1. What is JWT
Json web token (JWT) is a JSON-based development standard (RFC 7519) implemented for transmitting claims between network application environments. The token is designed to be compact and secure, especially suitable for single sign-on on distributed sites ( SSO) scenario. JWT claims are generally used to transfer authenticated user identity information between identity providers and service providers in order to obtain resources from the resource server. Some additional claim information necessary for other business logic can also be added. The token is also It can be used directly for authentication or encrypted.
Generally speaking, JWT is an encrypted string that contains a signature and carries user-related information. When the page requests to verify the login interface, the request header carries the JWT string to the back-end service. The back-end matches and verifies the signed encrypted string to ensure that the information is not been tampered with. If the verification passes, it is considered a reliable request and the data will be returned normally.
JWT applicable scenarios
Authorization :
This is the most common usage scenario, solving single sign-on issues. Because JWT is easy to use and has low overhead, and the server does not need to record user status information (stateless), it is widely used;
Information exchange :
JWT is a great way to securely transfer information between services. Because a JWT can be signed, for example, using a public/private key pair - you can be sure that the requesting party is legitimate. Additionally, since the signature is calculated using the header and payload, it is also possible to verify that the content has not been tampered with.
2. JWT data structure
2.1. Traditional session authentication and its shortcomings
Internet services are inseparable from user authentication. The general process is as follows.
1、用户向服务器发送用户名和密码。
2、服务器验证通过后,在当前对话(session)里面保存相关数据,比如用户角色、登录时间等等。
3、服务器向用户返回一个 session_id,写入用户的 Cookie。
4、用户随后的每一次请求,都会通过 Cookie,将 session_id 传回服务器。
5、服务器收到 session_id,找到前期保存的数据,由此得知用户的身份。
Such as 2-1:

The problem with this model is that it does not scale well. Of course, there is no problem with a single machine. If it is a server cluster or a cross-domain service-oriented architecture, session data sharing is required, and each server can read the session.
For example, website A and website B are related services of the same company. Now it is required that as long as the user logs in on one of the websites, he will automatically log in when he visits another website. How can this be achieved?
One solution is to persist session data and write it to the database or other persistence layer. After receiving the request, various services request data from the persistence layer. The advantage of this solution is that the structure is clear, but the disadvantage is that the amount of work is relatively large. In addition, if the persistence layer fails, it will be a single point of failure.
Another solution is that the server simply does not save the session data. All data is saved on the client and sent back to the server for each request. JWT is a representative of this solution.
2.2. JWT principle
The principle of JWT is that after server authentication, a JSON object is generated and sent back to the user, as follows
{
  "姓名": "张三",
  "角色": "管理员",
  "到期时间": "2023年9月1日0点0分"
}
In the future, when the user communicates with the server, this JSON object will be sent back. The server relies solely on this object to identify the user. In order to prevent users from tampering with data, the server will add a signature when generating this object (see below for details).
The server does not save any session data. In other words, the server becomes stateless, making it easier to expand.
2.3. JWT-data structure
The actual JWT is as follows:

It is a long string .separated into three parts by dots ( ). Note that there is no line break inside the JWT. It is written in several lines just for the convenience of display.
The three parts of JWT are as follows.
* Header (header)
* PayLoad (load)
*Signature
Written in one line, it looks like the following.
Header.Payload.Signature

These three parts are introduced below in turn.
2.3.1、Header
The Header part is a JSON object describing the metadata of the JWT, which usually looks like the following
{
  "alg": "HS256",
  "typ": "JWT"
}
In the above code, algthe attribute represents the signature algorithm (algorithm), and the default is HMAC SHA256 (written as HS256); the typattribute represents the type (type) of the token (token), and the JWT token is uniformly written as JWT.
Finally, convert the above JSON object into a string using the Base64URL algorithm (see below for details).
2.3.2、Payload
The Payload part is also a JSON object, used to store the actual data that needs to be transferred. JWT specifies 7 official fields for selection.
* iss (issuer): issuer
* exp (expiration time): expiration time
*sub(subject): subject
* aud (audience): audience
* nbf (Not Before): Effective time
*iat (Issued At): issuance time
* jti (JWT ID): number
In addition to official fields, you can also define private fields in this section. Here is an example.
{
  "sub": "1234567890",
  "name": "John Doe",
  "admin": true
}
Note that JWT is not encrypted by default and can be read by anyone, so do not put secret information in this section.
This JSON object must also be converted into a string using the Base64URL algorithm.
2.3.3、Signature
The Signature part is a signature of the first two parts to prevent data tampering.
First, you need to specify a secret. This key is known only to the server and cannot be leaked to users. Then, use the signature algorithm specified in the Header (the default is HMAC SHA256) to generate a signature according to the following formula.
HMACSHA256(
  base64UrlEncode(header) + "." +
  base64UrlEncode(payload),
  secret)
After the signature is calculated, the three parts of Header, Payload, and Signature are combined into a string, and each part is .separated by a "dot" ( ), and then it can be returned to the user.
2.3.4、Base64URL
As mentioned earlier, the algorithm for serializing Header and Payload is Base64URL. This algorithm is basically similar to the Base64 algorithm, but there are some minor differences.
As a token, JWT may be placed in the URL in some cases (such as api.example.com/?token=xxx). Base64 has three characters +, /and =, which have special meanings in the URL, so they must be replaced: =omitted, +replaced by -, /replaced by _. This is the Base64URL algorithm.
The client receives the JWT returned by the server, which can be stored in a cookie or in localStorage.
After that, every time the client communicates with the server, it must bring this JWT. You can put it in a cookie and send it automatically, but this cannot cross domains, so a better approach is to put it in the header Authorizationfield of the HTTP request.
Authorization: Bearer <token>
Another approach is to put the JWT in the data body of the POST request when crossing domains.
2.3. JWT authentication process
The general JWT authentication process is as follows:
The first one is Session authentication, and the second one is JWT authentication, which makes it easy to compare the differences.
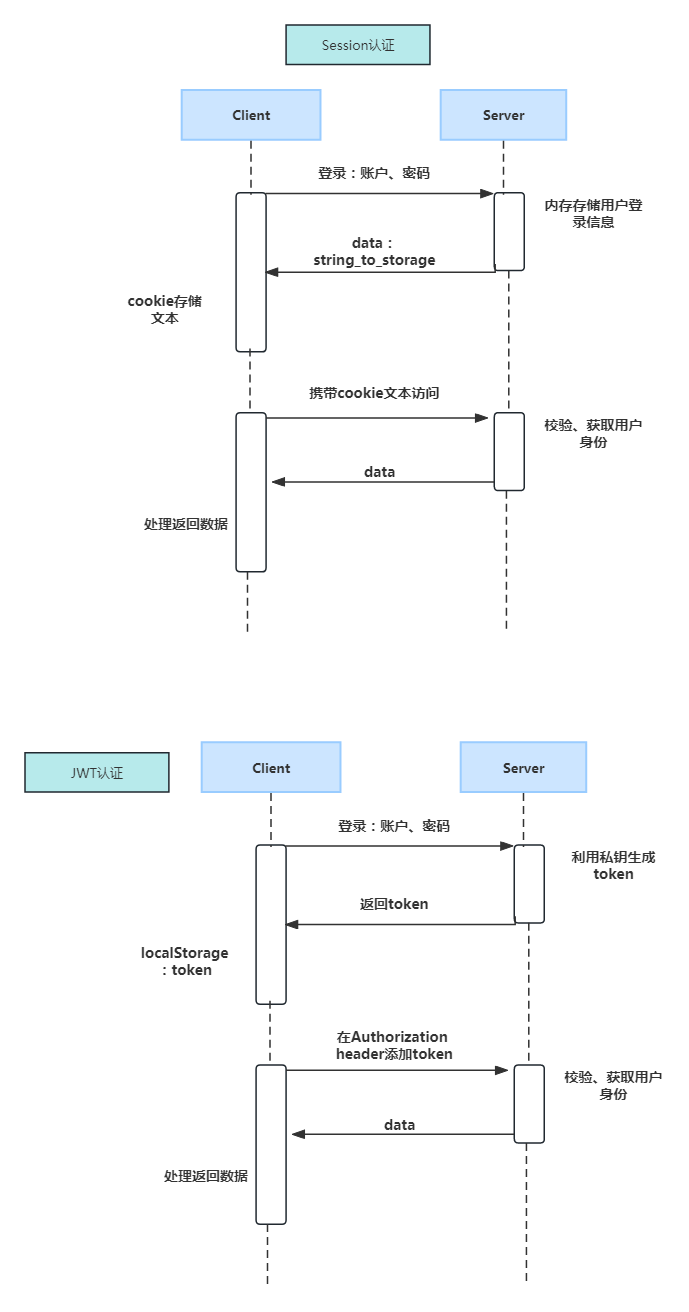
Compared with session authentication, JWT eliminates the need for the server to store user information.
JWT general verification process

The payload verification rules are generally set to check nbf, exp and some user-defined fields.
2.4. Use JWT to implement single sign-on (complete cross-domain solution)
One drawback of the cookie-based single sign-on model is that the top-level domain names of multiple sites must be the same.

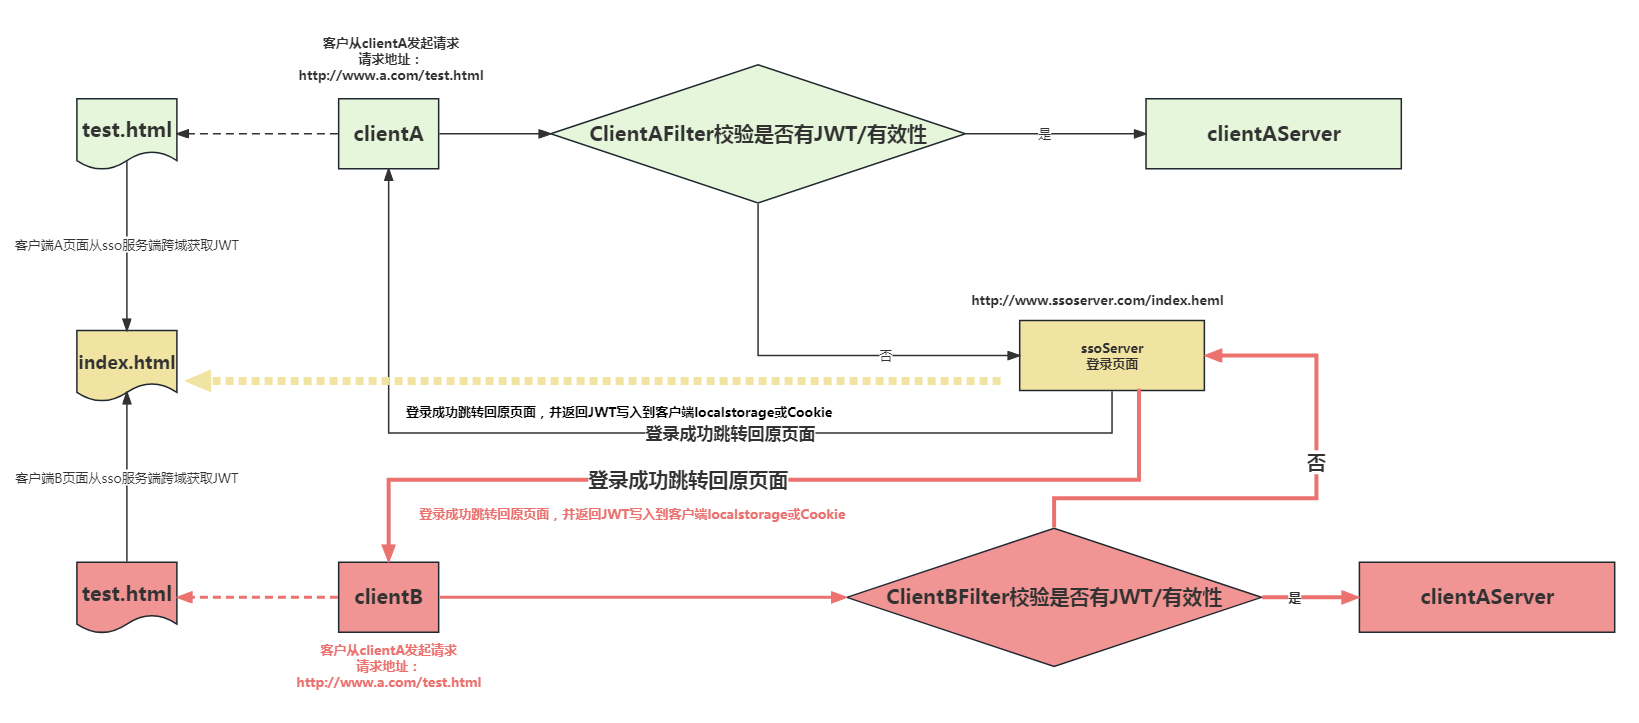
There are mainly three steps:
At the beginning of the project, a JWTHelper toolkit (GitHub download) was encapsulated, which mainly provides methods for generating JWT, parsing JWT, and verifying JWT, as well as some other encryption-related operations.
Next, I relied on the JWTHelper toolkit in the client project and added the Interceptor interceptor to intercept the interface that requires login verification. Verify the validity of the JWT in the interceptor and reset the new value of the JWT in the response;
finally, on the JWT server, relying on the JWT toolkit, in the login method, you need to call the generate JWT method after the login verification is successful to generate a The JWT token is set to the response header.
Refer to using JWT to implement single sign-on (complete cross-domain solution) https://blog.csdn.net/weixin_42873937/article/details/82460997
2.5, access_token and refresh_token
refresh_token and access_token are both important concepts in the OAuth 2.0 authorization mechanism.
access_token is a token used to access protected resources. For example, when a user logs into an application, the application can obtain an access_token to access the user's data without requiring the user to log in again. The access_token usually has an expiration time, and the application can use the token to access protected resources before expiration.
refresh_token is a token used to refresh the access_token. When the access_token expires, the application can use refresh_token to obtain a new access_token. The refresh_token usually expires longer than the access_token and will only expire after the user logs out or revokes authorization.
To sum up, access_token is used to access protected resources, and refresh_token is used to obtain a new access_token. By using both, applications can maintain constant access to user data without requiring the user to enter credentials again.
Usually when using JWT, two tokens, access_token and refresh_token, are set. Access_token has a shorter validity period and refresh_token has a longer validity period. When the access_token expires, if the refresh_token has not expired, it can be exchanged for a new access_token. My question is why not just set a longer validity period for access_token. If it is for security and you can get access_token, it is easy to get refresh_token; there is also a saying that refresh_token can store more information than access_token and is more complicated to verify.
Token serves as a credential for users to obtain protected resources, and an expiration time must be set. Otherwise, it can be used permanently after one login, and the authentication function will be meaningless. But the contradiction is: if the expiration time is set too long, the security of user data will be greatly reduced; if the expiration time is set too short, the user must log in again every once in a while to obtain new credentials, which will greatly frustrate the user's confidence. Positivity. To address this problem, we can use the concept of Access/Refresh Token to balance Token security and user experience.
What is Access/Refresh Token?
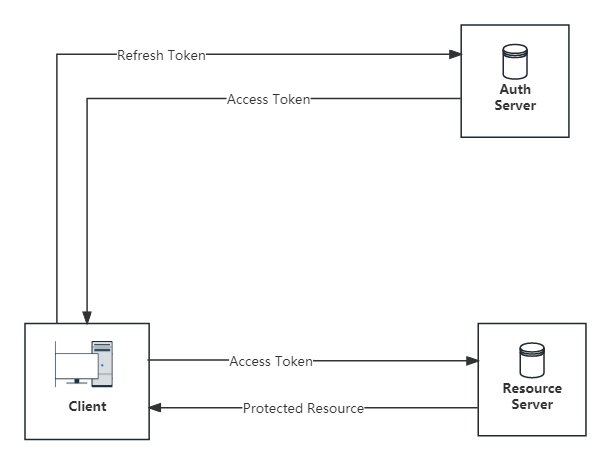
The above figure shows the transfer relationship of Access/Refresh Token between the client, authentication server and resource server. In simple terms:
- Access Token is the "access token", which is the credential for the client to exchange resources with the resource server;
- Refresh Token is the "refresh token", which is the certificate that the client exchanges for the Access Token from the authentication server.
How to use Access/Refresh Token?

The above figure shows how Access Token and Refresh Token are used together when the client requests resources:
1. The user provides identity information (usually [username/password], and uses the client to exchange Refresh Token and Access Token from the authentication server); 2. The client carries the Access Token to access the
resource server, and the resource server recognizes the Access Token and returns the resource;
3. When the Access Token expires or becomes invalid, and the client accesses the resource server again, the resource server returns an "invalid token" error ;
4. The client exchanges the Access Token with the authentication server through Refresh Token , and the authentication server returns a new Access Token.
3. Reference
(1) Learn about JSON Web Token (JWT) in 10 minutes
https://baijiahao.baidu.com/s?id=1608021814182894637&wfr=spider&for=pc
(2) JWT usage process
https://blog.csdn.net/shmely/article/details/85915044
(3) Comprehensive interpretation and usage steps of JWT
https://blog.csdn.net/achenyuan/article/details/80829401
(4) JSON Web Token introductory tutorial - Ruan Yifeng
http://www.ruanyifeng.com/blog/2018/07/json_web_token-tutorial.html
[Explanation] The jwt structure is explained clearly.
(5)JWT(JSON Web Tokens)
https://www.cnblogs.com/zaixiuxing/p/6005968.html
(6) Use JWT to implement single sign-on (complete cross-domain solution)
https://blog.csdn.net/weixin_42873937/article/details/82460997
(7) Single sign-on design based on JWT
Single sign-on design based on JWT - brief book
[Description] has a logic diagram and a clear introduction.
(8) Comprehensive interpretation and usage steps of JWT
https://blog.csdn.net/achenyuan/article/details/80829401
[Description] JAVA implementation code
(9) Look at the picture to understand how JWT is used for single sign-in
https://www.shuzhiduo.com/A/kPzORnodxn/