Table of contents
Detailed interpretation of module configuration
Principle: leaky bucket algorithm
basic introduction
NGINX implements rate limiting through two instructions: limit_req_zone and limit_req. The instruction limit_req_zone defines the speed limit parameters, and the instruction limit_req enables the defined rate at the location.
QPS, the query rate per second, is a measure of how much traffic a specific query server handles within a specified period of time. QPS = req/sec = number of requests/second, that is, the number of response requests per second, which is the maximum throughput capacity.
Detailed interpretation of module configuration
limit_req_zoneThe directive sets rate limits and parameters for shared memory regions, but it does not actually limit the request rate. So we need to apply its limit to a specific or block by contextsusing directive in . limit_reqlocationserver
limit_req_zone
Define a way to limit requests based on IP, named req_limit_zone, open up a 10M shared memory area, and process 10 requests per second.
limit_req_zone $binary_remote_addr zone=req_limit_zone:10m rate=10r/s;Description: The limit_req_zone directive is usually defined in an HTTP block so that it can be used in multiple contexts. It requires the following three parameters:
- key - Request characteristics that define application restrictions. The example uses the Nginx embedded variable binary_remote_addr (binary client address)
- zone - Defines the shared memory area used to store the status of each IP address and the frequency of restricted request URL access. Information saved in the memory shared area means that it can be shared between Nginx worker processes. The definition is divided into two parts: the name identifying the zone via zone=keyword, and a colon followed by the zone size. The status information of 16,000 IP addresses requires approximately 1MB, so the area in the example can store 160,000 IP addresses.
- rate - defines the maximum request rate. In the example, the rate cannot exceed 10 requests per second. Nginx actually tracks requests with millisecond granularity, so the rate limit is equivalent to 1 request every 100 milliseconds. Because "bursts" are not allowed, this means that requests arriving within 100 milliseconds of the previous request will be rejected.
limit_req_zone $binary_remote_addr zone=mylimit:10m rate=10r/s;

server {
    location /login/ {
        limit_req zone=mylimit;

        proxy_pass http://my_upstream;
    }
}
limit_req
The limit_req directive applies its limit to a specific location or server block.
limit_req zone=req_limit_zone burst=10 nodelay;- limit_req zone=req_limit_zone; Each IP address is limited to 10 URL requests per second, or more precisely, the URL cannot be requested within 100 milliseconds of the previous request.
- limit_req zone=req_limit_zone burst=10; The burst parameter defines how many requests the client can initiate if the rate specified by req_limit_zone is exceeded (req_limit_zone zone in the example, the rate is limited to 10 requests per second, or one request every 100 milliseconds) . Requests arriving within 100 milliseconds of the previous request will be put into the queue, and we set the queue size to 10.
That is, if 11 requests are sent from a given IP address, Nginx will immediately send the first request to the upstream server farm and then queue the remaining 10 requests. It then forwards a queued request every 100 milliseconds, and only when the incoming request causes the number of queued requests in the queue to exceed 10, Nginx will return 503 to the client.
- limit_req zone=req_limit_zone burst=10 nodelay; Using the nodelay parameter, queuing without delay can be achieved; Nginx will still allocate the position in the queue according to the burst parameter. When a request arrives, Nginx will forward it immediately as long as the position can be allocated in the queue. this request. This position in the queue is marked as "taken" and will not be released for use by another request until some time later (in this case, 100 milliseconds).
limit_req zone=name [burst=number] [nodelay | delay=number];location /login/ {
limit_req zone=mylimit burst=20 nodelay;
proxy_pass http://my_upstream;
}
- In the above configuration, we set burst=20, which defines the number of requests that the client can make exceeding the rate specified in the zone (for the mylimit zone we defined earlier, the request rate is limited to 10 requests per second, which is 1 request per 100 milliseconds. ). Requests arriving within 100 milliseconds of the previous request will be put into the queue. Here we set the queue size to 20.
- It is said that if 22 requests are sent at the same time, NGINX will immediately forward the first request to the upstream server according to relevant rules, and then put the next 20 requests from 2 to 21 in total into the queue, and then directly return the 503 code For the 22nd request, in the next 2 seconds, a request is taken out of the queue every 100 milliseconds and sent to the upstream server for processing.
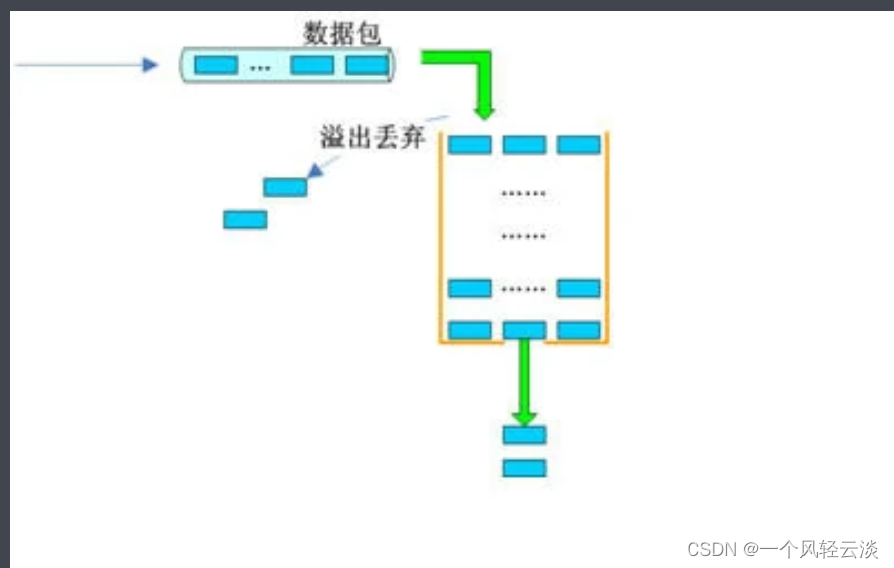
Principle: leaky bucket algorithm
The Leaky Bucket Algorithm is a classic algorithm used for flow control and current limiting. The basic principle is to put requests into a "bucket" with a fixed capacity, and requests in the bucket are sent out at a fixed rate. When the bucket is full, new incoming requests are discarded. The leaky bucket algorithm can ensure a constant rate of processing requests, thereby effectively preventing service instability caused by traffic surges.
When the host interface transmits data packets to the network, a leaky bucket algorithm can be used to make the interface output data flow rate constant.
-
A host that outputs irregular data streams is like a faucet that fills water with water.
-
The leaky bucket defined in the algorithm is similar to a bucket
-
Irregular data flow input into a leaky bucket is similar to pouring water into a leaky bucket

The flow output leaky bucket is similar to a leaky bucket leaking water.

Next, let’s break down in detail the implementation principle of the leaky bucket algorithm in the data packet transmission process.
1. The queue receives the data packet to be forwarded.
2. The queue is scheduled and gets the forwarding opportunity. Since the queue is configured with traffic shaping, the data packets in the queue first enter the leaky bucket.
3. Determine whether the data packet is forwarded based on the relationship between the rate at which the data packet reaches the leaky bucket and the output rate of the leaky bucket.
If the arrival rate ≤ the output rate, the leaky bucket has no effect.
If the arrival rate > the output rate, you need to consider whether the leaky bucket can bear the traffic at this moment.
- 1) If the data packet arrival rate - the leaky bucket outflow rate ≤ the configured leaky bucket burst rate, the data packet can be sent out without delay.
- 2) If the arrival rate of data packets - the outflow rate of the leaky bucket > the configured burst rate of the leaky bucket, the excess data packets will be stored in the leaky bucket. The data packets temporarily stored in the leaky bucket are delayed and sent out without exceeding the capacity of the leaky bucket.
- 3) If the arrival rate of data packets - the outflow rate of the leaky bucket > the configured burst rate of the leaky bucket, and the number of data packets has exceeded the capacity of the leaky bucket, these data packets will be discarded.