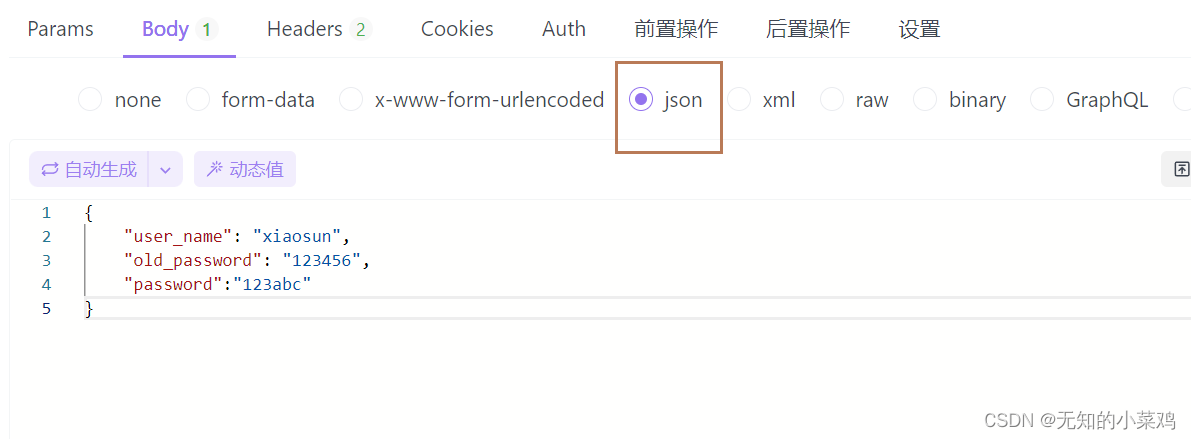
Request body
I encountered a problem here, ctx.request.bodythe value is a string. koa-bodyObviously middleware has been used
I checked and the reason is:
The value of ctx.request.body may be an object or a string, depending on the Content-Type of the request and the format of the request body.
When using the koa-body middleware, it will automatically parse the request body according to the Content-Type of the request and store the parsed result in ctx.request.body. If Content-Type is application/json, koa-body will parse the request body into JSON format and store it as an object; if Content-Type is application/x-www-form-urlencoded, koa-body will parse the request The body is in the form of key-value pairs and is stored as an object; if Content-Type is multipart/form-data, koa-body will parse the request body into multi-part form data and store it as an object.
However, if the koa-body middleware is not used or the requested Content-Type is not of the above types, ctx.request.body will remain in the original string form. In this case, you need to handle it manually based on the requested content type.
Therefore, the request parameters must be set to jsonthe format
Password encryption
Use bcryptjslibrary here
bcryptjs is a JavaScript library for hashing and comparing passwords. It uses the bcrypt algorithm, a password hashing function that converts passwords into unreadable strings for added security. The bcryptjs library provides a simple way to use the bcrypt algorithm for storing and comparing passwords in applications. It also provides some additional features, such as generating random salt values to increase the security of the hash. In web applications, use bcryptjs to protect user passwords and prevent hackers and data leaks.
Install
npm install bcryptjs
Here, password encryption is separated into a middleware to facilitate later maintenance. If you need to change the encryption method, you only need to use a new middleware, and there will be no major changes to the original code.
Write middleware
user.middleware.js
// 密码加密
const crpytPassword = async (ctx, next) => {


  const requestBidy = ctx.request.body;
  if (!requestBidy?.password) {


    console.error('密码为空,密码加密失败');
    return;
  }
  // 加盐
  const salt = bcrypt.genSaltSync(10);
  // 哈希加密
  const hash = bcrypt.hashSync(requestBidy.password, salt);
  // 更新密码
  ctx.request.body.password = hash;
  console.log('加密后的密码:', ctx.request.body);

  await next();
};
Use middleware to encrypt passwords before registration
user.route.js
// 注册
router.post('/register', userRegisterValidator, crpytPassword,register);

Verify login
user.middleware.jsDefine a new middleware in to verify login
// 用户登录校验
const userLoginValidator = async (ctx, next) => {


  // 获取入参
  const requistBody = ctx.request.body;
  // 合法性判断
  if (!requistBody.user_name || !requistBody.password) {


    // console.error 打印的内容会被记录到服务器的日志里
    console.error('用户名或密码为空:', requistBody);
    //使用了Koa的错误处理机制
    ctx.app.emit('error', UserErr.userFormatError, ctx);
    return;
  }
  // 使用try catch 避免进行数据库操作时出现问题,导致程序异常
  try {


    // 判断数据库中是否存在该用户,若存在还需比较密码是否正确
    // 1、判断用户是否存在,不存在则提示用户进行注册
    const user = await getUserInfo({

     user_name: requistBody.user_name });
    if (!user) {


      console.error('用户名不存在', requistBody.user_name);
      ctx.app.emit('error', UserErr.userNameErr, ctx);
      return;
    }
    // 2、用户存在,验证密码是否正确
    if (!bcrypt.compareSync(requistBody.password, user.password)) {


      console.error('密码不正确', requistBody.password);
      ctx.app.emit('error', UserErr.passwordErr, ctx);
      return;
    }
    // 验证通过后交由一个中间件处理
  } catch (error) {


    console.error('用户登录失败:', error);
    return ctx.app.emit('error', UserErr.userLoginErr, ctx);
  }
  await next();
};
Adding user.err.type.jsnew error types
userNameErr:{


    code:'10004',
    message:'用户名不存在,请进行注册',
    data:null
},
passwordErr:{


    code:'10005',
    message:'密码错误,请确认',
    data:null
},
userLoginErr:{


    code:'10006',
    message:'用户登录失败',
    data:null
}
user.route.jsAdd middleware in
// 登录
router.post('/login', userLoginValidator, login);
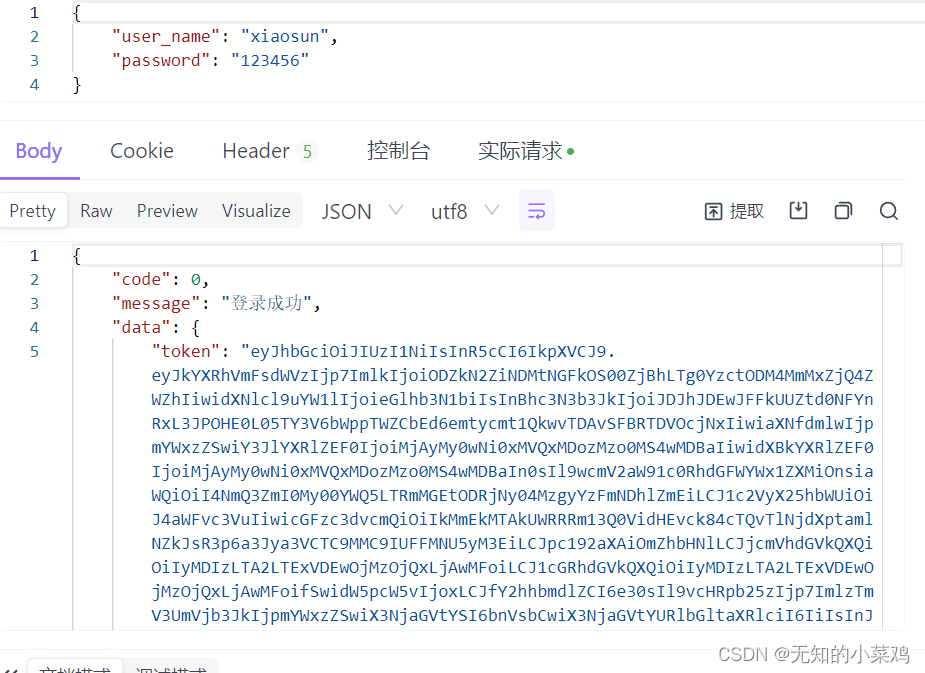
Issue token
After successful login, a token is issued to the user. The user will carry the token in every subsequent request, and the server will verify it. Here we useJWT
JWT (JSON Web Token) is an open standard (RFC 7519) that defines a compact and self-contained way to securely transmit information between parties. JWT is commonly used in authentication and authorization scenarios, where it can pass information between a client and a server to authenticate a user's identity and authorize the user to access resources.
In Node.js, we can use third-party libraries
jsonwebtokento generate and verify JWT. When generating a JWT, we need to provide a JSON object containing user information and a secret key, which are then encoded into a string. When validating the JWT, we need to provide this string and the same key, and then decode the JSON object to obtain the user information.
JWT consists of three parts: Header, Payload and Signature. The header contains the type of JWT and the algorithm used, the payload contains user information and other metadata, and the signature is used to verify the integrity and authenticity of the JWT.
Install
npm install jsonwebtoken
Issue token
user.controller.js
Token usually records some user authentication information, such as user ID, role, permissions, etc. However, user passwords are typically not recorded in Tokens because doing so increases security risks. Instead, user passwords are typically verified when the user logs in and then stored encrypted on the server side. On subsequent requests, the server uses the token to authenticate the user instead of the password. This protects the security of user passwords.
// 导入jsonwebtoken
const jwt = require('jsonwebtoken');

// 登录
  async login(ctx, next) {


    // 1、获取数据
    const requistBody = ctx.request.body;

    try {


      // 2、获取用户信息(在token的paykoad中要记录需要用到的用户信息,比如:id、user_name、is_vip)
      // 为了保证安全,token里不能记录密码
      const {

     password, ...res } = await getUserInfo({


        user_name: requistBody.user_name,
      });
      ctx.body = {


        code: 0,
        message: '登录成功',
        data: {


          // 用户信息和私钥
          token: jwt.sign(res, 'test', {


            expiresIn: '2h', // 过期时间2小时
          }),
        },
      };
    } catch (error) {


      console.error('用户登录失败', error);
    }
  }
token verification
After the user successfully logs in, it is necessary to determine whether the user has the permission when accessing certain functions. At this time, the user data can be obtained by parsing the token to determine the permission.
The following takes changing the user password as an example to implement token verification.
Add token to request header
Parameter name selection: Authorization, parameter value is the token value returned after successful login. The software I use here is Apifox, which I won’t talk about since I introduced it earlier.
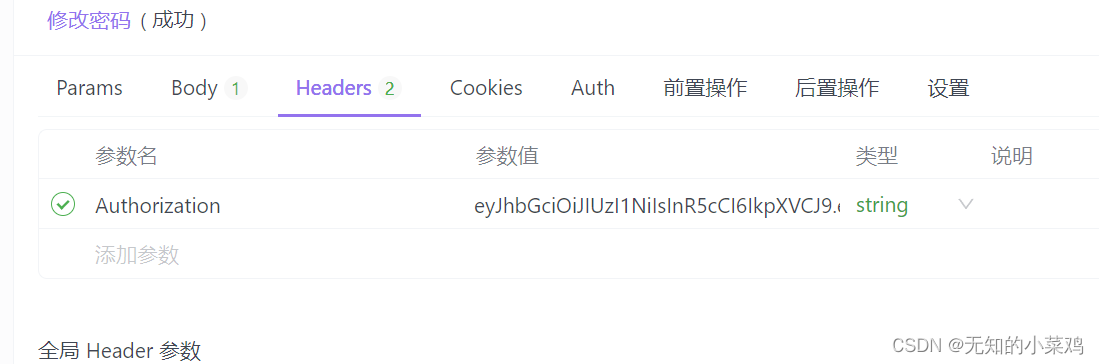
Note: Do not put quotation marks outside the parameter value.
Create middleware that handles user authentication.
Most subsequent operations will perform permission verification to determine whether you have permission for this function. Judgment permissions need to be processed token, and unified middleware is used here for processing.
auth.middleware.js
// 导入jwt
const jwt = require('jsonwebtoken');
// 导入工具函数
const {

     createSecretKey } = require('../tool/tool');
// 导入错误类型
const {

     AuthErr } = require('../constant/err.type');

const auth = async (ctx, next) => {


  // 获取token信息
  const {

     authorization } = ctx.request.header;
  // token信息通常放在请求头的Authorization属性下,并且在请求头中,可以使用Bearer前缀来标识
  const token = authorization.replace('Bearer ', '');
  // 验证token
  try {


    // 获取到用户名,用户名是唯一的,比如手机号,
    // 要保证请求每一个接口时都用用户名这个参数,这里ctx.request.body返回的是一个字符串
    const requistBody = JSON.parse(ctx.request.body);
    // 私钥
    let key = createSecretKey(requistBody.user_name);
    // 校验,校验成功后会解析出用户信息
    const userInfo = jwt.verify(token, key);
    // 将其挂载到ctx.state下,方便后续使用
    ctx.state.userInfo = userInfo;
  } catch (error) {


    // 错误信息见 https://www.npmjs.com/package/jsonwebtoken
    switch (error.name) {


      // token过期
      case 'TokenExpiredError':
        console.log('token已过期', error);
        return ctx.app.emit('error', AuthErr.tokenExpiredError, ctx);
      //   token验证错误
      case 'JsonWebTokenError':
        console.log('token验证失败', error);
        return ctx.app.emit('error', AuthErr.jsonWebTokenError, ctx);
      //   其他异常
      default:
        console.error('鉴权验证失败', error);
        return ctx.app.emit('error', AuthErr.authVerifyError, ctx);
    }
  }
  await next();
};

module.exports = {


  auth,
};
Add and modify routes in routes
user.route.js
// 修改密码
router.post('/editUserInfo', auth, editUserInfo);
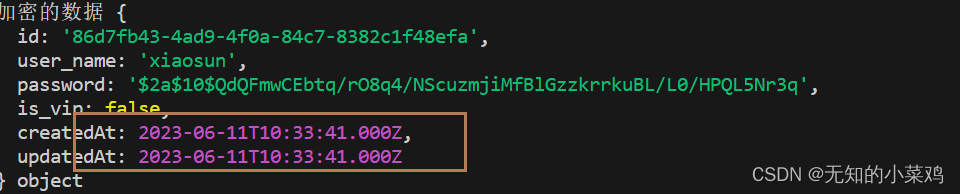
I encountered a problem here, that is, the token verification kept failing; later I used it to jwt.decode(token);parse the token, but the result kept failing. The problem was located in the initial token generation, and later it was found that it was caused by these two times. If you need to use time, it is best to dayjsformat the time through a library like this.
The time stored in the database is stored in a specific format, and when the request is returned, the server will convert the time into a string in ISO 8601 format, which is a universal time format.