1. Quick Start with Sentinel
Sentinel official website address: https://sentinelguard.io/zh-cn/index.html
Sentinel project address: https://github.com/alibaba/Sentinel
Sentinel is a microservice traffic management component open sourced by Alibaba. It mainly uses traffic as the entry point to help developers ensure the stability of microservices from multiple dimensions such as traffic limiting, circuit breaker degradation, and system load protection. (Benchmarking product: Springcloud Hystrix Porcupine)
Sentinel is divided into two parts:
- Core library (Java client) : This jar package does not depend on any framework and can run on Java 8 and above. It also has good support for frameworks such as Dubbo/Spring Cloud.
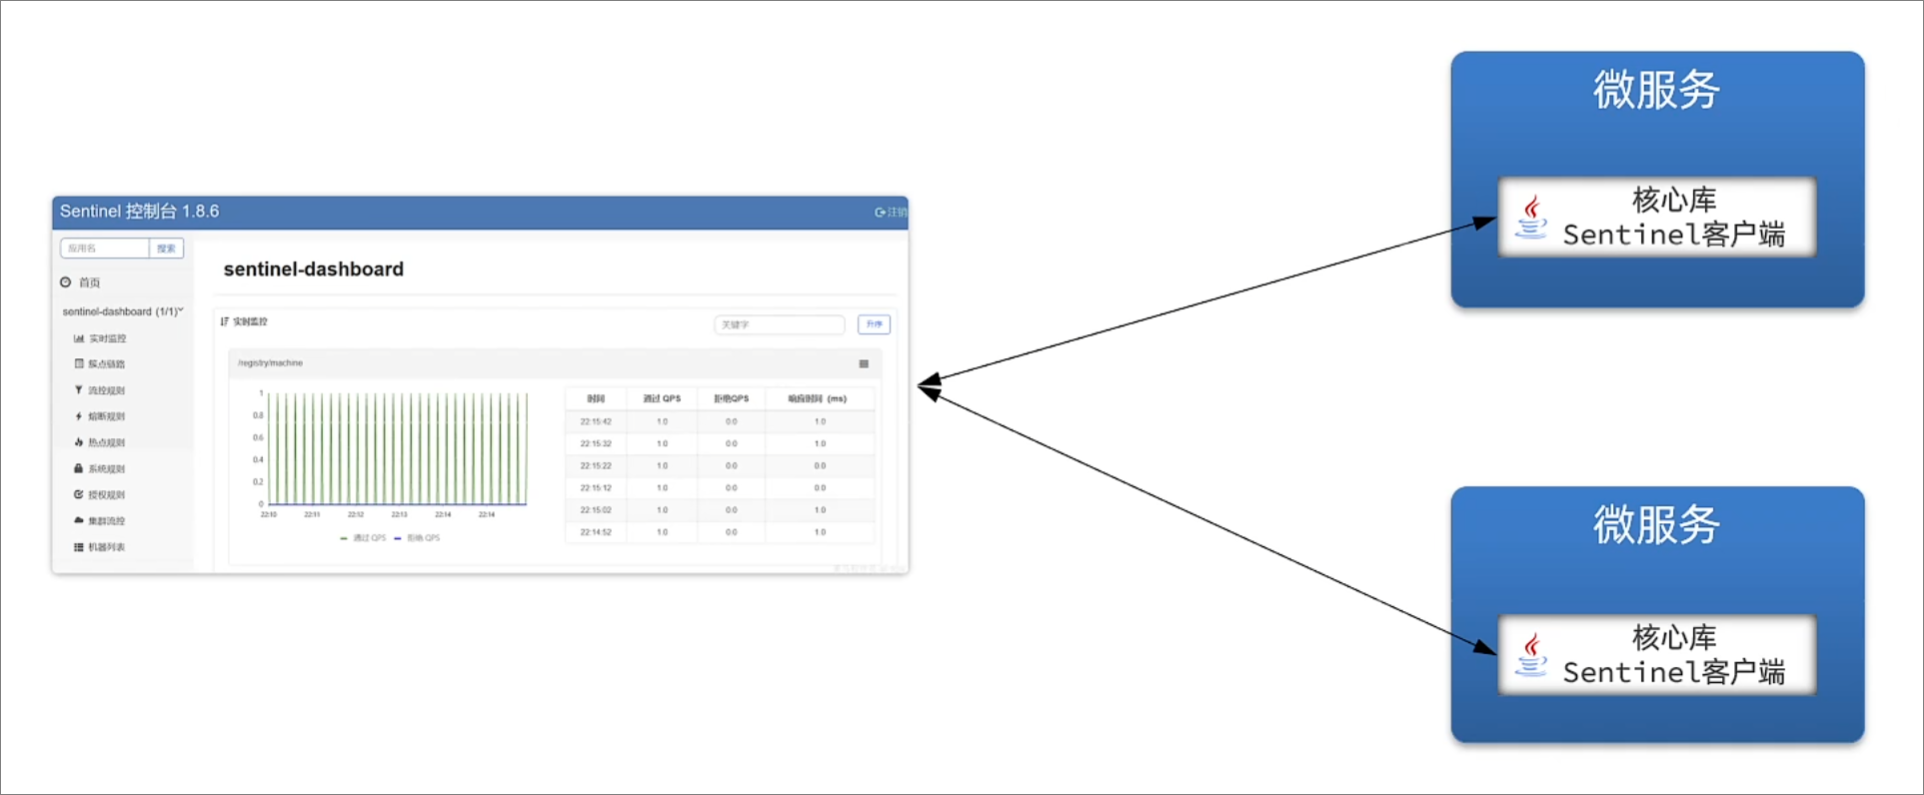
- Dashboard : Equivalent to the management center of the Sentinel framework, you can configure and monitor Sentinel through the graphical interface (you can monitor the traffic, requests, responses and other indicators of the service) and other operations, so as to better ensure the safety of the application. Stability and reliability.
Comparison of two fuse frames:
| Function | Sentinel | Hystrix (Brother Porcupine) |
|---|---|---|
| thread isolation | Semaphore isolation | Thread pool isolation/semaphore isolation |
| circuit breaker strategy | Based on slow call ratio or abnormal ratio | Based on abnormal proportion |
| Limiting | Based on QPS, supports traffic shaping | limited support |
| Fallback | support | support |
| console | Out of the box, you can configure rules, view second-level monitoring, machine discovery, etc. | imperfect |
| Configuration method | Based on the console, it will fail after restarting. | Based on annotations or configuration files, permanently effective |
1. Start the sentinel-dashboard console
It is easier to operate Sentinel through visualization.
1. Download the jar package of sentinel-dashboard: https://github.com/alibaba/Sentinel/releases/tag/1.8.6

2. Start the console by running jar on the command line: (or build the image and throw it into the container to start)
java -Dserver.port=8090 -Dcsp.sentinel.dashboard.server=localhost:8090 -Dproject.name=sentinel-dashboard -jar sentinel-dashboard-1.8.6.jar
Parameter introduction:
-
-Dserver.port=8090: Specify the port of the Sentinel console program as 8090. -
-Dcsp.sentinel.dashboard.server=localhost:8090: The access address of the Sentinel console. The client will automatically send a heartbeat packet to this address. -
-Dproject.name=sentinel-dashboard: Specify the name displayed by the Sentinel console program. -
Document address: https://github.com/alibaba/Sentinel/wiki/%E5%90%AF%E5%8A%A8%E9%85%8D%E7%BD%AE%E9%A1%B9
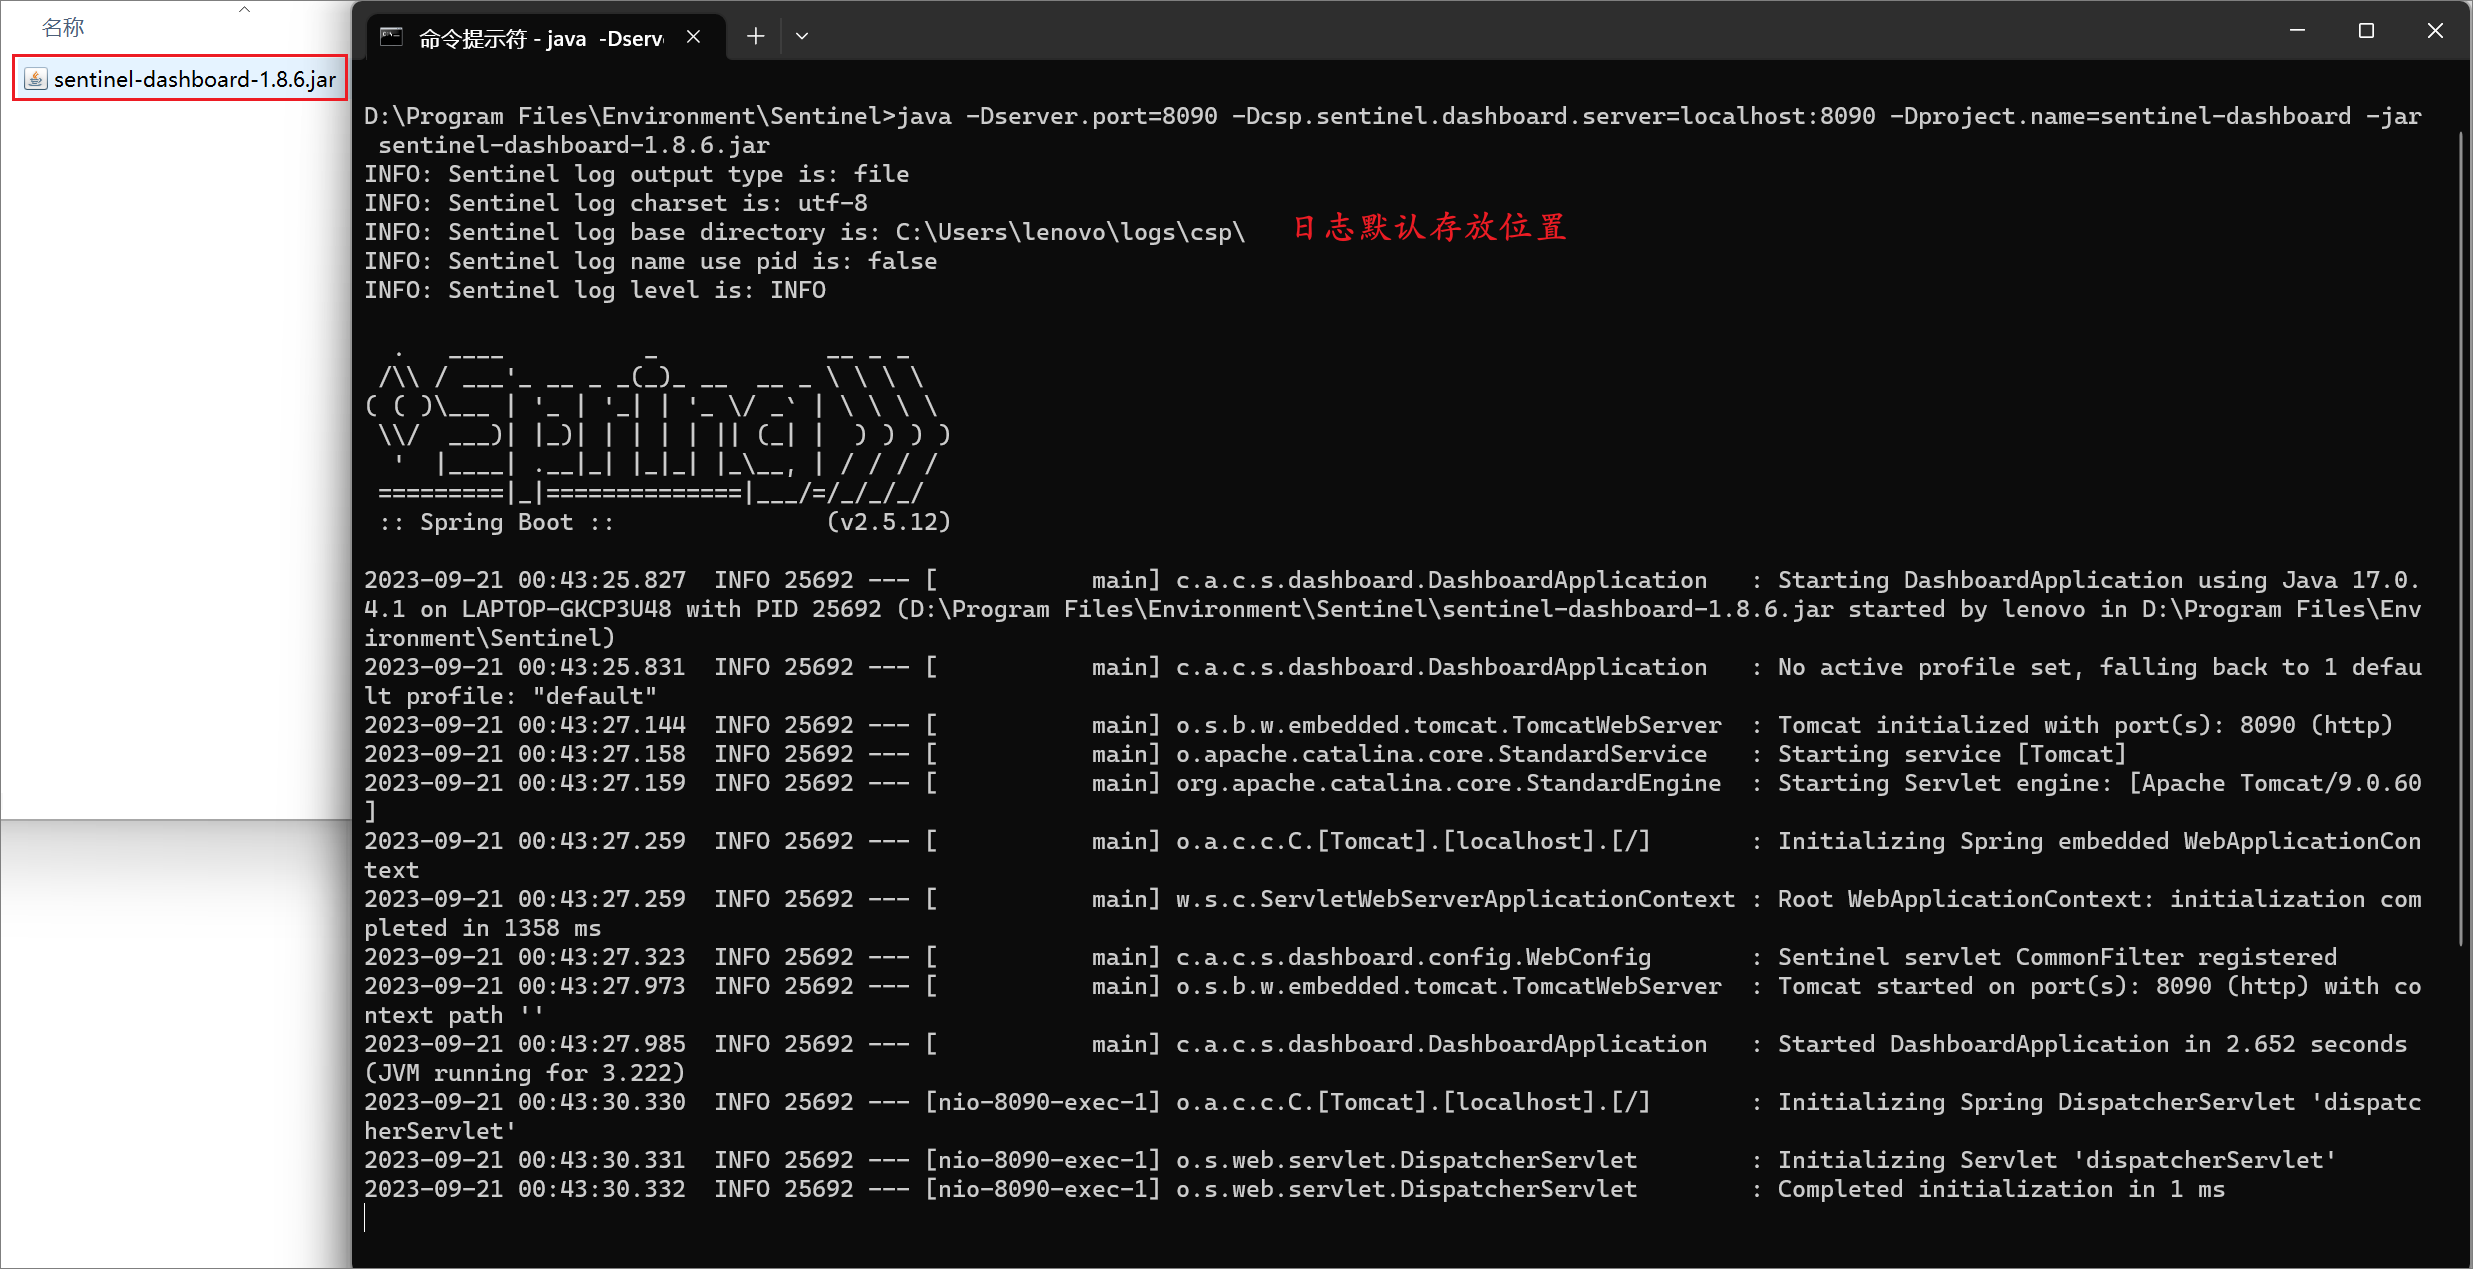
3. Access sentinel’s console: http://localhost:8090/, default account/password: both are sentinel.
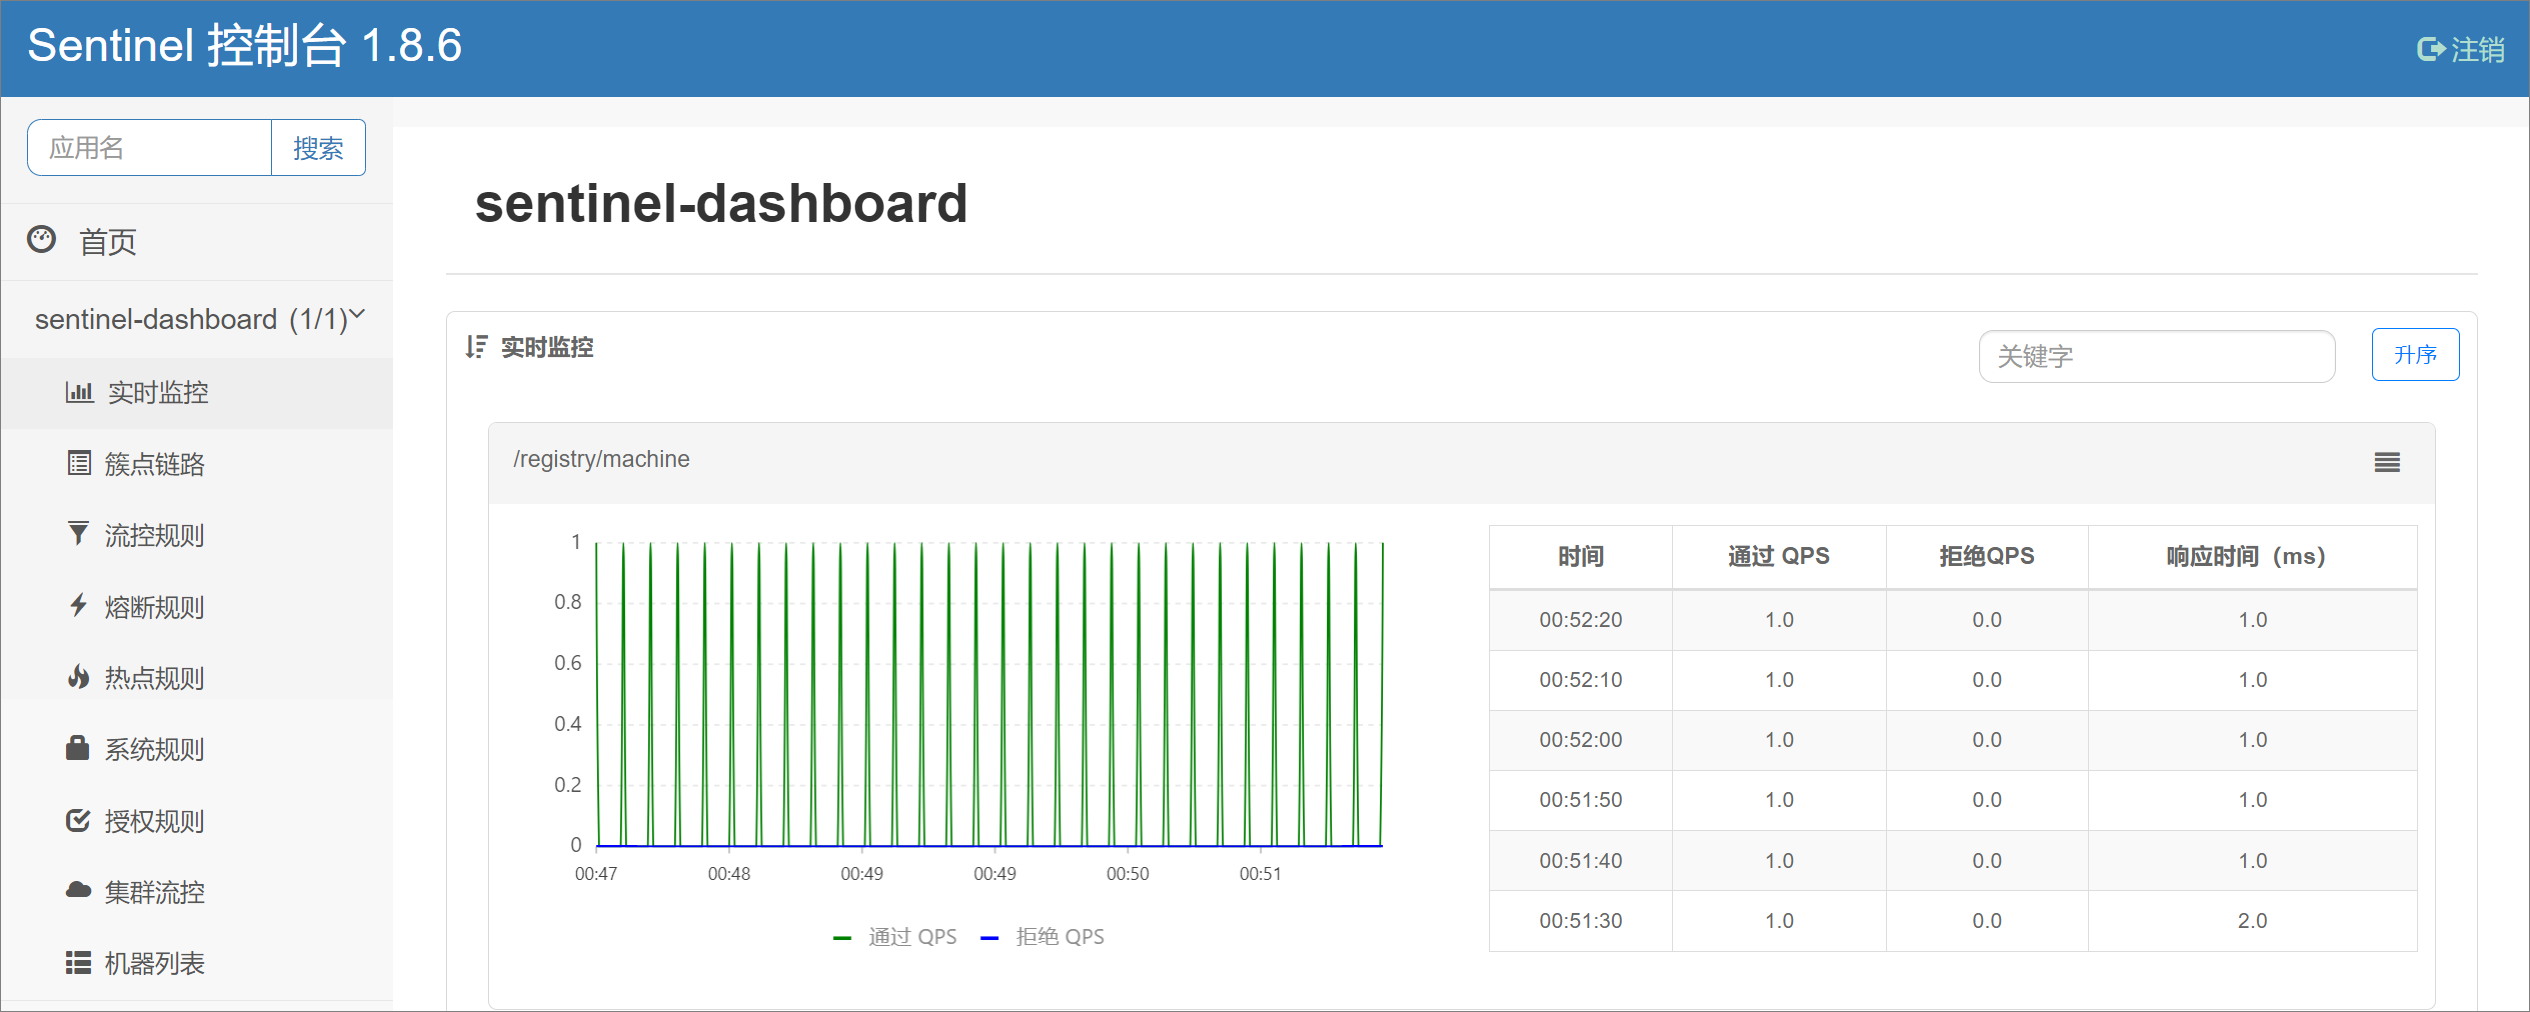
After successful login, you can view the internal information of the console. By default, the sentinel-dashboard service itself will be monitored:
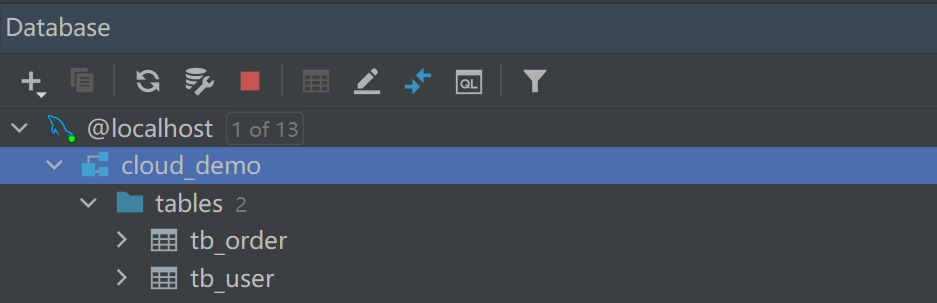
2. Build a microservice environment
Database preparation:
CREATE DATABASE cloud_demo DEFAULT CHARACTER SET utf8mb4;

use cloud_demo;

DROP TABLE IF EXISTS `tb_user`;

CREATE TABLE `tb_user`  (
  `id` bigint(20) NOT NULL AUTO_INCREMENT,
  `username` varchar(100) CHARACTER SET utf8 COLLATE utf8_general_ci NULL DEFAULT NULL COMMENT '收件人',
  `address` varchar(255) CHARACTER SET utf8 COLLATE utf8_general_ci NULL DEFAULT NULL COMMENT '地址',
  PRIMARY KEY (`id`) USING BTREE,
  UNIQUE INDEX `username`(`username`) USING BTREE
) ENGINE = InnoDB AUTO_INCREMENT = 109 CHARACTER SET = utf8 COLLATE = utf8_general_ci ROW_FORMAT = Compact;

INSERT INTO `tb_user` VALUES (1, '潘掌柜', '黑龙江省牡丹江市');
INSERT INTO `tb_user` VALUES (2, '文二狗', '陕西省西安市');
INSERT INTO `tb_user` VALUES (3, '华沉鱼', '湖北省十堰市');
INSERT INTO `tb_user` VALUES (4, '张必沉', '天津市');
INSERT INTO `tb_user` VALUES (5, '郑爽爽', '辽宁省沈阳市大东区');
INSERT INTO `tb_user` VALUES (6, 'kunkun', '山东省青岛市');


DROP TABLE IF EXISTS `tb_order`;

CREATE TABLE `tb_order`  (
  `id` bigint(20) NOT NULL AUTO_INCREMENT COMMENT '订单id',
  `user_id` bigint(20) NOT NULL COMMENT '用户id',
  `name` varchar(100) CHARACTER SET utf8 COLLATE utf8_general_ci NULL DEFAULT NULL COMMENT '商品名称',
  `price` bigint(20) NOT NULL COMMENT '商品价格',
  `num` int(10) NULL DEFAULT 0 COMMENT '商品数量',
  PRIMARY KEY (`id`) USING BTREE,
  UNIQUE INDEX `username`(`name`) USING BTREE
) ENGINE = InnoDB AUTO_INCREMENT = 109 CHARACTER SET = utf8 COLLATE = utf8_general_ci ROW_FORMAT = Compact;

INSERT INTO `tb_order` VALUES (101, 1, 'Apple 苹果 iPhone 12 ', 699900, 1);
INSERT INTO `tb_order` VALUES (102, 2, '雅迪 yadea 新国标电动车', 209900, 1);
INSERT INTO `tb_order` VALUES (103, 3, '骆驼(CAMEL)休闲运动鞋女', 43900, 1);
INSERT INTO `tb_order` VALUES (104, 4, '小米10 双模5G 骁龙865', 359900, 1);
INSERT INTO `tb_order` VALUES (105, 5, 'OPPO Reno3 Pro 双模5G 视频双防抖', 299900, 1);
INSERT INTO `tb_order` VALUES (106, 6, '美的(Midea) 新能效 冷静星II ', 544900, 1);
INSERT INTO `tb_order` VALUES (107, 2, '西昊/SIHOO 人体工学电脑椅子', 79900, 1);
INSERT INTO `tb_order` VALUES (108, 3, '梵班(FAMDBANN)休闲男鞋', 31900, 1);
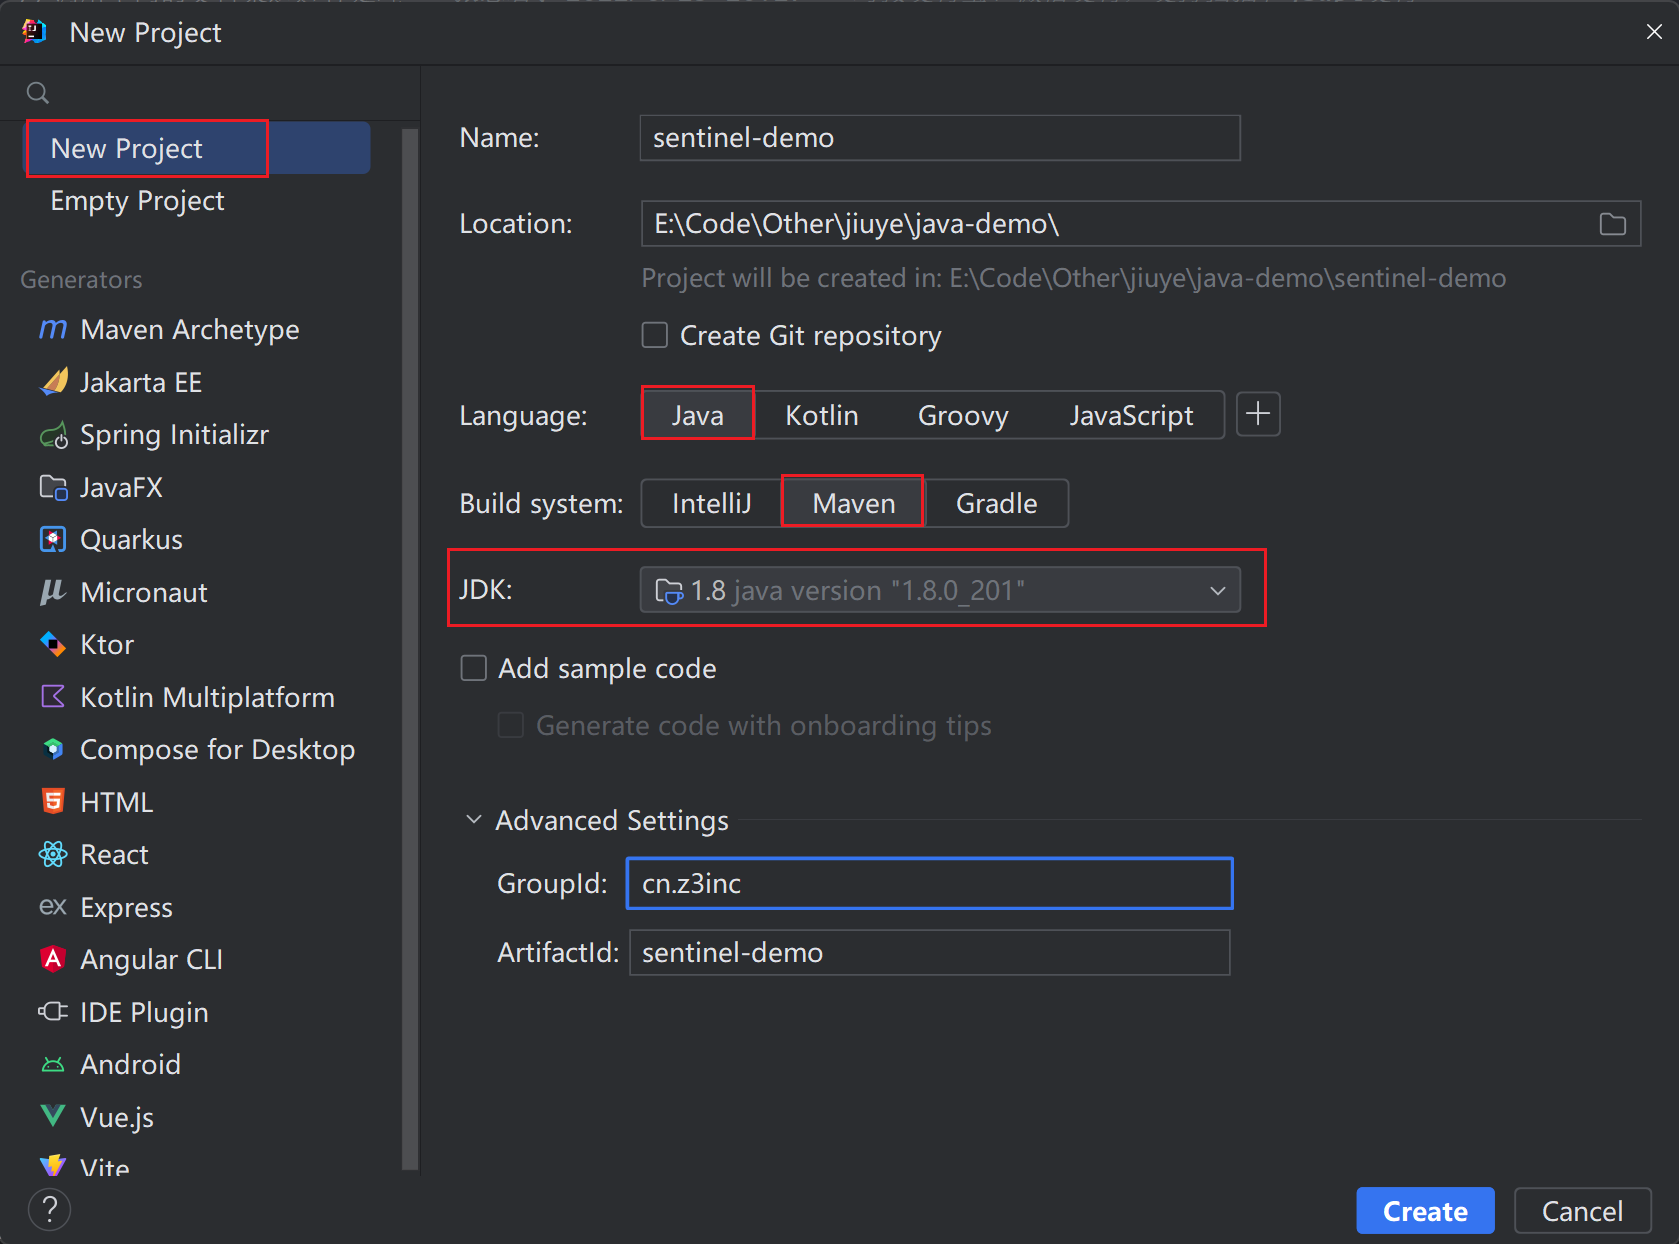
2.1 Create parent project
springboot version 2.7.12, springcloud version 2021.0.3.
Create a maven project, delete the src directory, and introduce some dependencies into the pom file:
<?xml version="1.0" encoding="UTF-8"?>
<project xmlns="http://maven.apache.org/POM/4.0.0"
         xmlns:xsi="http://www.w3.org/2001/XMLSchema-instance"
         xsi:schemaLocation="http://maven.apache.org/POM/4.0.0 http://maven.apache.org/xsd/maven-4.0.0.xsd">
    <modelVersion>4.0.0</modelVersion>

    <groupId>cn.z3inc</groupId>
    <artifactId>sentinel-demo</artifactId>
    <packaging>pom</packaging><!--pom代表聚合工程-->
    <version>1.0</version>

    <!-- springboot工程 -->
    <parent>
        <groupId>org.springframework.boot</groupId>
        <artifactId>spring-boot-starter-parent</artifactId>
        <version>2.7.12</version>
        <relativePath/> <!-- lookup parent from repository -->
    </parent>

    <properties>
        <maven.compiler.source>8</maven.compiler.source>
        <maven.compiler.target>8</maven.compiler.target>
        <project.build.sourceEncoding>UTF-8</project.build.sourceEncoding>
        <org.projectlombok.version>1.18.20</org.projectlombok.version>
        <spring-cloud.version>2021.0.3</spring-cloud.version>
        <spring-cloud-alibaba.version>2021.0.4.0</spring-cloud-alibaba.version>
        <mybatis-plus.version>3.4.3</mybatis-plus.version>
        <hutool.version>5.8.11</hutool.version>
        <mysql.version>8.0.23</mysql.version>
    </properties>

    <!-- 对依赖包进行管理 -->
    <dependencyManagement>
        <dependencies>
            <!-- spring cloud -->
            <dependency>
                <groupId>org.springframework.cloud</groupId>
                <artifactId>spring-cloud-dependencies</artifactId>
                <version>${spring-cloud.version}</version>
                <type>pom</type>
                <scope>import</scope>
            </dependency>
            <!-- spring cloud alibaba -->
            <dependency>
                <groupId>com.alibaba.cloud</groupId>
                <artifactId>spring-cloud-alibaba-dependencies</artifactId>
                <version>${spring-cloud-alibaba.version}</version>
                <type>pom</type>
                <scope>import</scope>
            </dependency>
            <!-- 数据库驱动 -->
            <dependency>
                <groupId>mysql</groupId>
                <artifactId>mysql-connector-java</artifactId>
                <version>${mysql.version}</version>
            </dependency>
            <!-- mybatis plus -->
            <dependency>
                <groupId>com.baomidou</groupId>
                <artifactId>mybatis-plus-boot-starter</artifactId>
                <version>${mybatis-plus.version}</version>
            </dependency>
            <!-- hutool工具类 -->
            <dependency>
                <groupId>cn.hutool</groupId>
                <artifactId>hutool-all</artifactId>
                <version>${hutool.version}</version>
            </dependency>
        </dependencies>
    </dependencyManagement>
    <dependencies>
        <!-- lombok -->
        <dependency>
            <groupId>org.projectlombok</groupId>
            <artifactId>lombok</artifactId>
            <version>${org.projectlombok.version}</version>
        </dependency>
        <!--单元测试-->
        <dependency>
            <groupId>org.springframework.boot</groupId>
            <artifactId>spring-boot-starter-test</artifactId>
            <scope>test</scope>
        </dependency>
    </dependencies>

   <build>
    <plugins>
        <!--打包跳过单元测试-->
        <plugin>
            <groupId>org.apache.maven.plugins</groupId>
            <artifactId>maven-surefire-plugin</artifactId>
            <configuration>
                <skipTests>true</skipTests>
            </configuration>
        </plugin>
    </plugins>
</build>

</project>
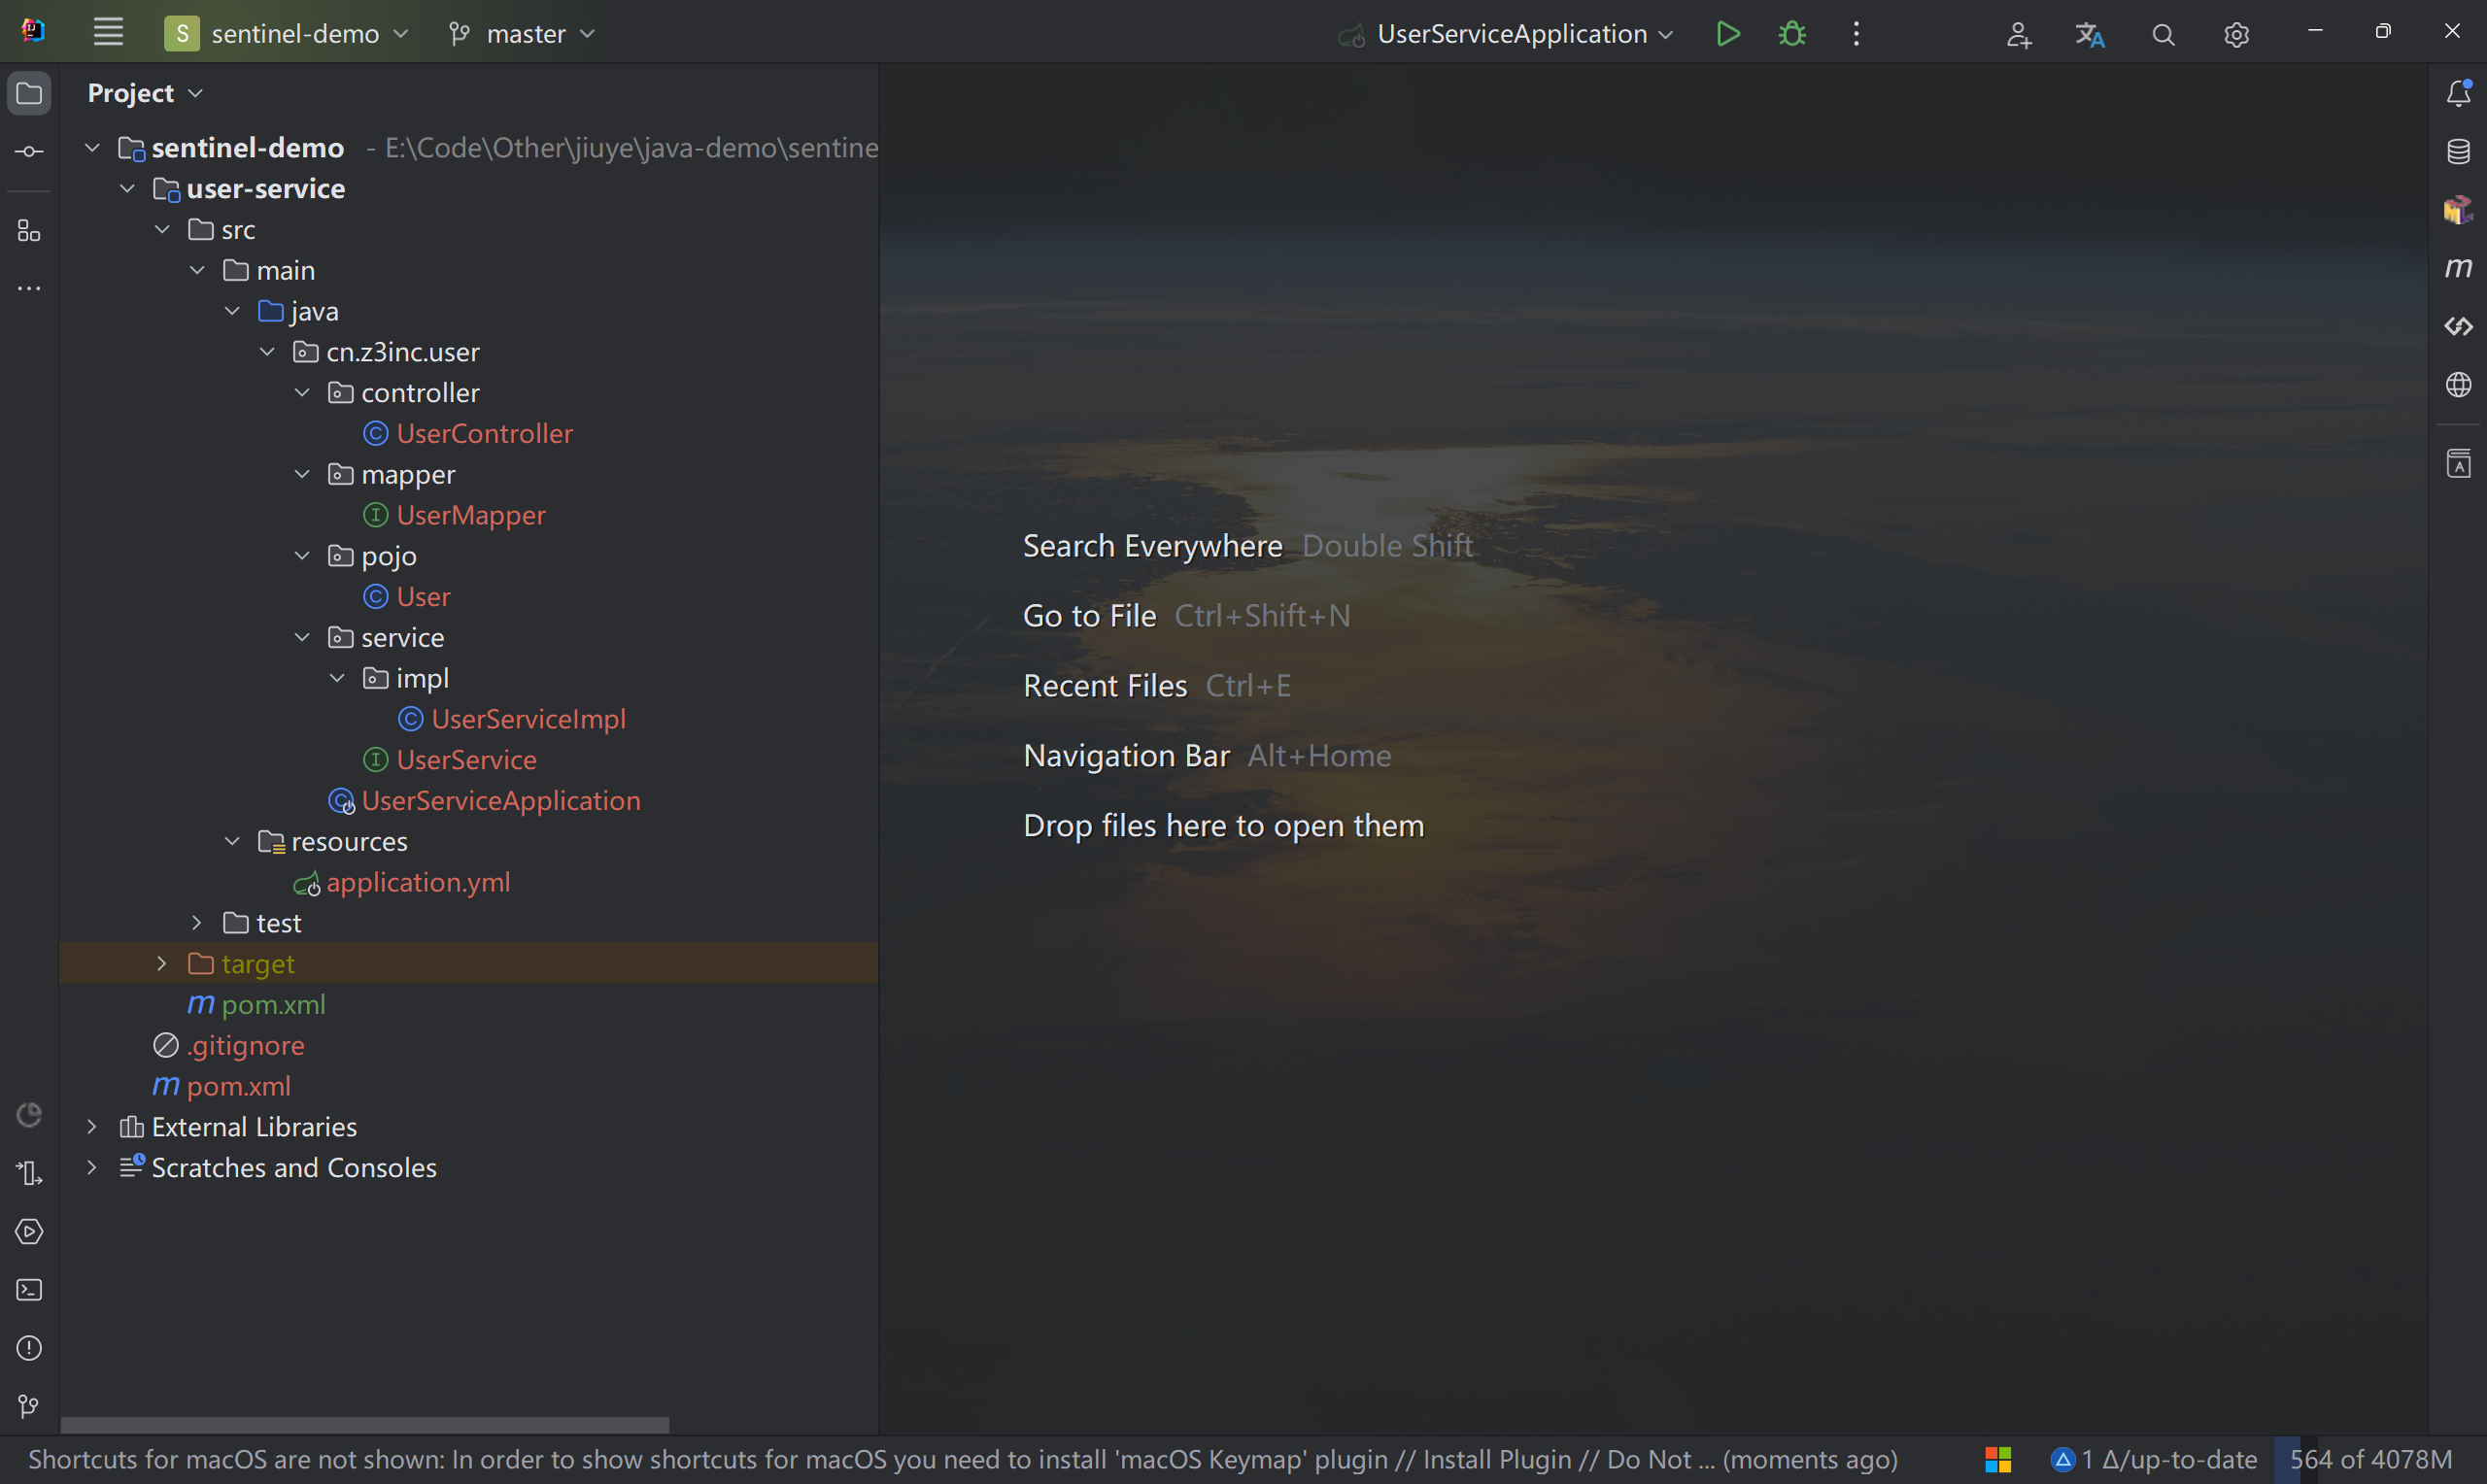
2.2 Create user microservices
1. Create user module

2. Introduce dependencies:
<?xml version="1.0" encoding="UTF-8"?>
<project xmlns="http://maven.apache.org/POM/4.0.0"
         xmlns:xsi="http://www.w3.org/2001/XMLSchema-instance"
         xsi:schemaLocation="http://maven.apache.org/POM/4.0.0 http://maven.apache.org/xsd/maven-4.0.0.xsd">
    <modelVersion>4.0.0</modelVersion>

    <parent>
        <groupId>cn.z3inc</groupId>
        <artifactId>sentinel-demo</artifactId>
        <version>1.0</version>
    </parent>

    <artifactId>user-service</artifactId>

    <properties>
        <maven.compiler.source>8</maven.compiler.source>
        <maven.compiler.target>8</maven.compiler.target>
        <project.build.sourceEncoding>UTF-8</project.build.sourceEncoding>
    </properties>

    <dependencies>
        <!--nacos注册中心依赖-->
        <dependency>
            <groupId>com.alibaba.cloud</groupId>
            <artifactId>spring-cloud-starter-alibaba-nacos-discovery</artifactId>
        </dependency>
        <!--单元测试-->
        <dependency>
            <groupId>org.springframework.boot</groupId>
            <artifactId>spring-boot-starter-test</artifactId>
        </dependency>
        <!--springmvc-->
        <dependency>
            <groupId>org.springframework.boot</groupId>
            <artifactId>spring-boot-starter-web</artifactId>
        </dependency>
        <!--mysql驱动-->
        <dependency>
            <groupId>mysql</groupId>
            <artifactId>mysql-connector-java</artifactId>
        </dependency>
        <!--mp-->
        <dependency>
            <groupId>com.baomidou</groupId>
            <artifactId>mybatis-plus-boot-starter</artifactId>
        </dependency>
        <!--lombok-->
        <dependency>
            <groupId>org.projectlombok</groupId>
            <artifactId>lombok</artifactId>
        </dependency>
        <!--hutool工具类-->
        <dependency>
            <groupId>cn.hutool</groupId>
            <artifactId>hutool-all</artifactId>
        </dependency>
    </dependencies>

    <!--打包插件-->
    <build>
        <plugins>
            <plugin>
                <groupId>org.springframework.boot</groupId>
                <artifactId>spring-boot-maven-plugin</artifactId>
            </plugin>
        </plugins>
    </build>
</project>
3. Write application.yml file configuration:
server:
  port: 9001

spring:
  application:
    name: user-service #服务名称
  cloud:
    nacos:
      # nacos注册中心配置
      discovery:
        server-addr: 127.0.0.1:8848 #nacos服务器地址
  # 数据库配置
  datasource:
    driver-class-name: com.mysql.cj.jdbc.Driver
    url: jdbc:mysql://localhost:3306/cloud_demo?useUnicode=true&characterEncoding=UTF-8&autoReconnect=true&serverTimezone=Asia/Shanghai
    username: root
    password: 123456

# mp配置
mybatis-plus:
  mmapper-locations: classpath:mapper/*.xml #mapper配置文件存放路径
  type-aliases-package: cn.z3inc.user.pojo # 类型别名(实体类所在包)
  configuration:
    log-impl: org.apache.ibatis.logging.stdout.StdOutImpl  #配置标准sql输出
    map-underscore-to-camel-case: true #开启驼峰映射

#日志级别
logging:
  level:
    cn.z3inc: debug
  pattern:
    dateformat: MM-dd HH:mm:ss:SSS # 格式化输出日期
4. Write the startup class:
@SpringBootApplication
@MapperScan("cn.z3inc.user.mapper")
public class UserServiceApplication {


    public static void main(String[] args) {


        SpringApplication.run(UserServiceApplication.class, args);
    }
}
5. Writing business:
Entity class:
package cn.z3inc.user.pojo;

import lombok.Data;

@Data
public class User {
    private Long id;
    private String username;
    private String address;
}
mapper interface:
package cn.z3inc.user.mapper;

import cn.z3inc.user.pojo.User;
import com.baomidou.mybatisplus.core.mapper.BaseMapper;
import org.apache.ibatis.annotations.Mapper;

@Mapper
public interface UserMapper extends BaseMapper<User> {


}
service interface:
package cn.z3inc.user.service;

import cn.z3inc.user.pojo.User;
import com.baomidou.mybatisplus.extension.service.IService;

public interface UserService extends IService<User> {


}
package cn.z3inc.user.service.impl;

import cn.z3inc.user.mapper.UserMapper;
import cn.z3inc.user.pojo.User;
import cn.z3inc.user.service.UserService;
import com.baomidou.mybatisplus.extension.service.impl.ServiceImpl;
import org.springframework.stereotype.Service;

@Service
public class UserServiceImpl extends ServiceImpl<UserMapper, User> implements UserService {


}
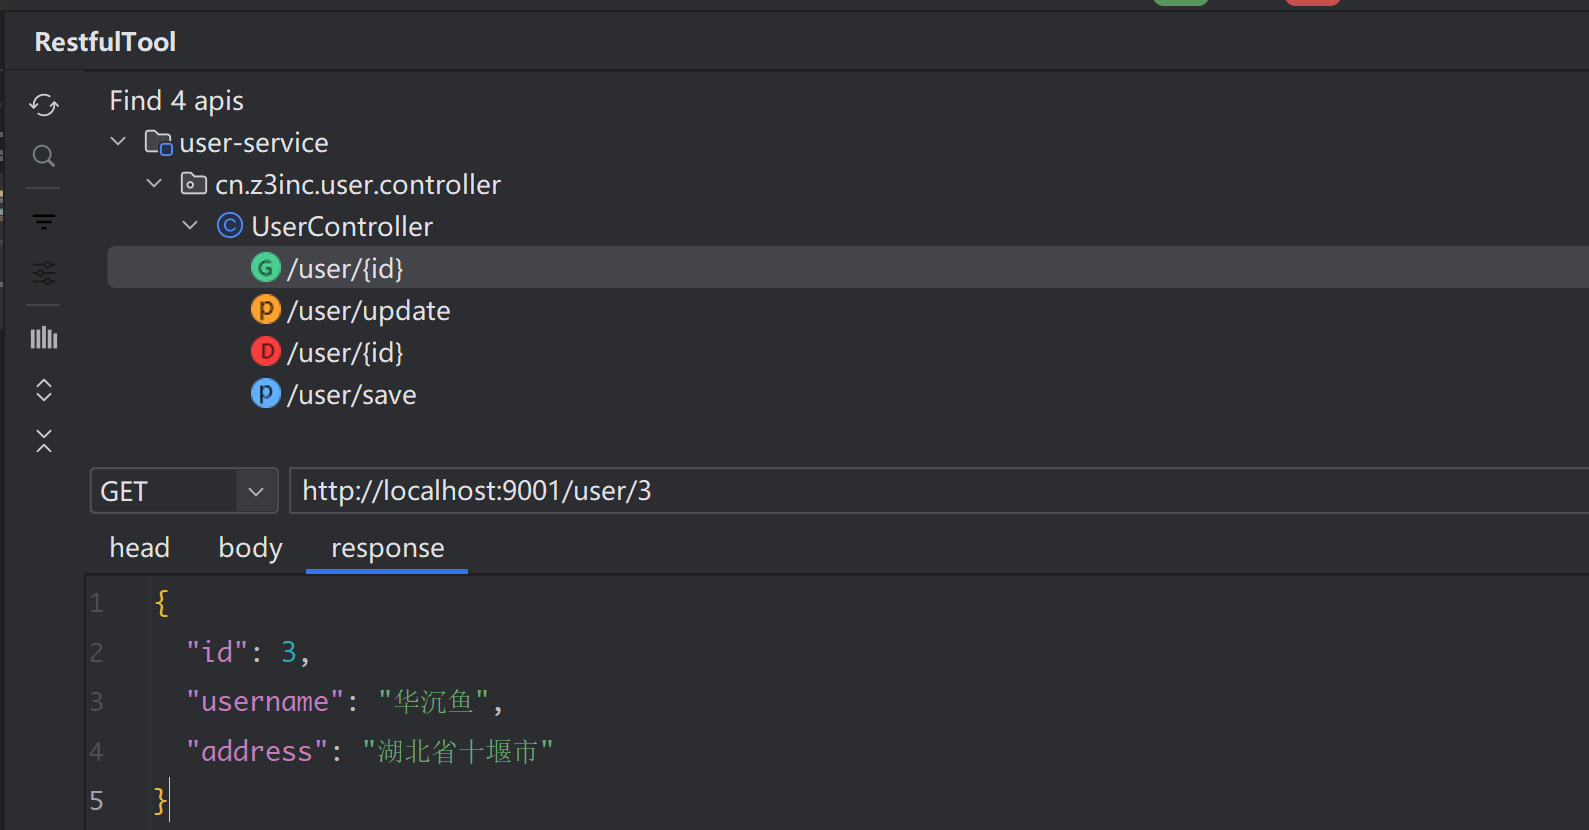
controller:
package cn.z3inc.user.controller;

import cn.z3inc.user.pojo.User;
import cn.z3inc.user.service.UserService;
import org.springframework.beans.factory.annotation.Autowired;
import org.springframework.web.bind.annotation.*;

@RestController
@RequestMapping("/user")
public class UserController {


    @Autowired
    private UserService userService;

    /**
     * 根据ID获取用户信息
     *
     * @param id 用户ID
     * @return
     */
    @GetMapping("/{id}")
    public User findById(@PathVariable("id") Long id) {


        return userService.getById(id);
    }

    /**
     * 修改用户信息
     *
     * @param user 用户信息
     */
    @PutMapping("/update")
    public void updateUser(@RequestBody User user) {


        userService.updateById(user);
    }

    /**
     * 根据ID删除用户
     *
     * @param id
     * @return
     */
    @DeleteMapping("/{id}")
    public void deleteUser(@PathVariable("id") Long id) {


        userService.removeById(id);
    }

    /**
     *  新增用户
     * @param user
     */
    @PostMapping("/save")
    public void saveUser(@RequestBody User user) {


        userService.save(user);
    }
}
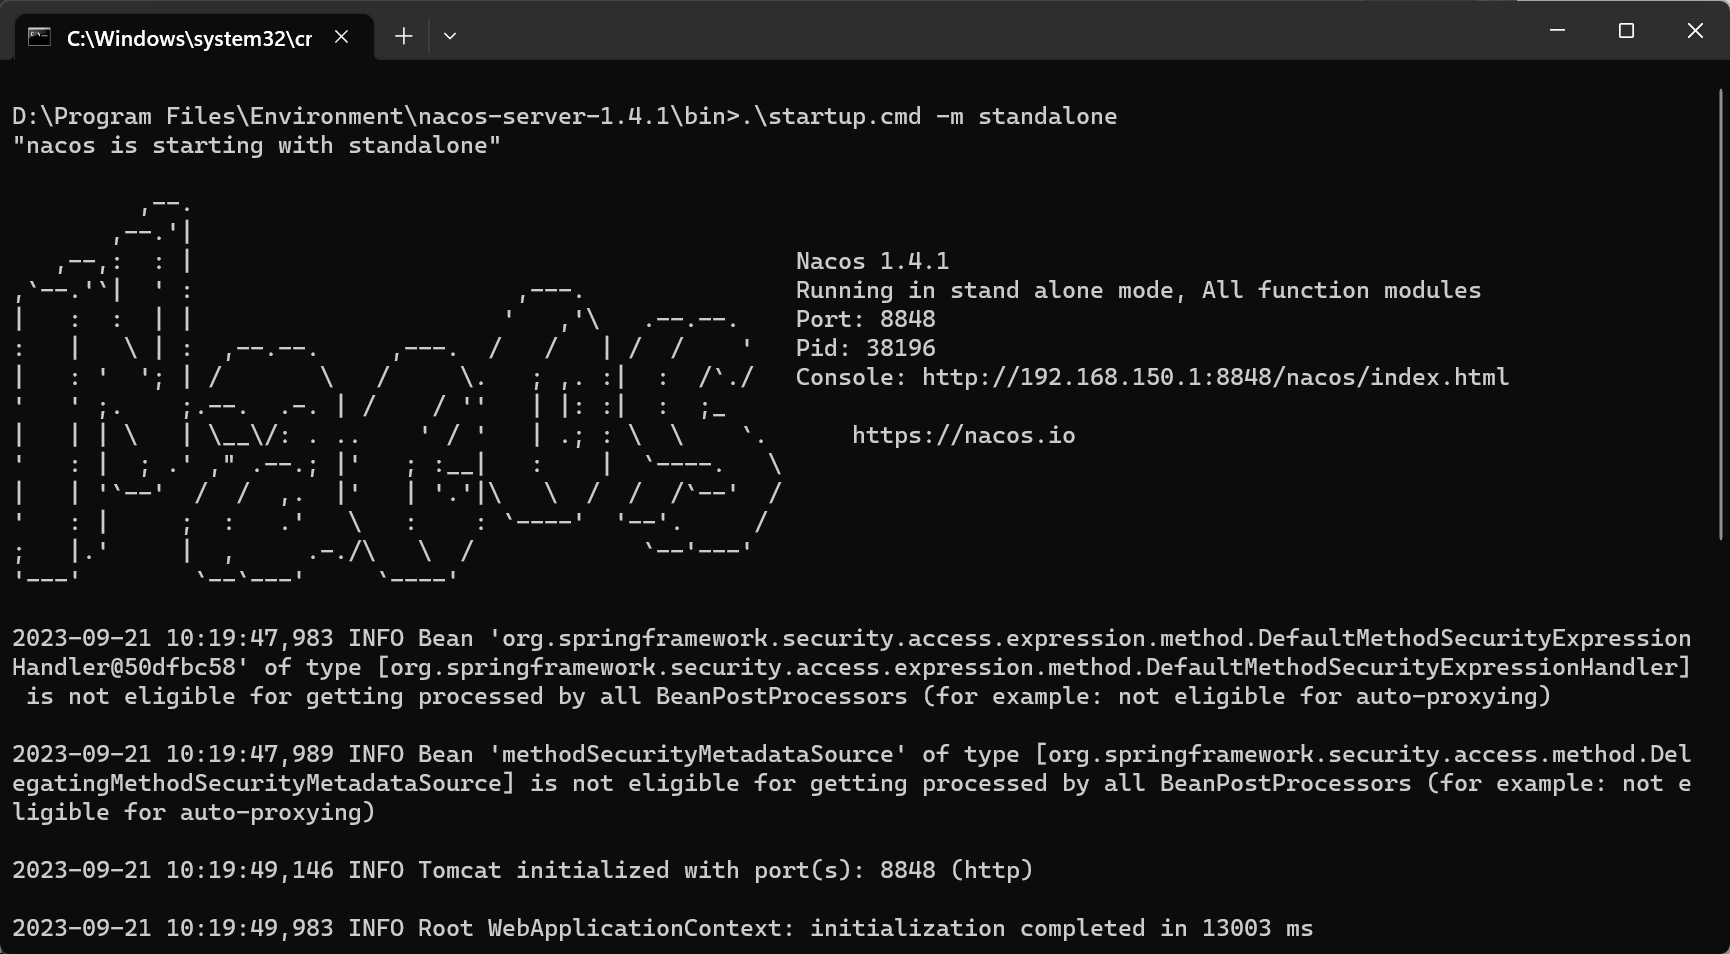
6. Start nacos and user microservice testing
.\startup.cmd -m standalone
2.3 Create order microservice
1. Create order module

2. Introduce dependencies:
<?xml version="1.0" encoding="UTF-8"?>
<project xmlns="http://maven.apache.org/POM/4.0.0"
         xmlns:xsi="http://www.w3.org/2001/XMLSchema-instance"
         xsi:schemaLocation="http://maven.apache.org/POM/4.0.0 http://maven.apache.org/xsd/maven-4.0.0.xsd">
    <modelVersion>4.0.0</modelVersion>
    <parent>
        <groupId>cn.z3inc</groupId>
        <artifactId>sentinel-demo</artifactId>
        <version>1.0</version>
    </parent>

    <artifactId>order-service</artifactId>

    <properties>
        <maven.compiler.source>8</maven.compiler.source>
        <maven.compiler.target>8</maven.compiler.target>
        <project.build.sourceEncoding>UTF-8</project.build.sourceEncoding>
    </properties>

    <dependencies>
        <!-- openfeign 微服务远程调用  -->
        <dependency>
            <groupId>org.springframework.cloud</groupId>
            <artifactId>spring-cloud-starter-openfeign</artifactId>
        </dependency>
        <!-- loadbalancer 实现客户端做负载均衡 -->
        <dependency>
            <groupId>org.springframework.cloud</groupId>
            <artifactId>spring-cloud-starter-loadbalancer</artifactId>
        </dependency>
        <!--nacos注册中心依赖-->
        <dependency>
            <groupId>com.alibaba.cloud</groupId>
            <artifactId>spring-cloud-starter-alibaba-nacos-discovery</artifactId>
        </dependency>
        <!--单元测试-->
        <dependency>
            <groupId>org.springframework.boot</groupId>
            <artifactId>spring-boot-starter-test</artifactId>
        </dependency>
        <!--springmvc-->
        <dependency>
            <groupId>org.springframework.boot</groupId>
            <artifactId>spring-boot-starter-web</artifactId>
        </dependency>
        <!--mysql驱动-->
        <dependency>
            <groupId>mysql</groupId>
            <artifactId>mysql-connector-java</artifactId>
        </dependency>
        <!--mp-->
        <dependency>
            <groupId>com.baomidou</groupId>
            <artifactId>mybatis-plus-boot-starter</artifactId>
        </dependency>
        <!--lombok-->
        <dependency>
            <groupId>org.projectlombok</groupId>
            <artifactId>lombok</artifactId>
        </dependency>
        <!--hutool工具类-->
        <dependency>
            <groupId>cn.hutool</groupId>
            <artifactId>hutool-all</artifactId>
        </dependency>
    </dependencies>

    <!--打包插件-->
    <build>
        <plugins>
            <plugin>
                <groupId>org.springframework.boot</groupId>
                <artifactId>spring-boot-maven-plugin</artifactId>
            </plugin>
        </plugins>
    </build>

</project>
3. Write application.yml configuration:
server:
  port: 9001

spring:
  application:
    name: user-service #服务名称
  cloud:
    nacos:
      # nacos注册中心配置
      discovery:
        server-addr: 127.0.0.1:8848 #nacos服务器地址
  # 数据库配置
  datasource:
    driver-class-name: com.mysql.cj.jdbc.Driver
    url: jdbc:mysql://localhost:3306/cloud_demo?useUnicode=true&characterEncoding=UTF-8&autoReconnect=true&serverTimezone=Asia/Shanghai
    username: root
    password: 123456

# mp配置
mybatis-plus:
  mmapper-locations: classpath:mapper/*.xml #mapper配置文件存放路径
  type-aliases-package: cn.z3inc.order.pojo # 类型别名(实体类所在包)
  configuration:
    log-impl: org.apache.ibatis.logging.stdout.StdOutImpl  #配置标准sql输出
    map-underscore-to-camel-case: true #开启驼峰映射
  global-config:
    db-config:
      id-type: auto # 主键策略
      table-prefix: tb_ # 表名前缀配置

#日志级别
logging:
  level:
    cn.z3inc: debug
  pattern:
    dateformat: MM-dd HH:mm:ss:SSS # 格式化输出日期
4. Write the startup class:
package cn.z3inc.order;

import org.mybatis.spring.annotation.MapperScan;
import org.springframework.boot.SpringApplication;
import org.springframework.boot.autoconfigure.SpringBootApplication;
import org.springframework.cloud.openfeign.EnableFeignClients;


@EnableFeignClients(basePackages = "cn.z3inc.order.feign") //开启feign远程调用
@SpringBootApplication
@MapperScan("cn.z3inc.order.mapper")
public class OrderServiceApplication {


    public static void main(String[] args) {


        SpringApplication.run(OrderServiceApplication.class, args);
    }
}
5. Writing business:
Entity class:
//用户实体
@Data
public class User {


    private Long id;
    private String username;
    private String address;
}

// 订单实体
@Data
public class Order {


    private Long id;
    private String name;
    private Long price;
    private Integer num;
    private Long userId;
    @TableField(exist = false) // 排除数据表中不存在的字段
    private User user;
}
mapper interface:
package cn.z3inc.order.mapper;

import cn.z3inc.order.pojo.Order;
import com.baomidou.mybatisplus.core.mapper.BaseMapper;
import org.apache.ibatis.annotations.Mapper;

@Mapper
public interface OrderMapper extends BaseMapper<Order> {


}
service interface:
package cn.z3inc.order.service;

import cn.z3inc.order.pojo.Order;
import com.baomidou.mybatisplus.extension.service.IService;

public interface OrderService extends IService<Order> {


    //根据id查订单
    Order findById(Long id);
}
feign interface:
package cn.z3inc.order.feign;

import cn.z3inc.order.pojo.User;
import org.springframework.cloud.openfeign.FeignClient;
import org.springframework.web.bind.annotation.GetMapping;
import org.springframework.web.bind.annotation.PathVariable;

/**
 *  用户服务Feign接口
 */
@FeignClient("user-service")//指定要调用的服务名称
public interface UserClient {


    /*
        主要是基于SpringMVC的注解来声明远程调用的信息,比如:
            - 服务名称:userservice
            - 请求方式:GET
            - 请求路径:/user/{id}
            - 请求参数:Long id
            - 返回值类型:User
     */

    // 定义远程调用方法
    // 通过id查用户
    @GetMapping("/user/{id}") //调用对应controller的方法路径
    User findById(@PathVariable("id") Long id);// @PathVariable注解一定要指定参数名称,否则会报错
}
service interface implementation class:
@Service
public class OrderServiceImpl extends ServiceImpl<OrderMapper, Order> implements OrderService {


    @Autowired
    private UserClient userClient;

    @Override
    public Order findById(Long id) {


        Order order = super.getById(id);
        User user = userClient.findById(order.getUserId());//微服务远程调用
        order.setUser(user);
        return order;
    }
}
controller:
package cn.z3inc.order.controller;

import cn.z3inc.order.pojo.Order;
import cn.z3inc.order.service.OrderService;
import org.springframework.beans.factory.annotation.Autowired;
import org.springframework.web.bind.annotation.*;

@RestController
@RequestMapping("/order")
public class OrderController {


    @Autowired
    private OrderService orderService;

    @GetMapping("/{orderId}")
    public Order findById(@PathVariable("orderId") Long orderId) {


        return orderService.findById(orderId);
    }
}
6. Test:
2.4 Build gateway microservices
1. Create a gateway module
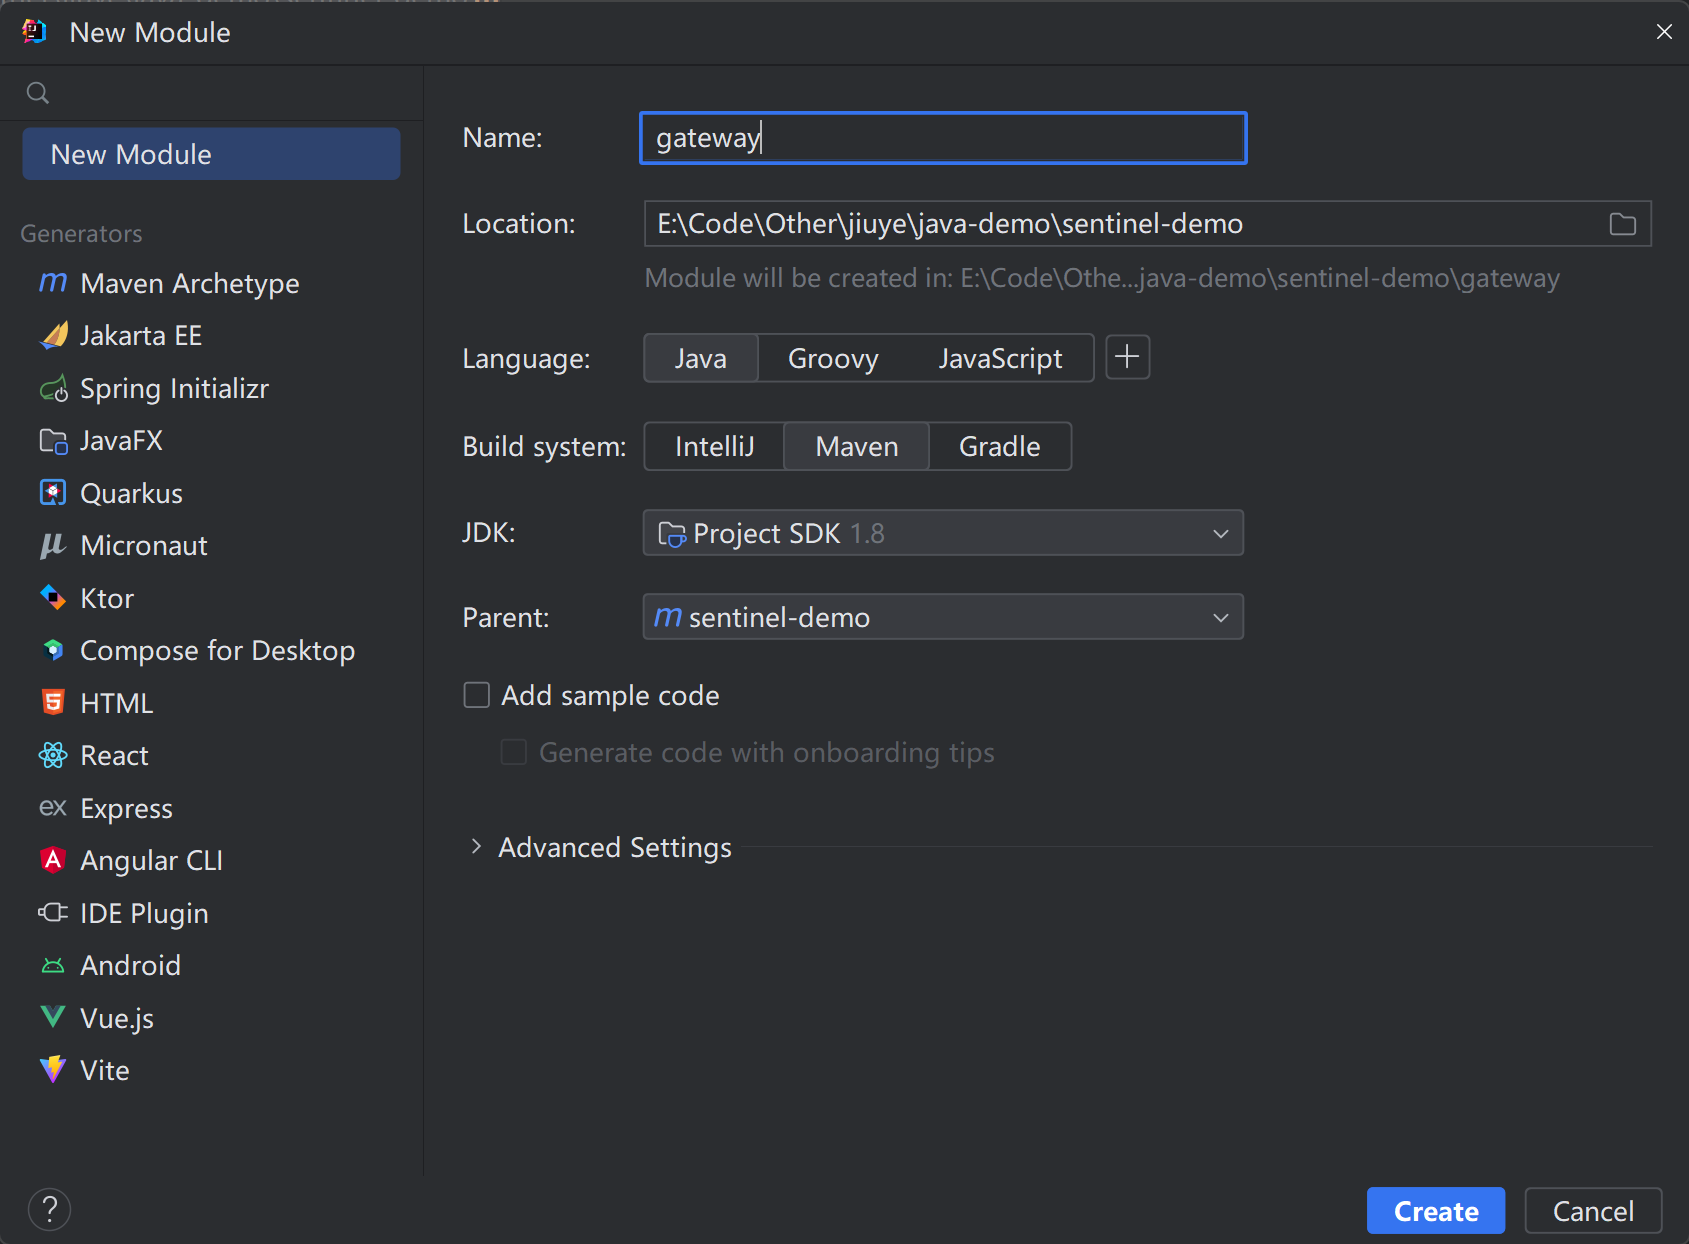
2. Introduce dependencies:
<dependencies>
    <!--gateway网关-->
    <dependency>
        <groupId>org.springframework.cloud</groupId>
        <artifactId>spring-cloud-starter-gateway</artifactId>
    </dependency>
    <!--loadbalancer代替ribbon-->
    <dependency>
        <groupId>org.springframework.cloud</groupId>
        <artifactId>spring-cloud-starter-loadbalancer</artifactId>
    </dependency>
    <!--nacos注册中心-->
    <dependency>
        <groupId>com.alibaba.cloud</groupId>
        <artifactId>spring-cloud-starter-alibaba-nacos-discovery</artifactId>
    </dependency>
</dependencies>
3. Modify application.yml configuration:
server:
  port: 10010 # 网关的服务端口
spring:
  application:
    name: gateway # 服务名称
  cloud:
    nacos:
      server-addr: localhost:8848 # nacos服务地址
    # 网关的配置
    gateway:
      # 跨域配置
      globalcors:
        cors-configurations:
          '[/**]':
            allowed-origin-patterns: "*"
            allowed-headers: "*"
            allow-credentials: true
            allowed-methods:
              - GET
              - POST
              - DELETE
              - PUT
              - OPTION
      # 网关路由配置
      routes:
        - id: user-service # 路由id
          uri: lb://user-service # 路由地址
          predicates: # 路由断言(匹配规则)
            - Path=/user/**
        - id: order-service
          uri: lb://order-service
          predicates:
            - Path=/order/**
4. Write the startup class:
package cn.z3inc.gateway;

import org.springframework.boot.SpringApplication;
import org.springframework.boot.autoconfigure.SpringBootApplication;

@SpringBootApplication
public class GatewayApplication {


    public static void main(String[] args) {


        SpringApplication.run(GatewayApplication.class, args);
    }
}
5. Test:

3. Integrate Sentinel
Introduce sentinel dependency into the order microservice and connect to the sentinel-dashboard console for monitoring.
1. Introduce sentinel dependency:
<!--sentinel-->
<dependency>
    <groupId>com.alibaba.cloud</groupId>
    <artifactId>spring-cloud-starter-alibaba-sentinel</artifactId>
</dependency>
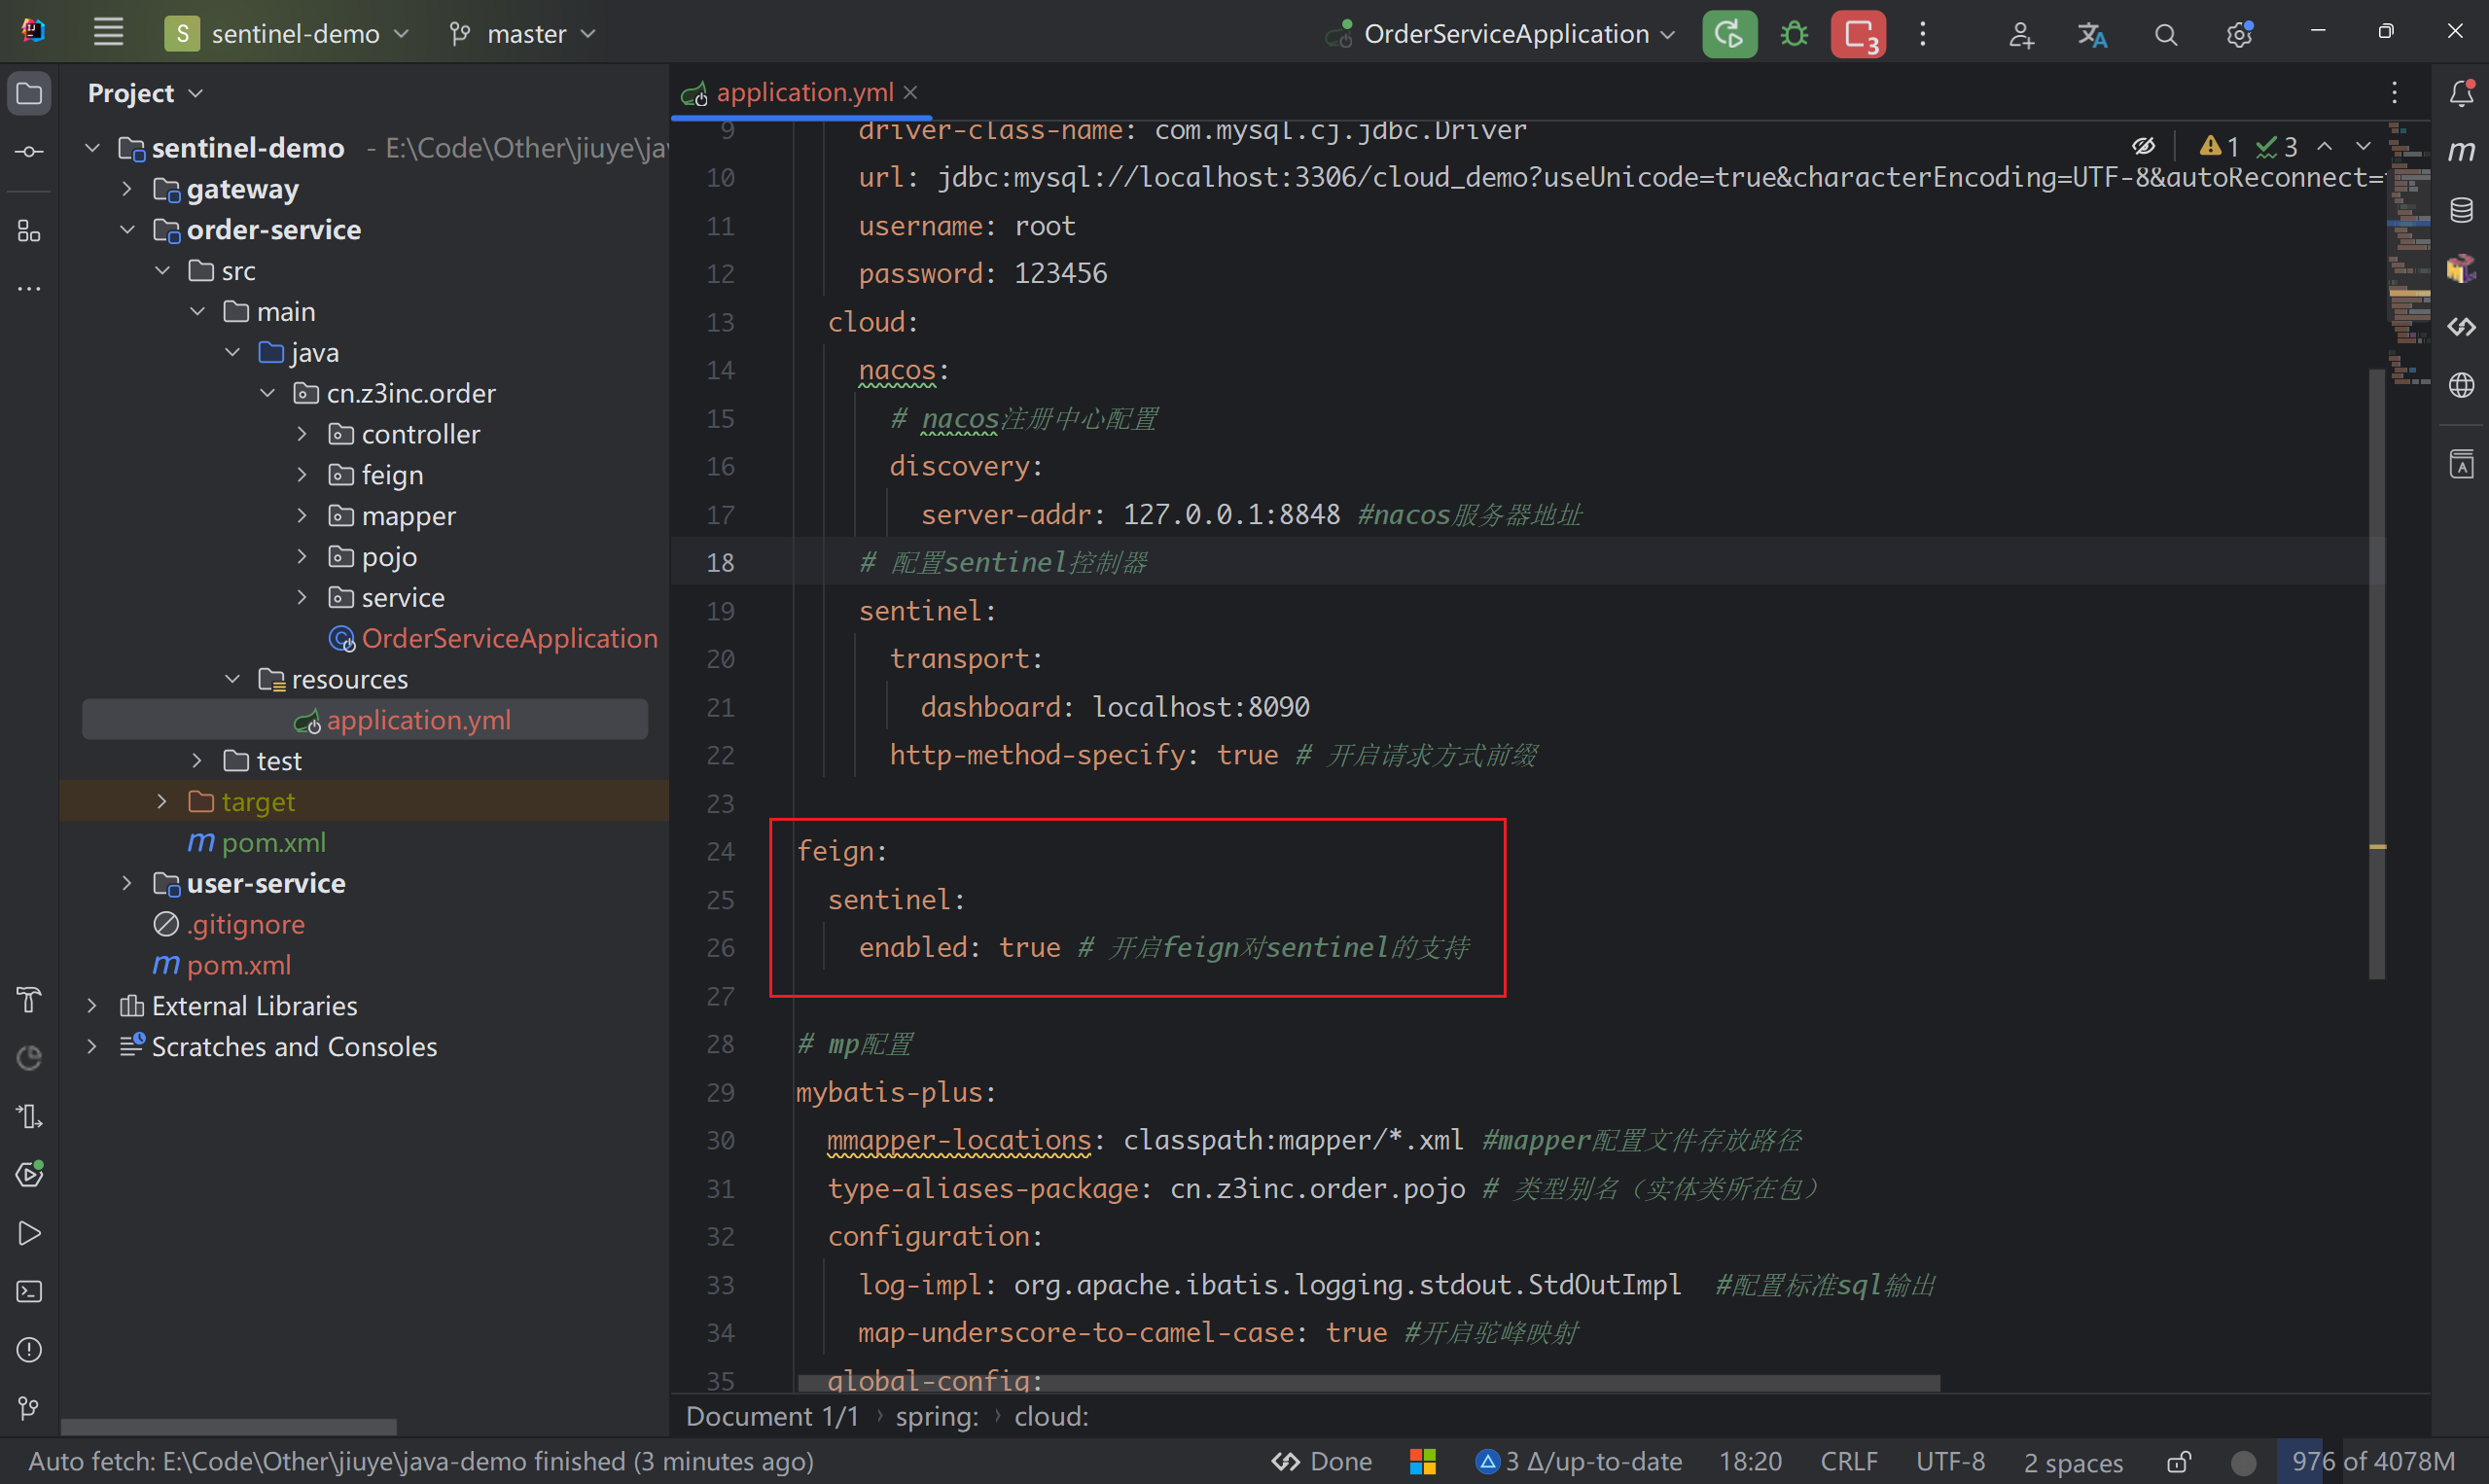
2. Modify the application.yml file of the order service and add sentinel console configuration:
spring:
  cloud:
    sentinel:
      transport:
        dashboard: localhost:8090 #控制台地址
      http-method-specify: true #开启请求方式前缀
3. Restart the order microservice
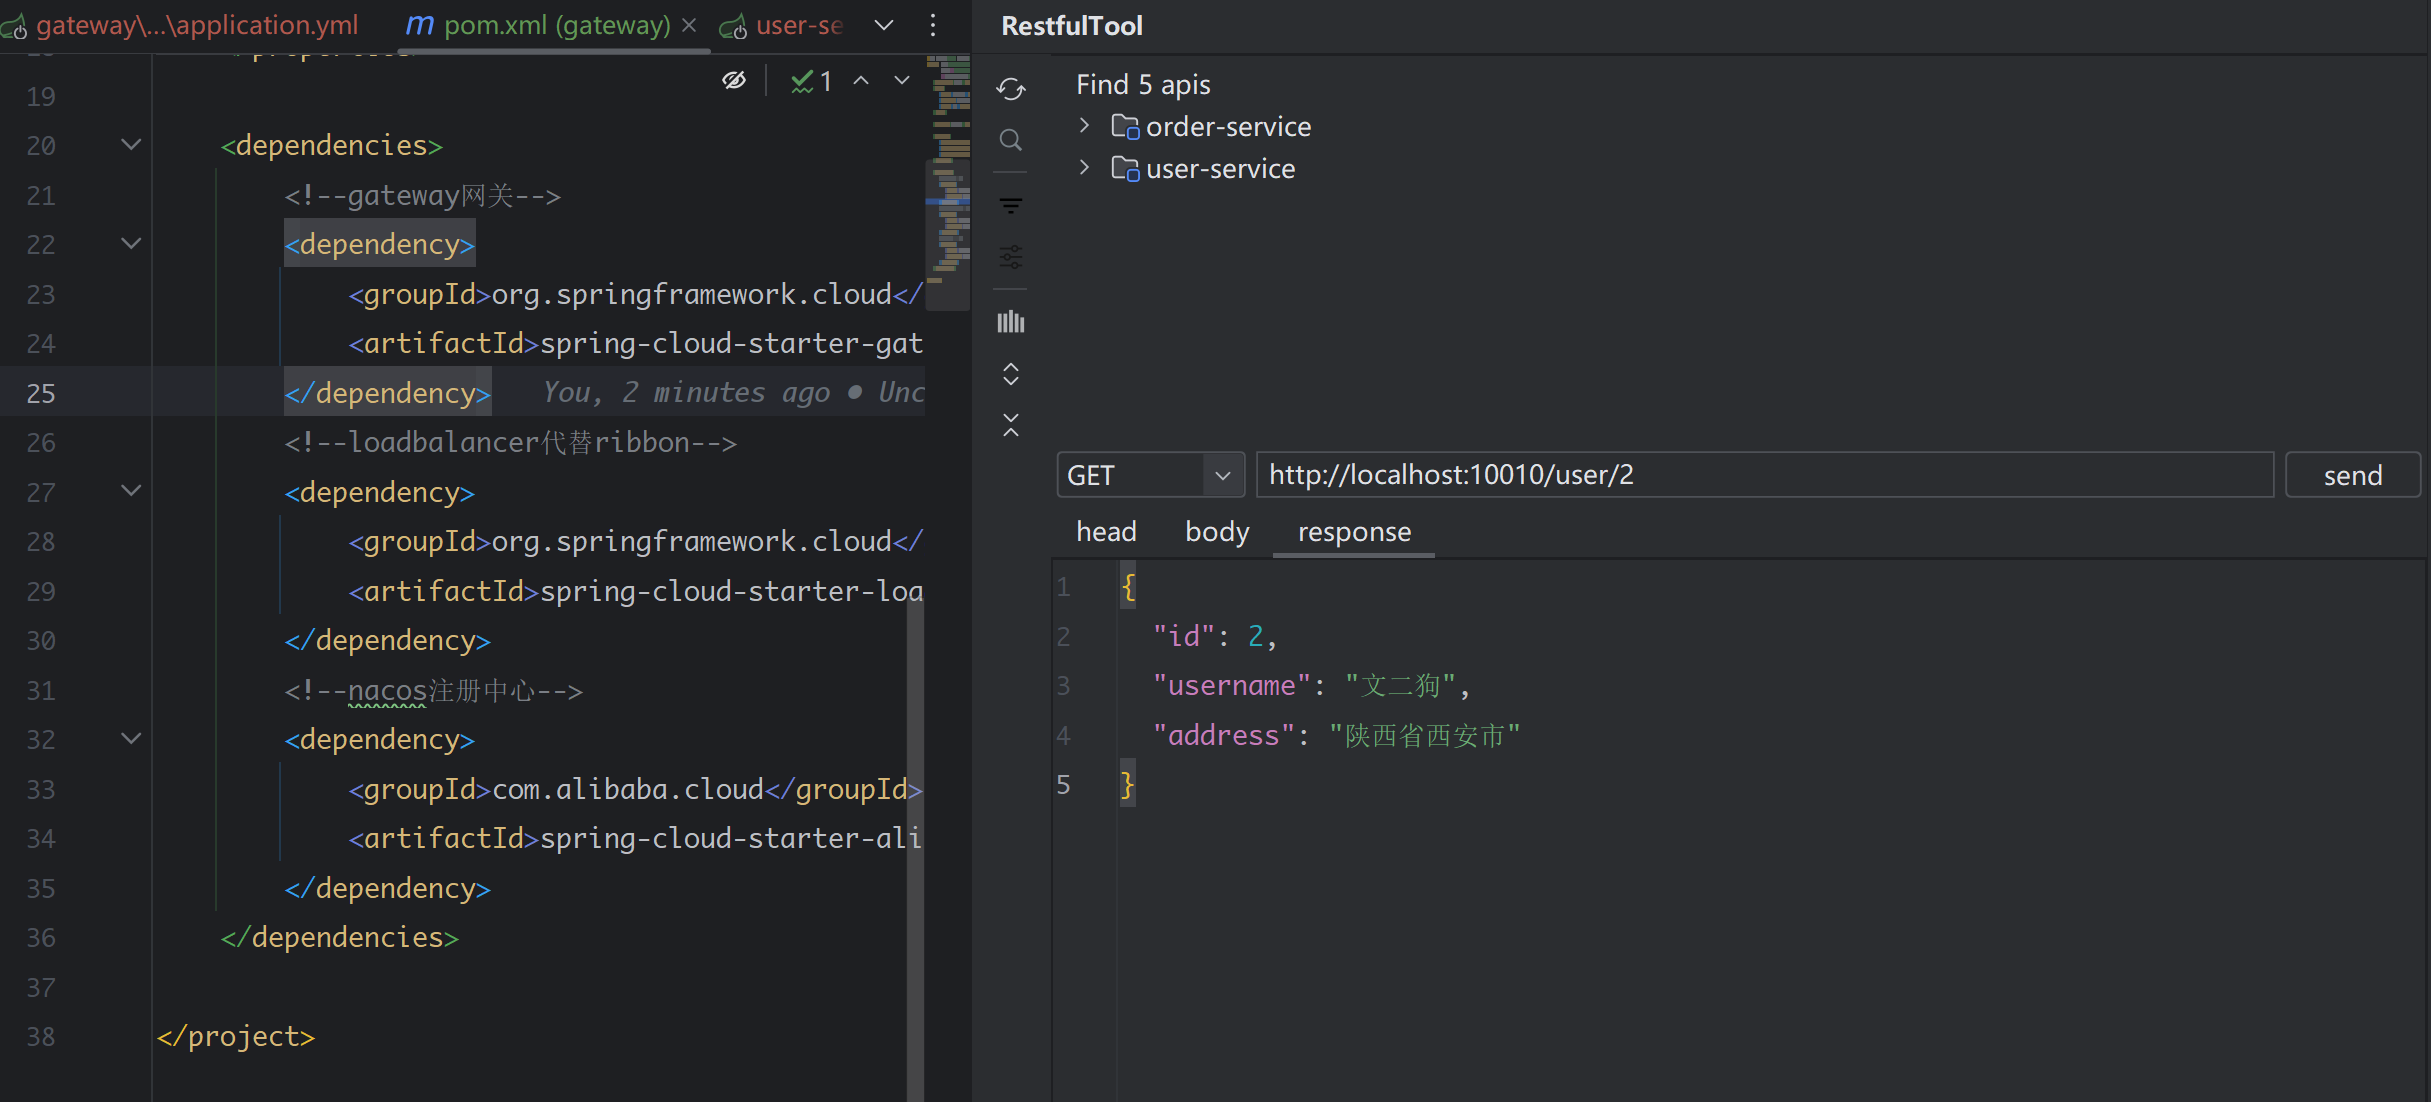
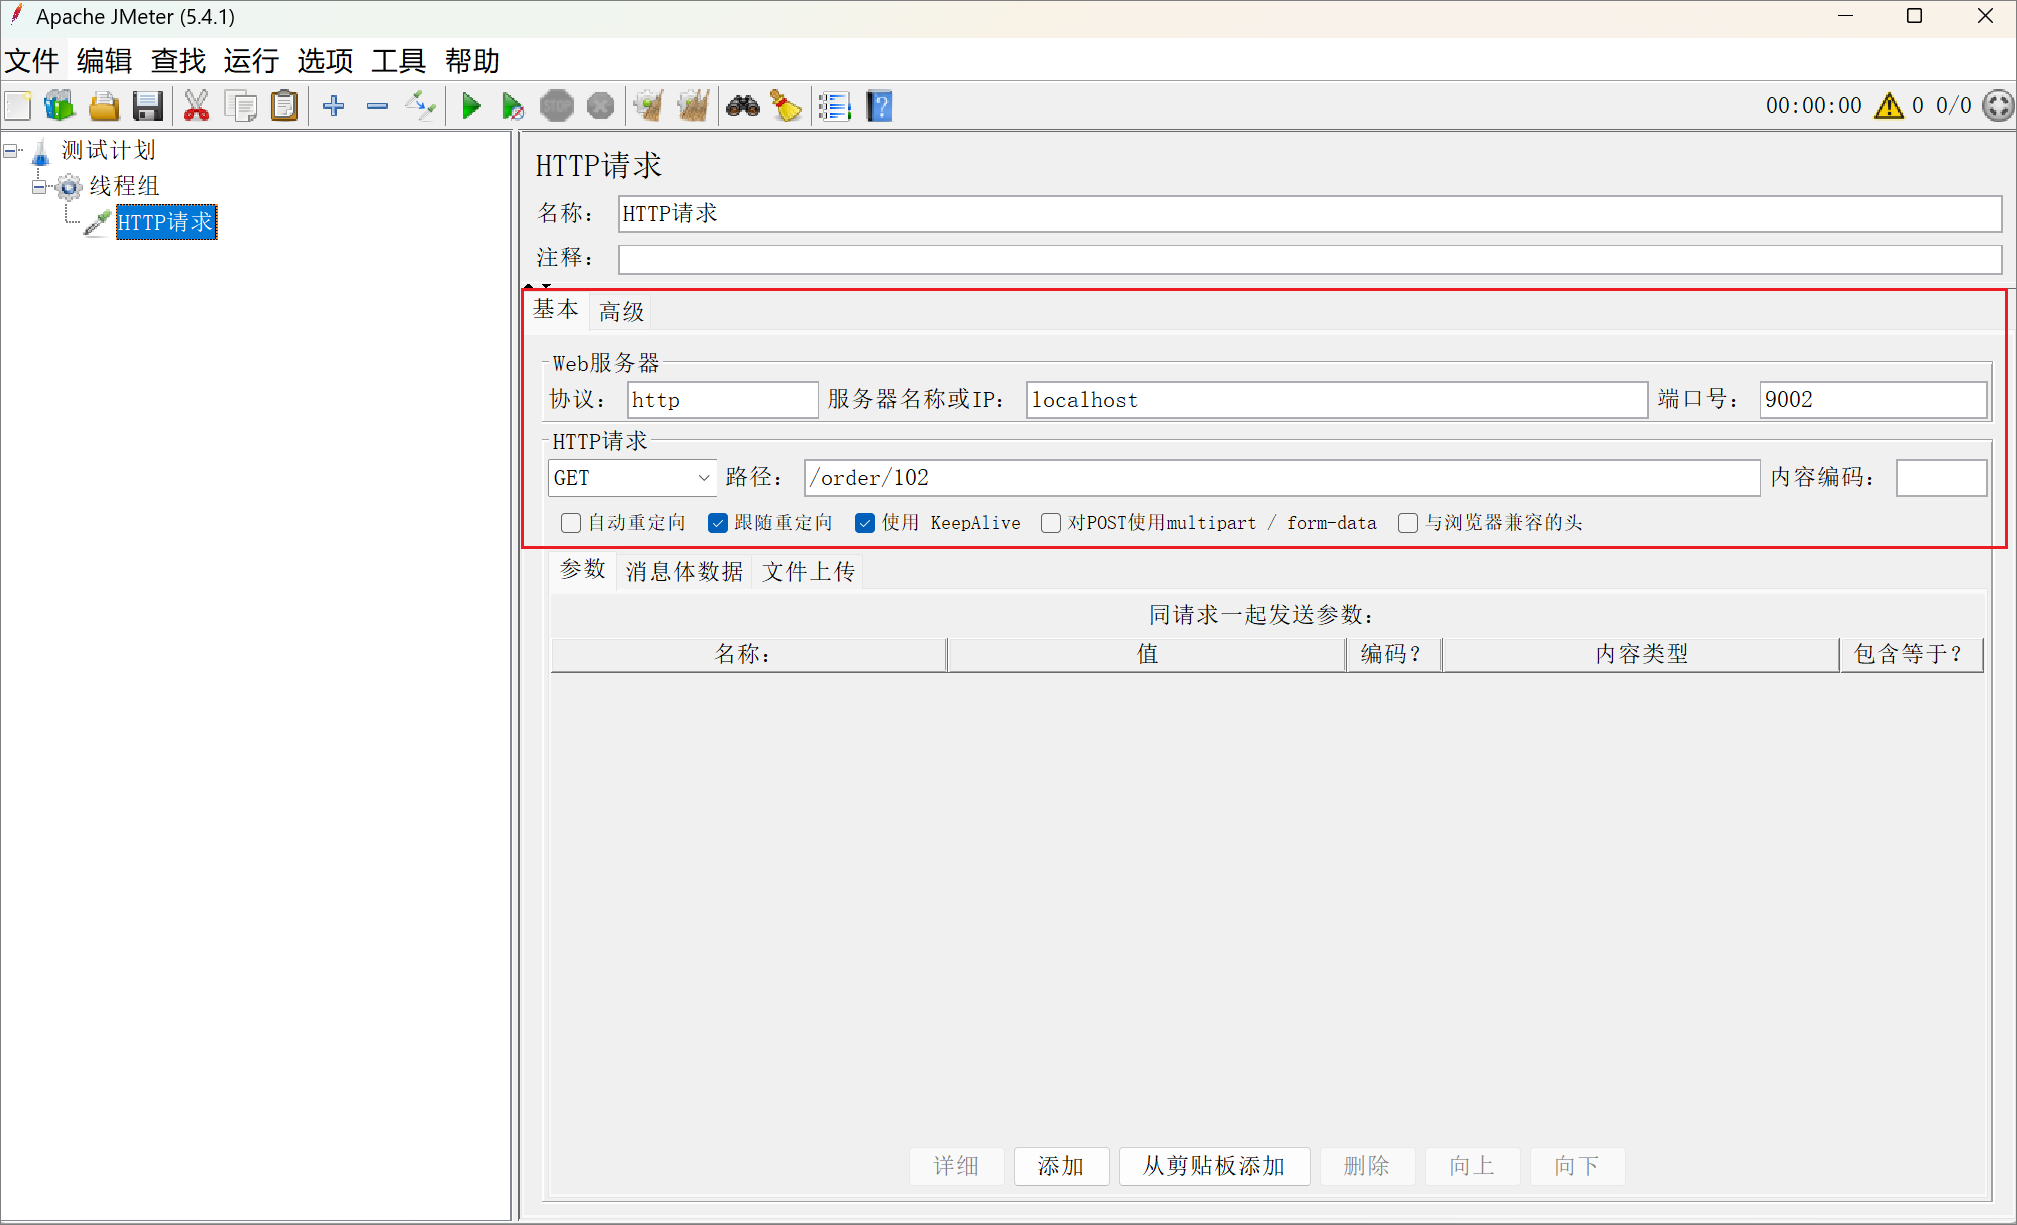
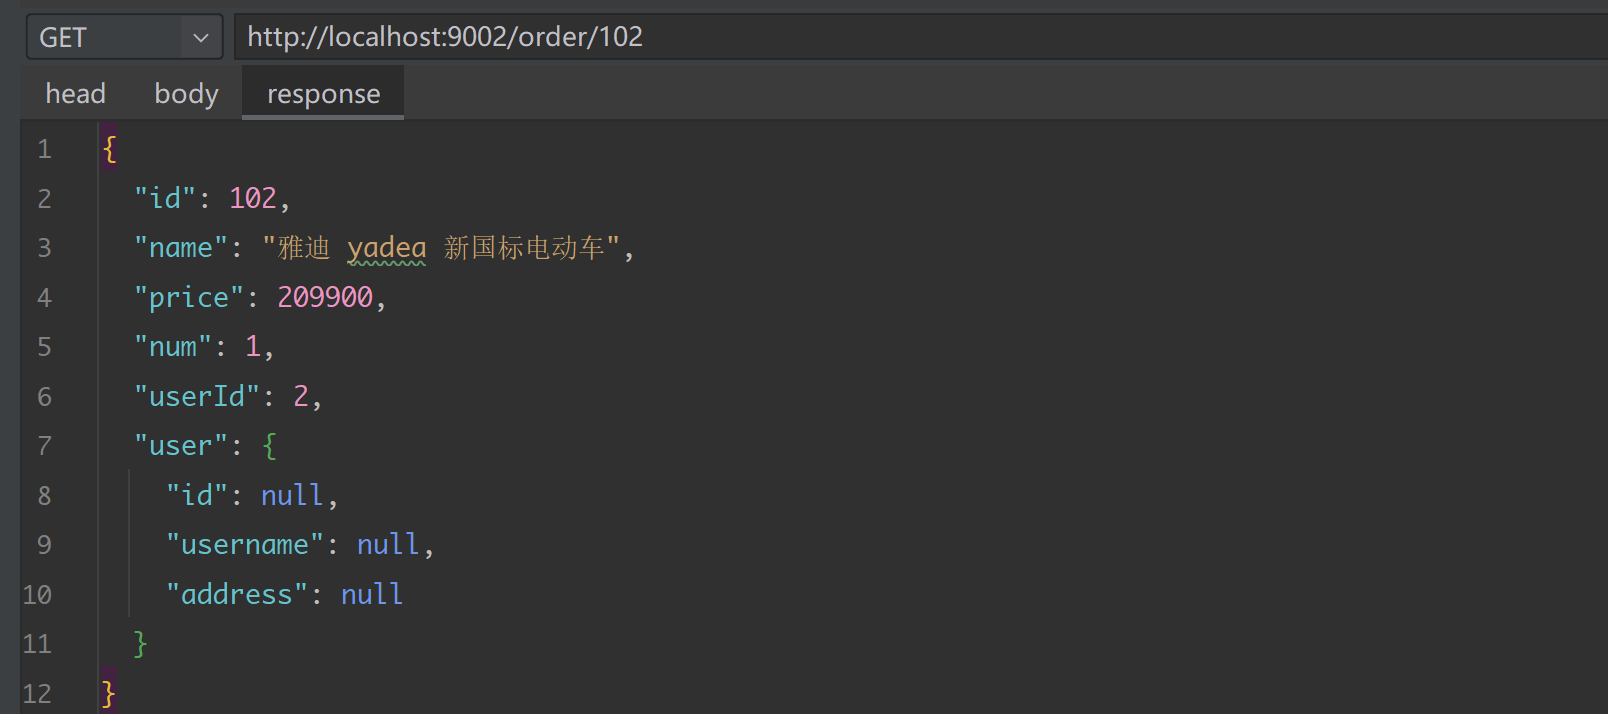
4. Access the order microservice interface: http://localhost:9002/order/102
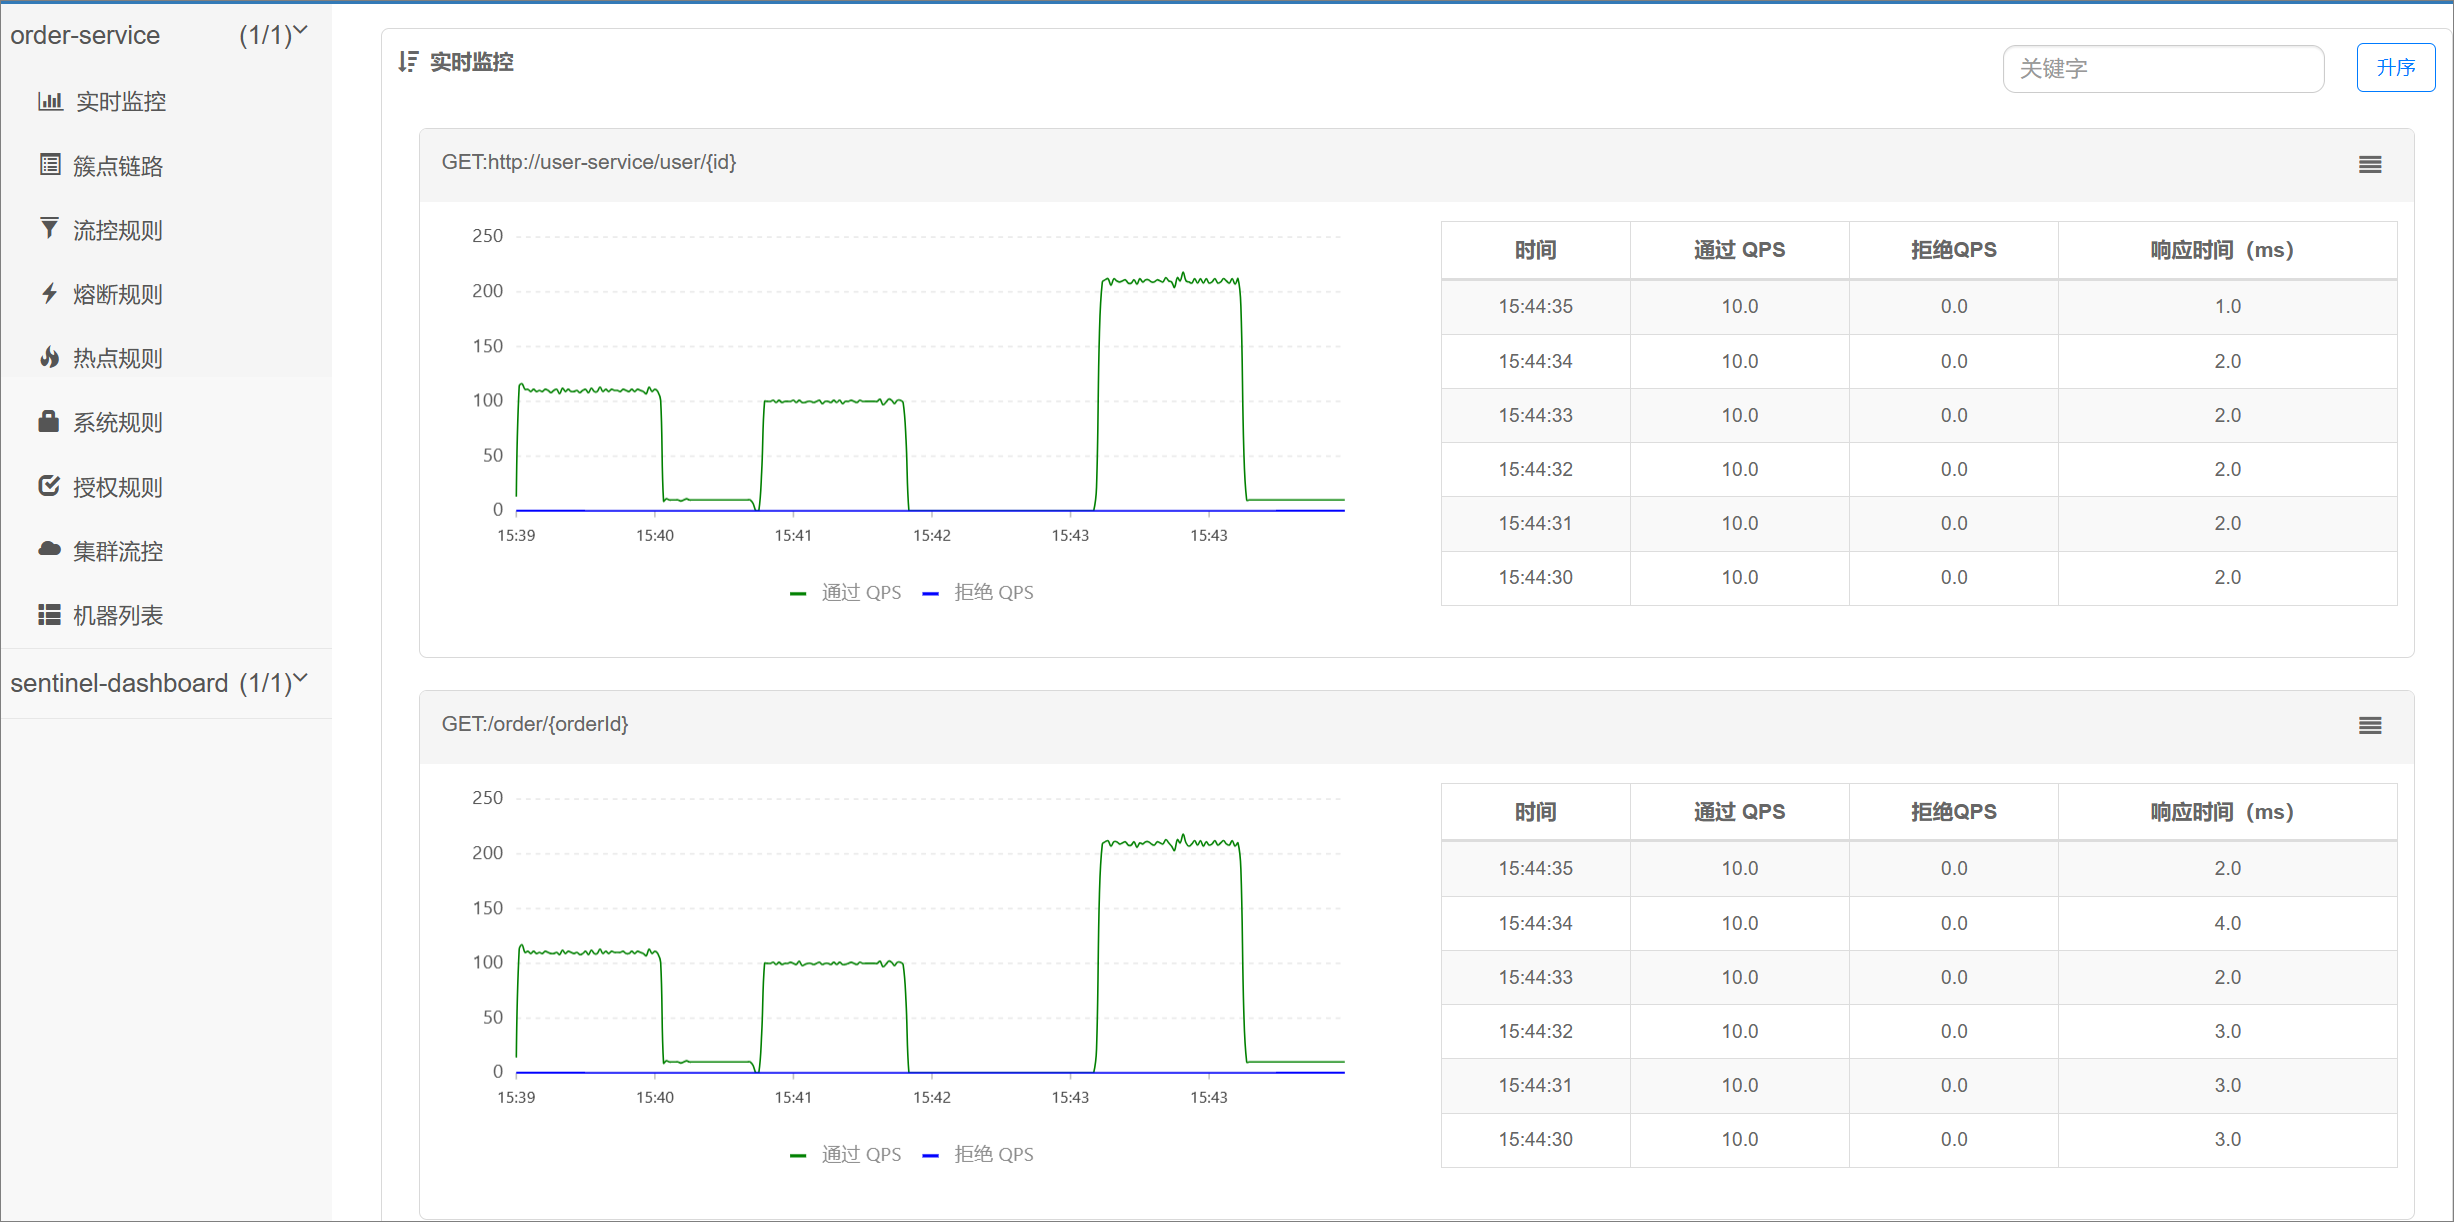
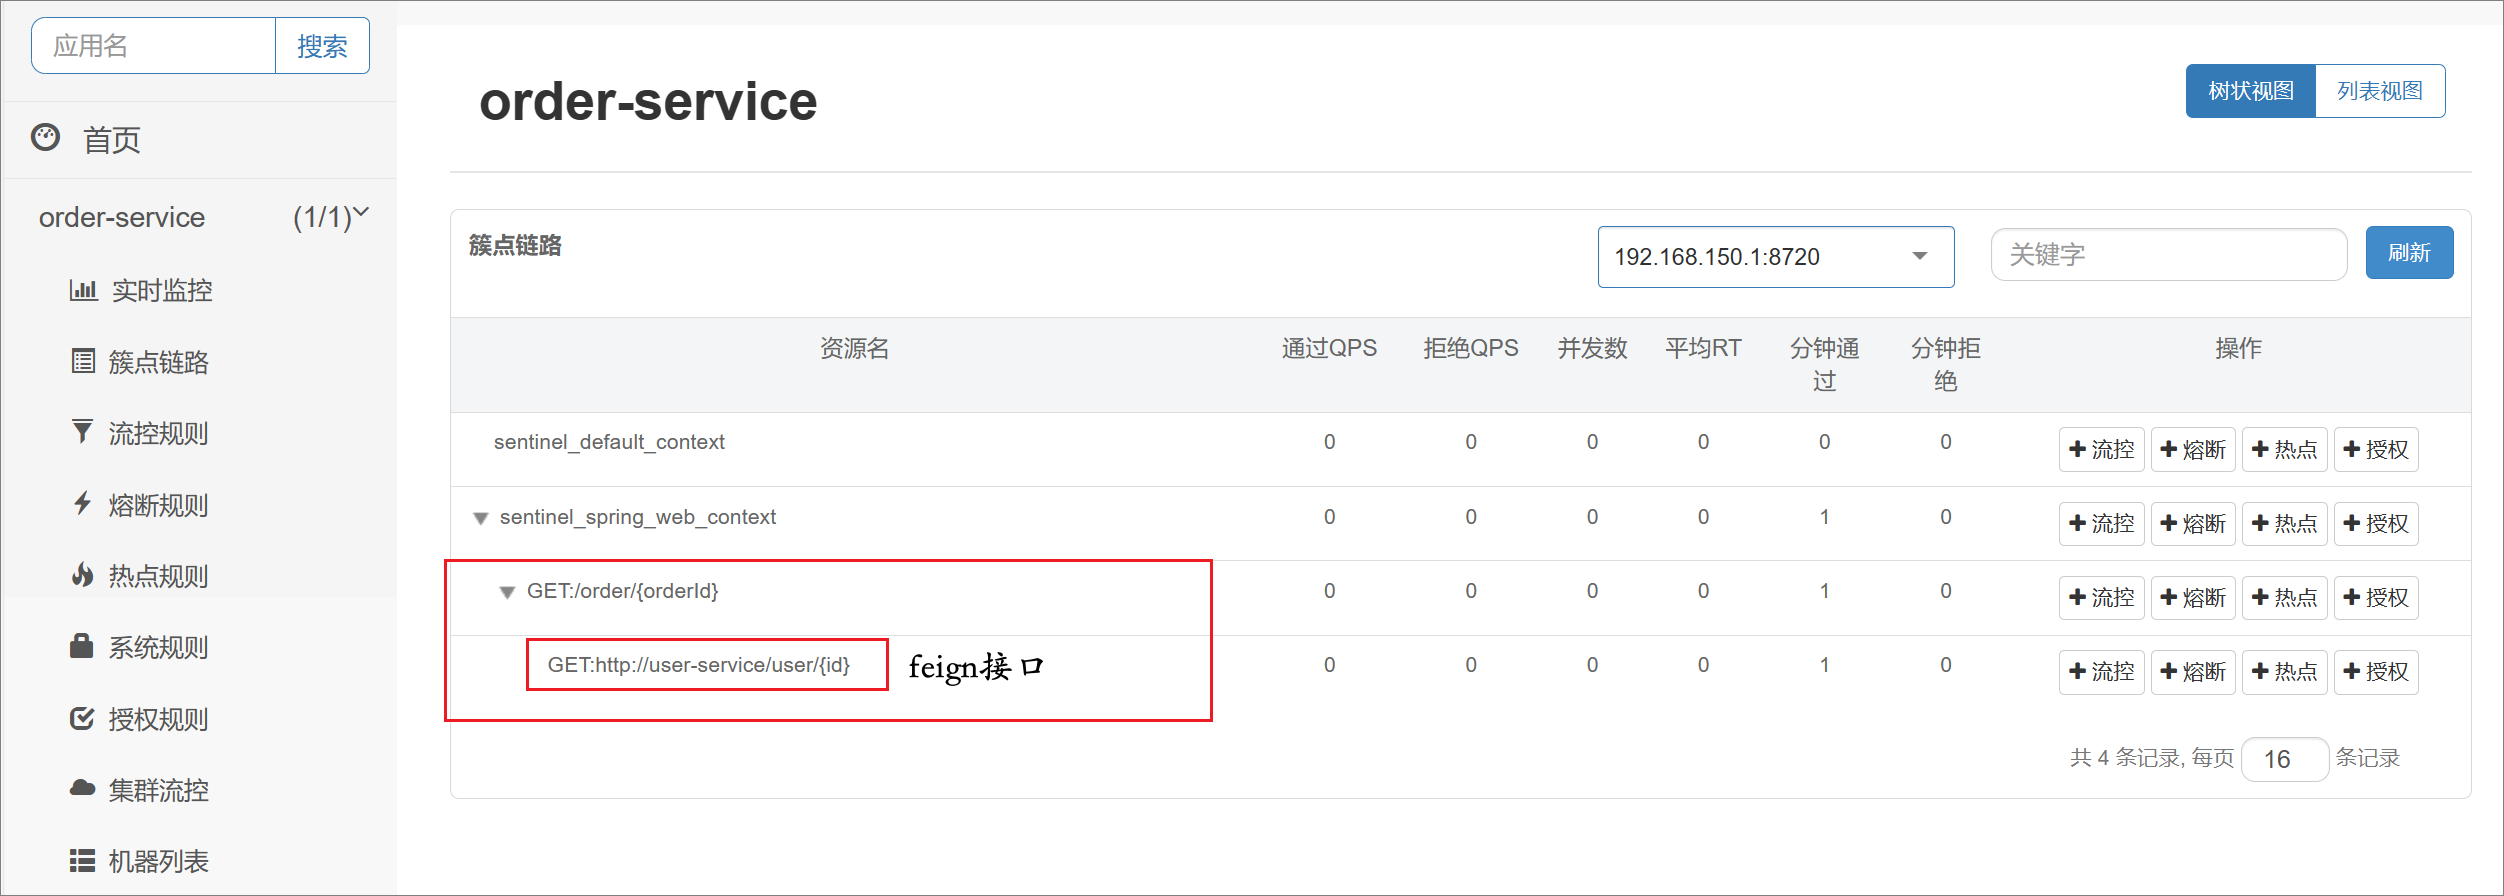
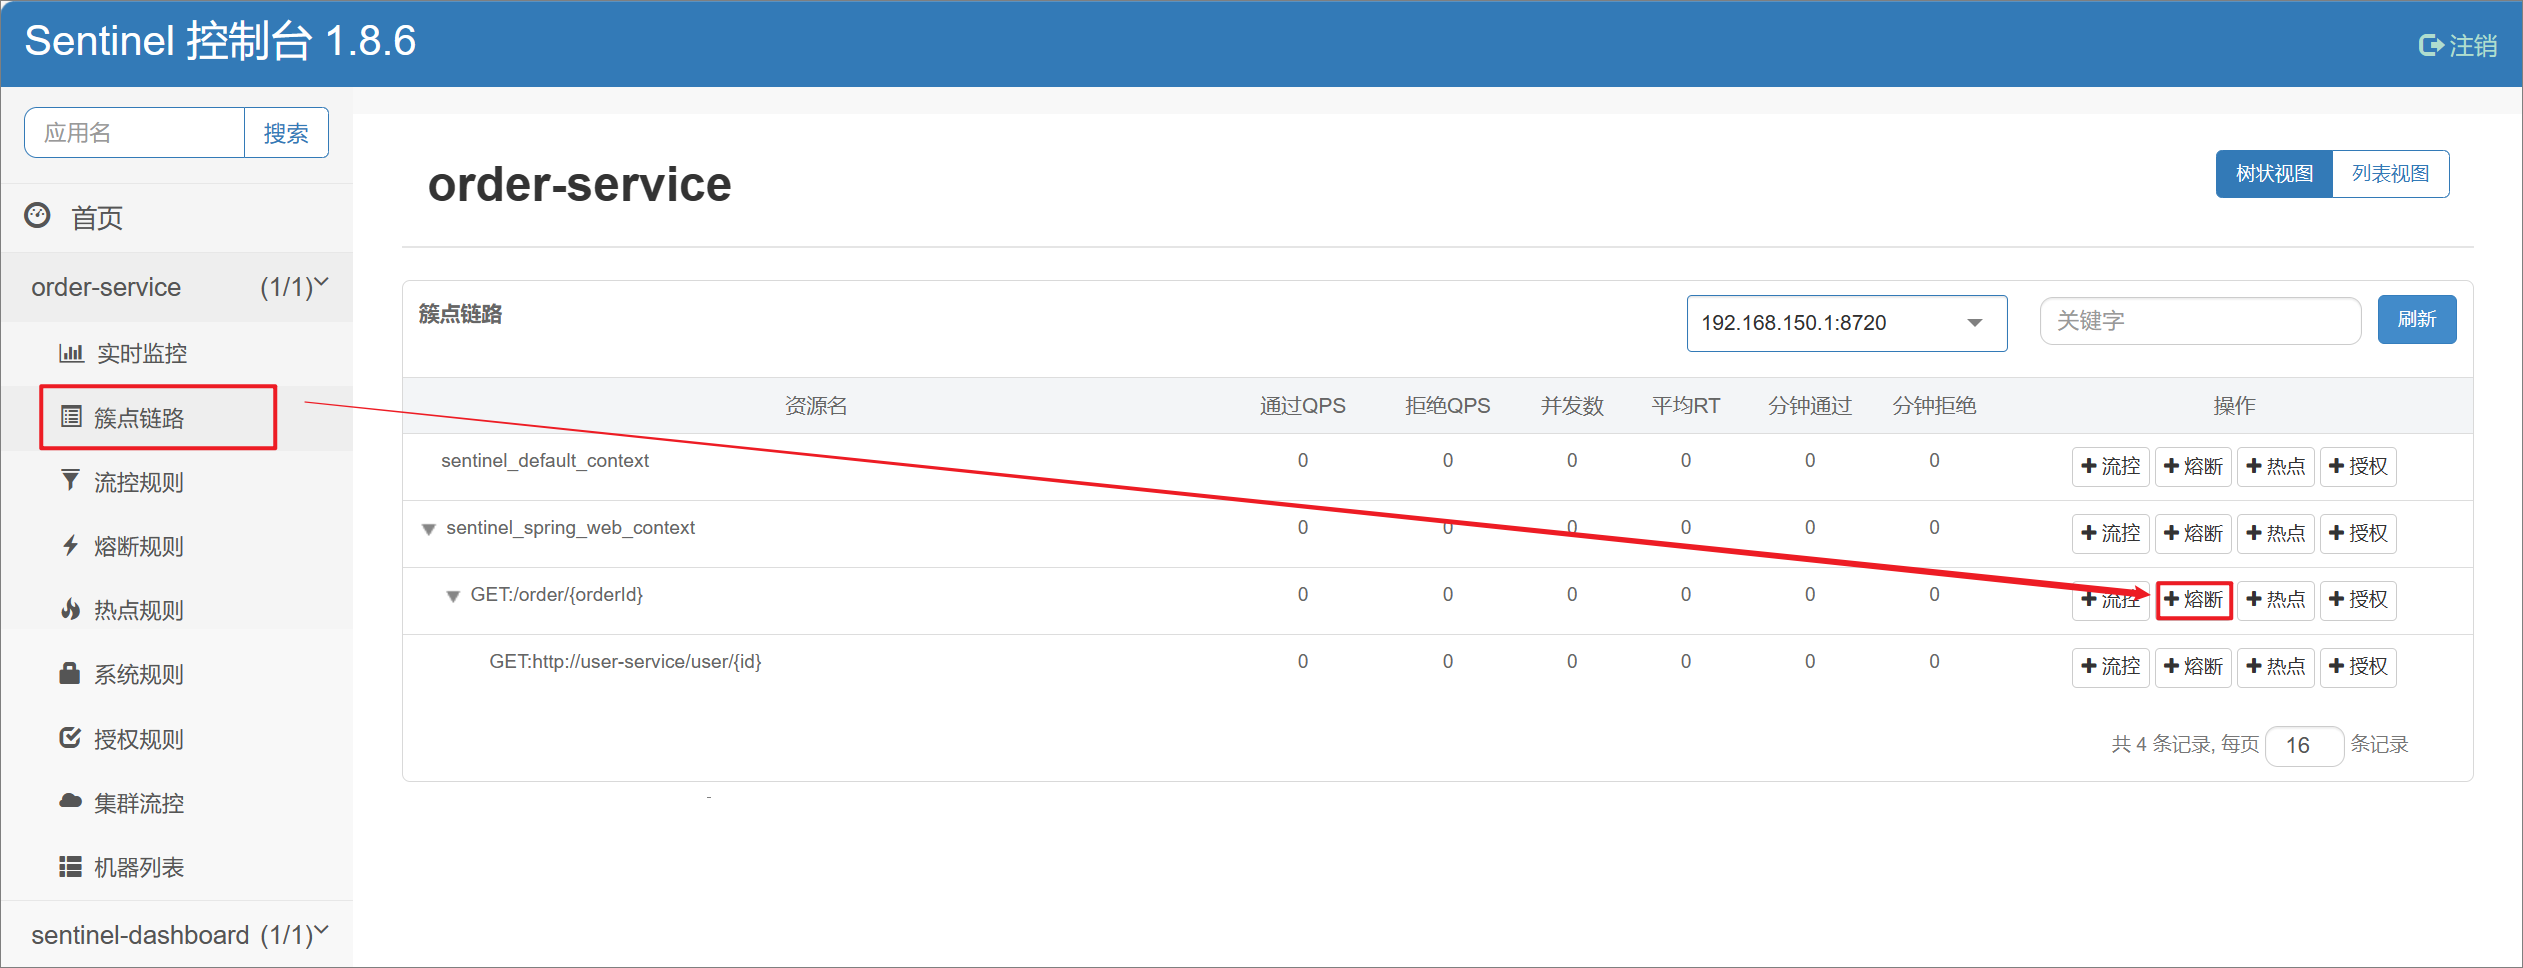
5. Visit the sentinel-dashboard console to view the order service request resources: http://localhost:8090
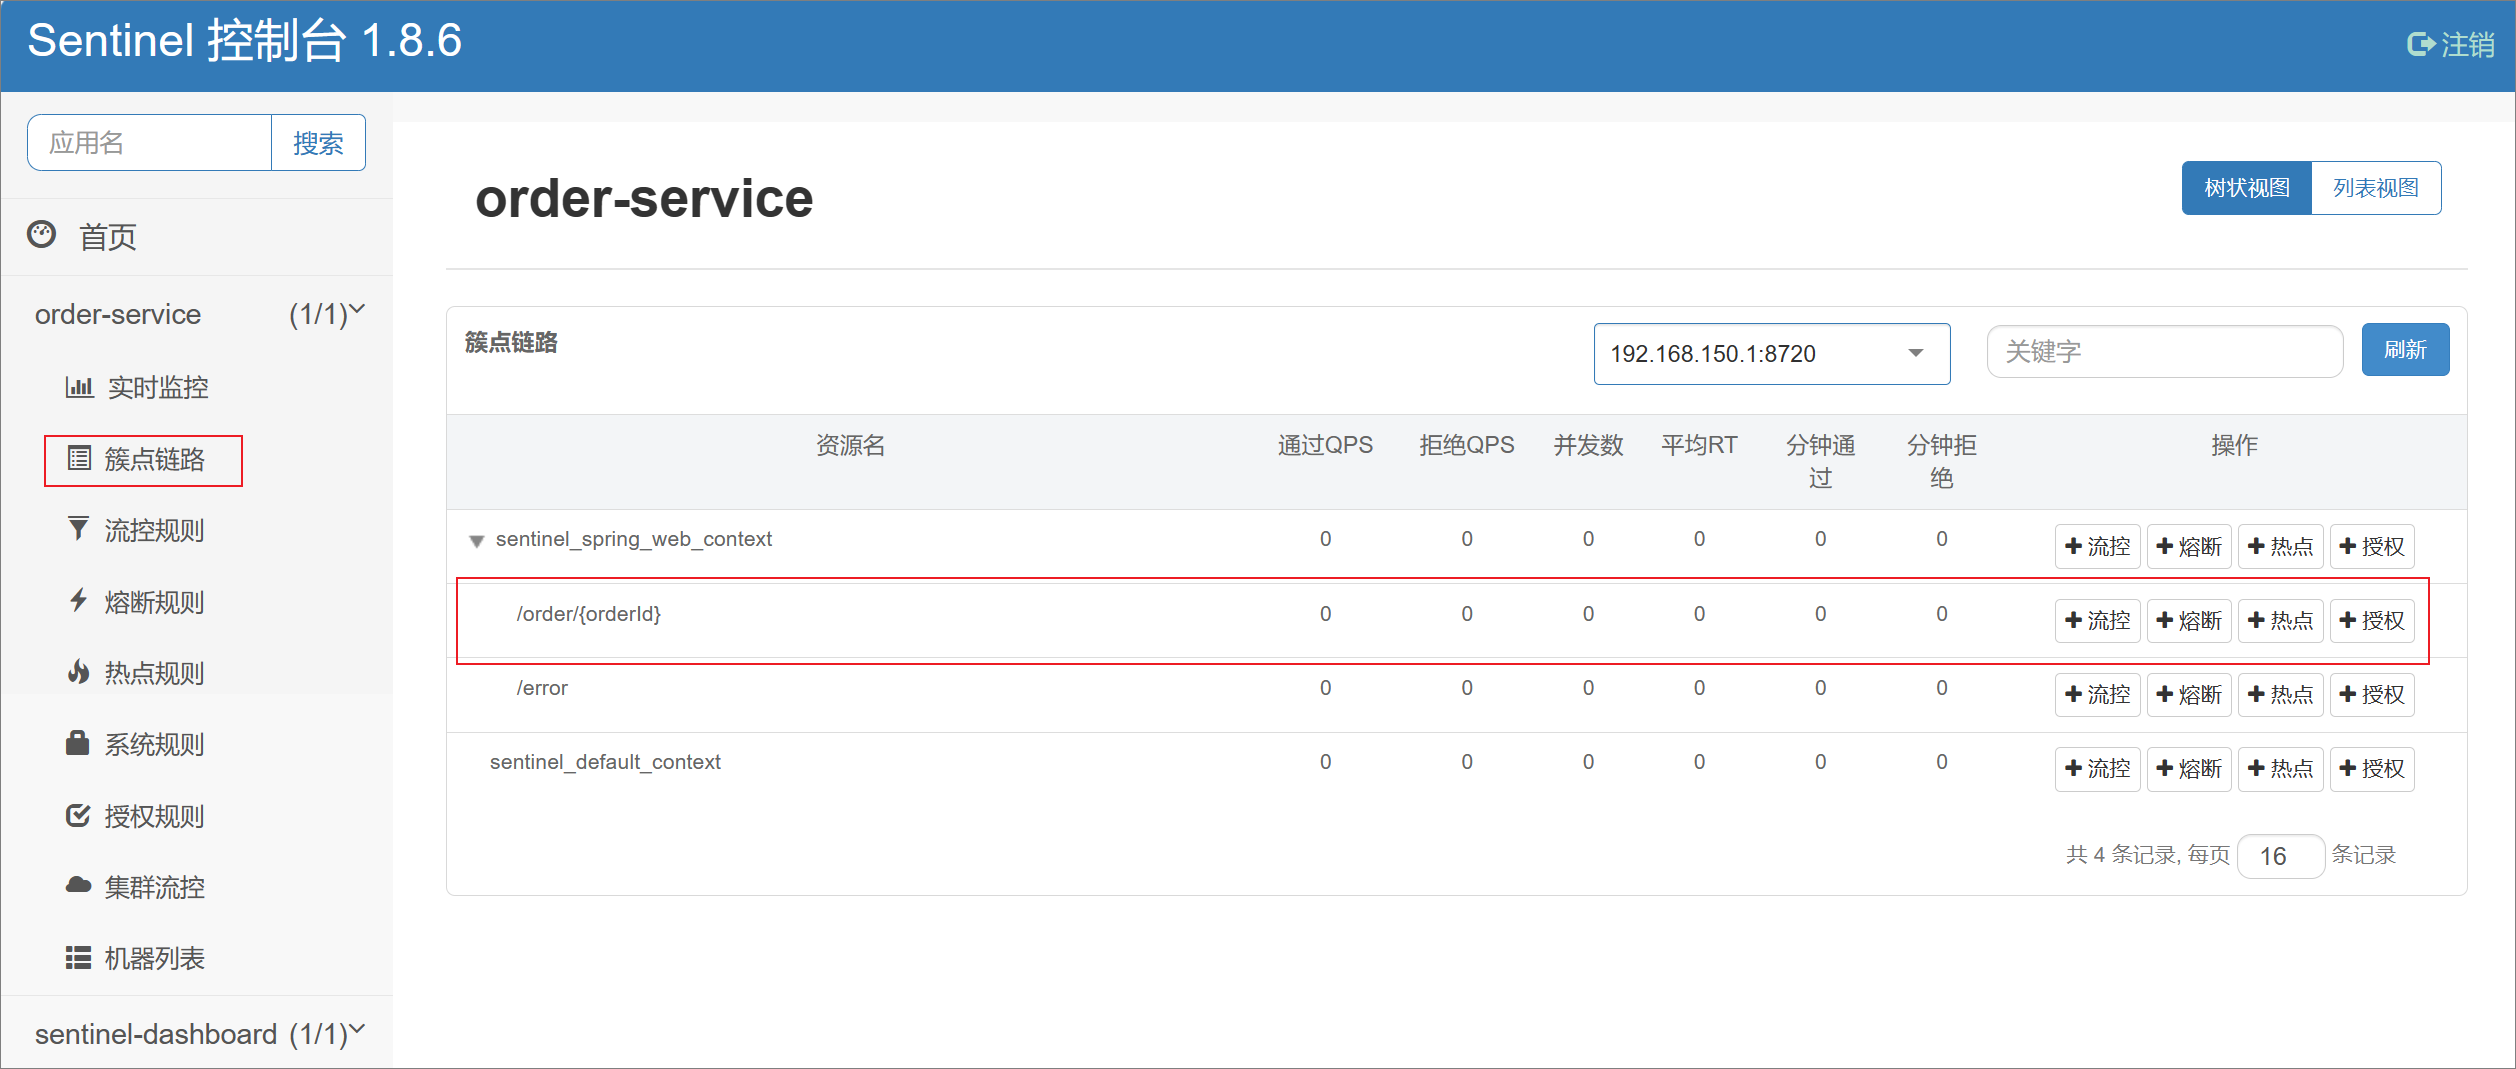
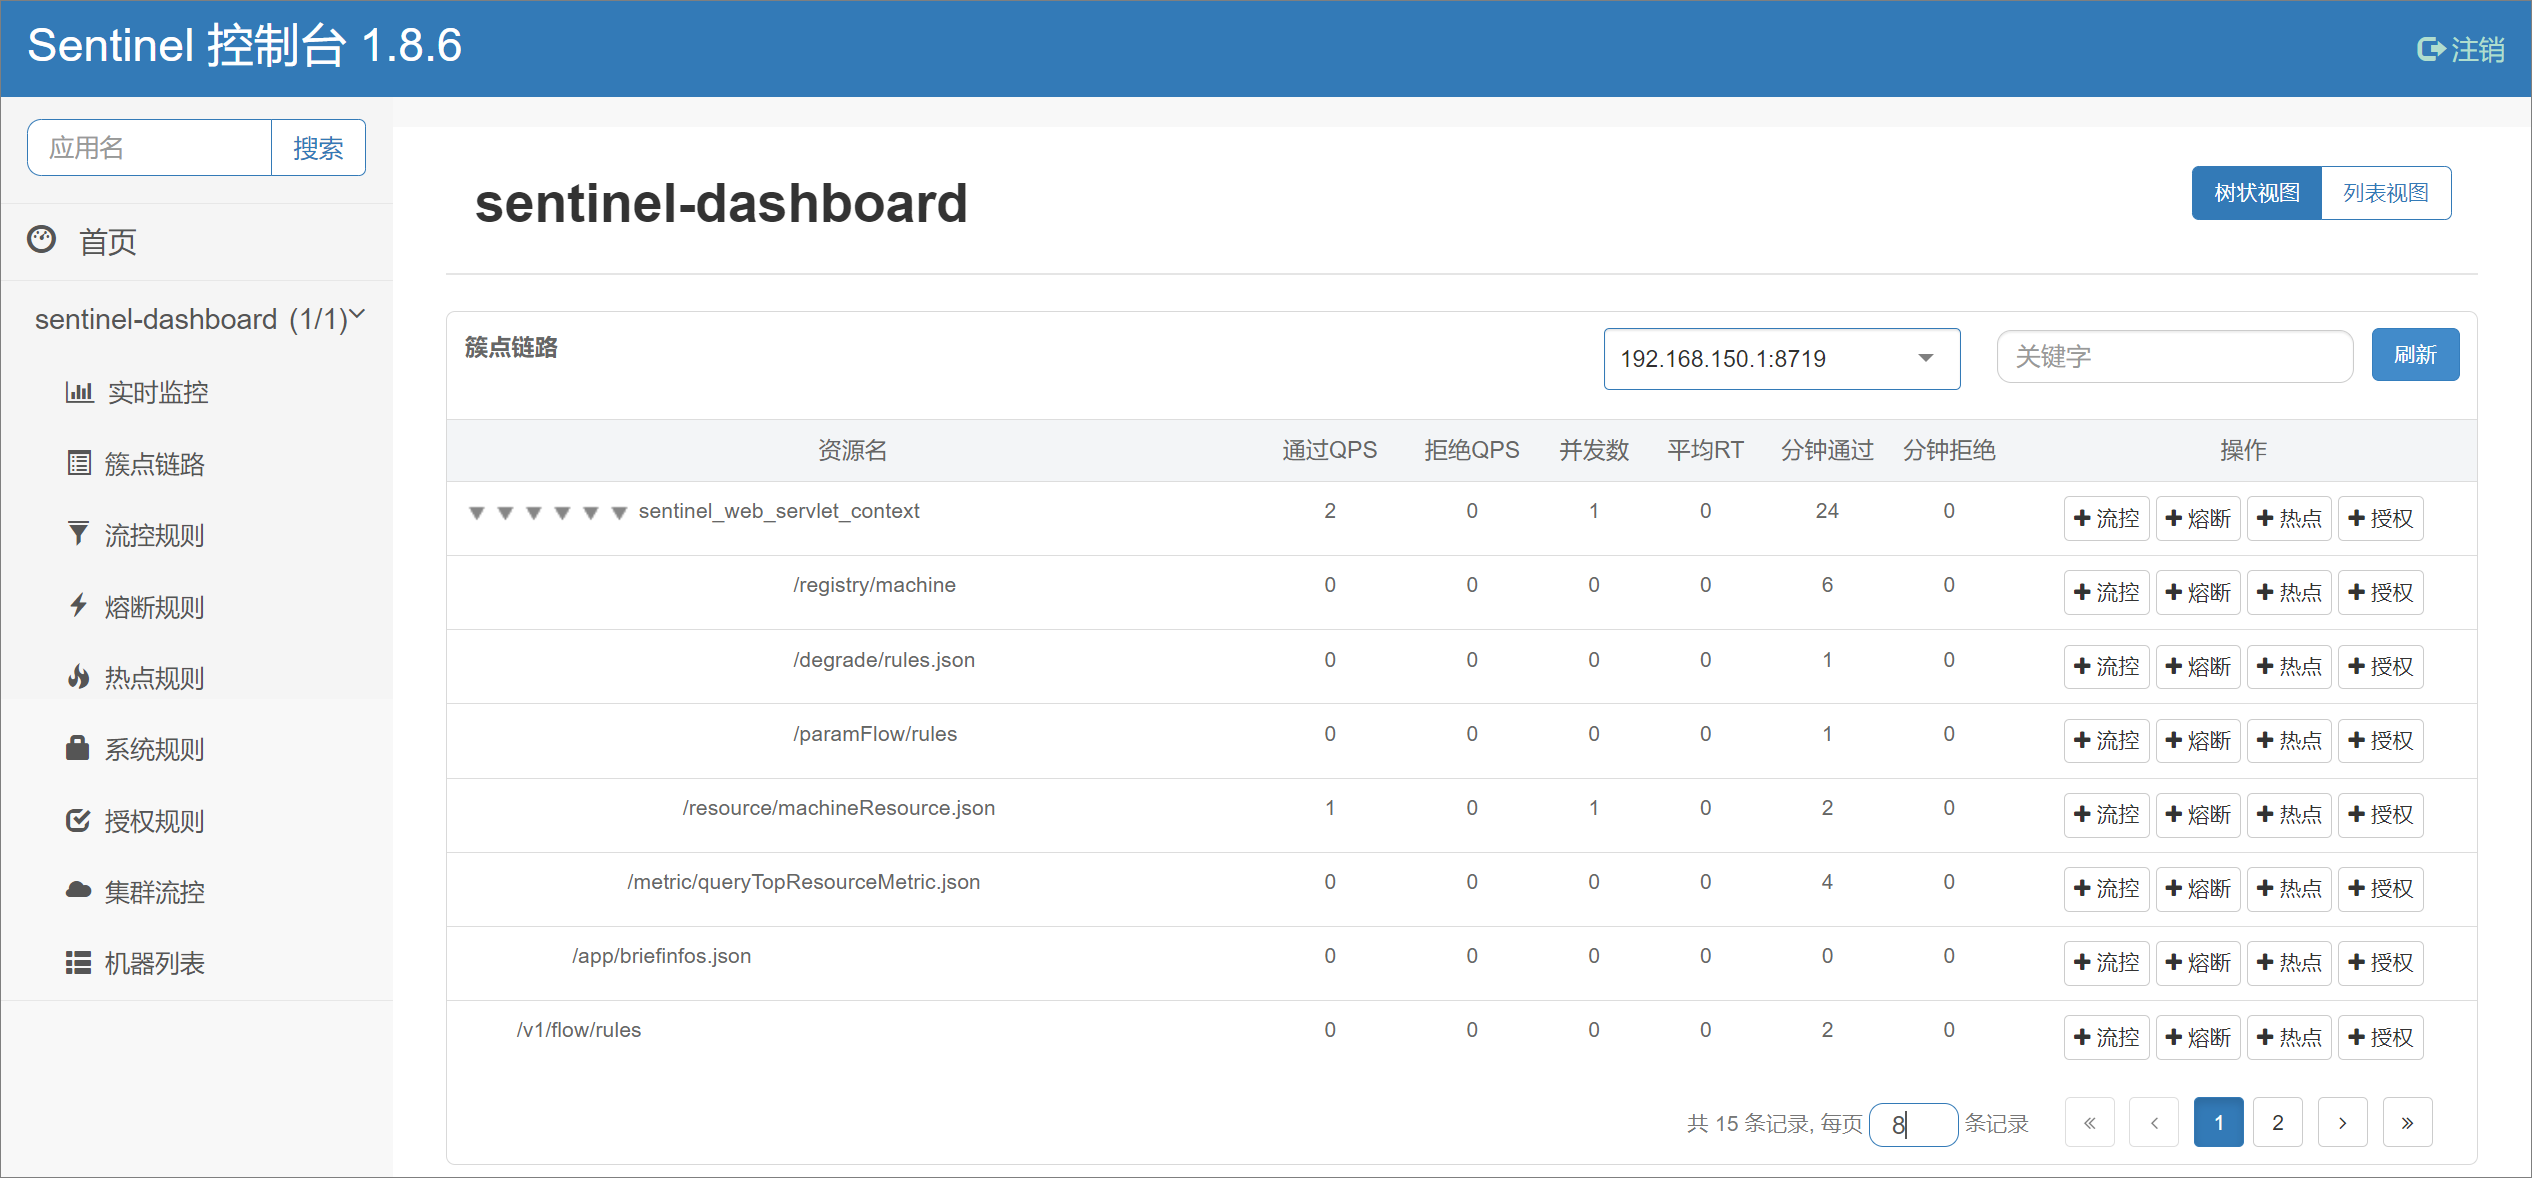
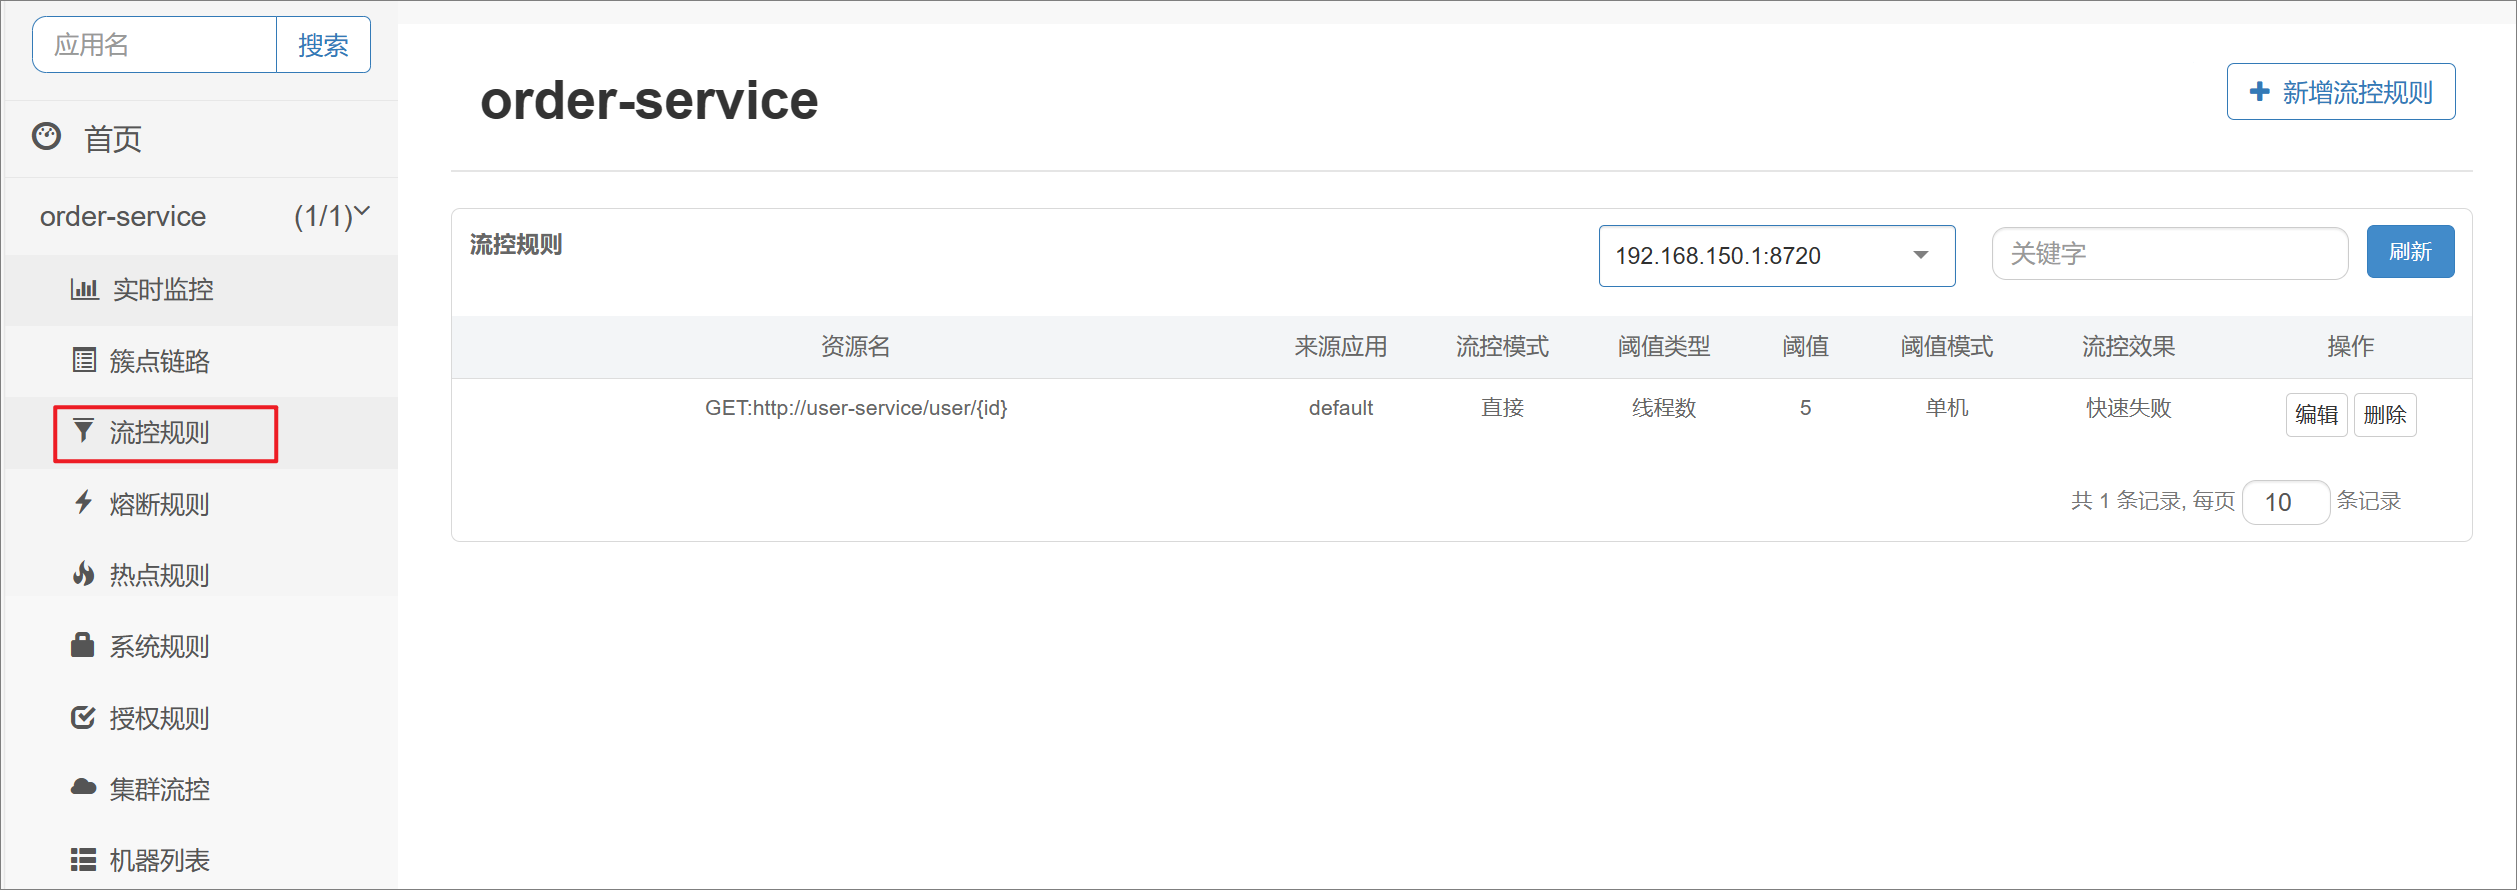
Cluster point link: It is the calling link within the project. Each interface monitored by Sentinel in the link is a resource. By default, Sentinel will monitor each Endpoint (http interface) of SpringMVC. Current limiting, circuit breaker, etc. are all set for the resources in the cluster point link, and the resource name defaults to the request path of the interface.
2. Request current limit
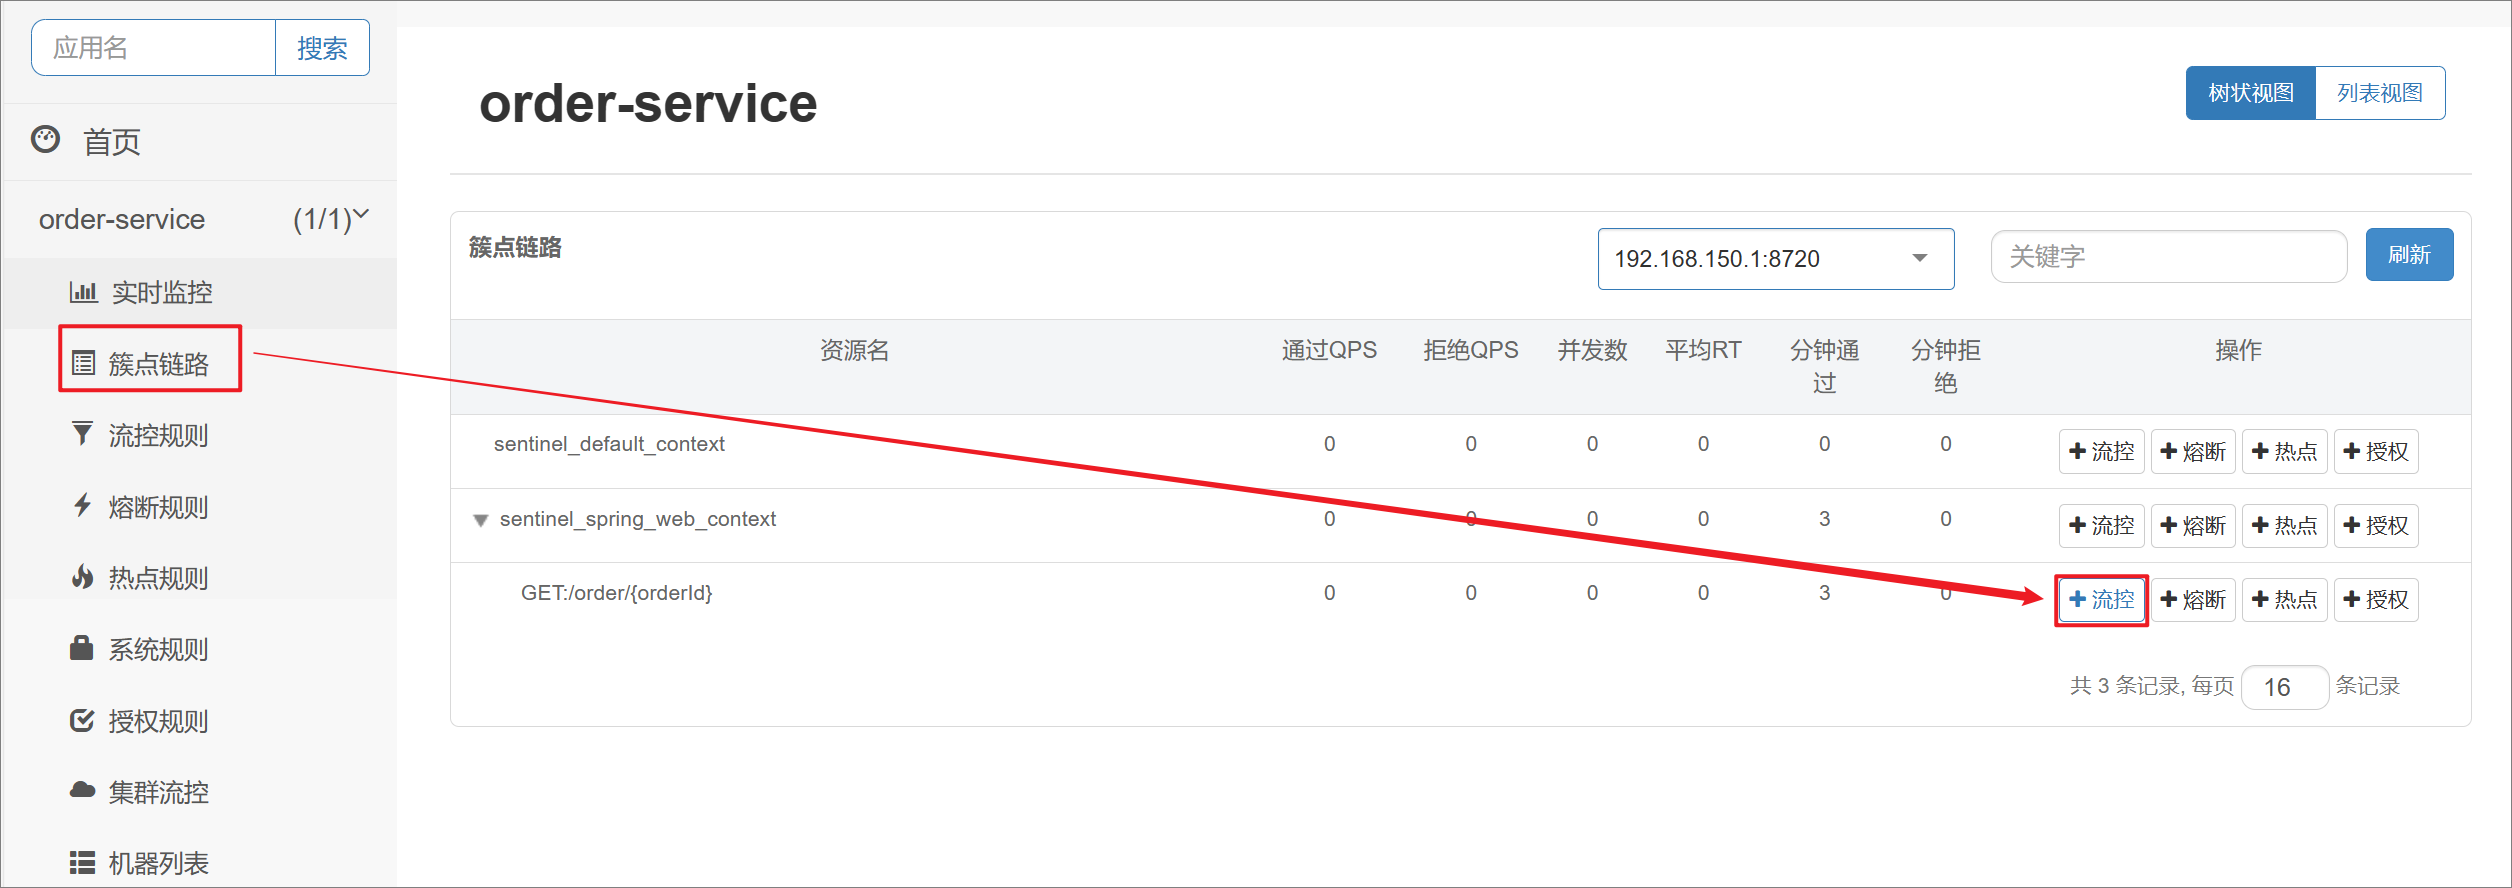
Request current limiting: Limit the number of concurrent requests to the access interface to avoid service failures due to traffic surges.
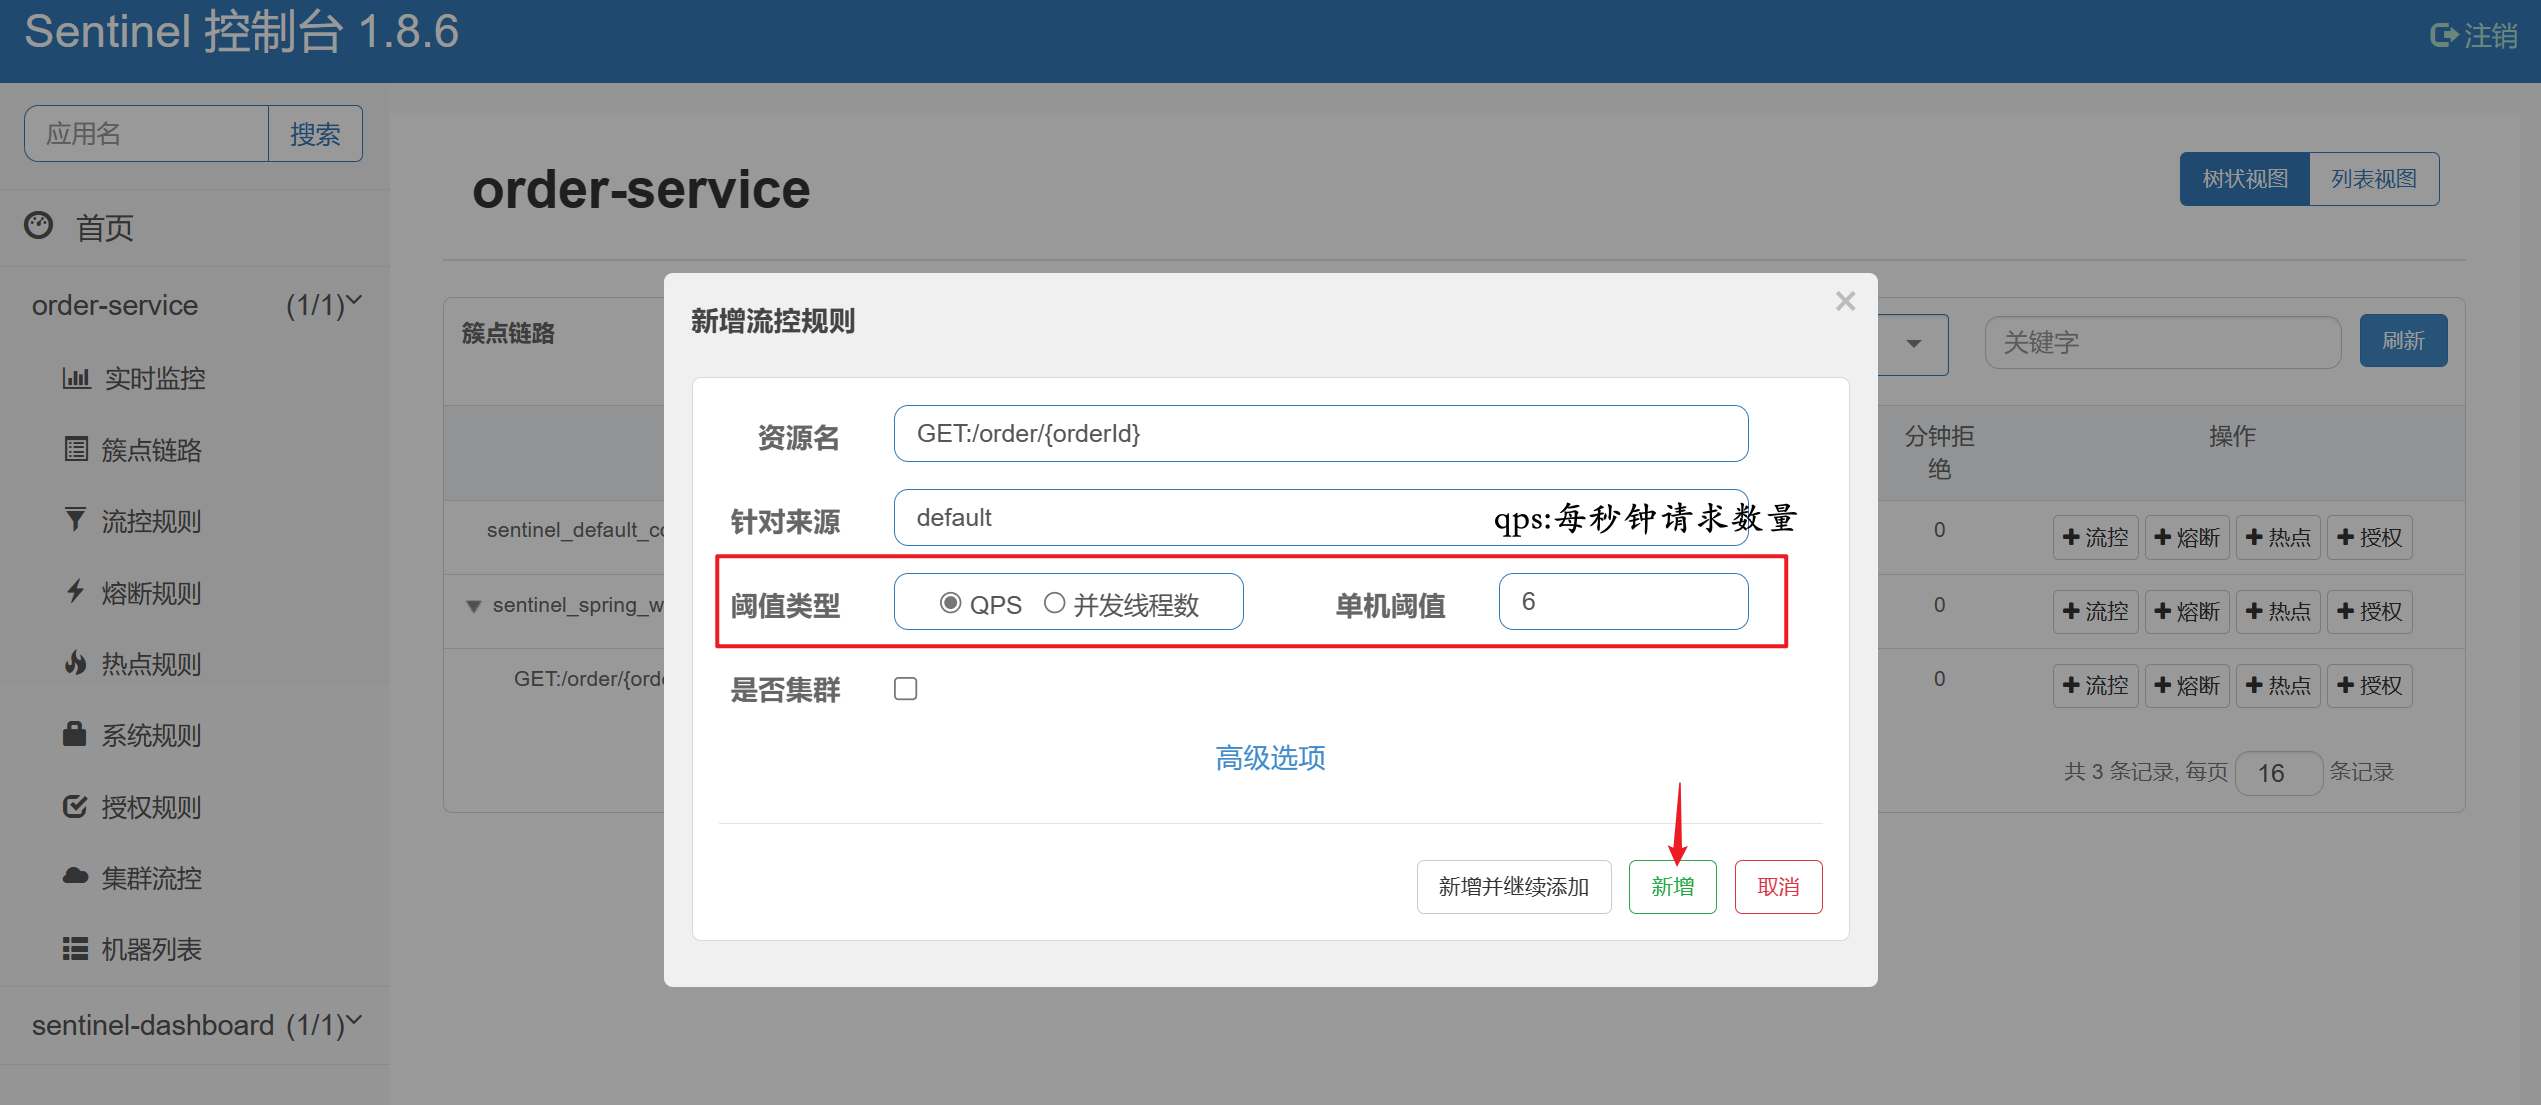
It is also configured in the sentinel console. Click the flow control button behind the specified cluster point link to perform current limiting processing:
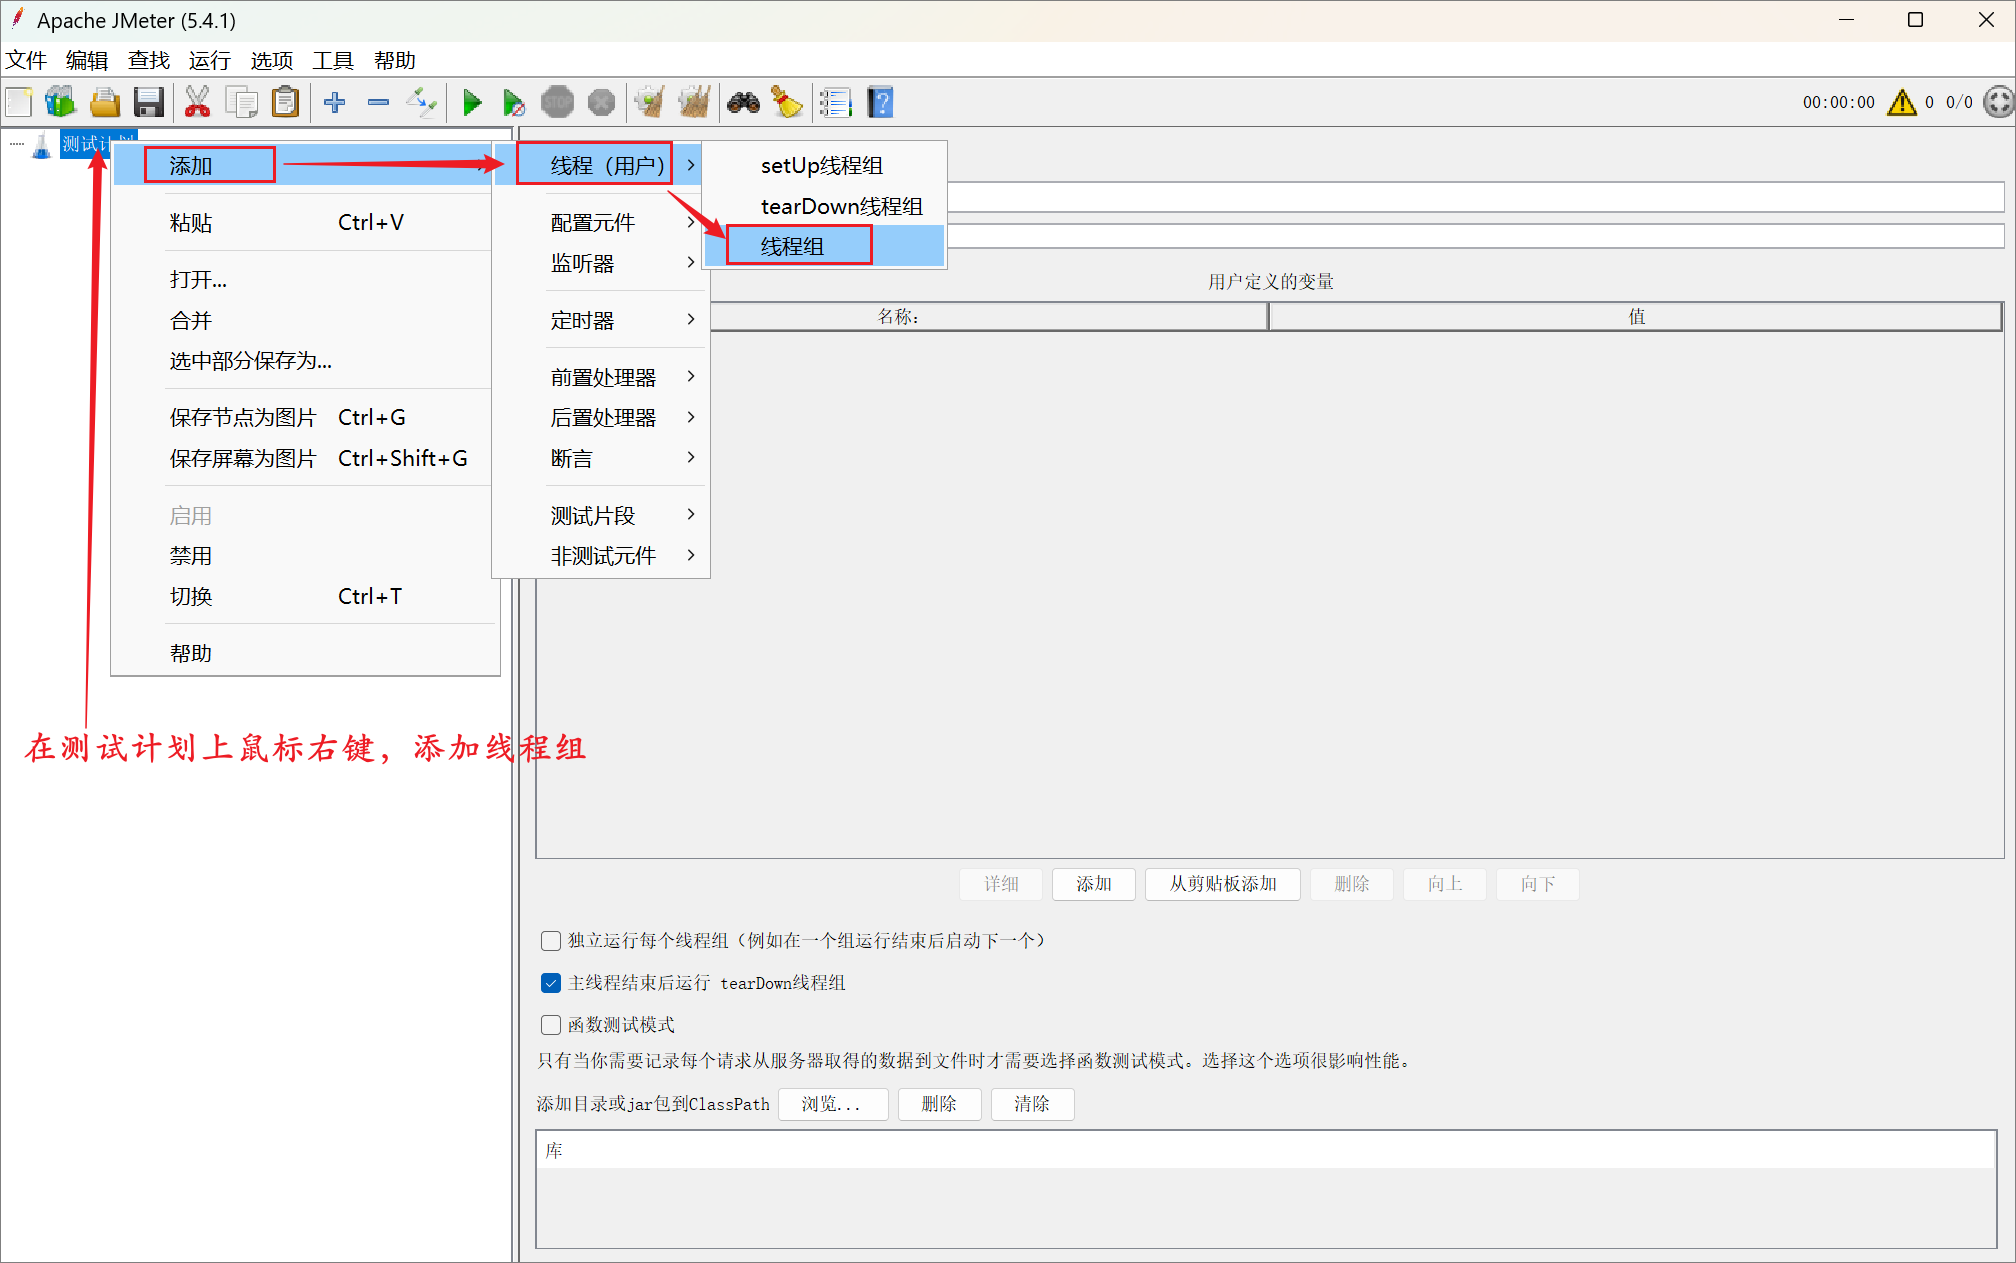
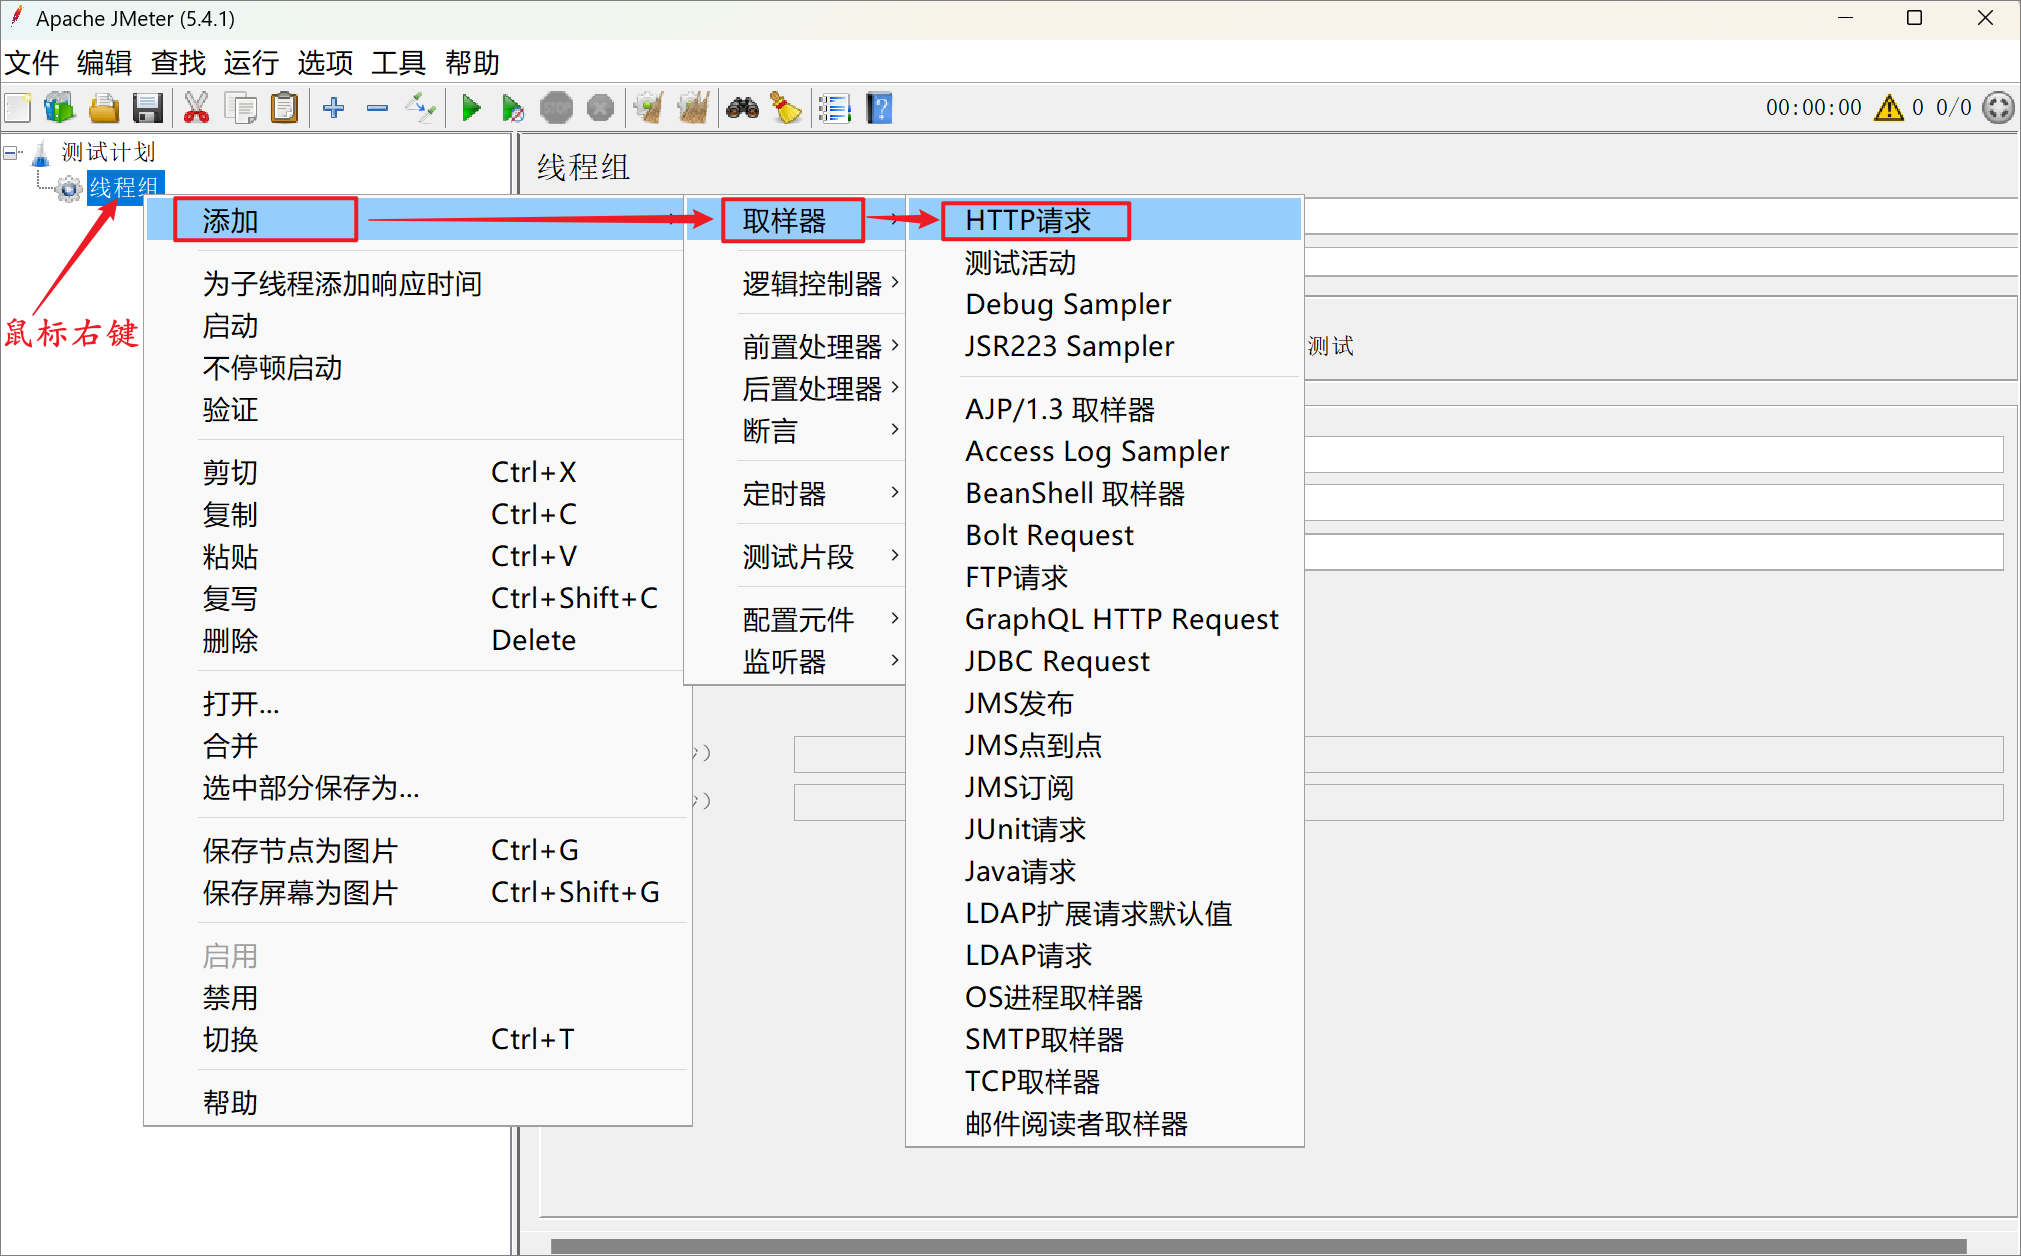
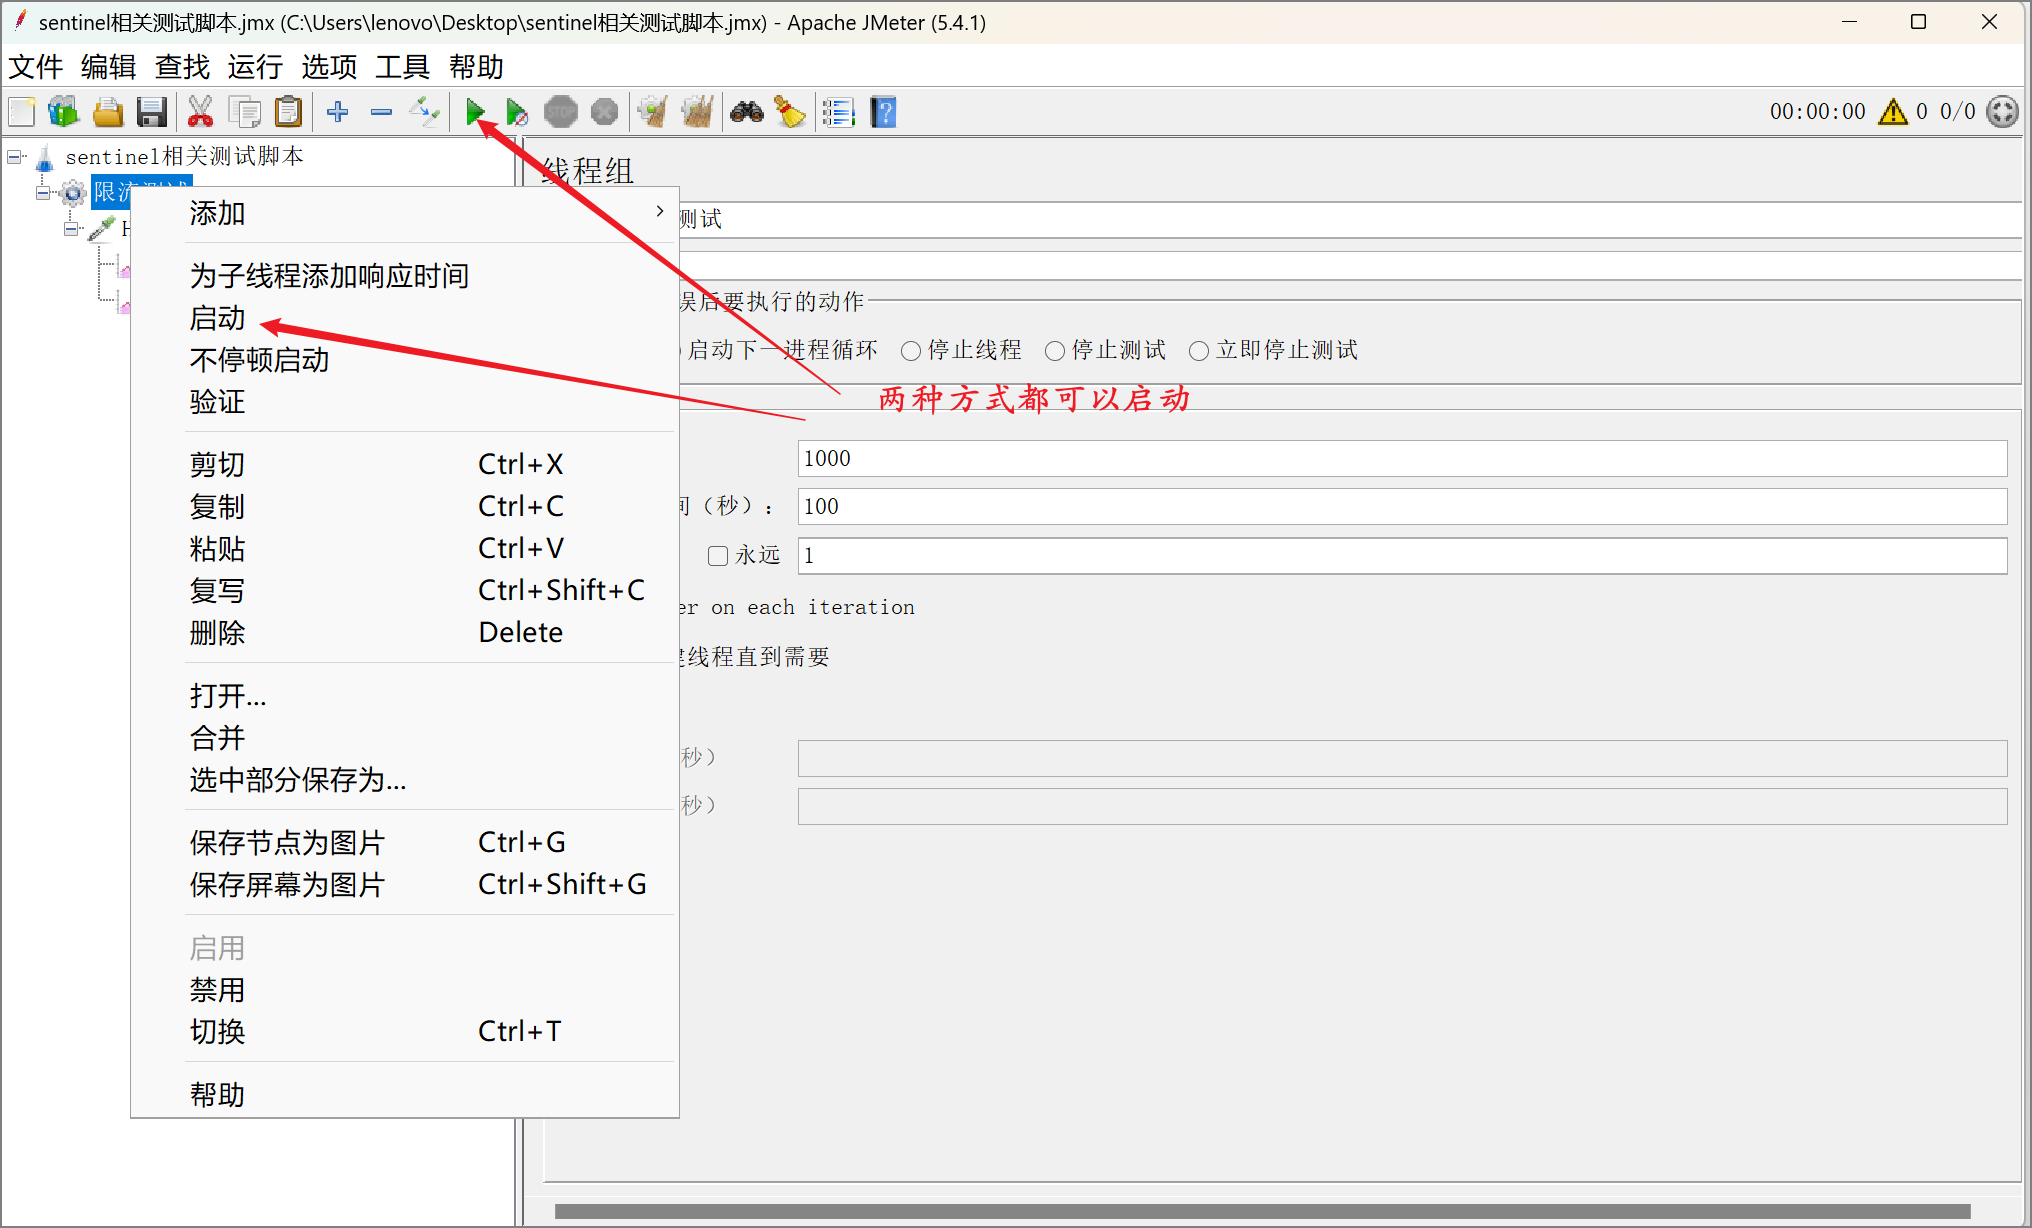
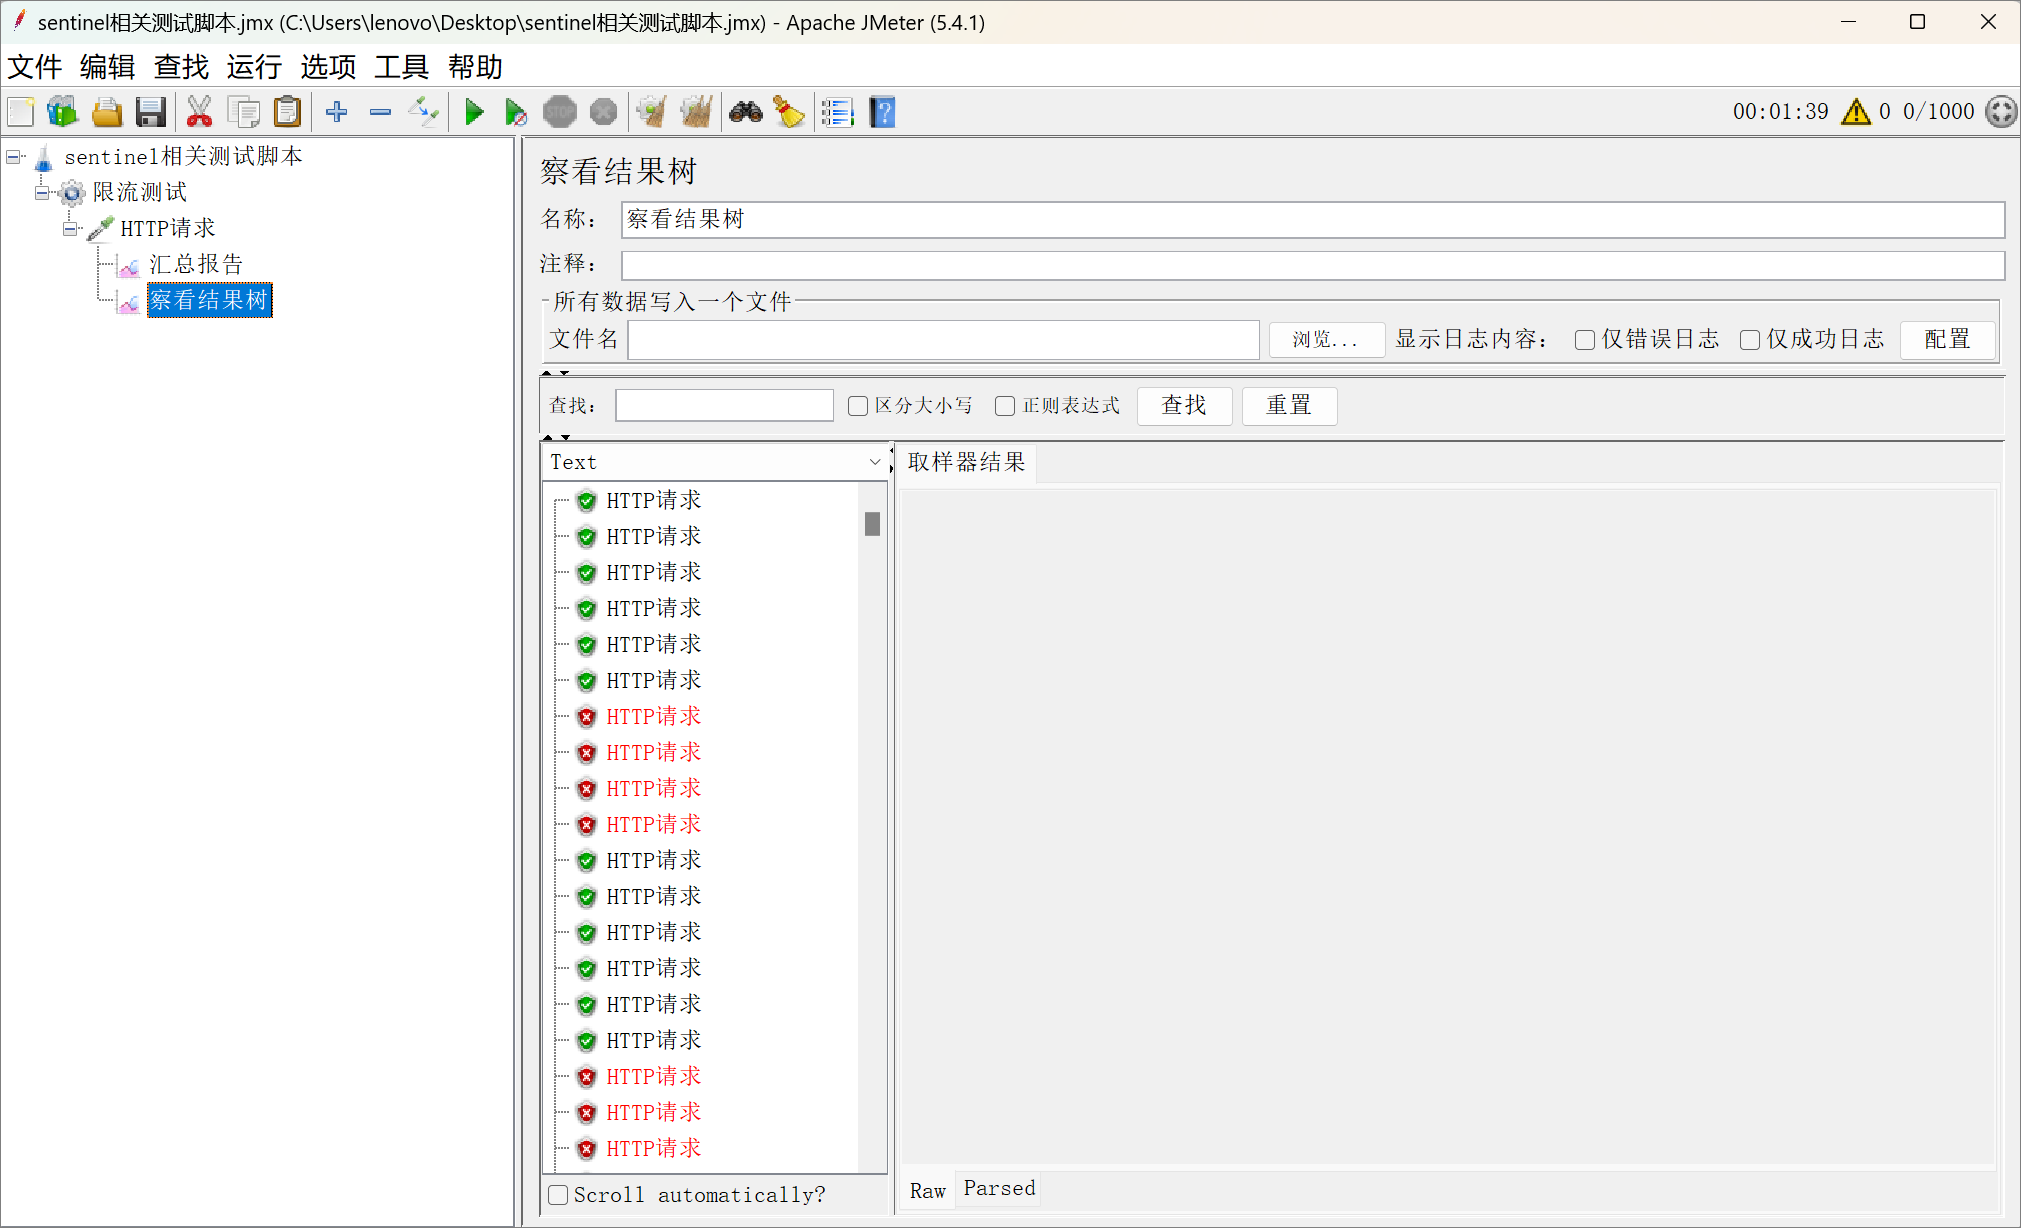
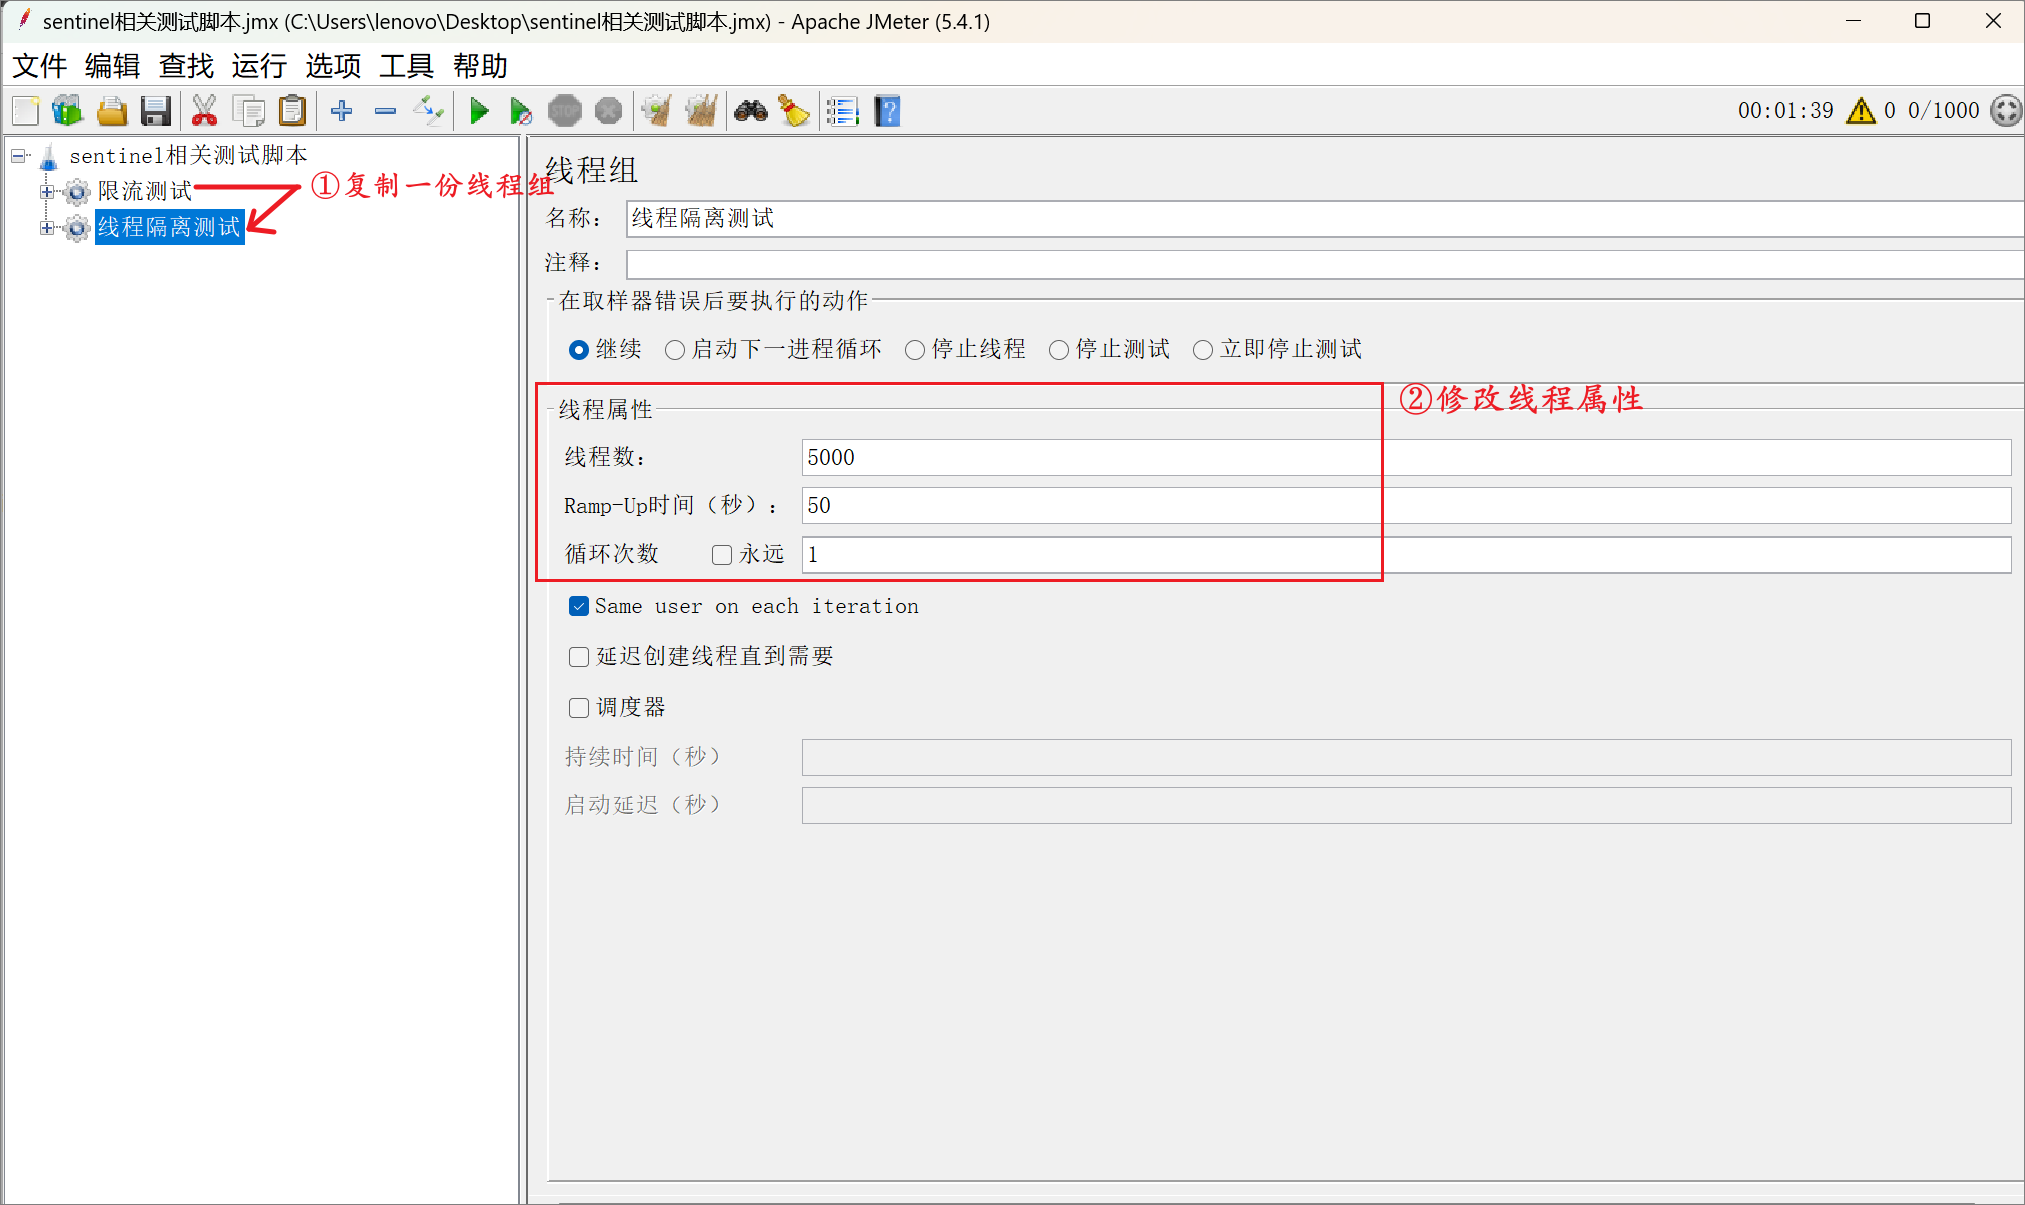
Use JMeter to do stress testing:
(1) Create a thread group for the test plan

(2) Add an http sampler to the thread group:
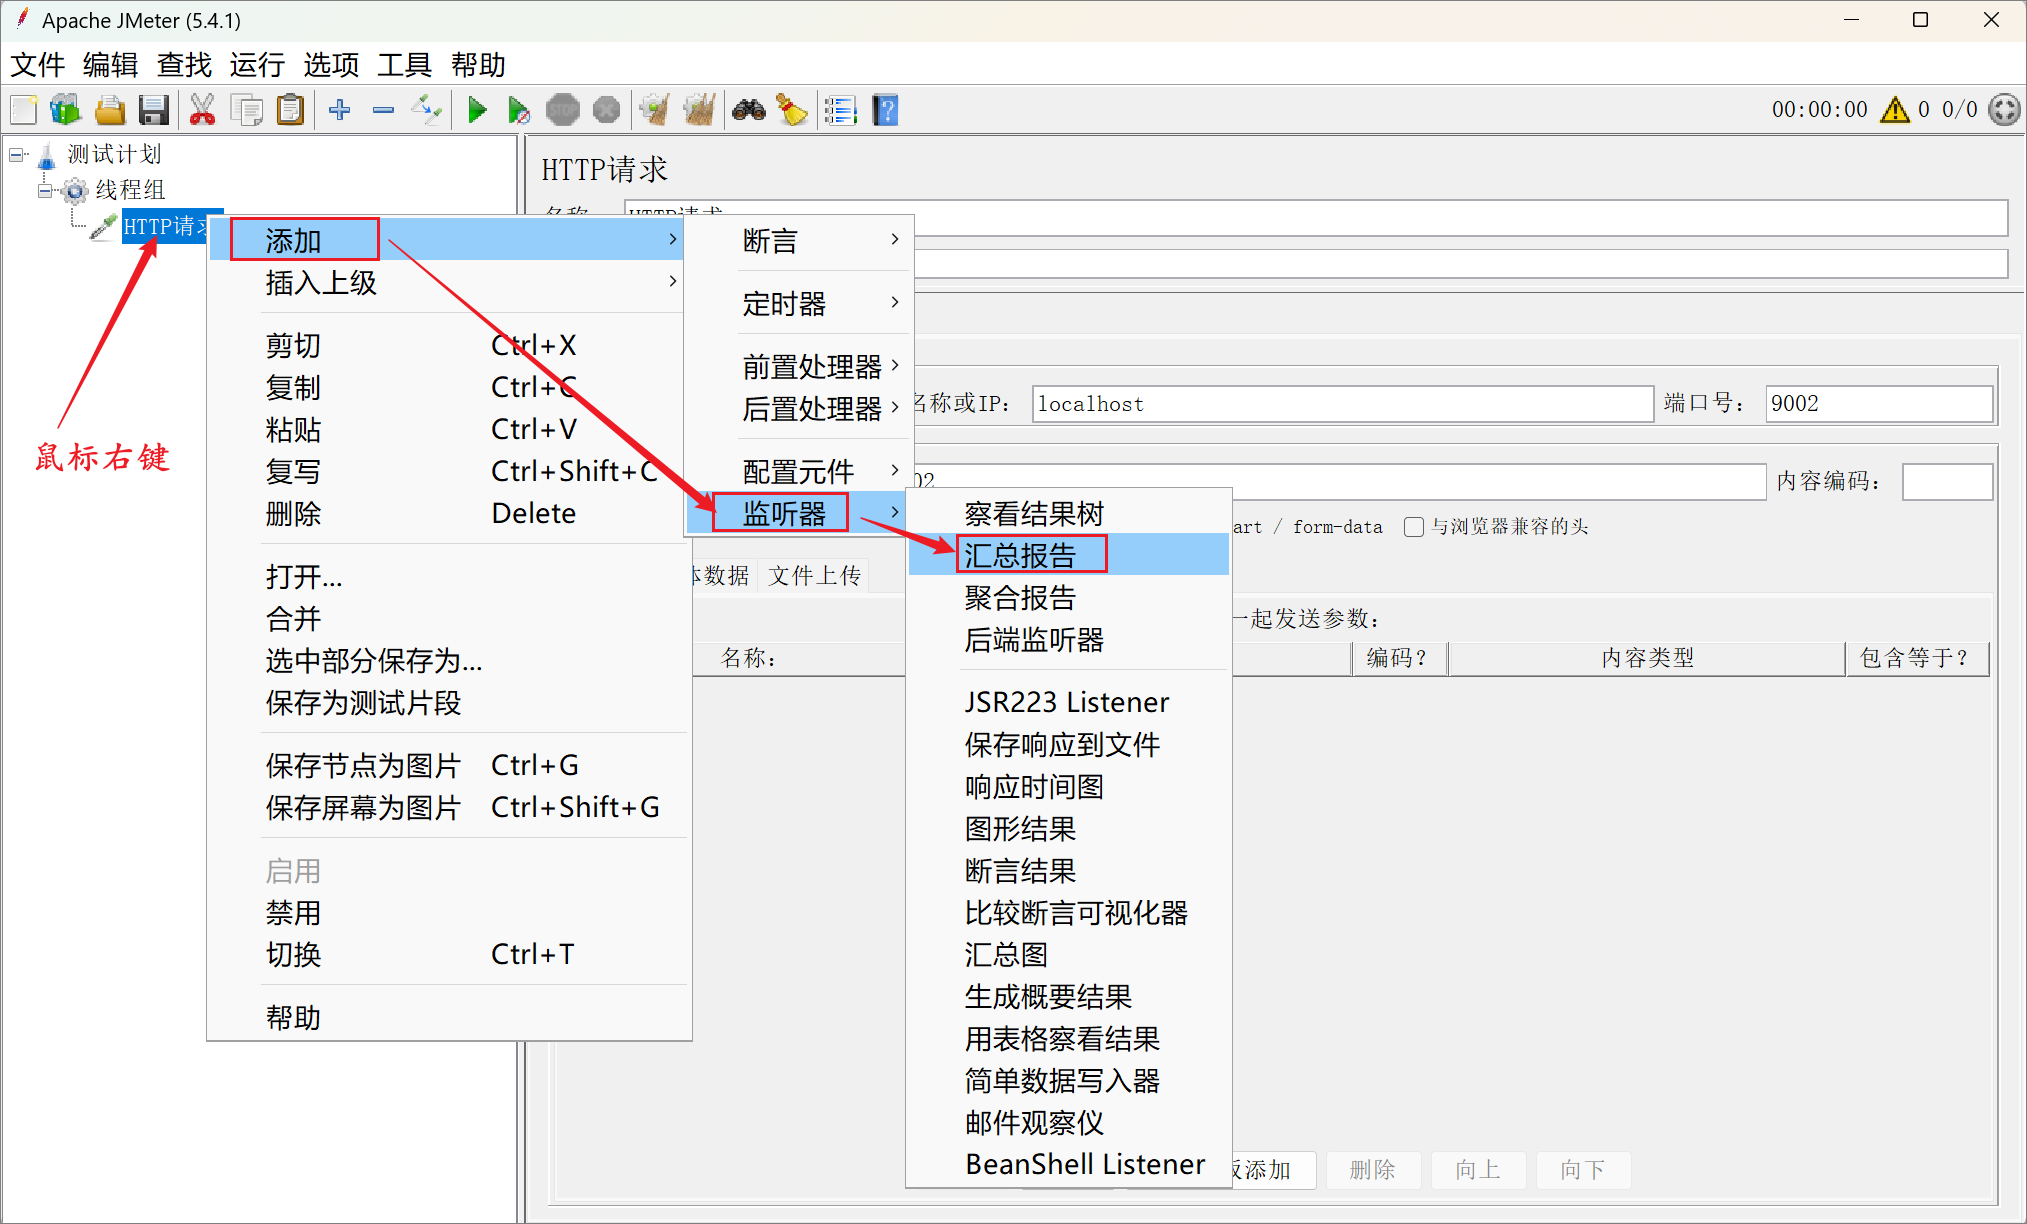
(3) Add a listening report for the http sampler:
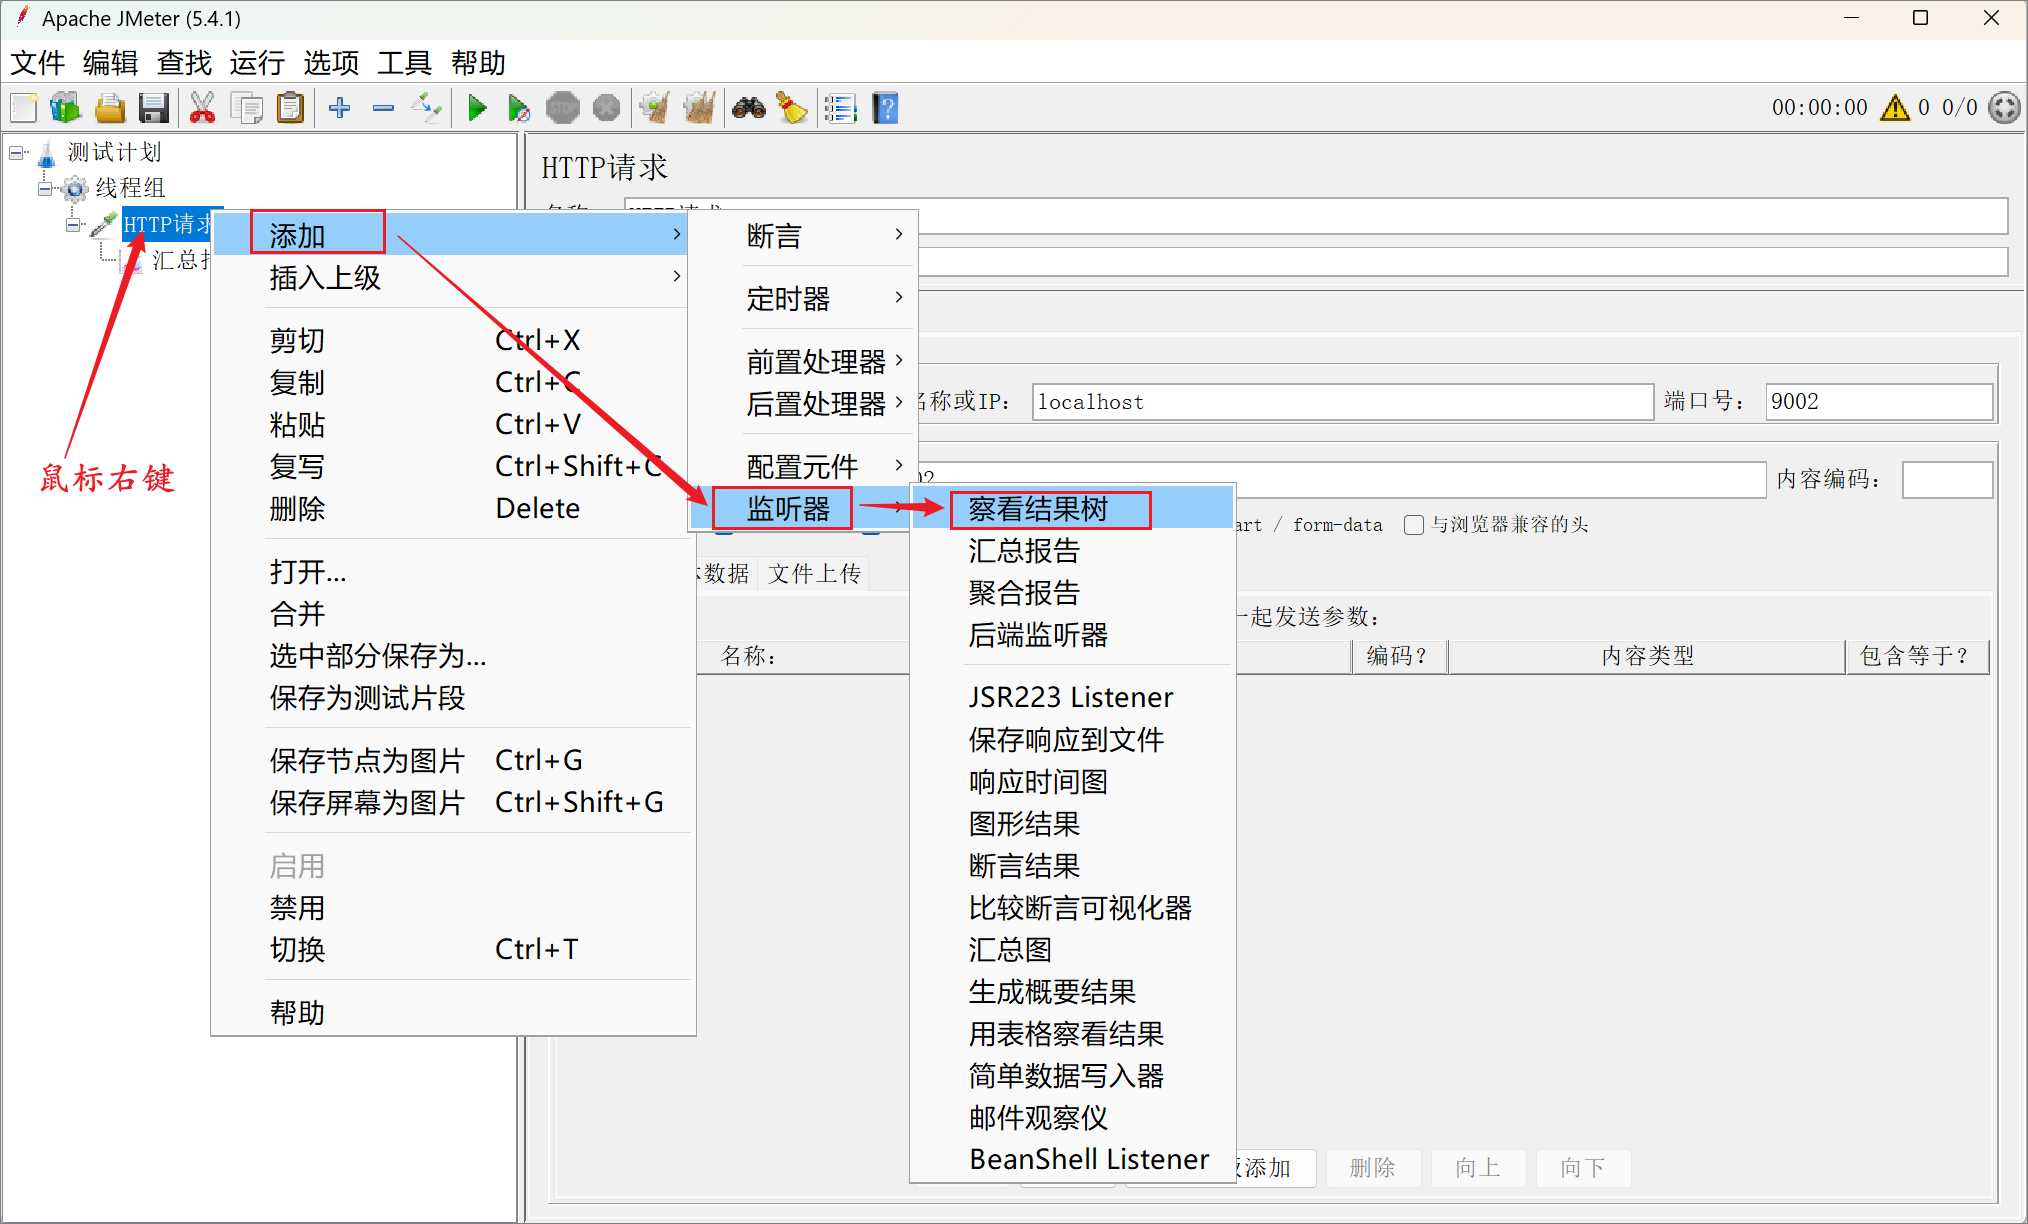
(4) Add a view result tree for the http sampler:
(5) Execute test

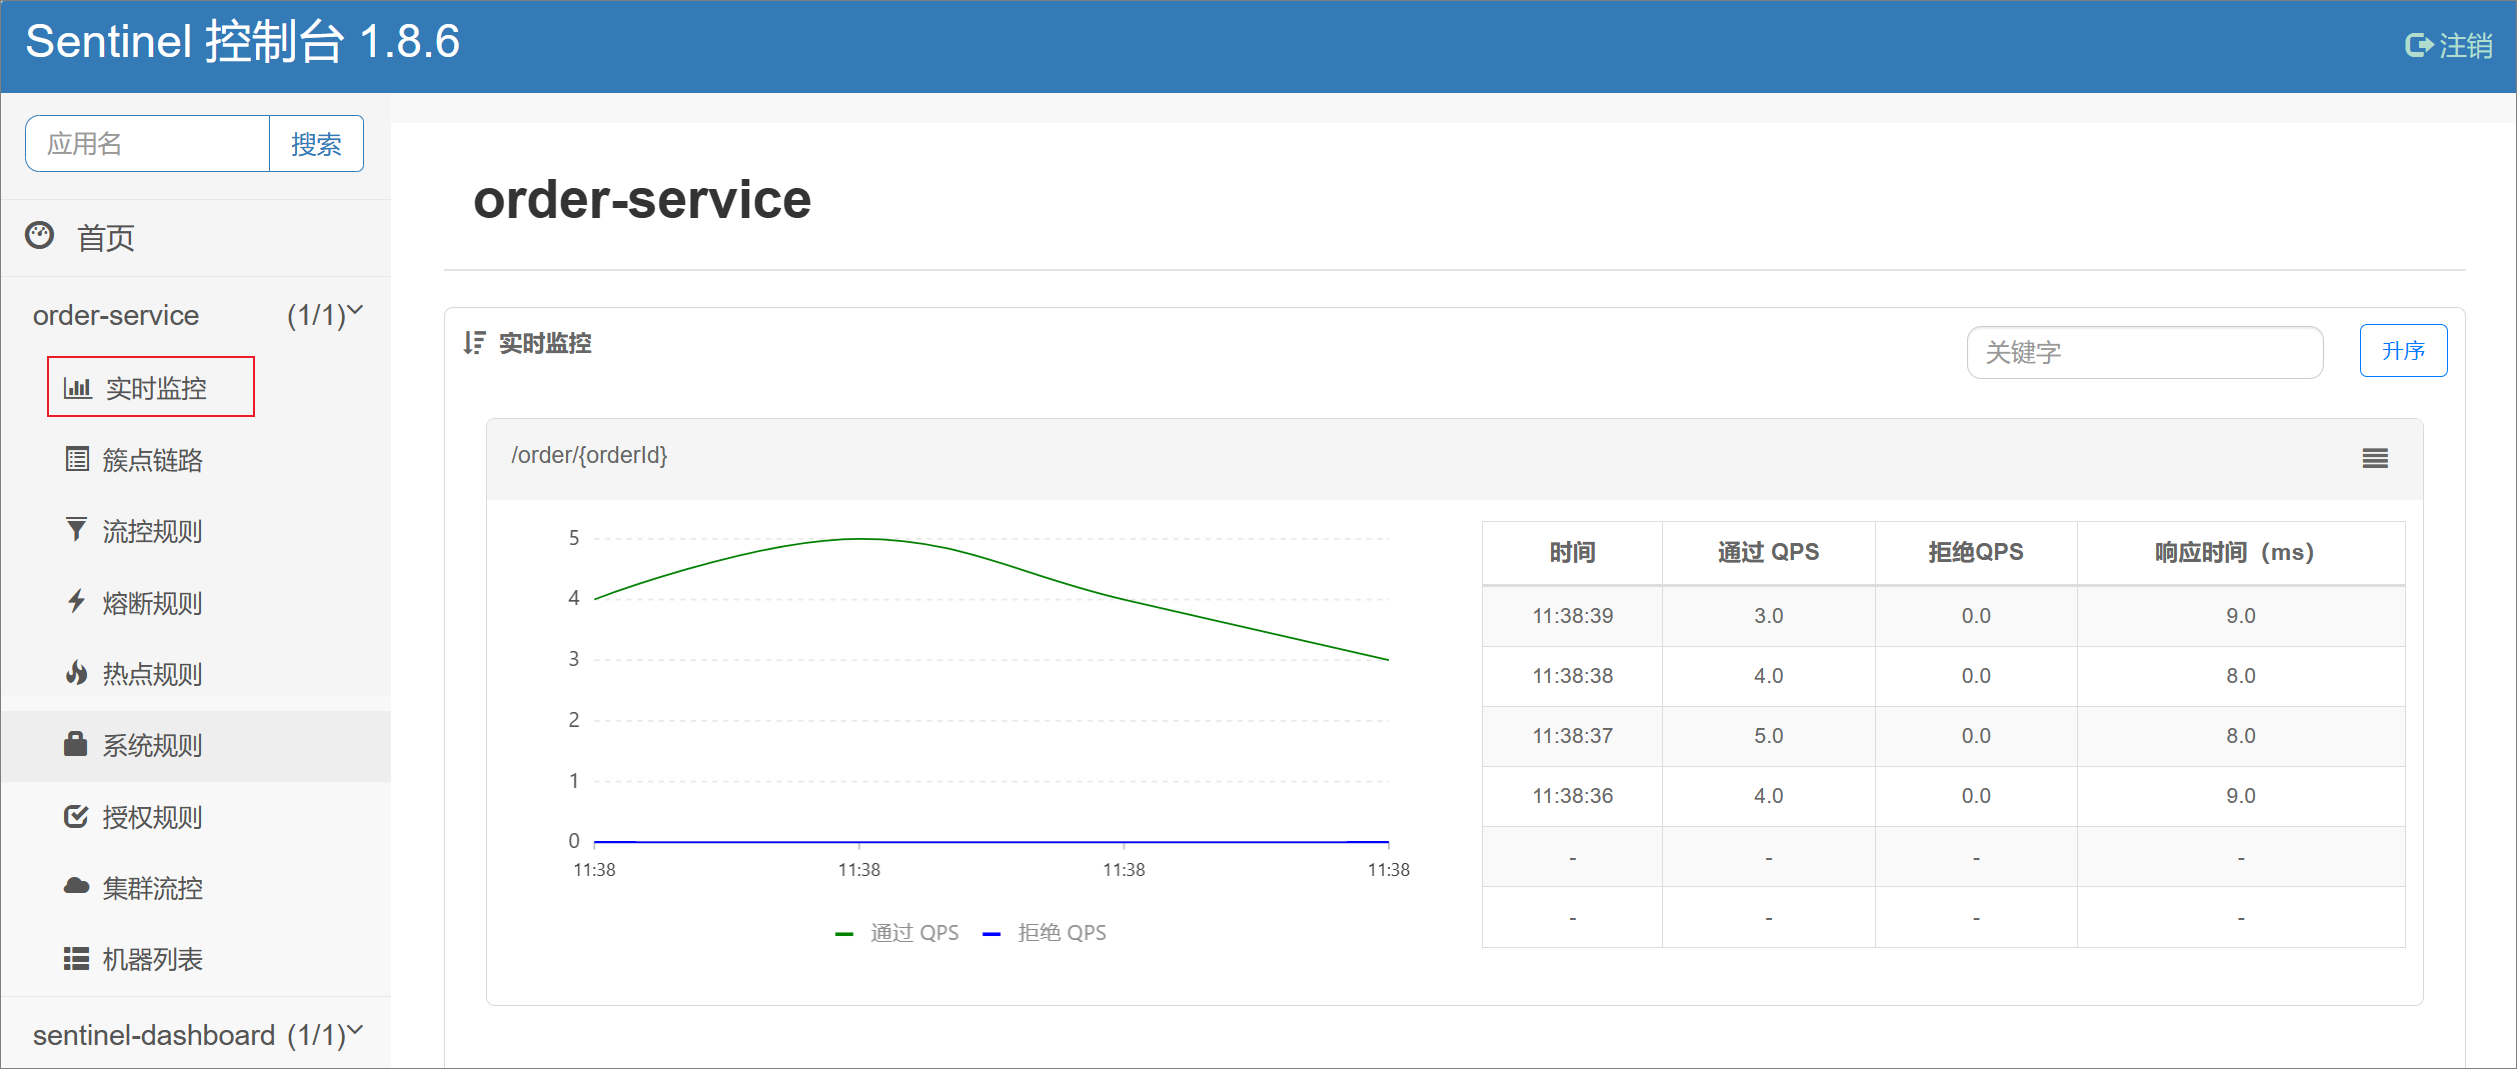
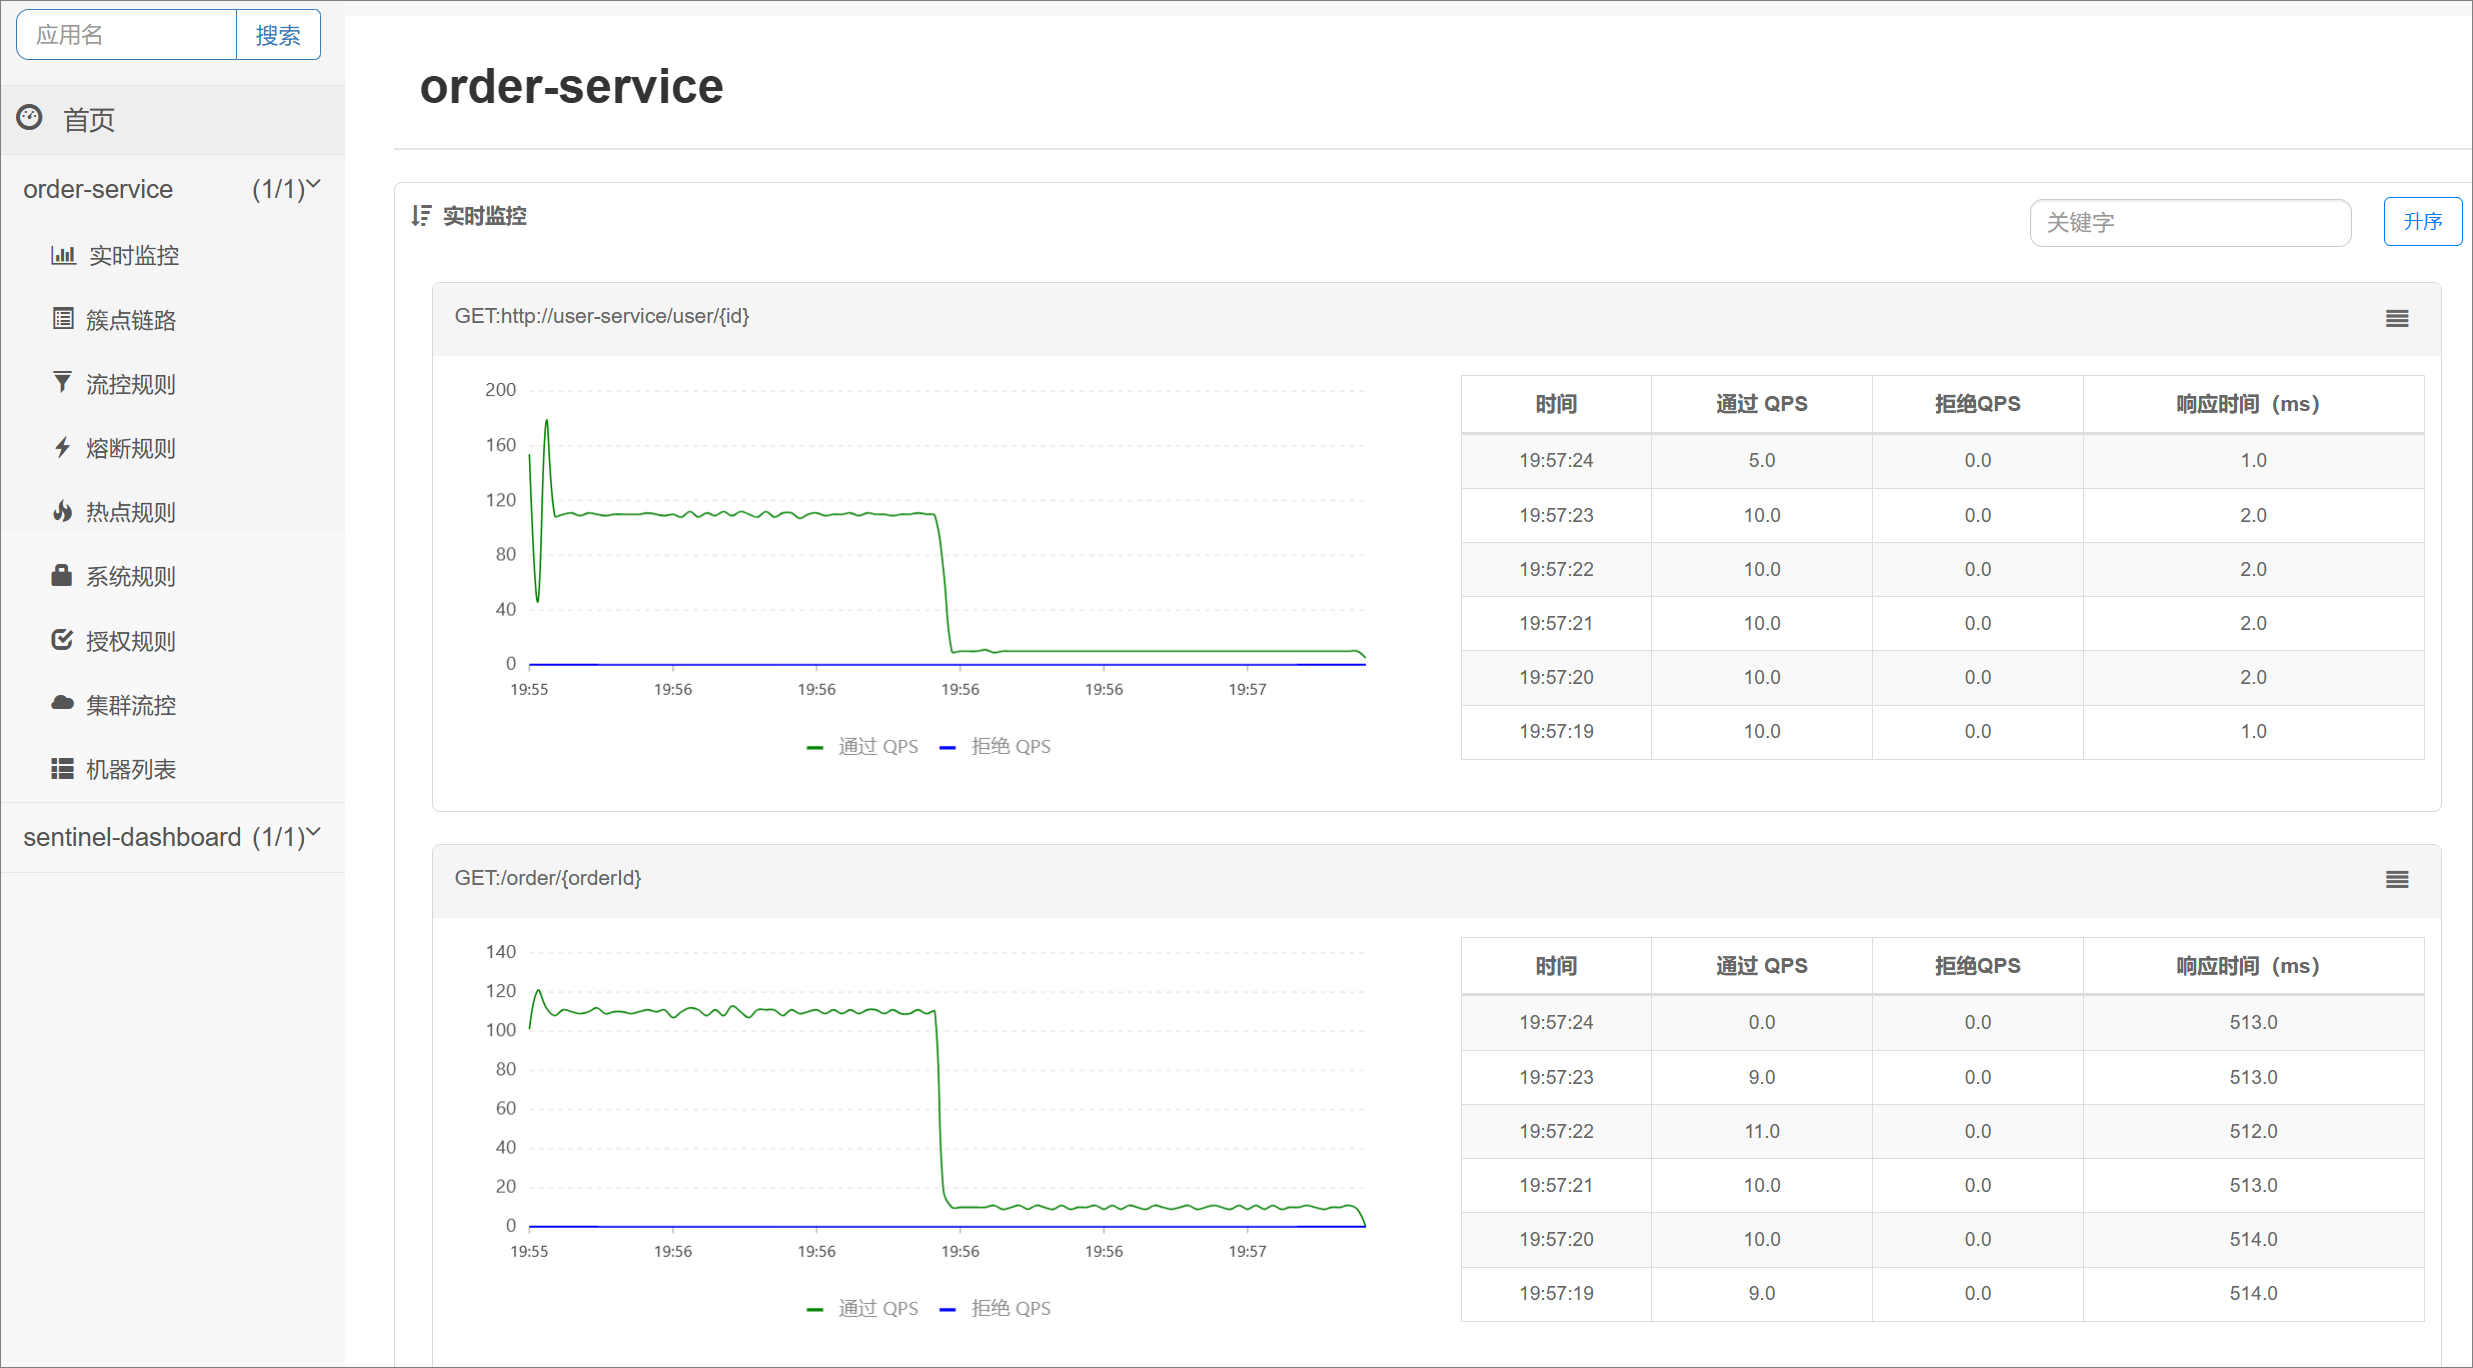
Finally, check the monitoring results on the console:
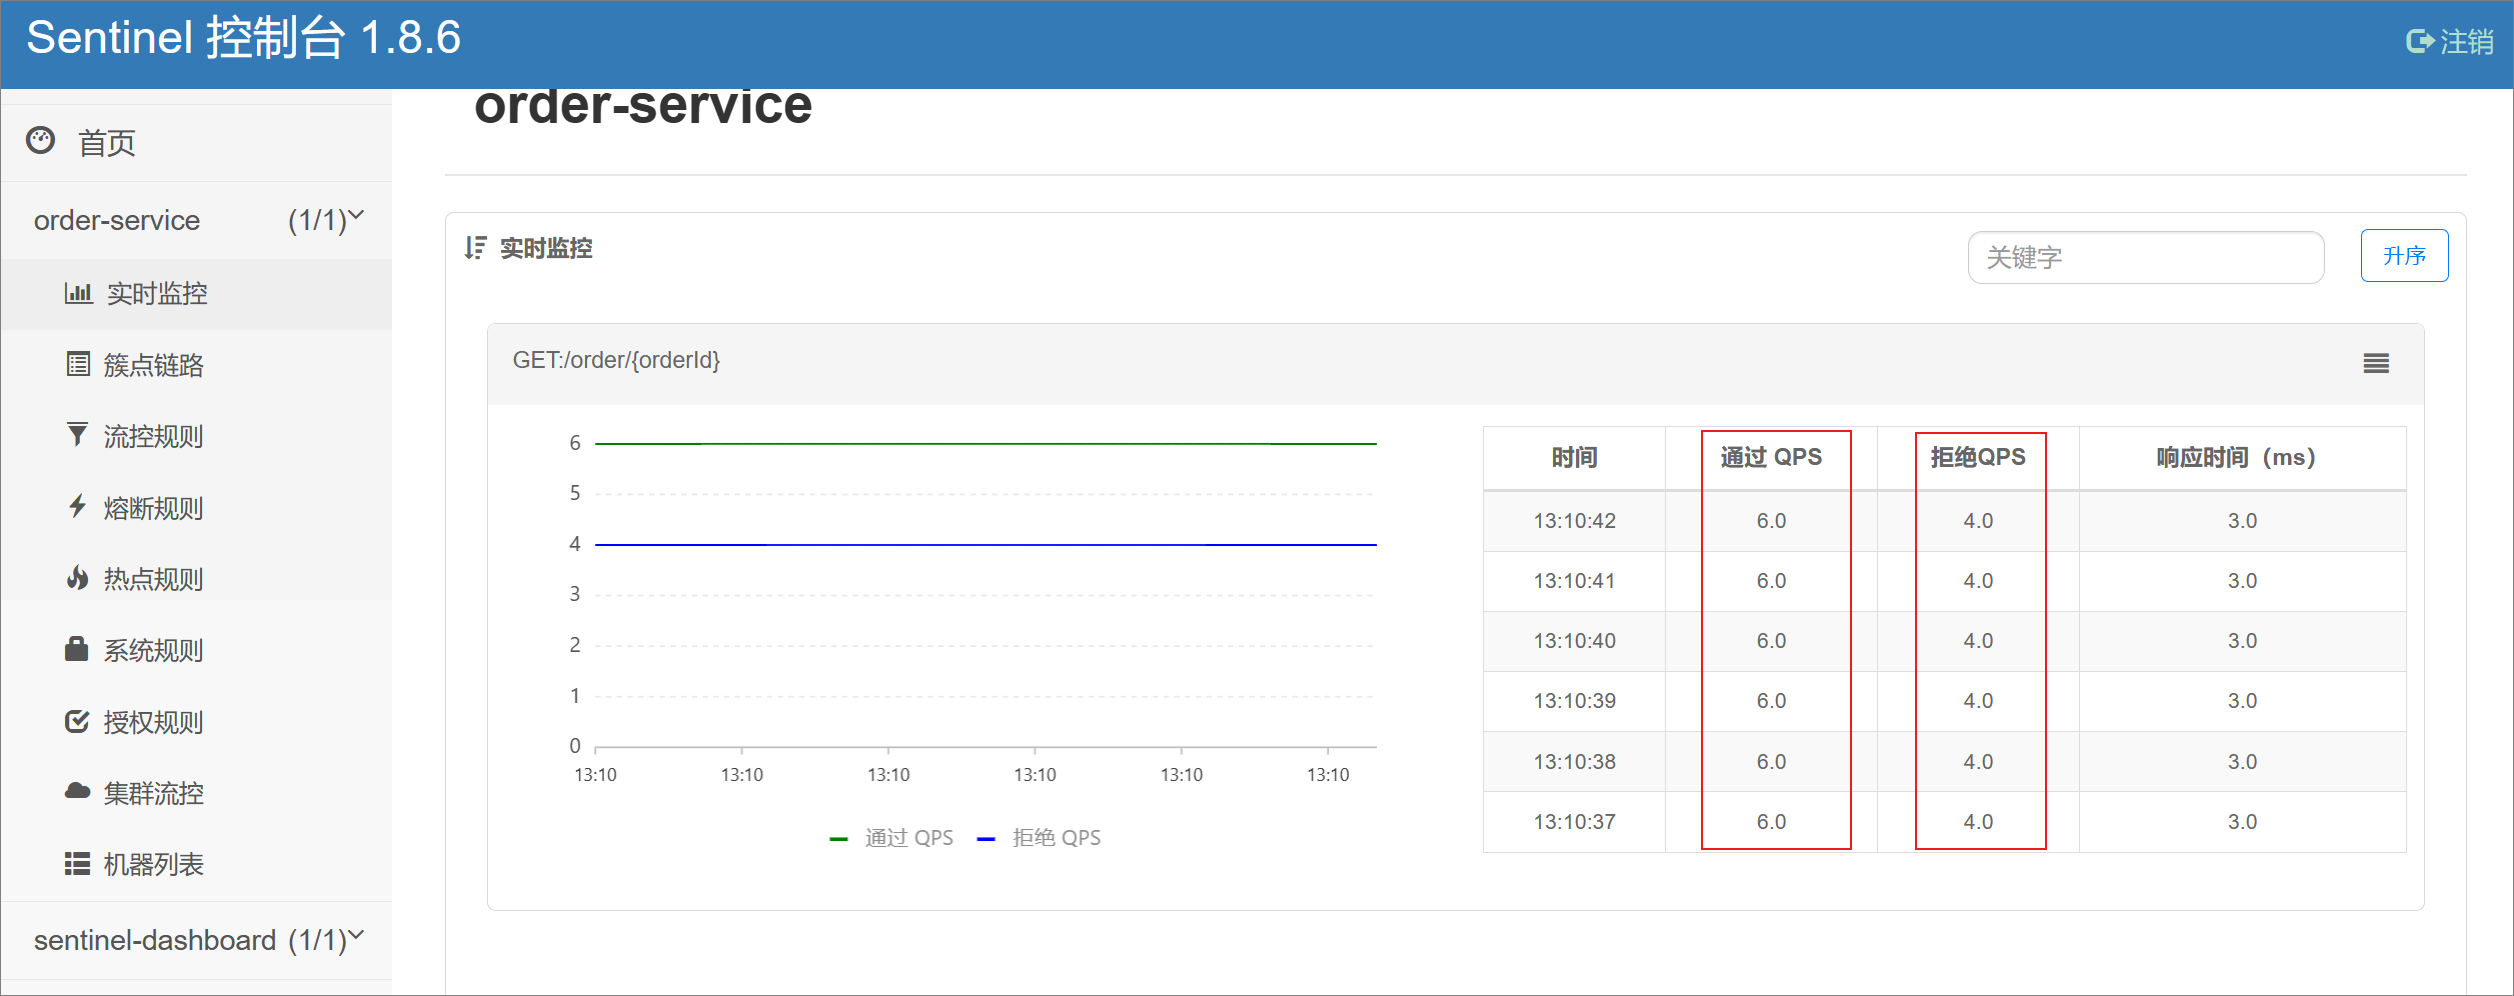
It can be seen that for this interface, the passed QPS is 6 and the rejected QPS is 4, which is in line with our expectations.
3. Thread isolation
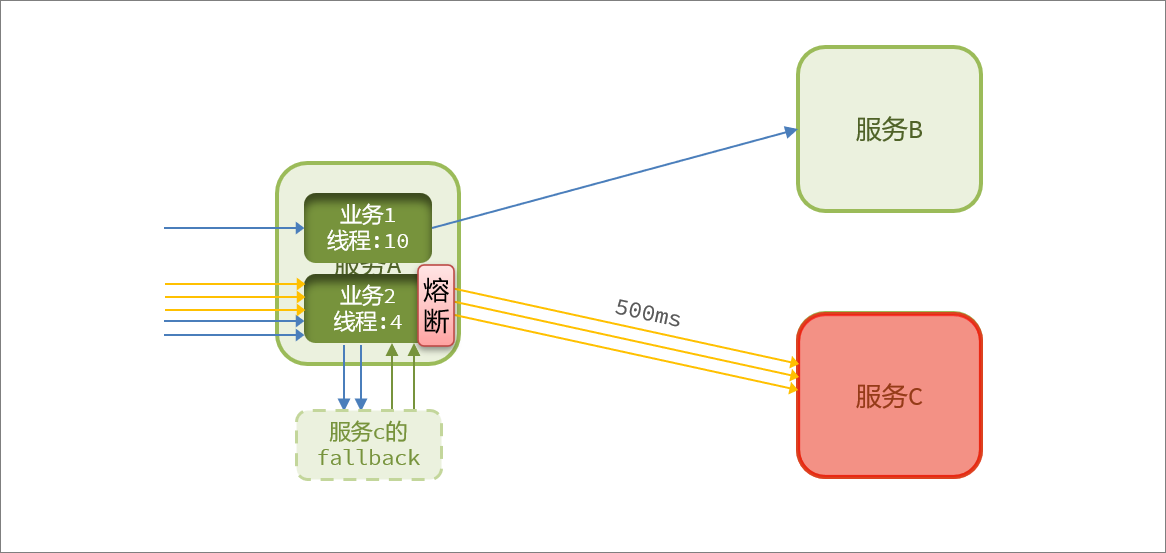
Current limiting can reduce server pressure and minimize the probability of service failures caused by concurrent traffic, but it cannot completely avoid service failures. Once a service fails, we must isolate calls to this service to avoid an avalanche.
Thread isolation: also called bulkhead mode, simulates the waterproof principle of cabin partitions. By limiting the number of threads used by each business, faulty businesses are isolated and the spread of faults is avoided. (Benefits: Even if the service crashes and some threads are lost, it will not affect the entire tomcat resources)
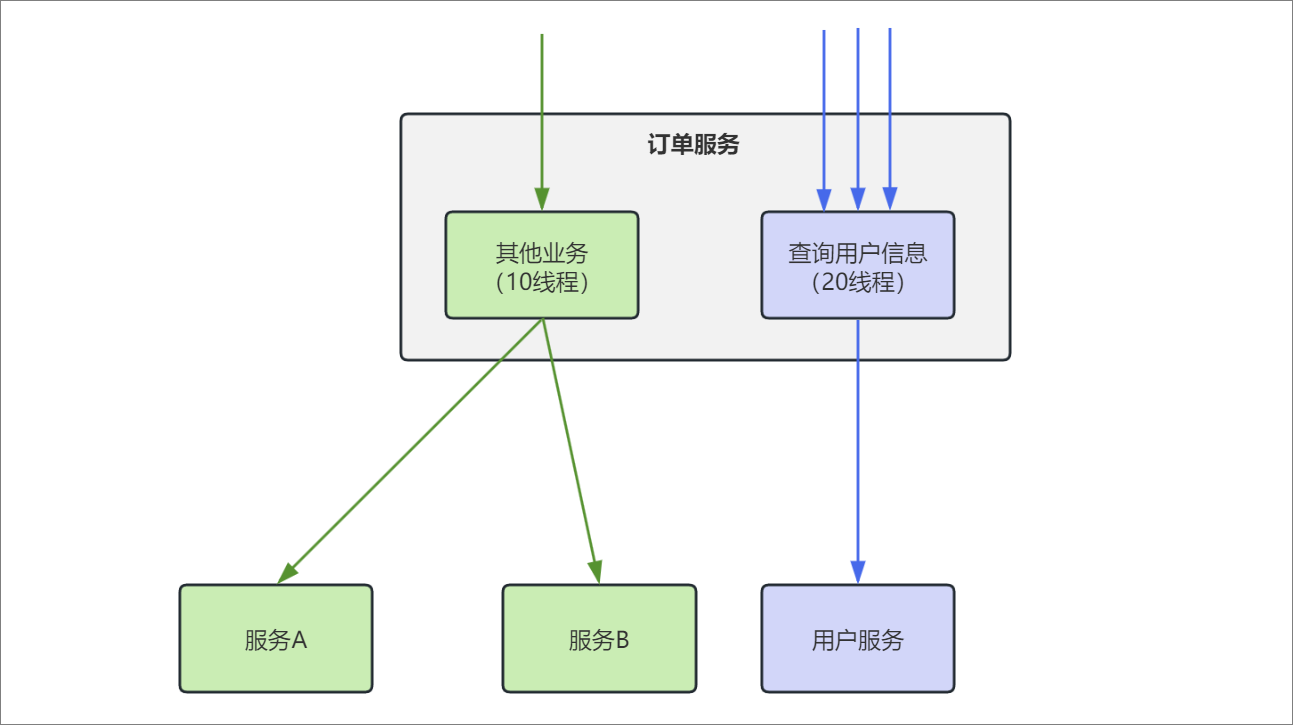
1. OpenFeign integrates Sentinel
Implement thread isolation for the FeignClient interface of the order service.
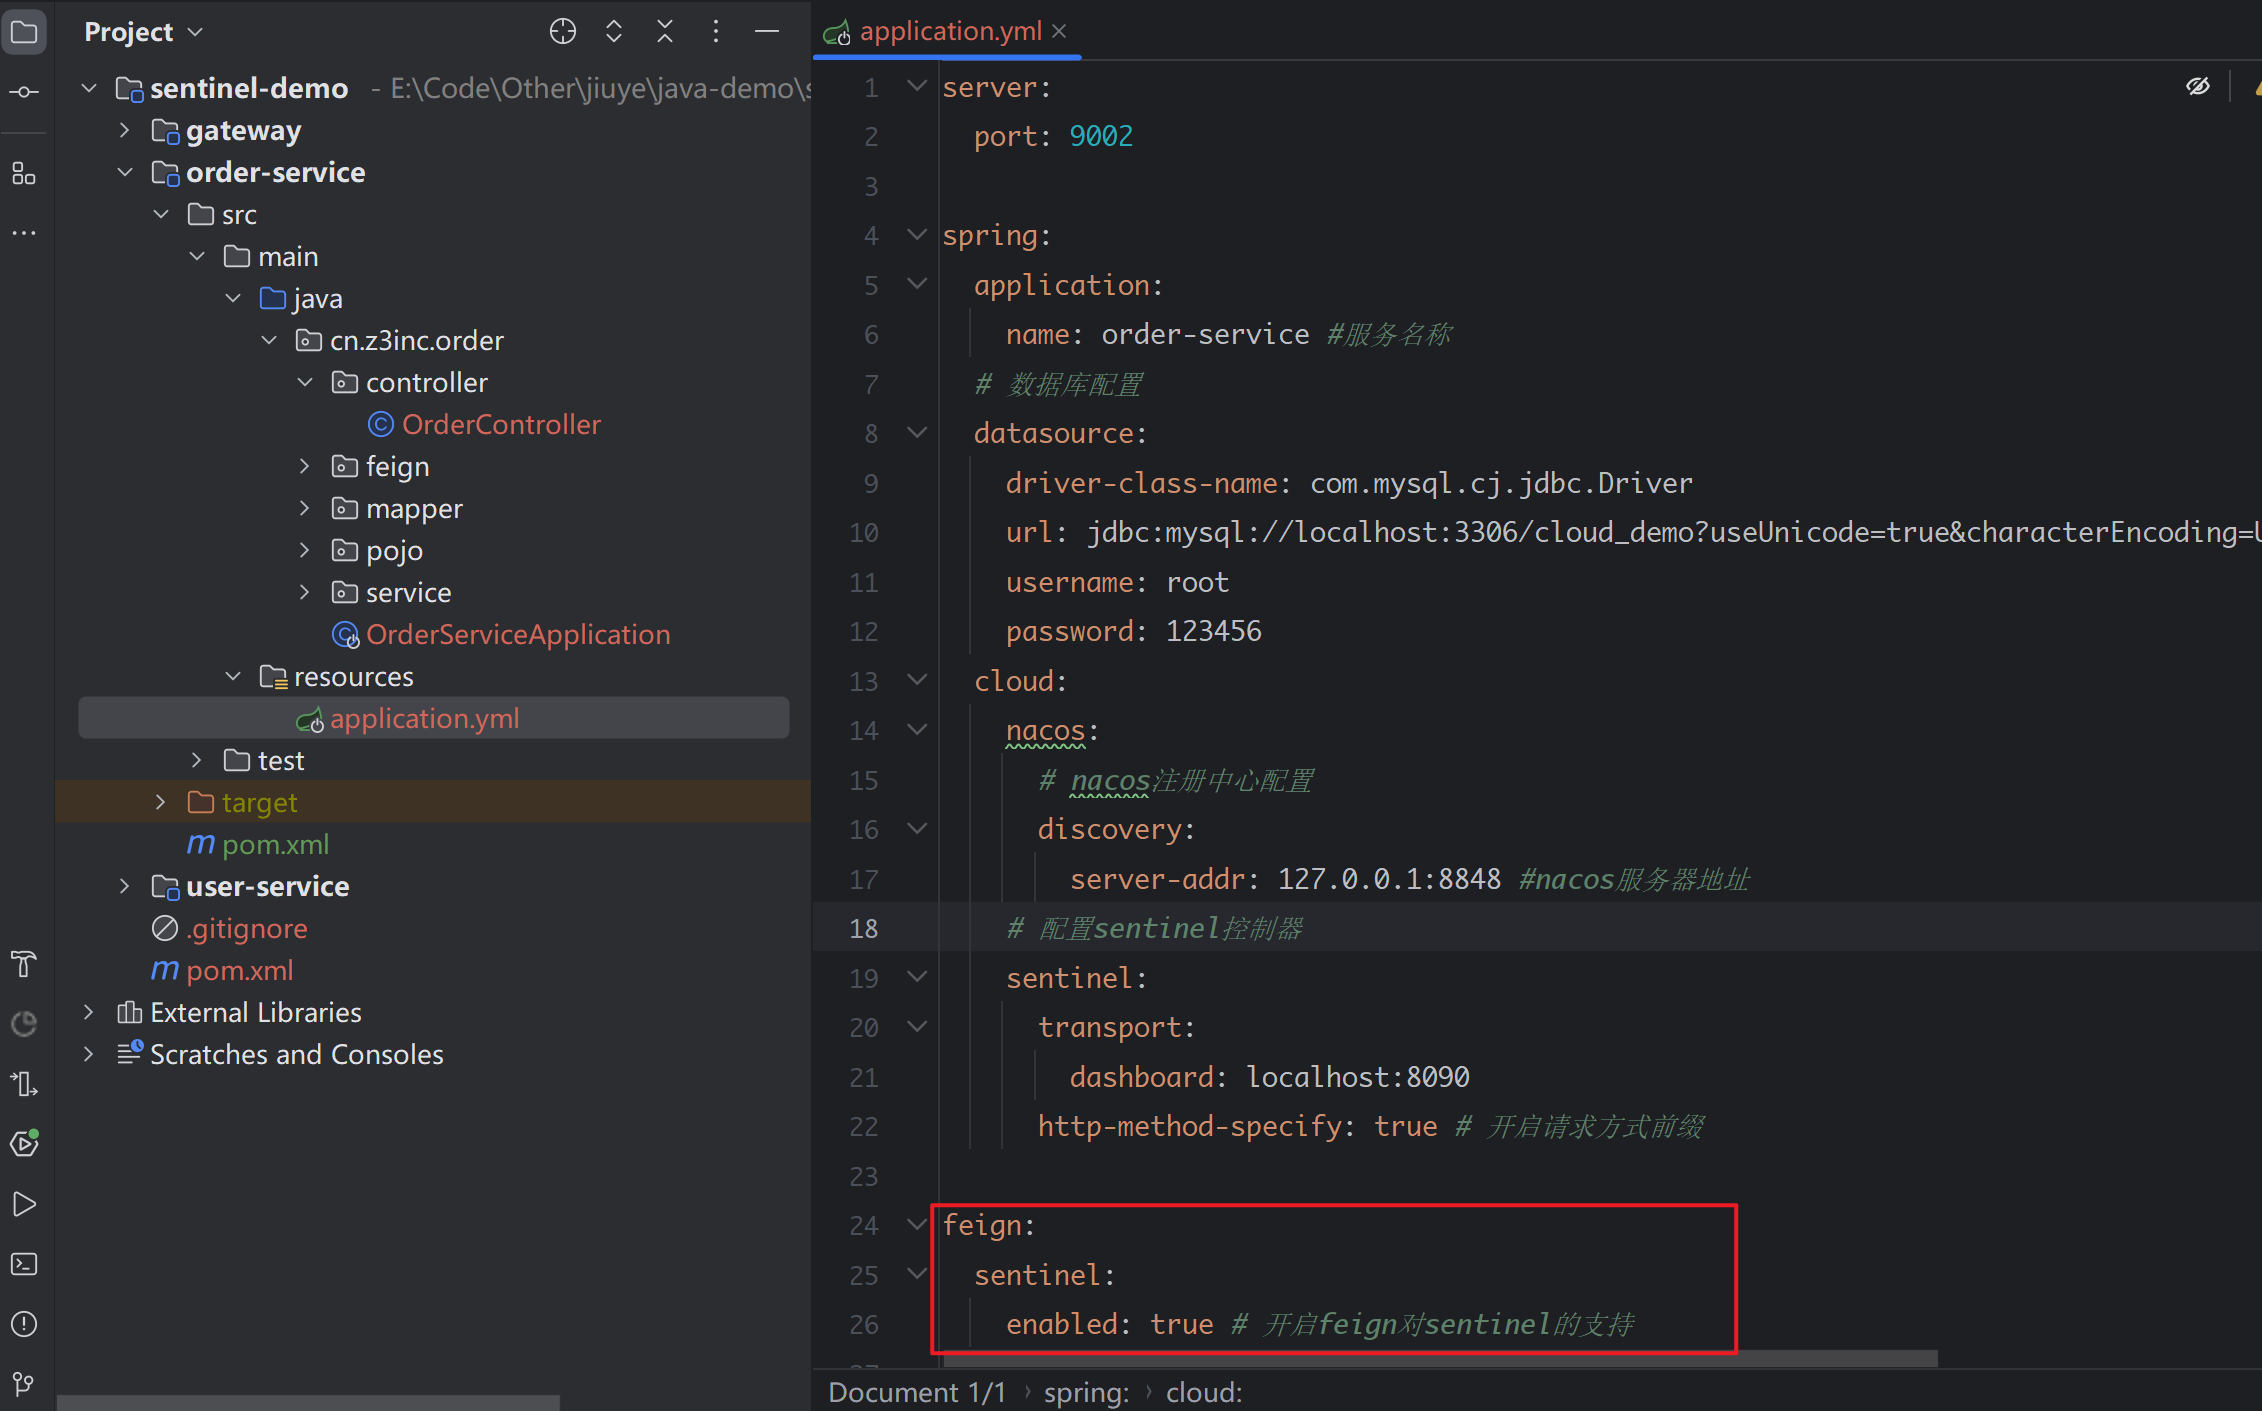
Modify the application.yml file of the order service and configure to enable Feign's sentinel function:
feign:
  sentinel:
    enabled: true # 开启feign对sentinel的支持
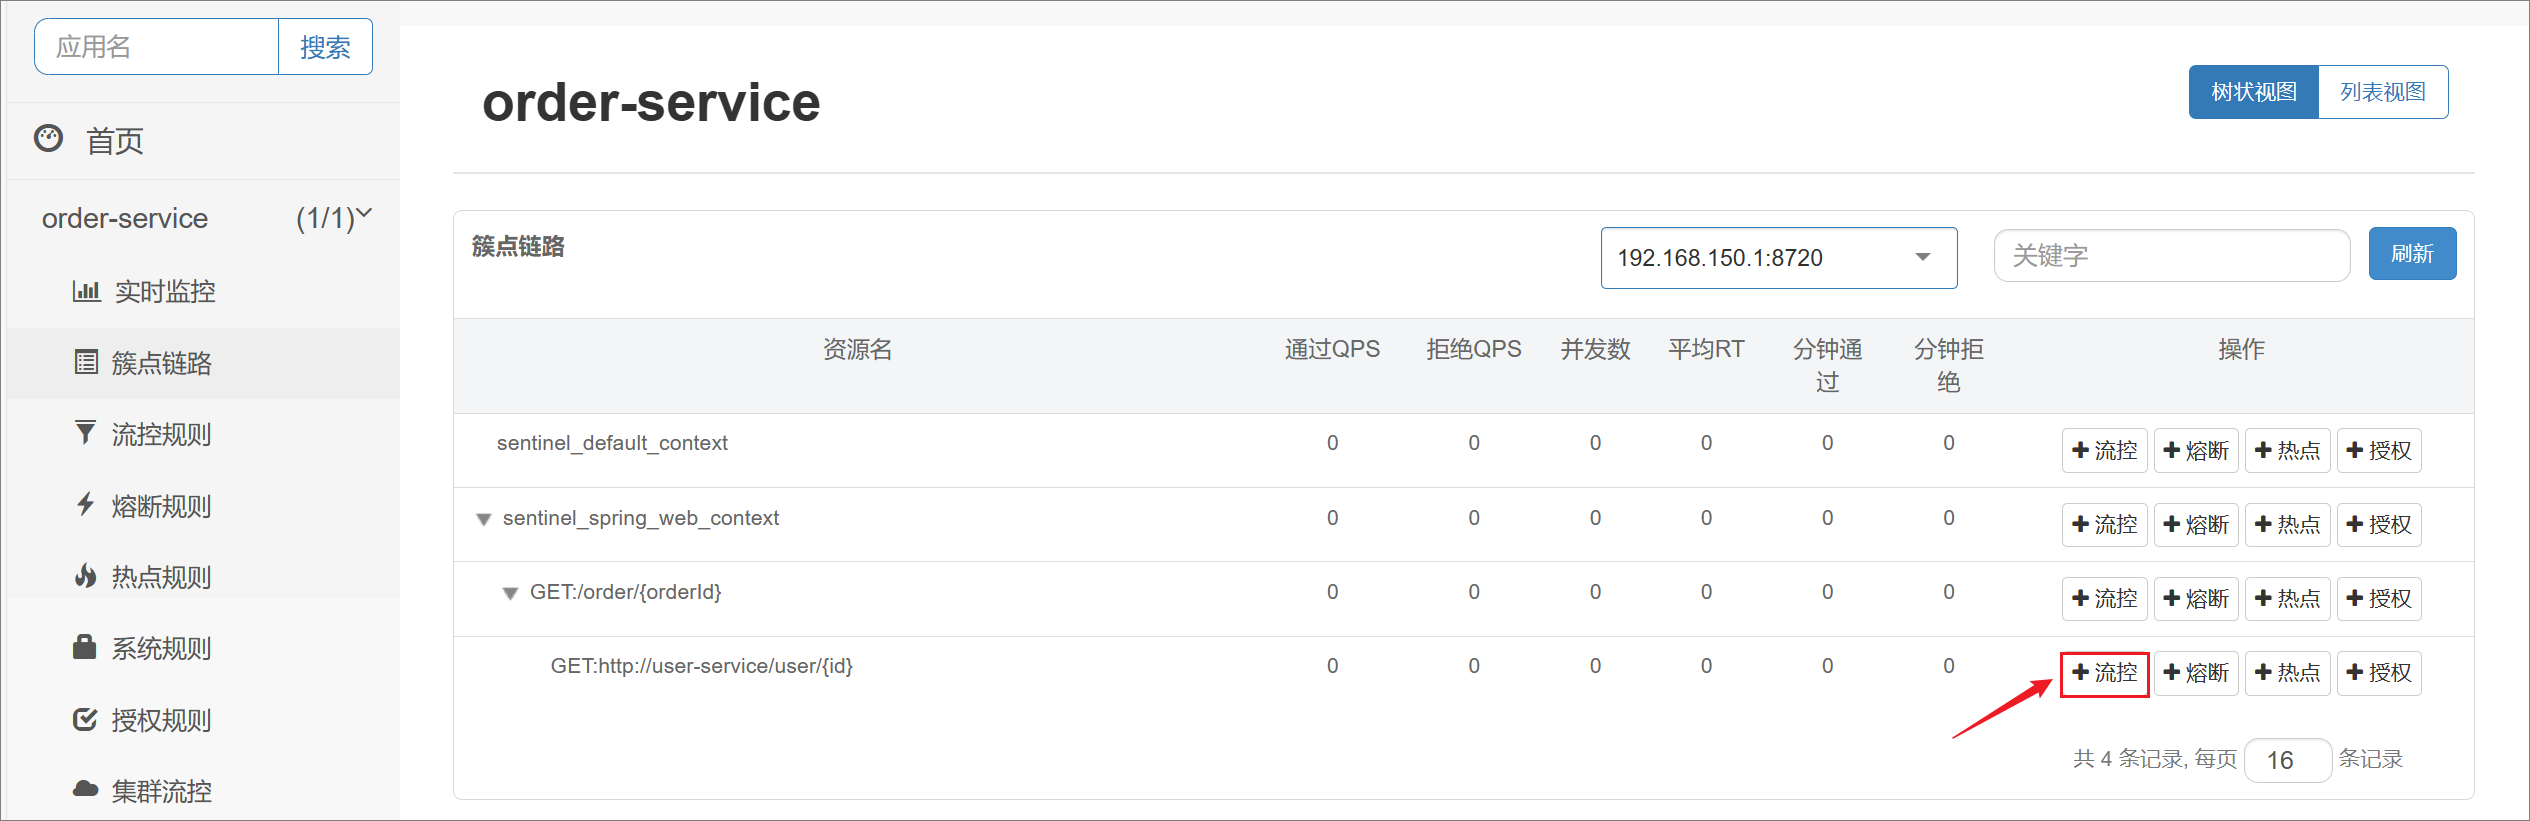
Restart the order service, and you can see that the query user's FeignClient automatically becomes a cluster point resource:
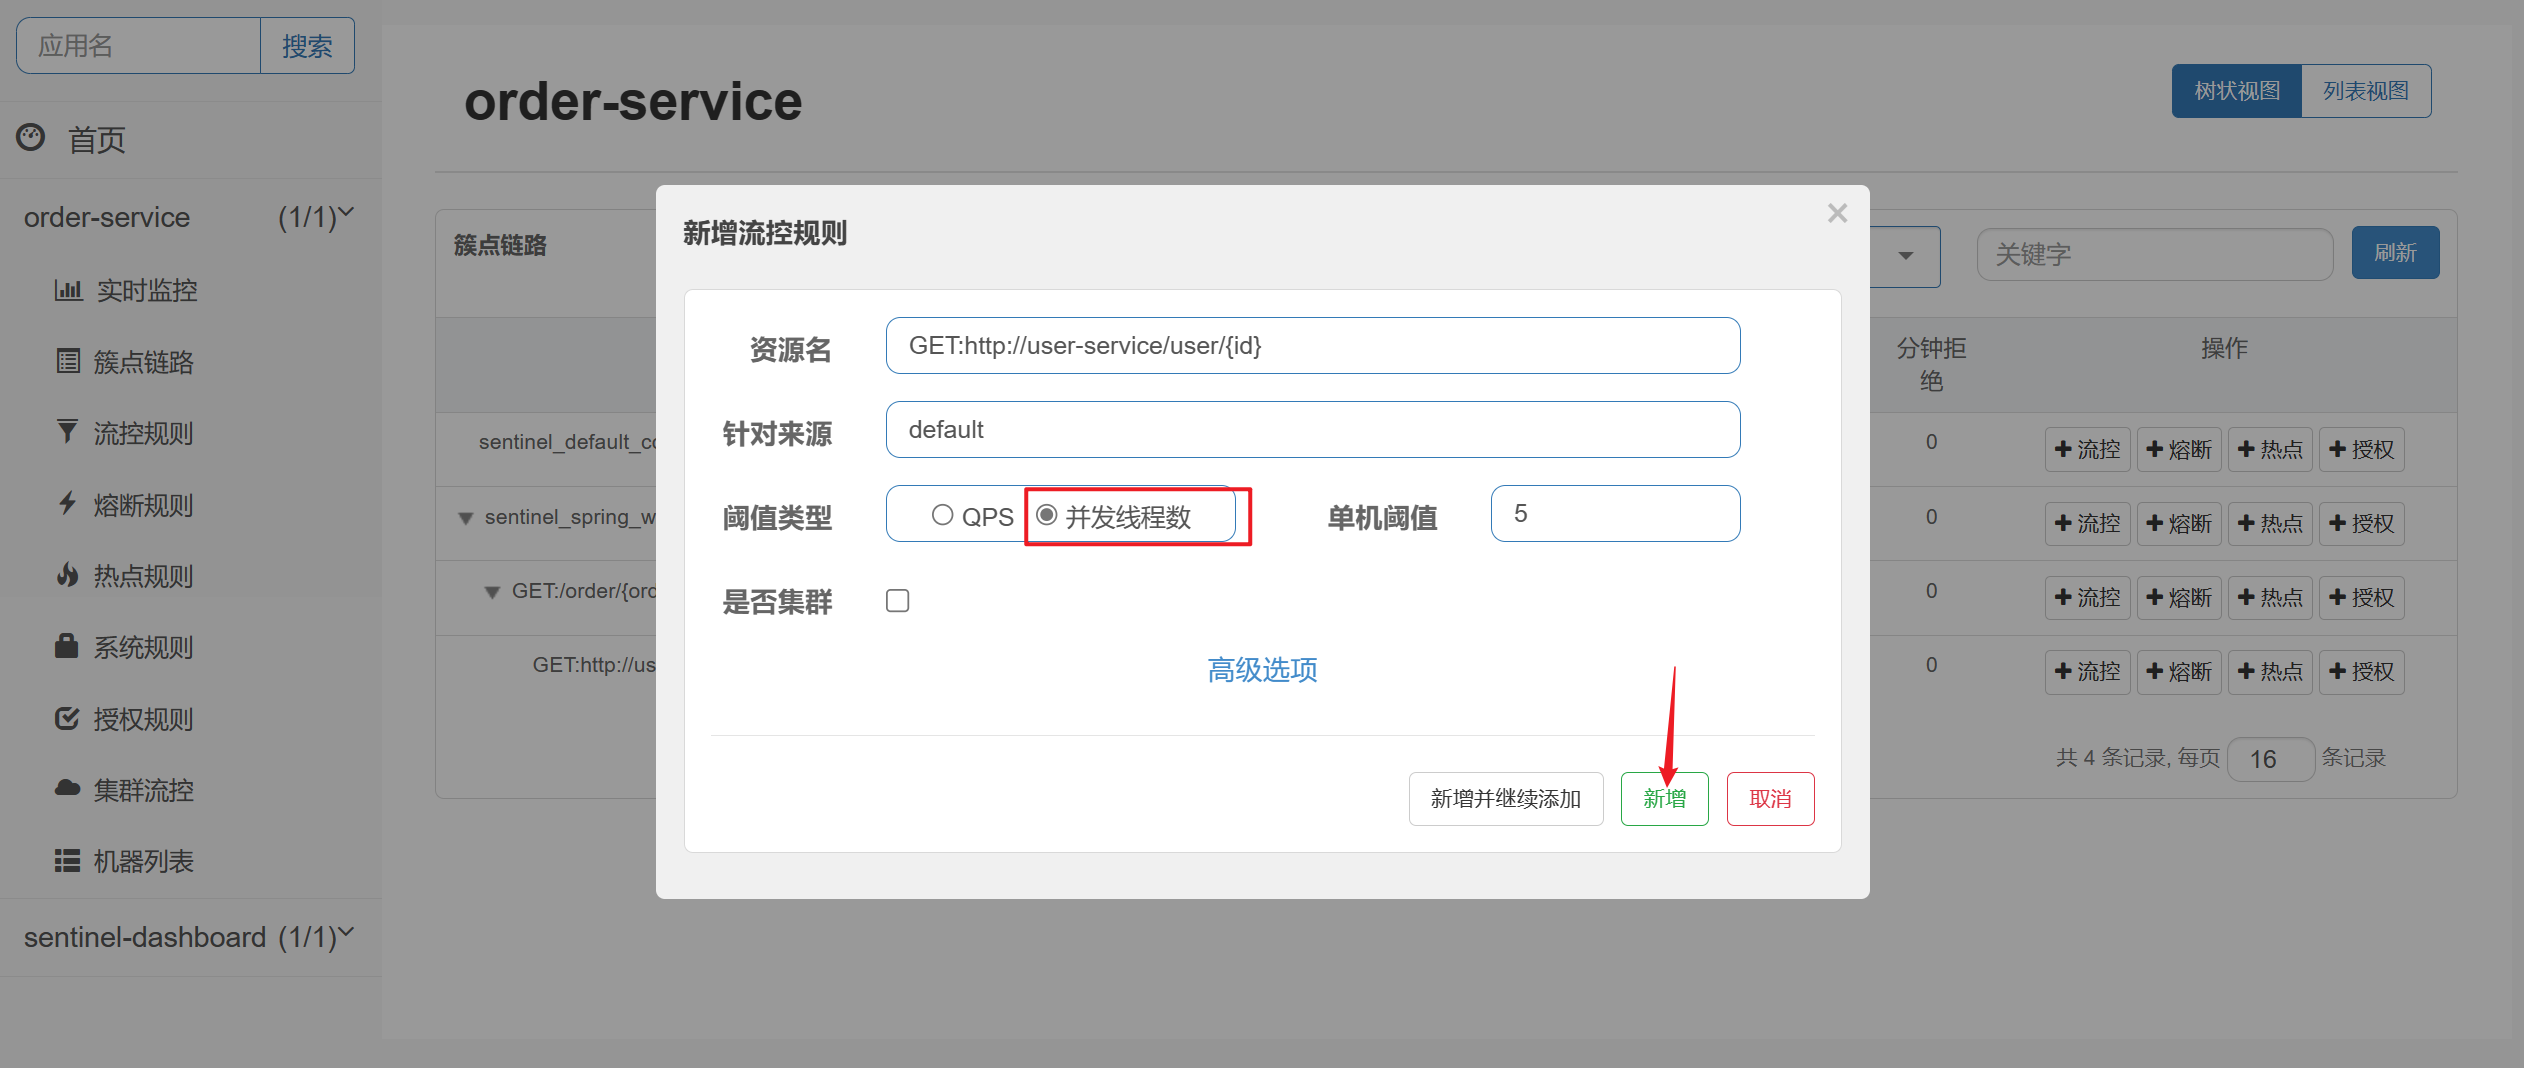
2. Configure thread isolation
Configure the number of concurrent threads for cluster point resources querying the user feign interface: (maximum 5 threads can be used)
Execute the JMeter test script and send 100 requests per second:
The test results are as follows:
4. Service circuit breaker
Service circuit breaker: The circuit breaker counts the abnormal proportion of requests or the proportion of slow calls. If the threshold is exceeded, the service will be circuit breaker and the request for the interface will be intercepted. During the circuit breaker period, all requests fail quickly and fallback logic is used to avoid affecting the current service. (Hystrix Porcupine’s approach: If the feign interface cannot be adjusted, then use the logic of the feign interface implementation class to avoid service avalanche)
1. Write downgrade logic
Similar to the usage of Brother Porcupine.
Requests that trigger current limiting or circuit breaker do not necessarily have to report an error directly. Some default data or friendly prompts can also be returned, which will provide a better user experience.
There are usually two ways to write downgrade logic after failure for FeignClient:
- Method 1: FallbackClass cannot handle exceptions in remote calls.
- Method 2: FallbackFactory, which can handle exceptions in remote calls (recommended).
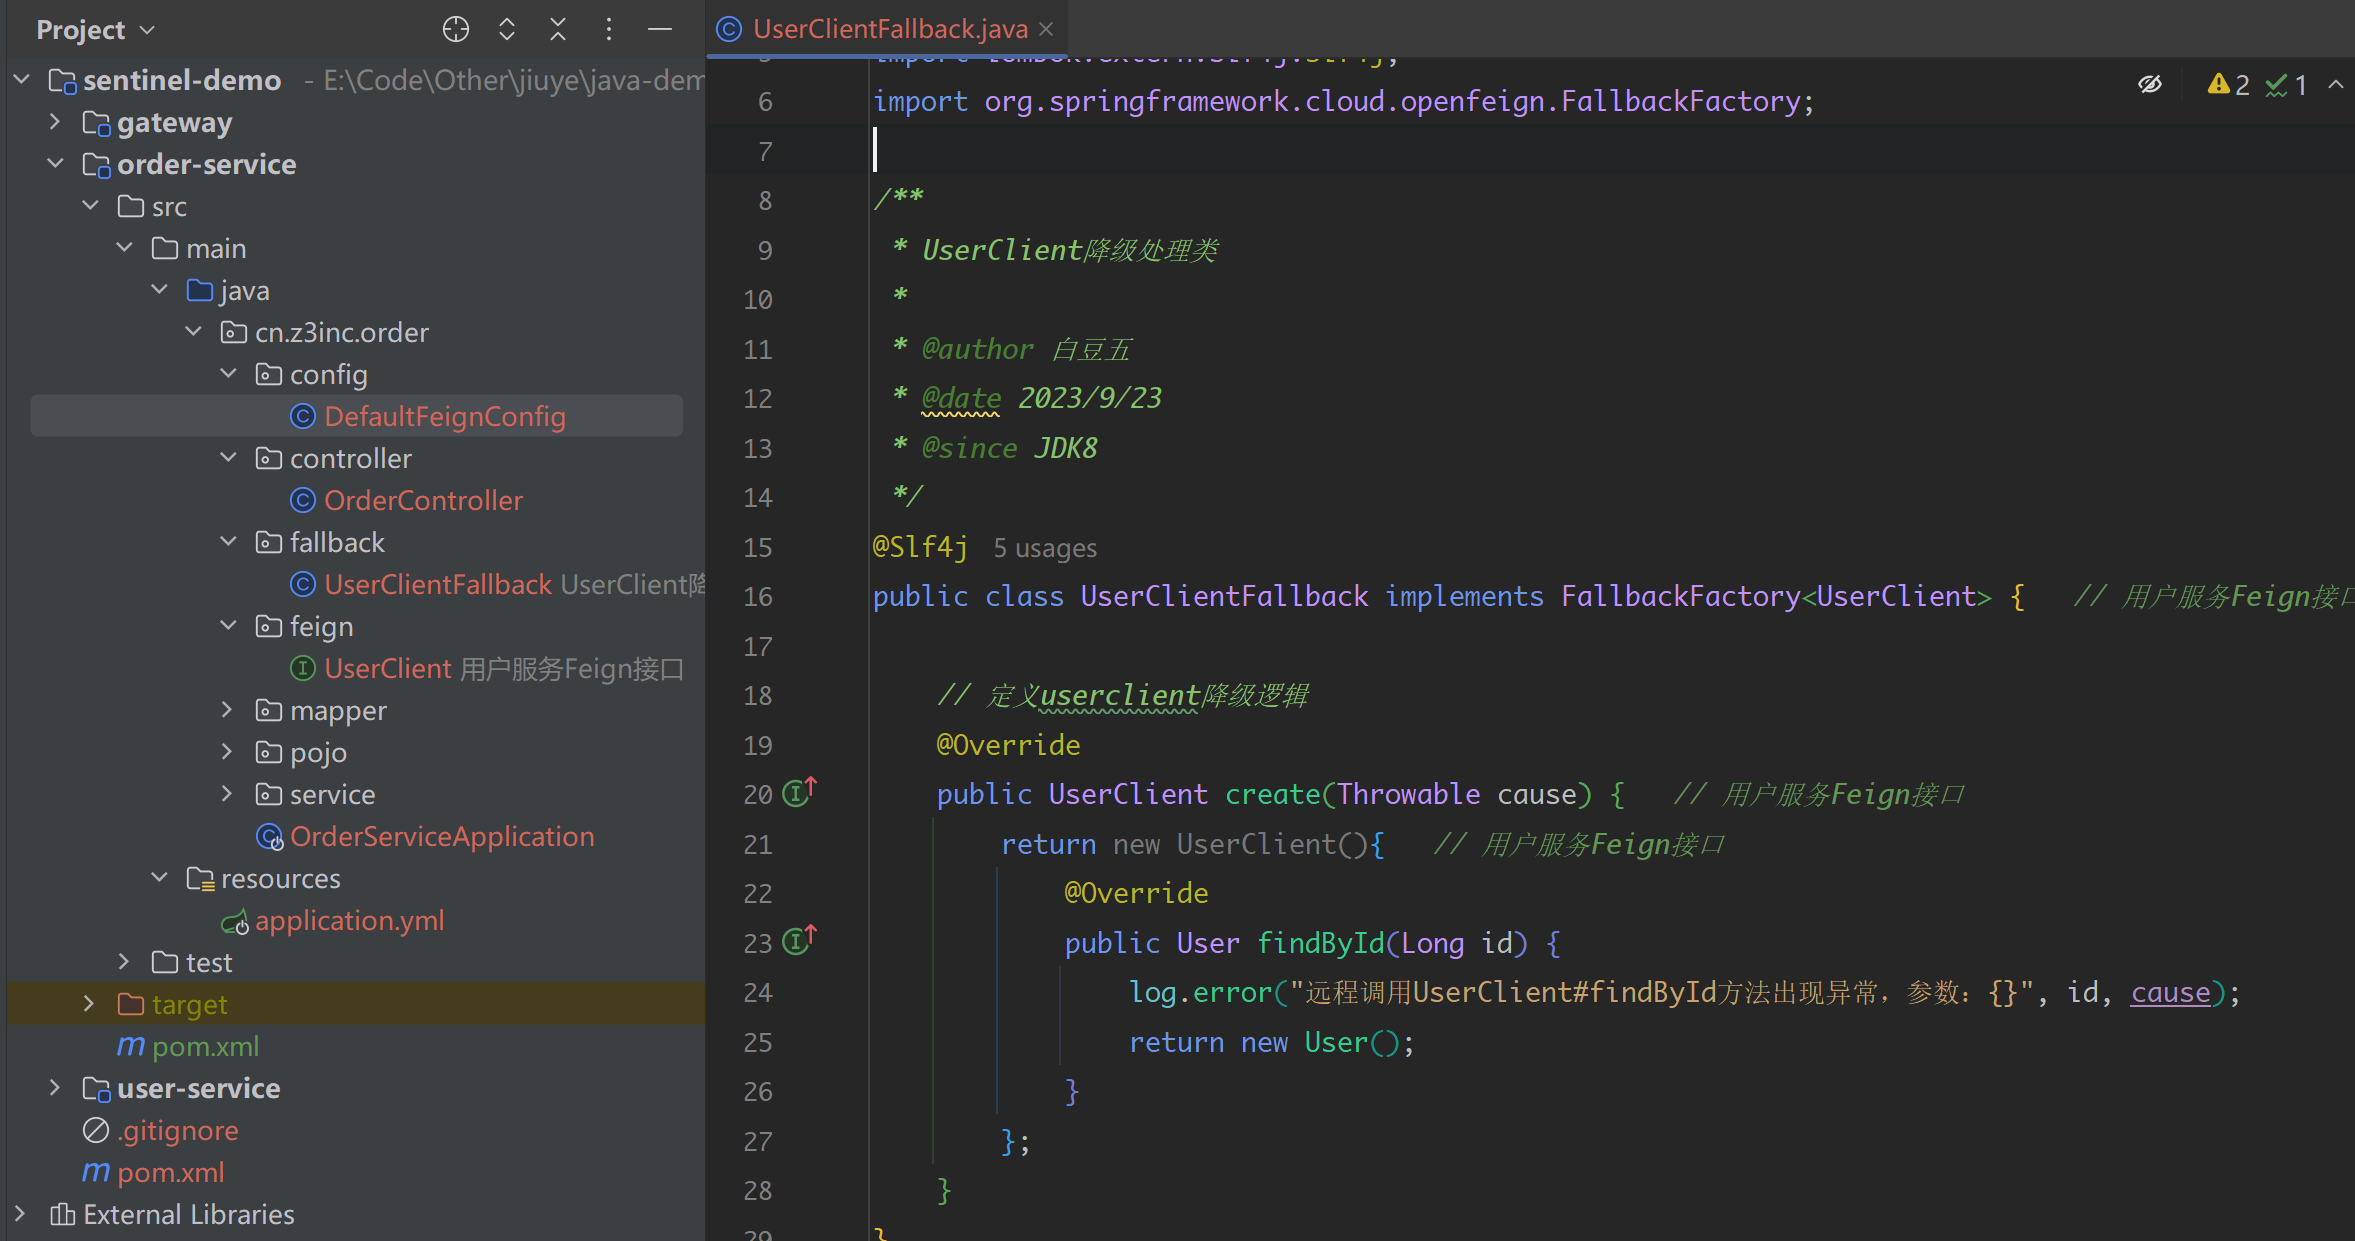
1. Define a downgrade processing class for the UserClient of the order service and implement the FallbackFactory interface.
package cn.z3inc.order.fallback;

import cn.z3inc.order.feign.UserClient;
import cn.z3inc.order.pojo.User;
import lombok.extern.slf4j.Slf4j;
import org.springframework.cloud.openfeign.FallbackFactory;

/**
 * UserClient降级处理类
 *
 */
@Slf4j
public class UserClientFallback implements FallbackFactory<UserClient> {


    // 定义userclient降级逻辑
    @Override
    public UserClient create(Throwable cause) {


        return new UserClient(){


            @Override
            public User findById(Long id) {


                log.error("远程调用UserClient#findById方法出现异常,参数:{}", id, cause);
                return new User();
            }
        };
    }
}
2. Create a configuration class and register UserClientFallback as a Bean:
package cn.z3inc.order.config;

import cn.z3inc.order.fallback.UserClientFallback;
import lombok.extern.slf4j.Slf4j;
import org.springframework.context.annotation.Bean;

@Slf4j
public class DefaultFeignConfig {


    @Bean
    public UserClientFallback userClientFallback() {


        return new UserClientFallback();
    }
}
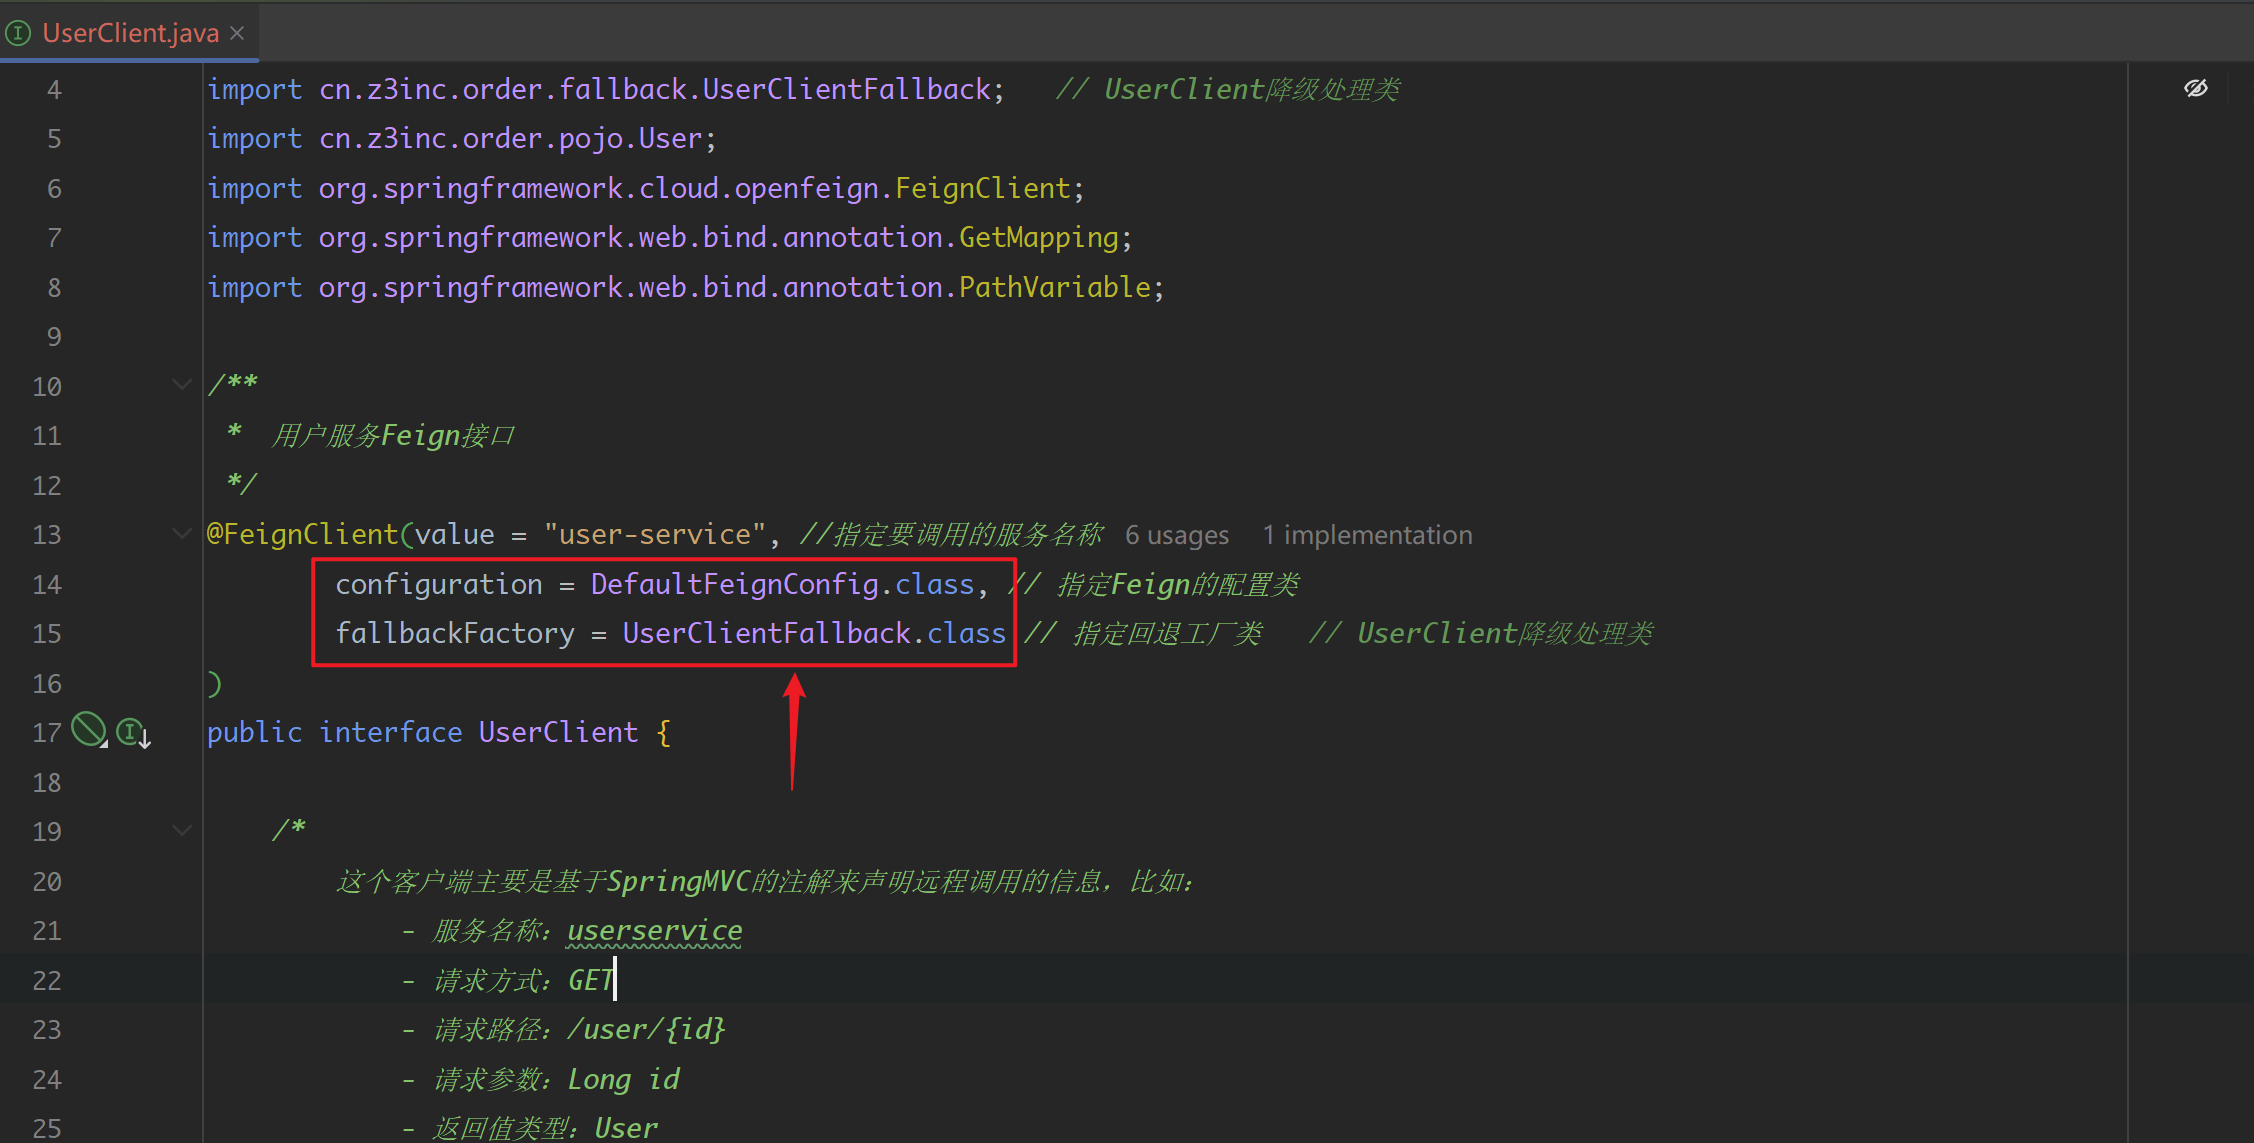
3. Configure the degradation processing class just created in UserClient:
/**
 *  用户服务Feign接口
 */
@FeignClient(value = "user-service", //指定要调用的服务名称
        configuration = DefaultFeignConfig.class, // 指定Feign的配置类
        fallbackFactory = UserClientFallback.class // 指定回退工厂类
)
public interface UserClient {
4. Restart the order service, stop the user service & test:
2. Service circuit breaker
When the remotely called service hangs up, the downgrade logic is used directly to avoid affecting the current service. That is to fuse the feign interface . When the remote calling service returns to normal, the interface is allowed to be called. This is actually the working mode of the circuit breaker .
The circuit breaker in Sentinel can not only count the proportion of slow requests on a certain interface , but also count the proportion of abnormal requests . When these ratios exceed the threshold, the interface will be cut off , that is, all requests to access the interface will be intercepted and downgraded; when the interface returns to normal, requests for the interface will be released.
The working state switching of the circuit breaker is controlled by a state machine:

the state machine includes three states:
- closed : closed state, the circuit breaker releases all requests, and starts to count the abnormal ratio and slow request ratio. If it exceeds the threshold, it switches to the open state.
- open : In the open state, the service call is circuit- breaker , and the request to access the circuit-breaker service will be rejected, fail quickly, and go directly to the downgrade logic. After the Open state lasts for a period of time, it will enter the half-open state.
- half-open : Half-open state, a request is released, and the next operation is judged based on the execution result.
- The request is successful: switch to closed state
- Request fails: switch to open state
We can configure the circuit breaker strategy in the console by clicking the button behind the cluster point link 熔断: (persistence needs to be written to the nacos configuration file)
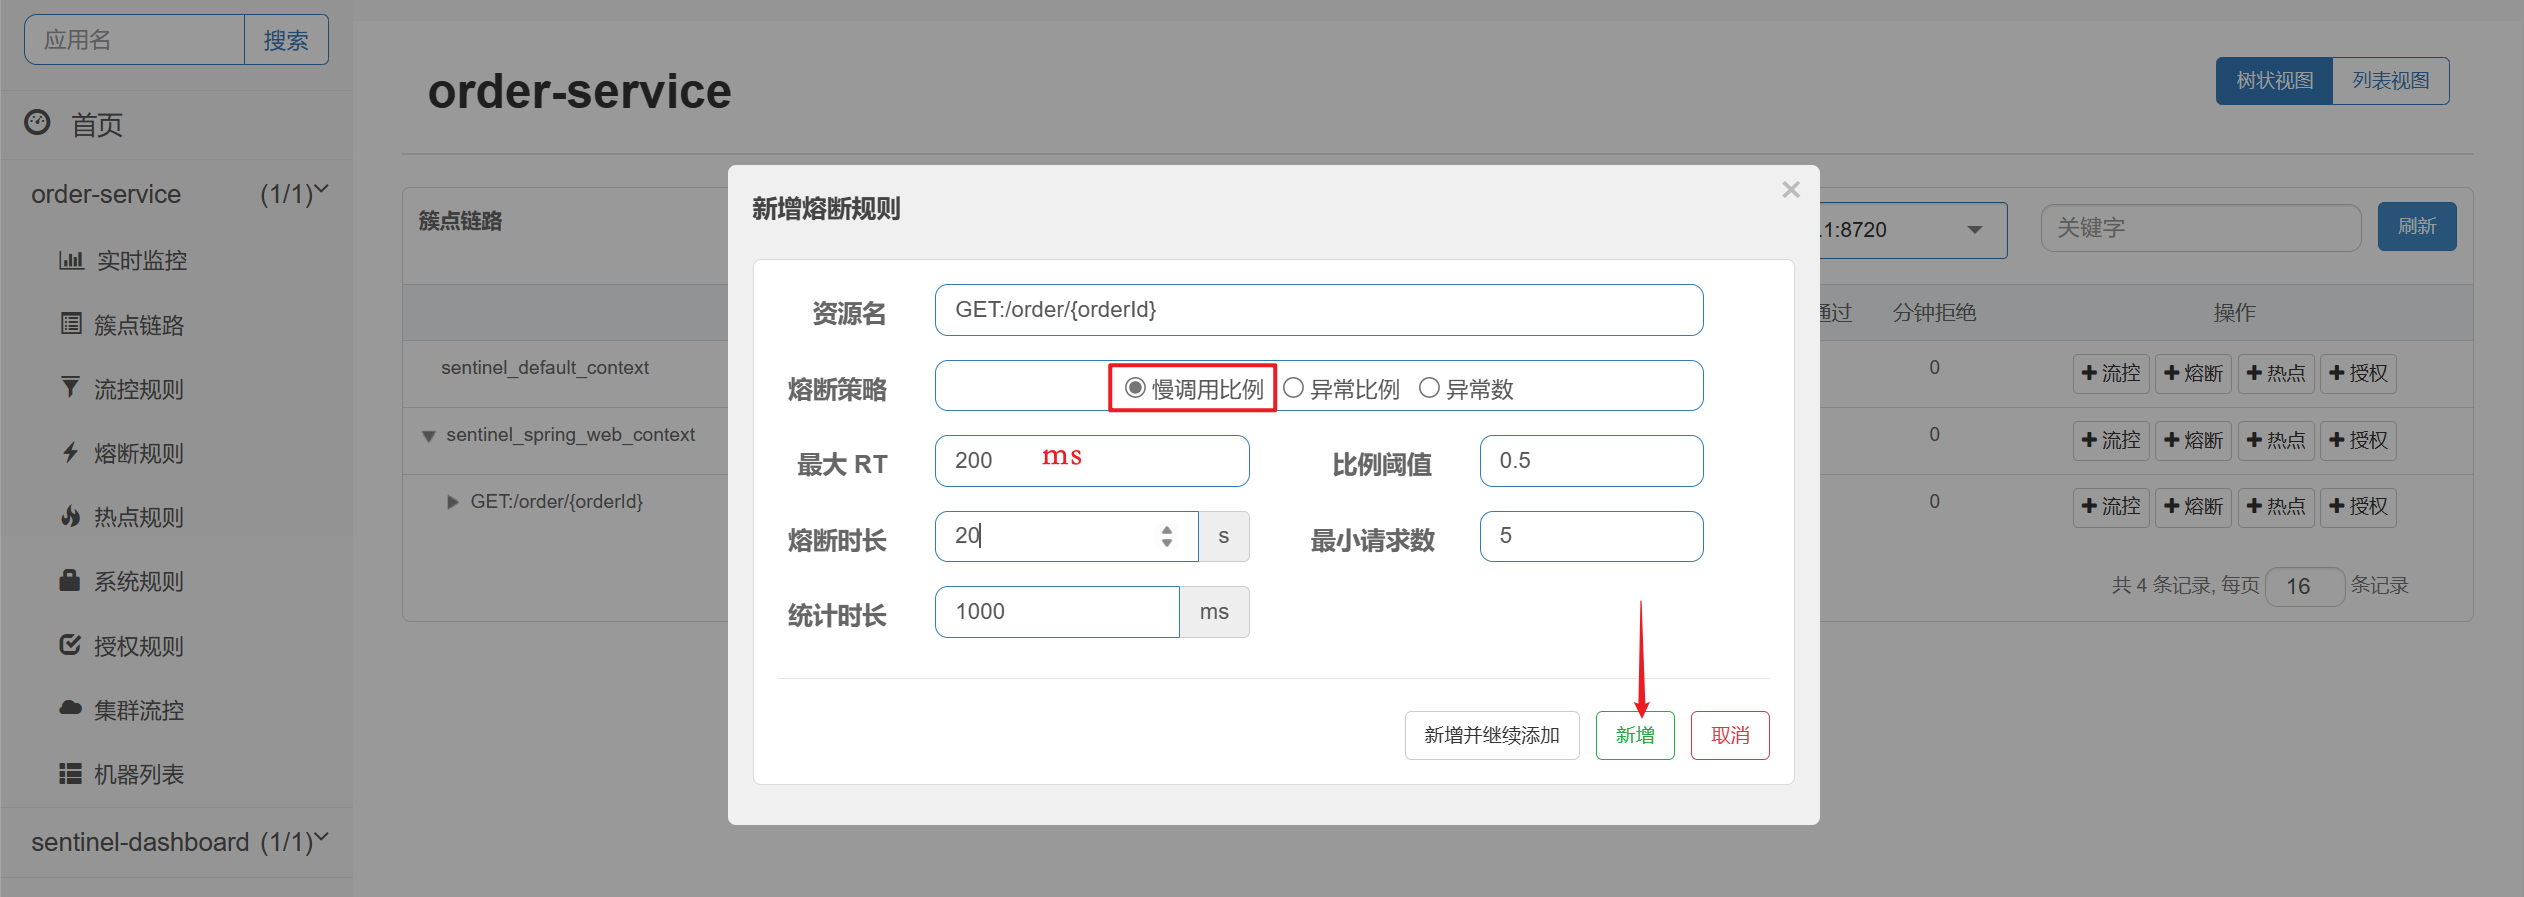
This is done based on the ratio of slow calls. The meaning of the above configuration is:
- A request call with an RT exceeding 200 milliseconds is a slow call.
- Count at least 5 requests in the last 1000ms. If the slow call ratio is not less than 0.5, the circuit breaker will be triggered.
- The circuit breaker duration is 20s
Test using jmeter: