springboot integrates mybaits-plus/mybaits to realize user login interface (step-by-step analysis) + beautiful interface

Article directory
-
-
- springboot integrates mybaits-plus/mybaits to realize user login interface (step-by-step analysis) + beautiful interface
- Preface
- 1.Demo screen
- 2. Project creation + dependencies
- 2. Check your project dependencies
- 3. Write the springboot core file yml file
- 4. Create database + connect to database
- 5. The idea of layering
- Conclusion
- mapper.xml template
- themleaf template (just write this at the beginning of our HTML)
-
Preface
Because this is also a novice’s understanding of this integration framework, I have added some of my own ideas, and I still hope to communicate with everyone.
So all the explanations here are very easy to understand, just read them directly.
1.Demo screen
It’s better to just let everyone see the final result first (in my opinion)
springboot+mybaits implements user login system
2. Project creation + dependencies


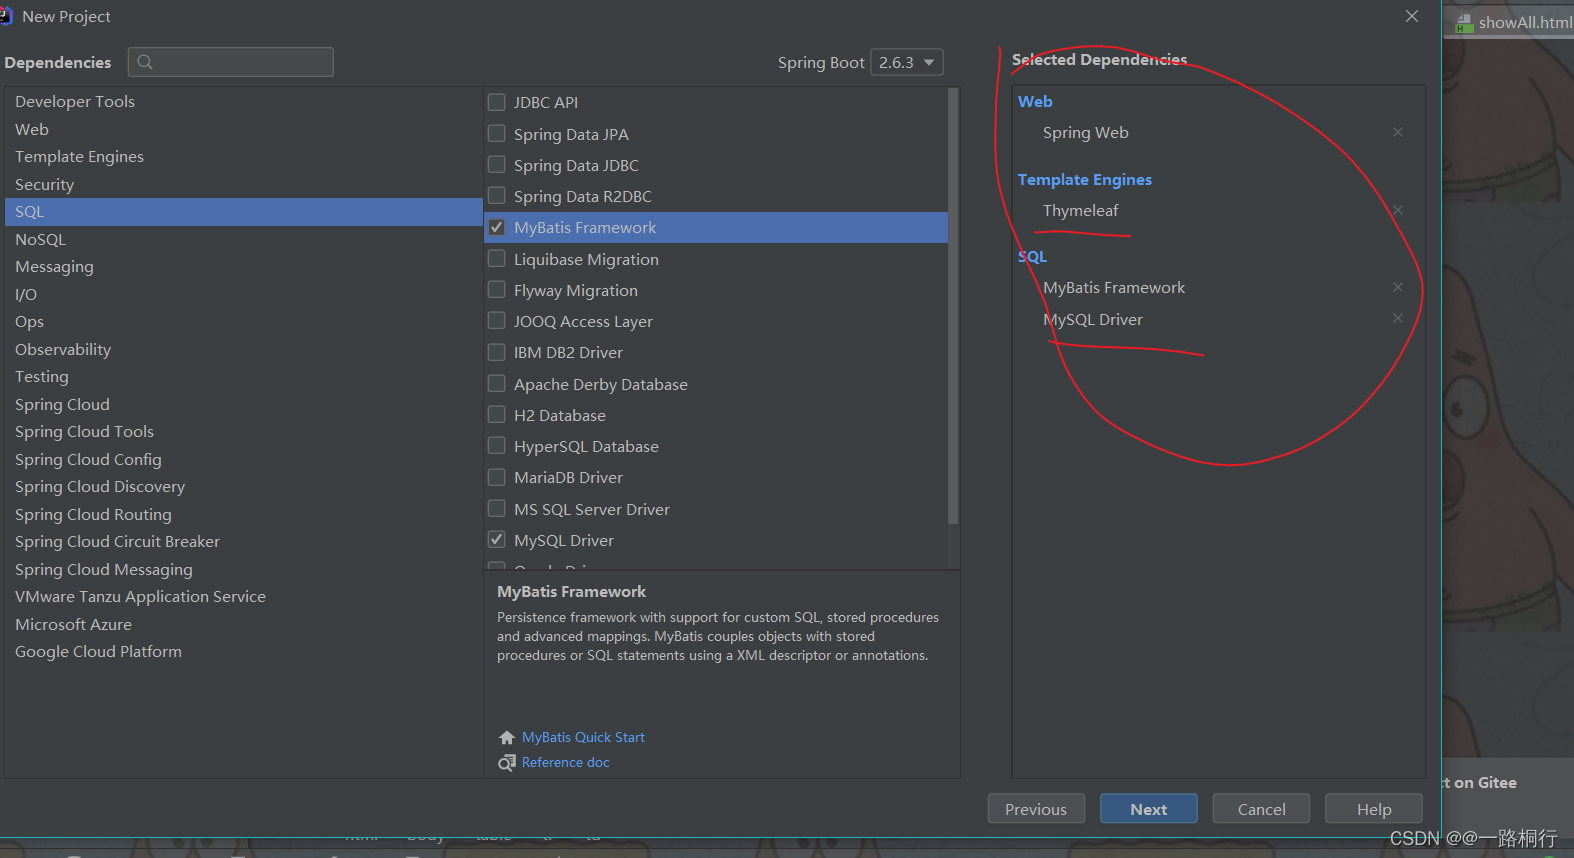
The few I circled are enough.
Let’s briefly talk about what these are for. Springweb is used for our web pages, because we want to make a front-end and back-end that can interact, and it belongs to the category of javaweb.
Thymeleaf is used to write front-end pages, and with the help of this template engine, it can help us establish a good connection with the back-end database (you will know it later).
SQL is our mybaits framework and mysql driver, just select it directly.
Then in our pom.xml
Add the mybaits-plus environment to the file

Although our project did not use it this time, it is very simple. Maven will help us package it, and this helps us complete a lot of encapsulated additions, deletions, modifications and checks.
2. Check your project dependencies

It’s ok if you are one of the above
3. Write the springboot core file yml file

Maybe you can’t find it, because its default name ends with application.propoties, but let’s rename it to be the same as mine.
In fact, it is okay to follow the original one, but springboot officials also recommend us to use yml files, so we should listen to the official instructions and avoid unnecessary trouble.
Then fill in our data

Here you can directly copy my code below, and then we will tell you what needs to be modified later, and explain what these codes are for.
server:
  port: 80
spring:
  datasource:
    driver-class-name: com.mysql.cj.jdbc.Driver
    url: jdbc:mysql://localhost:3306/spring?serverTimezone=Asia/Shanghai
    username: root
    password: root
  thymeleaf:
    cache: false

mybatis-plus:
  mapper-locations: classpath:mapper/**/*.xml
  configuration:
    map-underscore-to-camel-case: true
Explain below
server: #这个是配置我们的端口号 就是配置好之后我们直接输入就可以运行 不用写8080端口
  port: 80
spring:
  datasource:
    driver-class-name: com.mysql.cj.jdbc.Driver  --这个是我们的数据库驱动 直接写我的就行
    url: jdbc:mysql://localhost:3306/spring?serverTimezone=Asia/Shanghai-- 这个是配置我们数据库的路径 其实你只需要改一个位置就行 就是/spring 这个改成你自己的数据库名称就行 后面和前面都是固定格式
    username: root-- 这个写你们自己的数据库名称
    password: root
  thymeleaf:--这个是将我们的thymeleaf缓存设置为FALSE,便于我们测试
    cache: false

mybatis-plus:
  mapper-locations: classpath:mapper/**/*.xml //这个就是注册我们的xml文件,先写上,我后面创建的时候解释
  configuration:
    map-underscore-to-camel-case: true -- 这个是支持驼峰命名法,写上之后我们从数据库传来的数据就可以直接改写成驼峰命名法 比如说数据库是user_name 你在我们的实体类中就可以写成userName 不过这个不重要
4. Create database + connect to database
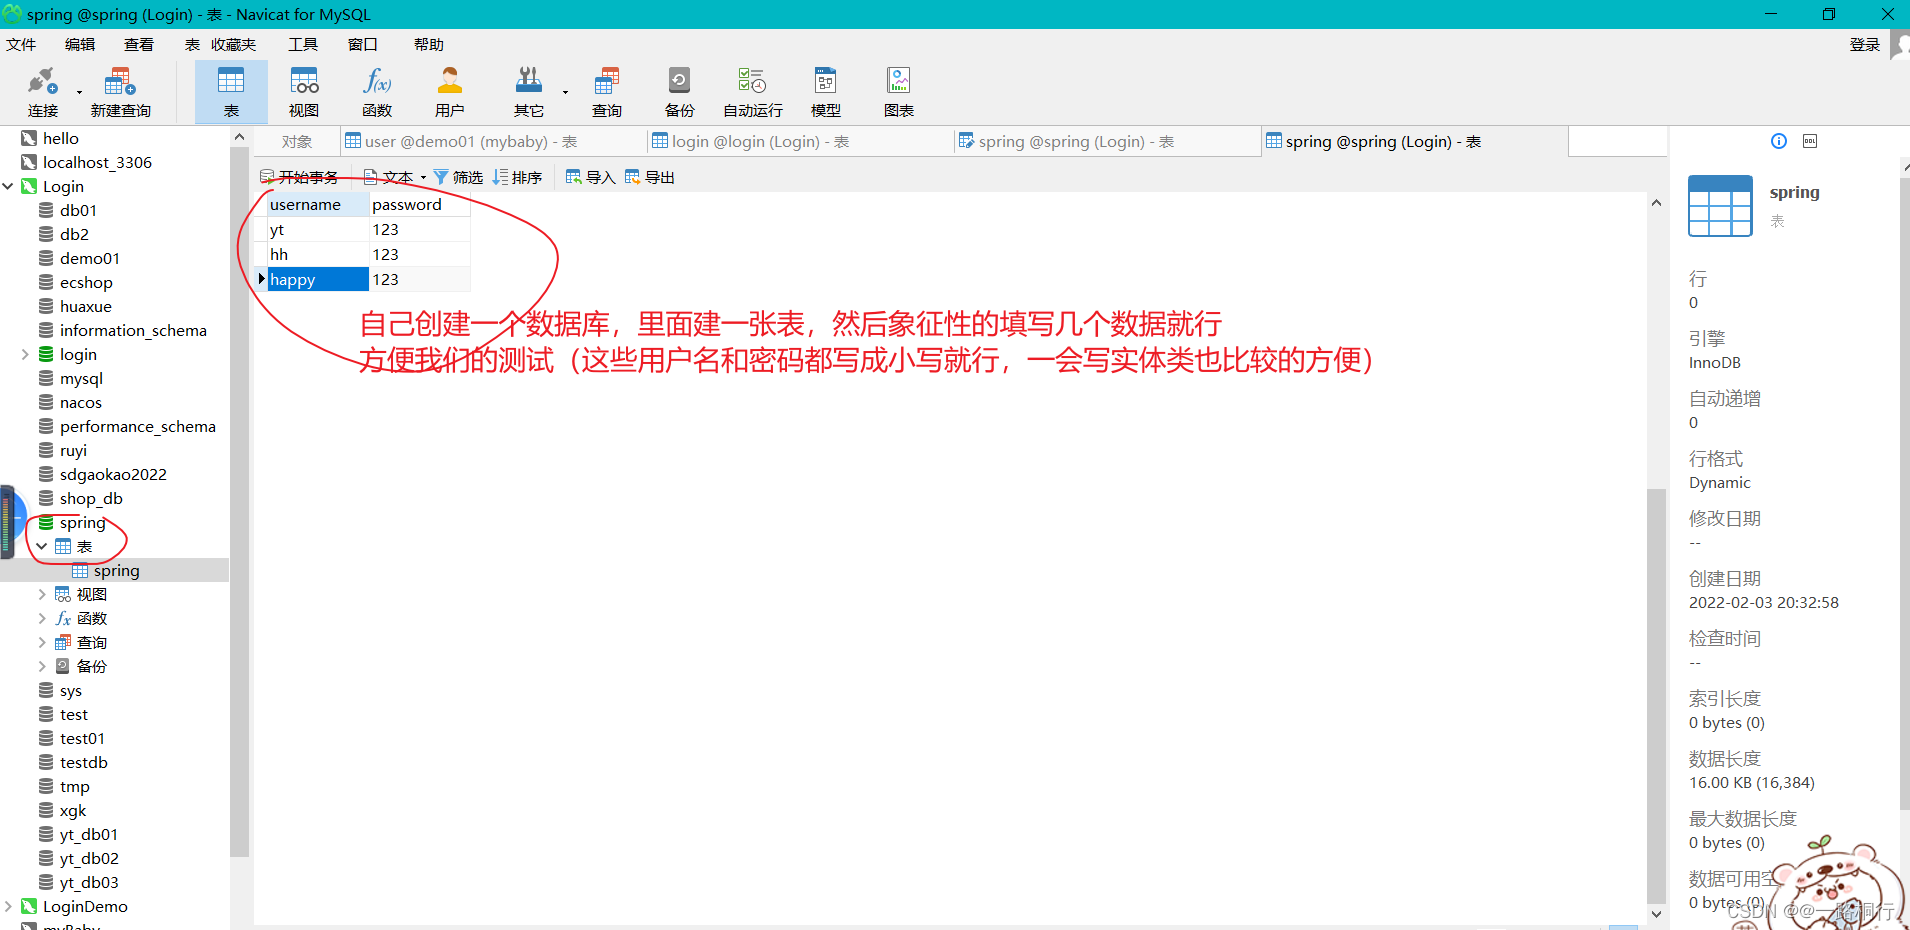
Use idea to connect to our database

Click to enter our connection page

connection succeeded
You should see something similar to the picture below

If you can see your watch, it means success.
5. The idea of layering
Let’s briefly talk about how to perform layering processing
Let’s take a look at my entire directory first

1. Entity layer
It stores the data that we map with the database, that is, what fields in the data are we write here.
Be careful not to build the package in the wrong location. You can follow mine.
Up code
package com.example.demo002.entity;

/**
 * @author yt1105
 * @version 1.0
 */
public class User {
    private String username;
    private String password;

    @Override
    public String toString() {
        return "User{" +
                "username='" + username + '\'' +
                ", password='" + password + '\'' +
                '}';
    }

    public User() {
    }

    public User(String username, String password) {
        this.username = username;
        this.password = password;
    }

    public String getUsername() {
        return username;
    }

    public void setUsername(String username) {
        this.username = username;
    }

    public String getPassword() {
        return password;
    }

    public void setPassword(String password) {
        this.password = password;
    }
}
This layer is very simple, you just need to write it, and then the fields correspond to the fields in your own database.
2.mapper layer
You can understand this layer as providing an interface to the database, which can interact with the data in the data library.
Here we use annotation operations to operate the database (here you can also choose to use xml files to operate, we will talk about this later)
package com.example.demo002.mapper;

import com.example.demo002.entity.User;
import org.apache.ibatis.annotations.Insert;
import org.apache.ibatis.annotations.Mapper;
import org.apache.ibatis.annotations.Select;

import java.util.List;

/**
 * @author yt1105
 * @version 1.0
 */
@Mapper
public interface UserMapper {
    @Insert("INSERT INTO spring VALUES(#{username},#{password})")
    int add(User user);
    @Select("SELECT * FROM spring")
    List<User> queryAll();
}
It should be noted that everyone should not forget to add @Mapper. This annotation is added to tell our springboot that this is a mapper to facilitate its management. Don’t forget to add it.
The annotations describe how to operate the database. They are all the basic syntax of the database. Except for this #{username}, #{password}, why do we need to add #{}?
This is a syntax written like this, which means that this data is transmitted from the outside. Everyone just remembers it.
Of course, you can also use xml file configuration
I have no use here because the query statement is relatively simple, just take a look at it.

Then write some of our templates here. If you want to use them, write this in first.
<?xml version="1.0" encoding="UTF-8" ?>
<!DOCTYPE mapper
        PUBLIC "-//mybatis.org//DTD Mapper 3.0//EN"
        "http://mybatis.org/dtd/mybatis-3-mapper.dtd">
<mapper namespace="com.example.dao.UserDao">
 <select id="queryAll" resultType="com.example.demo.pojo.UserLogin">
        select * from userLogin
    </select>

</mapper>
This is a template, and then write the sql statement you want to write in it. Please pay attention to what these parameters are for: namespace="com.example.dao.UserDao"
You need to change this to your own mapper path.
id="queryAll" This is the name of your query. This is the method name you wrote in the mapper interface. resultType represents your return type. Just write the path of your entity class.
Note that if you don’t use it, don’t create this package, otherwise an error will be reported if you create it, so don’t create it and install it directly according to my ideas.
Since it is useless for me to explain this this time.
Do a little test
At this time, you can test whether there are any errors in what you wrote, that is, see if your data can be displayed.

Write in this position
package com.example.demo002;

import com.example.demo002.entity.User;
import com.example.demo002.mapper.UserMapper;
import com.example.demo002.service.UserServiceInterface;
import org.junit.jupiter.api.Test;
import org.springframework.beans.factory.annotation.Autowired;
import org.springframework.boot.test.context.SpringBootTest;

import java.util.List;

@SpringBootTest
class Demo002ApplicationTests {
@Autowired
private UserMapper userMapper;
    @Test
    void contextLoads() {
        User user = new User("HHH","ASD");
        userMapper.add(user);
        List<User> users = userMapper.queryAll();
        users.forEach(System.out::println);

    }

}
Then if the data can be printed, there is no problem.
3.service layer
Here we implement some of our business
Go directly to coding
This is the UserService class
package com.example.demo002.service;

import com.example.demo002.entity.User;
import com.example.demo002.mapper.UserMapper;
import org.springframework.beans.factory.annotation.Autowired;
import org.springframework.stereotype.Service;

import java.util.List;

/**
 * @author yt1105
 * @version 1.0
 */
@Service
public class UserService implements UserServiceInterface{
    @Autowired
    private UserMapper userMapper;


    @Override
    public int add(User user) {
        return userMapper.add(user);
    }

    @Override
    public List<User> queryAll() {
        return userMapper.queryAll();
    }
}
package com.example.demo002.service;

import com.example.demo002.entity.User;

import java.util.List;

/**
 * @author yt1105
 * @version 1.0
 */
public interface UserServiceInterface {
    int add(User user);
    List<User> queryAll();
}
Writing front-end pages
Before writing this controller, I will first write our front-end page.
Then tell me my thoughts
What I want to achieve is that a user can log in after entering their account number and password.
Then what I hope is that after logging in, there will be a page to query how many users have logged in.
Then there is an interface that will welcome the user after successful login.
Then upload my front-end code
login.html
<!DOCTYPE html>
<!--引入我们的模版引擎-->
<html lang="en" xmlns:th="http://www.thymeleaf.org">
<head>
<meta charset="UTF-8">
<title>Title</title>
<style>
body{
background: #30cfd0;
/*background-image: url(../static/img1/虎年.jpg);*/
background-repeat: no-repeat;
background-size:100%;
background-position: 0px -50px;
}
#login-box{
background-color: #00000068;
border-radius: 13px;
text-align: center;
margin: 0px auto;
margin-top: 80px;
width: 350px;
height: 400px;
}
#login-box h1{
padding-top: 60px;
color: #ffffff;
}
#login-box .input-box{
margin-top: 30px;
}
#login-box .input-box input{
border: none;
background: none;
border-bottom: #FFFFFF 2px solid;
padding: 5px 10px;
outline: none;
color: #FFFFFF;
}
#login-box button{
line-height:30px;
margin-top: 30px;
width: 130px;
height: 30px;
border-radius:13px ;
outline: none;
border: none;
background-image: linear-gradient(120deg, #a6c0fe 0%, #f68084 100%);
color: #FFFFFF;
}
#login-box button:hover{
background-image: linear-gradient(to top, #30cfd0 0%, #330867 100%);
}
#login-box .input-box i{
color: #FFFFFF;
}
</style>
</head>
<body>
<!DOCTYPE html>
<html>
<head>
<meta charset="utf-8" />
<title>Sign in</title>
<link rel="stylesheet" type="text/css"href="./css/index.css"/>
<link rel="stylesheet" type="text/css"href="./css/iconfont.css"/>
</head>
<body>
<div id="login-box">
<h1>Login</h1>
<form method="get" action="/LoginSuccess">
<div class="input-box">
<i class="iconfont"></i>
<span th:text="${data}" style="text-color:#ff0000;font-size: 10px"></span>
<input type="text" name="username" placeholder="请输入用户名" required/><br><br>
</div>
<div class="input-box">
<i class="iconfont"></i>
<input type="password" name="password" placeholder="请输入密码" required/><br><br>
</div>
<input type="submit" value="登录">
</form>
<br>
<form method="get" action="/toRegister">
<input type="submit" value="注册">
</form>
<form method="get" action="/toMessage">
<input type="submit" value="查询登陆用户的信息">
</form>
</div>
</body>
</html>
</body>
</html>
Let’s talk about this form, which is what we want to submit. The action attribute inside corresponds to the requestmapper in our controller.
This login and registration interface has been beautified. You can just use it directly. It is relatively beautiful.
register.html
<!DOCTYPE html>
<html lang="en" xmlns:th="http://www.thymeleaf.org">
<head>
<meta charset="UTF-8">
<title>Title</title>
<style>
body{
background: #30cfd0;
/*background-image: url(../static/img1/虎年.jpg);*/
background-repeat: no-repeat;
background-size:100%;
background-position: 0px -50px;
}
#login-box{
background-color: #00000068;
border-radius: 13px;
text-align: center;
margin: 0px auto;
margin-top: 80px;
width: 350px;
height: 400px;
}
#login-box h1{
padding-top: 60px;
color: #ffffff;
}
#login-box .input-box{
margin-top: 30px;
}
#login-box .input-box input{
border: none;
background: none;
border-bottom: #FFFFFF 2px solid;
padding: 5px 10px;
outline: none;
color: #FFFFFF;
}
#login-box button{
line-height:30px;
margin-top: 30px;
width: 130px;
height: 30px;
border-radius:13px ;
outline: none;
border: none;
background-image: linear-gradient(120deg, #a6c0fe 0%, #f68084 100%);
color: #FFFFFF;
}
#login-box button:hover{
background-image: linear-gradient(to top, #30cfd0 0%, #330867 100%);
}
#login-box .input-box i{
color: #FFFFFF;
}
</style>
</head>
<body>
<!DOCTYPE html>
<html>
<head>
<meta charset="utf-8" />
<title>Sign in</title>
<link rel="stylesheet" type="text/css"href="./css/index.css"/>
<link rel="stylesheet" type="text/css"href="./css/iconfont.css"/>
</head>
<body>
<div id="login-box">
<h1>Register</h1>
<form method="get" action="/RegisterSuccess">
<div class="input-box">
<i class="iconfont"></i>
<input type="text" name="username" placeholder="请输入用户名" required/><br><br>
</div>
<div class="input-box">
<i class="iconfont"></i>
<input type="password" name="password" placeholder="请输入密码" required/><br><br>
<input type="password" name="password2" placeholder="请确认密码" required/><br><br>
</div>
<input type="submit" value="注册">
</form>
</div>
</body>
</html>
</body>
</html>
success.html
<!DOCTYPE html>
<html lang="en" xmlns: th="http://www.thymeleaf.org" xmlns:th="http://www.w3.org/1999/xhtml">
<head>
    <meta charset="UTF-8">
    <title>Title</title>
    <style>
        body{
            background: aquamarine;
        }
    </style>
</head>
<body>
<!--这里是进行联系 我们借助的是"${kkk} 这个语句"-->
<h1 style="text-align: center ;background: cadetblue;border-radius: inherit" >注册成功</h1>
<span th:text="${kkk}" style="background: aqua ;font-size: 40px; text-align: center"> </span>
<!---->
<p style="text-align: center; background: salmon; font-size: 40px ">新年快乐</p>
</body>
</html>
showall.html
<!DOCTYPE html>
<html xmlns:th="http://www.thymeleaf.org">
<head>
    <meta charset="UTF-8">
    <title>Title</title>
    <style>
        table{
            border-collapse: collapse;
            margin: auto;
        }
        th,td{
            border: salmon solid 1px;
            padding: 5px;
        }

    </style>
</head>
<body>
<table>
    <tr>
        <th>用户姓名</th>
        <th>用户密码</th>

    </tr>
    <tr th:each="user:${users}">
        <td th:text="${user.getUsername()}"></td>
        <td th:text="${user.getPassword()}"></td>
    </tr>


</table>
</body>
</html>
Let’s look at our controller layer
package com.example.demo002.controller;

import com.example.demo002.entity.User;
import com.example.demo002.service.UserService;
import org.springframework.beans.factory.annotation.Autowired;
import org.springframework.stereotype.Controller;
import org.springframework.ui.Model;
import org.springframework.web.bind.annotation.RequestMapping;

/**
 * @author yt1105
 * @version 1.0
 */
@Controller
public class UserController {
    @Autowired
   public UserService userService;

    @RequestMapping("/toLogin")//当你在浏览器输入/toLogin,我们会直接跳转到登陆界面
    public String toLogin(){
        return "login";
    }
    @RequestMapping("/LoginSuccess")//这个是判断是否成功登陆
    public String  LoginSuccess(Model model,User user){
        if(user.getUsername()!=null){
             model.addAttribute("kkk",user.getUsername());
            return "success";//我们就返回到我们的成功页面上边去
        }
        else {
            model.addAttribute("data","请输入你的密码");
            return "login";
        }

    }

    @RequestMapping("/toRegister")//这个是注册页面
    public String toRegister(){
        return "register";
    }

    @RequestMapping("/RegisterSuccess")//判断注册成功,然后将我们的数据放入数据库
    public String RegisterSuccess(User user){

        int add = userService.add(user);
        return "login";

    }
    @RequestMapping("/toMessage")//这个是显示我们的用户登陆信息(对应我们的显示用户信息按钮)
    public String toMessage(Model model){
        model.addAttribute("users",userService.queryAll());
        return "showAll";
    }

}
Conclusion
The above is my code
If you need the original code, please come directly to our gitee warehouse
Just get it
SpringBoot: Simple user login implementation (mybaits combined with themleaf template) (gitee.com)
Finally, attach our
mapper.xml template
<?xml version="1.0" encoding="UTF-8" ?>
<!DOCTYPE mapper
  PUBLIC "-//mybatis.org//DTD Mapper 3.0//EN"
  "http://mybatis.org/dtd/mybatis-3-mapper.dtd">
<mapper namespace="org.mybatis.example.BlogMapper">
  <select id="selectBlog" resultType="Blog">
    select * from Blog where id = #{id}
  </select>
</mapper
themleaf template (just write this at the beginning of our HTML)
<html xmlns:th="http://www.thymeleaf.org">
