uniapp custom watermark camera
background
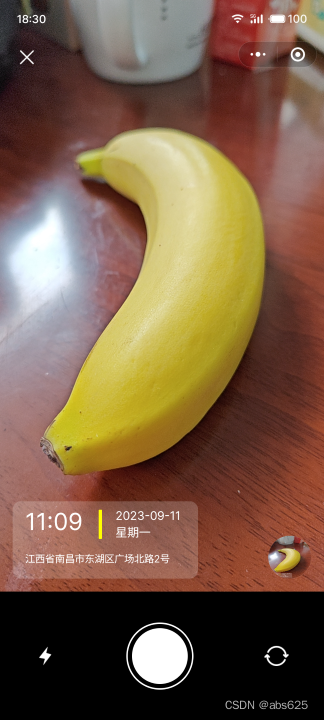
The previous article implemented adding watermarks to pages in uniapp . Today we implement a custom watermark camera (recently having trouble with watermarks, haha). The camera component is mainly used to realize the preview of the viewfinder. Finally, canvas is used to draw the custom watermark on the taken photos. First, the picture is shown.
accomplish
The page is divided into viewfinder and preview after taking the photo.
UI implementation
1. We first open WeChat, hahahaha, that’s right, we open WeChat. This viewfinder page refers to the WeChat photo interface UI.
2. The viewfinder interface is divided into upper and lower parts. The upper part is the camera viewfinder frame component, and the lower part is the operation area.
The closure and watermark on the viewfinder component, as well as the thumbnail display after taking the photo, need to be displayed through cover-view and cover-image .
code show as below:
<camera :device-position="position"
        :flash="flash"
        @error="error"
        class="camera"
        :style="'height:'+cHei+'px;'">
        <cover-image
            class="close-img active"
            @click="close"
            src="/static/miniprogram/custom-camera/close.png"/>
        <cover-view class="water-marker">
            <cover-view class="time">11:09</cover-view>
            <cover-view class="div"></cover-view>
            <cover-view class="date">2023-09-11</cover-view>
            <cover-view class="week">星期一</cover-view>
            <cover-view class="address">江西省南昌市东湖区广场北路2号</cover-view>
        </cover-view>
        <cover-image
            class="result"
            @click="handlePre"
            :src="photo"
            v-show="photo"/>
    </camera>
The lower half of the operating area includes the flash control button on the left, the camera button in the middle (concentric circles are realized through CSS), and the camera switching button on the right.
The implementation code is as follows:
<view class="bottom layout-row less-center">
        <image :src="'/static/miniprogram/custom-camera/light-'+(flash == 'off' ? 'on' : 'off')+'.png'"
            :class="'light-img active '+(position == 'front' ? 'hidden' : '')"
            @click="handleLight"/>
        <view class="layout-row center cicle-outside">
            <view class="cicle-inside active"
            @click="doTakePhoto"/>
        </view>
        <image src="/static/miniprogram/custom-camera/switch.png"
            class="switch-img active"
            @click="handlePosition"/>
    </view>
After this wave of operations, the viewfinder page will be what you saw at the beginning.
Function realization
Define the control variables first
...
const position = ref('back')//摄像头
const flash = ref('off')//闪光灯
const photo = ref('')//拍完后的图片
const canvasW = ref(0)//绘制水印的canvas宽度
const canvasH = ref(0)//绘制水印的canvas高度
const fristTimedraw = ref(true)//是否为首次绘制
const working = ref(false)//是否正在生成水印
...
close button event
...
const close = () => {


        uni.navigateBack({


            delta: 1
        })
    }
...
camera switching event
...
const handlePosition = () => {


        if(working.value){


            return
        }
        if(position.value == 'back'){


            position.value = 'front'
            //切换成前置摄像头关闭闪光灯
            flash.value = 'off'
        }else {


            position.value = 'back'
        }
    }
...
flashbulb event
...
const handleLight = () => {


        if(working.value){


            return
        }
        if(flash.value == 'off'){


            flash.value = 'on'
        }else {


            flash.value = 'off'
        }
    }
...
Preview after shooting
...
const handlePre = () => {


        if(working.value){


            return
        }
        uni.previewImage({


            current: 0,
            urls: [photo.value],
            success: (res) => {


                console.log(res);
            },
        });
    }
...
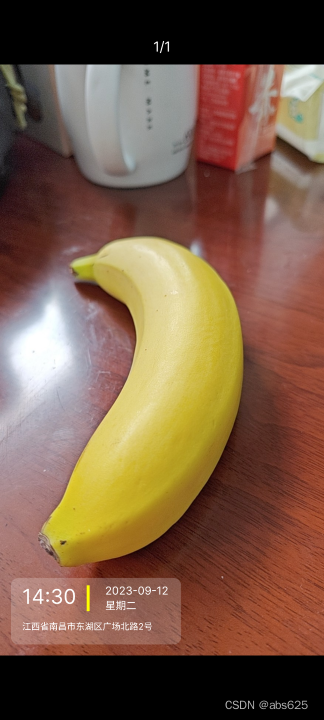
The final camera function is here. Because the photos taken by our camera component do not have watermarks, we need to put a canvas component on the interface. Later, we will draw both the watermark and the picture into the canvas, and then generate them through canvas. picture.
First add a canvas to the interface, and this canvas is not visible on the interface.
...
<canvas canvas-id="firstCanvas"
        class="canvas"
        :style="'width:'+canvasW+'px;height: '+canvasH+'px'"/>
...
All implementation code
Then after taking the photo, draw the photo and watermark-related content onto the canvas, including drawing rectangles, text, etc. For canvas drawing, please refer to my previous article canvas drawing API . After drawing, use uni.canvasToTempFilePath to generate a bitmap from the canvas.

I know, who wants to see you fooling around so much? Is there any code that can be copied with one click? Hey, don't go, we must make arrangements! ! !
Next is all the implementation code
<template>
  <view class="layout-column">
    <camera :device-position="position"
        :flash="flash"
        @error="error"
        class="camera"
        :style="'height:'+cHei+'px;'">
        <cover-image
            class="close-img active"
            @click="close"
            src="/static/miniprogram/custom-camera/close.png"/>
        <cover-view class="water-marker">
            <cover-view class="time">11:09</cover-view>
            <cover-view class="div"></cover-view>
            <cover-view class="date">2023-09-11</cover-view>
            <cover-view class="week">星期一</cover-view>
            <cover-view class="address">江西省南昌市东湖区广场北路2号</cover-view>
        </cover-view>
        <cover-image
            class="result"
            @click="handlePre"
            :src="photo"
            v-show="photo"/>
    </camera>
    <view class="bottom layout-row less-center">
        <image :src="'/static/miniprogram/custom-camera/light-'+(flash == 'off' ? 'on' : 'off')+'.png'"
            :class="'light-img active '+(position == 'front' ? 'hidden' : '')"
            @click="handleLight"/>
        <view class="layout-row center cicle-outside">
            <view class="cicle-inside active"
            @click="doTakePhoto"/>
        </view>
        <image src="/static/miniprogram/custom-camera/switch.png"
            class="switch-img active"
            @click="handlePosition"/>
    </view>
    <canvas canvas-id="firstCanvas"
        class="canvas"
        :style="'width:'+canvasW+'px;height: '+canvasH+'px'"/>
  </view>
</template>

<script setup lang="ts">
    import {


        onLoad
    } from "@dcloudio/uni-app";
    import {


        ref
    } from 'vue'
    const cHei = ref(0)
    const position = ref('back')
    const flash = ref('off')
    const photo = ref('')
    const canvasW = ref(0)
    const canvasH = ref(0)
    const fristTimedraw = ref(true)
    //是否正在生成水印
    const working = ref(false)
    onLoad(() => {


        cHei.value = uni.getSystemInfoSync().windowHeight - uni.upx2px(300)
    })
    const close = () => {


        uni.navigateBack({


            delta: 1
        })
    }
    const error = (e) => {


        console.log('camera error',e)
    }
    const takePhoto = () => {


        const ctx = uni.createCameraContext();
        ctx.takePhoto({


            quality: 'high',
            success: (res) => {


                console.log('takePhoto success',res)
                drawPhoto(res.tempImagePath)
            }
        });
    }
    const doTakePhoto = () => {


        working.value = true
        takePhoto()
        //这里真机上面第一次绘制水印图片可能需要很久,所以延迟500毫秒再执行一次
        if(fristTimedraw.value){


            setTimeout(()=>{


                takePhoto()
                fristTimedraw.value = false
            },500)
        }
    }
    const drawPhoto = (path) => {


        uni.getImageInfo({


            src: path,
            success: res => {


                let ctx = uni.createCanvasContext('firstCanvas');
                //设置画布宽高
                canvasW.value = res.width
                canvasH.value = res.height
                ctx.drawImage(path, 0, 0, res.width, res.height)
                //水印框的大小
                let w = 460
                let h = 180
                //水印框左上角坐标
                let x = 30
                let y = res.height - 210
                //圆角半径
                let r = 20
                let time = "14:30"
                let date = "2023-09-12"
                let week = "星期二"
                let address = "江西省南昌市东湖区广场北路2号"
                ctx.beginPath()
                // 因为边缘描边存在锯齿,最好指定使用 transparent 填充
                ctx.setFillStyle('transparent')
                // 左上角
                ctx.arc(x + r, y + r, r, Math.PI, Math.PI * 1.5)

                // border-top
                ctx.moveTo(x + r, y)
                ctx.lineTo(x + w - r, y)
                ctx.lineTo(x + w, y + r)
                // 右上角
                ctx.arc(x + w - r, y + r, r, Math.PI * 1.5, Math.PI * 2)

                // border-right
                ctx.lineTo(x + w, y + h - r)
                ctx.lineTo(x + w - r, y + h)
                // 右下角
                ctx.arc(x + w - r, y + h - r, r, 0, Math.PI * 0.5)

                // border-bottom
                ctx.lineTo(x + r, y + h)
                ctx.lineTo(x, y + h - r)
                // 左下角
                ctx.arc(x + r, y + h - r, r, Math.PI * 0.5, Math.PI)

                // border-left
                ctx.lineTo(x, y + r)
                ctx.lineTo(x + r, y)

                // 这里是使用 fill 或者 stroke都可以
                ctx.fill()
                // ctx.stroke()
                ctx.closePath()
                // 剪切
                ctx.clip()
                ctx.setFillStyle('rgba(255, 255, 255, 0.2)')
                ctx.fillRect(x, y, w, h)

                //字体加粗真机不起作用?
                //ctx.font = "normal bold 50px Arial"
                ctx.setFontSize(55); // 设置字体大小
                ctx.setFillStyle('#FFFFFF'); // 设置颜色为白色
                ctx.fillText(time, x+30, y+70);

                let timeW = ctx.measureText(time).width
                ctx.setFillStyle('#FFFF00'); // 设置颜色为
                ctx.fillRect(x+30+timeW+30, y+20, 8, 70)

                ctx.setFontSize(30); // 设置字体大小
                ctx.setFillStyle('#FFFFFF'); // 设置颜色为白色
                ctx.fillText(date, x+30+timeW+30+50, y+45);

                ctx.setFontSize(28); // 设置字体大小
                ctx.setFillStyle('#FFFFFF'); // 设置颜色为白色
                ctx.fillText(week, x+30+timeW+30+50, y+85);

                ctx.setFontSize(24); // 设置字体大小
                ctx.fillText(address, 60, y+140);

                ctx.draw(false, () => {


                    uni.showLoading({


                        title: '正在生成水印照片'
                    })
                    uni.canvasToTempFilePath({


                        canvasId: 'firstCanvas',
                        destWidth: canvasW.value*2,   //展示图片尺寸=画布尺寸1*像素比2
                        destHeight: canvasH.value*2,
                        success: res1 => {


                            working.value = false
                            uni.hideLoading()
                            photo.value = res1.tempFilePath
                        }
                    });
                })
            }
        })
    }
    //照片保存到相册
    const savePhoto = (path) => {


        uni.saveImageToPhotosAlbum({


			filePath: path,
			success: res=> {


				uni.showToast({


                    title: '照片已保存到相册',
                    icon: 'none',
                    duration: 2000
                });
			}
		})
    }
    const handleLight = () => {


        if(working.value){


            return
        }
        if(flash.value == 'off'){


            flash.value = 'on'
        }else {


            flash.value = 'off'
        }
    }
    const handlePosition = () => {


        if(working.value){


            return
        }
        if(position.value == 'back'){


            position.value = 'front'
            //切换成前置摄像头关闭闪光灯
            flash.value = 'off'
        }else {


            position.value = 'back'
        }
    }
    const handlePre = () => {


        if(working.value){


            return
        }
        uni.previewImage({


            current: 0,
            urls: [photo.value],
            success: (res) => {


                console.log(res);
            },
        });
    }
</script>

<style scoped lang="scss">
    page {


        width: 100%;
        height: 100%;
    }
    .camera {


        width: 100%;
        background: #999999;
    }
    .close-img {


        width: 48rpx;
        height: 48rpx;
        margin-top: 110rpx;
        margin-left: 40rpx;
    }
    .light-img {


        width: 48rpx;
        height: 48rpx;
    }
    .switch-img {


        width: 57rpx;
        height: 48rpx;
    }
    .bottom {


        width: 100%;
        height: 300rpx;
        background: black;
        justify-content: space-around;
    }
    .cicle-outside {


        width: 150rpx;
        height: 150rpx;
        border: 5rpx solid #fff;
        border-radius: 50%;
    }
    .cicle-inside {


        width: 130rpx;
        height: 130rpx;
        border-radius: 50%;
        background: #fff;
    }
    .hidden {


        visibility: hidden;
    }
    .water-marker {


        position: absolute;
        left: 30rpx;
        bottom: 30rpx;
        width: 430rpx;
        height: 180rpx;
        background: rgba($color: #ffffff, $alpha: 0.2);
        border-radius: 20rpx;
    }
    .time {


        font-size: 55rpx;
        color: white;
        position: absolute;
        top: 20rpx;
        left: 30rpx;
    }
    .div {


        border-radius: 3rpx;
        width: 8rpx;
        height: 70rpx;
        background: yellow;
        position: absolute;
        top: 20rpx;
        left: 200rpx;
    }
    .date {


        font-size: 28rpx;
        color: white;
        position: absolute;
        top: 20rpx;
        left: 240rpx;
        width: 180rpx;
    }
    .week {


        font-size: 28rpx;
        color: white;
        position: absolute;
        top: 60rpx;
        left: 240rpx
    }
    .address {


        font-size: 24rpx;
        color: white;
        position: absolute;
        top: 120rpx;
        left: 30rpx;
        bottom: 30rpx;
        word-break: break-all;
		word-wrap: break-word;
		white-space: pre-line;
    }
    .canvas {


        position: absolute;
        top: -999999rpx;
        width: 100%;
    }
    .result{


        width: 100rpx;
        height:100rpx;
        position: absolute;
        right:30rpx;
        bottom:30rpx;
        background:white;
        border-radius: 50%;
    }
</style>
Some of the styles are referenced globally. In fact, they are flex layout and row or column. You can implement them yourself. So far, all functions have been implemented.
Tail
The icons used on the page are downloaded from the Alibaba iconfont icon library .
That’s it for today’s article. I hope it can be helpful to you. If you like my article, please like, comment, and follow me. Thank you all!