Installation preparation
The following operations require that you have deployed Yapi yourself by default , and it is best to have deployed Yapi secondary development environment.
Whether you choose online installation or local installation, you need to install the client tool.
1、yapi-cli:npm install yapi-cli –g,
2. After installation, configure the folder nodejs/node_global into the environment variable.
3、ykit: npm install -g ykit。
Online installation
1. Go to the directory containing config.json
2, Execution: yapi plugin --name yapi-plugin-interface-oauth2-token
Online installation generally has higher network requirements, and offline installation can be used in case of failure.
Offline installation
1. Download the source code: https://github.com/shouldnotappearcalm/yapi-plugin-interface-oauth2-token
2. Unzip node_modules.tar.gz in the source code and overwrite the original node_modules directory under yapi.
3. Go to the vendors directory
4. Execute: ykit pack –m

5. If you encounter the above problems, you generally need to update node-sass and execute the command: npm rebuild node-sass

6. After the installation is complete, restart the yapi service:

Configure using
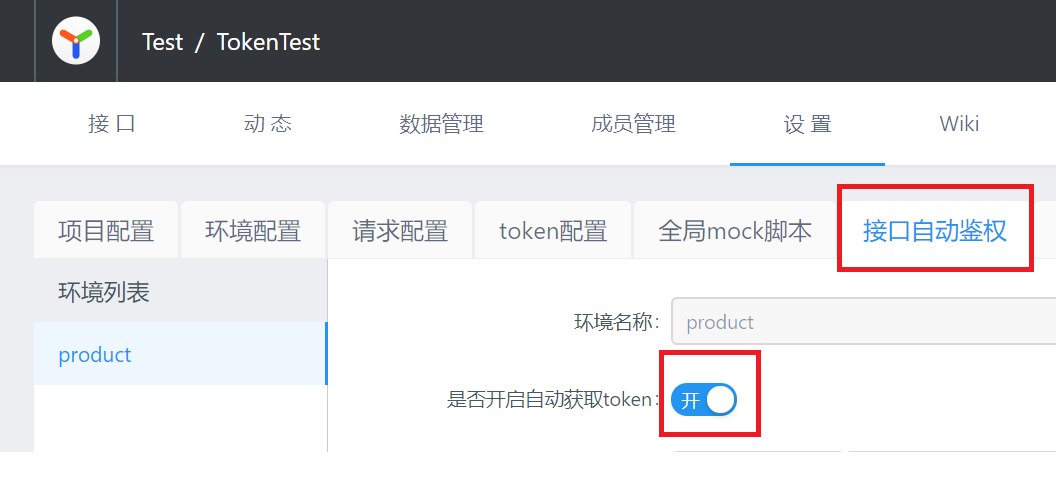
1. Select: Interface->Settings->Interface automatic authorization, select the set environment , and open the automatic token acquisition option , that is, open the scheduled task:
2. Obtain the token address: This is handled according to a common interface. According to different calling methods, just fill in the interface name and input parameters. A few notes:
a. The parameters after the get method address and the parameter list below will be repeated. You only need to fill in one place. For example, if the above address contains ?username=xxx, do not write the username parameter in the following list.
b. The "Check" button is very useful and can be used to determine whether the token can be obtained through the current interface. If it is a normal interface, the response is usually 401 (no authorization indicated), so make sure the test passes.
c. The "data" table is blank by default, with a Delete key next to it. If it is empty, you can ignore it. There is no need to press the Delete key to delete, as it is difficult to restore after deletion.

3. Set the token validity period : shorter than the minimum value of the token update period and the token expiration period.
4. Request header field: According to the program to be tested, which field is set wherever the program token is written.
5. Get the path: F12 debugging to get the token address. If json is returned, the root node is the body, and then you can go down layer by layer according to the path. In many cases the path is like this: body.result.jwt.token_type + " " + body.result.jwt.access_token
6. Save: The save button can actually play a debugging role. After saving, an update will be triggered in real time. After updating, you can go to "Environment Configuration" to view the updated values. Remember to press F5 to refresh the page before viewing.


At this point, the interface authentication function has been added.
Finally, I would like to thank everyone who reads my article carefully. Reciprocity is always necessary. Although it is not a very valuable thing, if you can use it, you can take it directly:
This information should be the most comprehensive and complete preparation warehouse for [software testing] friends. This warehouse has also accompanied tens of thousands of test engineers through the most difficult journey. I hope it can also help you!