Chapter 5 VTK Image Processing
- 5.3 Basic operations of VTK images
Learning Tutorial: "Advanced VTK Graphics and Image Development" Zhang Xiaodong, Luo Huoling
Special thanks: Dongling Studio
5.3 Basic operations of VTK images
5.3.1 Access and modification of image information
(1) vtkImageData - image information access
vtkImageData provides multiple functions for obtaining basic information of the image, usually named in the form of Set or Get plus the corresponding information name.
Example:
Read a two-dimensional image in bmp format and display the obtained image dimension, image origin and pixel interval information.
Source code:
#include <vtkSmartPointer.h>
#include <vtkImageData.h>
#include <vtkRenderer.h>
#include <vtkRenderWindow.h>
#include <vtkRenderWindowInteractor.h>
#include <vtkImageViewer2.h>
#include <vtkBMPReader.h>

//测试图像:../data/lena.bmp
int main()
{


	//读取bmp图像
	vtkSmartPointer<vtkBMPReader>reader = vtkSmartPointer<vtkBMPReader>::New();
	reader->SetFileName("../data/lena.bmp");
	reader->Update();

	//获取图像信息
	int dims[3];
	reader->GetOutput()->GetDimensions(dims);
	std::cout << "图像维数" << dims[0] << " " << dims[1] << " " << dims[2] << std::endl;

	double origin[3];
	reader->GetOutput()->GetOrigin(origin);
	std::cout << "图像原点" << origin[0] << " " << origin[1] << " " << origin[2] << std::endl;

	double spacing[3];
	reader->GetOutput()->GetSpacing(spacing);
	std::cout << "像素间隔" << spacing[0] << " " << spacing[1] << " " << spacing[2] << std::endl;

	//显示图像
	vtkSmartPointer<vtkImageViewer2>imageViewer = vtkSmartPointer<vtkImageViewer2>::New();
	imageViewer->SetInputConnection(reader->GetOutputPort());

	vtkSmartPointer<vtkRenderWindowInteractor>renWinInter = vtkSmartPointer<vtkRenderWindowInteractor>::New();
	imageViewer->SetupInteractor(renWinInter);
	imageViewer->Render();
	imageViewer->GetRenderer()->ResetCamera();
	imageViewer->Render();

	imageViewer->GetRenderer()->SetBackground(1.0, 1.0, 1.0);
	imageViewer->SetSize(640, 480);
	imageViewer->GetRenderWindow()->SetWindowName("GetImageInformationExample");

	renWinInter->Start();

	return 0;
}
result:

Note: In VTK, whether it is a two-dimensional or three-dimensional image, it is represented by vtkImageData, so the image dimension is defined in the program as dims[3].
(2) vtkChangeImageInformation——Image information modification
vtkChangeImageInformation can be used as a Filter in the pipeline to modify image information. The origin, pixel interval and range of the image can be modified, and operations such as image translation and scaling can also be implemented.
vtkImageData provides multiple Set functions that can also set basic image information. However, after the output image information of an image Filter is modified, if the Filter is updated, the image information will be restored to the original value.
Source code:
#include <vtkSmartPointer.h>
#include <vtkImageViewer2.h>
#include <vtkRenderer.h>
#include <vtkRenderWindow.h>
#include <vtkRenderWindowInteractor.h>
#include <vtkBMPReader.h>
#include <vtkImageChangeInformation.h>
#include <vtkImageData.h>
//测试图像:../data/lena.bmp
int main()
{
//读取图像
vtkSmartPointer<vtkBMPReader>reader = vtkSmartPointer<vtkBMPReader>::New();
reader->SetFileName("../data/lena.bmp");
reader->Update();
int dims[3];
double origin[3];
double spacing[3];
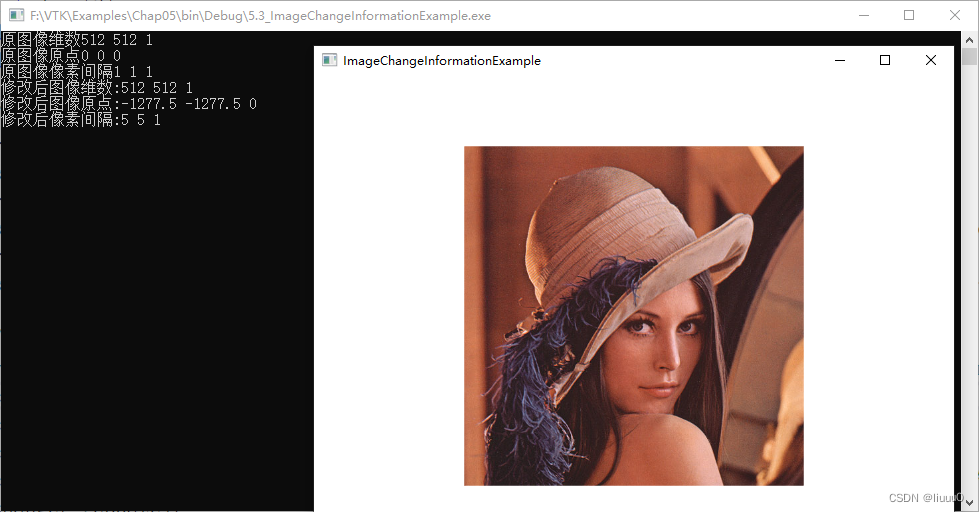
//查看图像原始信息
reader->GetOutput()->GetDimensions(dims);
std::cout << "原图像维数" << dims[0] << " " << dims[1] << " " << dims[2] << std::endl;
reader->GetOutput()->GetOrigin(origin);
std::cout << "原图像原点" << origin[0] << " " << origin[1] << " " << origin[2] << std::endl;
reader->GetOutput()->GetSpacing(spacing);
std::cout << "原图像像素间隔" << spacing[0] << " " << spacing[1] << " " << spacing[2] << std::endl;
//修改图像
vtkSmartPointer<vtkImageChangeInformation>changer = vtkSmartPointer<vtkImageChangeInformation>::New();
changer->SetInputData(reader->GetOutput());
changer->SetOutputOrigin(100, 100, 0); //将图像原点置为(100,100)
changer->SetOutputSpacing(5, 5, 1);
changer->SetCenterImage(1);//该函数的作用是将(0,0,0)置为图像的中心。将会覆盖上述设置的SetOutputOrigin(100, 100, 0)
changer->Update();
//查看图像修改后信息
changer->GetOutput()->GetDimensions(dims);
std::cout << "修改后图像维数:" << dims[0] << " " << dims[1] << " " << dims[2] << std::endl;
changer->GetOutput()->GetOrigin(origin);
std::cout << "修改后图像原点:" << origin[0] << " " << origin[1] << " " << origin[2] << std::endl;
changer->GetOutput()->GetSpacing(spacing);
std::cout << "修改后像素间隔:" << spacing[0] << " " << spacing[1] << " " << spacing[2] << std::endl;
//显示修改后的图像
vtkSmartPointer<vtkImageViewer2> imageViewer = vtkSmartPointer<vtkImageViewer2>::New();
imageViewer->SetInputConnection(changer->GetOutputPort());
vtkSmartPointer<vtkRenderWindowInteractor> renderWindowInteractor = vtkSmartPointer<vtkRenderWindowInteractor>::New();
imageViewer->SetupInteractor(renderWindowInteractor);
imageViewer->Render();
imageViewer->GetRenderer()->ResetCamera();
imageViewer->Render();
imageViewer->GetRenderer()->SetBackground(1.0, 1.0, 1.0);
imageViewer->SetSize(640, 480);
imageViewer->GetRenderWindow()->SetWindowName("ImageChangeInformationExample");
renderWindowInteractor->Start();
return 0;
}
result:
5.3.2 Access and modification of image pixel values
Accessing and modifying image pixel values is the most commonly used operation. Two methods are provided in VTK.
(1) Directly access the data array of vtkImageData - obtain the data array pointer through the GetScalarPointer() function
vtkImageData provides the GetScalarPointer() function to obtain the data array pointer. This function has three forms:
//根据给定的像素索引得到指定的像素值,返回的是第(x,y,z)个像素值的地址
virtual void *GetScalarPointer(int coordinates[3]);
virtual void *GetScalarPointer(int x,int y,int z);

//返回图像数据数组的头指针,根据头指针可以依次访问索引像素
virtual void *GetScalarPointer();
Example:
Set a 100×100 size area of the image to black.
Source code:
#include <vtkSmartPointer.h>
#include <vtkImageViewer2.h>
#include <vtkRenderWindow.h>
#include <vtkRenderWindowInteractor.h>
#include <vtkRenderer.h>
#include <vtkBMPReader.h>
#include <vtkImageData.h>

//测试图像:../data/lena.bmp
int main()
{


	//读取图像
	vtkSmartPointer<vtkBMPReader> reader = vtkSmartPointer<vtkBMPReader>::New();
	reader->SetFileName("../data/lena.bmp");
	reader->Update();

	//图像大小
	int dims[3];
	reader->GetOutput()->GetDimensions(dims);

	//获取图像的元组组分数(是灰度图、梯度图、还是RGB图)
	int nbOfComp;
	nbOfComp = reader->GetOutput()->GetNumberOfScalarComponents();

	//三重循环遍历像素点
	for (int k = 0; k < dims[2]; k++)
	{


		for (int j = 0; j < dims[1]; j++)
		{


			for (int i = 0; i < dims[0]; i++)
			{


				if (i < 100 && j < 100)
				{


					//GetScalarPointer返回的是void类型,因此需要根据图像的实际类型进行强制转换。
					//如果是RGB图,获取R值地址
					unsigned char * pixel = (unsigned char *)(reader->GetOutput()->GetScalarPointer(i, j, k));
					*pixel = 0;
					*(pixel + 1) = 0;  //(pixel + 1)即为G值的地址
					*(pixel + 2) = 0;  //(pixel + 2)即为B值的地址
				}
			}
		}
	}

	vtkSmartPointer<vtkImageViewer2> imageViewer = vtkSmartPointer<vtkImageViewer2>::New();
	imageViewer->SetInputConnection(reader->GetOutputPort());

	vtkSmartPointer<vtkRenderWindowInteractor> renderWindowInteractor = vtkSmartPointer<vtkRenderWindowInteractor>::New();
	imageViewer->SetupInteractor(renderWindowInteractor);
	imageViewer->Render();
	imageViewer->GetRenderer()->ResetCamera();
	imageViewer->Render();

	imageViewer->GetRenderer()->SetBackground(1.0, 1.0, 1.0);
	imageViewer->SetSize(640, 480);
	imageViewer->GetRenderWindow()->SetWindowName("VisitImagePixelDirectlyExample");

	renderWindowInteractor->Start();

	return 0;
}
result:

Note:
The GetScalarPointer() function returns a void * type, which needs to be cast based on the actual type of the image. If you are not sure about the data type, you can also cast the image data type to a specific data type and then traverse.
When modifying RGB image and vector image pixels, you need to access them according to the number of components of the pixel tuple. First access the address of the R value of the (i, j, k)-th pixel, and then add one to the address to access the subsequent G and B values.
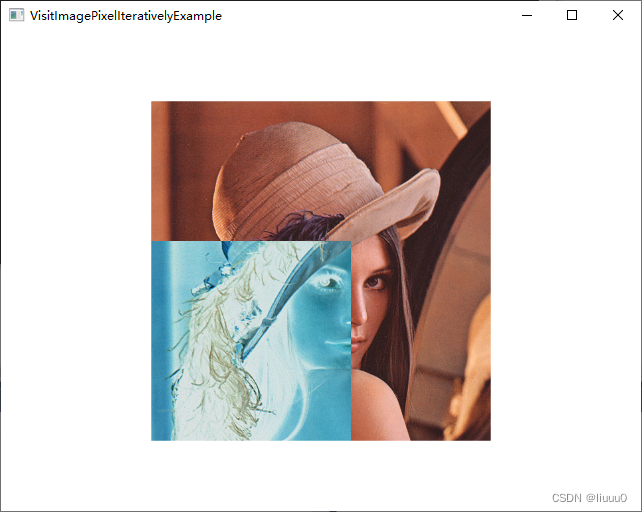
(2) vtkImageIterator - iterator method to access image pixels
This class is a template class. When using it, you need to provide the iterated image pixel type and the iterated area size.
Example:
Read an image in bmp format and invert the pixel values in the 300×300 area of the image.
Source code:
#include <vtkSmartPointer.h>
#include <vtkImageViewer2.h>
#include <vtkRenderWindow.h>
#include <vtkRenderWindowInteractor.h>
#include <vtkRenderer.h>
#include <vtkBMPReader.h>
#include <vtkImageData.h>
#include <vtkImageIterator.h>

//测试图像:../data/lena.bmp
int main()
{


	//1.读取图像
	vtkSmartPointer<vtkBMPReader> reader = vtkSmartPointer<vtkBMPReader>::New();
	reader->SetFileName("../data/lena.bmp");
	reader->Update();

	//2.迭代访问像素值 二重循环

	//定义一个子区域,不能超过图像范围(xmin,xmax,ymin,ymax,zmin,zmax)
	//根据图像类型unsigned char定义一个图像迭代器it,两个参数(要访问的图像,要访问的图像子区域)
	int subRegion[6] = {

     0,300,0,300,0,0 };
	vtkImageIterator<unsigned char>it(reader->GetOutput(), subRegion);

	//判断迭代器是否结束,即该图像子区域的像素点是否全被遍历
	while (!it.IsAtEnd())
	{


		unsigned char *inSI = it.BeginSpan();   //该点像素的第一个组分
		unsigned char *inSIEnd = it.EndSpan(); //该点像素的最后一个组分

		//判断当前像素的元组Tuple是否迭代完毕
		while (inSI != inSIEnd)
		{


			*inSI = 255 - *inSI;
			++inSI; //不断迭代当前像素的组分
		}

		it.NextSpan(); //该像素点组分迭代完毕后,继续迭代下个像素的组分元组
	}

	//3.显示图像
	vtkSmartPointer<vtkImageViewer2> imageViewer = vtkSmartPointer<vtkImageViewer2>::New();
	imageViewer->SetInputConnection(reader->GetOutputPort());

	vtkSmartPointer<vtkRenderWindowInteractor> renderWindowInteractor = vtkSmartPointer<vtkRenderWindowInteractor>::New();
	imageViewer->SetupInteractor(renderWindowInteractor);
	imageViewer->Render();
	imageViewer->GetRenderer()->ResetCamera();
	imageViewer->Render();

	imageViewer->GetRenderer()->SetBackground(1.0, 1.0, 1.0);
	imageViewer->SetSize(640, 480);
	imageViewer->GetRenderWindow()->SetWindowName("VisitImagePixelIterativelyExample");

	renderWindowInteractor->Start();

	return 0;

}
result:
5.3.3 Image type conversion
(1) vtkImageCast - the simplest type conversion Filter, not recommended
The method of use is as follows, just SetOutputScalarTypeToxxx()set it to the corresponding output type.
There is also a variable ClampOverflow in this class, which is used to identify whether the data needs to be truncated. By default, the value of this variable is 0. When its value is set to 1, the output pixel value cannot exceed the maximum value of the output type, and it will automatically Truncated to maximum value.
Therefore, when performing type conversion, this class only forcibly converts the data without performing proportional scaling, and its use is limited. This class is not recommended in VTK.
vtkSmartPointer<vtkImageCast>imageCast=vtkSmartPointer<vtkImageCast>::New();
imageCast->SetInput((vtkDataObject*)reader->GetOutput());
imageCast->SetOutputScalarTypeToFloat();
imageCast->Update();
(2) vtkImageShiftScale - specify offset and scale parameters
vtkImageShiftScale can specify offset and scale parameters to operate on input image data.
For example: a double type image, the value range is [-1,1], if you convert it to unsigned char type, you need to set the shift value to +1 and the scale factor to 127.5, then the input data is -1 The mapping is (-1+1)×127.5=0, while +1 will be mapped to (+1+1)×127.5=255. The specific code is as follows:
vtkSmartPointer<vtkImageShiftScale>shiftScaleFilter=vtkSmartPointer<vtkImageShiftScale>::New();
shiftScalarFilter->SetInputConnection(image->GetProducerPort());
shiftScalarFilter->SetOutputScalarTypeToUnsignedChar();
shiftScalarFilter->SetShift(1);  //设置偏移量
shiftScalarFilter->SetScale(127.5);  //设置缩放值
shiftScalarFilter->Update();
Note:
There is also a variable ClampOverflow in this class. When its value is 1, if the output value exceeds the maximum value of the output type, it will be automatically truncated. For example, the output type is unsigned char, and the value range is 0~255. When the output pixel is 257, this class willAutomatically truncated to 255. By default, the value of the variable ClampOverflow is 0. At this time, when the output value is 257 and the output type is unsigned char, the class will not truncate it, but will overflow.The final value is 2。
5.3.4 Image color mapping
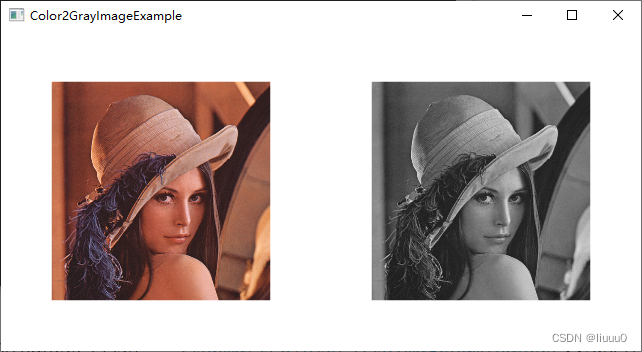
(1)vtkImageLuminance——Grayscale mapping
vtkImageLuminance is responsible for converting an RGB color image into a single-component grayscale image. The mapping formula is:

This formula is used to calculate the brightness of an RGB color.
The usage code of this class is as follows:
vtkSmartPointer<vtkImageLuminance>luminanceFilter=vtkSmartPointer<vtkImageLuminance>::New();
luminanceFilter->SetInputConnection(reader->GetOutputPort());
luminanceFilter->Update();
(2) vtkImageExtractComponents - Extract color components
Extract each color component of a color image. When using this class, you need to set the sequence number of the component to be extracted.
(3) vtkImageMapToColors - color mapping
The principle of image color mapping is: first generate a color lookup table, then find the corresponding color in the color lookup table based on a scalar value of the image pixel, and replace the original pixel value with the new color value. VTK is used to vtkImageMapToColorsimplement image color mapping to vtkLookUpTablegenerate a color lookup table.
//读入灰度图像
vtkSmartPointer<vtkJPEGReader>reader=vtkSmartPointer<vtkJPEGReader>::New();
reader->SetFileName("../data/lena.jpg");

//生成颜色查找表
vtkSmartPointer<vtkLookupTable>colorTable=vtkSmartPointer<vtkLookupTable>::New();
colorTable->SetRange(0.0,255.0);//设置要映射的标量数据的范围
colorTable->SetHueRange(0.1,0.5);//设置HSV颜色空间的Hue值范围,最大范围[0,1]
colorTable->SetValueRange(0.6,1.0);//设置HSV颜色空间的Value值范围,最大范围[0,1]
colorTable->Build();//生成颜色查找表

//根据颜色查找表来查找新颜色,并替换
vtkSmartPointer<vtkImageMapToColors>colorMap=vtkSmartPointer<vtkImageMapToColors>::New();
colorMap->SetInputConnection(reader->GetOutputPort());
colorMap->SetLookupTable(colorTable);//设置相应的颜色查找表
colorMap->Update();
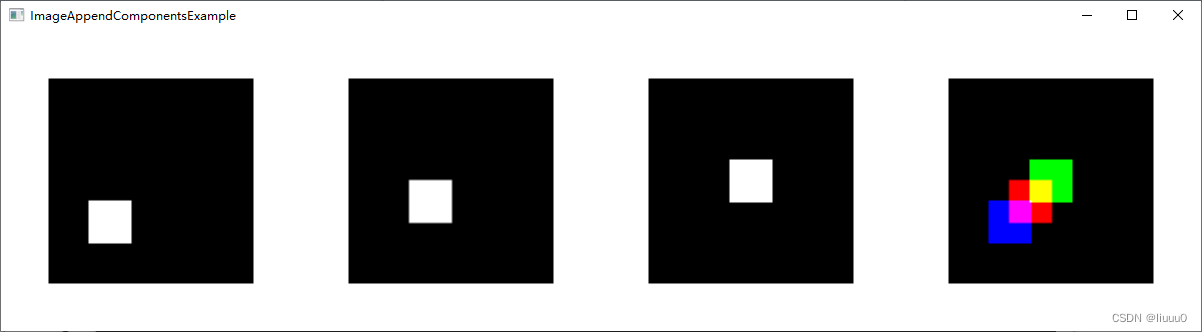
(4)vtkImageAppendComponents——Color synthesis
Merge multiple grayscale images into one color image. The vtkImageAppendComponents class can be used to synthesize color images and requires three grayscale images as input.
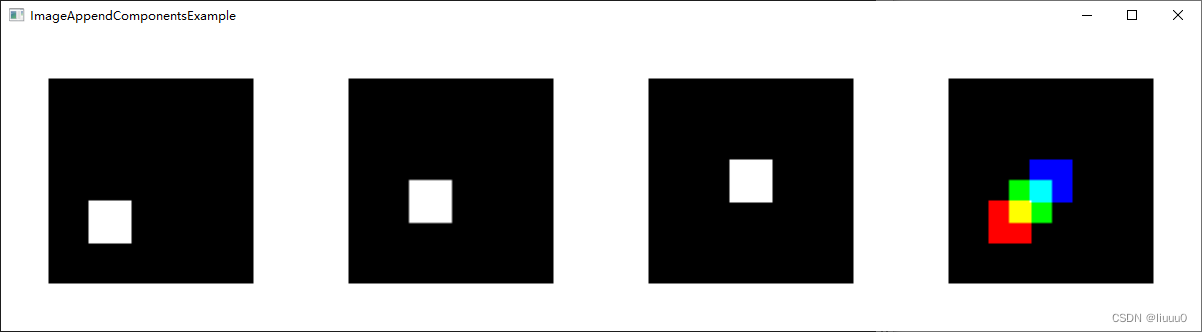
Just like a single-channel binary image, three channels can be superimposed to form a color image. The three values of the superimposed image pixel are the RGB values of the point, and the color can be synthesized. The three channels are stacked in different orders and displayed in different colors.
5.3.5 Region extraction
(1) vtkExtractVOI - Extract area of interest
Extract sub-images based on user-specified area ranges. The input and output of this Filter are both a vktImageData, so its results can be saved directly as images.
Define a vtkExtractVOI object that needs to receive two inputs, one is the original image data, and the other is the extraction area size.
//获取图像大小
int dims[3];
reader->GetOutput()->GetDimensions(dims);

//设定提取的区域大小(xmin,xmax,ymin,ymax,zmin,zmax)
vtkSmartPointer<vtkExtractVOI>extractVOI=vtkSmartPointer<vtkExtractVOI>::New();
extractVOI->SetInputConnection(reader->GetOutputPort());
extractVOI->SetVOI(dims[0]/4.,3.*dims[0]/4.,dims[1]/4.,3.*dims[1]/4.,0,0);
extractVOI->Update();
(2) vtkImageReslice——3D image section extraction (×)
vtkImageReslice can extract a point inside a three-dimensional image and a plane parallel to any direction.
(3) Extension - slide the mouse to switch three-dimensional image slices (×)
5.3.6 Histogram Statistics (×)
Classes in VTK vtkImageAccumulateare used to implement histogram statistical functions. It divides the numerical range of each component into discrete intervals, and then counts the number of pixels on each grayscale interval. Its input and output are all of vtkImageData type, so the histogram can also be regarded as an image. The pixel data type of the input image can be arbitrary, but a maximum of 3 component pixel types are supported, while the pixel data type of the output image is int type.
(1) Grayscale image histogram (×)
Using this filter on a grayscale image will produce a one-dimensional image.
(2) Color image histogram (×)
Color images have three color channels, so the three RGB channel data need to be extracted to calculate the histogram separately.
5.3.7 Image Resampling
Image resampling refers to resampling a digital image according to the required position pixels or pixel spacing to form a new image after geometric transformation.
The dimensions of the image will change after resampling. When the dimension of the resampled image is smaller than the original image, it is called downsampling; when the dimension of the resampled image is larger than the original image, it is called upsampling. vtkImageShrink3DClass can be used to implement image downsampling. vtkImageMagnifyClass can be used to implement upsampling of images.
Downsampling requires setting the sampling rate in each direction. The larger the sampling rate, the blurr the image. The principle of upsampling is the same as that of downsampling, except that the dimensionality of the image is increased by increasing the number of sampling points.
The sampling rate is 20, that is, one is selected in 20 steps. Therefore, after downsampling the 512×512 image with a sampling rate of 20×20, the image dimension is 25×25.
Source code:
#include <vtkSmartPointer.h>
#include <vtkImageData.h>
#include <vtkImageShiftScale.h>
#include <vtkRenderWindow.h>
#include <vtkRenderWindowInteractor.h>
#include <vtkInteractorStyleImage.h>
#include <vtkRenderer.h>
#include <vtkImageActor.h>
#include <vtkBMPReader.h>
#include <vtkImageShrink3D.h>
#include <vtkImageMagnify.h>

//测试图像:../data/lena.bmp
int main()
{


	//读入图像
	vtkSmartPointer<vtkBMPReader>reader = vtkSmartPointer<vtkBMPReader>::New();
	reader->SetFileName("../data/lena.bmp");
	reader->Update();

	int originalDims[3];
	reader->GetOutput()->GetDimensions(originalDims);
	std::cout << "原图图像维数      :" << originalDims[0] << " " << originalDims[1] << " " << originalDims[2] << std::endl;

	double originalSpace[3];
	reader->GetOutput()->GetSpacing(originalSpace);
	std::cout << "原图图像像素间隔  :" << originalSpace[0] << " " << originalSpace[1] << " " << originalSpace[2] << std::endl;

	//降采样
	vtkSmartPointer<vtkImageShrink3D>shrinkFilter = vtkSmartPointer<vtkImageShrink3D>::New();
	shrinkFilter->SetInputConnection(reader->GetOutputPort());
	shrinkFilter->SetShrinkFactors(20, 20, 1);
	shrinkFilter->Update();

	int shrinkDims[3];
	shrinkFilter->GetOutput()->GetDimensions(shrinkDims);
	std::cout << "降采样图像维数    :" << shrinkDims[0] << " " << shrinkDims[1] << " " << shrinkDims[2] << std::endl;

	double shrinkSpace[3];
	shrinkFilter->GetOutput()->GetSpacing(shrinkSpace);
	std::cout << "降采样图像像素间隔:" << shrinkSpace[0] << " " << shrinkSpace[1] << " " << shrinkSpace[2] << std::endl;

	//升采样
	vtkSmartPointer<vtkImageMagnify> magnifyFilter = vtkSmartPointer<vtkImageMagnify>::New();
	magnifyFilter->SetInputConnection(reader->GetOutputPort());
	magnifyFilter->SetMagnificationFactors(10, 10, 1);
	magnifyFilter->Update();

	int magnifyDims[3];
	magnifyFilter->GetOutput()->GetDimensions(magnifyDims);
	std::cout << "升采样图像维数    :" << magnifyDims[0] << " " << magnifyDims[1] << " " << magnifyDims[2] << std::endl;

	double magnifySpace[3];
	magnifyFilter->GetOutput()->GetSpacing(magnifySpace);
	std::cout << "升采样图像像素间隔:" << magnifySpace[0] << " " << magnifySpace[1] << " " << magnifySpace[2] << std::endl;

	//显示三张图像(原图、降采样、升采样)
	vtkSmartPointer<vtkImageActor>originalActor = vtkSmartPointer<vtkImageActor>::New();
	originalActor->SetInputData(reader->GetOutput());

	vtkSmartPointer<vtkImageActor>shrinkActor = vtkSmartPointer<vtkImageActor>::New();
	shrinkActor->SetInputData(shrinkFilter->GetOutput());

	vtkSmartPointer<vtkImageActor>magnifyActor = vtkSmartPointer<vtkImageActor>::New();
	magnifyActor->SetInputData(magnifyFilter->GetOutput());

	double originalViewport[4] = {

     0.0, 0.0, 0.33, 1.0 };
	double shrinkViewport[4] = {

     0.33, 0.0, 0.66, 1.0 };
	double magnifyViewport[4] = {

     0.66, 0.0, 1.0, 1.0 };

	vtkSmartPointer<vtkRenderer> originalRenderer = vtkSmartPointer<vtkRenderer>::New();
	originalRenderer->SetViewport(originalViewport);
	originalRenderer->AddActor(originalActor);
	originalRenderer->ResetCamera();
	originalRenderer->SetBackground(1.0, 1.0, 1.0);

	vtkSmartPointer<vtkRenderer> shrinkRenderer = vtkSmartPointer<vtkRenderer>::New();
	shrinkRenderer->SetViewport(shrinkViewport);
	shrinkRenderer->AddActor(shrinkActor);
	shrinkRenderer->ResetCamera();
	shrinkRenderer->SetBackground(1.0, 1.0, 1.0);

	vtkSmartPointer<vtkRenderer> magnifyRenderer = vtkSmartPointer<vtkRenderer>::New();
	magnifyRenderer->SetViewport(magnifyViewport);
	magnifyRenderer->AddActor(magnifyActor);
	magnifyRenderer->ResetCamera();
	magnifyRenderer->SetBackground(1.0, 1.0, 1.0);

	vtkSmartPointer<vtkRenderWindow> renderWindow = vtkSmartPointer<vtkRenderWindow>::New();
	renderWindow->AddRenderer(originalRenderer);
	renderWindow->AddRenderer(shrinkRenderer);
	renderWindow->AddRenderer(magnifyRenderer);
	renderWindow->SetSize(640, 320);
	renderWindow->Render();
	renderWindow->SetWindowName("ImageShrinkMagnifyExample");

	vtkSmartPointer<vtkRenderWindowInteractor> renderWindowInteractor = vtkSmartPointer<vtkRenderWindowInteractor>::New();
	vtkSmartPointer<vtkInteractorStyleImage> style = vtkSmartPointer<vtkInteractorStyleImage>::New();

	renderWindowInteractor->SetInteractorStyle(style);
	renderWindowInteractor->SetRenderWindow(renderWindow);
	renderWindowInteractor->Initialize();
	renderWindowInteractor->Start();

	return 0;
}
result:

5.3.8 Image operations
(1) vtkImageMathematics - mathematical operations
vtkImageMathematics provides basic unary and binary mathematical operations. Binary mathematical operations require that both input images have the same pixel data type and color components. When the two images are of different sizes, the range of the output image is the union of the ranges of the two input images, with the origin and pixel spacing consistent with the first input image.

(2) vtkImageLogic - logical operation
vtkImageLogic accepts one or two images for Boolean logic operations. This class mainly supports AND, OR, XOR, NAND, NOR, and NOT. When selecting a binary operator, the two input images must be of the same type.
5.3.9 Image binarization
Binary images and Label images are two types of images that are often used in image segmentation. Each pixel of a binary image has only two possible values, namely 0 and 255. 0 represents the background of the image, and 255 represents the foreground of the image.
Image binarization: Set a grayscale threshold, set the pixel values below the threshold in the image as the background, and set the pixel values above the threshold as the foreground, to obtain a binary image. Implemented through vtkImageThreshold class.
vtkSmartPointer<vtkJPEGReader> reader = vtkSmartPointer<vtkJPEGReader>::New();
reader->SetFileName("../data/lena-gray.jpg");
reader->Update();

vtkSmartPointer<vtkImageThreshold> thresholdFilter = vtkSmartPointer<vtkImageThreshold>::New();
thresholdFilter->SetInputConnection(reader->GetOutputPort());

//取大于100的所有像素输出值为255,而小于100的像素输出值为0
thresholdFilter->ThresholdByUpper(100);//取大于100的灰度范围为有效范围
thresholdFilter->SetInValue(255);//设置有效范围内的输出值为255
thresholdFilter->SetOutValue(0);//设置有效范围外的输出值为0