In winform, we often use various types of assignments, such as:
- button1.Text="Hello";
- label.Text="Hello";
- ...
The main reason why we don't call assignment operations like this binding is because most of them are one-time operations. Whether the data or the button itself changes, it is invisible to both.
The concept of binding focuses on: the association between the two, the agreement and the impact between the two.
First, let's understand what binding is from a simple example.
- Create a slider control and hope to update the value to another static text during the sliding process. code show as below:


In winform, our normal approach is to create a value change event for the slider and assign the value of the slider to the text.
Next, I only need to add a small binding statement in the static text to complete the originally complex operation:
- Text=
- {Binding}: Binding declaration syntax, a pair of angle brackets, and the initial declaration starts with Binding.
- ElementName=: This statement means, set the name of the element
- Path: Set the position of the associated element. In the above example, it is set to the value attribute of the element.
So how to understand the meaning of the whole sentence, translation: The Text attribute of the static text TextBlock will be associated to the value attribute of the element name 'slider' through binding.

The effect diagram shows:

It can be seen that as the slider continues to slide, the TextBlock is also constantly changing, indicating that the TextBlock has obtained the value changes during the sliding process. This association is called binding. In WPF, binding There are many types of binding, and the above one is through element binding.
After understanding the basic binding, then it is time to understand the binding mode.
The binding model is similar to cooperation in our business, whether it is a one-time return or continuous benefit, whether it can be terminated unilaterally, whether it has voting rights, etc. The binding model in WPF is divided into five types:
- OneWay (one-way binding): When the source attribute changes, the target attribute is updated. Similar to the above example, the sliding change updates the text data. Example:

Effect: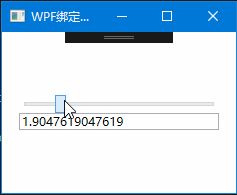
- TwoWay (two-way binding): When the source attribute changes, the target attribute is updated, and when the target attribute changes, the source attribute is also updated.
- The difference from one-way binding can be understood as that the former can only hit you, and the person being hit cannot fight back. The meaning of two-way binding is: if you dare to slap me, I can slap you back. Example:

Effect: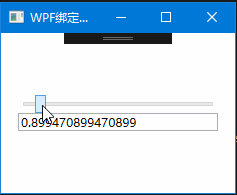
- The difference from one-way binding can be understood as that the former can only hit you, and the person being hit cannot fight back. The meaning of two-way binding is: if you dare to slap me, I can slap you back. Example:
- OneTime (single mode): Set the target property based on the first source property, after which all changes are invalid.
- If the data source is bound to 0 for the first time, then no matter how 2, 3, 4... are changed later, it will not be updated to the target attribute. Example:

Effect: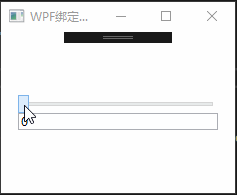
- If the data source is bound to 0 for the first time, then no matter how 2, 3, 4... are changed later, it will not be updated to the target attribute. Example:
- OneWayToSource: Same as OneWay type, but the whole process is inverted. Example:

Effect:
- Default: It can be either bidirectional or single. Unless a certain mode is explicitly stated, the default binding is used.


Bind to non-element
In the above code, the binding method used is based on the element: ElementName=xxx. If you need to bind to a non-element object, there are the following attributes:
- Source: points to a data source. For example, TextBox uses binding to point to a static resource ABC with Source:

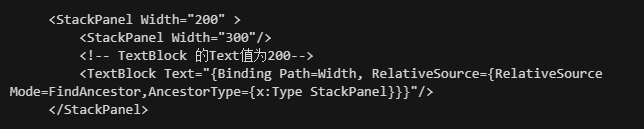
- RelativeSource: Use an object named RelativeSource to find source objects based on different patterns,

Example, use RelativeSource's FindAncestor mode to find the Width value of the parent element StackPanel
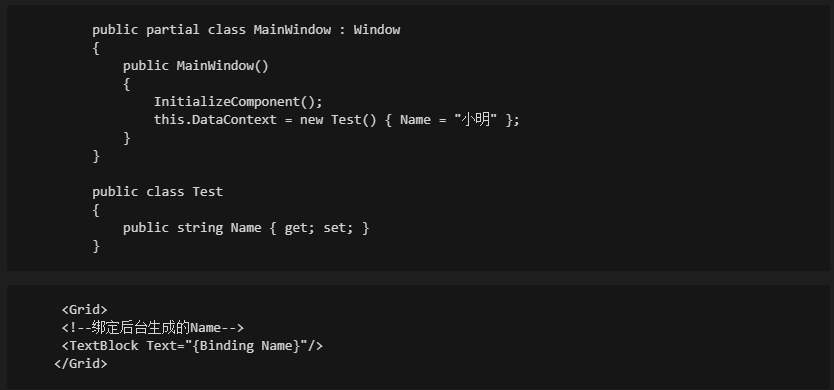
- DataContext: Find the first non-empty DataContext property from the current element tree upwards as the source object.
Example, this example uses code behind to create a class containing only Name, Test, by binding the DataContext context of the window:
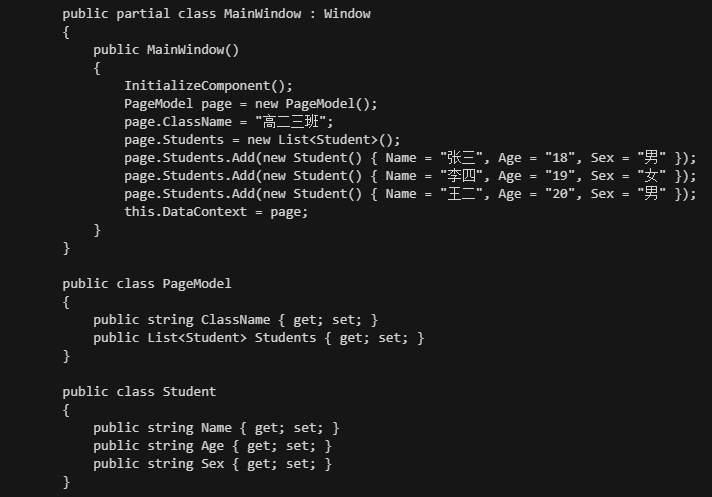
Background code binds simple text and list
Create a PageModel class, set a ClassName as the class name, and a Students list, the background code:
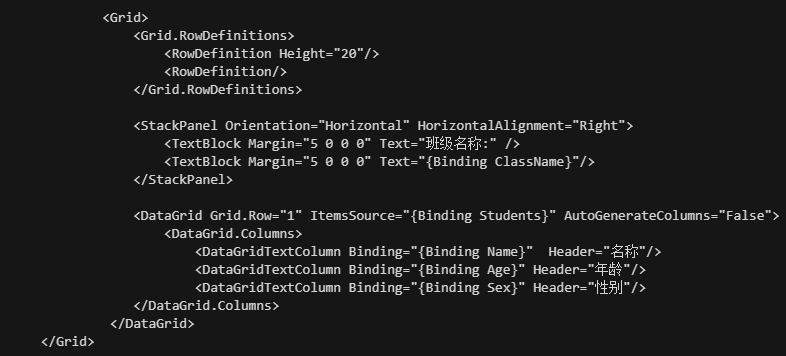
window code
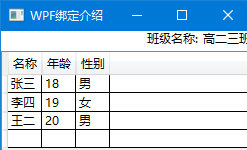
Effect preview
Control binding event
Event binding steps
The implementation of event binding is relatively simple, but the information currently searched on the Internet is an older implementation, and sometimes later versions are incompatible. The following is an introduction to the implementation of the current new version:
step1: Add Microsoft.Xaml.Interactions tool source address in nuget management: https://www.yii666.com/blog/439906.html

step2:
Then reference the namespace in xaml
xmlns:i="http://schemas.microsoft.com/xaml/behaviors"
step3:
<Button Content="向前" Style="{StaticResource ButtonStyle1}" >
                            <i:Interaction.Triggers>
                                <i:EventTrigger EventName="MouseDown">
                                    <i:InvokeCommandAction Command="{Binding  MouseDownCmd}">
                                        <i:InvokeCommandAction.CommandParameter>
                                            <MultiBinding Converter="{StaticResource Servoxy}">
                                                <Binding FallbackValue="DB8.DBX1.4"/>
                                                <Binding FallbackValue="true"/>
                                            </MultiBinding>
                                        </i:InvokeCommandAction.CommandParameter>
                                    </i:InvokeCommandAction>
                                </i:EventTrigger>
                                <i:EventTrigger EventName="MouseUp">
                                    <i:InvokeCommandAction Command="{Binding MouseUpCmd}">
                                        <i:InvokeCommandAction.CommandParameter>
                                            <MultiBinding Converter="{StaticResource Servoxy}">
                                                <Binding FallbackValue="DB8.DBX1.4"/>
                                                <Binding FallbackValue="false"/>
                                            </MultiBinding>
                                        </i:InvokeCommandAction.CommandParameter>
                                    </i:InvokeCommandAction>
                                </i:EventTrigger>
                            </i:Interaction.Triggers>
                        </Button>