Foreword:
欢迎阅读Spring MVC入门必读!在这篇文章中,我们将探索这个令人兴奋的框架,它为您提供了一种高效、灵活且易于维护的方式来构建Web应用程序。通过使用Spring MVC,您将享受到以下好处:简洁的代码、强大的功能和与Spring生态系统的无缝集成。

在本指南中,我们将深入探讨Spring MVC的关键步骤,包括注解的使用、参数传递、返回值处理以及页面跳转。这些技术将帮助您更好地理解Spring MVC的核心概念,并使您能够更轻松地应对实际开发中的挑战。
1. Commonly used annotations
1.1.@RequestMapping
The @RequestMapping annotation is an annotation used to handle request address mapping. It can be used to map a request or a method and can be used on a class or method.
- Mark on the method
Used on methods, it means that appending the address in the annotation on the method under the parent path of the class will access the method.
@Controller
public class ParamController {


    @RequestMapping("/hello1")
    public String jslx(String bname, Integer bid) {


        log.info("参数类型参数 bname:{},bid:{}", bname, bid);
        return "index";
    }
At this time, the request path of the request mapped by the request mapping is:
http://localhost:8080/springmvc01/hello1
The path springmvc01 represents the project name
- Annotated on classes and methods
Used on a class, it means that all methods in the class that respond to requests use this address as the parent path.
Note: When you add the RequestMapping annotation to a class, if you want to request mapping, it means that the request must first be mapped to the location of the annotated class, and then mapped to the method of the class.
@Controller
@RequestMapping("/param")
public class ParamController {


    @RequestMapping("/hello1")
    public String jslx(String bname, Integer bid) {


        log.info("参数类型参数 bname:{},bid:{}", bname, bid);
        return "index";
    }
At this time, the request path of the request mapped by the request mapping is:
http://localhost:8080/springmvc01/param/hello1
The path springmvc01 represents the project name
- parameter list
| parameter | illustrate |
|---|---|
| value | The value attribute of @RequestMapping must be set; the value attribute of @RequestMapping matches requests through the request address of the current request; from the source code, you can see that the value attribute is an array of string type, so it means that multiple requests can be mapped to On one method, you only need to specify an array containing multiple paths for value. |
| method | The method attribute of @RequestMapping matches requests based on the request method of the current request; the browser sends a request to the server, and there are many request methods: GET, HEAD, POST, PUT, PATCH, DELETE, OPTIONS, and TRACE. You can use the method attribute to constrain the request method. |
| headers | The headers attribute of @RequestMapping matches requests based on the request header information of the current request; the headers attribute of @RequestMapping is an array of string type, and the matching relationship can be set through the following four expressions. For example: "header": requires request mapping The request must be a request header information containing header "!header": the request request mapping must be a request header information not containing header "header=value": the request request mapping must be a request header information including header information, and The value of header must be value "header!=value": The request request mapping must be a request header information containing header, and the value of header must not be value |
| params | The params attribute of @RequestMapping matches the request through the request parameters of the current request; the params attribute of @RequestMapping is an array of string type, and the matching relationship can be set through the following four expressions. For example: "param": request mapping The request must be a request parameter that contains param "!param": The request that requires request mapping must not contain the request parameter of param "param=value": The request that requires request mapping must include the request parameter of param, and the value of the param parameter must be value “param!=value”: The request requiring request mapping is a request parameter that must contain param, and its value cannot be value. |
Example 1: params attribute of @RequestMapping
@RequestMapping(value = "/test",params = "username")
public String test(){


	return "success";
}
Note: We set the params attribute, which means that the request mapping request must contain username for the request to be successful.
Example 2: headers attribute of @RequestMapping
@RequestMapping(value = "/test",headers = "Host = localhost:8081")
public String test(){


	return "success";
}
Note: If the current request does not meet the headers attribute, the page will display a 404 error, that is, the resource is not found.
Extensions:
@GetMapping: Mapping for processing get request
@PostMapping: Mapping for post request
@PutMapping: Mapping for put request
@DeleteMapping: Mapping for delete request
@GetMapping is equivalent to @RequestMapping(method=RequestMethod.GET) , which maps get to a specific method.
1.2.@RequestParam
@RequestParam is mainly used to map the data in the request parameter area to the parameters of the control layer method.
| parameter | illustrate |
|---|---|
| value | The name of the parameter passed in the request. If the value of the background interface is not set, it will default to this variable name. |
| required | Whether this parameter is required. The default is true , which means that the corresponding parameters must be passed in the request, otherwise a 404 error will be reported . If set to false, when there is no such parameter in the request, it will default to null. For variables of basic data types, it must If there is a value, a null pointer exception will be thrown . If null values are allowed, variables in the interface need to be declared using a wrapper class. |
| defaultValue | The default value of the parameter. If there is no parameter with the same name in the request, this variable defaults to this value. Note that the default value can use SpEL expressions, such as "#{systemProperties['java.vm.version']}" |
Example:
    @RequestMapping("/hello3")
    public String requestParam(
            @RequestParam String bname,
            @RequestParam(required = false)  Integer bid) {


        log.info("requestParam类型参数 bname:{},bid:{}", bname, bid);
        return "index";
    }
1.3.@ModelAttribute
@ModelAttribute has the following three functions:
-
Bind request parameters to the command object : When placed on the input parameter of the function processing method, it is used to bind multiple request parameters to a command object, thereby simplifying the binding process and automatically exposing it as model data for display on the view page. use;
-
Expose the form reference object as model data : When placed on the general method of the processor (non-functional processing method), it prepares the form reference object to be displayed for the form, such as the city that needs to be selected during registration, etc., and performs functional processing method (@RequestMapping annotated method), it is automatically added to the model object for use when displaying the view page;
-
Expose the return value of the @RequestMapping method as model data : When placed on the return value of the function processing method, it exposes the return value of the function processing method as model data, which is used when displaying the view page.
Example 1: Bind request parameters to command object
For example, if a user logs in, we need to capture the user login request parameters (user name, password) and encapsulate them as a user object. At this time, we can use @ModelAttribute to bind multiple request parameters to our command object.
public String test1(@ModelAttribute("user") UserModel user)
Its function is to add the bound command object to the model object with the name "user" for display on the view page. At this time, we can use ${user.username} on the view page to obtain the properties of the bound command object.
Example 2: Exposing form reference objects as model data
@ModelAttribute
public void init(Model model){


	model.addAttribute("book",new Book());
}
The above code will be executed before the function processing method is executed, and it will be automatically added to the model object.
@RequestMapping("/toBookList")
public String toBookList(){


    System.out.println("toBookList");
    return "book/bookList";
}
Example 3: Expose the @RequestMapping method return value as model data
The return value of the @ModelAttribute annotation will overwrite the command object of the same name annotated with @ModelAttribute in the @RequestMapping annotation method.
public @ModelAttribute("user2") UserModel test3(@ModelAttribute("user2") UserModel user)
1.4.@SessionAttributes
By default, when the attribute scope in ModelMap is request level, that is to say, when this request ends, the attributes in ModelMap will be destroyed. If you want to share the attributes in the ModelMap among multiple requests, you must transfer its attributes to the session so that the attributes of the ModelMap can be accessed across requests;
Spring allows us to selectively specify which attributes in the ModelMap need to be transferred to the session, so that these attributes can be accessed in the attribute list of the corresponding ModelMap in the next request.
SpringMVC provides us with such an annotation to implement the above scenario: @SessionAttributes: Share the attribute values of the ModelMap into the session.
Note: The @SessionAttributes annotation can only be used on classes and is used to pass parameters between multiple requests. It is similar to Session's Attribute, but not exactly the same. Generally speaking, the parameters set by @SessionAttributes are only used for temporary transfer (existence into sessionAttributeStore), instead of long-term storage, long-term storage of data still needs to be placed in Session.
There are two ways to share attribute values in ModelMap to session:
- Use the value attribute of the annotation : you can specify the attributes that need to be placed in the session through the attribute name;
@Controller
@SessionAttributes("user")	//将ModelMap中key为user的属性共享到session中
public class DemoController {


	@RequestMapping("/hello")
	public String hello(ModelMap model) {


		//向ModelMap中添加key为user和user1的属性
        model.addAttribute("user", new User(520, "U love me"));
        model.addAttribute("user1", new User("I love U"));
        return "result";
    }
}
- Using the annotation's type attribute : You can also specify which model attributes need to be placed in the session through the object type of the model attribute.
@SessionAttributes(types = {

    User.class})
@Controller
public class DemoController{


    @RequestMapping("/hello")
    public String hello(Map<String, Object> map){


        map.put("user1", new User(520, "U love me"));
        return "hello";
    }
}
1.5.@RequestBody
@RequestBody is mainly used to receive the data in the json string passed from the front end to the back end (that is, the data in the request body);
The GET method does not have a request body, so when using @RequestBody to receive data, the front end cannot use the GET method to submit data, but uses the POST method to submit the data . In the same receiving method on the backend, @RequestBody and @RequestParam() can be used at the same time. There can be at most one @RequestBody, but there can be multiple @RequestParam().
In short:
- One request: There is only one @RequestBody;
- One request: There can be multiple @RequestParams.
Content-type:
(1) application/x-www-form-urlencoded: @RequestBody is not required
(2) mutipart/form-data: @RequestBody cannot handle this format
(3) Other formats, such as application/json, application/xml, etc., must be processed using @RequestBody
   @RequestMapping("/hello6")
    public String RequestBody2(@RequestBody Map map) {


        log.info("RequestBody map:{}",map);
        return "index";
    }
When the class corresponding to the @RequestBody annotation assembles the HTTP input stream (including the request body) to the target class (ie: the class behind @RequestBody), it will match the attributes of the corresponding entity class based on the key in the json string. If it matches When they are consistent and the value corresponding to the key in json meets (or can be converted to) the type requirements of the corresponding attribute of the entity class, the setter method of the entity class will be called to assign the value to the attribute.
1.6.@RequestHeader
Use the @RequestHeader annotation to obtain specified request header information. If you want to obtain all request header information, you can use any of the three Maps: Map<String,String>, MultiValueMap<String,String>, and HttpHeaders to encapsulate the name and value of all request headers.
parameter list
| parameter | illustrate |
|---|---|
| name | name and value are aliases for each other. When there is only one parameter, value can be omitted, just ("xxx") |
| value | name and value are aliases for each other. When there is only one parameter, value can be omitted, just ("xxx") |
| required | By default, if the specified name is missing from the request header, an error will be reported. If required = false is not added, an error will be reported when there is no zking request header in the request header. |
| defaultValue | If the specified name is missing in the request header, an error will be reported. You can use the defaultValue attribute to specify a default value to avoid error reporting; if the request header is missing the specified name, the value set by this attribute will be used as the default value. If the attribute does not Set value, it has its own default value DEFAULT_NONE |
Example:
@GetMapping("/headParams")
public Map userInfo(
    @RequestHeader(value = "zking",defaultValue = "hello zking") String username,
    // 将请求头中 name=Accept-Encoding 赋值给形参 encoding
    @RequestHeader("Accept-Encoding") String encoding,
    // 将请求头中 name=Host 赋值给形参 host
    @RequestHeader("Host") String host,
    // 将所有请求头的 name 和 value 封装到 Map 集合 headsMap 中
    @RequestHeader Map<String,String> headsMap) {


        Map map = new HashMap<String, Object>();
        map.put("username",username);
        map.put("Accept-Encoding",encoding);
        map.put("Host",host);
        map.put("headsMap",headsMap);

        return map;
}
Since the information name=zking does not exist in the request header, an exception will be thrown if only value=zking is used.
Solution:
1. The default value of required is true, that is, if there is no name=zking in the request header, an error will be reported. Change its value to false, that is, if there is no such header information, no error will be reported.
@RequestHeader(value = "zking",required = "false") String username
2. Do not modify the default value of required=true. When the header information does not contain name=zking, give it a default value of hello zking.
@RequestHeader(value = "zking",defaultValue = "hello zking") String username
1.7.@PathVariable
This annotation requests the binding of the template variable part of the URI to the method parameters of the handler function processing method.
That is, when using the @RequestMapping URI template style mapping, that is, someUrl/{paramId}, the paramId at this time can bind the value passed by it to the parameter of the method through the @Pathvariable annotation.
//@PathVariable可以用来映射URL中的占位符到目标方法的参数中
    @RequestMapping("/hello4/{bid}")
    public String rjcc(@PathVariable("bid")Integer bid) {


        log.info("PathVariable bid:{}",bid);
        return "index";
    }
Rest
That is Representational State Transfer. (Resource) Presentation layer state transformation. It is currently the most popular Internet software architecture. It has a clear structure, conforms to standards, is easy to understand, and is easy to expand, so it is being adopted by more and more websites.
- Resources : An entity on the network, or a specific information on the network . It can be a piece of text, a picture, a song, a service, in short it is a specific existence. You can point to it with a URI (Uniform Resource Locator), and each resource corresponds to a specific URI . To obtain this resource, just access its URI, so the URI is the unique identifier of each resource.
- Presentation layer ( Representation ): The form in which resources are concretely presented is called its presentation layer ( Representation ). For example, text can be expressed in txt format, HTML format, XML format, JSON format, or even binary format.
- State Transfer : Each time a request is issued, it represents an interaction process between the client and the server. The HTTP protocol is a stateless protocol, that is, all states are stored on the server side. Therefore, if the client wants to operate the server, it must use some means to cause " State Transfer " to occur on the server side . This transformation is based on the presentation layer, so it is " presentation layer state transformation " . Specifically, there are four verbs indicating operation methods in the HTTP protocol: GET , POST , PUT , and DELETE . They correspond to four basic operations: GET is used to obtain resources, POST is used to create resources, PUT is used to update resources, and DELETE is used to delete resources.
Example:
- /order/1 HTTP GET    :得到 id = 1 的 order
- /order/1 HTTP DELETE :删除 id = 1 的 order
- /order/1 HTTP PUT    :更新 id = 1 的 order
- /order   HTTP POST   :新增 order
1.8.@CookieValue
The @CookieValue annotation mainly maps the requested cookie data to the parameters of the function processing method.
parameter list
| parameter | illustrate |
|---|---|
| value | Binding parameter name, String type. |
| required | Whether value must be included, boolean type, defaults to true, indicating that the request parameter must contain the corresponding parameter; if it does not exist, an exception will be thrown. |
| defaultValue | Default value, String type. This value will be used when no parameters are passed. |
Example:
@RequestMapping("/testCookieValue")
public Map<String, Object> testCookieValue(
	@CookieValue("JSESSIONID") String cookie) {


    response.put("cookie", cookie);
    return response;
}
2.Parameter passing
pom.xml
note: pay attention to the nesting relationship when importing
<log4j2.version>2.9.1</log4j2.version>
<log4j2.disruptor.version>3.2.0</log4j2.disruptor.version>
<slf4j.version>1.7.13</slf4j.version>

<!--4.log日志相关依赖-->

<!-- log4j2日志相关依赖 -->
<!-- log配置:Log4j2 + Slf4j -->
<!-- slf4j核心包-->
<dependency>
	<groupId>org.slf4j</groupId>
	<artifactId>slf4j-api</artifactId>
	<version>${slf4j.version}</version>
</dependency>
<dependency>
	<groupId>org.slf4j</groupId>
	<artifactId>jcl-over-slf4j</artifactId>
	<version>${slf4j.version}</version>
	<scope>runtime</scope>
</dependency>

<!--核心log4j2jar包-->
<dependency>
	<groupId>org.apache.logging.log4j</groupId>
	<artifactId>log4j-api</artifactId>
	<version>${log4j2.version}</version>
</dependency>
<dependency>
	<groupId>org.apache.logging.log4j</groupId>
	<artifactId>log4j-core</artifactId>
	<version>${log4j2.version}</version>
</dependency>
<!--用于与slf4j保持桥接-->
<dependency>
	<groupId>org.apache.logging.log4j</groupId>
	<artifactId>log4j-slf4j-impl</artifactId>
	<version>${log4j2.version}</version>
</dependency>
<!--web工程需要包含log4j-web,非web工程不需要-->
<dependency>
	<groupId>org.apache.logging.log4j</groupId>
	<artifactId>log4j-web</artifactId>
	<version>${log4j2.version}</version>
	<scope>runtime</scope>
</dependency>

<!--需要使用log4j2的AsyncLogger需要包含disruptor-->
<dependency>
	<groupId>com.lmax</groupId>
	<artifactId>disruptor</artifactId>
	<version>${log4j2.disruptor.version}</version>
</dependency>
2.1.Basic type + String
@Slf4j
@Controller
@RequestMapping("/param")
public class ParamController {


    @RequestMapping("/hello1")
    public String jslx(String bname, Integer bid) {


        log.info("参数类型参数 bname:{},bid:{}", bname, bid);
        return "index";
    }
operation result:
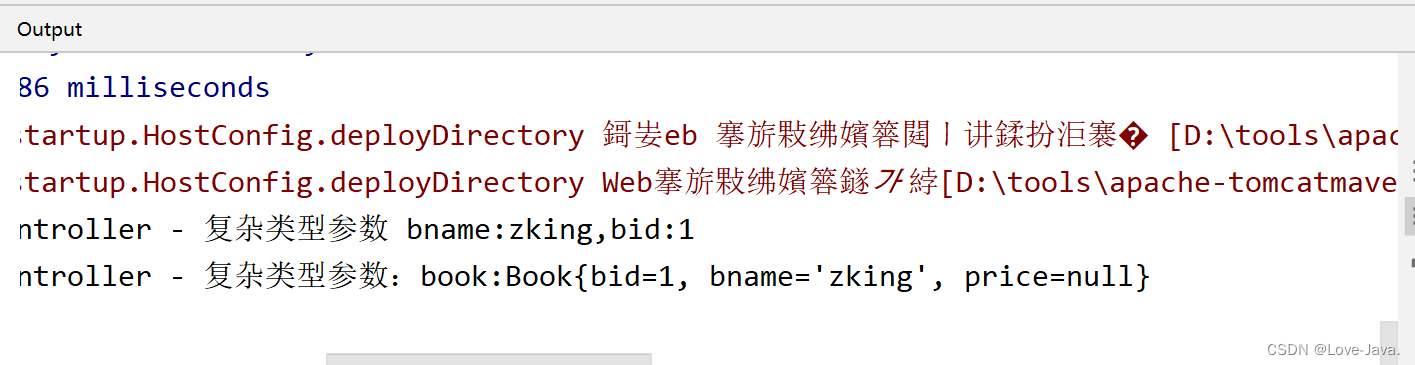
2.2. Complex types
@RequestMapping("/hello2")
    public String fzlx(Book book, HttpServletRequest request) {


       //servlet参数的获取方式
        log.info("复杂类型参数 bname:{},bid:{}",
                          request.getParameter("bname"),
                          request.getParameter ("bid"));
         //复杂参数获取方式
        log.info("复杂类型参数:book:{}",book.toString());
        return "index";
    }
operation result:
2.3.@RequestParam
    @RequestMapping("/hello3")
    public String requestParam(
            @RequestParam String bname,
            @RequestParam(required = false)  Integer bid) {


        log.info("requestParam类型参数 bname:{},bid:{}", bname, bid);
        return "index";
    }
operation result:
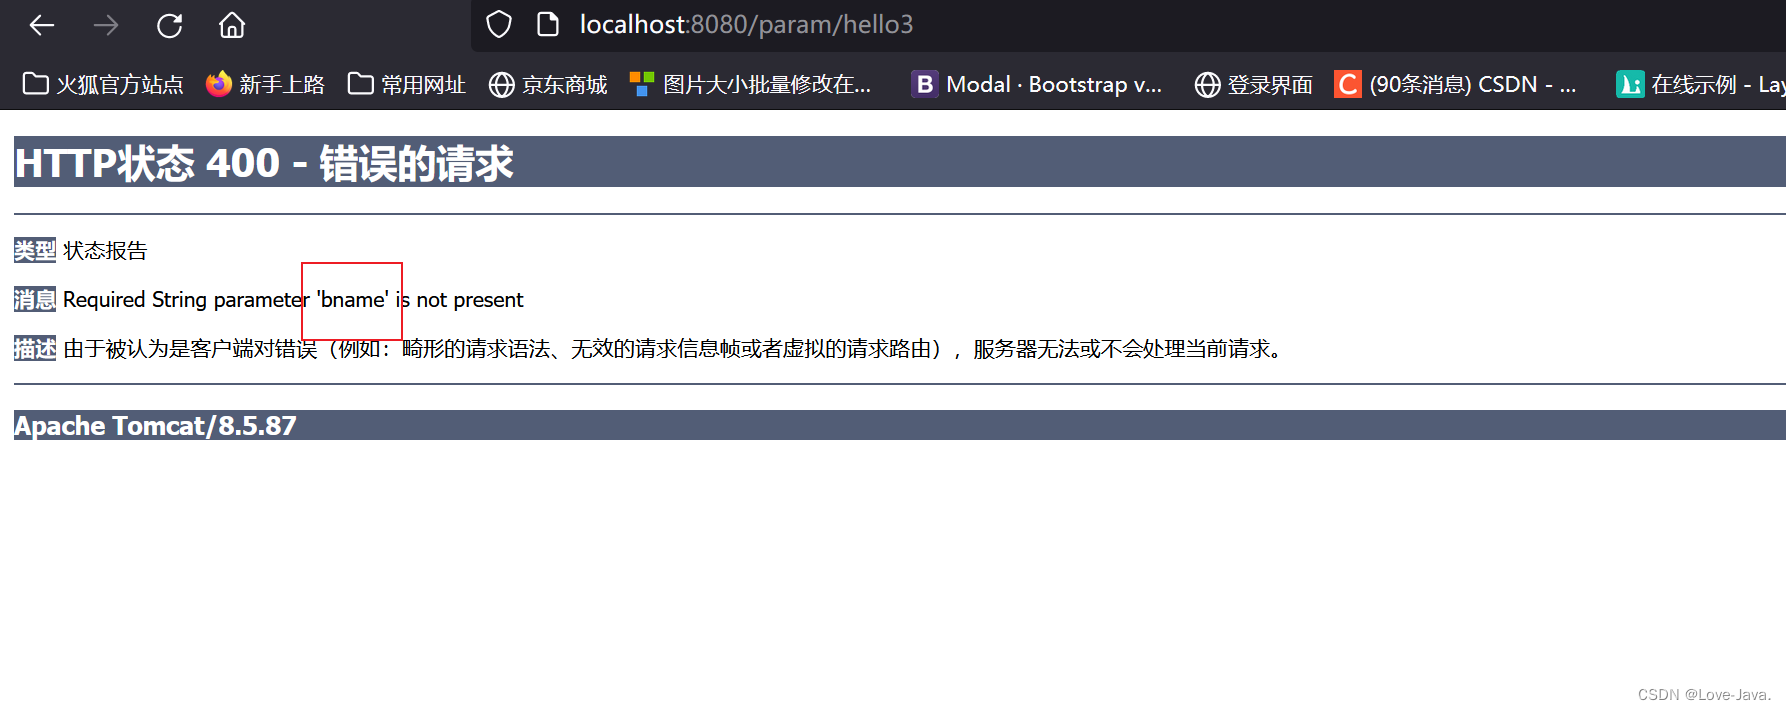
Conclusion: The parameter required annotated by @RequestParam defaults to true, which means that the corresponding parameter must be passed in the request, otherwise a 404 error will be reported. If set to false, when there is no such parameter in the request, it will default to null, and for basic Variables of data type must have a value, in which case a null pointer exception will be thrown. If null values are allowed, variables in the interface need to be declared using a wrapper class.
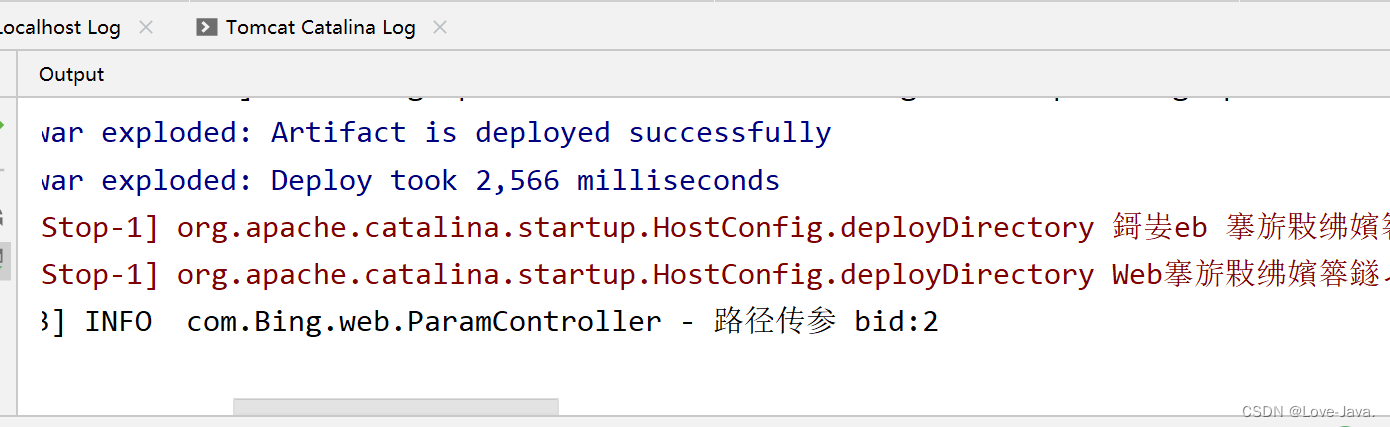
2.4.@PathVariable
    @RequestMapping("/hello4/{bid}")
    public String rjcc(@PathVariable("bid")Integer bid) {


        log.info("PathVariable bid:{}",bid);
        return "index";
    }
operation result:
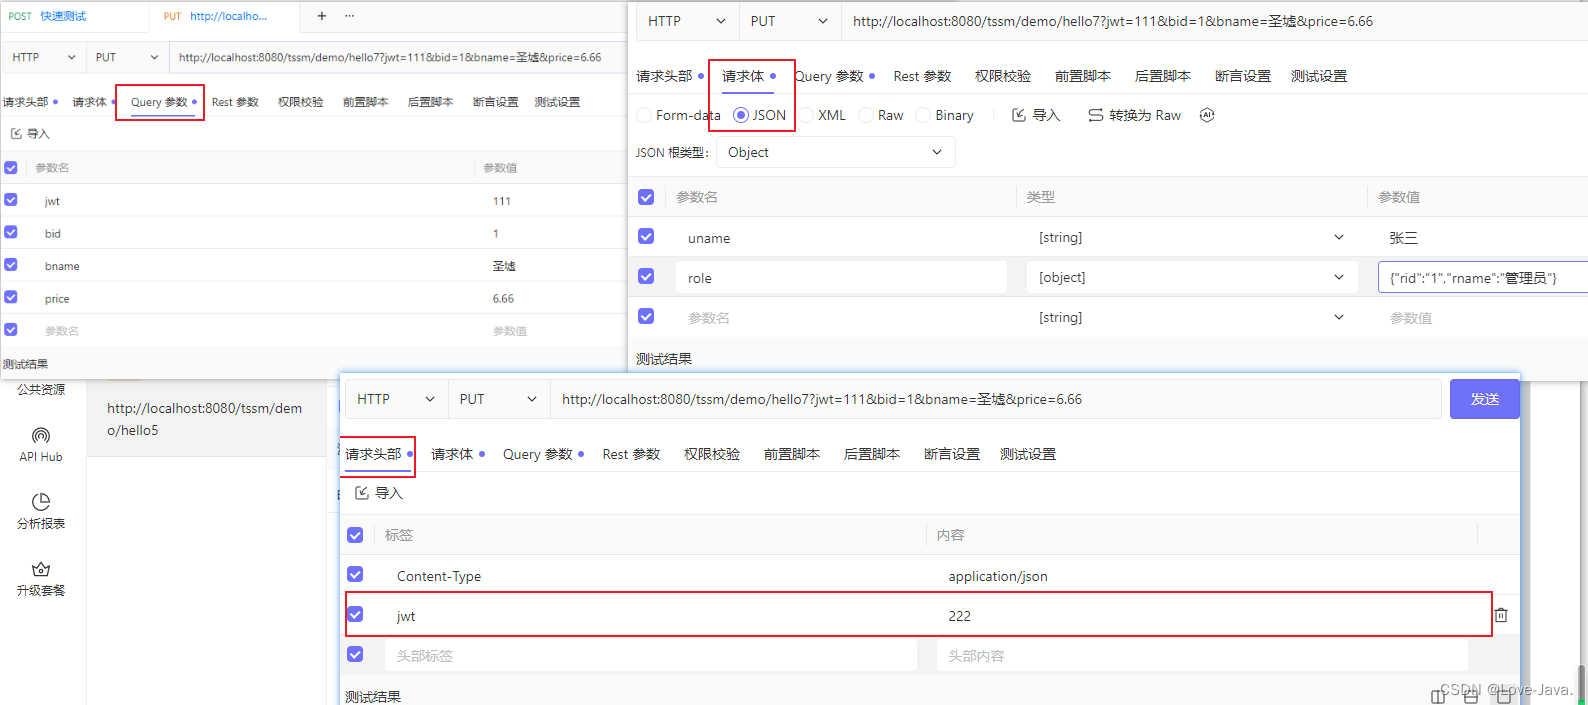
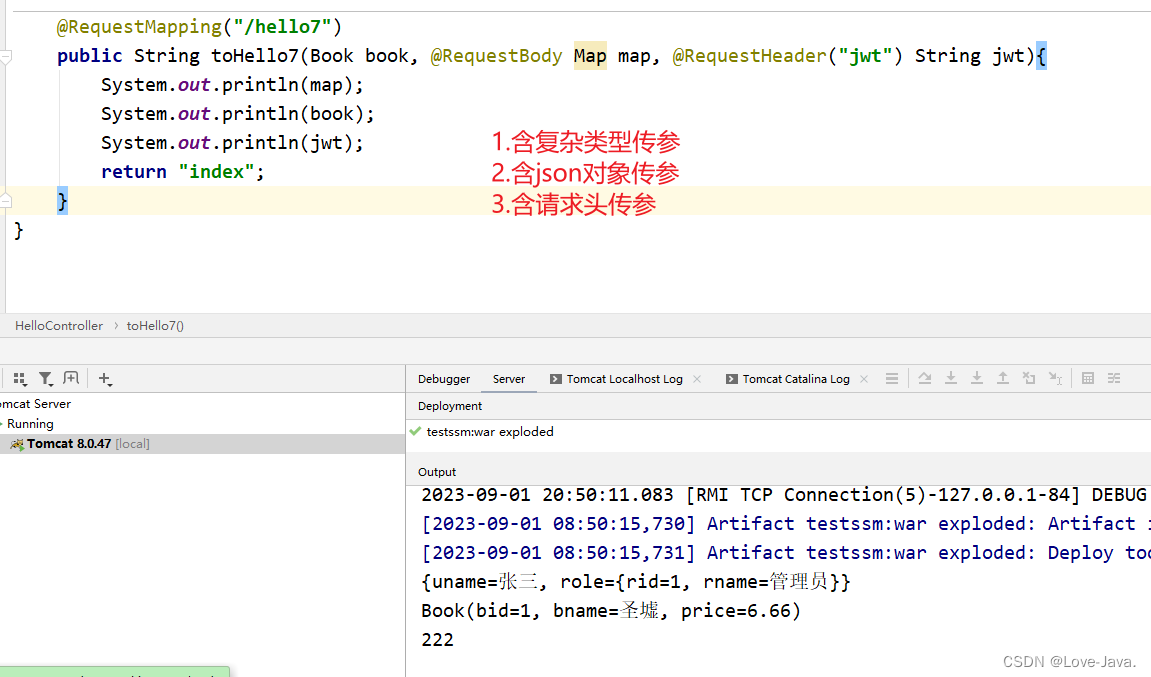
2.5.@RequestBody
Before explaining @RequestBody, I recommend tools such as postman or apipost/eolink to send request data.
These tools can help you simulate sending a request and receiving a response to better understand the meaning and use of the @RequestBody parameter.
When using **@RequestBody** we need to import dependencies
 <jackson.version>2.9.3</jackson.version>

 <dependency>
      <groupId>com.fasterxml.jackson.core</groupId>
      <artifactId>jackson-databind</artifactId>
      <version>${jackson.version}</version>
    </dependency>
    <dependency>
      <groupId>com.fasterxml.jackson.core</groupId>
      <artifactId>jackson-core</artifactId>
      <version>${jackson.version}</version>
    </dependency>
    <dependency>
      <groupId>com.fasterxml.jackson.core</groupId>
      <artifactId>jackson-annotations</artifactId>
      <version>${jackson.version}</version>
    </dependency>
//    能接受json数据,前提导入了Jackson依赖,没有导入Jackson依赖的话那进不了这个方法
    @RequestMapping("/hello6")
    public String RequestBody2(@RequestBody Map map) {


        log.info("RequestBody map:{}",map);
        return "index";
    }

//  不能接受json数据
    @RequestMapping("/hello5")
    public String RequestBody1(Map map) {


        log.info("RequestBody map:{}",map);
        return "index";
    }
Please use tools such as postman or apipost/eolink to send request data.
2.6.@RequestHeader
```java
    @RequestMapping("/hello7")
    public String RequestHeader(@RequestHeader("jwt") String  jwt) {
        log.info("RequestHeader jwt:{}",jwt);
        return "index";
    }
3.Return value
In order to facilitate the simulation effect, with the help of the ResponseUtil tool class, the ResponseUtil class provides a convenient way to write objects in text or JSON format into the HTTP response stream to return data to the client in the web application.
ResponseUtil:
package com.Bing.util;

import com.fasterxml.jackson.databind.ObjectMapper;

import javax.servlet.http.HttpServletResponse;
import java.io.PrintWriter;

public class ResponseUtil {


	public static void write(HttpServletResponse response,Object o)throws Exception{


		response.setContentType("text/html;charset=utf-8");
		PrintWriter out=response.getWriter();
		out.println(o.toString());
		out.flush();
		out.close();
	}

	public static void writeJson(HttpServletResponse response,Object o)throws Exception{


		ObjectMapper om = new ObjectMapper();
//		om.writeValueAsString(o)代表了json串
		write(response, om.writeValueAsString(o));
	}
}
pom.xml dependency
<dependency>
      <groupId>com.fasterxml.jackson.core</groupId>
      <artifactId>jackson-databind</artifactId>
      <version>2.12.4</version> <!-- 请根据您的需求选择合适的版本 -->
    </dependency>
3.1.void
After the processor processes the request, there is no need to jump to any other resources. At this time, the processor method can be returned to void.
Controller writes:
@Controller
@RequestMapping("/rs")
public class ReturnController {


    @RequestMapping("/hello")
    public void hello(HttpServletResponse response) {


        Map<String, Object> map = new HashMap<>();
        map.put("code", 200);
        map.put("msg", "成功添加");
        try {


            ResponseUtil.writeJson(response, map);
        } catch (Exception e) {


            e.printStackTrace();
        }
    }

}
operation result:

```java
@RequestMapping("/queryStudents")
    public void queryStudents(HttpServletResponse response) throws IOException {

        //处理Ajax,使用json做数据格式
        Student student = new Student();
        student.setName("张三");
        student.setAge(18);

        try {
            ResponseUtil.writeJson(response,student);
        } catch (Exception e) {
            e.printStackTrace();
        }
    }

@Data
class Student{
    private String name;
    private Integer age;
}
3.2.String
通过http://localhost:8080/springmvc01/toHello访问请求方法,并经过视图解析器跳转指定页面。
@RequestMapping("/toHello")
public String toHello(){


    //逻辑视图名
    return "hello";
}
返回类型为String,默认被作为视图名,指定逻辑视图名,经过视图解析器解析为jsp物理路径:/WEB-INF/page/success.jsp
3.3.String+Model
通过http://localhost:8080/springmvc01/toHello访问请求方法,并经过视图解析器跳转指定页面,最后完成视图模型数据渲染操作。
@RequestMapping("/toHello1")
    public String toHello1(Model model,HttpServletRequest request){


        //填充模型数据
        model.addAttribute("name","张三");
        request.setAttribute("role","管理员");
        //逻辑视图名
        return "hello";
    }
3.4.ModelAndView
通过http://localhost:8080/springmvc01/toHello访问请求方法。
@RequestMapping("/toHello2")
    public ModelAndView toHello2(){


        ModelAndView mv = new ModelAndView();
        //填充模型数据
        mv.addObject("name","张三");
        mv.addObject("role","管理员");
        mv.setViewName("hello");
        //逻辑视图名
        return mv;
    }
4.页面跳转
转发(forward:path)和重定向(redirect:path)这两种跳转方式将会绕开视图解析器的前缀和后缀;还有就是如果是在同一controller中则不用使用"/"从根目录开始,而如果是在不同的controller则一定要从根目录开始。
path为请求处理方法名,而非逻辑视图名。
- 转发(地址栏不变)
@RequestMapping("/helloPage1")
    public String toHelloPage1(){


        System.out.println("helloPage1");
        return "forward:toHello2";
    }
它相当于“request.getRequestDispatcher(“url”).forward(request,response)”。使用转发,既可以转发到jsp, 也可以转发到其他的控制器方法。
- 重定向(地址栏改变)
@RequestMapping("/helloPage2")
    public String toHelloPage2(){


        System.out.println("helloPage2");
        return "redirect:toHello2";
    }
它相当于“response.sendRedirect(url)”。需要注意的是,如果重定向到jsp页面,则jsp页面不能写在WEB-INF目录中,否则无法找到。
跳其它的controller
@RequestMapping("/helloPage3")
    public String toHelloPage3(){
        System.out.println("helloPage3");
        return "forward:/demo/hello";
    }

    @RequestMapping("/helloPage4")
    public String toHelloPage4(){
        System.out.println("helloPage4");
        return "redirect:/demo/hello";
    }