1. Basic introduction to TestNG
TestNG is a testing framework in Java. It is a very popular and practical unit testing framework. It has a complete use case management module and can be used with Maven to easily manage third-party plug-ins. TestNG can be used to do automated testing of functions, interfaces, units, and integrations. The most common method is to use Selenium to do automated functional testing. It uses Java annotations to write test methods.
Testers generally use TestNG to write automated tests, and developers generally use Junit to write unit tests. The reasons why TestNG is suitable for testers:
- A testing framework that covers more comprehensive functions than Junit;
- Junit is more suitable for unit tests with strong isolation;
- TestNG is more suitable for complex integration testing.
The process of writing a test consists of the following steps:
- Write test business logic and insert TestNG annotation into the code;
- Add test information to the testng.xml file or build.xml;
- Run TestNG.
2. Use of TestNG
The application of TestNG is relatively simple. Understanding its annotations is equivalent to knowing more than half of it. 1. To reference
TestNG in Maven
and use Maven as a project management tool, you need to add the following dependencies in pom.xml, groupId, After the artifactId and version are introduced, the Maven framework can be used for automatic downloading and use.
<dependencies>
<dependency>
<groupId>org.testng</groupId>
<artifactId>testng</artifactId>
<version>6.10</version>
</dependency>
</dependencies>
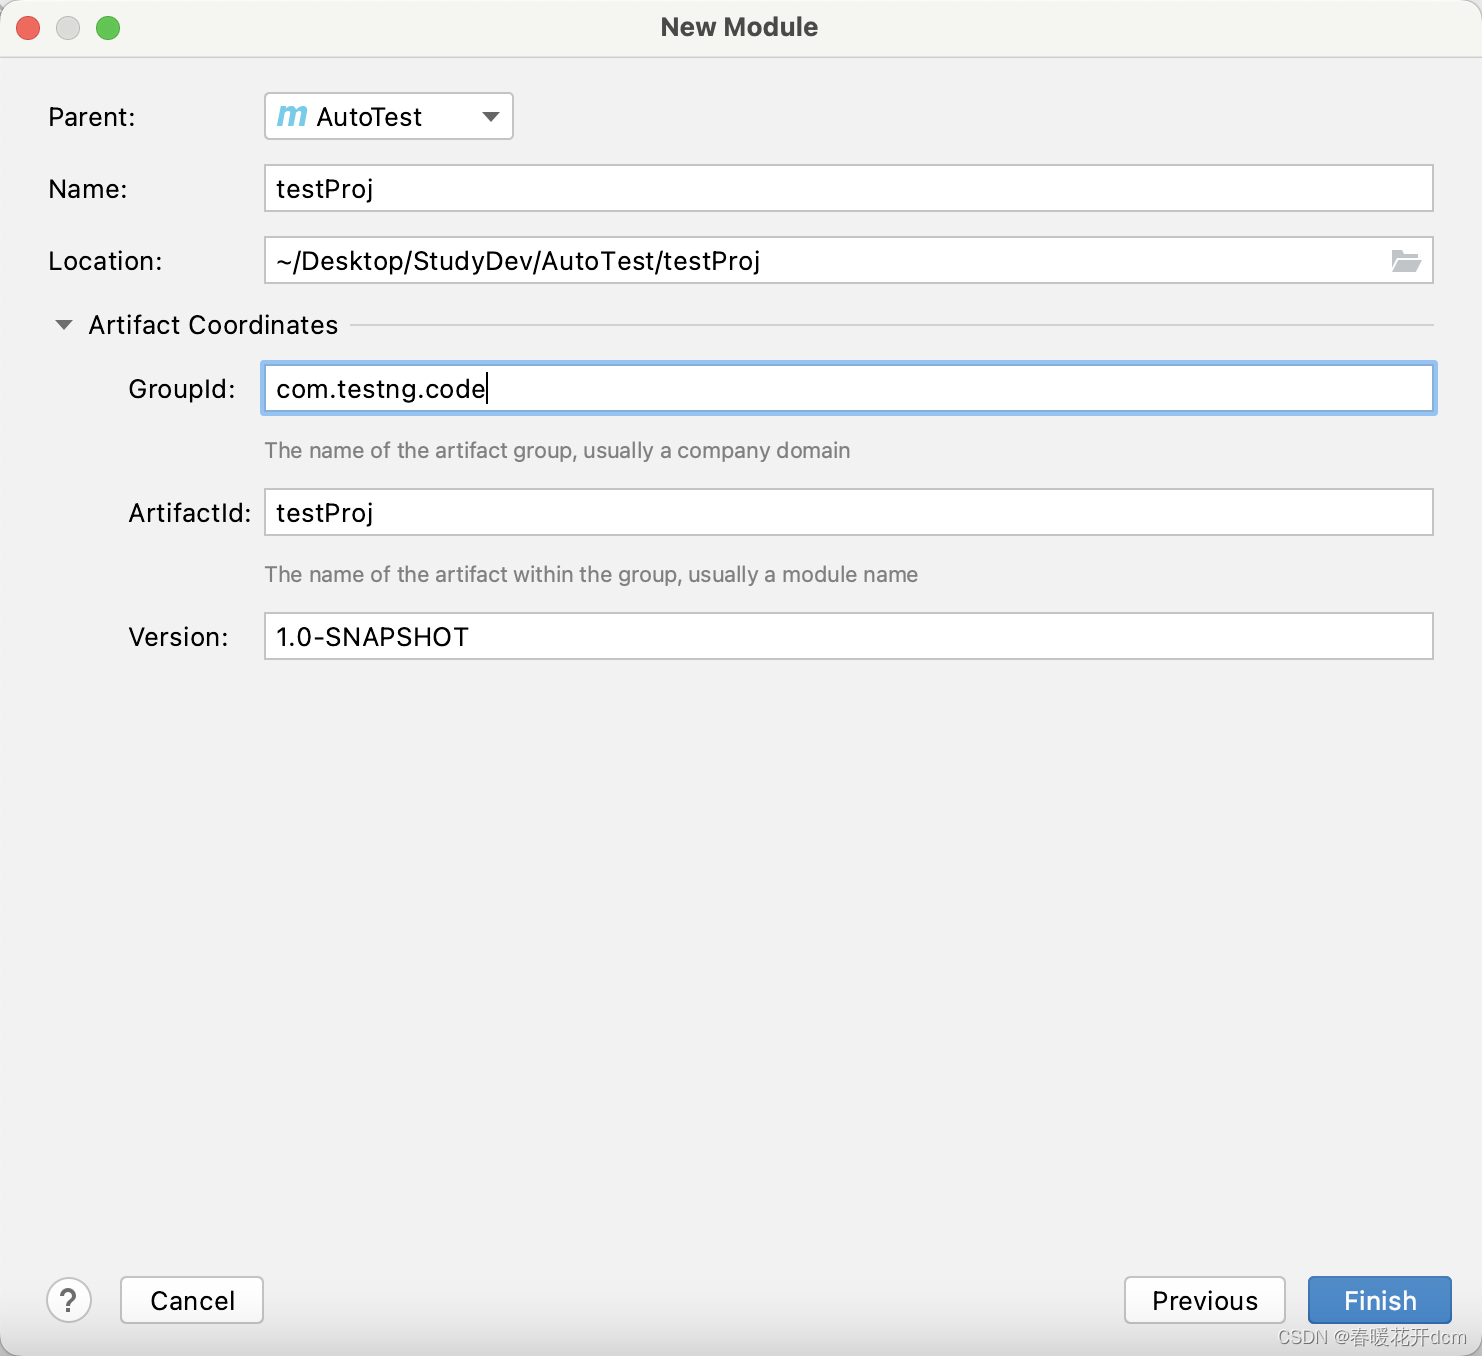
2. Create a module in IDEA
and create a new folder for the project: AutoTest. Use IntelliJ IDEA to open the folder (File—>open), right-click on the folder—>New—>module (module means that it is managed by this project)—>select Maven and click Next—>fill in the GroupId and ArtifactId , click Next—>Created a module, click Finished (GroupId: usually the reverse of the domain name, also used as the package name of the class in the project, it is the directory structure of java in the main directory; ArtifactId: project name, which is the root folder name)
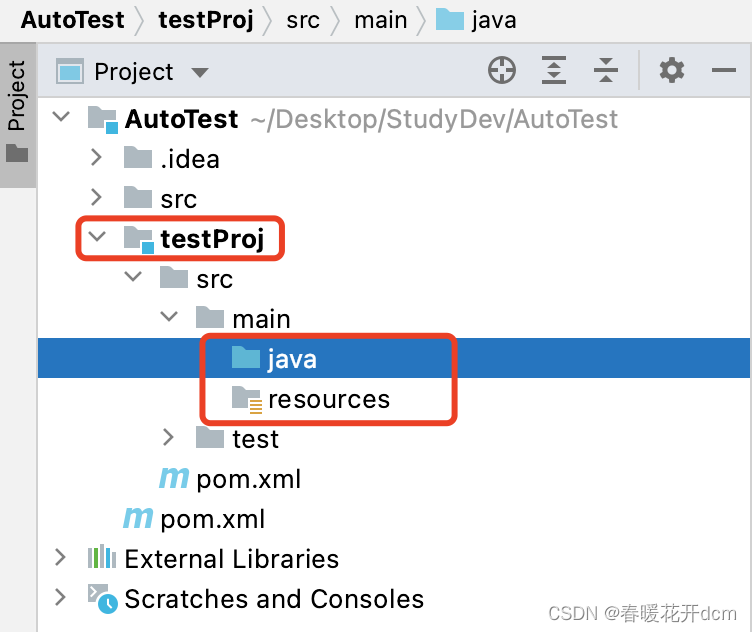
A module is created, which is considered the logo of the project. The lower right corner before the root folder name is blue, and the front java is also blue. The resources resource directory file is the file logo in the figure. The project directory structure is as shown in the figure:
3. After the most basic annotation @Test
Module has been created, you can start to understand the basic annotations of TestNG.
1) Right-click on the java file->new->Package to create a package, package name: com.test.testng. (In a company, when developing a project, each functional module must be placed under a certain package. Generally, the package name is: highest domain name. company name/personal name. module name) 2) Create a class in the package,
this Classes are created to run code in TestNG. Right-click the package—>new—>Java Class, enter the class name: BasicAnnotation—>OK
3) Reference TestNG in the pom. A good thing about the integration of TestNG and IDEA is that even if TestNG is not referenced in the pom, a prompt will be given.
4) Create a method: testCase1, add "@Test" before the method, which is the most basic annotation and is used to mark the method as part of the test.
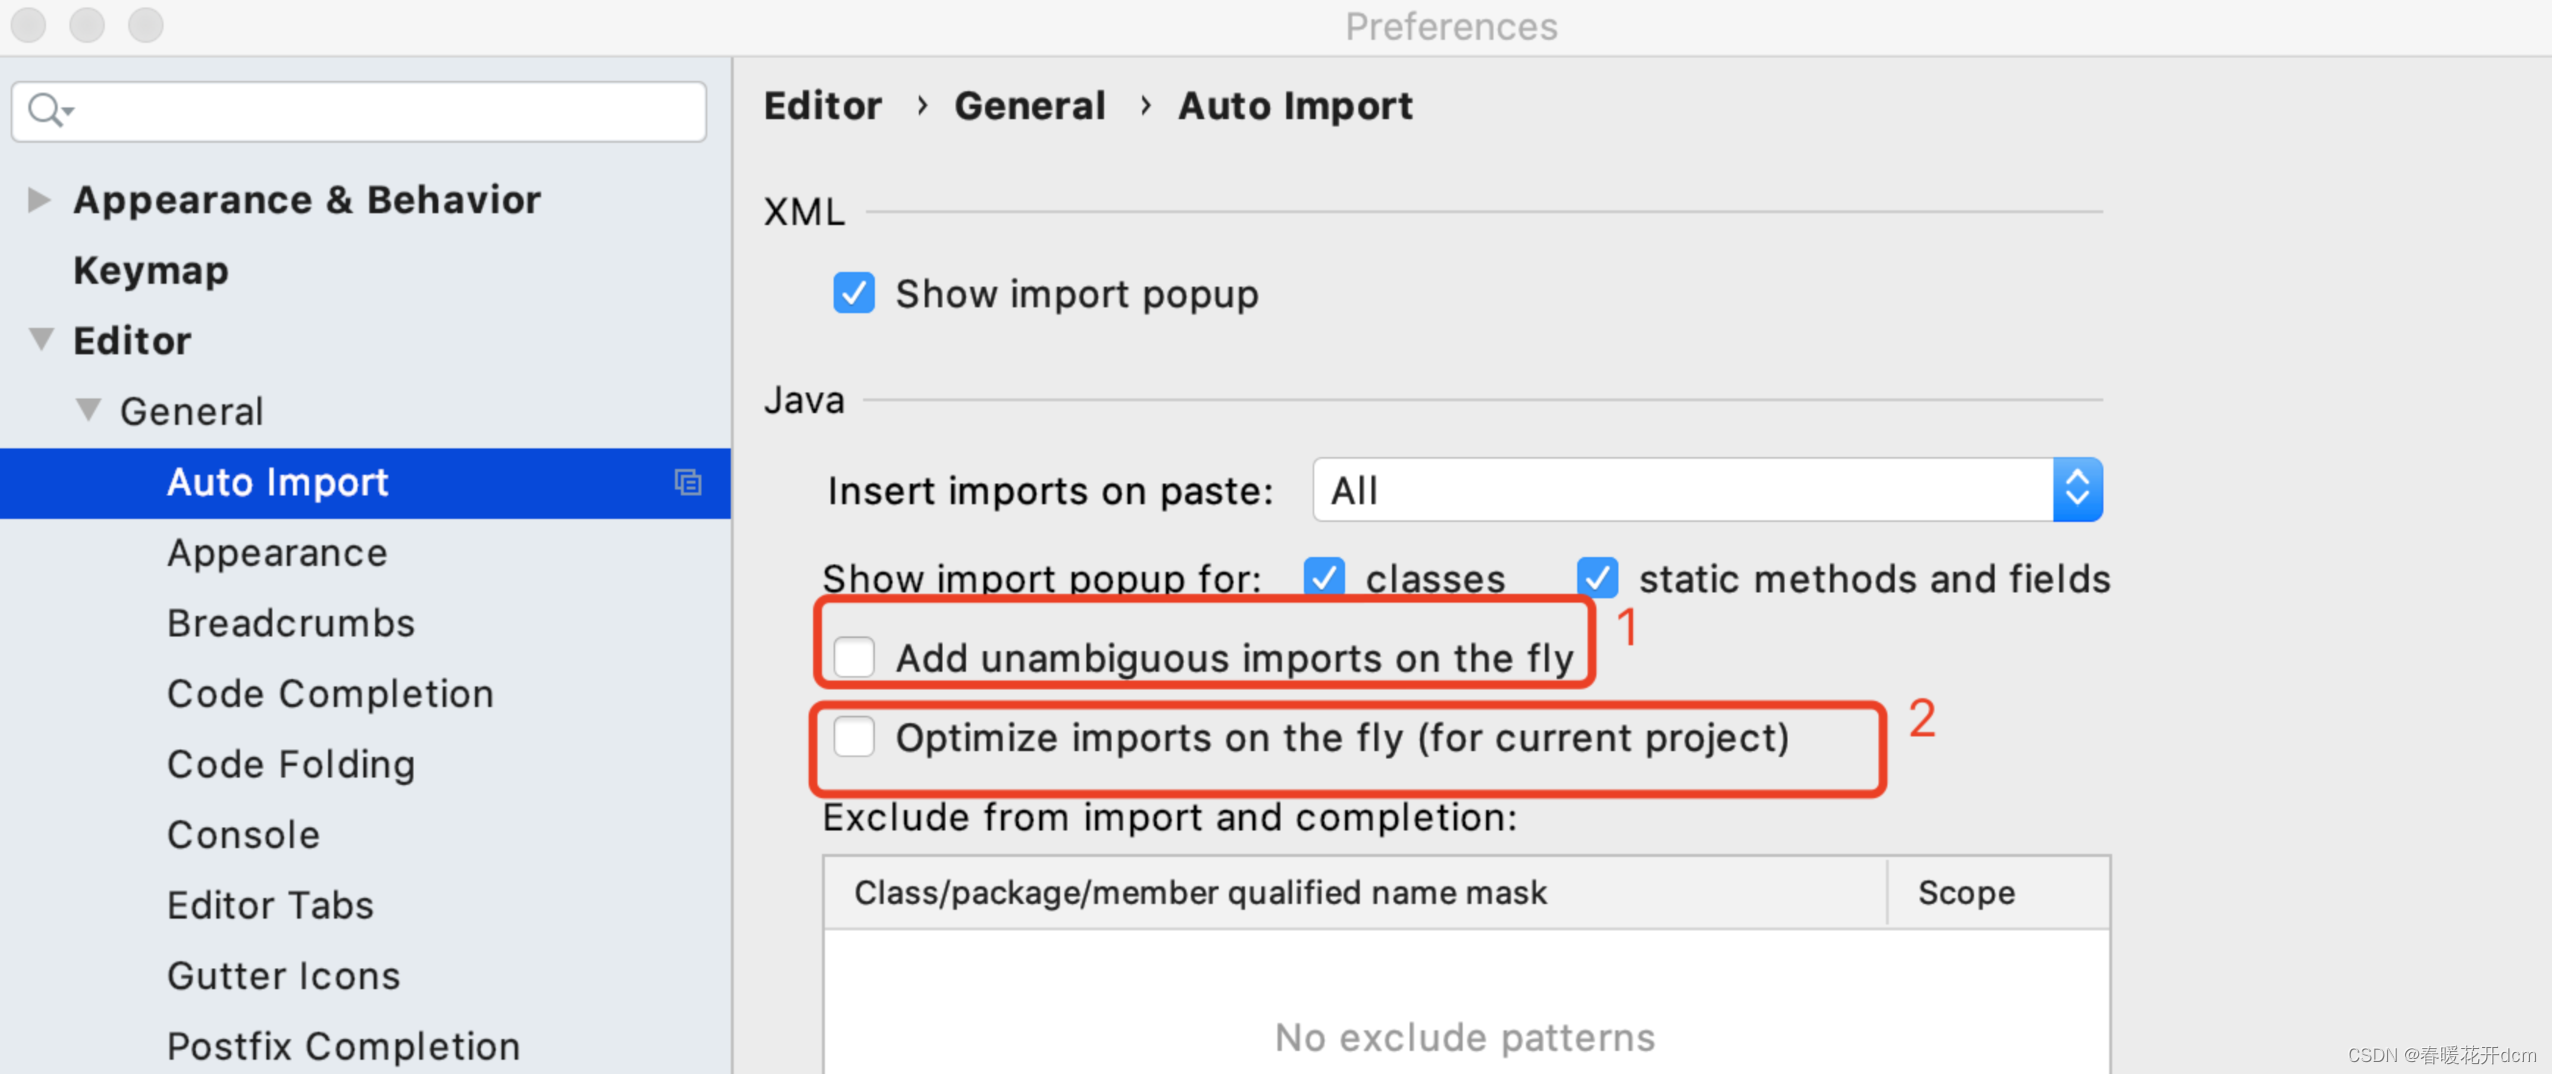
When @Test is red, it means that there is no corresponding method for import. Here we can set up the automatic optimization of the import package:
File—>settings—>Editor—>General—>Auto Import. Check 1 and 2 in the figure below. Select,
1: IDEA will automatically help us import the packages we need to use when we write code, but if there are multiple classes with the same name calling different packages, we still need to set them manually (Alt+Enter).
2: IDEA will automatically help us optimize imported packages when we write code, such as automatically removing some useless packages. 4. In addition to the most basic annotations, the
@BeforeMethod and @AfterMethod annotations also have tags that can be annotated to run before or after this method.
Create two methods: beforeMethod and afterMethod, and also create a testCase2 method—>Run class, so that the output content can be understood more intuitively. Note: Enter soout and press Enter to output System.out.println().
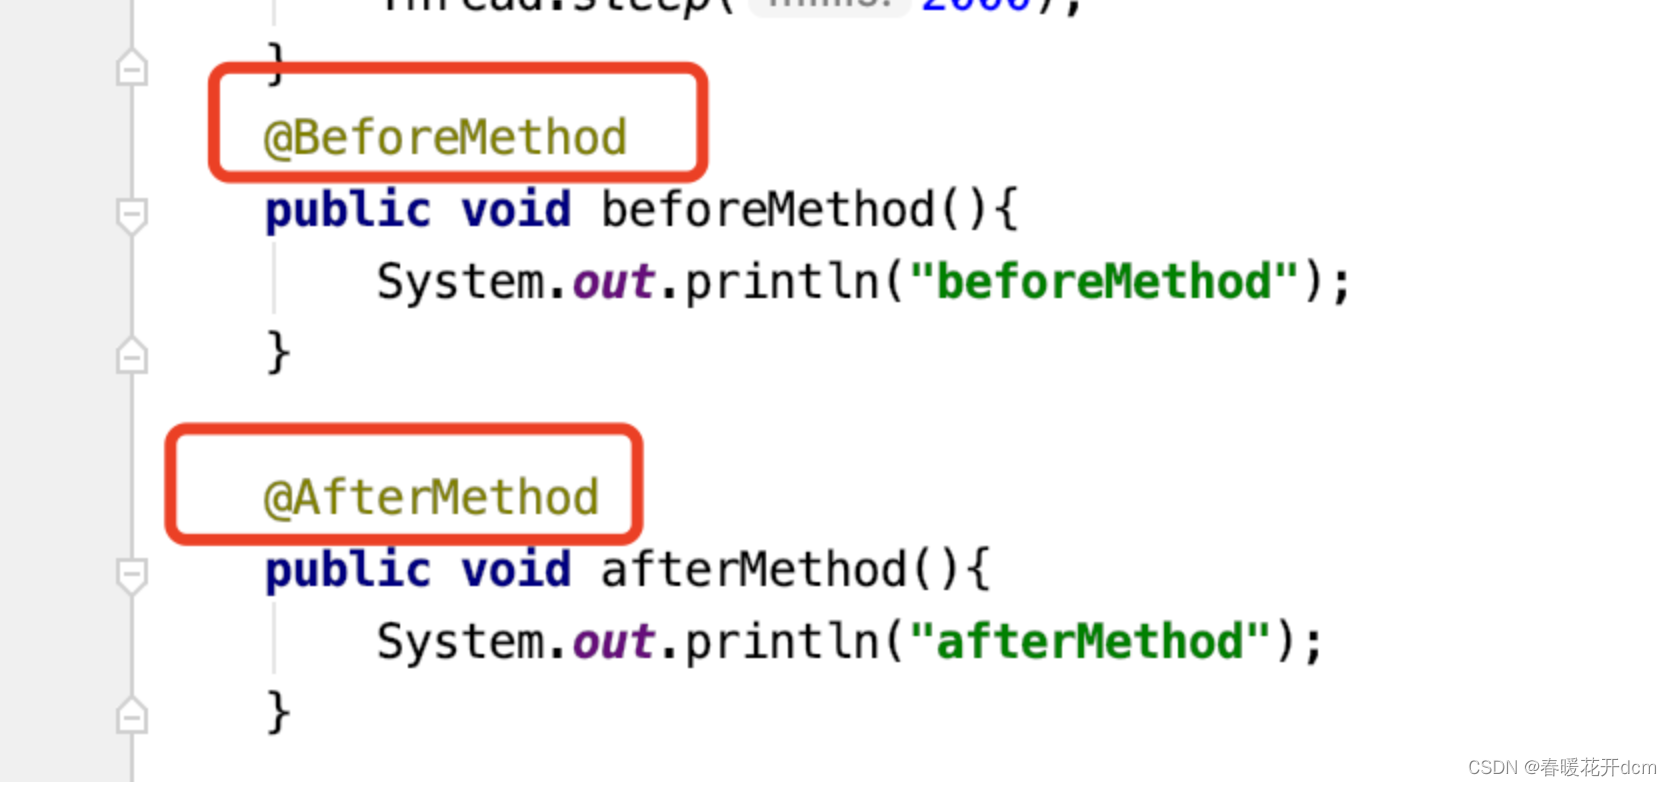
As you can see, BeforeMethod/AfterMethod will be run once before/after each method is run. When writing test cases in the future, everything that must be run before/after the test method can be written in BeforeMethod/AfterMethod.
5. Annotations @BeforeClass and @AfterClass
@BeforeClass and @AfterClass are annotations before and after the class is run.
Create two methods: beforeClass and afterClass—>Run class, as shown in the figure below:
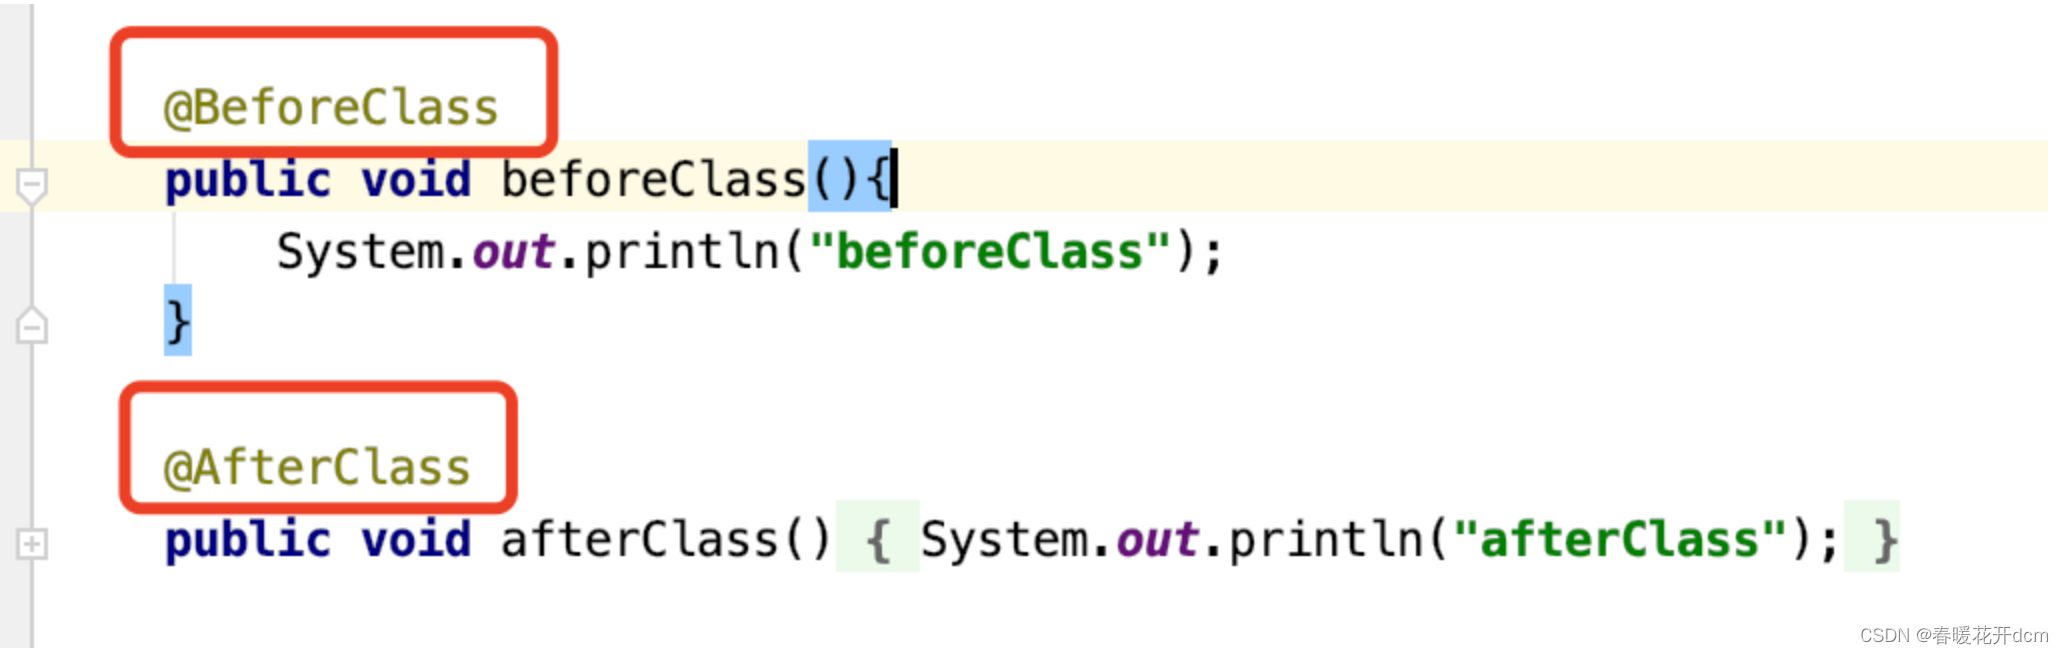
Examples of usage scenarios of @BeforeClass and @AfterClass: before the class is run, whether variable assignment, object initialization, etc. are required, after writing, they can be used in other methods used.
6. Annotations @BeforeSuite and @AfterSuite
In the annotations, the order of execution is very, very important. Test suite annotation: Create two methods beforeSuite and afterSuite—>Run class, the results are shown in the figure below.
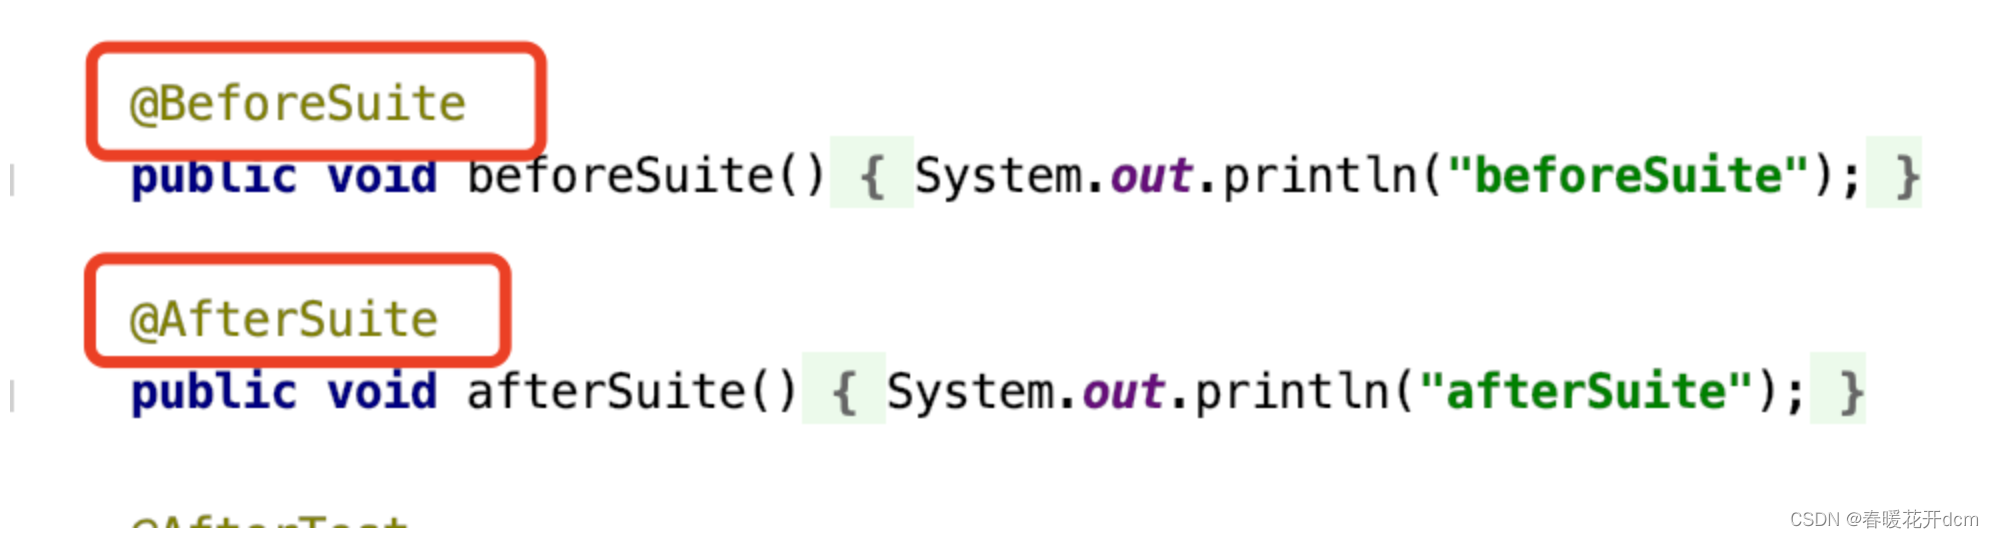
According to the results, you can see that Suite wraps the class, which means that the class runs Suite before running. Suite can contain multiple Classes, and classes belong to a certain suite.
7. Suite testing
Let’s take an example to explain the suite testing in TestNG. Although suite testing is used relatively rarely in TestNG, you still need to understand the details. The steps are as follows:
-
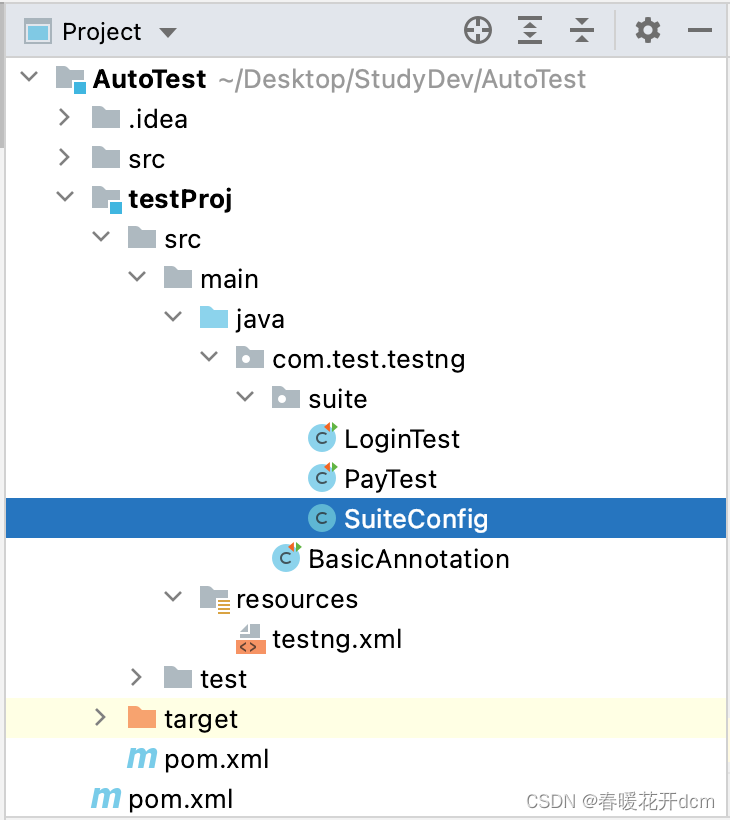
I created a package com.test.testng in the java file before. Now create a new package in the package to manage all suite test codes (New—>PacKage, the package name can be: suite)
-
Create a class in the suite (New—>Java Class: SuiteConfig-Configuration Class). SuiteConfigs In order to configure all test suites, write here the methods that need to be run before the test suite.
-
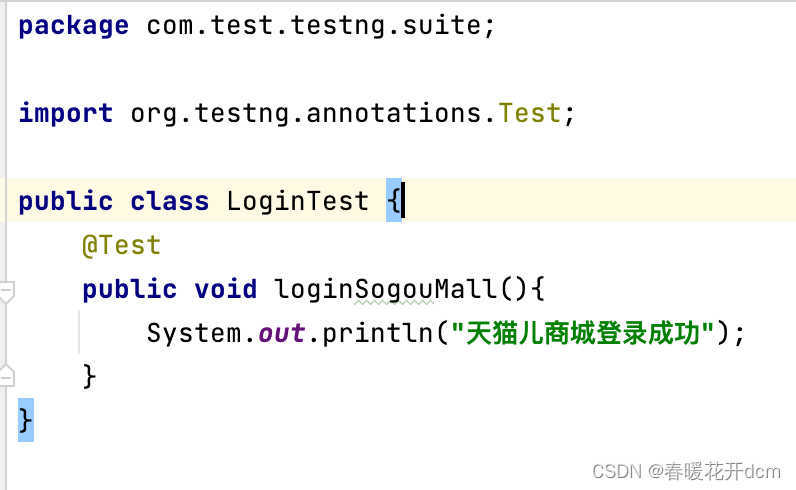
Then create a class in the suite package, taking the login test as an example, (New->Java Class: LoginTest-Login Success-Logic Control Class), and write here the methods contained under the main Test tag.
-
Create the testng.xml configuration file in the resources directory. Generally speaking, the configuration file is called tesng.xml, but it is not necessary and can also be called another name. testing.xml is actually a standard xml file, and is actually related to SuiteConfig and LoginTest.
-
Open the SuiteConfig class and create two methods: beforeSuite and afterSuite.
-
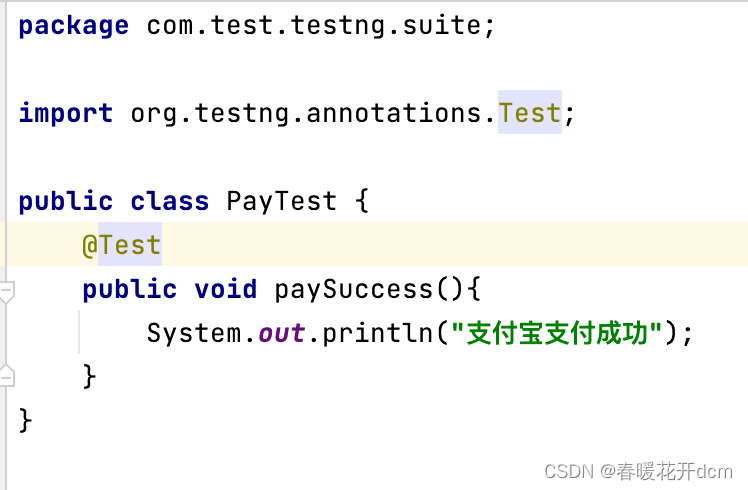
Then create a class in the Suite package: PayTest-payment successful, which is equivalent to a test group with LoginTest and is easier to distinguish. So far: the directory structure is as shown below:
-
Open LoginTest, write the method: loginSogouMall, and the login is successful.
-
Open PayTest, write the method paySuccess, and the payment is successful.
-
Open the configuration file testng.xml, the root directory is suite, and write the content as shown in the figure below. It should be noted here that the test tag must define a name. After running testing.xml, according to the running results, you can see that the execution order is 1-2-3-4.

8. Ignore tests
Ignore tests refer to test methods that you do not want to execute during this test execution. Examples are as follows.
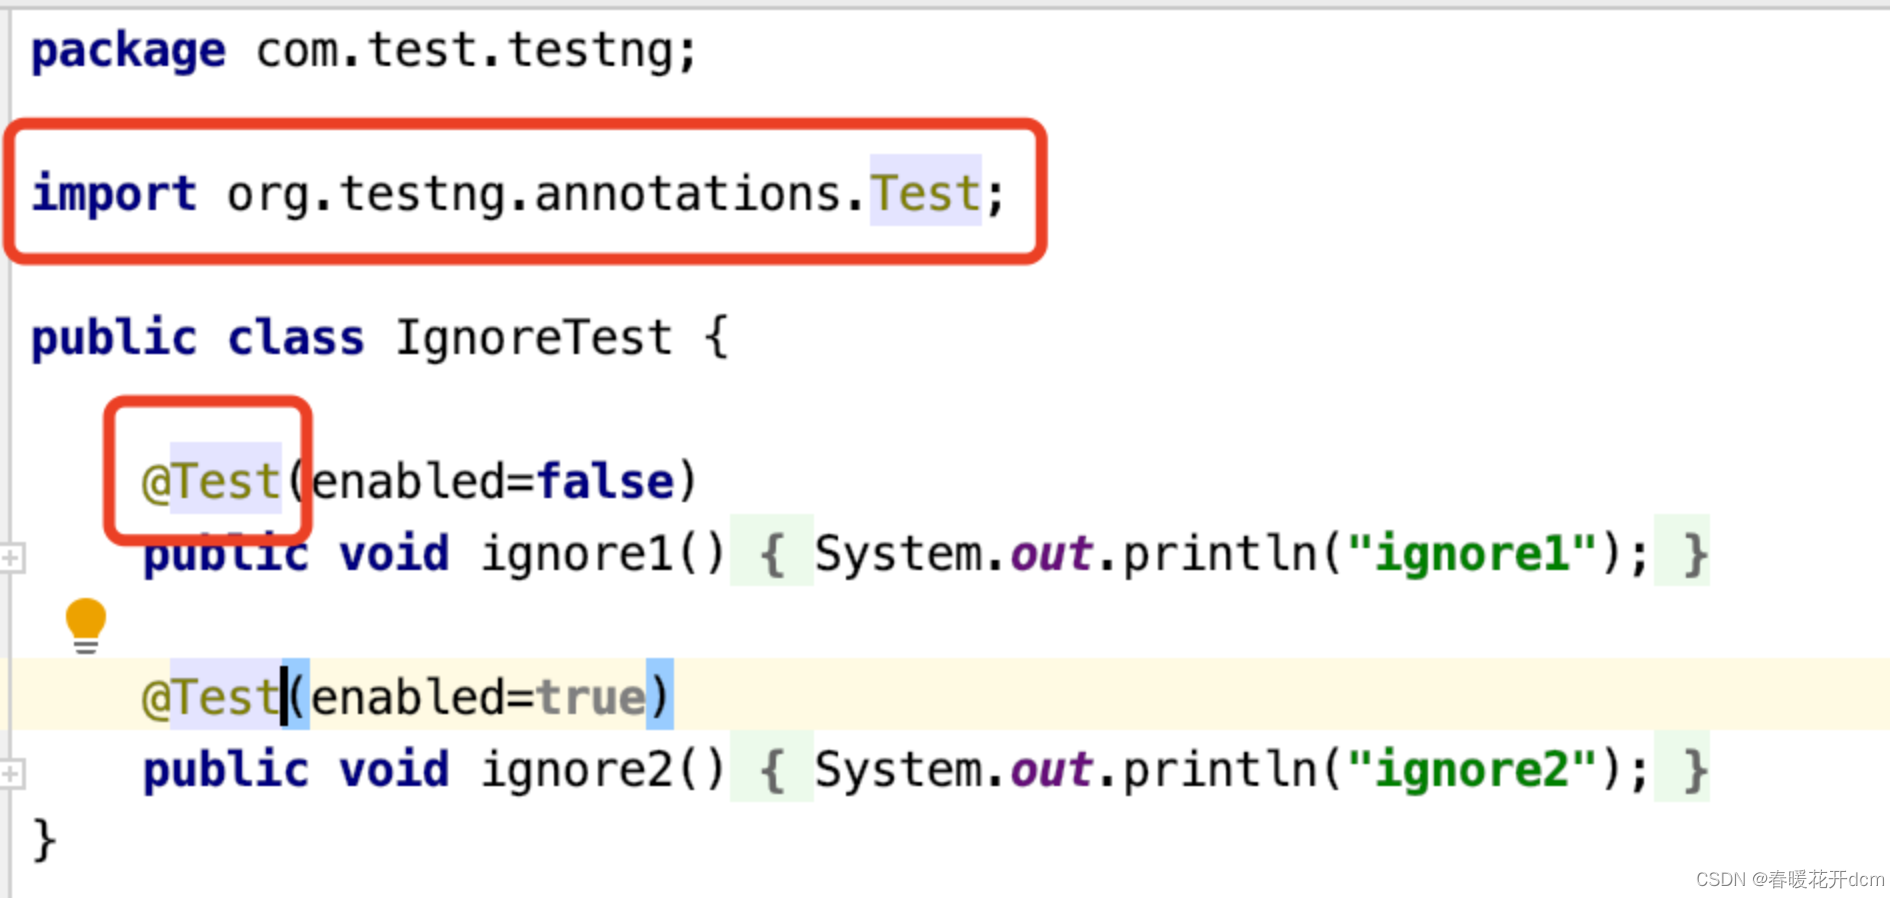
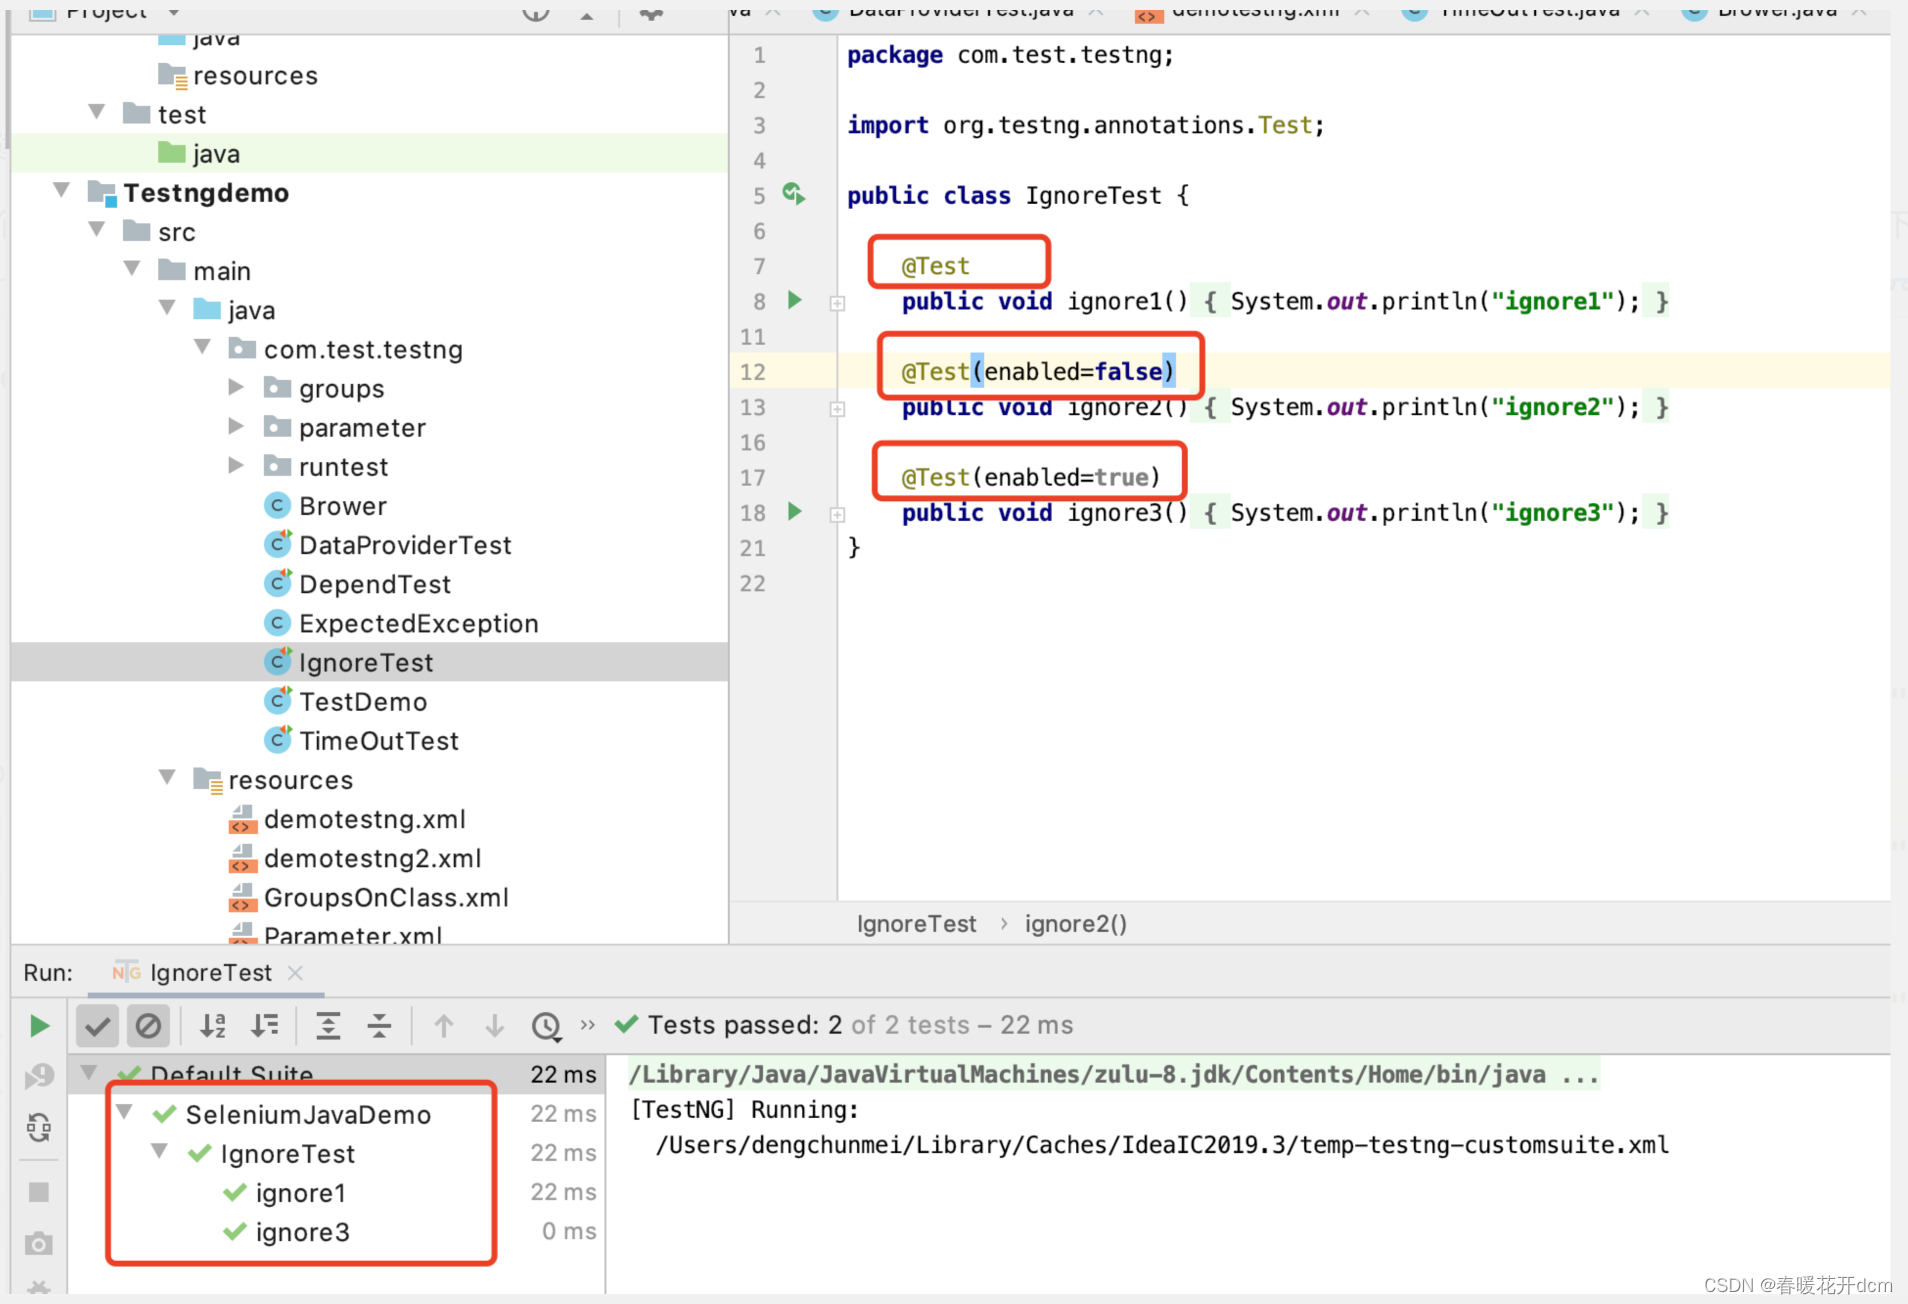
1) Create a class in the package com.test.testng, New-Java Class: IgnoreTest;
2) Create two methods in the IgnoreTest class: ignore1 and ignore2, as you can see from the output results, add attributes after the @Test tag (enabled=false), you can ignore this test method, enabled is true by default.
9. Method group testing in group testing
First introduce method grouping and classify methods.
- Create a new package in the package com.test.testng to manage all suite test codes (New—>PacKage, the package name can be: groups);
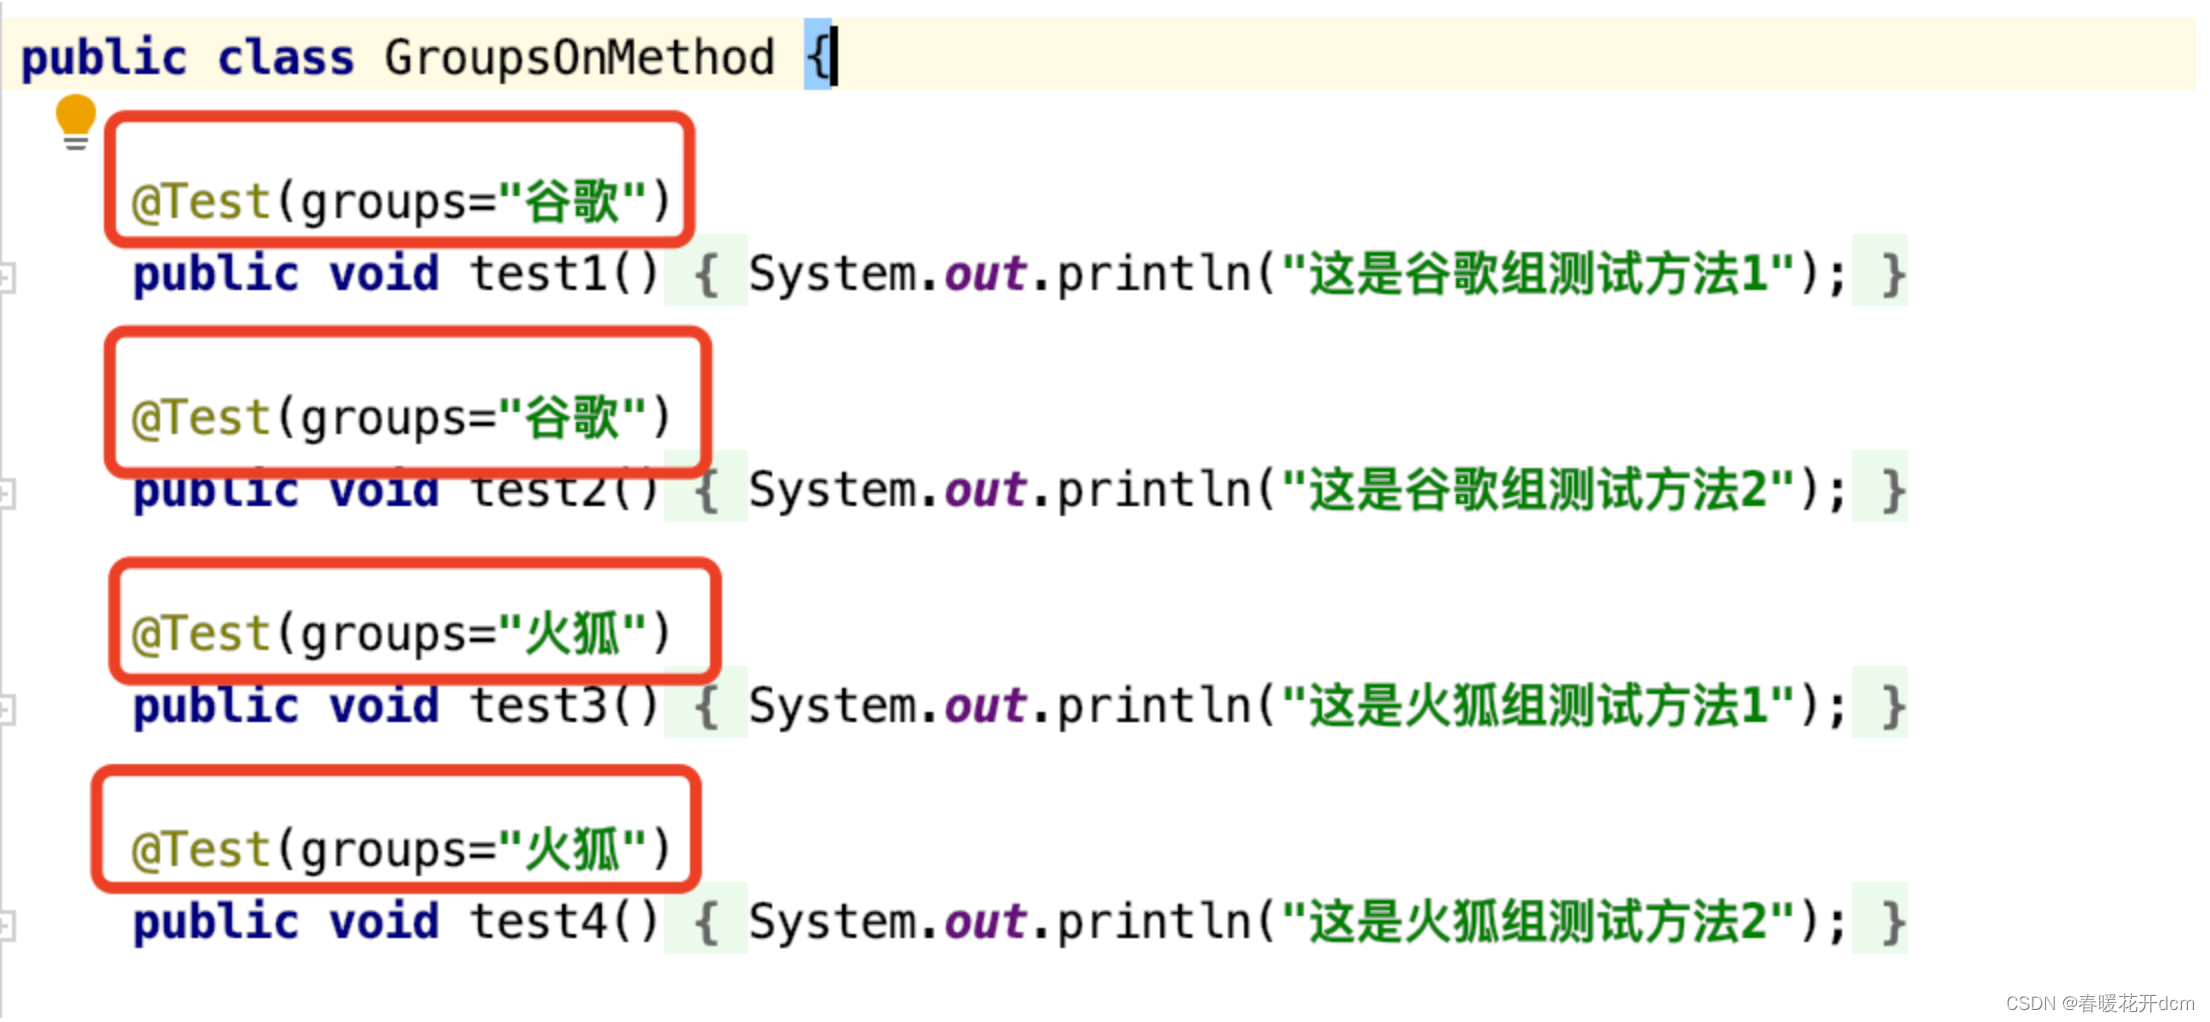
2) Create a new class in the groups package (New—>Java Class, method name: GroupsOnMethod); - Create 4 methods, as shown in the figure below. Note that you need to add the attribute groups in the @Test tag;
- Create two more methods, as shown in the figure below. You need to add the name of the group after the @BeforeGroups and @AfterGroups tags.

How to write multiple groups:
public class Test1 {


  @Test(groups = {

     "functest", "checkintest" })
  public void testMethod1() {


  }
  @Test(groups = {

    "functest", "checkintest"} )
  public void testMethod2() {


  }
  @Test(groups = {

     "functest" })
  public void testMethod3() {


  }
}
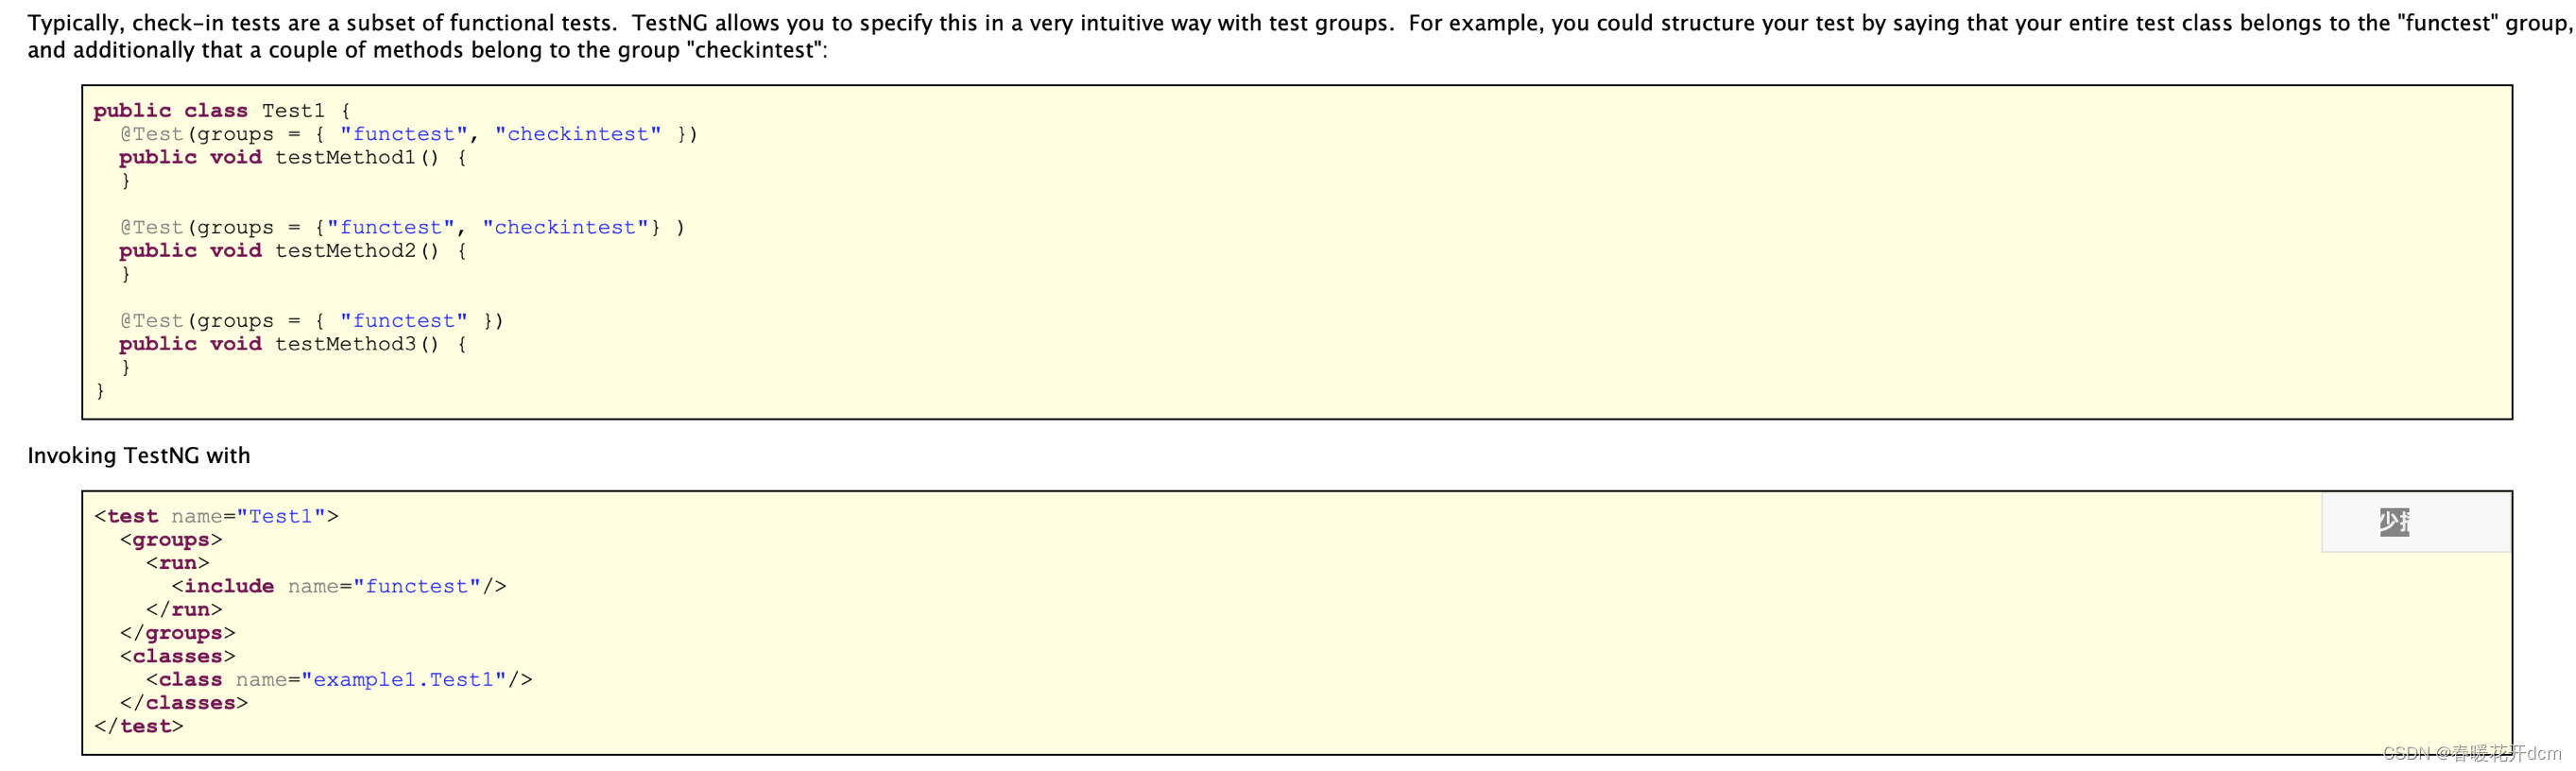
- Run class, the running result is:
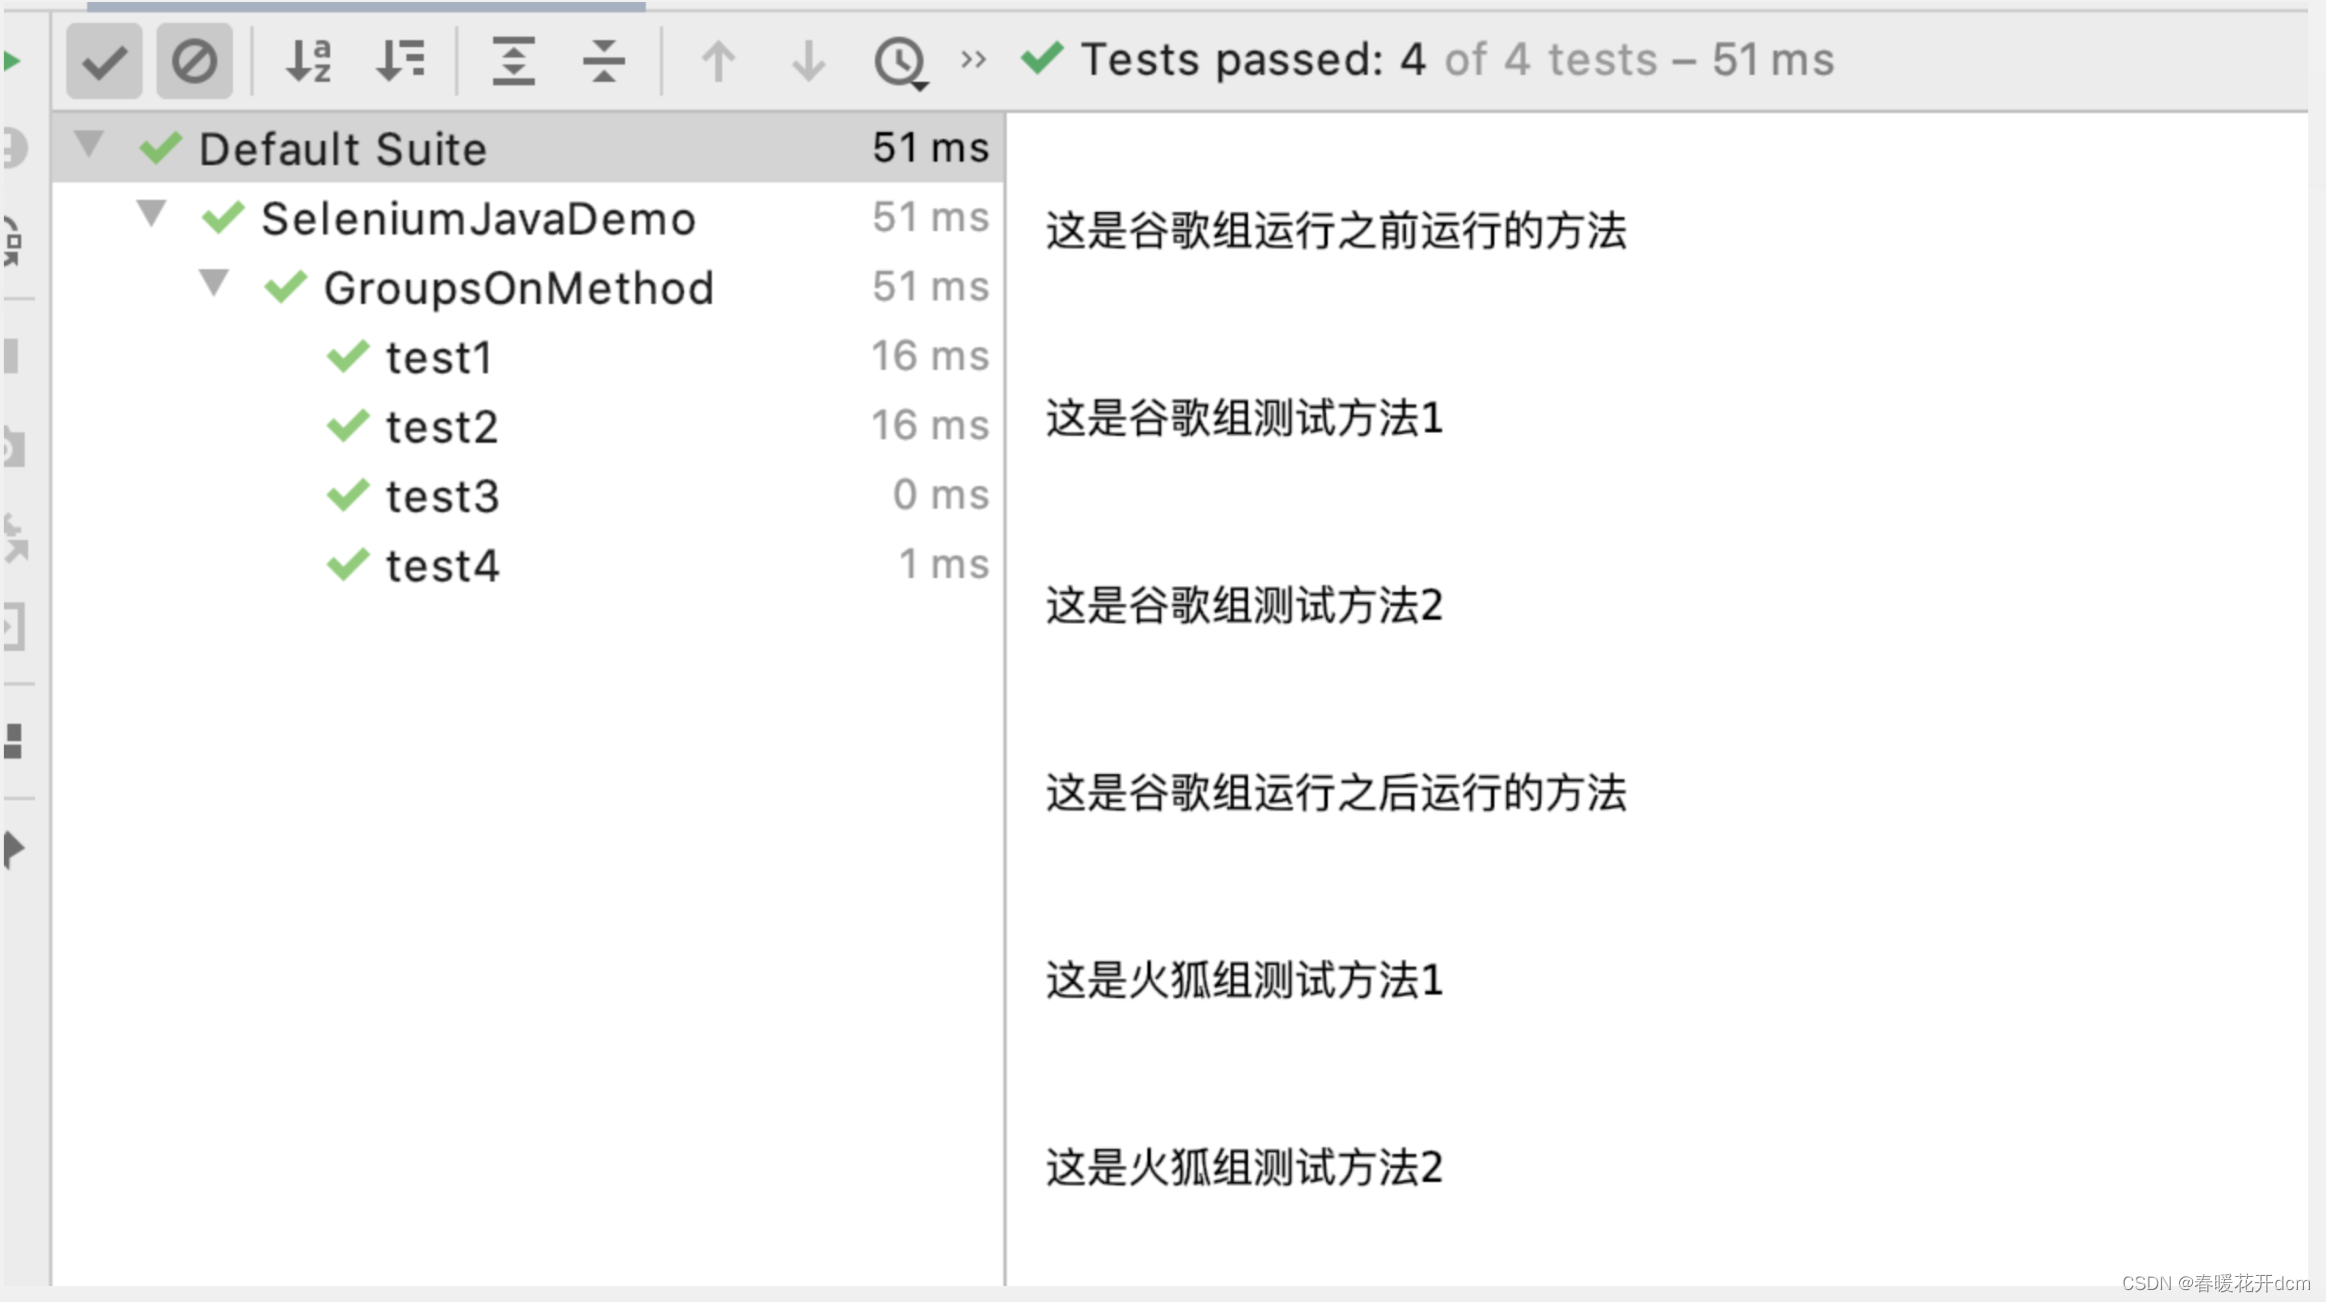
- Through this approach, many test methods can be classified into a group and then related operations can be performed.
10. Class grouping test in group testing
As mentioned in the previous section, this section introduces class grouping to group the entire class file.
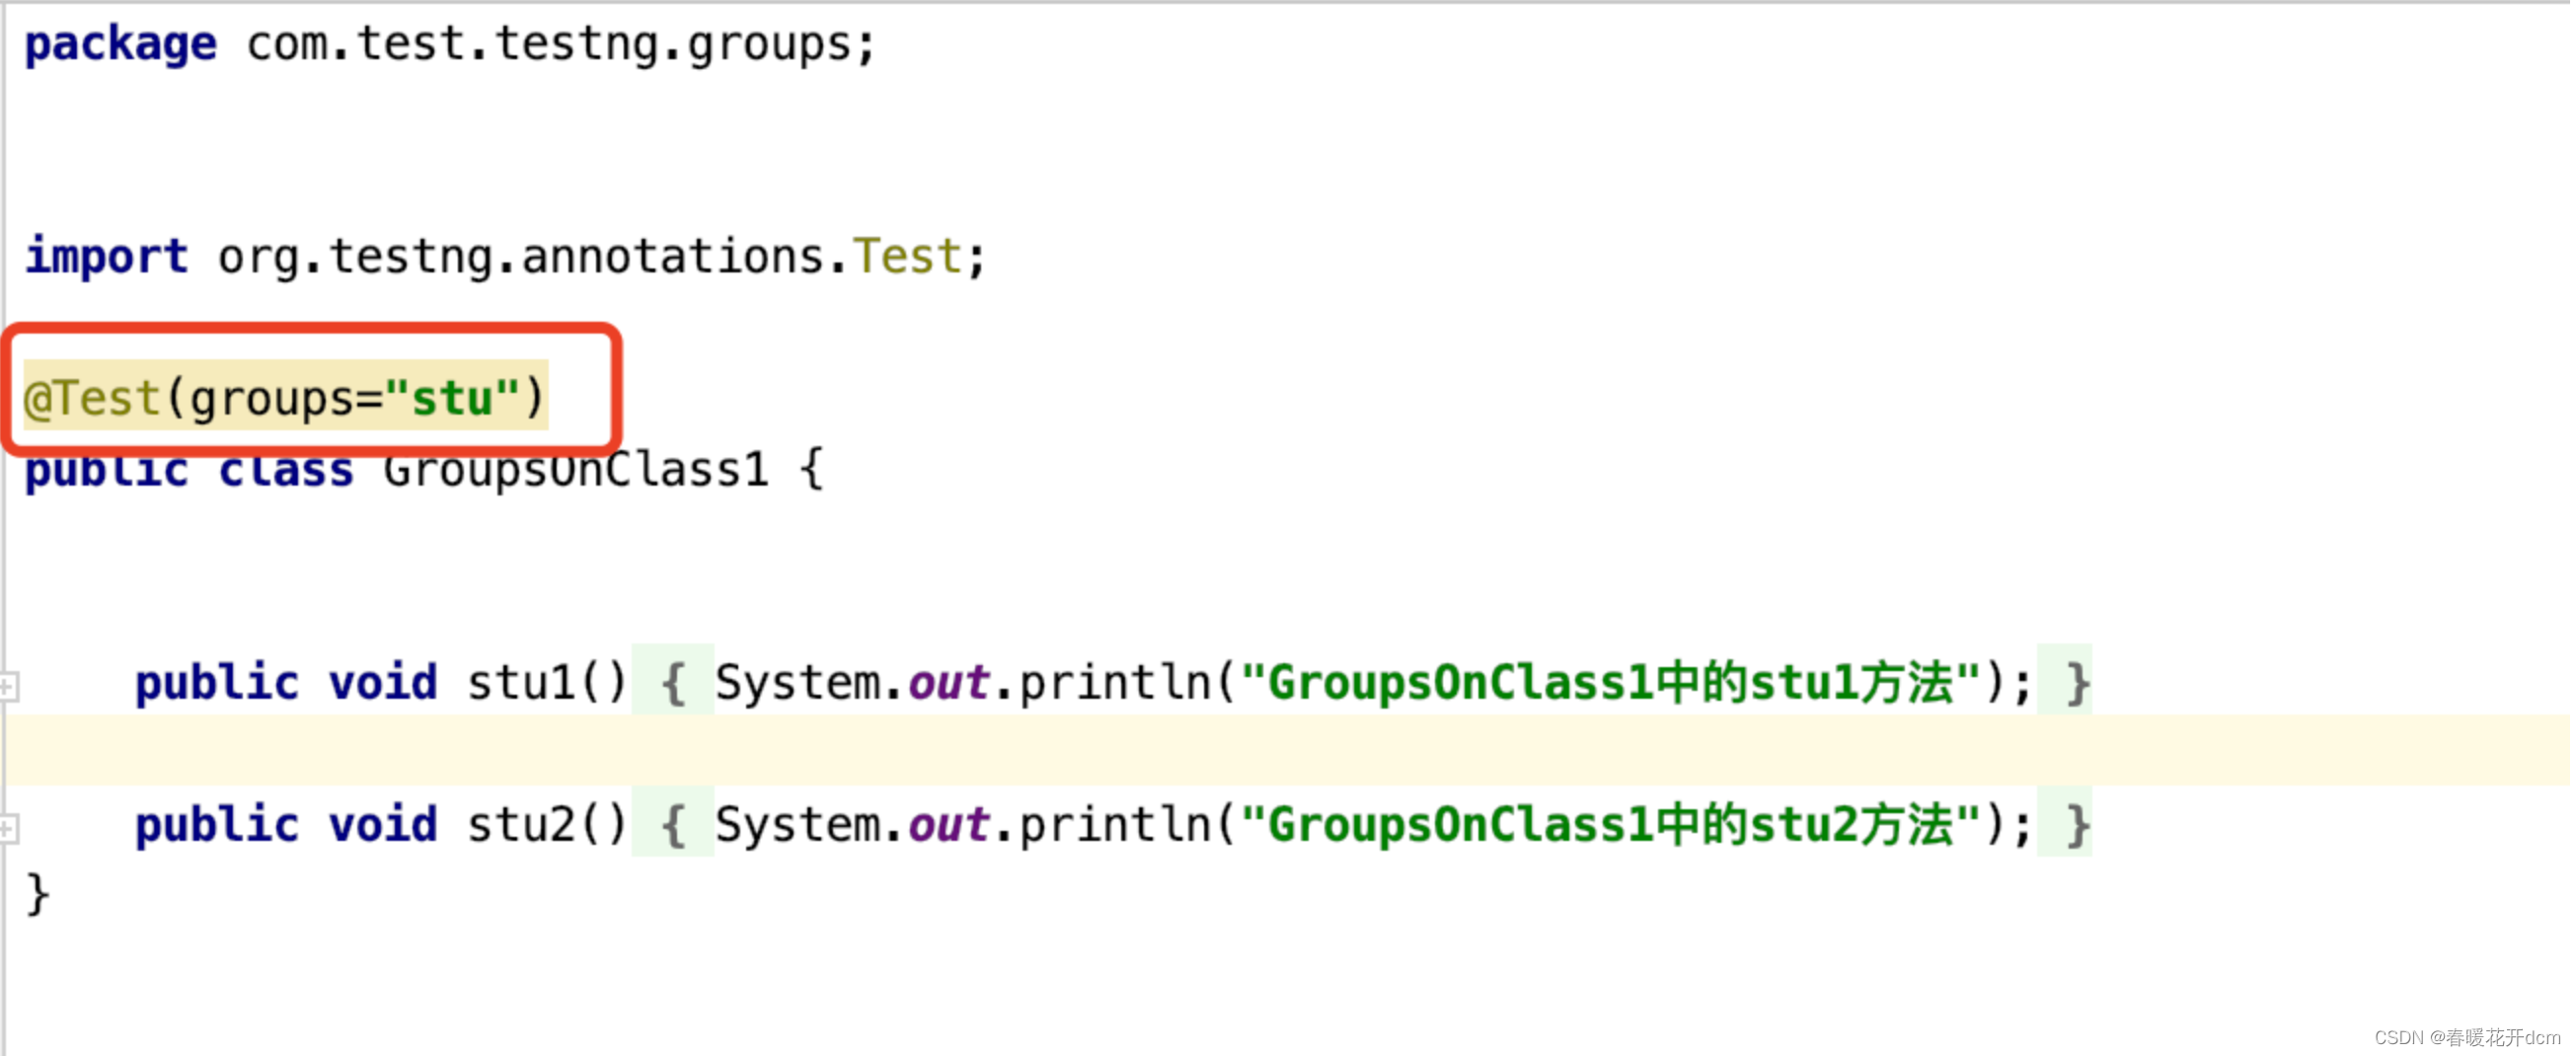
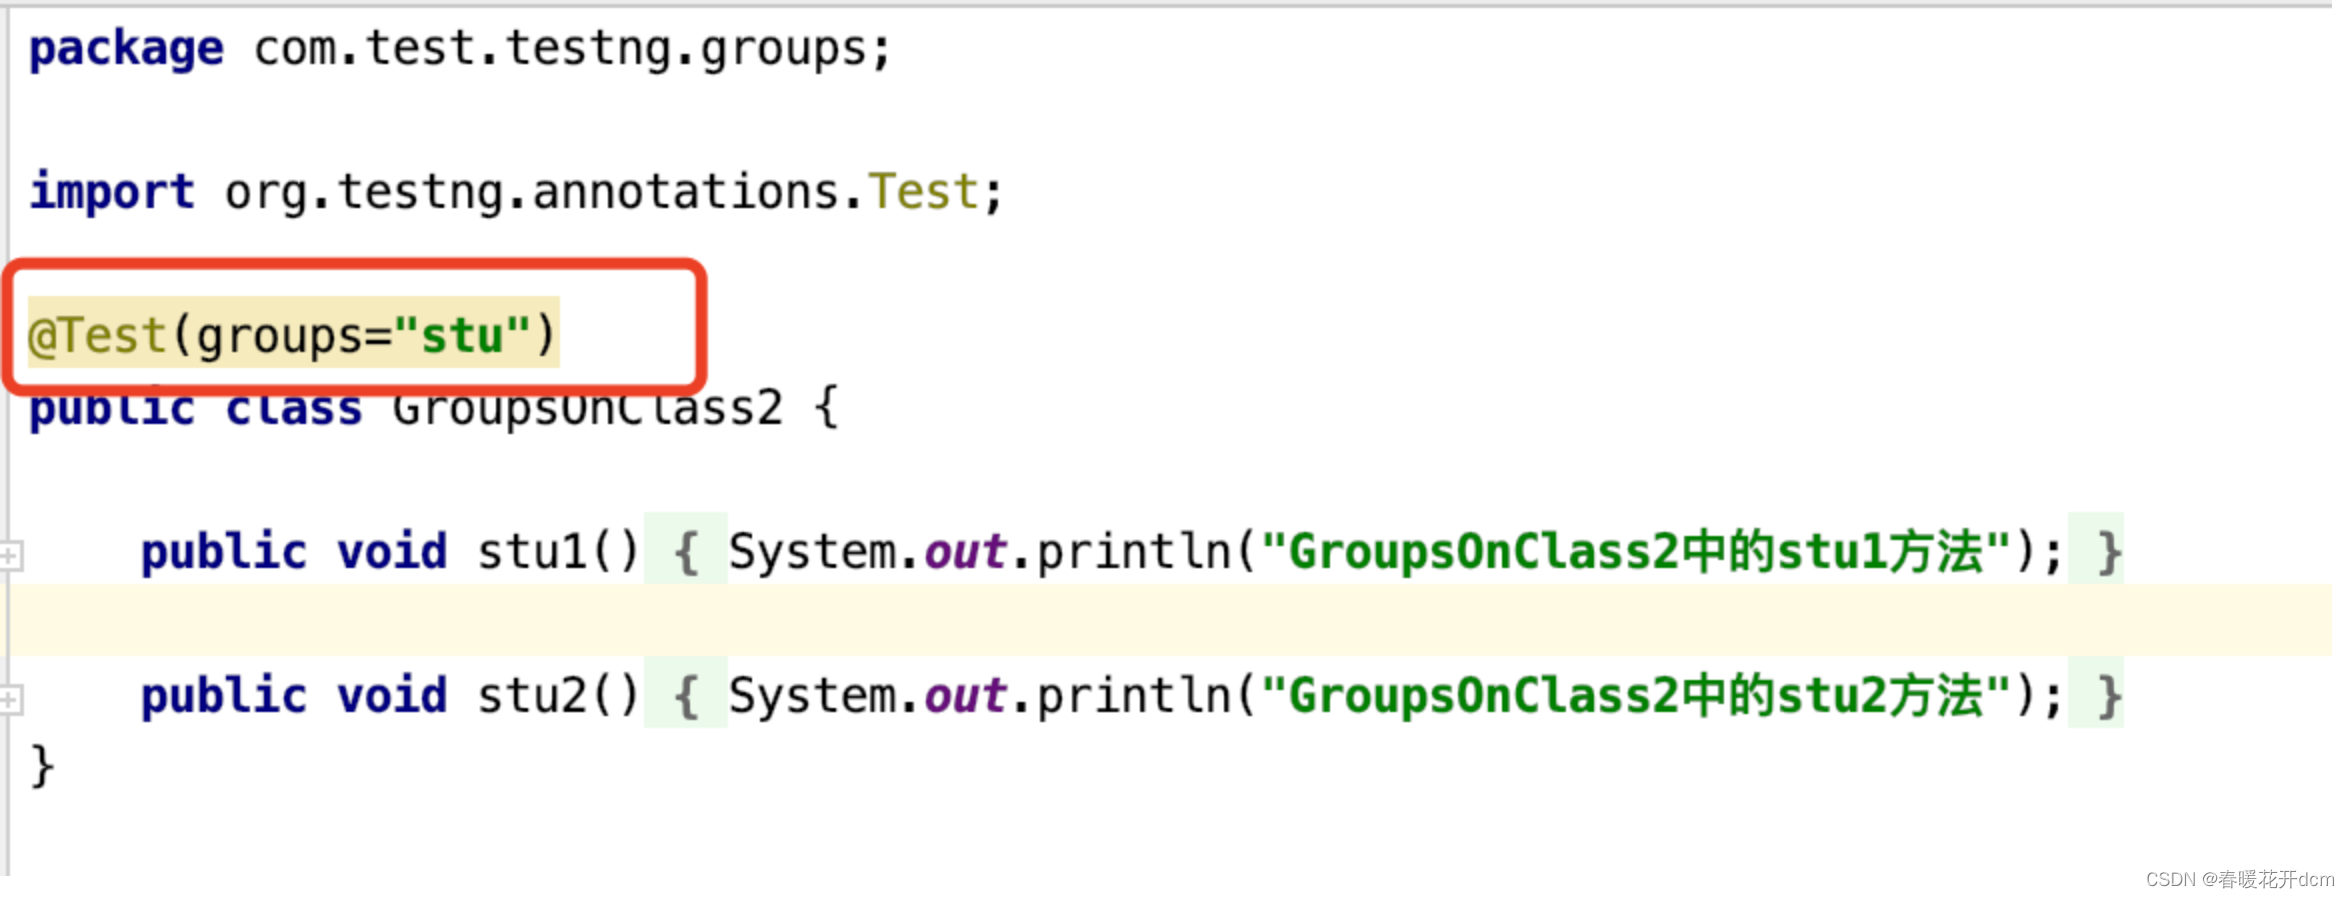
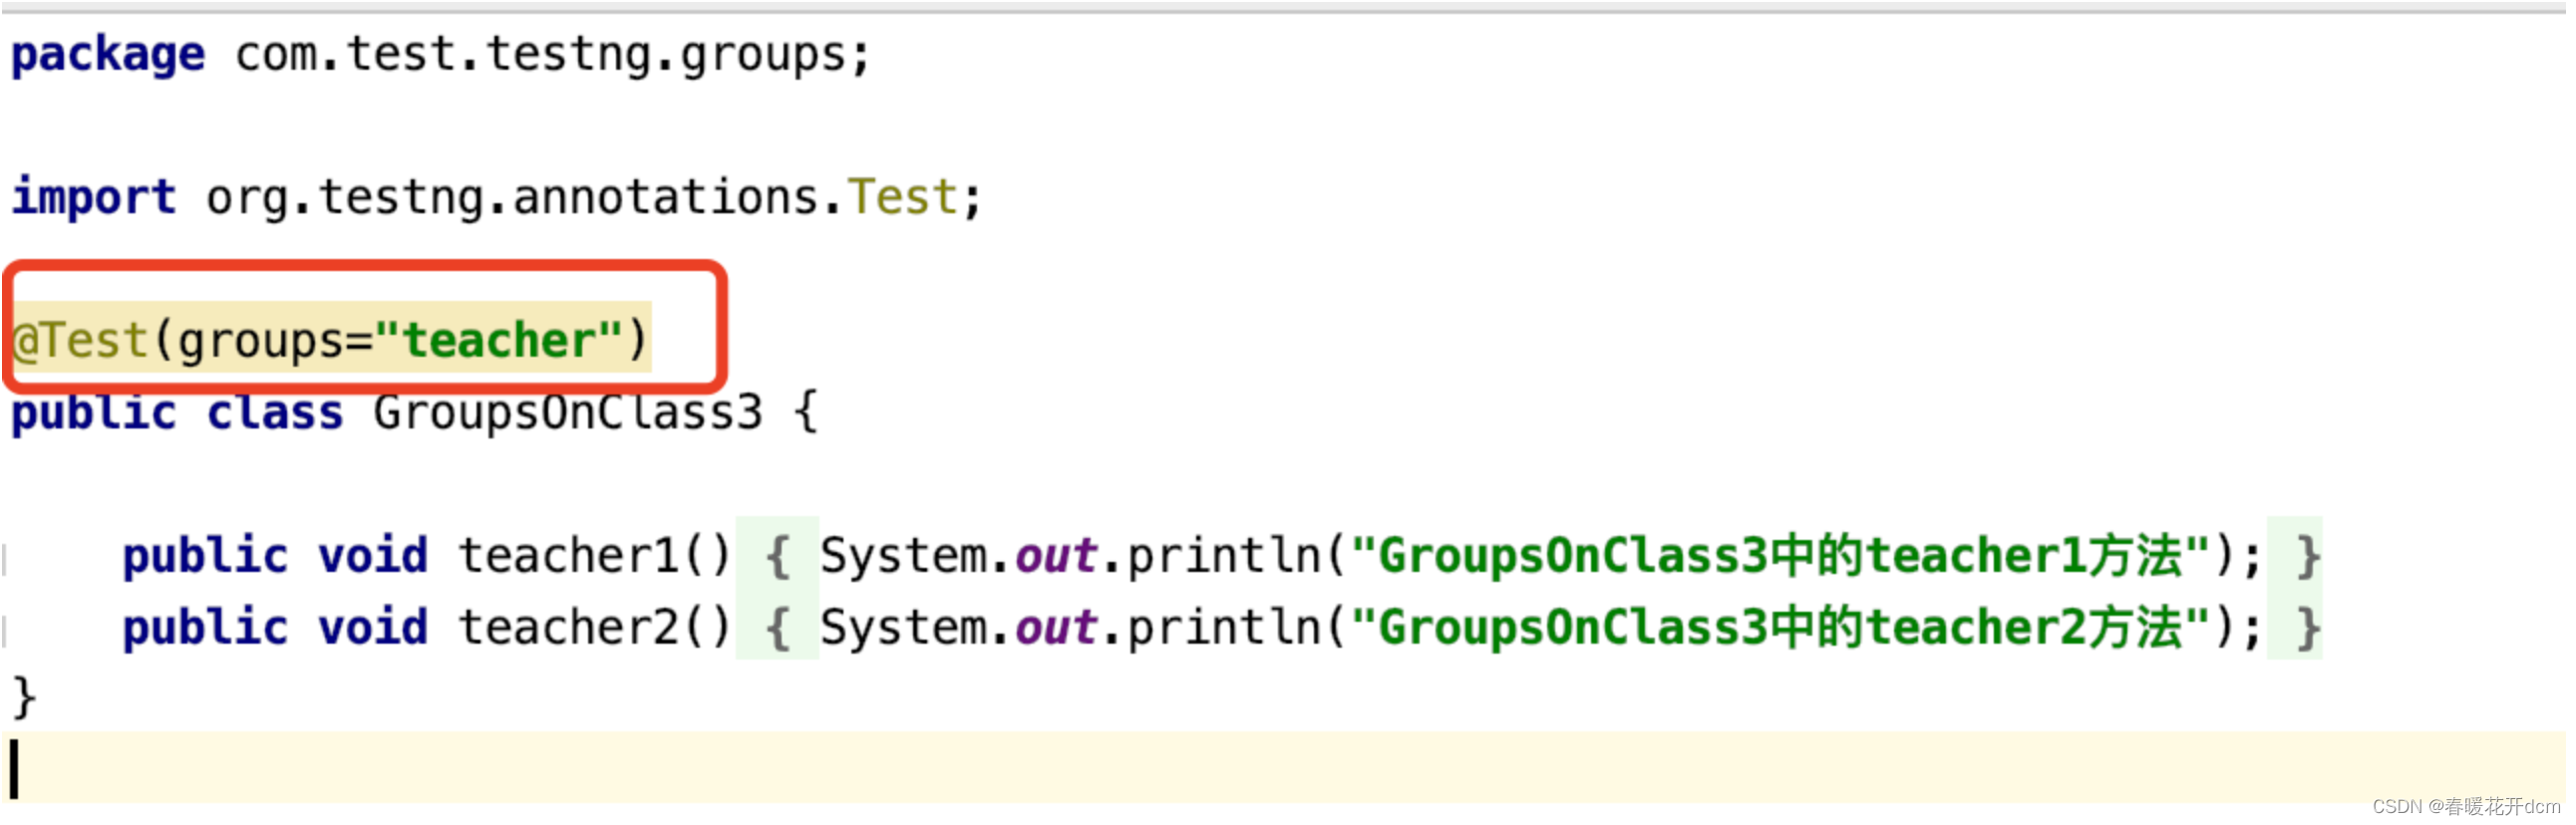
1) In the groups package, create 3 classes: GroupsOnClass1; GroupsOnClass2; GroupsOnClass3;
2) In GroupsOnClass1, create 2 methods, as shown in the figure below. At this time, it should be noted that the @Test tag is written on the class ( Labels can also be written on classes), and then add the attribute groups;
3) In GroupsOnClass2, create 2 methods, similar to GroupsOnClass1, equivalent to two classes of students;
4) In GroupsOnClass3, create 2 methods, as follows As shown in the figure;
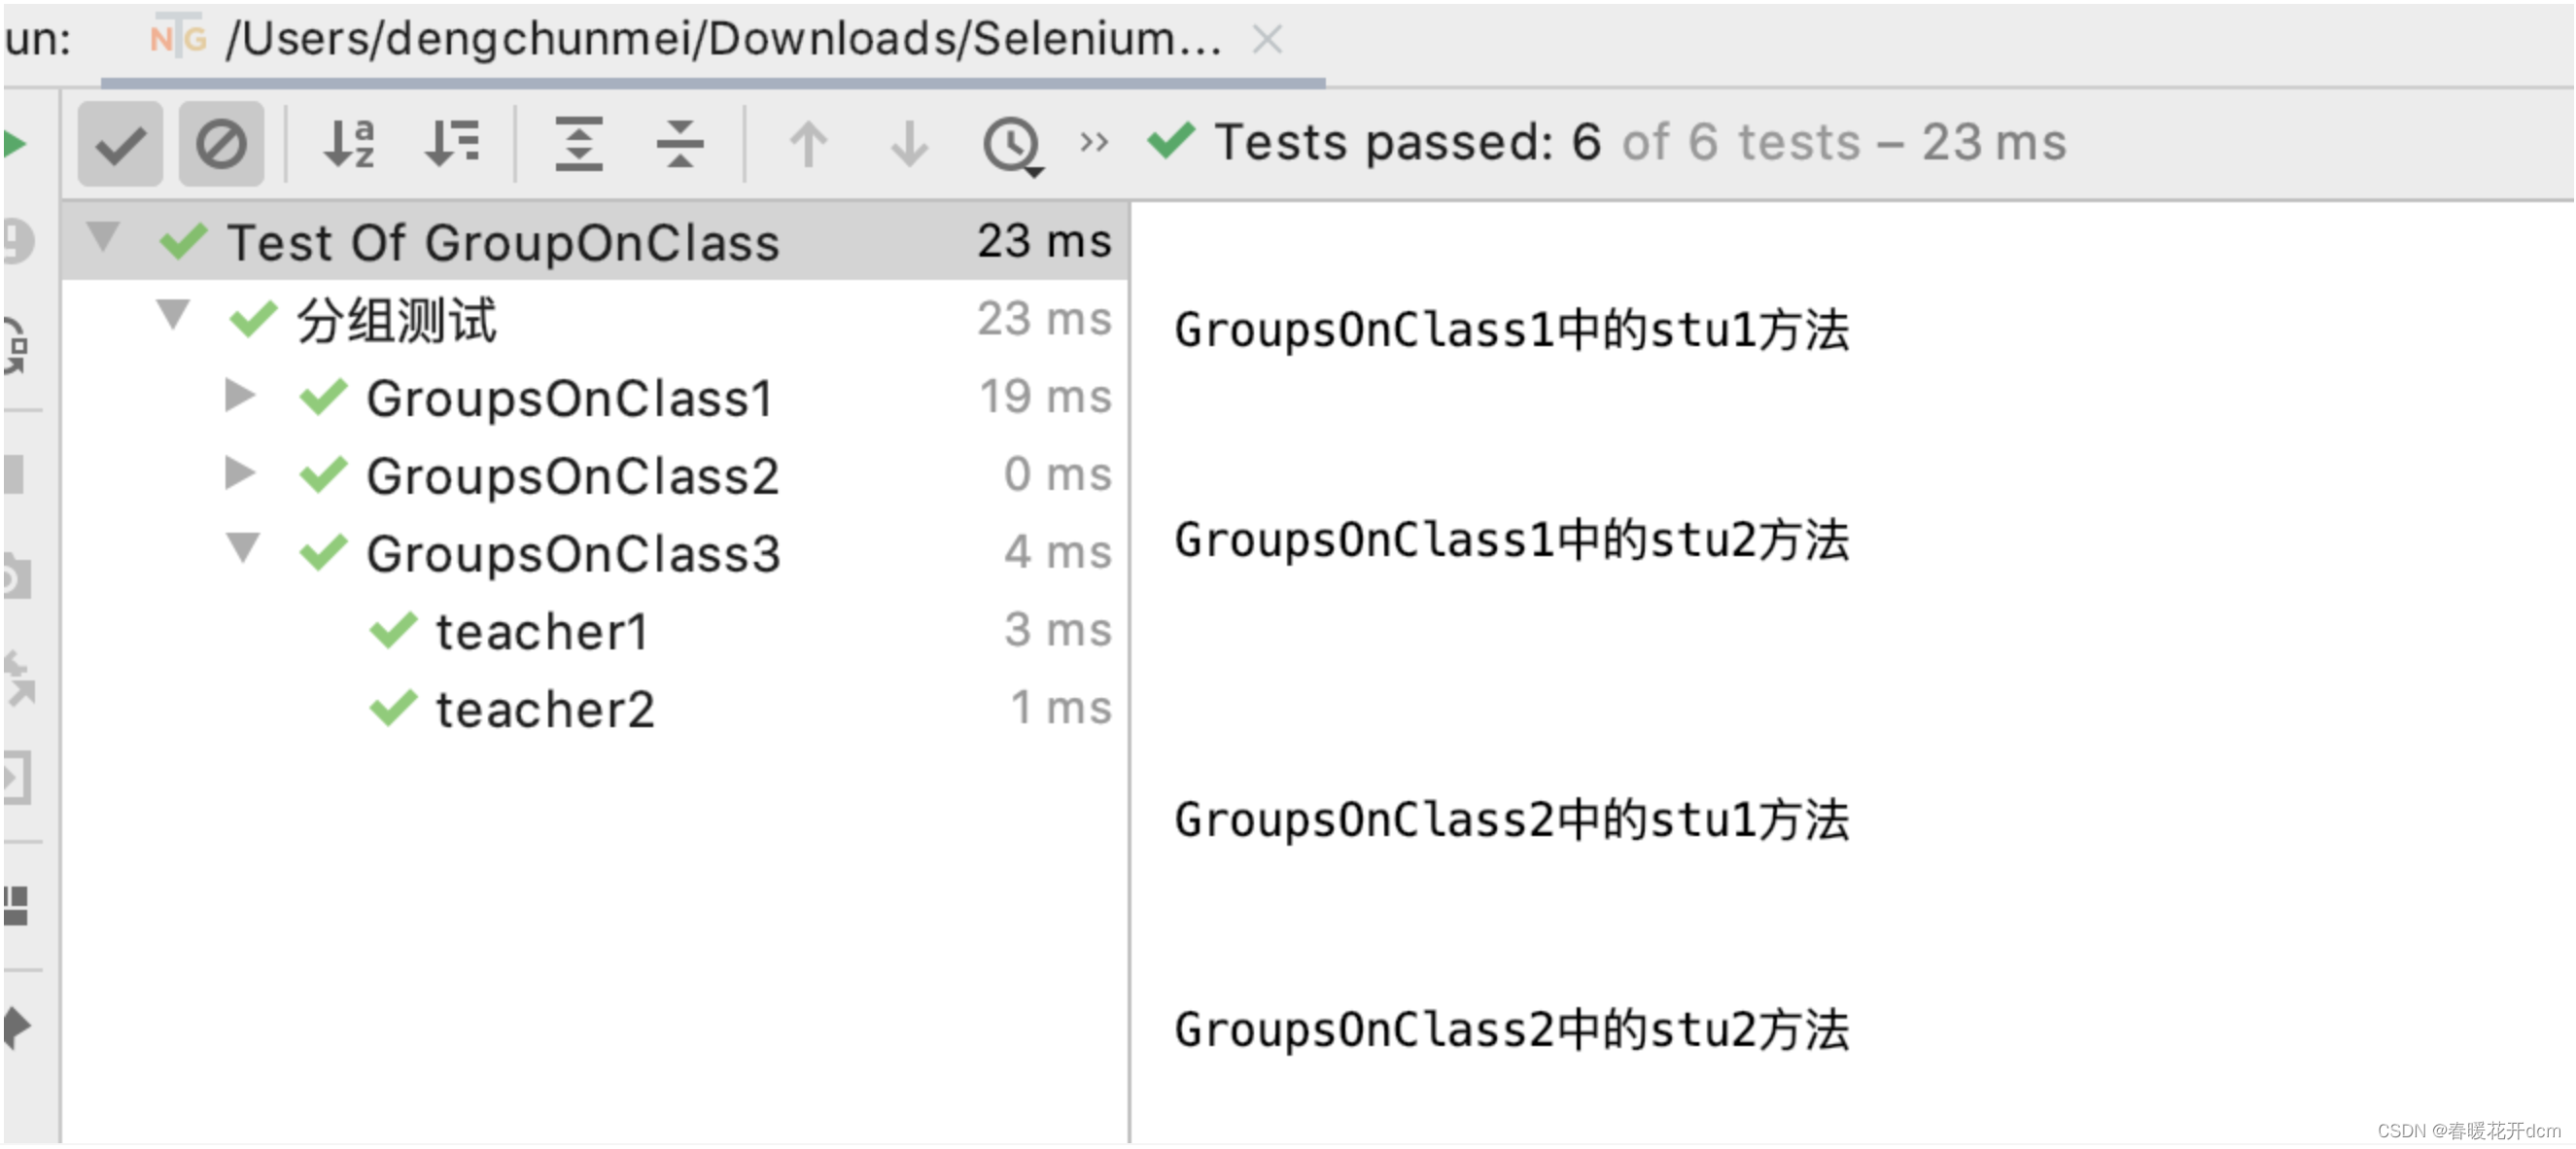
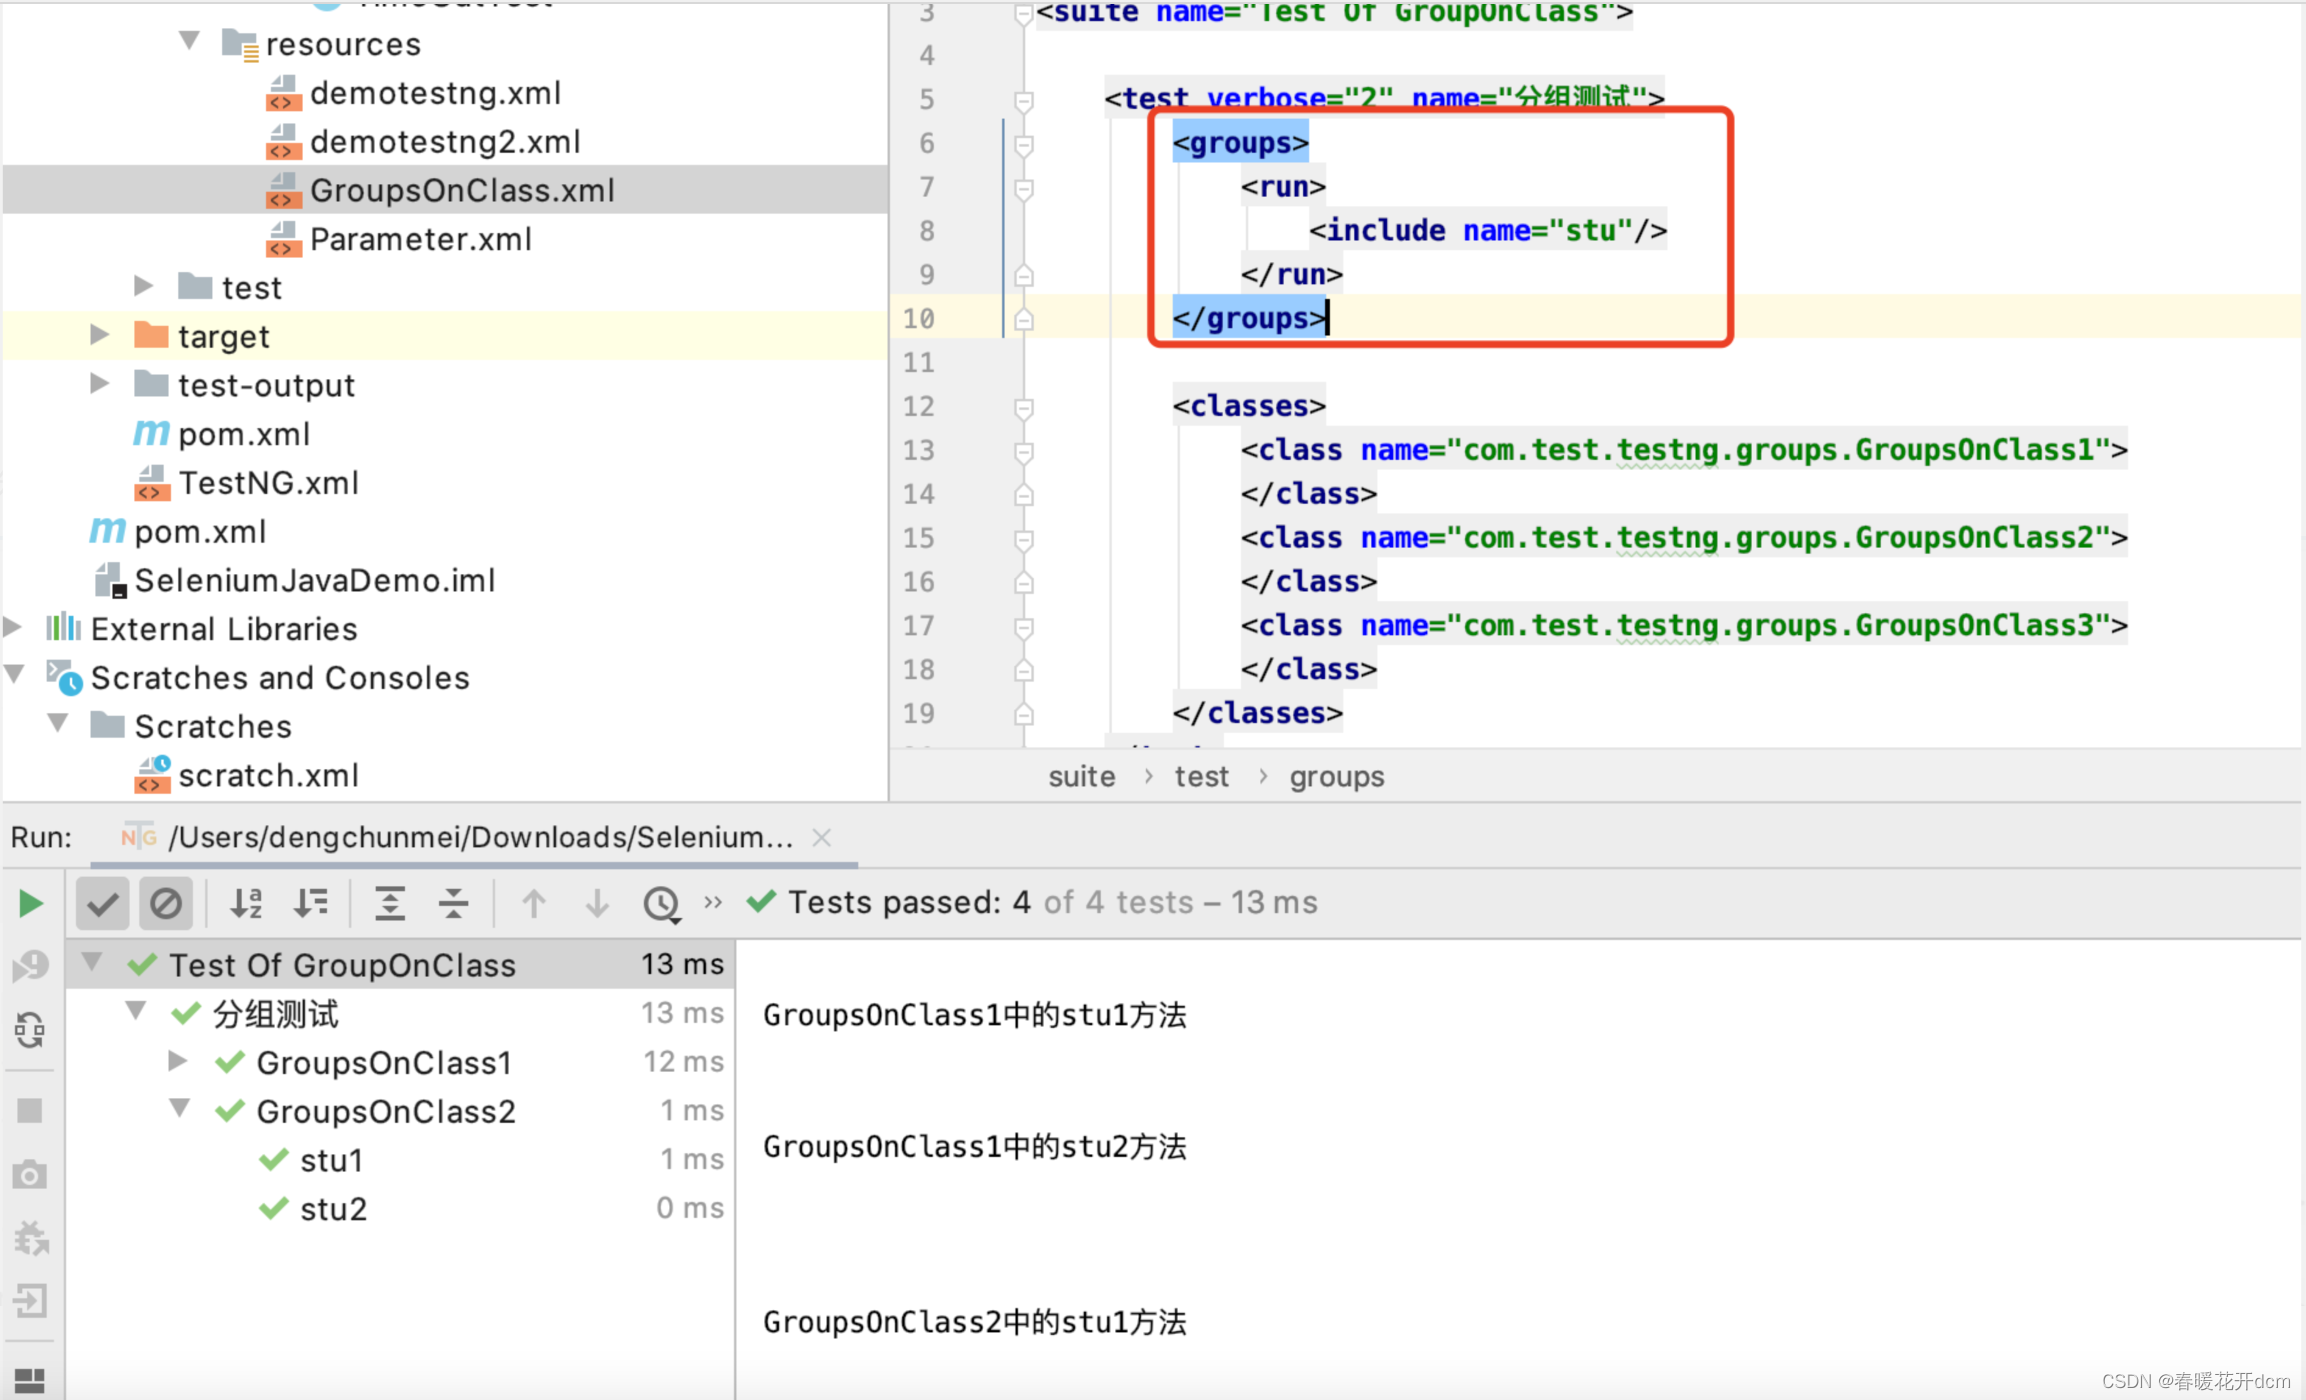
5) Create an xml file in the resources directory: GroupsOnClass.xml, use this file to drive, the content and running results are as shown in the figure below, all groups are run; 6) Only part of the groups are run
, writing and configuration method, as shown in the figure below, the result is that only the classes with the groups name stu will be run.
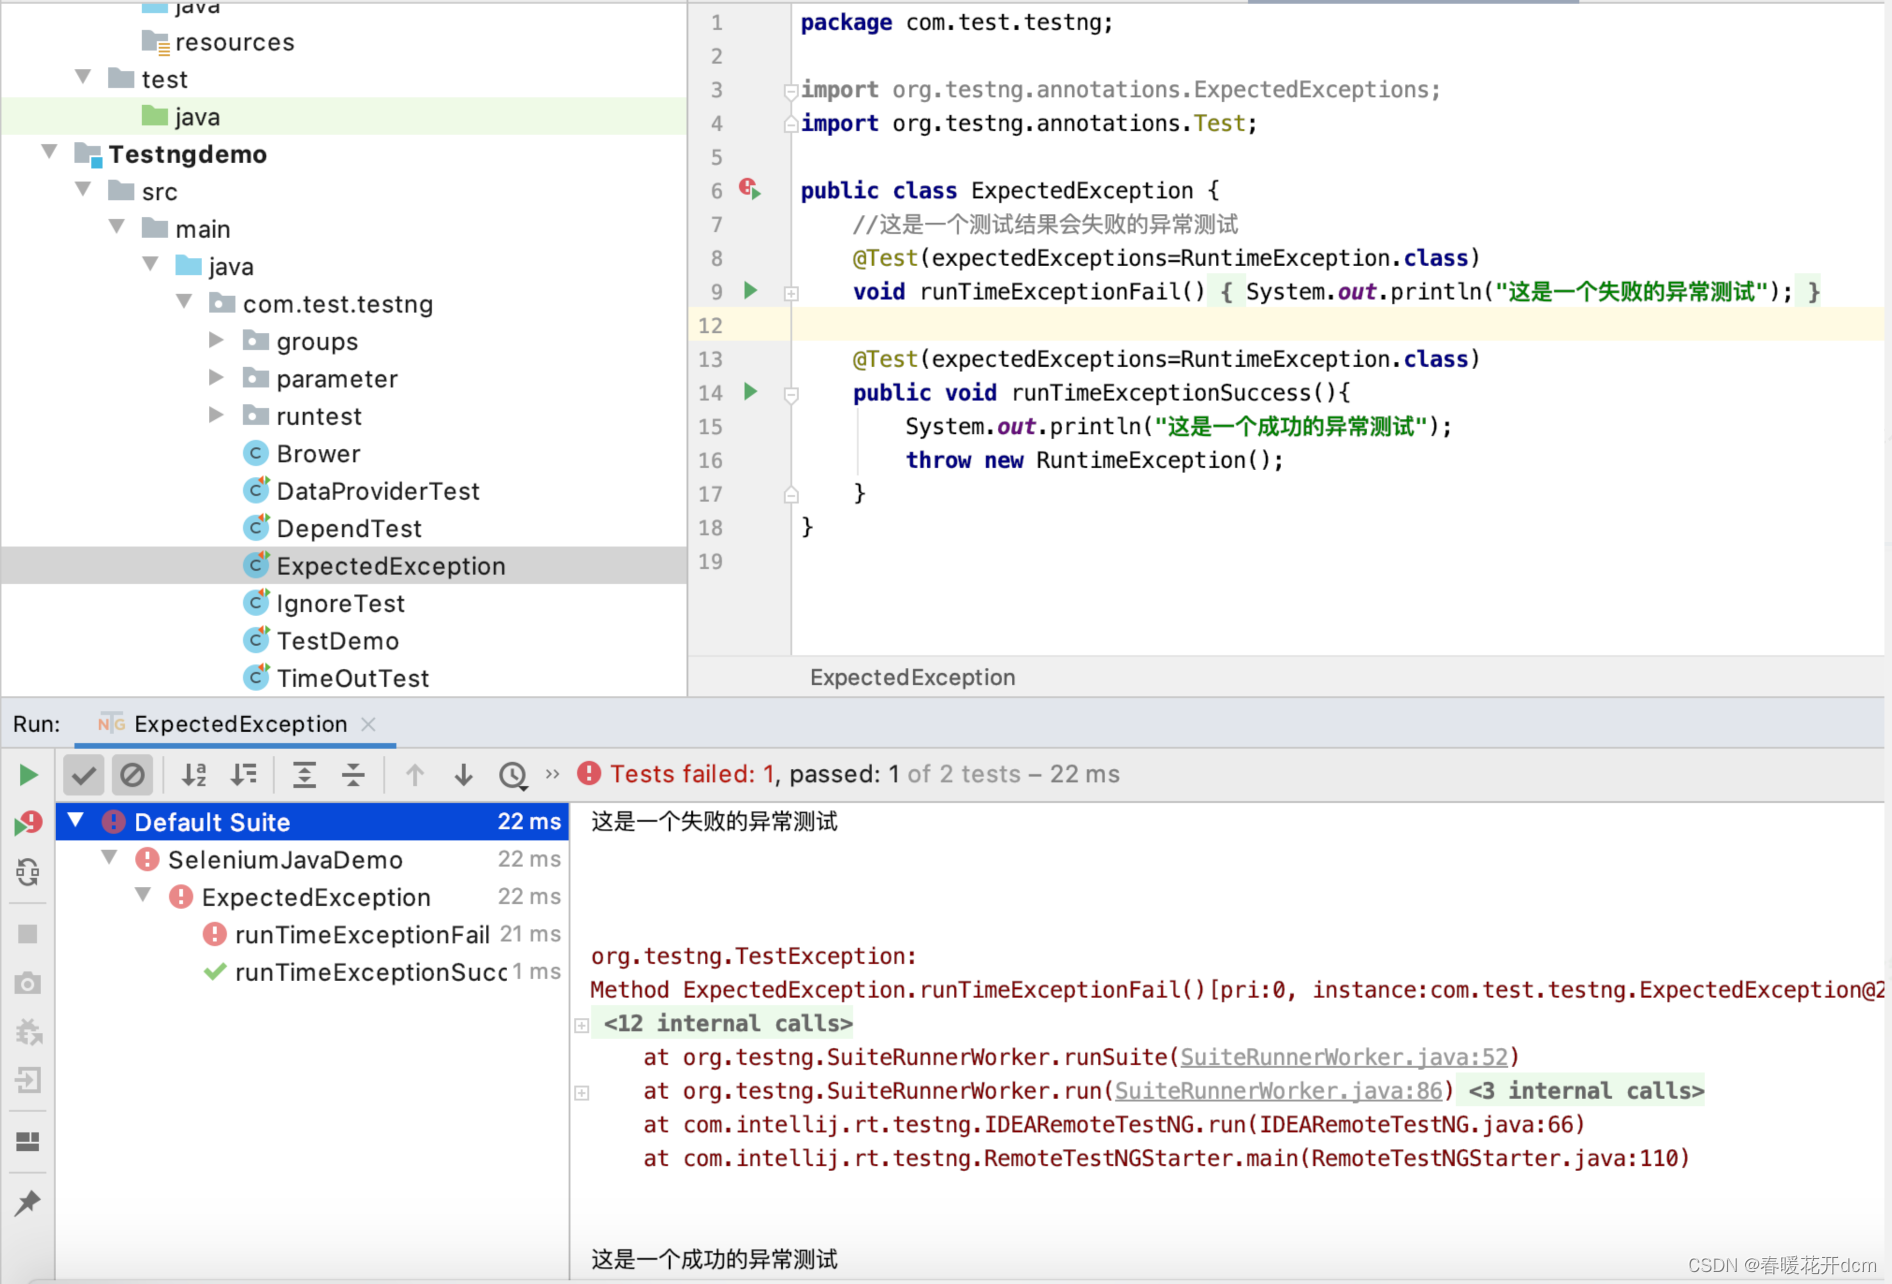
11. Exception testing:
Exception testing is used when we expect the result to be an exception. For example: if some illegal parameters are passed in, the program throws an exception.
1) Create a new class, ExpectedException;
2) Create 2 methods, as shown in the figure below. In the exception test, the expectedExceptions attribute in the @Test tag is used. According to the results, you can see that one is successful (i.e. method 2). You need to Add the statement throw new RuntimeException() to the method. It should be noted that the content after this statement will not run, so you must pay attention to the order.
12. Dependency testing
TestNGINX dependency method means that this test method depends on other methods when executed. for example:
1) Create a Java class: DependTest;
2) Create 2 methods: test1 and test2, where test2 depends on test1, that is, test1 must be executed first. If test1 fails, test2 will not be executed. The attribute dependsOnMethods of the @Test tag is used here. The specific writing method is as shown in the figure below. Only test2 is run. As a result, you can see that test1 is also executed;
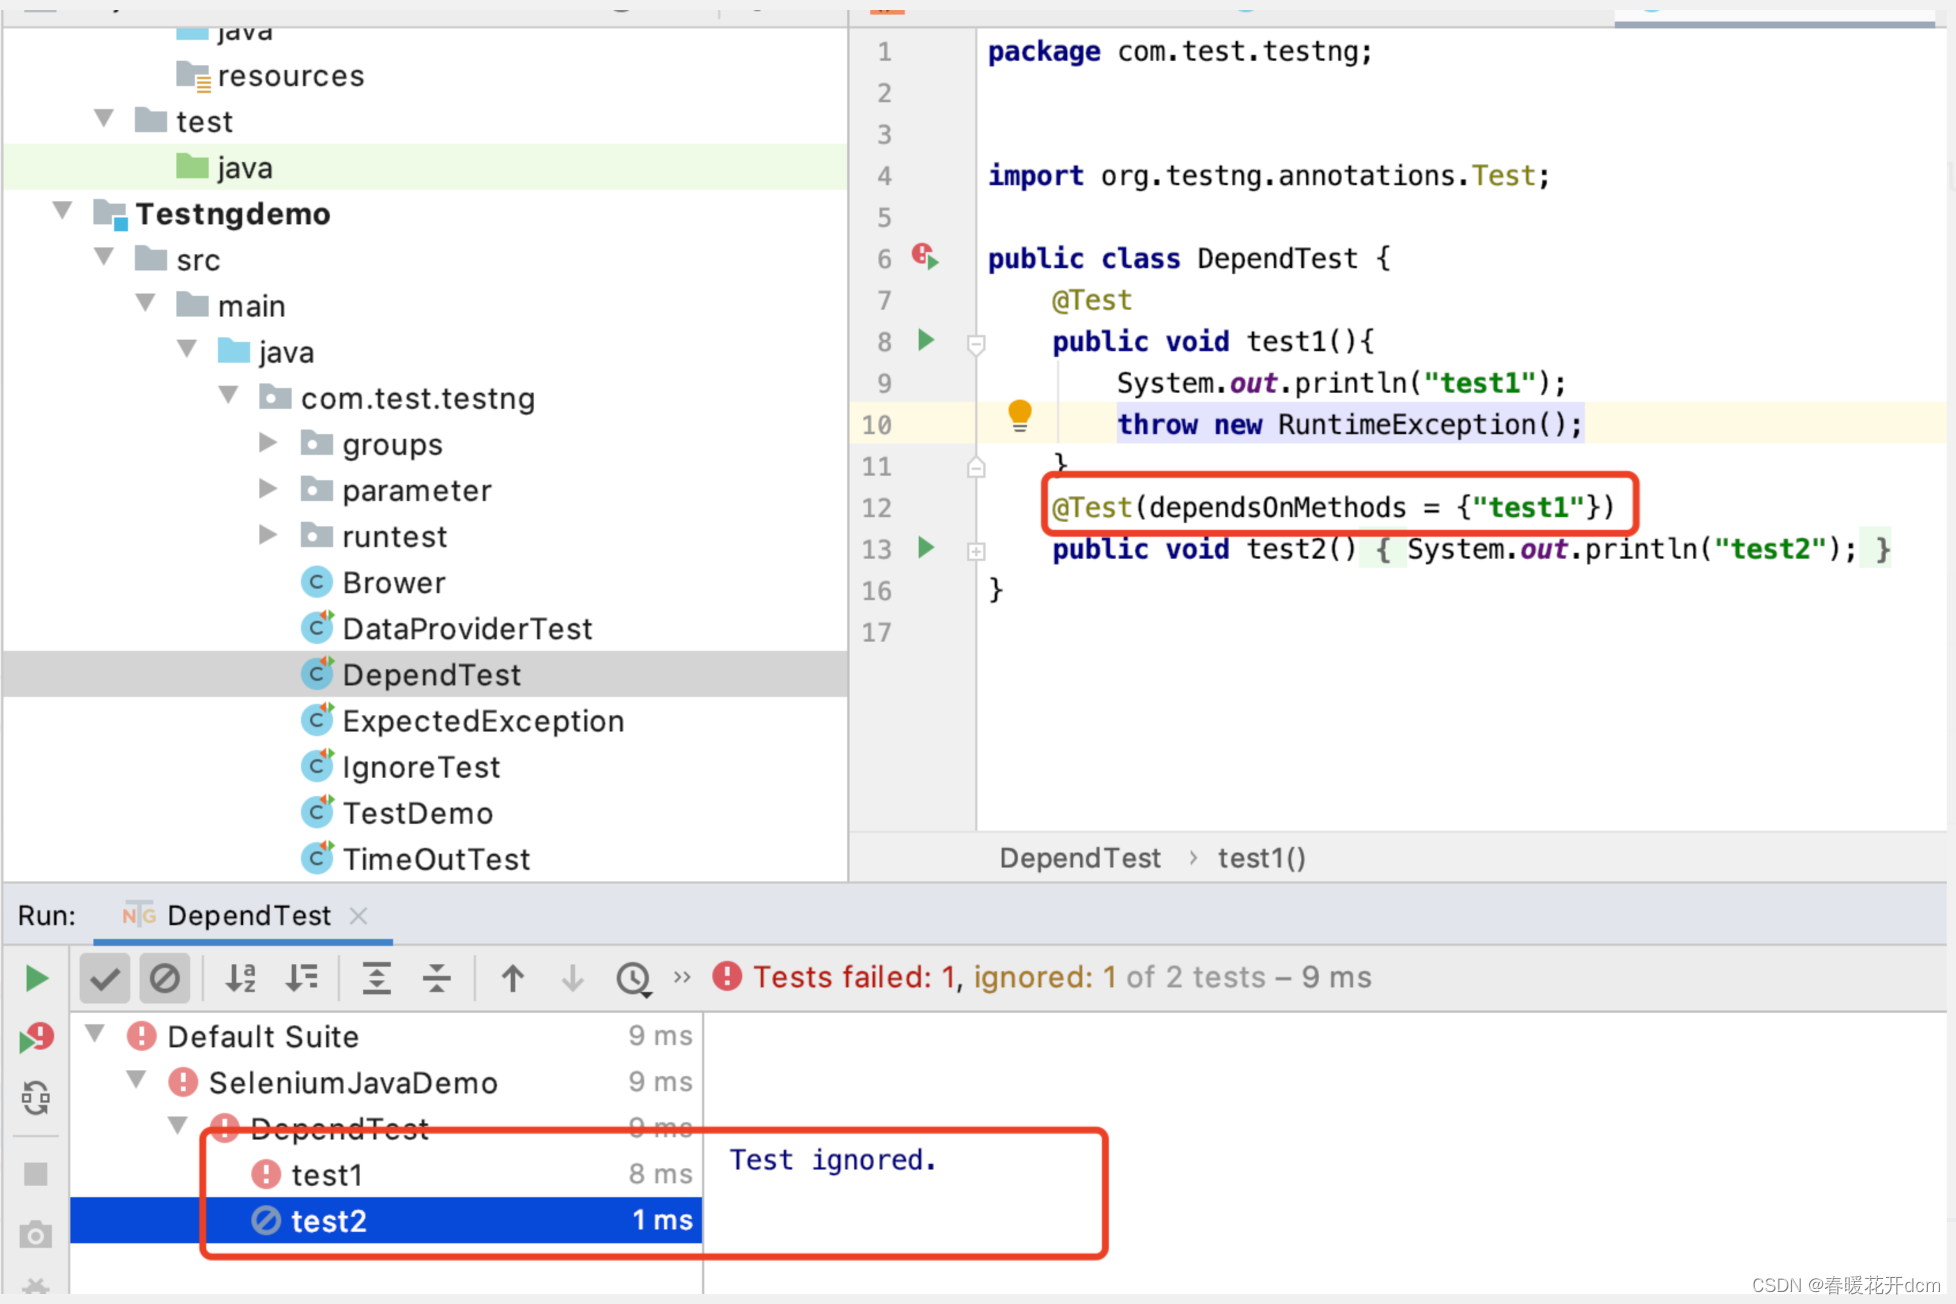
3) Add the statement to test1: throw new RuntimeException() to throw an exception. At this time, if you run test2 again, the result will be 1 failed, 1 ignored. When doing dependency testing, if the dependent method fails to execute, the dependent method will be ignored and will not be executed. It can be used when making preconditions in actual scenarios.
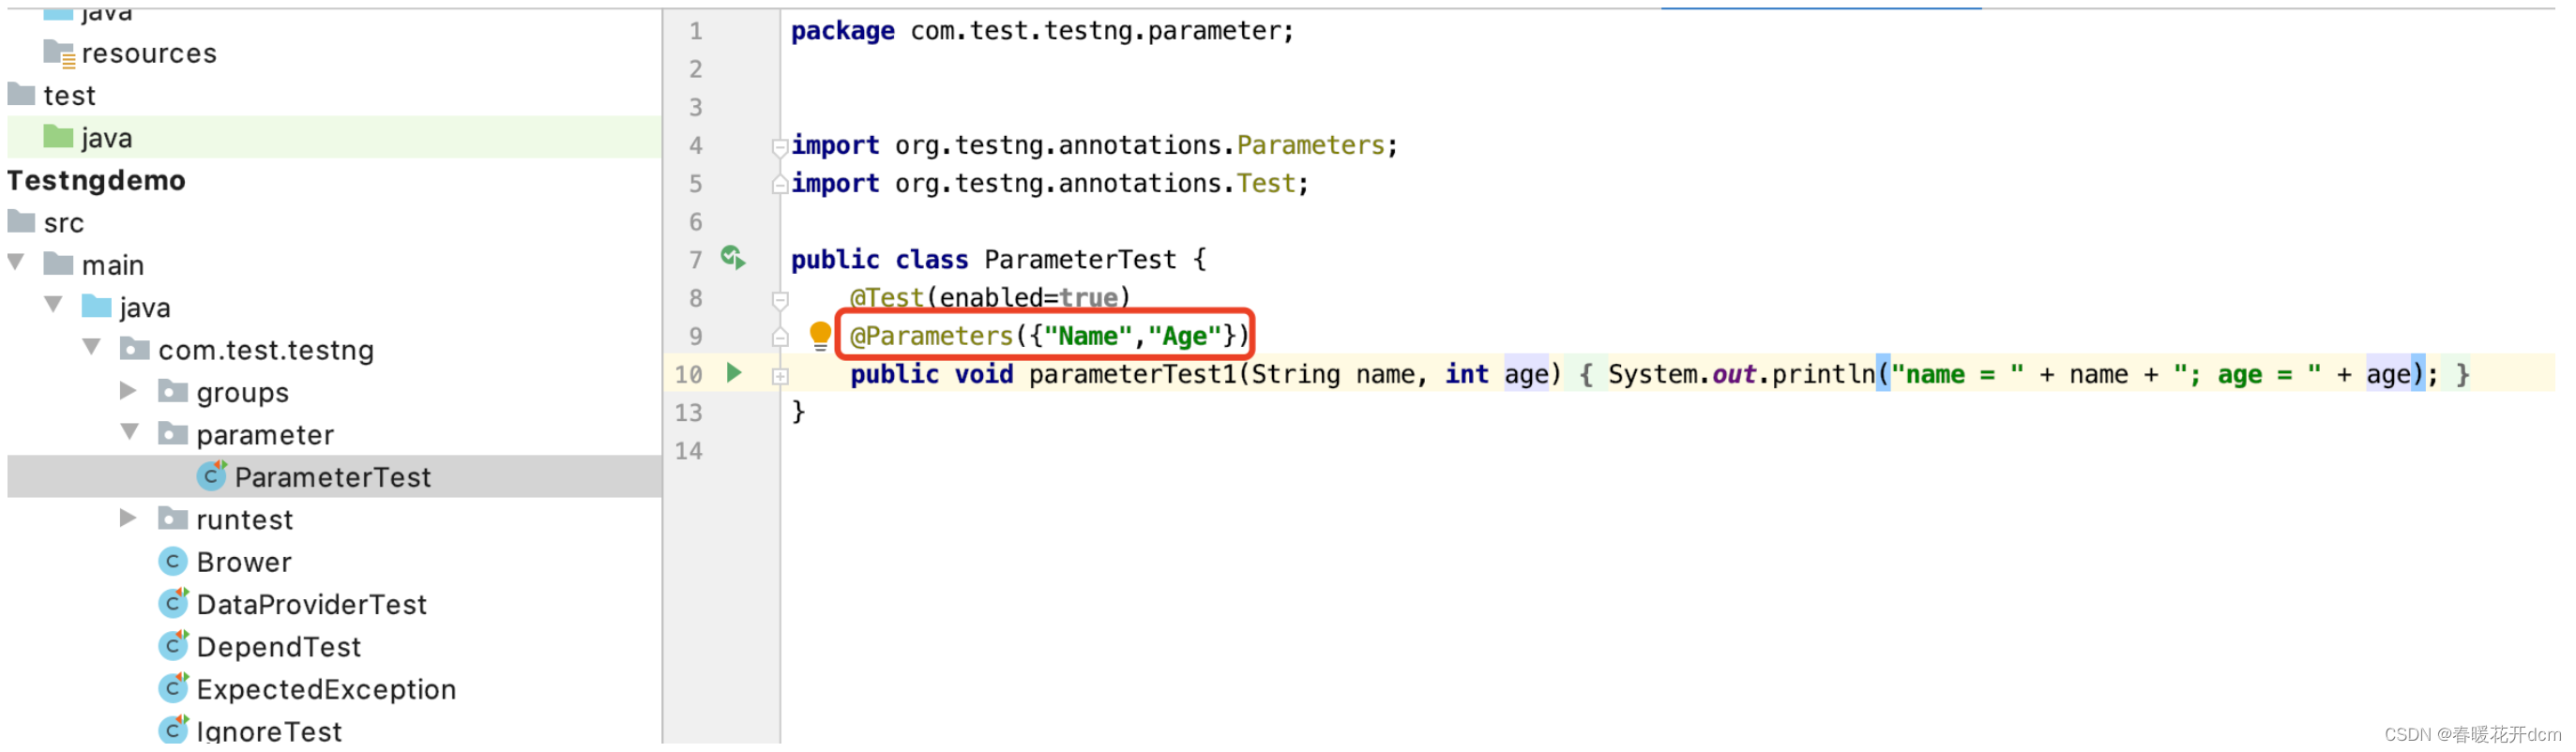
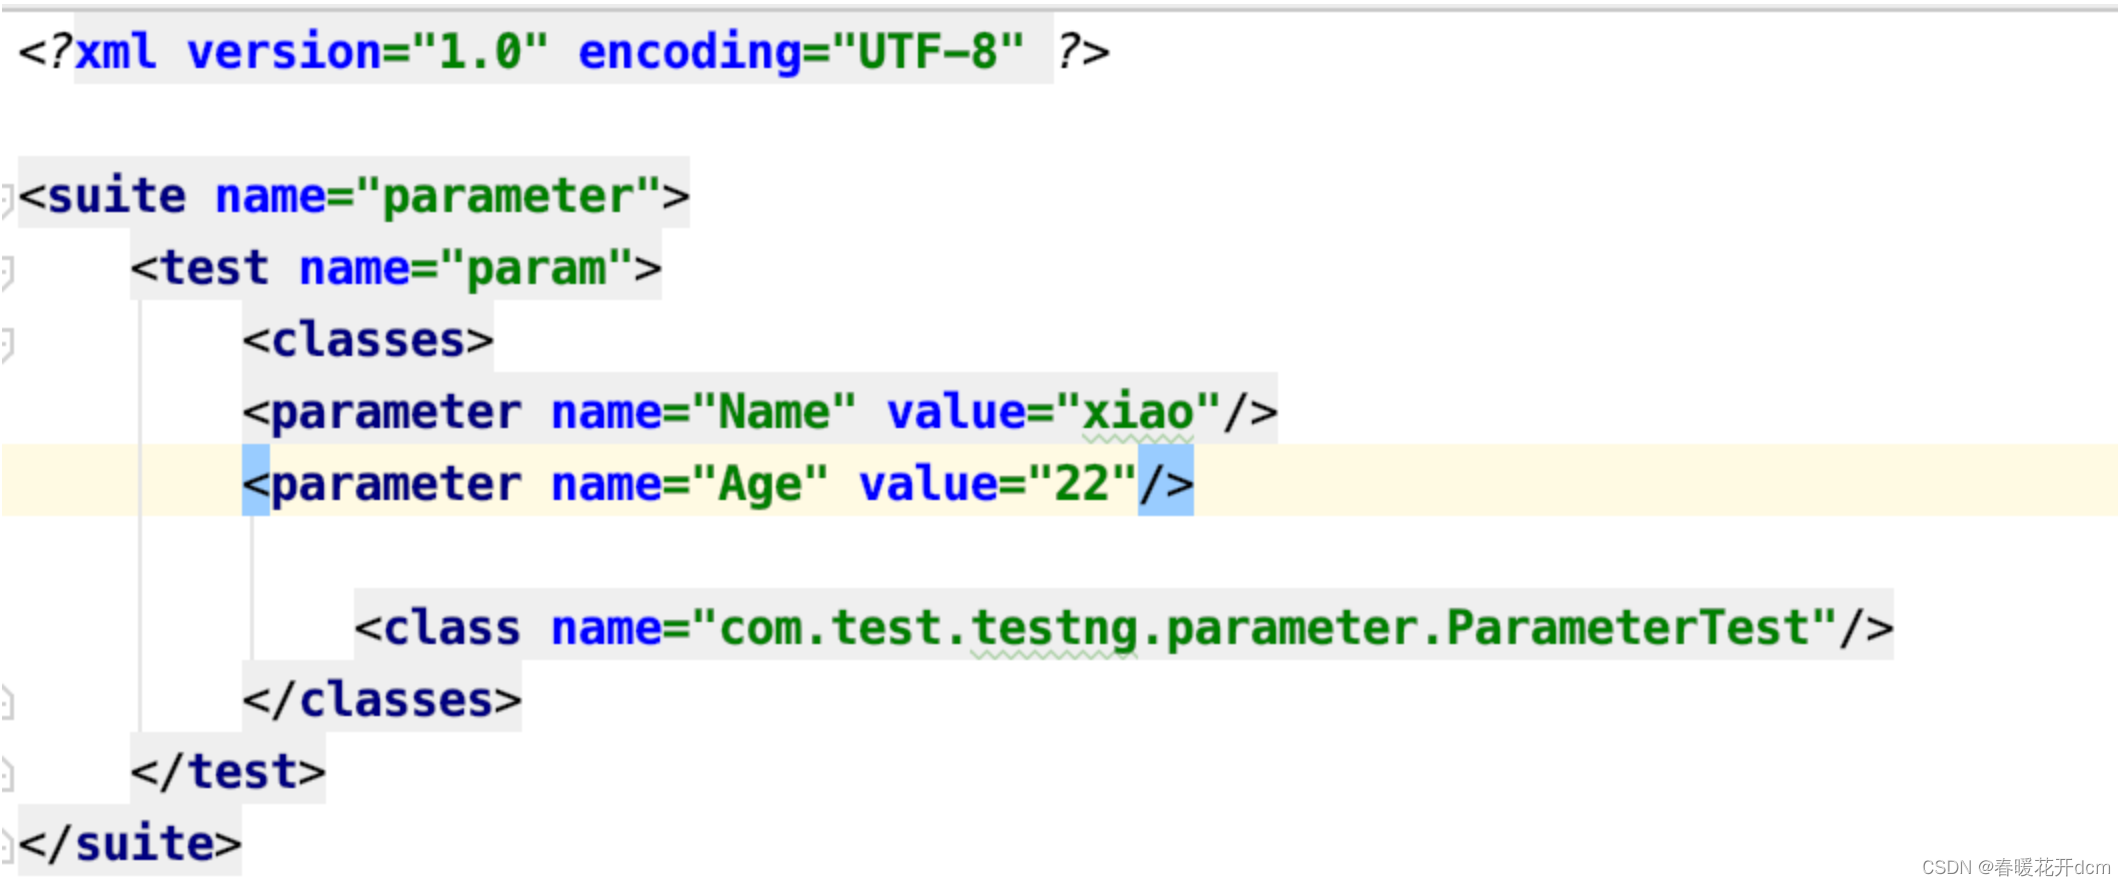
13. Parameterized test-xml file parameterized
TestNGINX allows parameters to be passed in TestMethod and methods annotated with @Before/After class annotations and @Factory class annotations. There are two ways to pass parameters, one is to use xml file configuration, and the other is to pass parameters in an encoding manner. This summary introduces the configuration method using xml files. Example:
1) Create a new package parameter (New->Package);
2) Create a new class ParameterTest, and create a new method parameterTest in the class, as shown in the figure below, a new tag is used here: @Parameters;
3) In the resources directory Next, create a new xml configuration file for passing parameters. The content is as shown in the figure below, and it will run successfully.
14. Parameterized testing - DataProvider parameterization
The previous summary described how to pass parameters through xml, this section describes another way.
- Create a new class DataProviderTest;
- Create two new methods, testDataprovide and ProviderData. The ProviderData method provides the data source and returns the form Object. Note that the attribute value of dataProvider in the @Test tag on the testDataprovide method must be consistent with the attribute value of name in the @DataProvider tag on the ProviderData method.
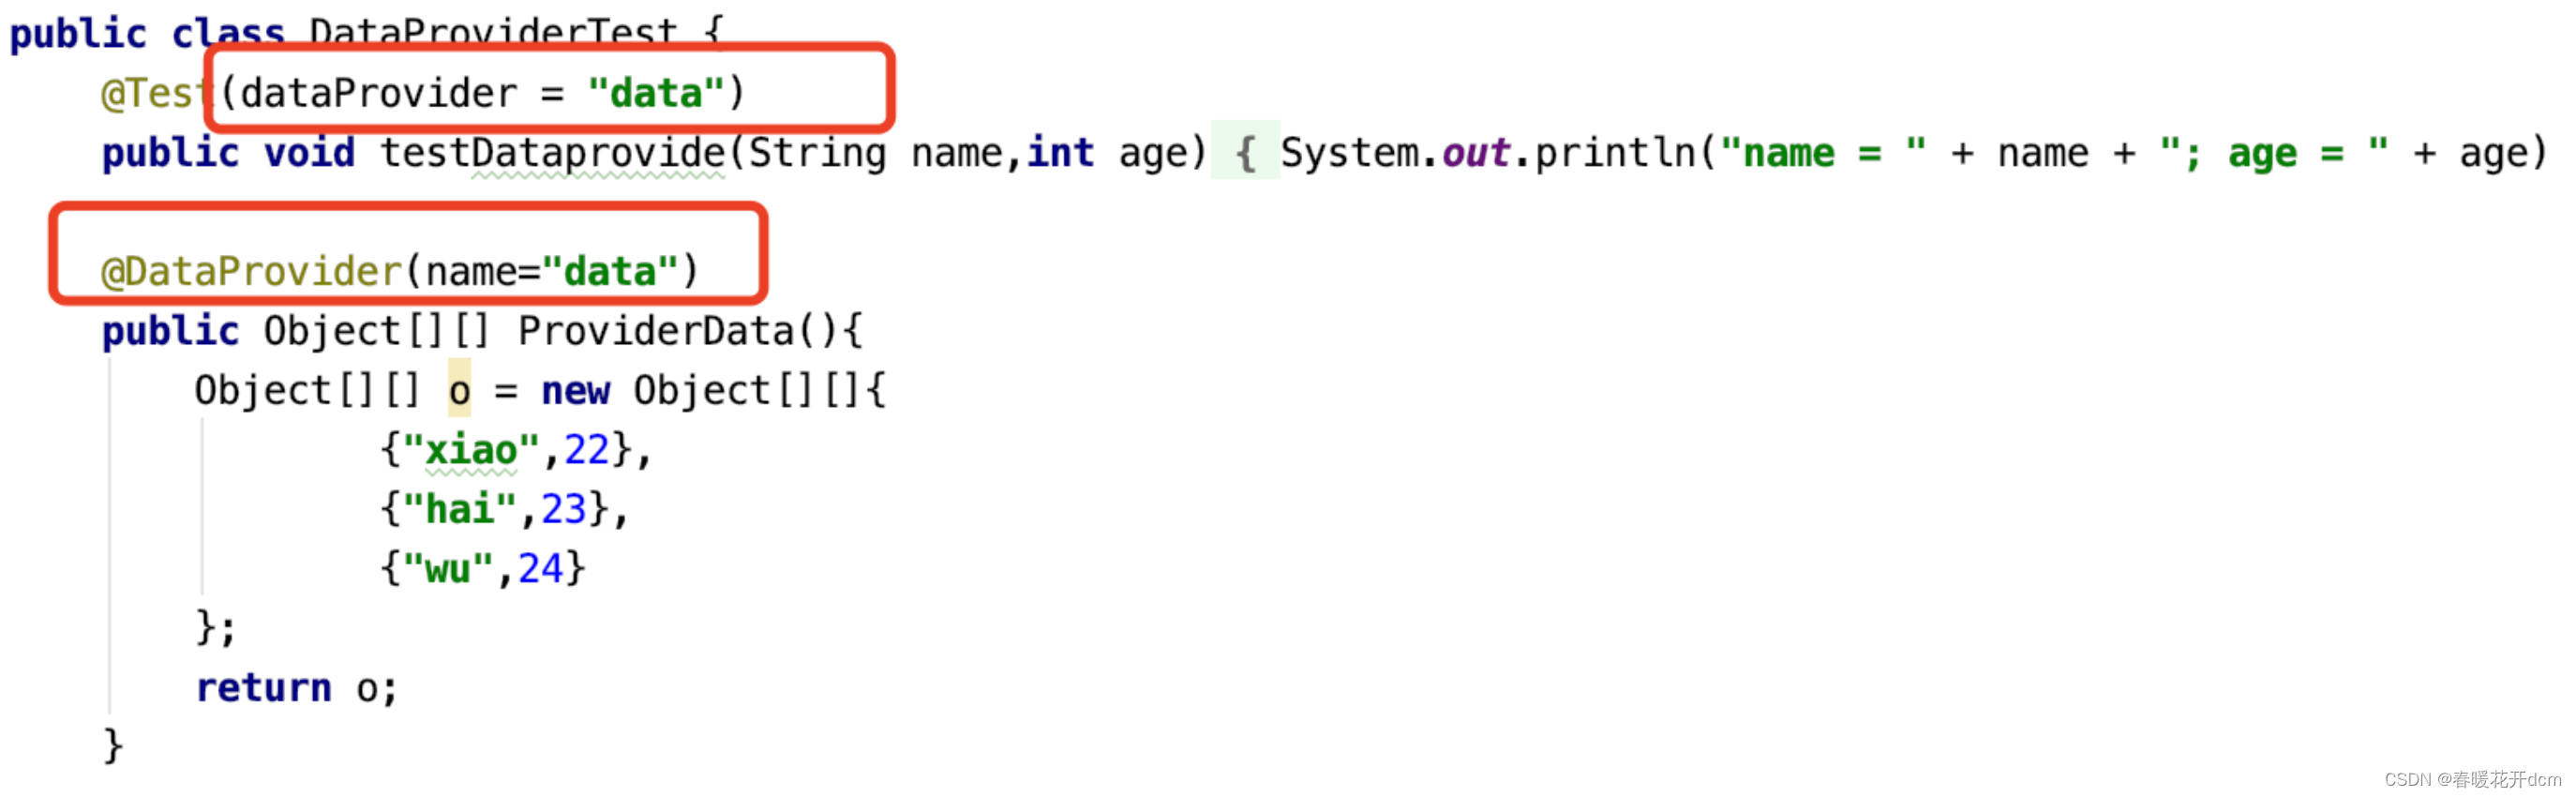
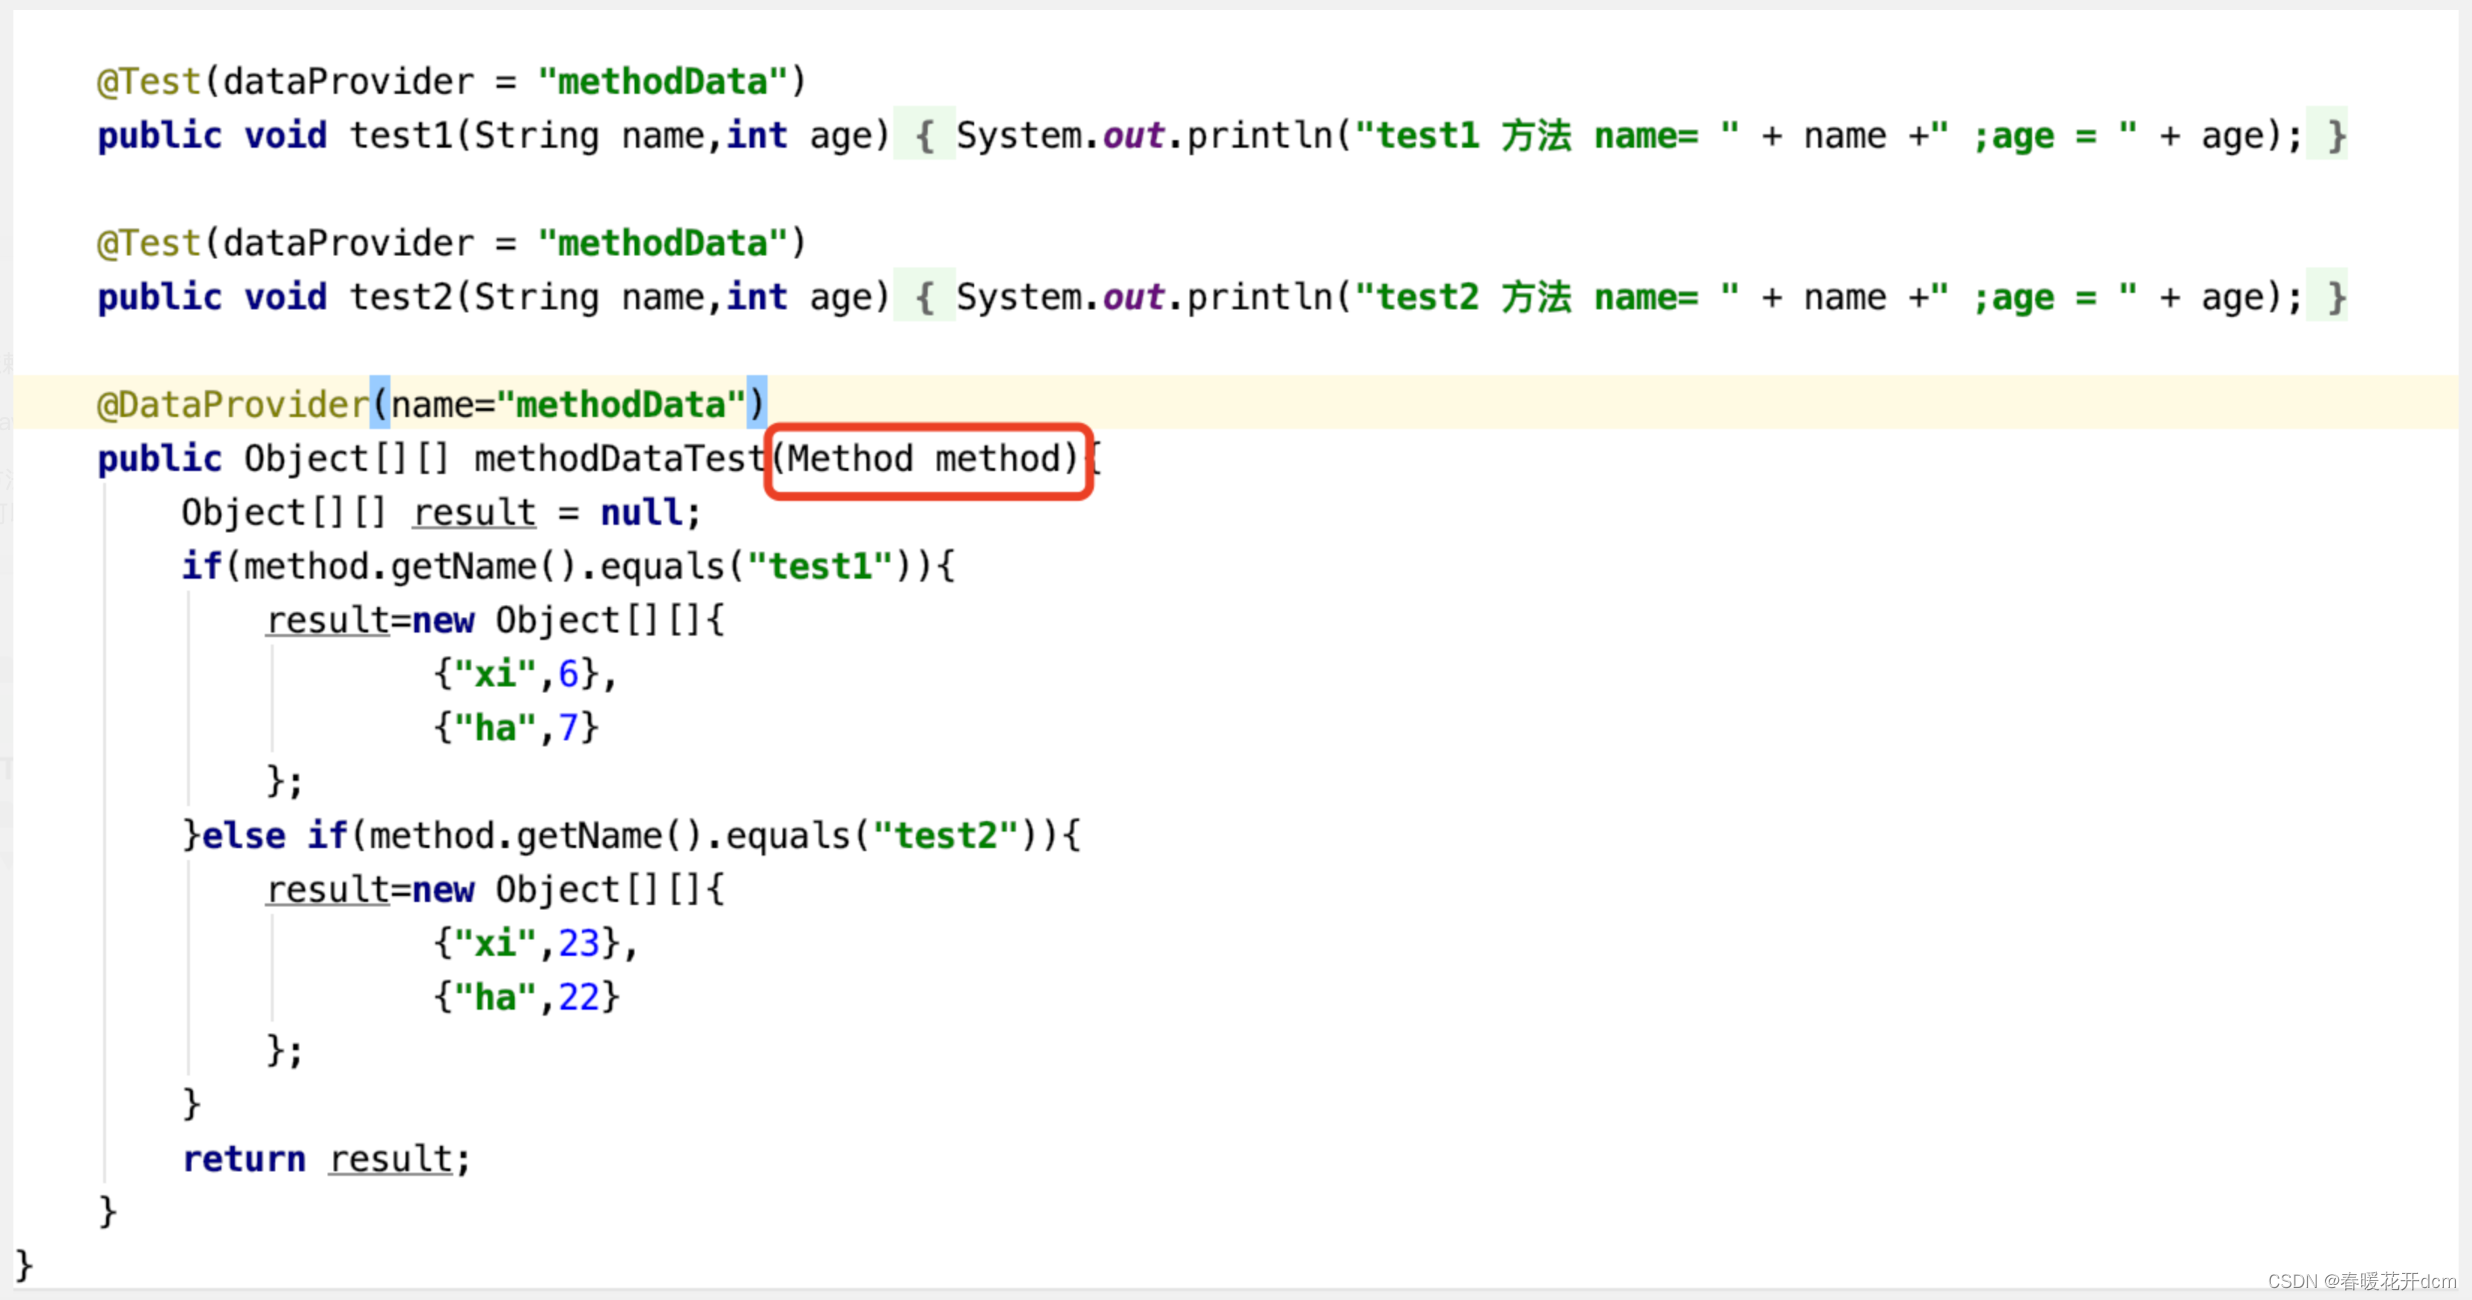
The above is how to transfer data using DataProvider. In addition, DataProvider supports parameter passing according to methods, and different parameters are passed through different methods. Example:
Create three new methods: test1, test2 and methodDataTest. Methodmethod must be filled in the methodDataTest method. , which means that the test1 and test2 methods will be automatically passed in, and different parameters will be passed for different method names.
15. Timeout test
Timeout test is relatively simple, mainly using the timeOut attribute in the @Test tag, the unit is milliseconds, examples:
1) Create a new class TimeOutTest;
2) Create two new methods, testSuccess and testFail, method one is at 3000 milliseconds A response is given within 2000 milliseconds, no exception is thrown, and the operation is successful. Method 2 does not receive a response within 2000 milliseconds, an exception is thrown, and the operation fails.
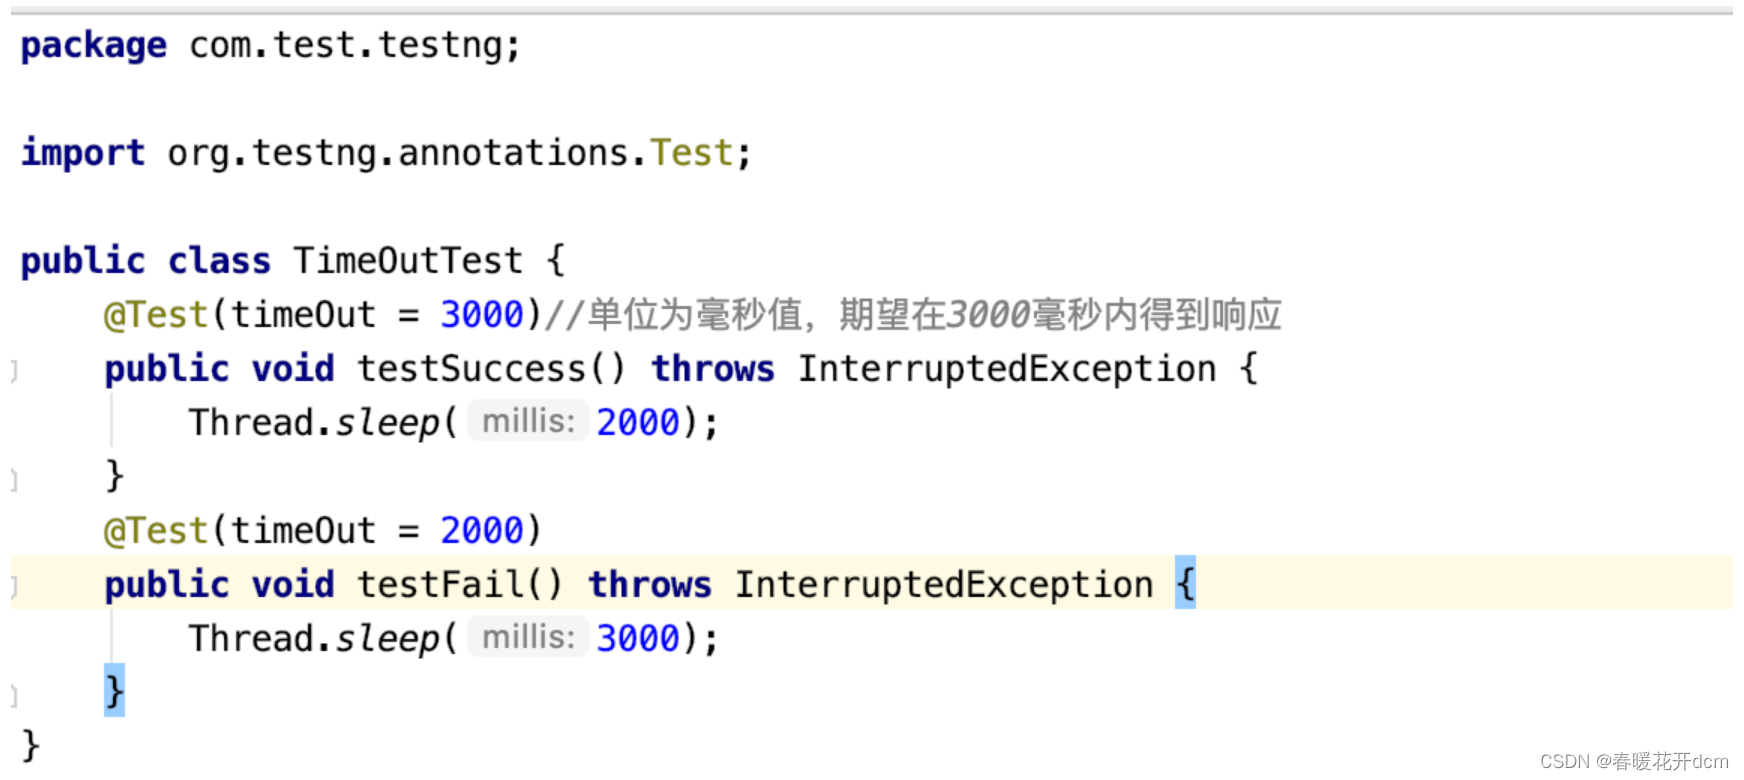
Timeout test usage scenarios, for example: if there is no response after a certain period of time during the test and you want to skip it, you can use the timeout test.
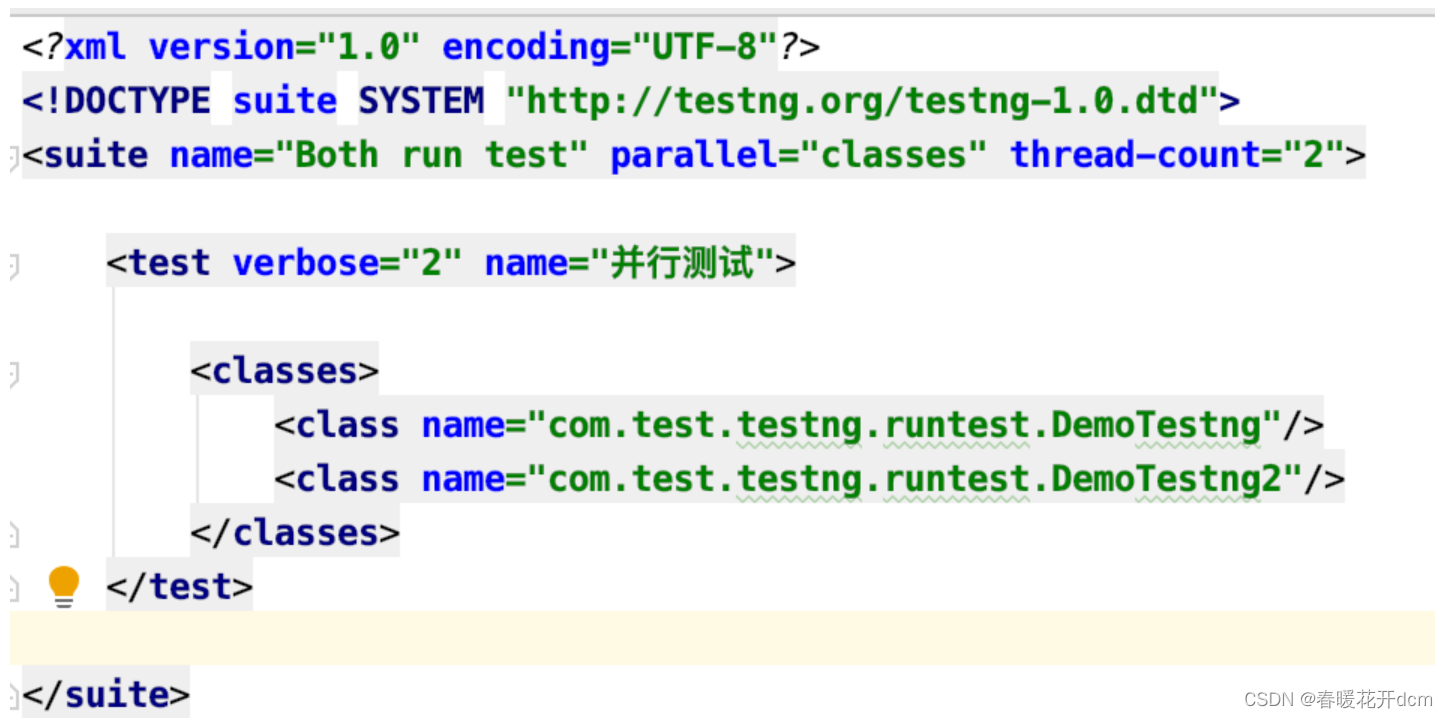
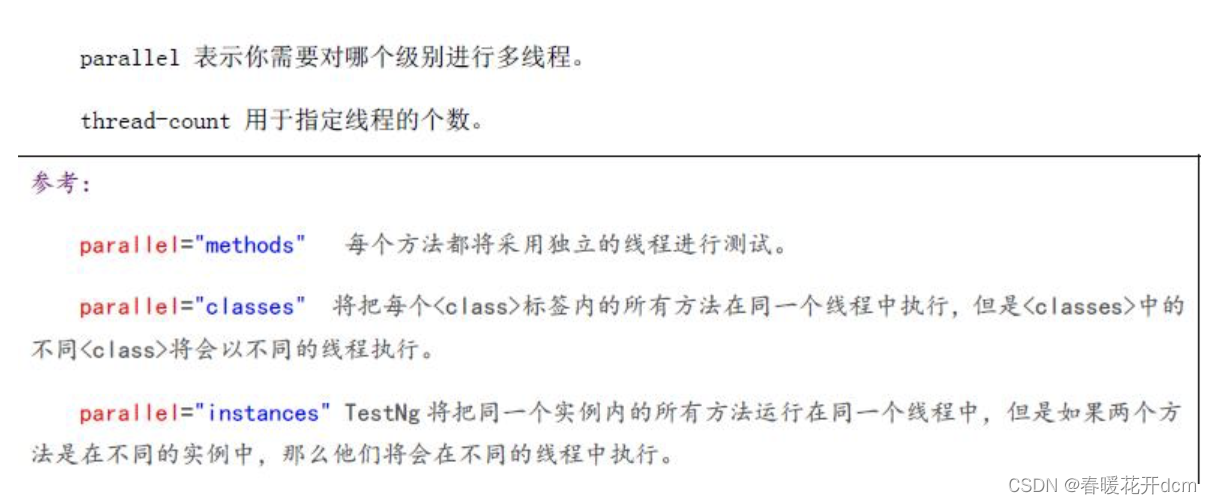
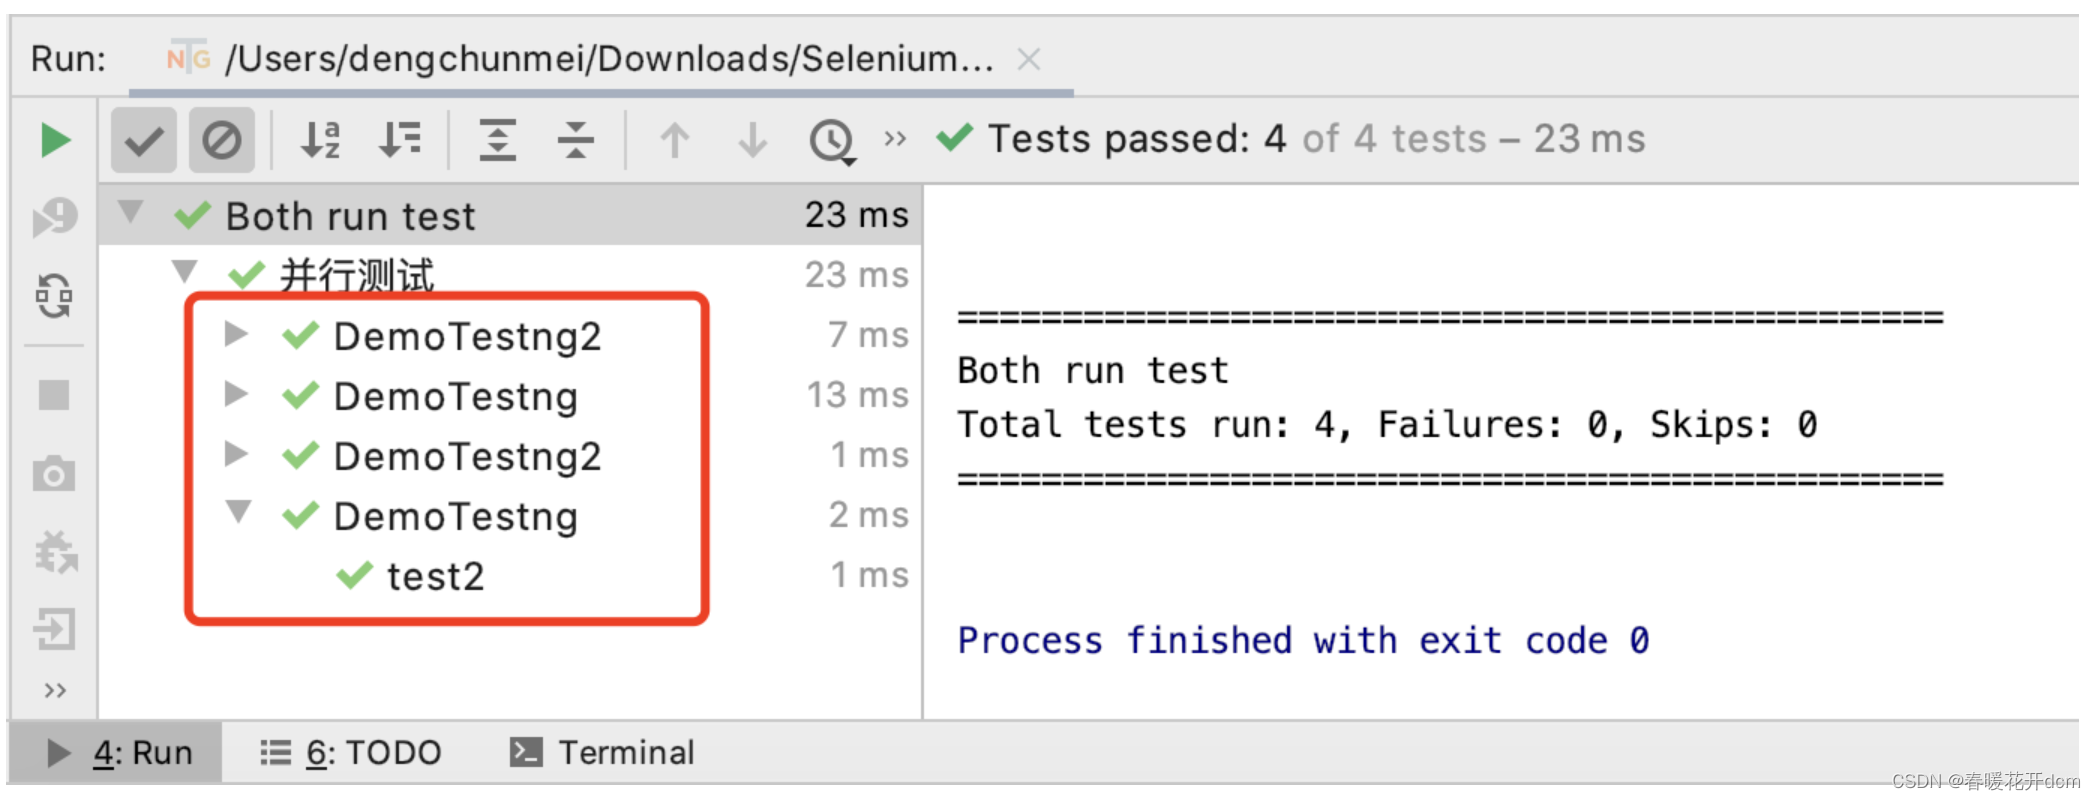
16. Multi-threaded concurrent test execution.
Execution results:
The above is some of the more commonly used knowledge of TestNG shared this time. I hope it will be helpful to everyone~~