1. Power on and off commands
1.1 Shutdown
The shutdown command is : shutdown (for root users)
sync # Synchronize data from memory to hard disk.
shutdown # Shutdown command, you can use man shutdown to read the help document. For example, you can run the following command to shut down:
- shutdown -h 10 # This command tells everyone that the computer will shut down in 10 minutes
- shutdown -h now # Shut down immediately
- shutdown -h 20:25 # The system will shut down at 20:25 today
- shutdown -h +10 # Shut down after ten minutes
- shutdown -r now # Restart the system immediately
- shutdown -r +10 # Restart the system in ten minutes
- reboot # means reboot, equivalent to shutdown -r now
- halt # Shut down the system, equivalent to shutdown -h now and poweroff
Whether you are restarting the system or shutting down the system, you must first run the sync command to write the data in the memory to the disk.
In the shutdown command, generally speaking, -r is the abbreviation of reboot, and -h is the abbreviation of shutdown.
The similarities and differences between shutdown -h 10 and shutdown -h +10 are as follows:
- shutdown -h 10 refers to shutting down when the absolute time is 10 o'clock. That is to say, if it is 9:59 now, then this command will shut down in one minute; if it is 10:01 now, then this command will Shut down at 10 o'clock the next day.
- shutdown -h +10 means to shut down the computer after a relative time of 10 minutes. That is to say, no matter what time it is now, this command will shut down within 10 minutes after execution.
1.2 System directory structure
After logging in to the system, enter the command in the current command window:

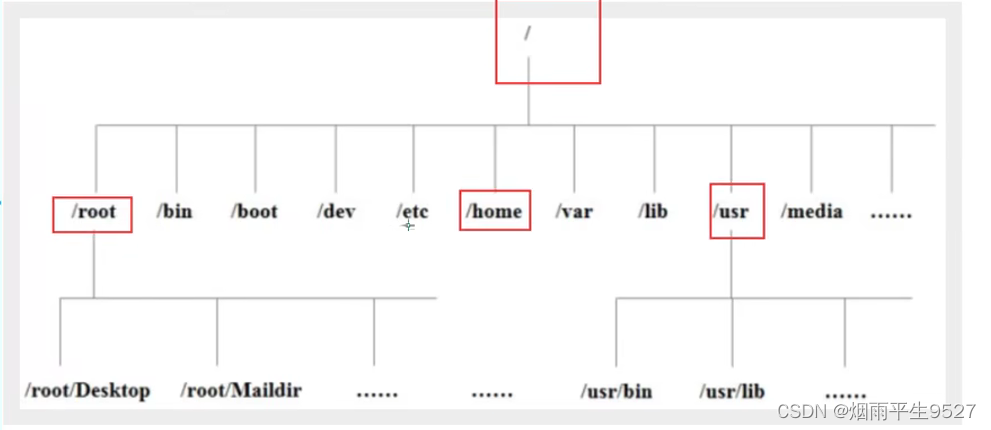
/bin :
bin is the abbreviation of Binaries (binary files). This directory stores the most commonly used commands./boot:
Stored here are some core files used when starting Linux, including some connection files and image files. (cannot move)/dev:
dev is the abbreviation of Device. This directory stores Linux external devices. The way to access devices in Linux is the same as the way to access files./etc:
etc is the abbreviation of Etcetera (etc.). This directory is used to store all configuration files and subdirectories required for system management./home :
The user's home directory. In Linux, each user has his own directory. Generally, the directory name is named after the user's account, such as alice, bob and eve in the picture above./lib :
lib is the abbreviation of Library (library). This directory stores the most basic dynamic link shared library of the system, and its function is similar to the DLL file in Windows. Almost all applications require these shared libraries. (cannot move)/lost+found :
This directory is usually empty. When the system is shut down illegally, some files are stored here./media :
The Linux system will automatically recognize some devices, such as U disks, CD-ROM drives, etc. After recognition, Linux will mount the recognized devices to this directory./mnt :
The system provides this directory to allow users to temporarily mount other file systems. We can mount the optical drive on /mnt/, and then enter this directory to view the contents of the optical drive./opt :
opt is the abbreviation of optional, which is the directory where additional software is installed for the host. For example, if you install an ORACLE database, you can put it in this directory. The default is empty ./proc :
proc is the abbreviation of Processes. /proc is a pseudo file system (that is, a virtual file system) that stores a series of special files in the current kernel running status. This directory is a virtual directory. It is a mapping of system memory. We can obtain system information by directly accessing this directory.
The contents of this directory are not on the hard disk but in the memory. We can also directly modify some files in it. For example, we can use the following command to block the ping command of the host so that others cannot ping your machine.
/root :
This directory is the user home directory of the system administrator, also known as the super privileged person./sbin :
s means Super User and is the abbreviation of Superuser Binaries (superuser binary files). The system management programs used by system administrators are stored here./srv :
This directory stores some data that needs to be extracted after the service is started./sys:
This is a big change in the Linux2.6 kernel. A new file system sysfs that appeared in the 2.6 kernel is installed in this directory.
The sysfs file system integrates information from the following three file systems: the proc file system for process information, the devfs file system for devices, and the devpts file system for pseudo terminals.
The file system is a visual reflection of the kernel device tree.
When a kernel object is created, the corresponding files and directories are also created in the kernel object subsystem.
/tmp :
tmp is the abbreviation of temporary (temporary). This directory is used to store some temporary files./usr :
usr is the abbreviation of Unix shared resources (shared resources). This is a very important directory. Many user applications and files are placed in this directory, similar to the program files directory under Windows./usr/bin:
Applications used by system users./usr/sbin:
More advanced management programs and system daemons used by super users./usr/src:
The default placement directory for kernel source code./var :
var is the abbreviation of variable (variable). This directory stores things that are constantly expanding. We are accustomed to placing directories that are frequently modified in this directory. Includes various log files./run :
is a temporary file system that stores information since the system started. When the system restarts, files in this directory should be deleted or cleared. If you have a /var/run directory on your system, it should point to run.
- The following are different suffixes for different files
: Compressed package: .gz .bz2 .tar.bz2 .tgz
Binary software package: .rpm
Web page file: .html .php
script file: .sh
configuration file: .conf- Note: Linux does not rely on extensions to distinguish file information, and all storage devices must be mounted before they can be used (hard disk, U disk, CD-ROM)
2. Commonly used basic commands
2.1 Path
Absolute path:
The path is written starting from the root directory /, for example: /usr/share/doc directory.
relative path:
The way to write a path is not to start with /. For example, when going from /usr/share/doc to /usr/share/man, you can write it as: cd ../man. This is how to write a relative path!
2.2 Common commands for processing directories
Next, let’s take a look at some common commands for processing directories:
ls: list directories
cd: change directory
pwd: displays the current directory
mkdir: Create a new directory
rmdir: delete an empty directory
cp: copy a file or directory
rm: remove files or directories
mv: Move files and directories, or modify the names of files and directories
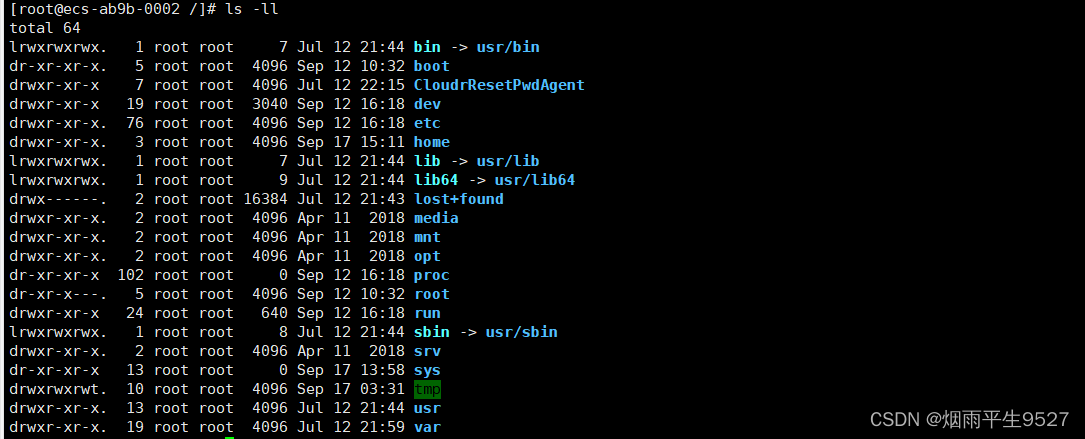
Linux ls (list directories)
grammar:[root@www ~]# ls [-aAdfFhilnrRSt] directory name
- -a displays all files and directories (hidden files starting with . will also be listed)
- -l displays file and directory information in long format, including permissions, owner, size, creation time, etc.
- -F adds a symbol after the listed file name; for example, add "*" for executable files and "/" for directories.
- -r displays files and directories in reverse order
- -t will sort by modification time, latest files first
- -R Recursively displays all files and subdirectories in a directory.
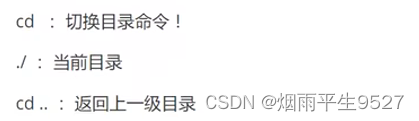
Linux cd (switch directory)
grammar:
cd [relative path or absolute path]
- Switch to the upper-level directory: Use .. to indicate the upper-level directory. You can switch to a higher-level directory by using .. multiple times in succession. cd..
- Switch to the user's home directory (home): Use ~ to indicate the current user's home directory. You can use the cd command to directly switch to the home directory cd ~
- Switch to the last visited directory: Use cd - to switch to the last visited directory. cd-
- Return to the root directory cd /
Linux pwd (displays current directory)
pwd is the abbreviation of Print Working Directory , which is the command to display the current directory.
[root@kuangshen kuangstudy]#pwd [-P]Options and parameters: -P : Display the actual path instead of using the link path
Linux mkdir (create new directory)
If you want to create a new directory, use mkdir (make directory).
mkdir [-mp] directory nameOptions and parameters:
-m: Configuration file permissions! Configure directly, no need to look at the default permissions (umask) ~
-p: Helps you directly create the required directory (including the upper-level directory) recursively!
Press the key up or down to switch past commands
Anzhu Tab auto-completion
Linux rmdir (delete empty directories)
grammar:
rmdir [-p] directory name
- rmdir test # Delete an empty directory named test in the current directory
- rmdir -p test1/test2 # Recursively delete two empty directories test1 and test1/test2 in the current directory
- rmdir -v test3 # Delete an empty directory named test3 in the current directory and display the deletion information
Linux cp (copy files or directories)
- cp file1 file2 # Copy file file1 to file file2
- cp -r dir1 dir2 #Copy directory dir1 and all its contents to directory dir2. Recursive continuous replication, used for directory replication behavior; (commonly used)
- cp -a file1 file2 # Copy file file1 to file file2, retaining all its attributes and links
- cp -s file1 file2 # Copy file file1 as a soft link to file file2
Linux rm (remove files or directories)
grammar:
rm [-fir] file or directoryOptions and parameters:
-f: means force, ignore files that do not exist, and no warning message will appear;
-i: Interactive mode, the user will be asked whether to take action before deletion
-r: Recursive deletion! It is most commonly used for deleting directories! This is a very dangerous option! ! !
Linux mv (move files and directories, or change names)
- mv file1 file2 # Rename file file1 to file file2
- mv file1 dir1 # Move file file1 to directory dir1
- mv dir1 dir2 # Rename directory dir1 to directory dir2 if directory dir2 does not exist; or move directory dir1 to directory dir2 if directory dir2 already exists
- mv -f file1 file2 # Forcibly rename file file1 to file file2. If file file2 already exists, no confirmation will be prompted.
- mv -i file1 file2 # Interactively rename file file1 to file file2. If file file2 already exists, you will be prompted for confirmation.
- mv -v file1 file2 # Display the process of renaming file file1 to file file2
- mv -u file1 file2 # Only when file file1 is newer than file file2, or file file2 does not exist, rename file file1 to file file2.
Linux sort (file content sorting)
The sort command is a commonly used command in Linux systems. Its function is to sort the contents of text files. Sort can sort the contents of text files according to different options and parameters, such as letters, numbers, months, etc. It can also be specified to sort by a certain column or a certain range. sort can also perform operations such as deduplication, merging, and comparison on file contents.
3. Basic attributes
3.1 Basic concepts
The Linux system is a typical multi-user system. Different users are in different positions and have different permissions. In order to protect the security of the system, the Linux system has different regulations on the permissions of different users to access the same file (including directory files).
Linux basic attributes refer to some characteristics of files or directories in Linux systems, including file type, file permissions, file owner, file group, etc. These attributes can be viewed through the ls -l command, or modified through chgrp, chown, chmod and other commands. The function of Linux basic attributes is to protect the security of the system and prevent different users from performing illegal operations on the same file.
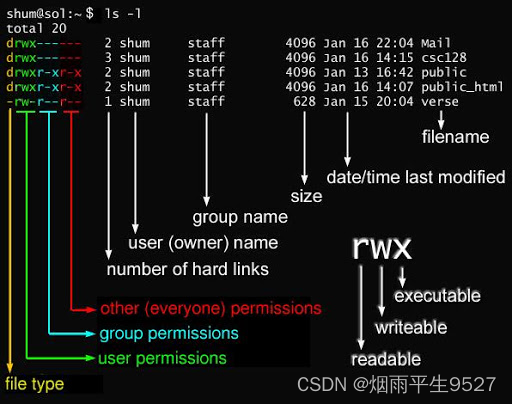
The specific contents of Linux basic attributes are as follows:
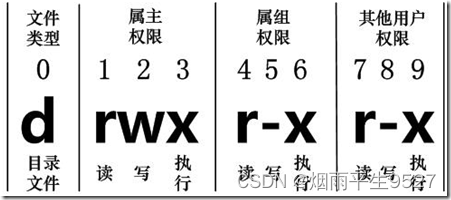
1. File types: There are many different file types in Linux systems, such as ordinary files, directory files, link files, device files, etc. The file type can be determined by the first character of the ls -l command
When it is [ d ], it is a directory
When it is [ - ], it is a file;
If it is [ l ], it is expressed as a link document (link file); (shortcut)
If it is [ b ], it means the interface device that can be stored in the device file (random access device);
If it is [ c ], it means the serial port device in the device file, such as keyboard and mouse (one-time reading device).
The following characters are grouped into groups of three, and are all combinations of the three parameters of "rwx". Among them, [ r ] represents readable (read), [ w ] represents writable (write), and [ x ] represents executable (execute). It should be noted that the positions of these three permissions will not change. If there is no permission, a minus sign [-] will appear.
The attributes of each file are determined by the 10 characters in the first part on the left (as shown below):
A file has a specific owner, which is the user who owns the file.
At the same time, in Linux systems, users are classified by groups, and a user belongs to one or more groups.
Users other than the file owner can be divided into users in the same group as the file owner and other users.
Therefore, the Linux system stipulates different file access permissions based on the file owner, users in the file owner's group, and other users.
In the above example, the boot file is a directory file, and the owner and group are both root.
3.2 Change file attributes
1. chgrp: Change the file group
grammar:
chgrp [-R] group name file nameParameter options
- -R: Change the file group recursively, that is, when changing the group ownership of a directory file, if you add the -R parameter, the group ownership of all files in the directory will be changed.
2. chown: Change the file owner, and you can also change the file group at the same time.
grammar:
chown [-R] owner name file name
chown [-R] owner name: group name file name
3. chmod: Change 9 attributes of the file
chmod [-R] xyz file or directory
- xyz : It is the permission attribute of the numeric type just mentioned, which is the addition of the rwx attribute values.
- -R : Perform recursive and continuous changes, and all files in the subdirectory will be changed.
There are nine basic permissions for Linux files, namely owner/group/others (owner/group/others), each of which has its own read/write/execute permissions.
First review the data mentioned above: the permission characters of the file are: -rwxrwxrwx. These nine permissions are in groups of three! Among them, we can use numbers to represent each permission. The score comparison table for each permission is as follows:
- r:4
- w:2
- x:1
The three permissions (r/w/x) scores of each identity (owner/group/others) need to be accumulated. For example, when the permissions are: -rwxrwx--- the score is:
- owner = rwx = 4+2+1 = 7
- group = rwx = 4+2+1 = 7
- others= --- = 0+0+0 = 0
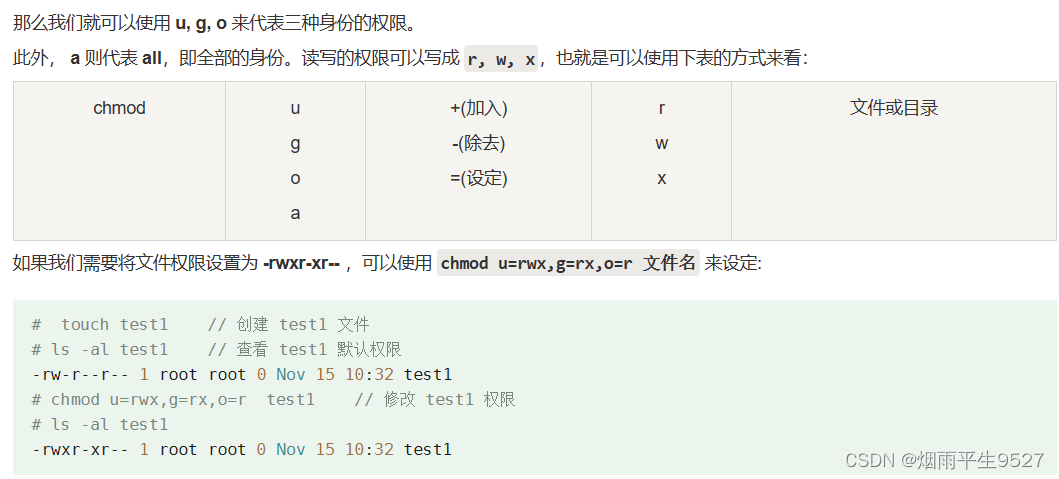
Symbol type changes file permissions
There is also a way to change permissions. From the previous introduction, we can find that there are basically nine permissions:
- user: user
- group: group
- others:others
Then we can use u, g, o to represent the permissions of the three identities.
4. View file content
Use the following command on Linux systems to view the contents of the file:
cat displays the file contents starting from the first line
tac is displayed starting from the last line. It can be seen that tac is cat written backwards!
When nl is displayed, the line number is output!
more displays the file content page by page
less is similar to more, but what's better than more is that it can turn pages forward!
head only read the first few lines
tail only looks at the tail lines
You can use man [command] to view the usage documentation of each command, such as: man cp.
cat displays the file contents starting from the first line
4.1cat command
The cat command is a common command in Linux systems for connecting files and printing to the standard output device. Its full English spelling is concatenate, which means connection or series.
The basic syntax of the cat command is:
cat [选项] [文件]...If you are in the same directory as the containing file, you can use the above command directly. Otherwise, you need to specify the path to the file, for example:
cat [选项] [path/to/file]...The cat command has the following commonly used options:
-nOr--number: Number all output lines, starting from 1.-bOr--number-nonblank: number non-blank lines, blank lines are not numbered.-sOr--squeeze-blank: Replace multiple consecutive blank lines with one blank line.-vor--show-nonprinting: Display non-printable characters except newlines and tabs.-EOr--show-ends: Display symbols at the end of each line$.-TOr--show-tabs: Display tab characters as^Isymbols.-Aor--show-all: Equivalent to-vETa combination of options.The cat command has the following common uses:
- Display file content: For example,
cat file.txtthe entire content of file.txt can be displayed.- Create a file: For example,
cat > file.txtyou can enter content from the keyboard and create a file.txt file. Press Ctrl+D to end the input.- Append content to the file: For example,
cat >> file.txtyou can input content from the keyboard and append it to the end of the file.txt file. Press Ctrl+D to end the input.- Merge multiple files: For example,
cat file1.txt file2.txt > file3.txtyou can merge the contents of file1.txt and file2.txt into file3.txt.- Make an image file: For example,
cat /dev/fd0 > image.imgyou can copy the contents of the floppy disk to the image.img file.
4.2tac command
The tac command is a command in the Linux system. Its function is to connect and print the file contents to the standard output device line by line from back to front. It is equivalent to the reverse output of the cat command. The main function of this command is to facilitate viewing the file content, especially when the file content is large and needs to be viewed line by line.
The basic syntax of the tac command is:
tac [选项]... [文件]...If no file is specified or the file is -, the tac command reads data from standard input.
The tac command has the following commonly used options:
-bOr--before: add a separator before each line instead of after.-ror--regex: parse the delimiter as a regular expression.-sOr--separator=STRING: Specify a string as the line separator instead of a newline character.--help: Display help information and exit.- --version: display version information and exit
The tac command has the following common uses:
- Reverse file content: For example,
tac file.txtthe content of file.txt can be displayed in reverse order starting from the last line.- Reverse pipe output: For example,
ls -l | tacthe output of the ls -l command can be displayed in reverse order starting from the last line.- Reverse the file contents according to the specified delimiter: for example,
tac -s ',' file.csvyou can reverse the contents of file.csv according to the comma delimiter.- Search the file for the latest match: For example,
tac log.txt | grep -m 1 'error'you can search the log.txt file starting from the last line for the first line containing 'error' and display it.
4.3 nl command
The nl command is a command in the Linux system. Its function is to connect and print the file contents to the standard output device line by line from front to back, and add a line number to the left of each line. It is the abbreviation of number of lines
The basic syntax of the nl command is:
nl [选项]... [文件]...If no file is specified or the file is -, the nl command reads data from standard input.
The nl command has the following commonly used options:
-bOr--body-numbering=STYLE: Specify the line number specification method of the main part. There are three main ways:
a: Indicates that the line number will also be listed regardless of whether it is a blank line (similar to cat -n);t: If there is an empty line, do not list the line number on the empty line (default value);n: Do not list any line numbers.-hOr--header-numbering=STYLE: Specify the line number specification method of the header part, the same as above.-fOr--footer-numbering=STYLE: Specify the line number designation method of the footer part, the same as above.-nOr--number-format=FORMAT: There are three main ways to list line numbers:
ln: The line number is displayed at the far left of the screen;rn: The line number is displayed at the far right of its own column without adding 0;rz: The line number is displayed at the far right of its own column, and 0 is added;-wOr--number-width=NUMBER: Specify the number of digits occupied by the line number field.-por--no-renumber: Do not restart calculation at logical delimiter.--help: Display help information and exit.--version: Display version information and exit.The nl command has the following common uses:
- Display the file contents and add line numbers: For example,
nl file.txtyou can display the contents of file.txt and add line numbers in front of each line.- Create a file and add line numbers: For example,
nl > file.txtyou can enter content from the keyboard and create a file.txt file, add a line number in front of each line, and press Ctrl+D to end the input.- Append content to the file and add line numbers: For example,
nl >> file.txtyou can enter content from the keyboard and append it to the end of the file.txt file, add line numbers in front of each line, and press Ctrl+D to end the input.- Merge multiple files and add line numbers: For example,
nl file1.txt file2.txt > file3.txtyou can merge the contents of file1.txt and file2.txt into file3.txt and add line numbers in front of each line.
4.4 more command
more 一页一页翻动While the more program is running, you have several buttons that you can press:
Space key (space): represents turning down a page;
Enter: represents scrolling down "one line";
/String: means searching for the keyword "string" in the displayed content;
:f: Immediately display the file name and the number of lines currently displayed;
q: means to leave more immediately and no longer display the content of the file.
b or [ctrl]-b: means turning pages back, but this action is only useful for files, not pipelines.
The more command has the following common uses:
- Display the file contents and add line numbers: For example,
more file.txtyou can display the contents of file.txt and add line numbers in front of each line.- Create a file and add line numbers: For example,
more > file.txtyou can enter content from the keyboard and create a file.txt file, add a line number in front of each line, and press Ctrl+D to end the input.- Append content to the file and add line numbers: For example,
more >> file.txtyou can enter content from the keyboard and append it to the end of the file.txt file, add line numbers in front of each line, and press Ctrl+D to end the input.- Merge multiple files and add line numbers: For example,
more file1.txt file2.txt > file3.txtyou can merge the contents of file1.txt and file2.txt into file3.txt and add line numbers in front of each line.
4.5less command
The less command is a command in the Linux system. Its function is to display the contents of text files in pages. It is similar to the more command, but the less command can browse files at will and supports page up and page down, while the more command can only browse forward. The less command also supports search, jump, mark and other functions, allowing you to view file content more conveniently.
The basic syntax of the less command is:
less [选项]... [文件]...If no file is specified or a file is specified
-, the less command reads data from standard input.The less command has the following commonly used options:
-bOr--buffers=NUM: Set the buffer size to NUM K bytes.-eOr--quit-at-eof: automatically exit when the end of the file is reached.-fOr--force: Force opening of special files such as directories and binaries.-gOr--hilite-search: Highlight only matches from the last search.-ior--ignore-case: Ignore case when searching.-mOr--long-prompt: Display detailed prompt information.-NOr--LINE-NUMBERS: Display the line number of each line.-oOr--LOG-FILE=FILE: Save the content output by less to a FILE file.-QOr--QUIET: Do not use ring tones and visual cues.-sOr--squeeze-blank-lines: compress multiple consecutive blank lines into one line for display.-xOr--tabs=NUM: Display tabs as NUM spaces.The less command has the following common uses:
- Display file content and browse by pages: For example,
less file.txtyou can display the content of file.txt and display it by page. You can use the space bar, enter key, up and down arrow keys, PageUp and PageDown keys to control page turning.- Search file contents and highlight them: For example,
less file.txtpost-typing/keywordcan search for lines containing keyword in file.txt and highlight them. You can use the n and N keys to jump to the next or previous match.- Jump to the specified line number or percentage position: for example,
less file.txtthe last input100gcan jump to the 100th line of file.txt, and the input50pcan jump to the middle position (50%) of file.txt.- Mark and return to the mark position: For example,
less file.txtthe inputmacan set a mark named a at the current position of file.txt, and the input'acan return to the mark position.The commands that can be entered when less is running are:
Space key: Scroll down one page;
[pagedown]: Scroll down one page;
[pageup]: Scroll up one page;
/String: The function of searching downward for "string";
?String: The function of searching upward for "string";
n : Repeat the previous search (related to / or ?!)
N: Repeat the previous search in reverse (related to / or ?!)
q: Leave the less program;
4.6head command
The head command is a command in Linux system. Its function is to display the content at the beginning of the file. The default is the first 10 lines.
The basic syntax of the head command is:
head [选项]... [文件]...If no file is specified or a file is specified
-, the head command reads data from standard input.The head command has the following commonly used options:
-cOr--bytes=[-]NUM: Display the first NUM bytes of the file, or if NUM is negative, display everything except the last NUM bytes.-nOr--lines=[-]NUM: Display the first NUM lines of the file, or if NUM is negative, display everything except the last NUM lines.-qOr--quiet:--silentDo not display the header information of the file name.-vOr--verbose: Always display the header information of the file name.--help: Display help information and exit.--version: Display version information and exit.The head command has the following common uses:
- Display the content at the beginning of the file: for example,
head file.txtyou can display the first 10 lines of file.txt.- Display the contents at the beginning of multiple files: for example,
head file1.txt file2.txtyou can display the first 10 lines of file1.txt and file2.txt respectively, and add the file name before each file.- Display the content of the specified number of bytes: for example,
head -c 20 file.txtyou can display the first 20 bytes of file.txt.- Display the content of a specified number of lines: for example,
head -n 5 file.txtyou can display the first 5 lines of file.txt.- Display all but the last part: For example,
head -c -20 file.txtyou can display all but the last 20 bytes of file.txt.
4.7tail command
The tail command is a command in Linux system. Its function is to display the content at the end of the file. The default is the last 10 lines.
The basic syntax of the tail command is:
tail [选项]... [文件]...If no file or file is specified
-, the tail command reads data from standard input.The tail command has the following commonly used options:
-cOr--bytes=[-]NUM: Display the last NUM bytes of the file. If NUM is a negative number, display everything except the first NUM bytes.-fOr--follow[={name|descriptor}]: Continue to display the latest content at the end of the file. If name or descriptor is specified, continue tracking after the file is moved or renamed.-nOr--lines=[-]NUM: Display the last NUM lines of the file, or if NUM is a negative number, display everything except the first NUM lines.-qOr--quiet:--silentDo not display the tail information of the file name.-vOr--verbose: Always display the tail information of the file name.--help: Display help information and exit.--version: Display version information and exit.The tail command has the following common uses:
- Display the content at the end of the file: for example,
tail file.txtyou can display the last 10 lines of file.txt.- Display the contents at the end of multiple files: for example,
tail file1.txt file2.txtyou can display the last 10 lines of file1.txt and file2.txt respectively, and add the file name before each file.- Display the content of the specified number of bytes: for example,
tail -c 20 file.txtyou can display the last 20 bytes of file.txt.- Display the content of the specified number of lines: for example,
tail -n 5 file.txtthe last 5 lines of file.txt can be displayed.- Continuously refresh and display the latest content at the end of the specified file: for example,
tail -f log.txtthe latest update of the log.txt file can be displayed in real time and refreshed continuously.
5. Links
5.1 Related concepts
Linux linking is a method of creating aliases for files or directories in a Linux system, making it easy to access or manage the same file or directory. There are two types of Linux links, one is Hard Link and the other is Soft Link (Symbolic Link) or symbolic link.
Hard links refer to connecting files or directories through index nodes (inodes), which means that different file names point to the same inode number and thus the same data block. The characteristics of hard links are:
- Hard links cannot span different file systems and can only be created within the same file system.
- Hard links cannot be used for directories, only for ordinary files.
- Hard links are equal to the original file and the linked file. Deleting either one will not affect the access of the other.
- Hard links can protect important files from accidental deletion or modification.
A soft link refers to connecting a file or directory by storing the path of another file or directory, that is, creating a special file that contains the location information of the original file or directory. The characteristics of soft links are:
- Soft links can span different file systems and can be created anywhere.
- Soft links can be used for directories and ordinary files.
- Soft links have a master-slave relationship between the original file and the linked file. Deleting the original file will cause the linked file to become invalid.
- Soft links make it easy to create shortcuts, save space and facilitate management.
The command to create a link in Linux is ln, which has the following commonly used options:
-sOr--symbolic: Create a soft link, by default a hard link is created.-fOr--force: If the target file already exists, force overwrite it.-iOr--interactive: If the target file already exists, ask the user whether to overwrite it.-vOr--verbose: Display detailed operation information.
5.2 touch command
The touch command is a command in Linux system. Its function is to modify the time attributes of files or directories, including access time and modification time. If the file does not exist, the system will create a new file.
The basic syntax of the touch command is:
touch [选项]... [文件]...The touch command has the following commonly used options:
-a: Only the access time of the file is modified, not the modification time.-c: If the file does not exist, do not create a new file.-d: Specifies the access and modification times of files, and can use a variety of different formats.-m: Only the modification time of the file is modified, not the access time.-r: Use the reference file's access and modification times instead of the current system time.-t: Specify the access and modification time of the file, the format is the same as the date command.The touch command has the following common uses:
- Create an empty file: For example,
touch file.txtyou can create an empty file named file.txt.- Modify the time attribute of an existing file: For example,
touch -d "2023-05-18 15:44" file.txtyou can set the access and modification time of file.txt to 15:44 on May 18, 2023.- Use the time attributes of the reference file: for example
touch -r file1.txt file2.txtyou can set the access and modification times of file2.txt to be the same as file1.txt.
5.3echo command
The echo command is a commonly used command in Linux systems. Its function is to output parameters to the standard output device, usually a terminal or a file. The echo command is usually used to display the value of a variable, output a string or the results of other commands, or prompt or debug in a shell script
The basic syntax of the echo command is:
echo [选项]... [字符串]...If no string is specified or if string is specified
-, the echo command reads data from standard input.The echo command has the following commonly used options:
-n: Do not output newline characters, so that the next output is on the same line as this output.-e: Enables the interpretation of escape characters, such as\nline breaks,\ttabs, etc.-E: Disables interpretation of escape characters, this is the default option.--help: Display help information and exit.--version: Display version information and exit.The echo command has the following common uses:
- Output a normal string: for example,
echo Hello, World!it can be outputHello, World!to the terminal.- Output a string with double or single quotes: for example,
echo \"Hello, World!\"it can be output"Hello, World!"to the terminal and needs to be escaped with a backslash.- Output a string with special characters: for example,
echo -e "Hello\tWorld\n"you can output itHello Worldto the terminal and wrap it in a new line. You need to-eenable escape characters with the option.- Output the value of a variable: For example, it can be output to the terminal
name="Linux"later , and the variable needs to be quoted with a symbol.echo $nameLinux$- Output the results of the command: For example,
echo $(date)you can output the current date and time to the terminal, you need to use$()the include command.- Redirect the output results to a file: for example,
echo Hello, World! > file.txtyou canHello, World!write it to the file.txt file, overwriting the original content.- echo "Hello, World!" >> file.txt To append output to a file, rather than overwriting the original content, use the >> symbol.