Table of contents
2.1 Create a good brand management menu
Edit 2.5 Areas that need optimization
2.6 Specific optimization implementation
2.6.3 Optimization 3: Change the logo address column of the table list to display an image
1. Overview
The front-end part of the previous classification management was basically handwritten additions, deletions, modifications, and searches. Although some of them were directly used components provided by elementUI with only slight modifications, you still needed to find the corresponding components yourself, write the data fields for the components, and write the methods yourself. , Bind it yourself, etc. In fact, there is still a lot to write. But in fact, if you think about it carefully, these components are actually similar. They are all lists, provide some buttons, some text boxes, and then add, delete, modify, and check. The codes are similar. Since it's almost the same, there's nothing technical about it, it's just more complicated. Then it should be automatically generated for us to use directly. Yes, Zoey also provides the reverse code of the front-end part. ( PS: Brothers, you really have to work hard to learn. We don’t need to write these basic additions, deletions, modifications, and codes. If you still only know these simple ones, you will be eliminated )
What you need to do now is to use it directly and then modify some parts according to your own needs.
2. Front-end part
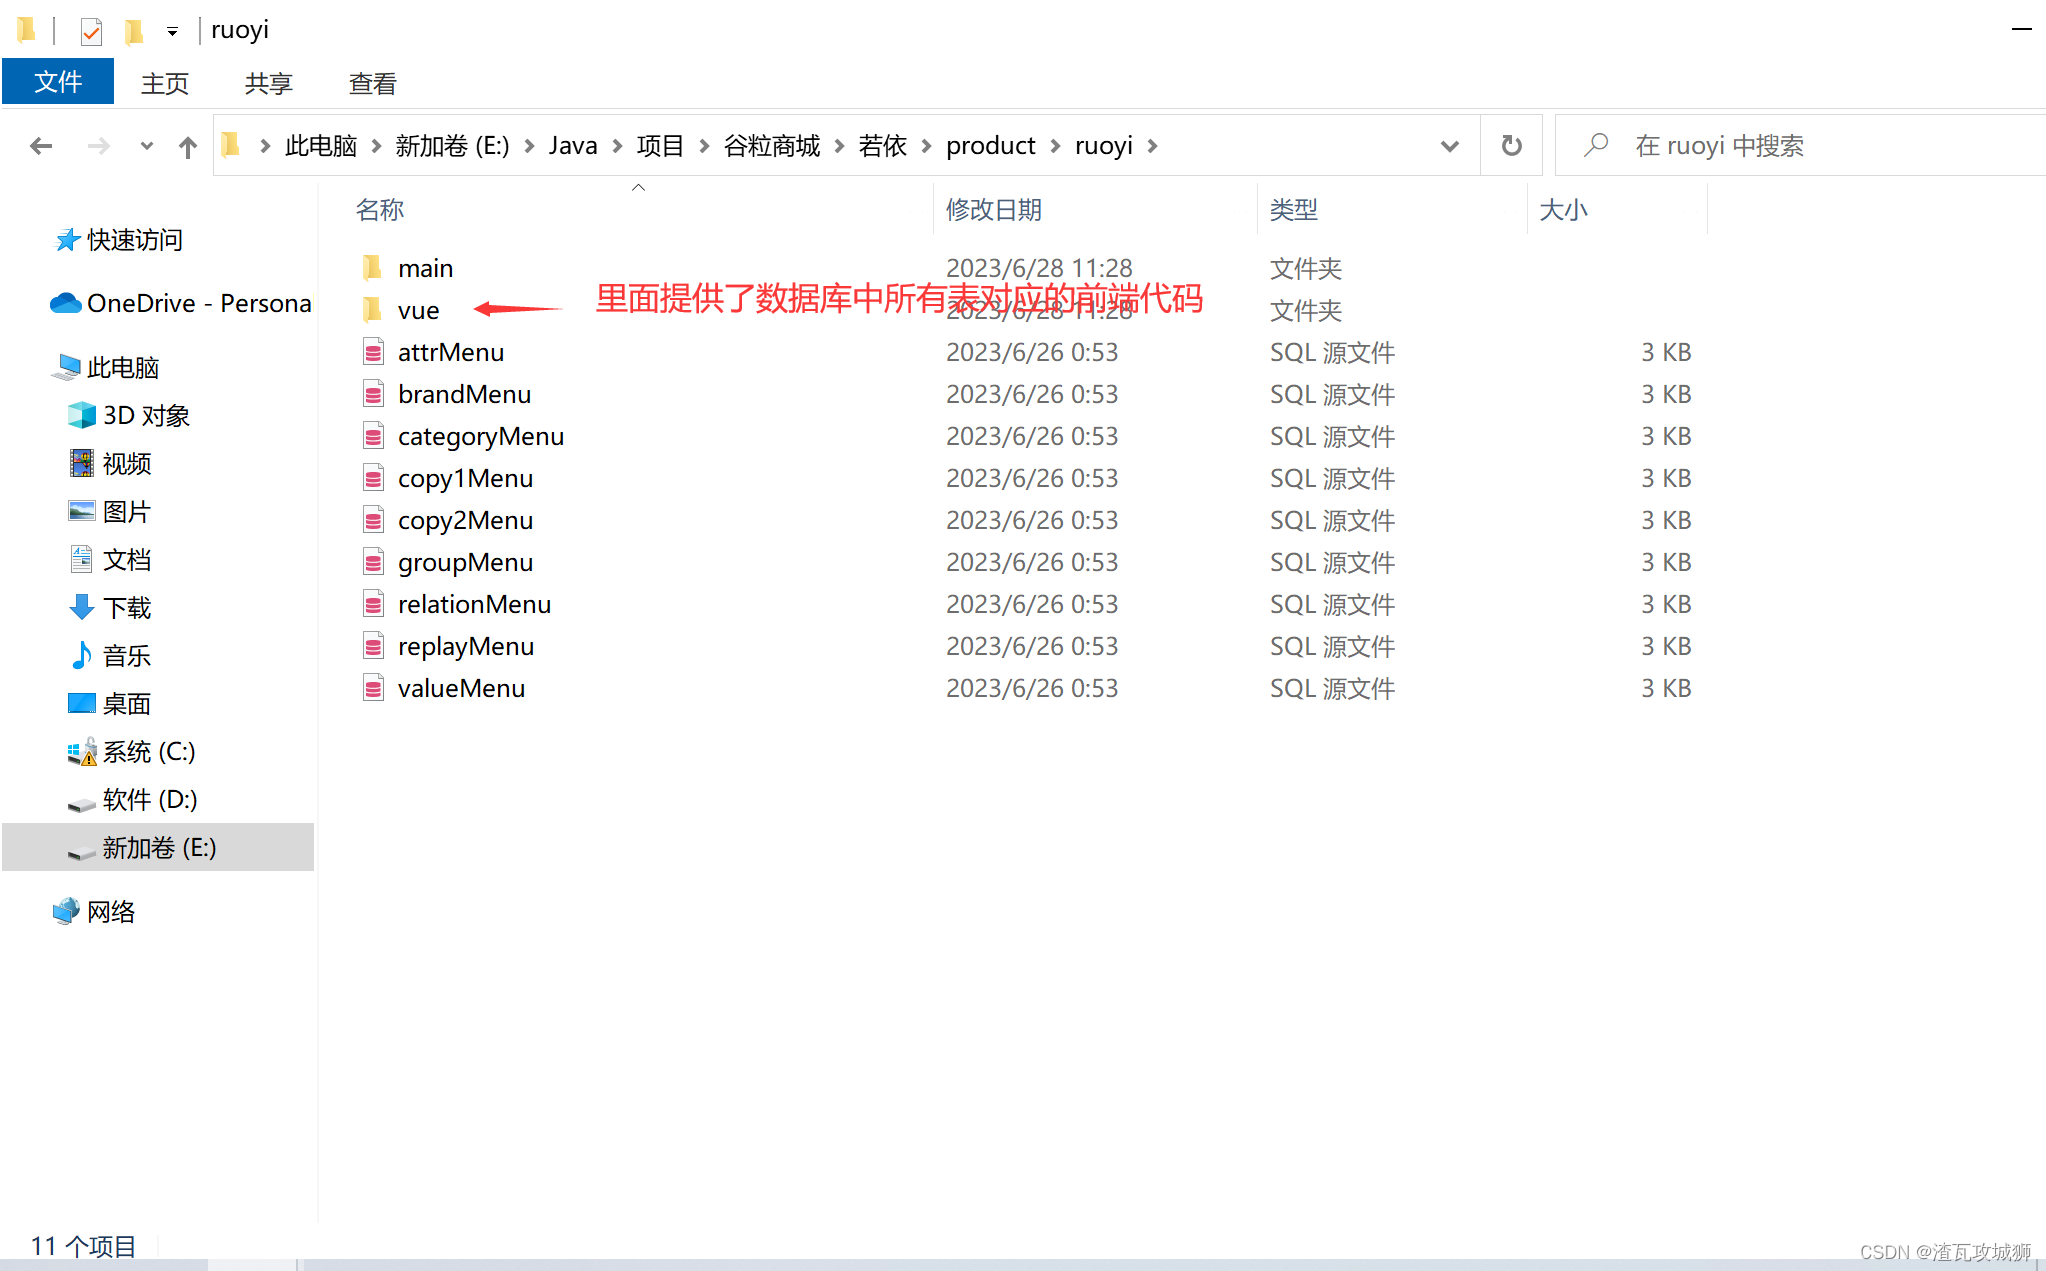
To realize the code part generated by the front-end reverse engineering, it is actually a directory at the same level as main, a vue directory, which contains the front-end codes corresponding to many tables selected on the web page:
2.1 Create a good brand management menu
There is nothing to say about this. I have already done it before when creating category management. I just need to modify some attributes:
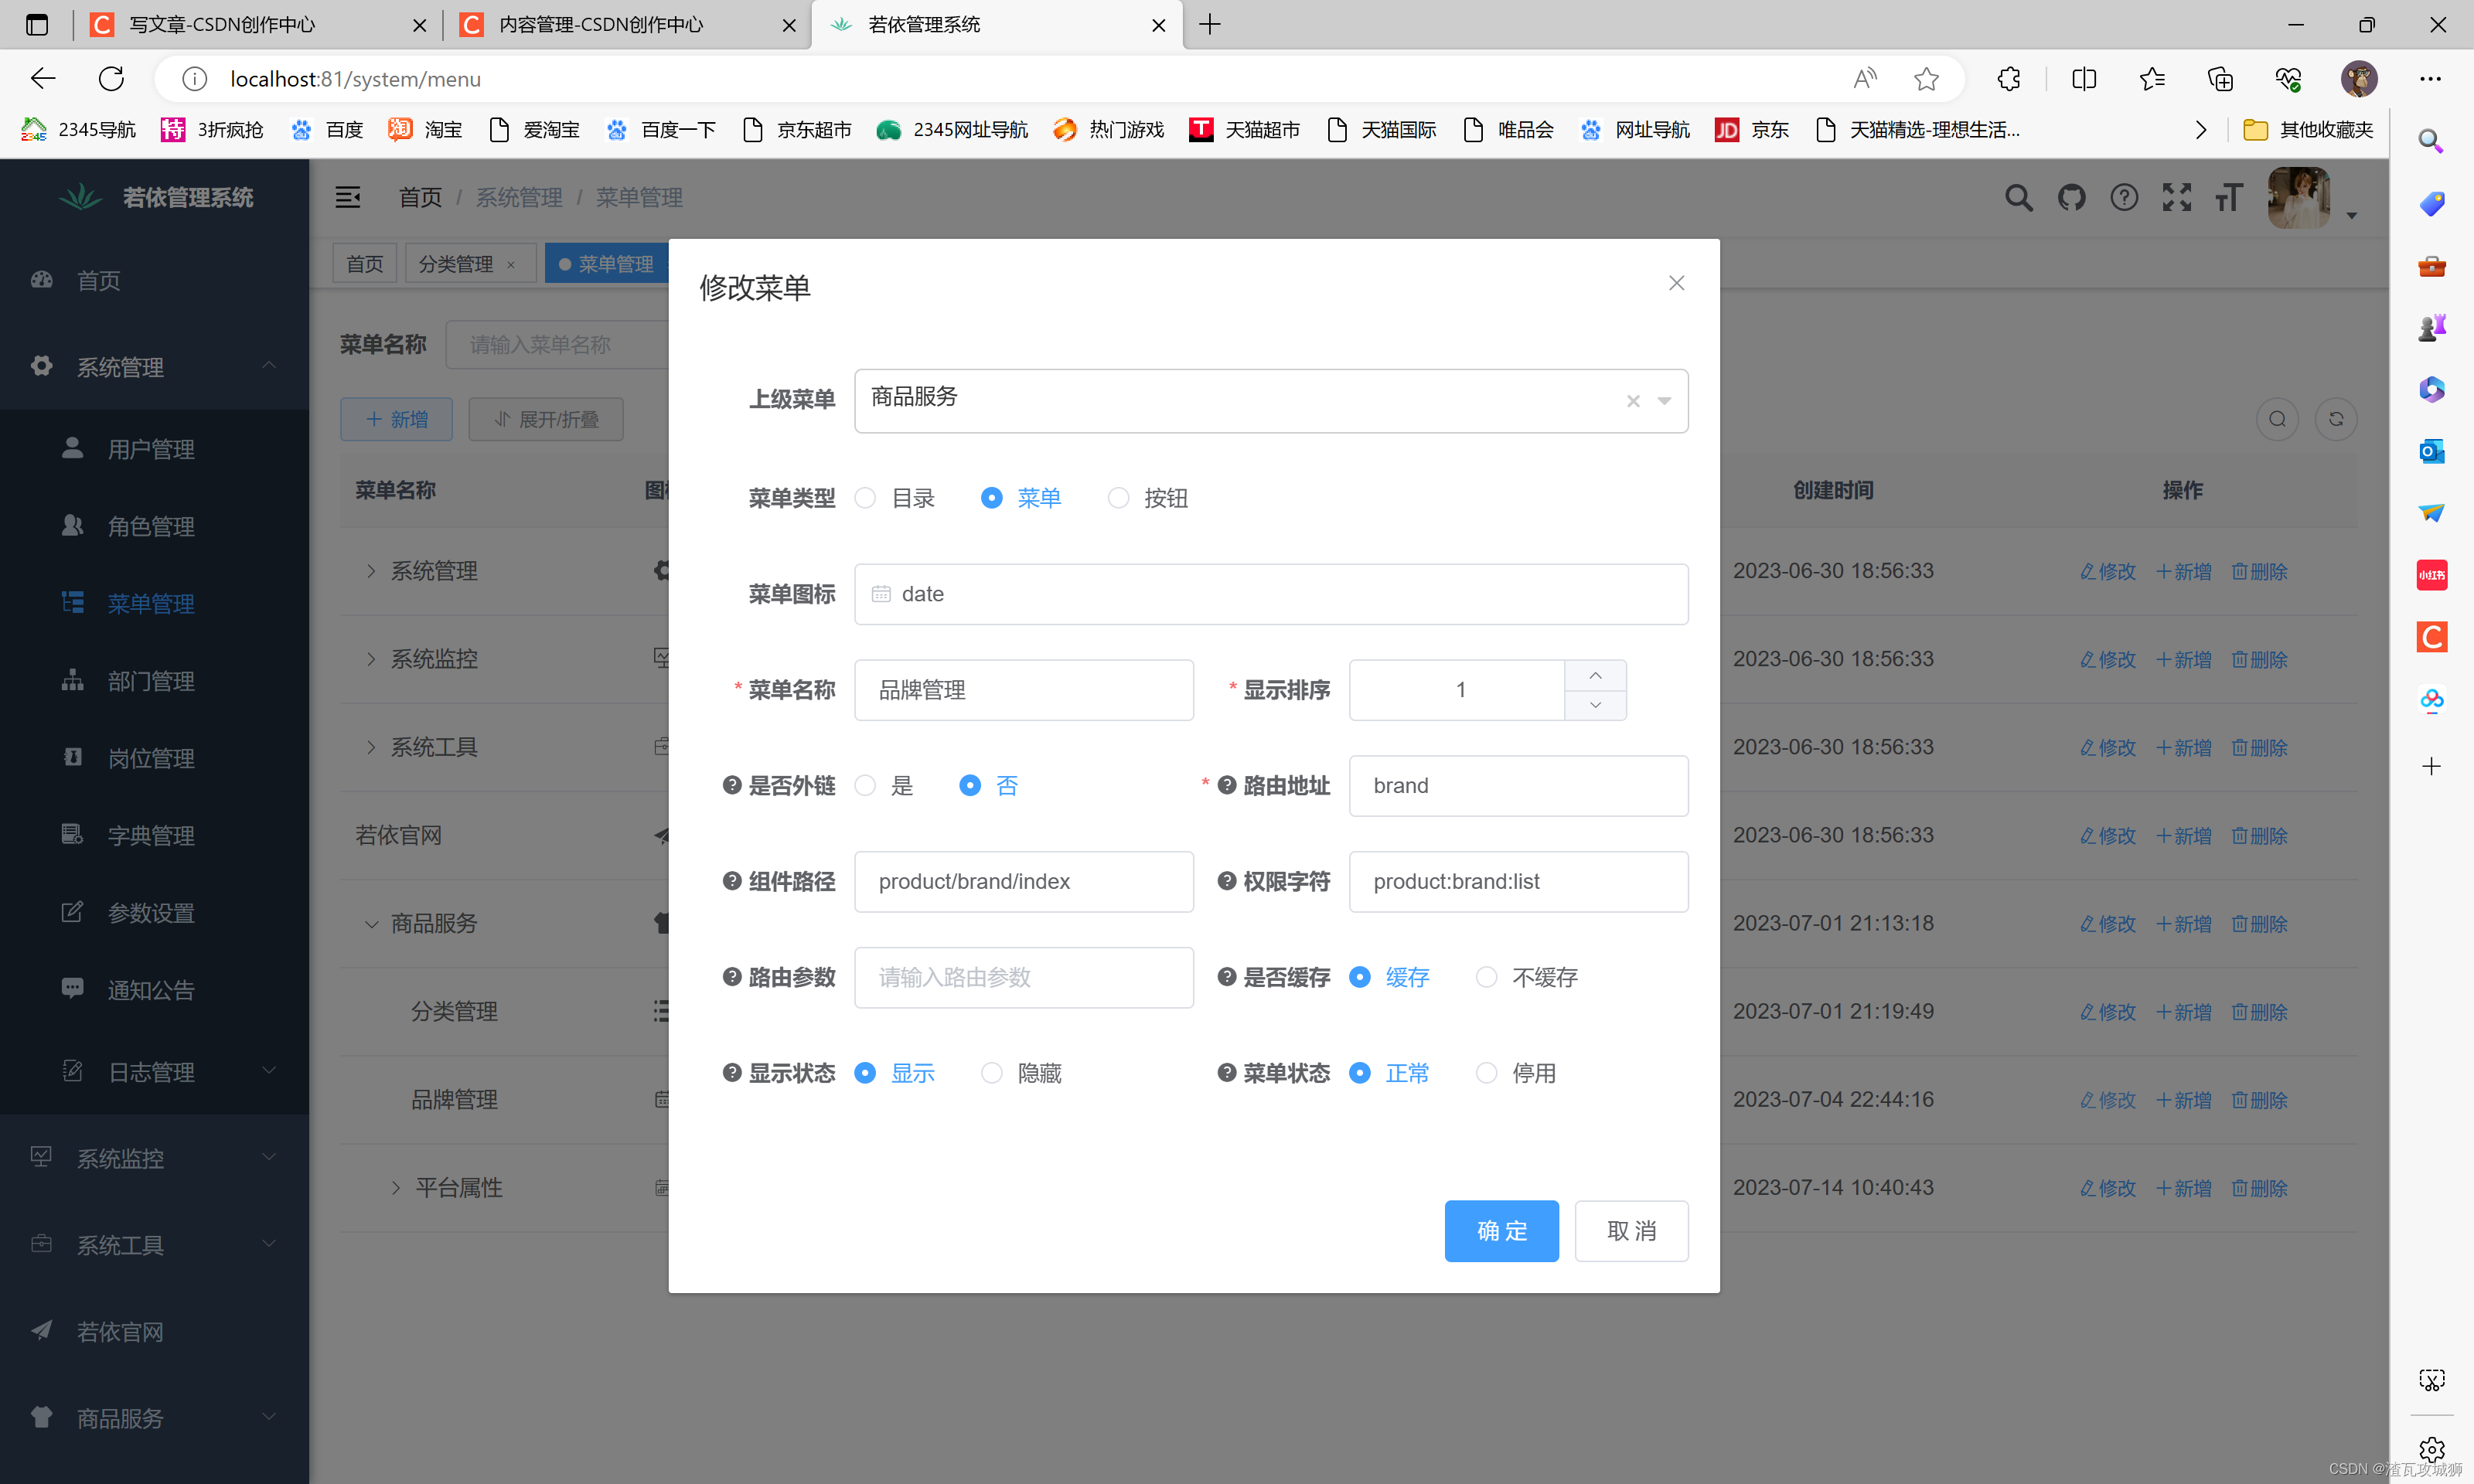
In fact, you can also choose to create in the database, and then use the database to create batches. In fact, they are almost the same.
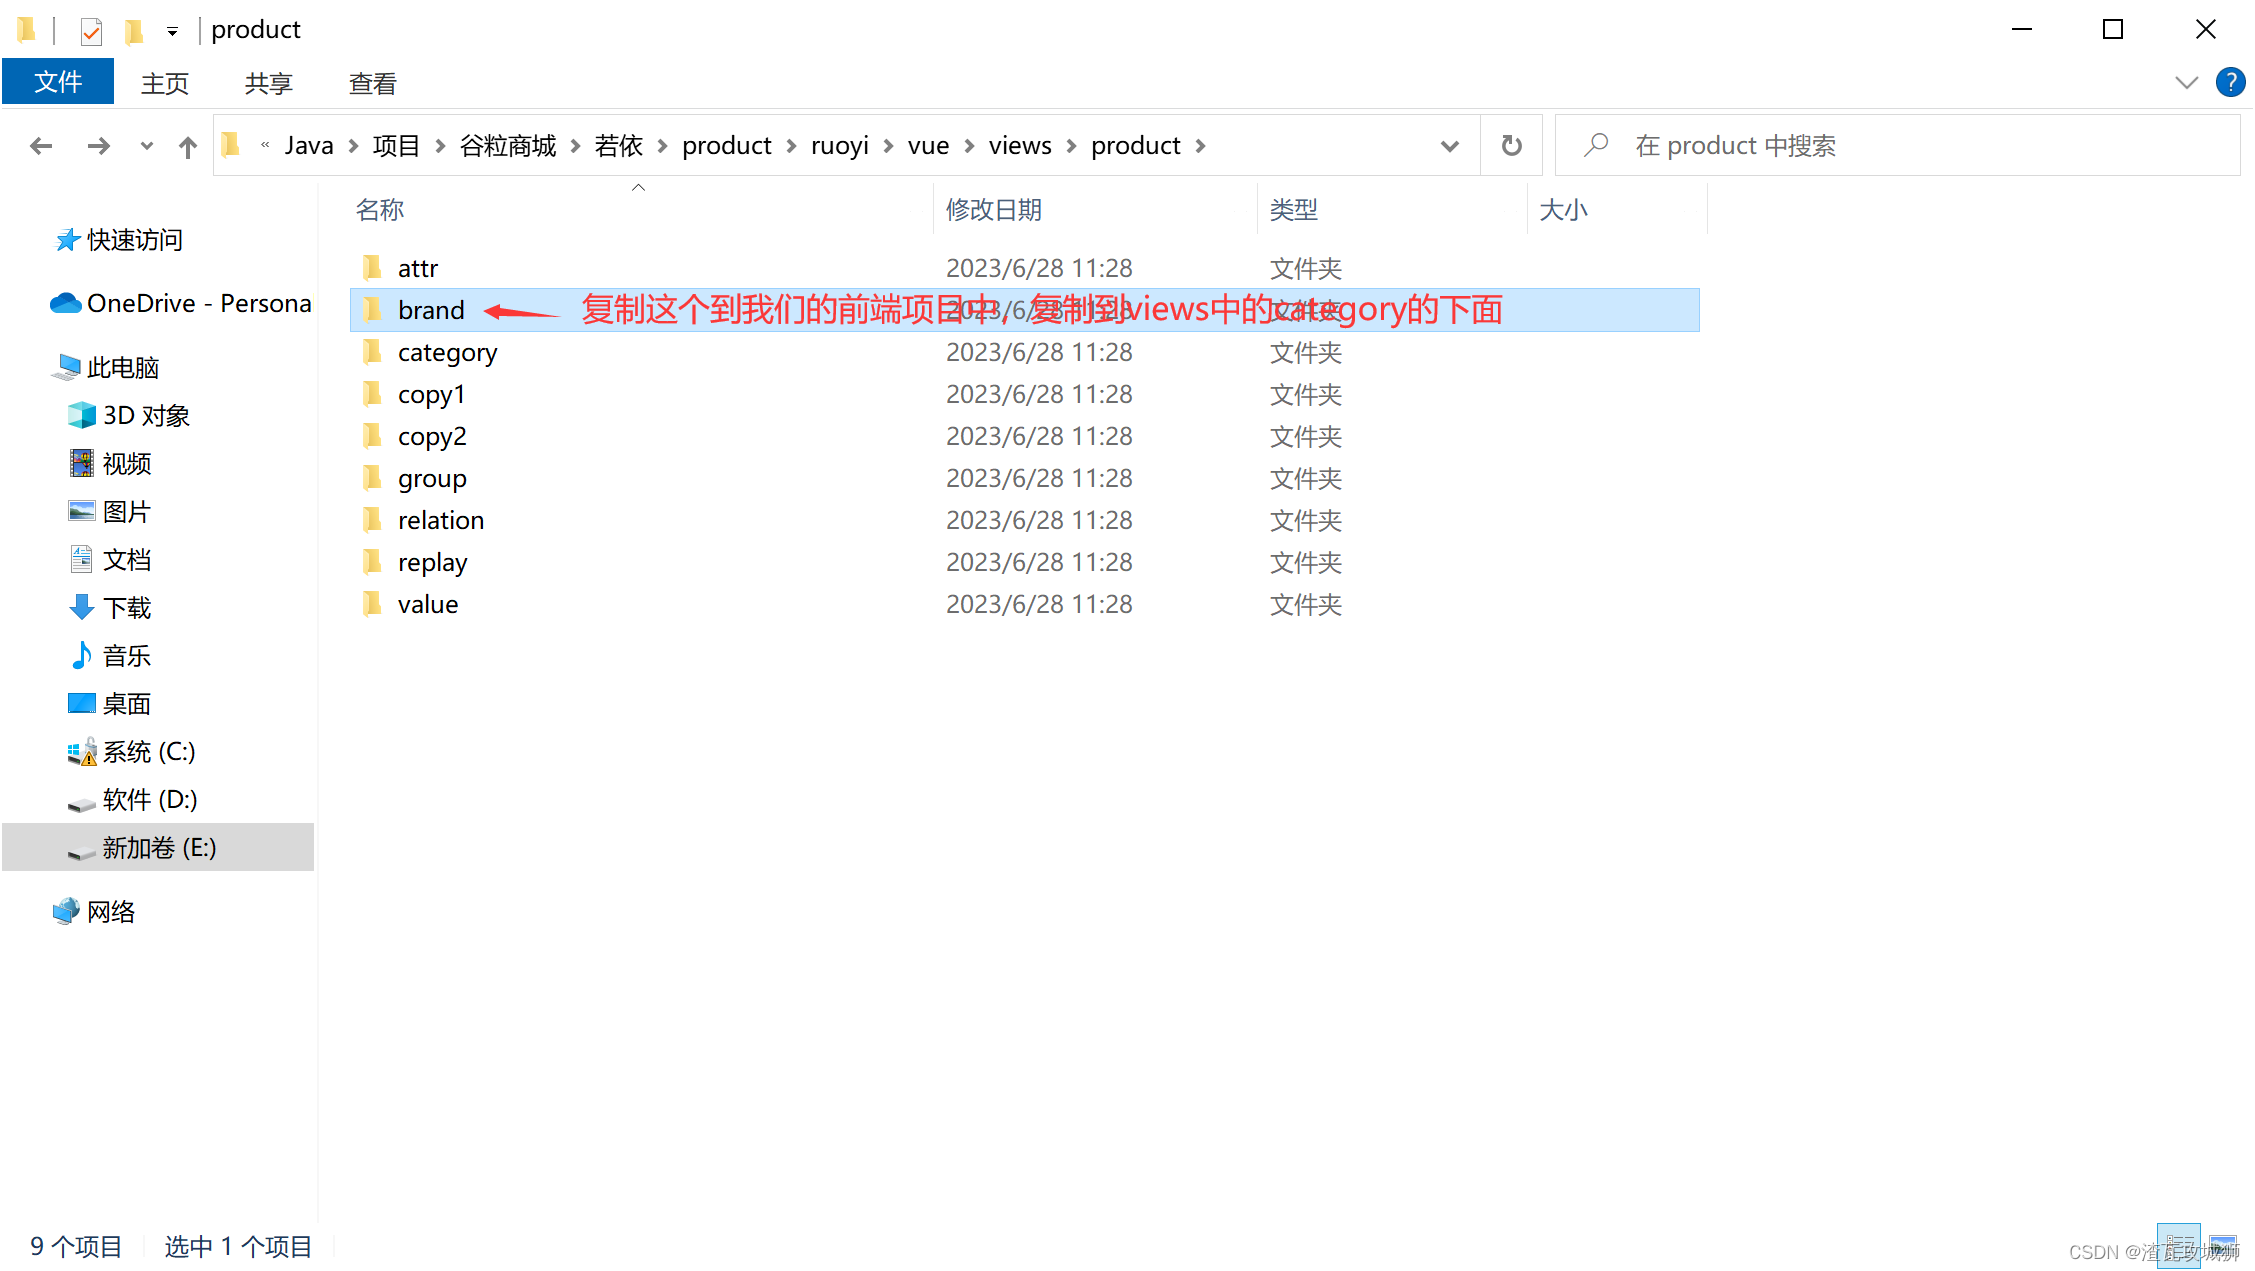
2.2 Copy components
 2.3 Copy api
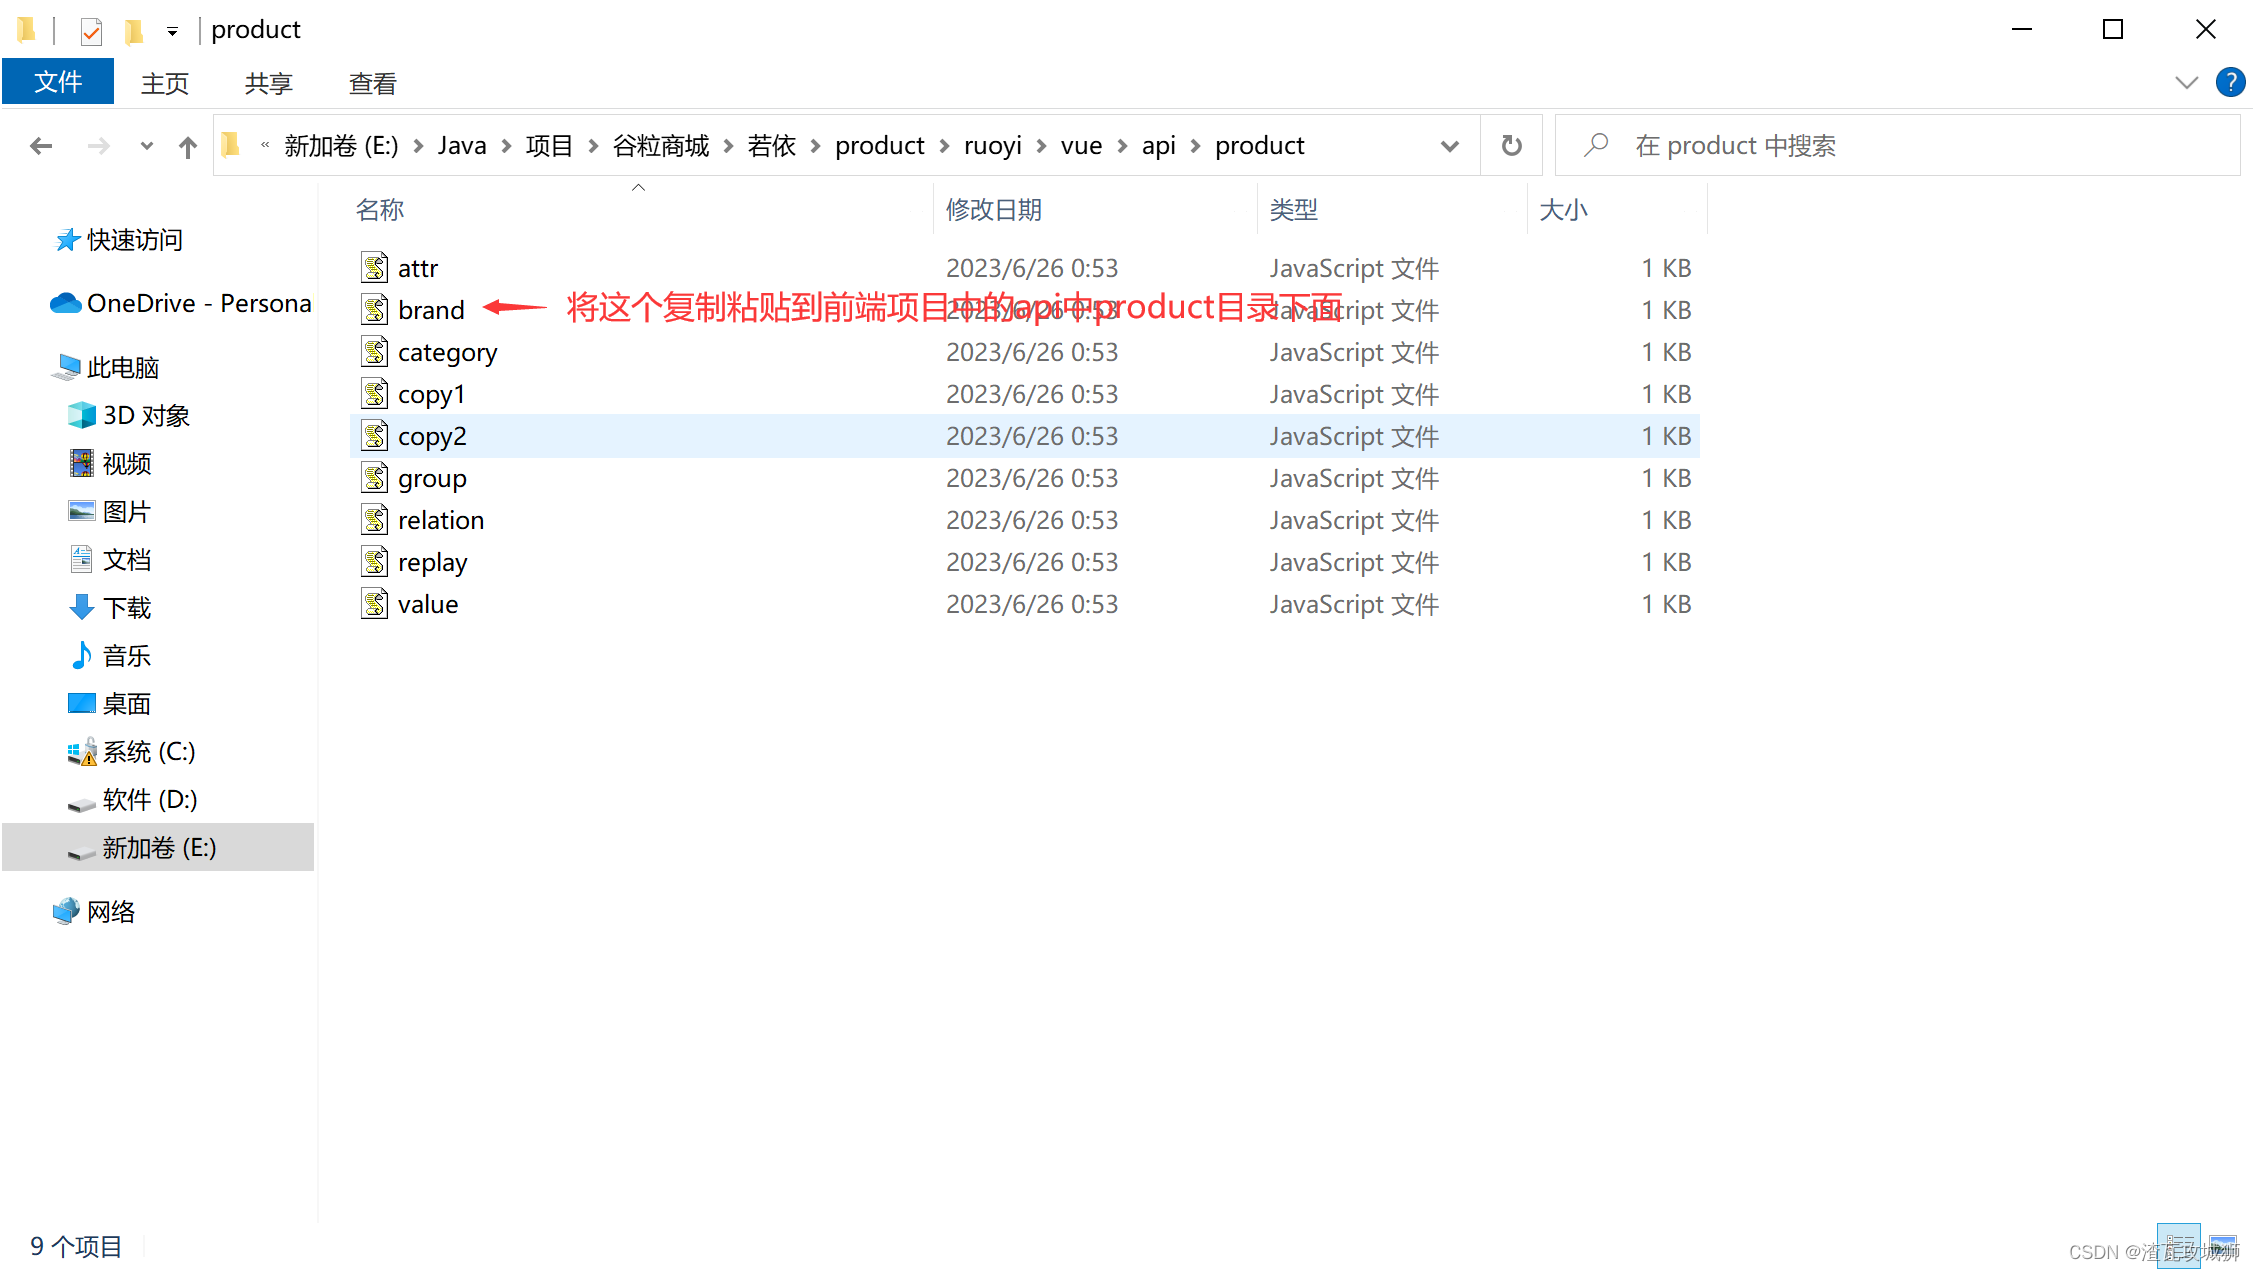
2.4 Check the effect
The effect is as shown below:
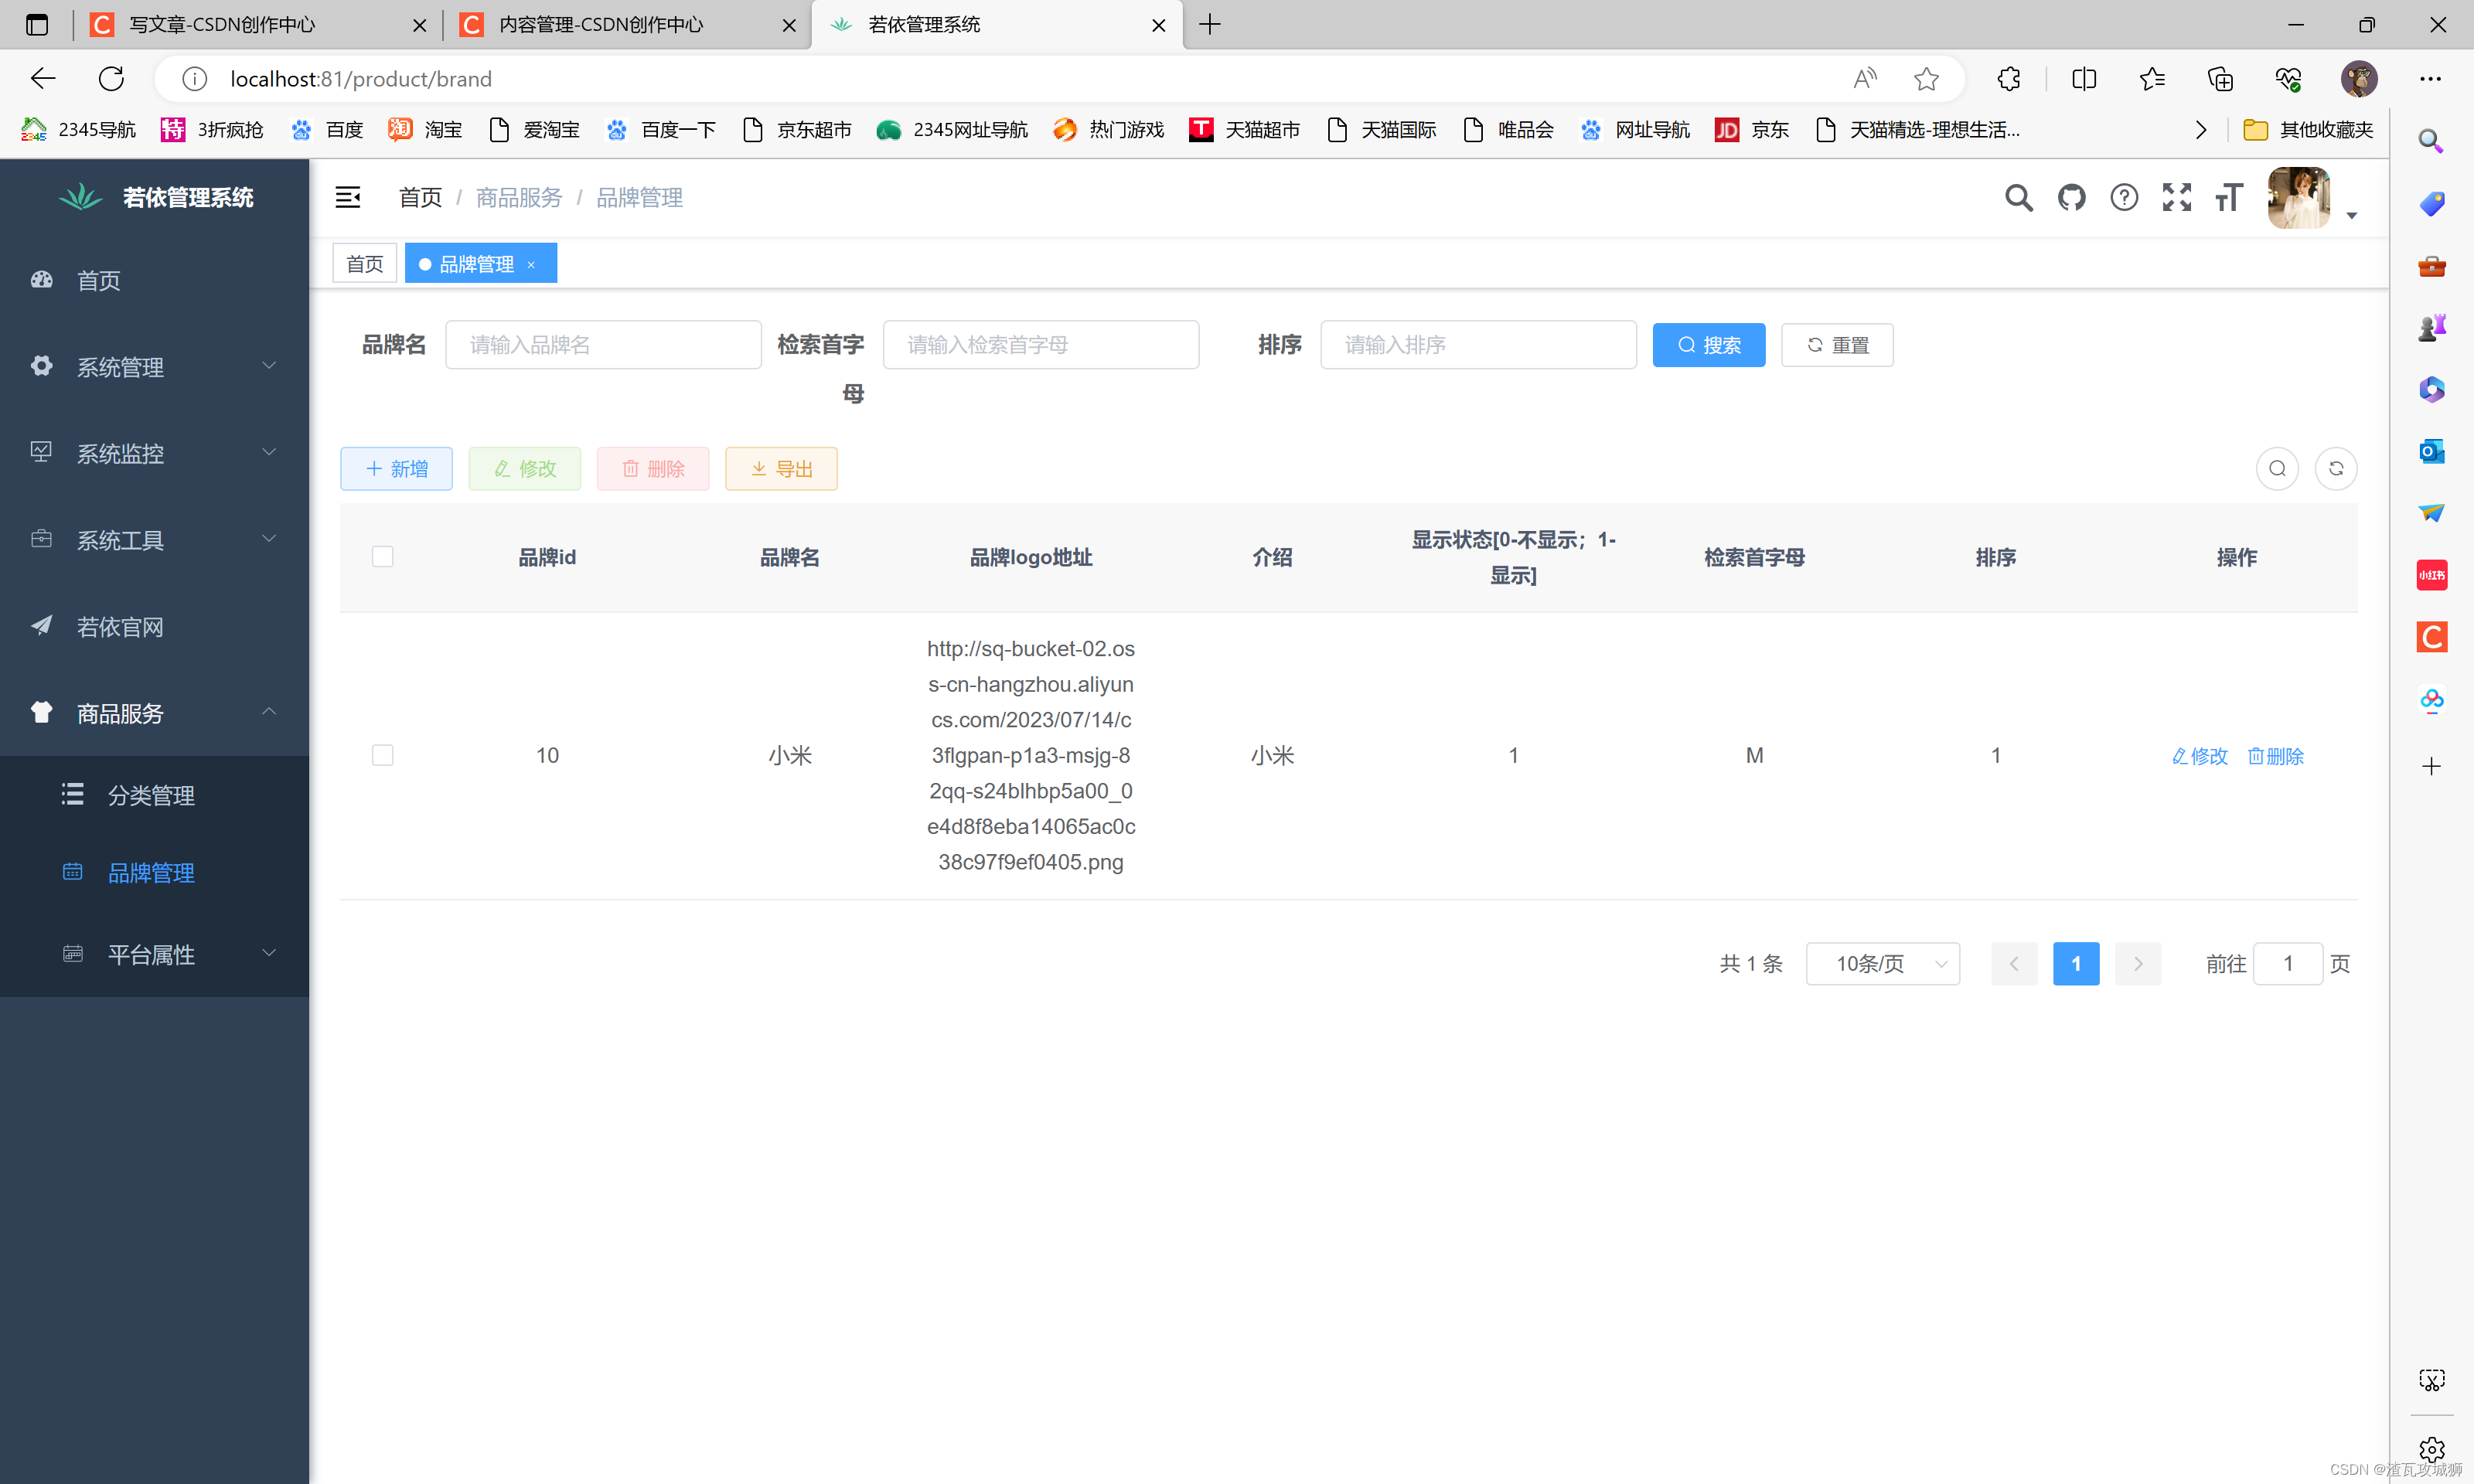
We found that the front-end generated by reverse engineering actually looks like the following three parts:
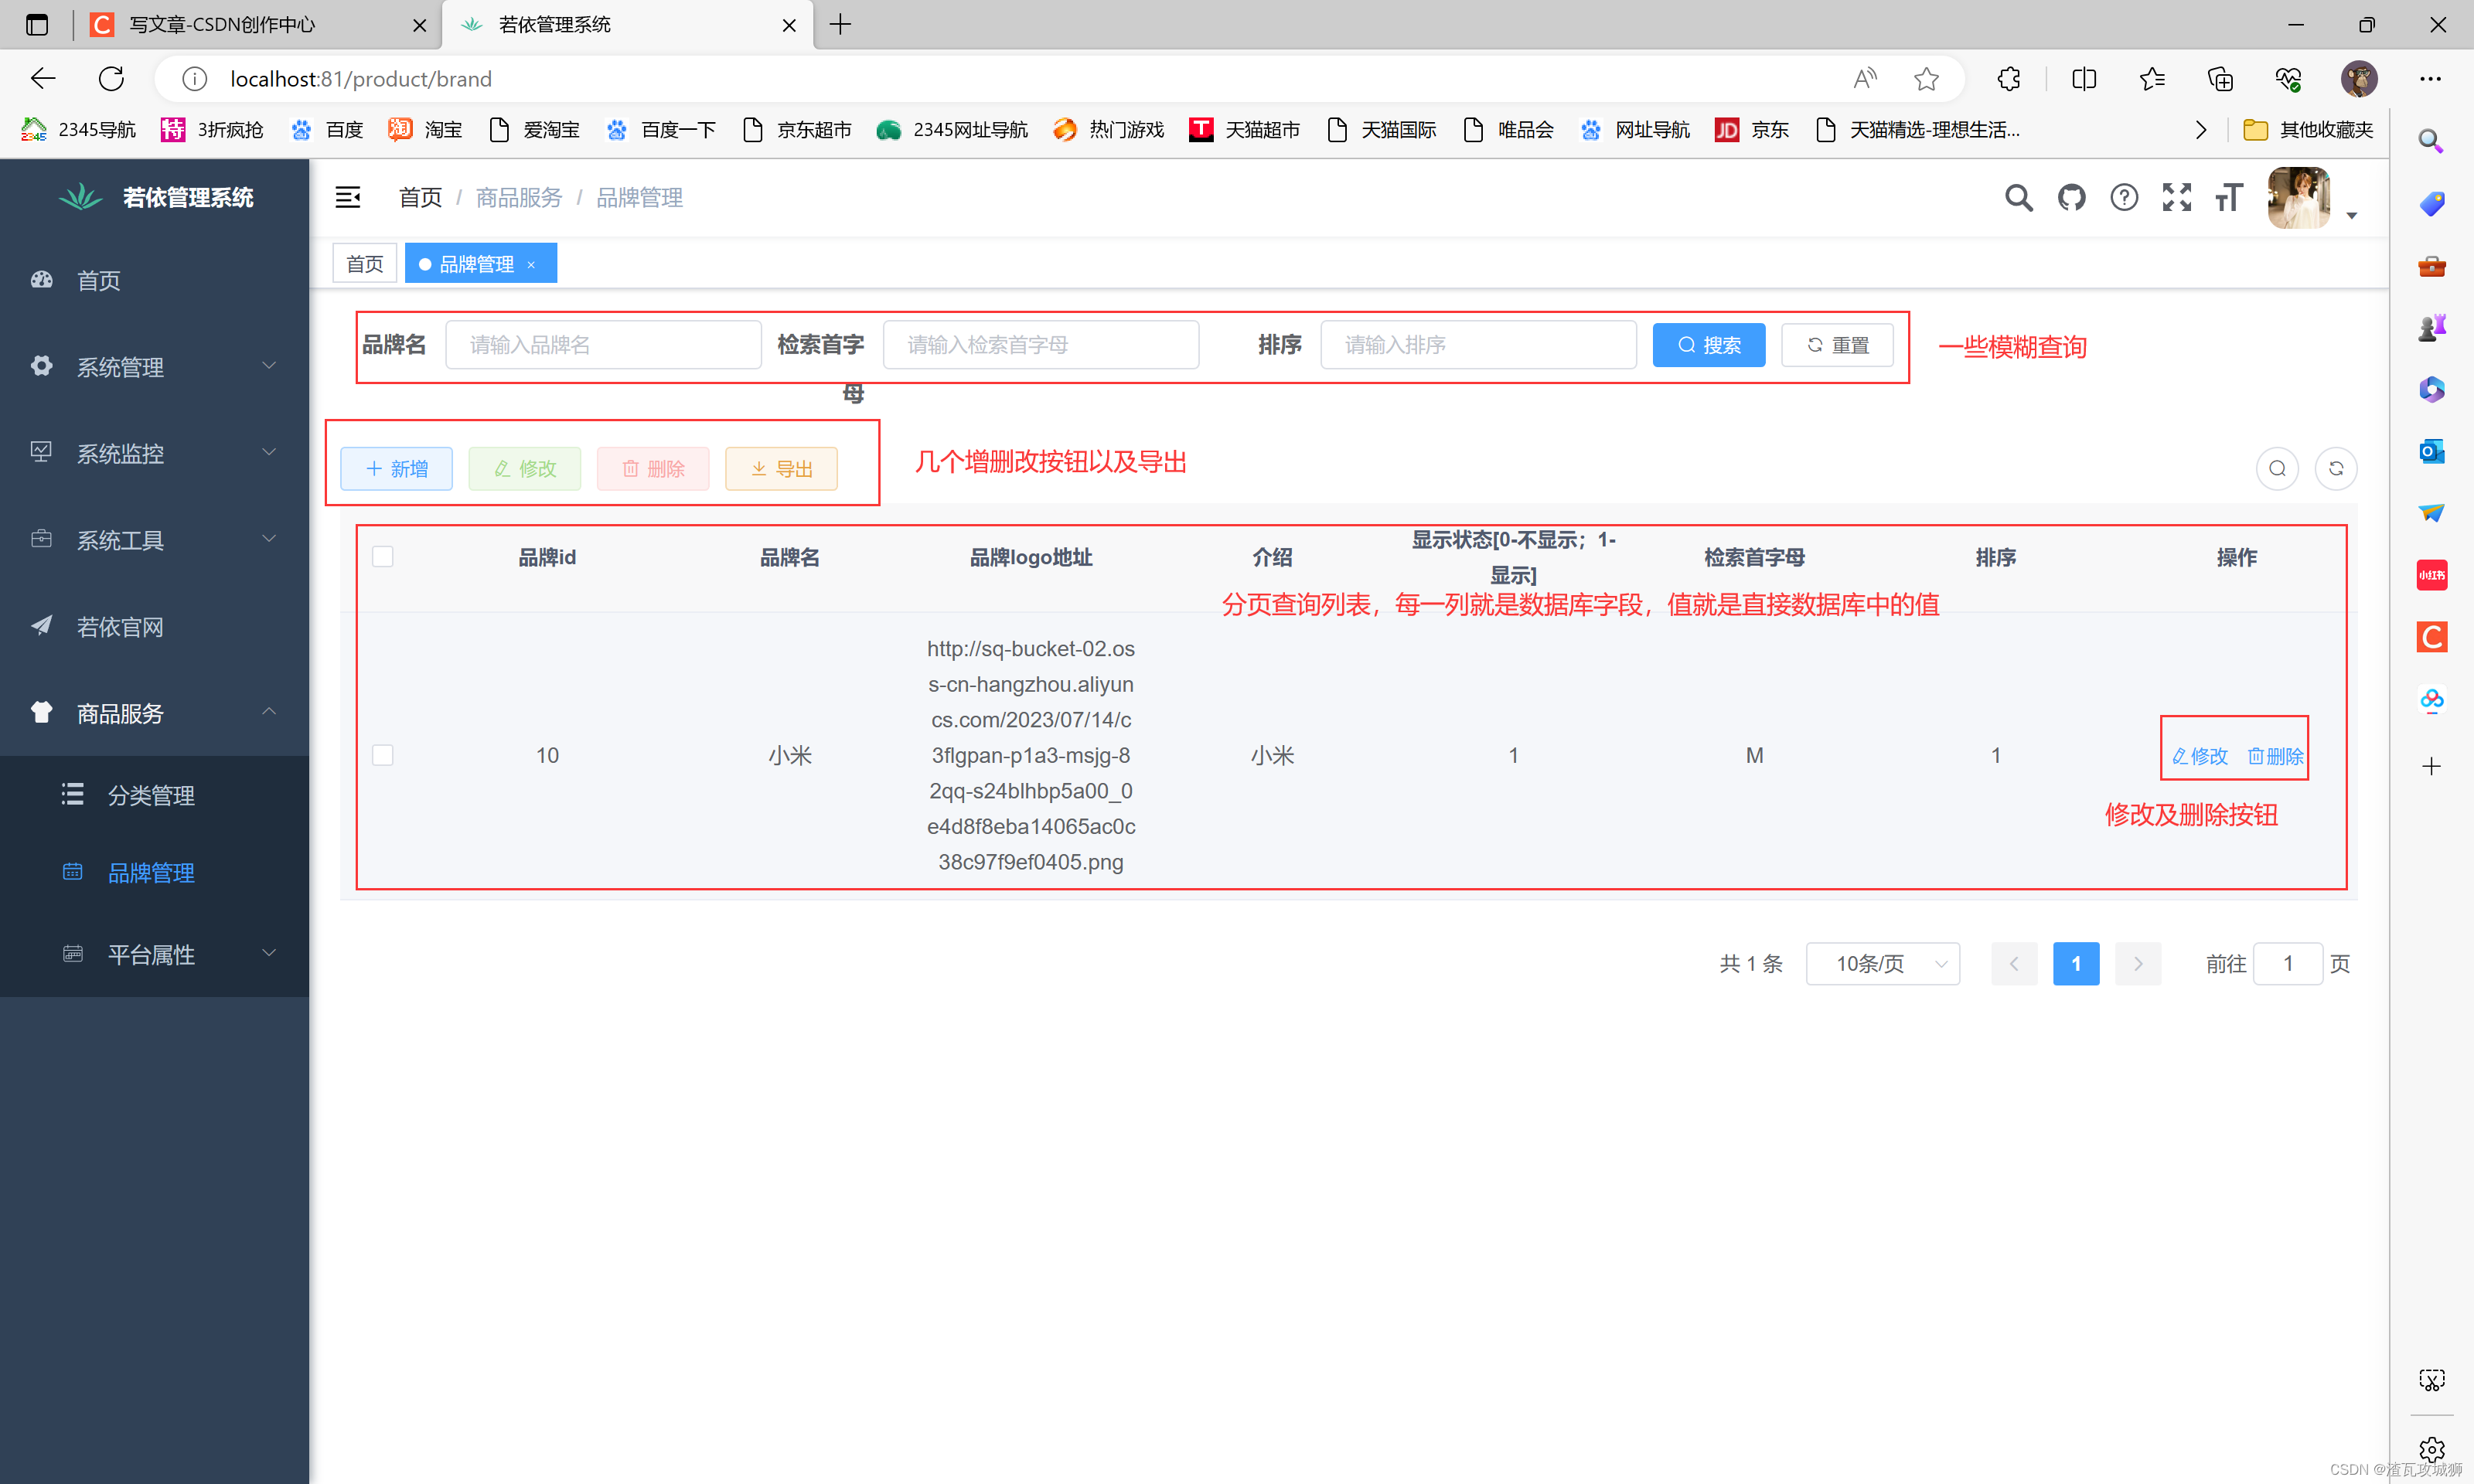 2.5 Areas that need optimization
It seems pretty good. Basically, we write these things ourselves. Now they have been written for us, which greatly improves the development efficiency. But generally speaking, it can’t be OK just like this. It still needs to be Optimization, or adjustments need to be made according to certain needs.
So which parts need us to adjust and optimize?
1. Modify the status column as a switch, and the same applies to the modification page.
For example, if this or other fields are displayed, 01 is used to indicate the status. Generally speaking, we do not want to display it so abruptly, mainly because it looks unsightly. The most important thing is that it is difficult to modify directly. It also needs Go to the modification pop-up window and manually enter 0 or 1 to modify it. This is inconvenient. If this attribute in this list is replaced with a switch, the modification pop-up window will not open and there is no need to manually enter the status value. Instead, you can modify it directly with just one click, which is very convenient.
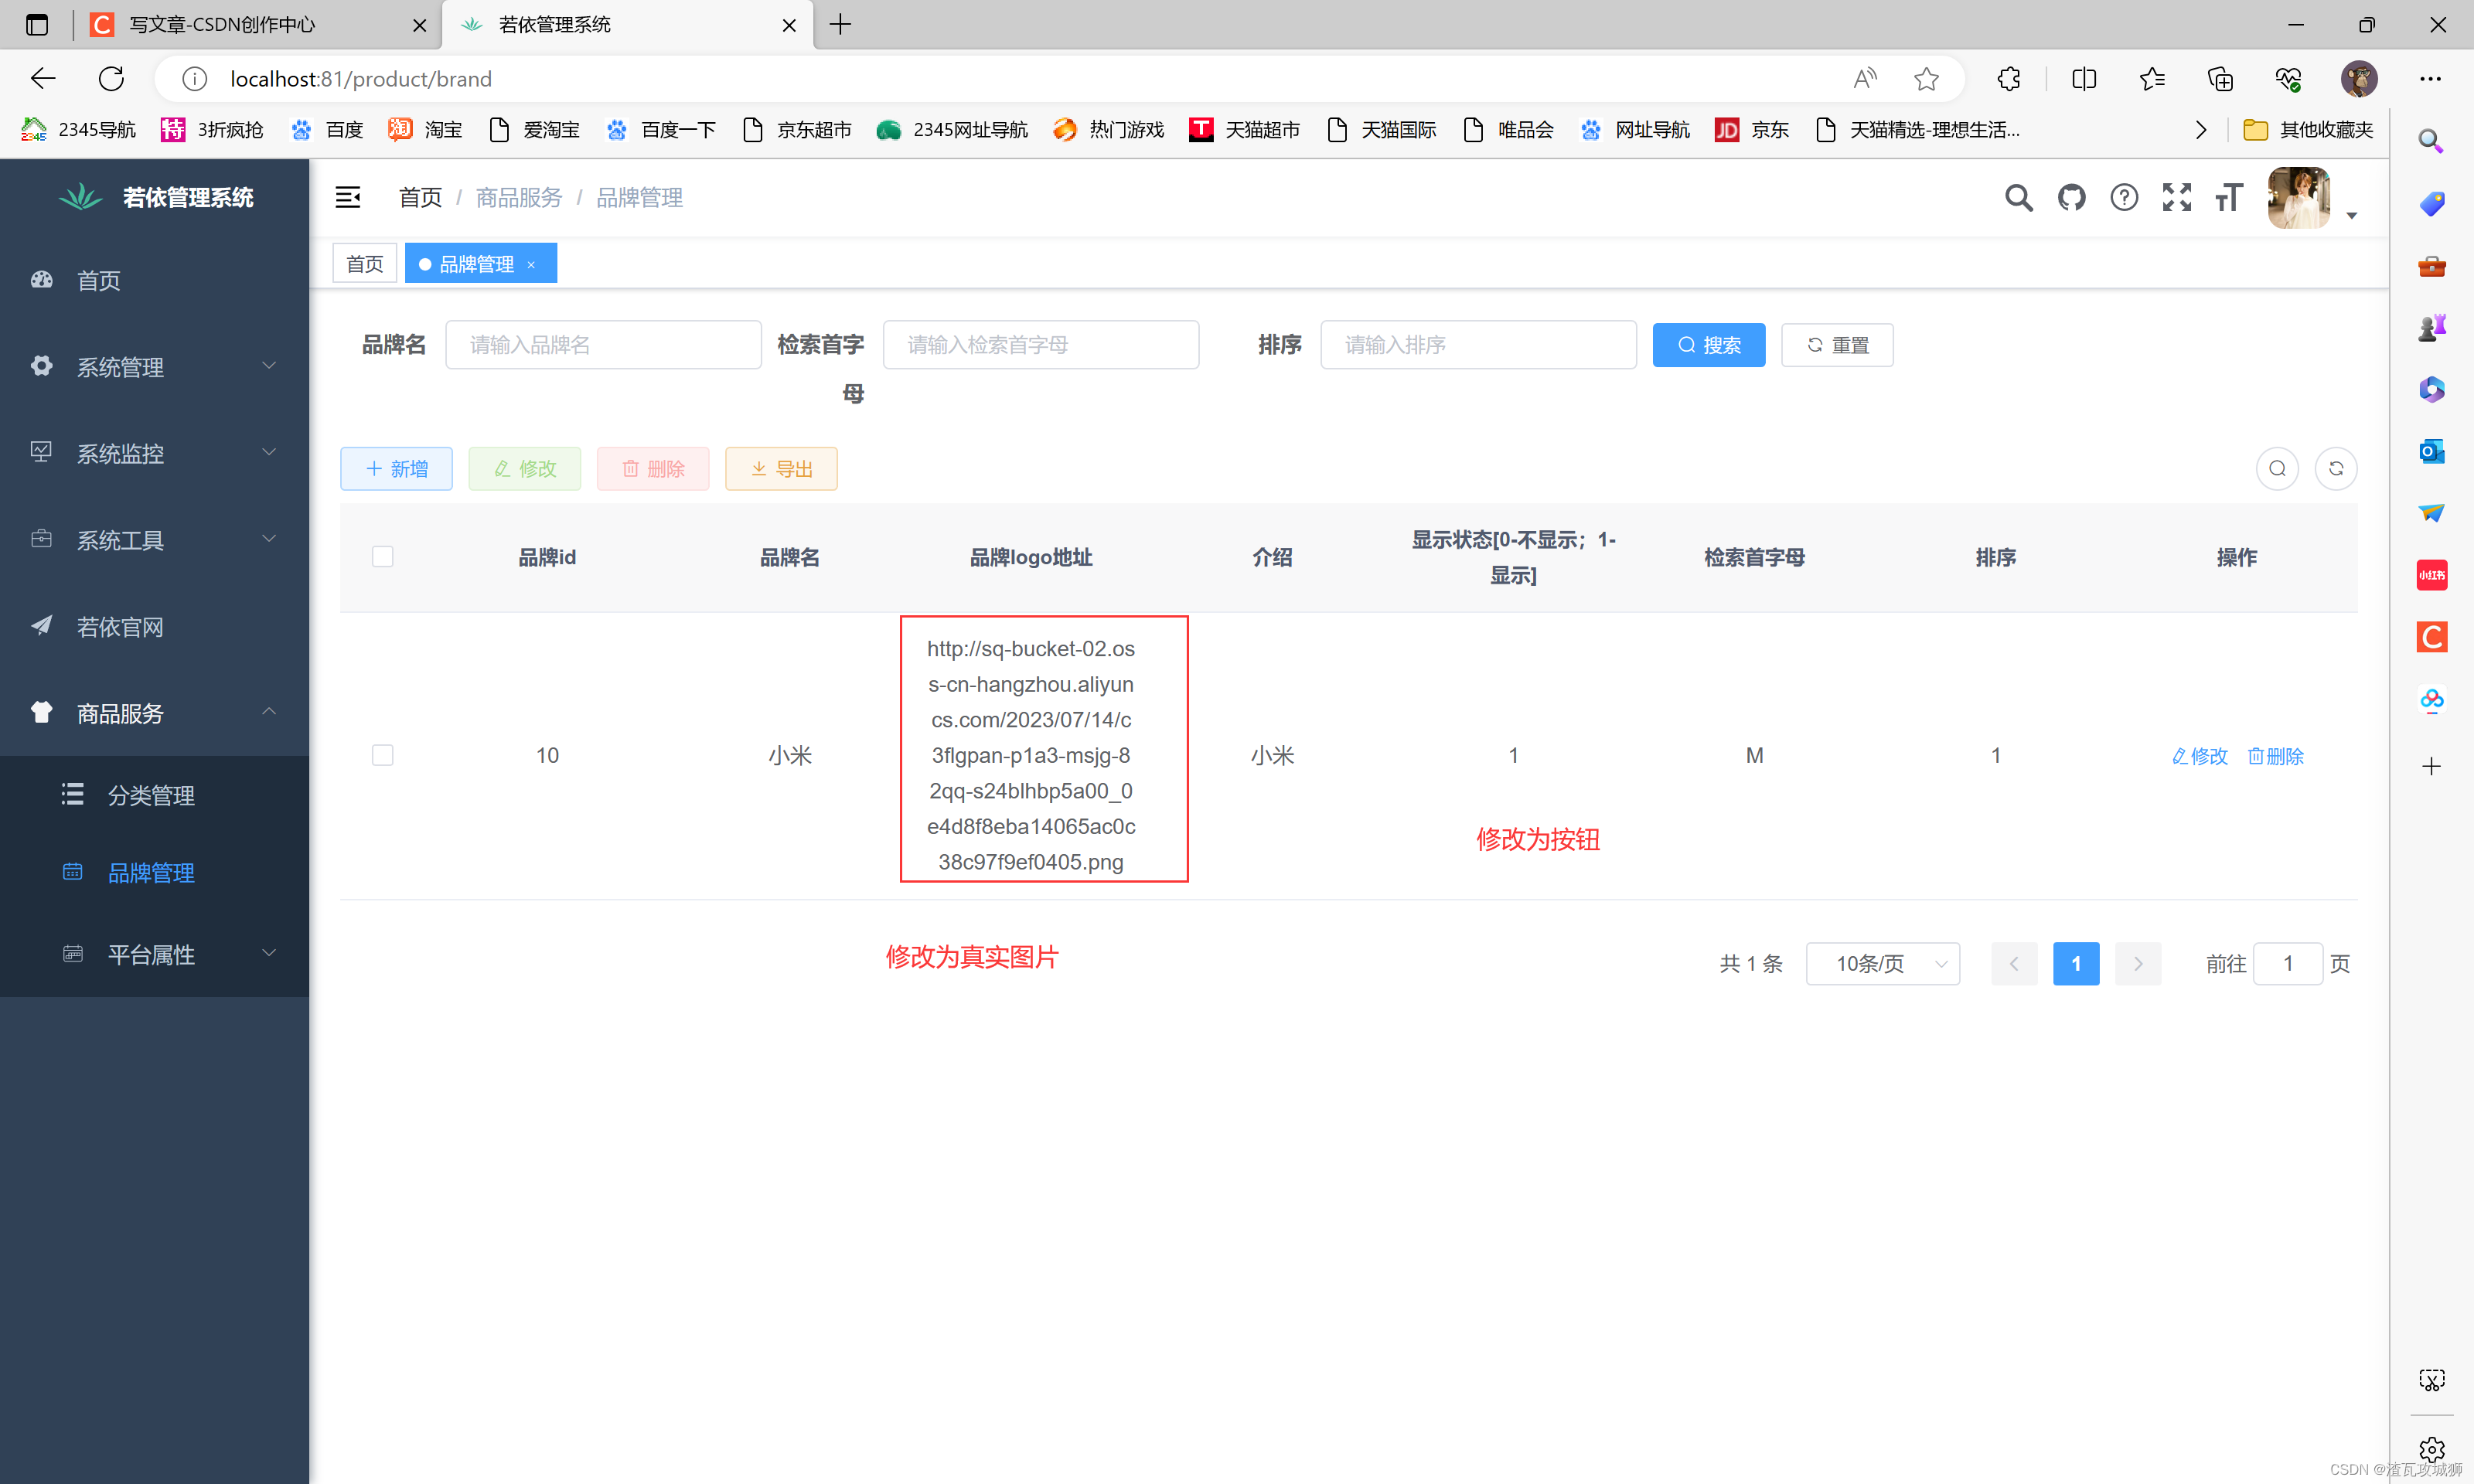
2. Modify the image address listed as the real image
This method of directly placing the image address is definitely not advisable. We don’t know what the image looks like at all. We only need to use the image component provided by elementUI to replace it.
3. When modifying the brand logo address on the page, it must be replaced by a file upload button.

Mainly these are these three parts. In other component pages, these are the places that need to be modified.
2.6 Specific optimization implementation
2.6.1 Optimization 1: Modify the status column of the table (here, whether to display the column) to a switch, and add a displayable modification switch on the modification page.
Now this column of the table is already text? How to replace it?
In fact, it is very simple. Since we want to replace a column in the table, we must refer to the table component in elementUI. How to replace it? You must have this awareness: check the documentation of which component you want to modify (ps: it sounds like nonsense, but it is very important, this is how the idea came about).
Okay, now go to the official website to view the documentation of the table component to see how to replace column values:
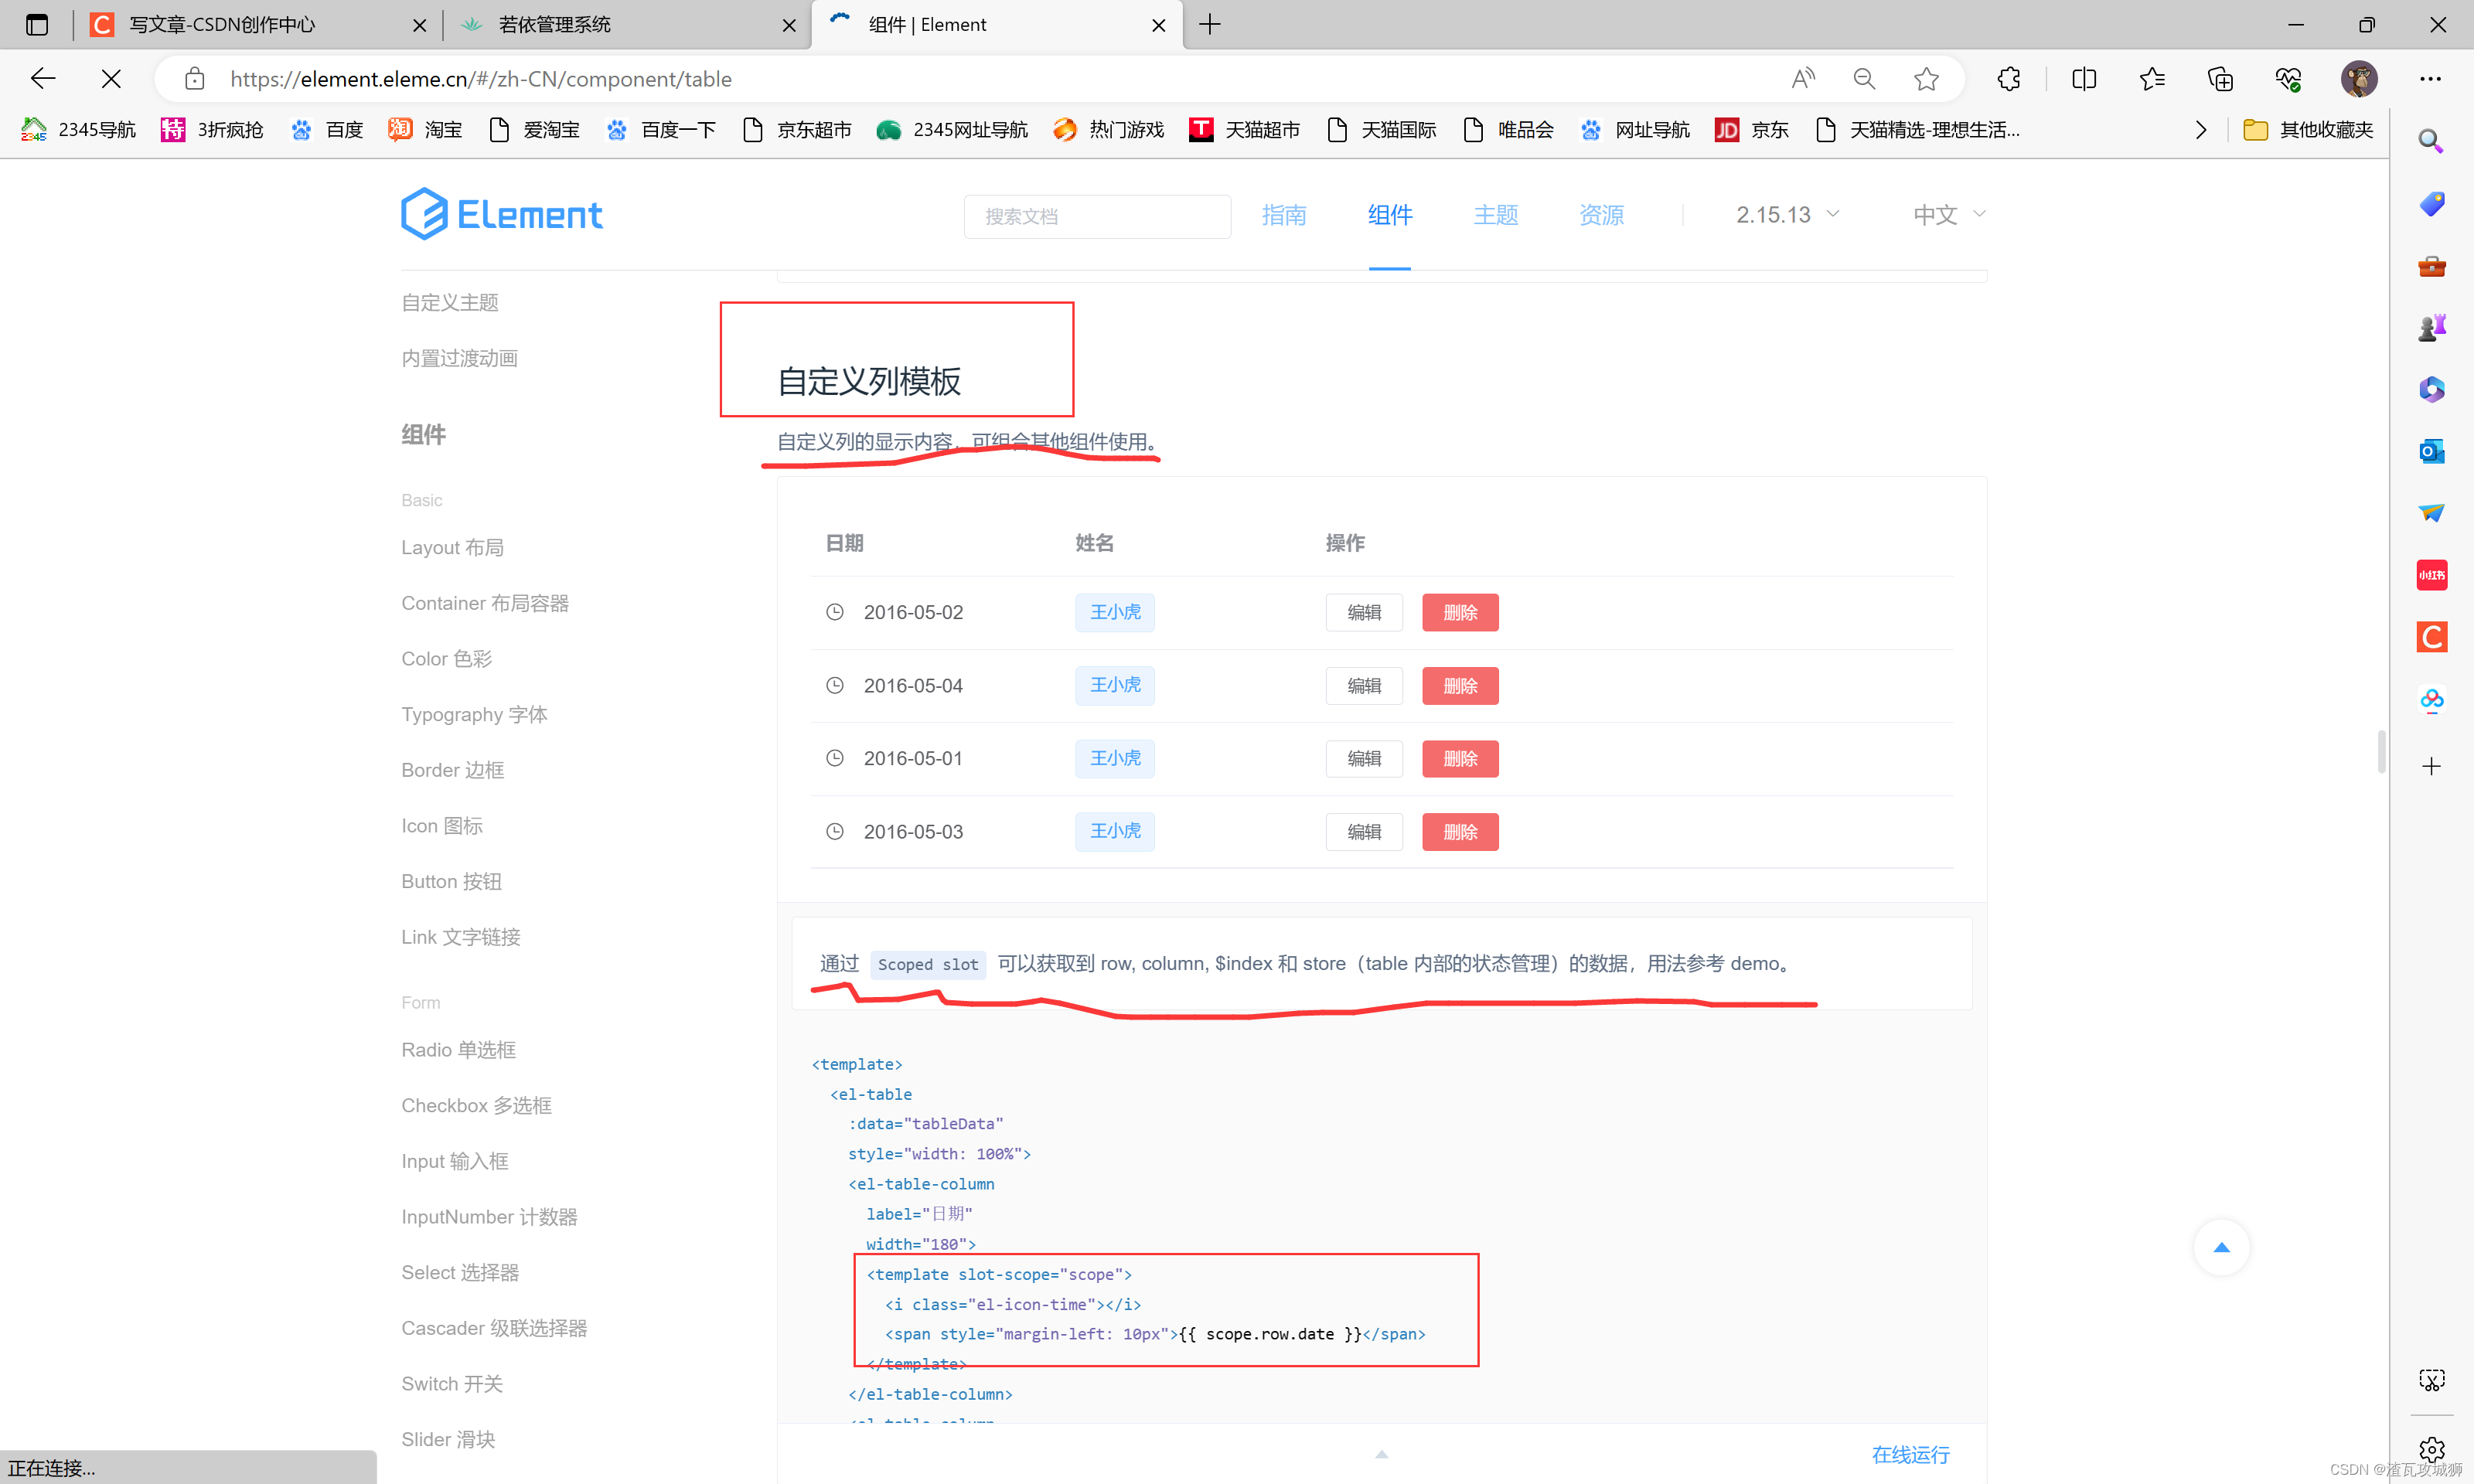
Find this custom template. We copy this template directly into our own component:
At table column:

This is just a template, just like the templates in the three major parts of the component file. In fact, it stipulates the location where the component is written. Specifically, the component must be written in it. For example, now the switch component needs to be placed, and the logo address of the subsequent table The picture component needs to be placed in that column. The current task is to continue to the official website to find the modified status switch component:
By putting it in that template, you can display a switch in the column that is displayed on the web page.
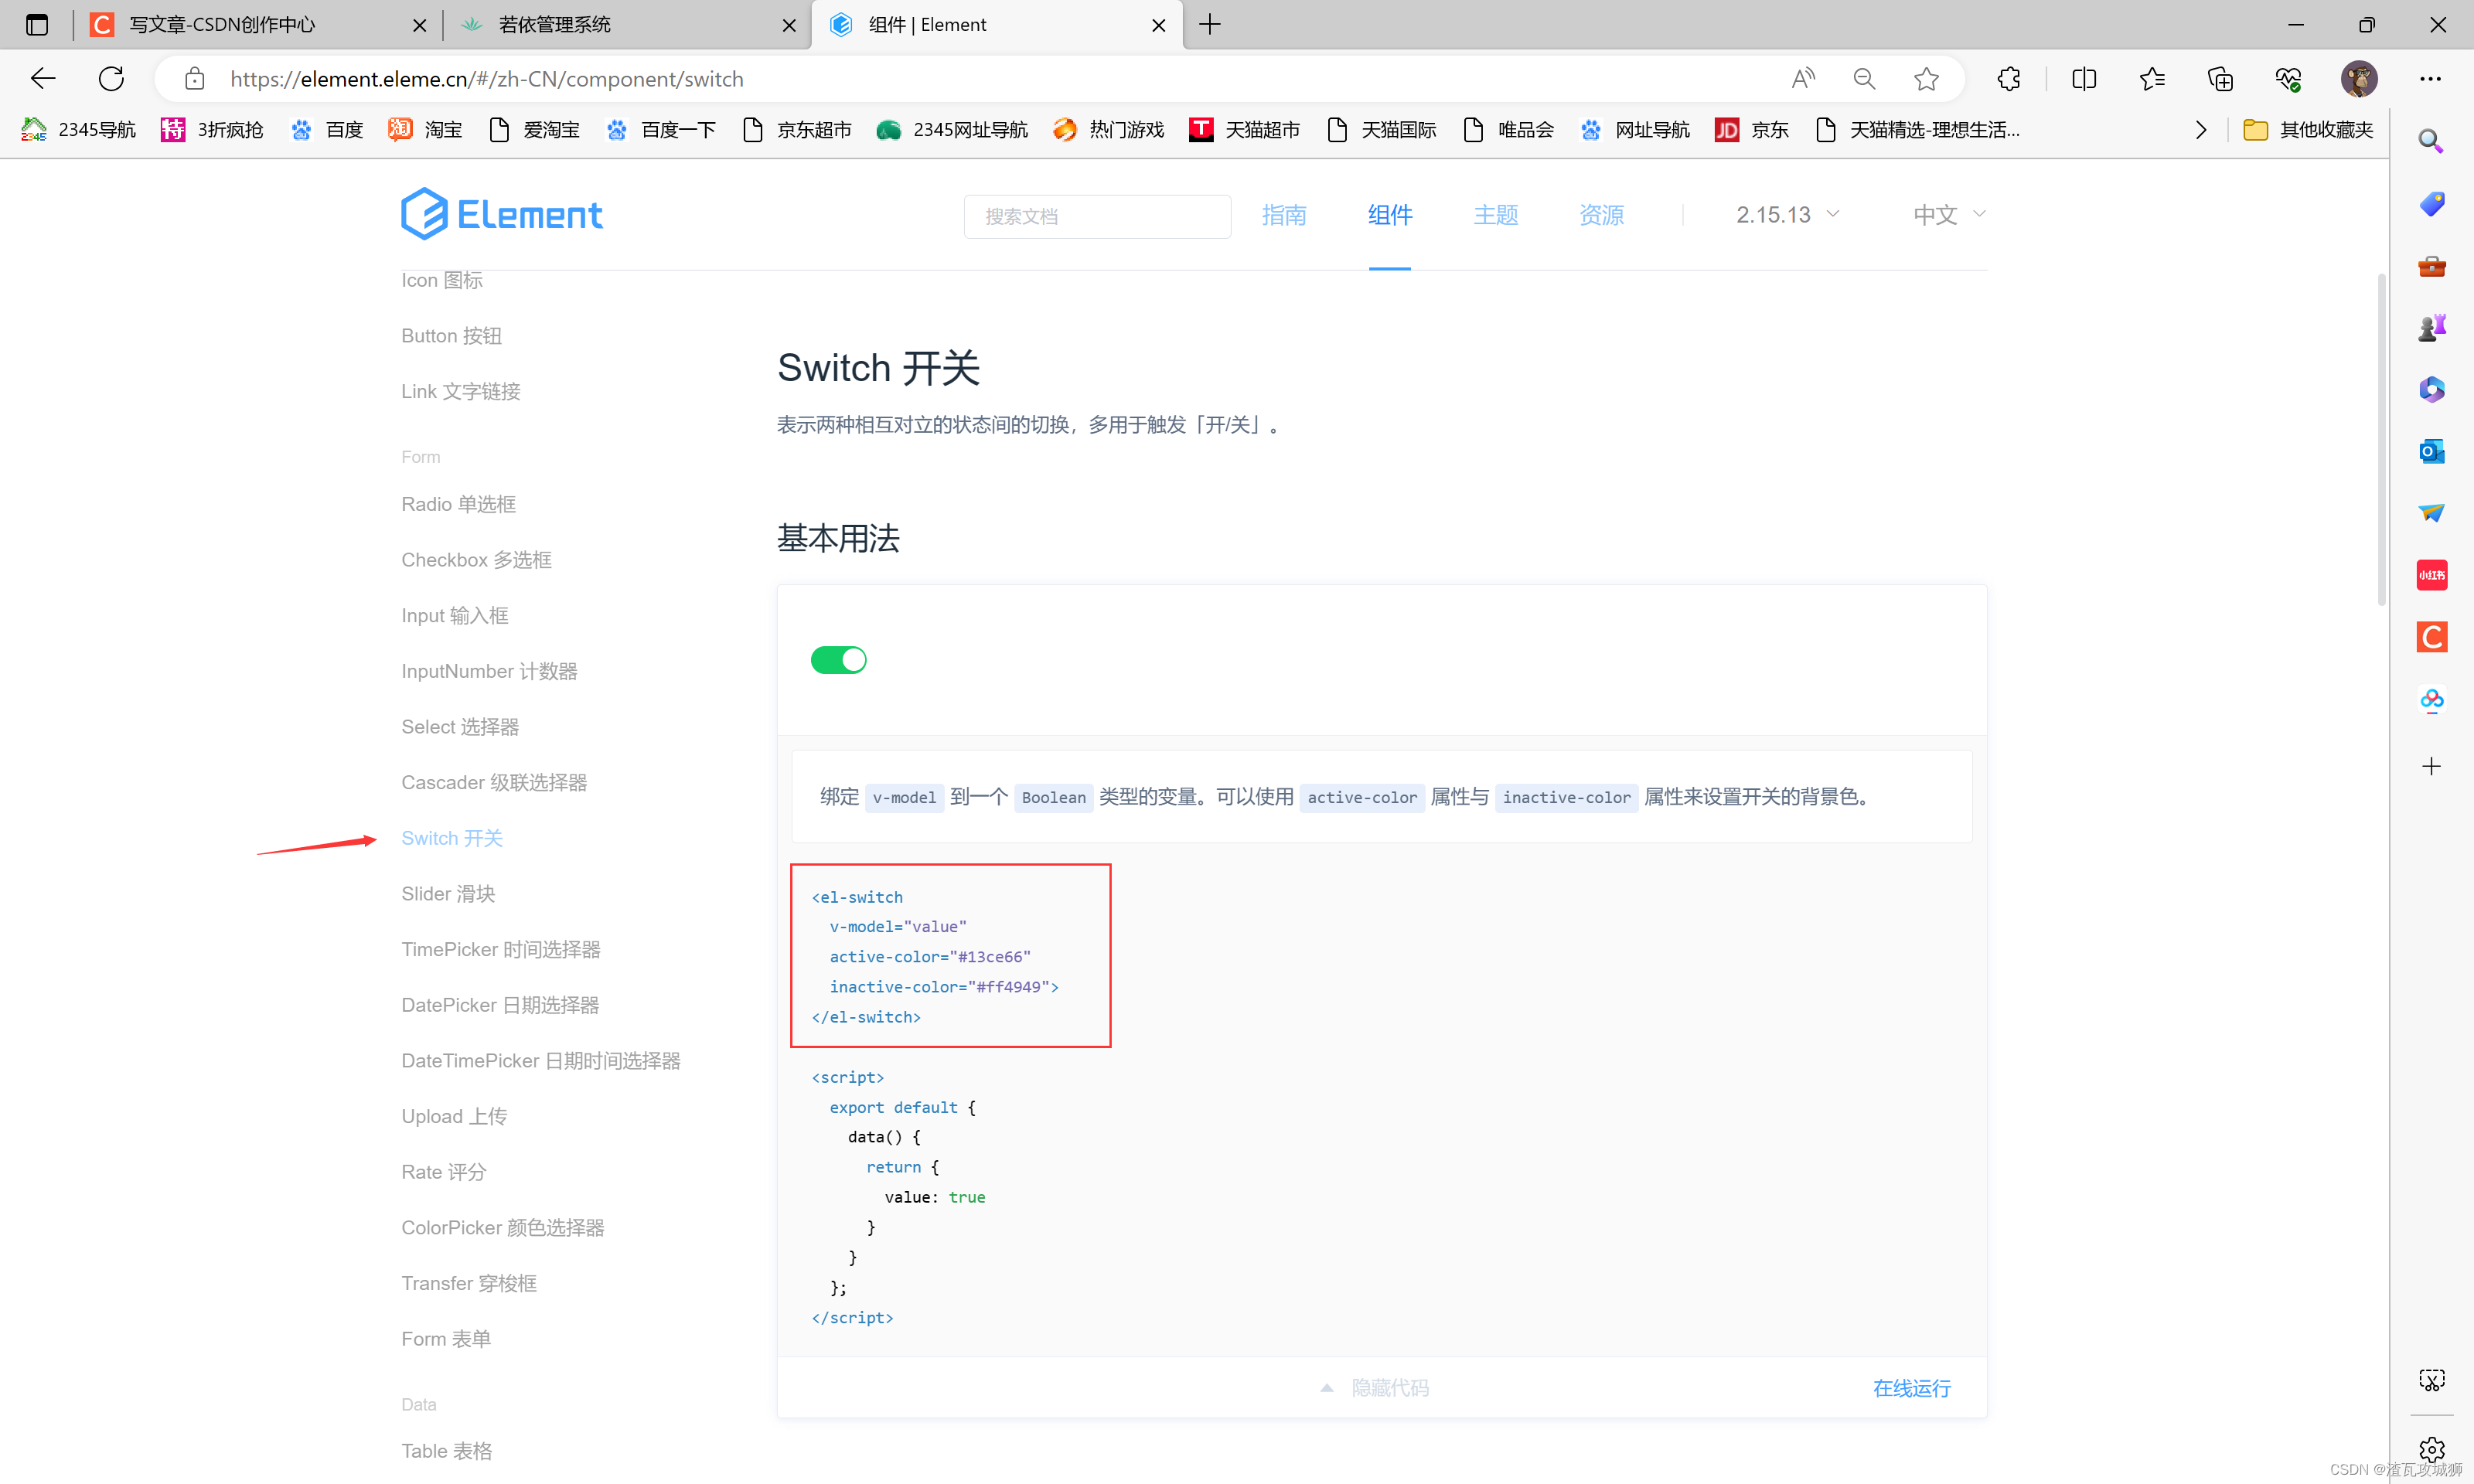
The most important thing is to associate the decision of whether the switch is open or closed with the data in the data field, and use the v-model instruction for dynamic binding:
The key here is to understand how this column is represented in the data field! ! ! it's actually really easy
But there is a problem here, that is, no matter in my database, whether the value is 0 or 1, that is, whether the switch is displayed or not displayed, it is closed. So what is going on? In fact, we need to have such an awareness that the opening and closing of this switch must be affected by a value, which is the form.showStatus I bound here, which corresponds to this column value of the object in the database.
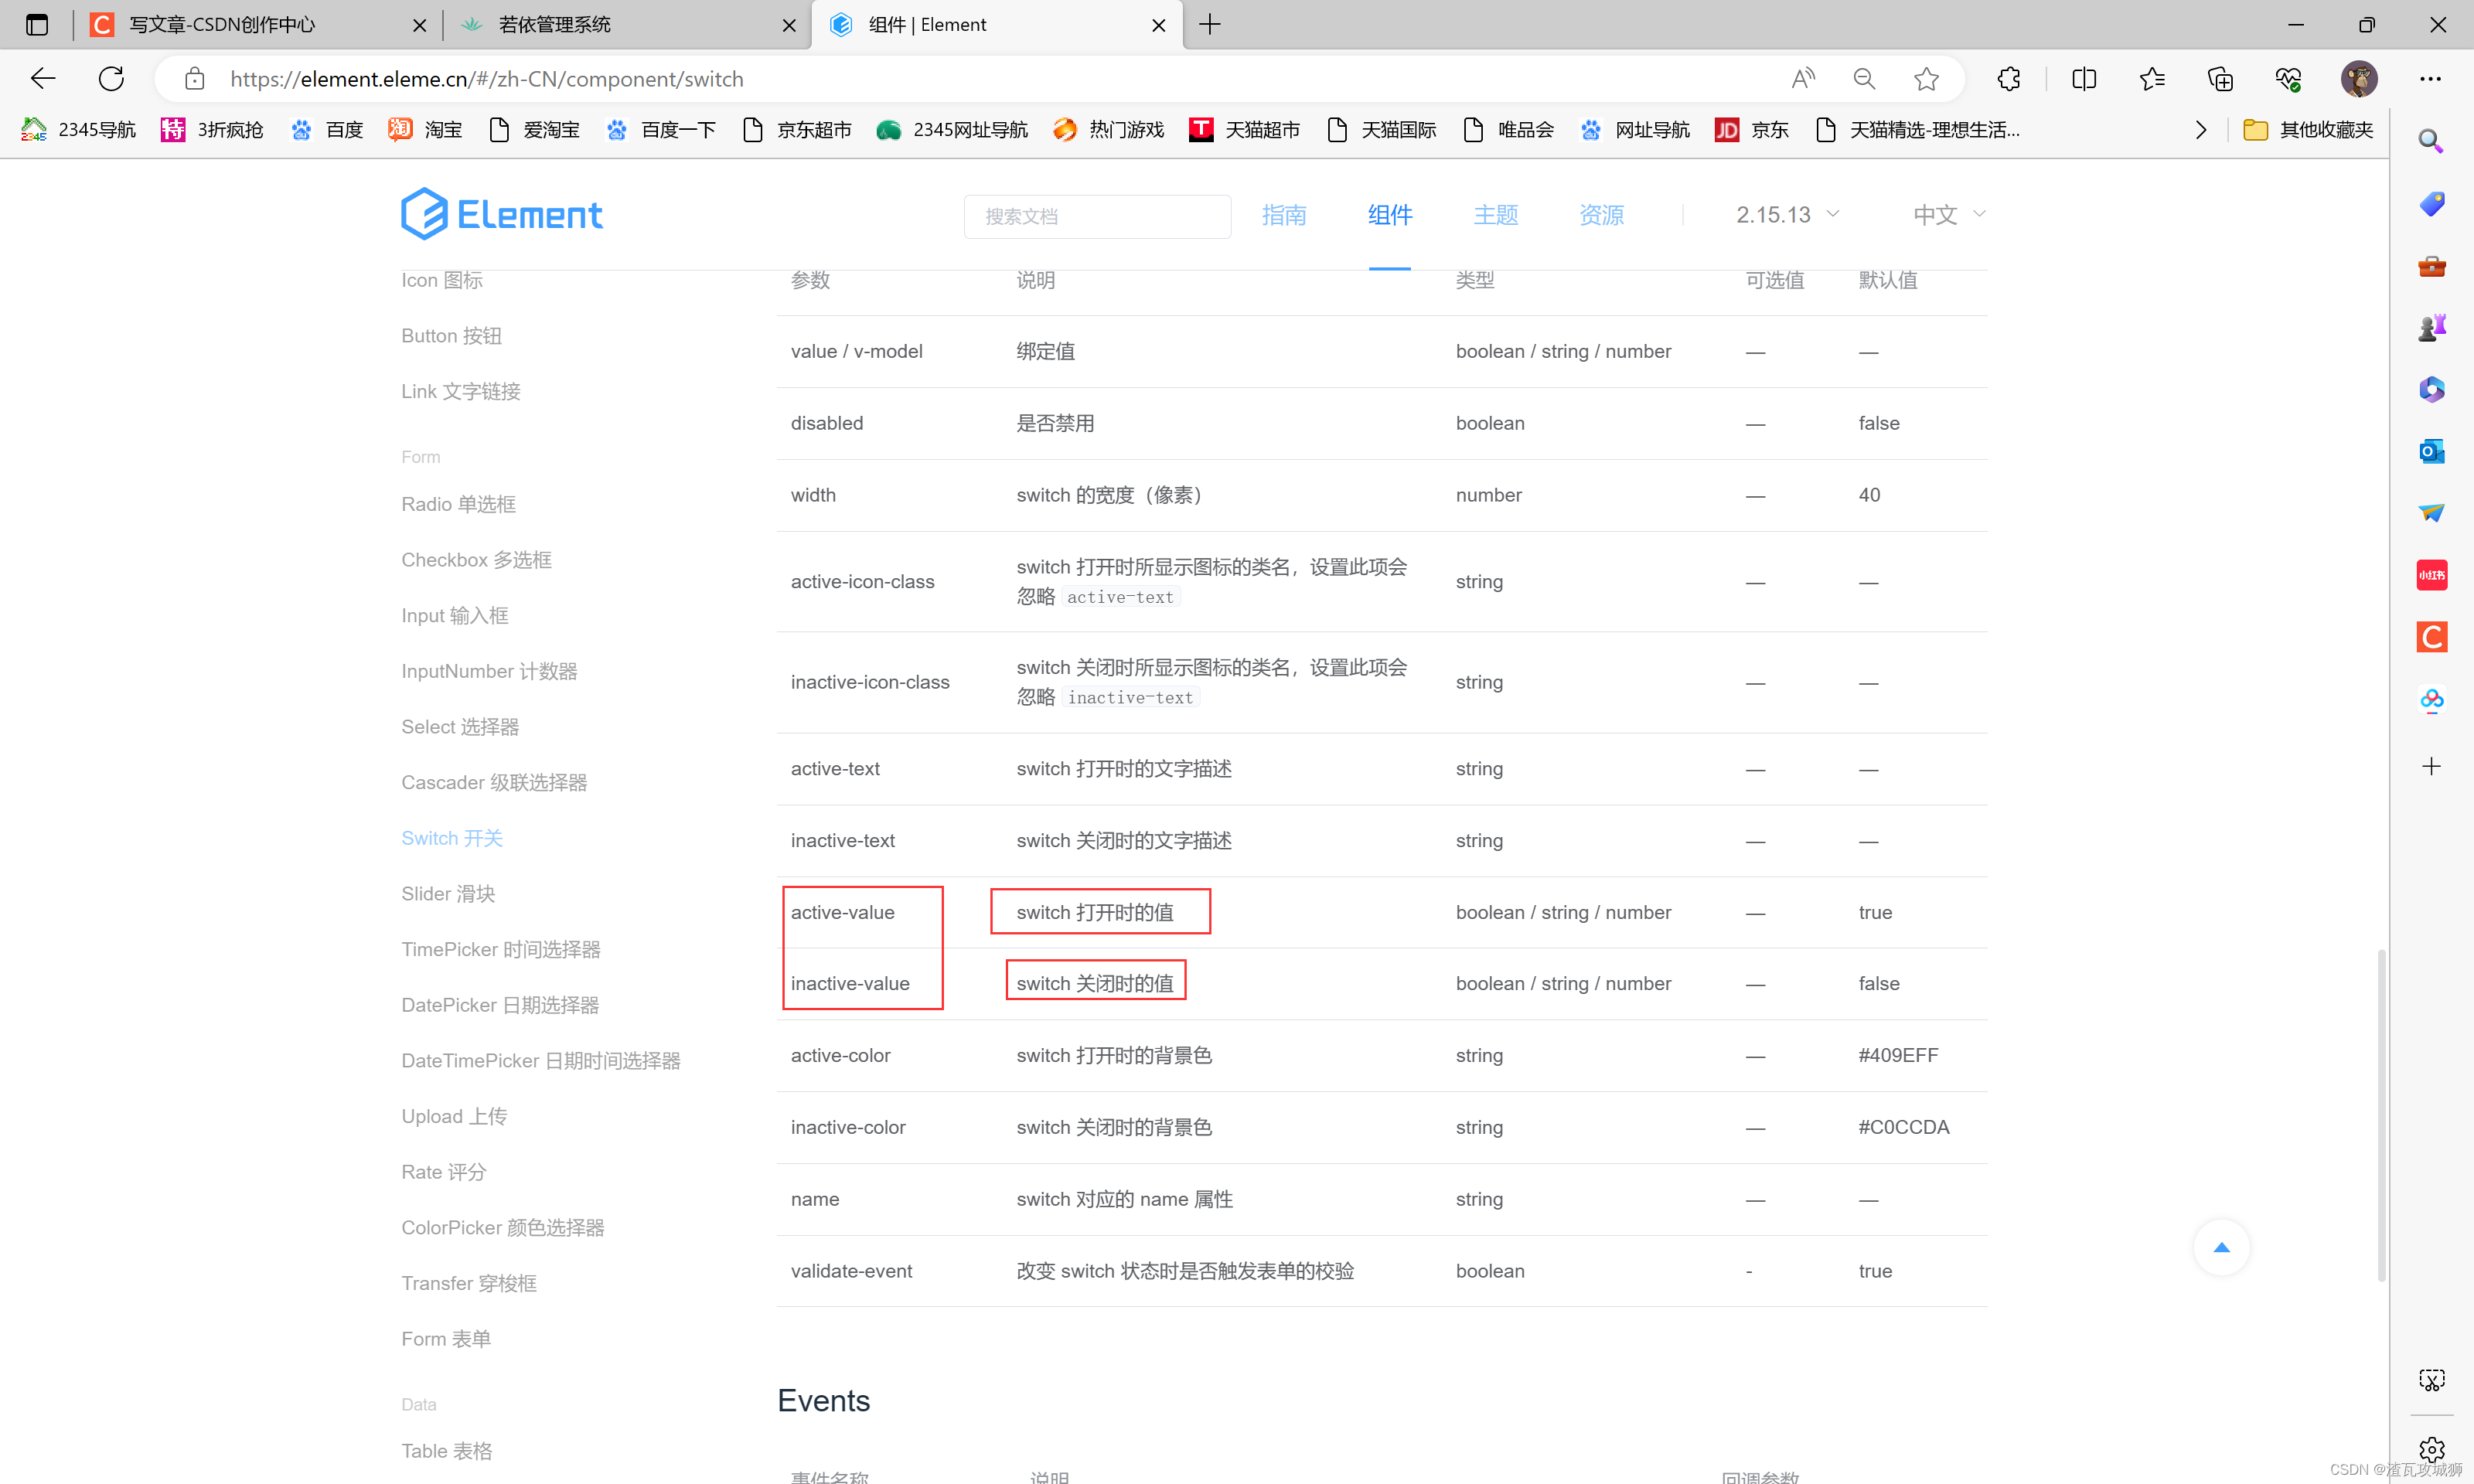
We know that the value of this column in the database will only be 0 or 1. In fact, this switch component does not know that 0 means off and 1 means on. It defaults to deciding whether to turn on or off based on a Boolean value, false means off, and true It means on, which is the default. Then we must generally not store Boolean values in our database, so we must change them. ElementUI also knows that there will definitely be such a demand, so it provides corresponding parameters to specify by yourself, what value is on, off What is the value again. The elememtUI official website has made it very clear:
Because it needs to be dynamically bound to the attributes in the data domain, it needs to be specified by adding a colon before the parameter.
The final look looks like this ( ps: Every step has been explained in detail here. If you still don’t understand, please send me a private message ):
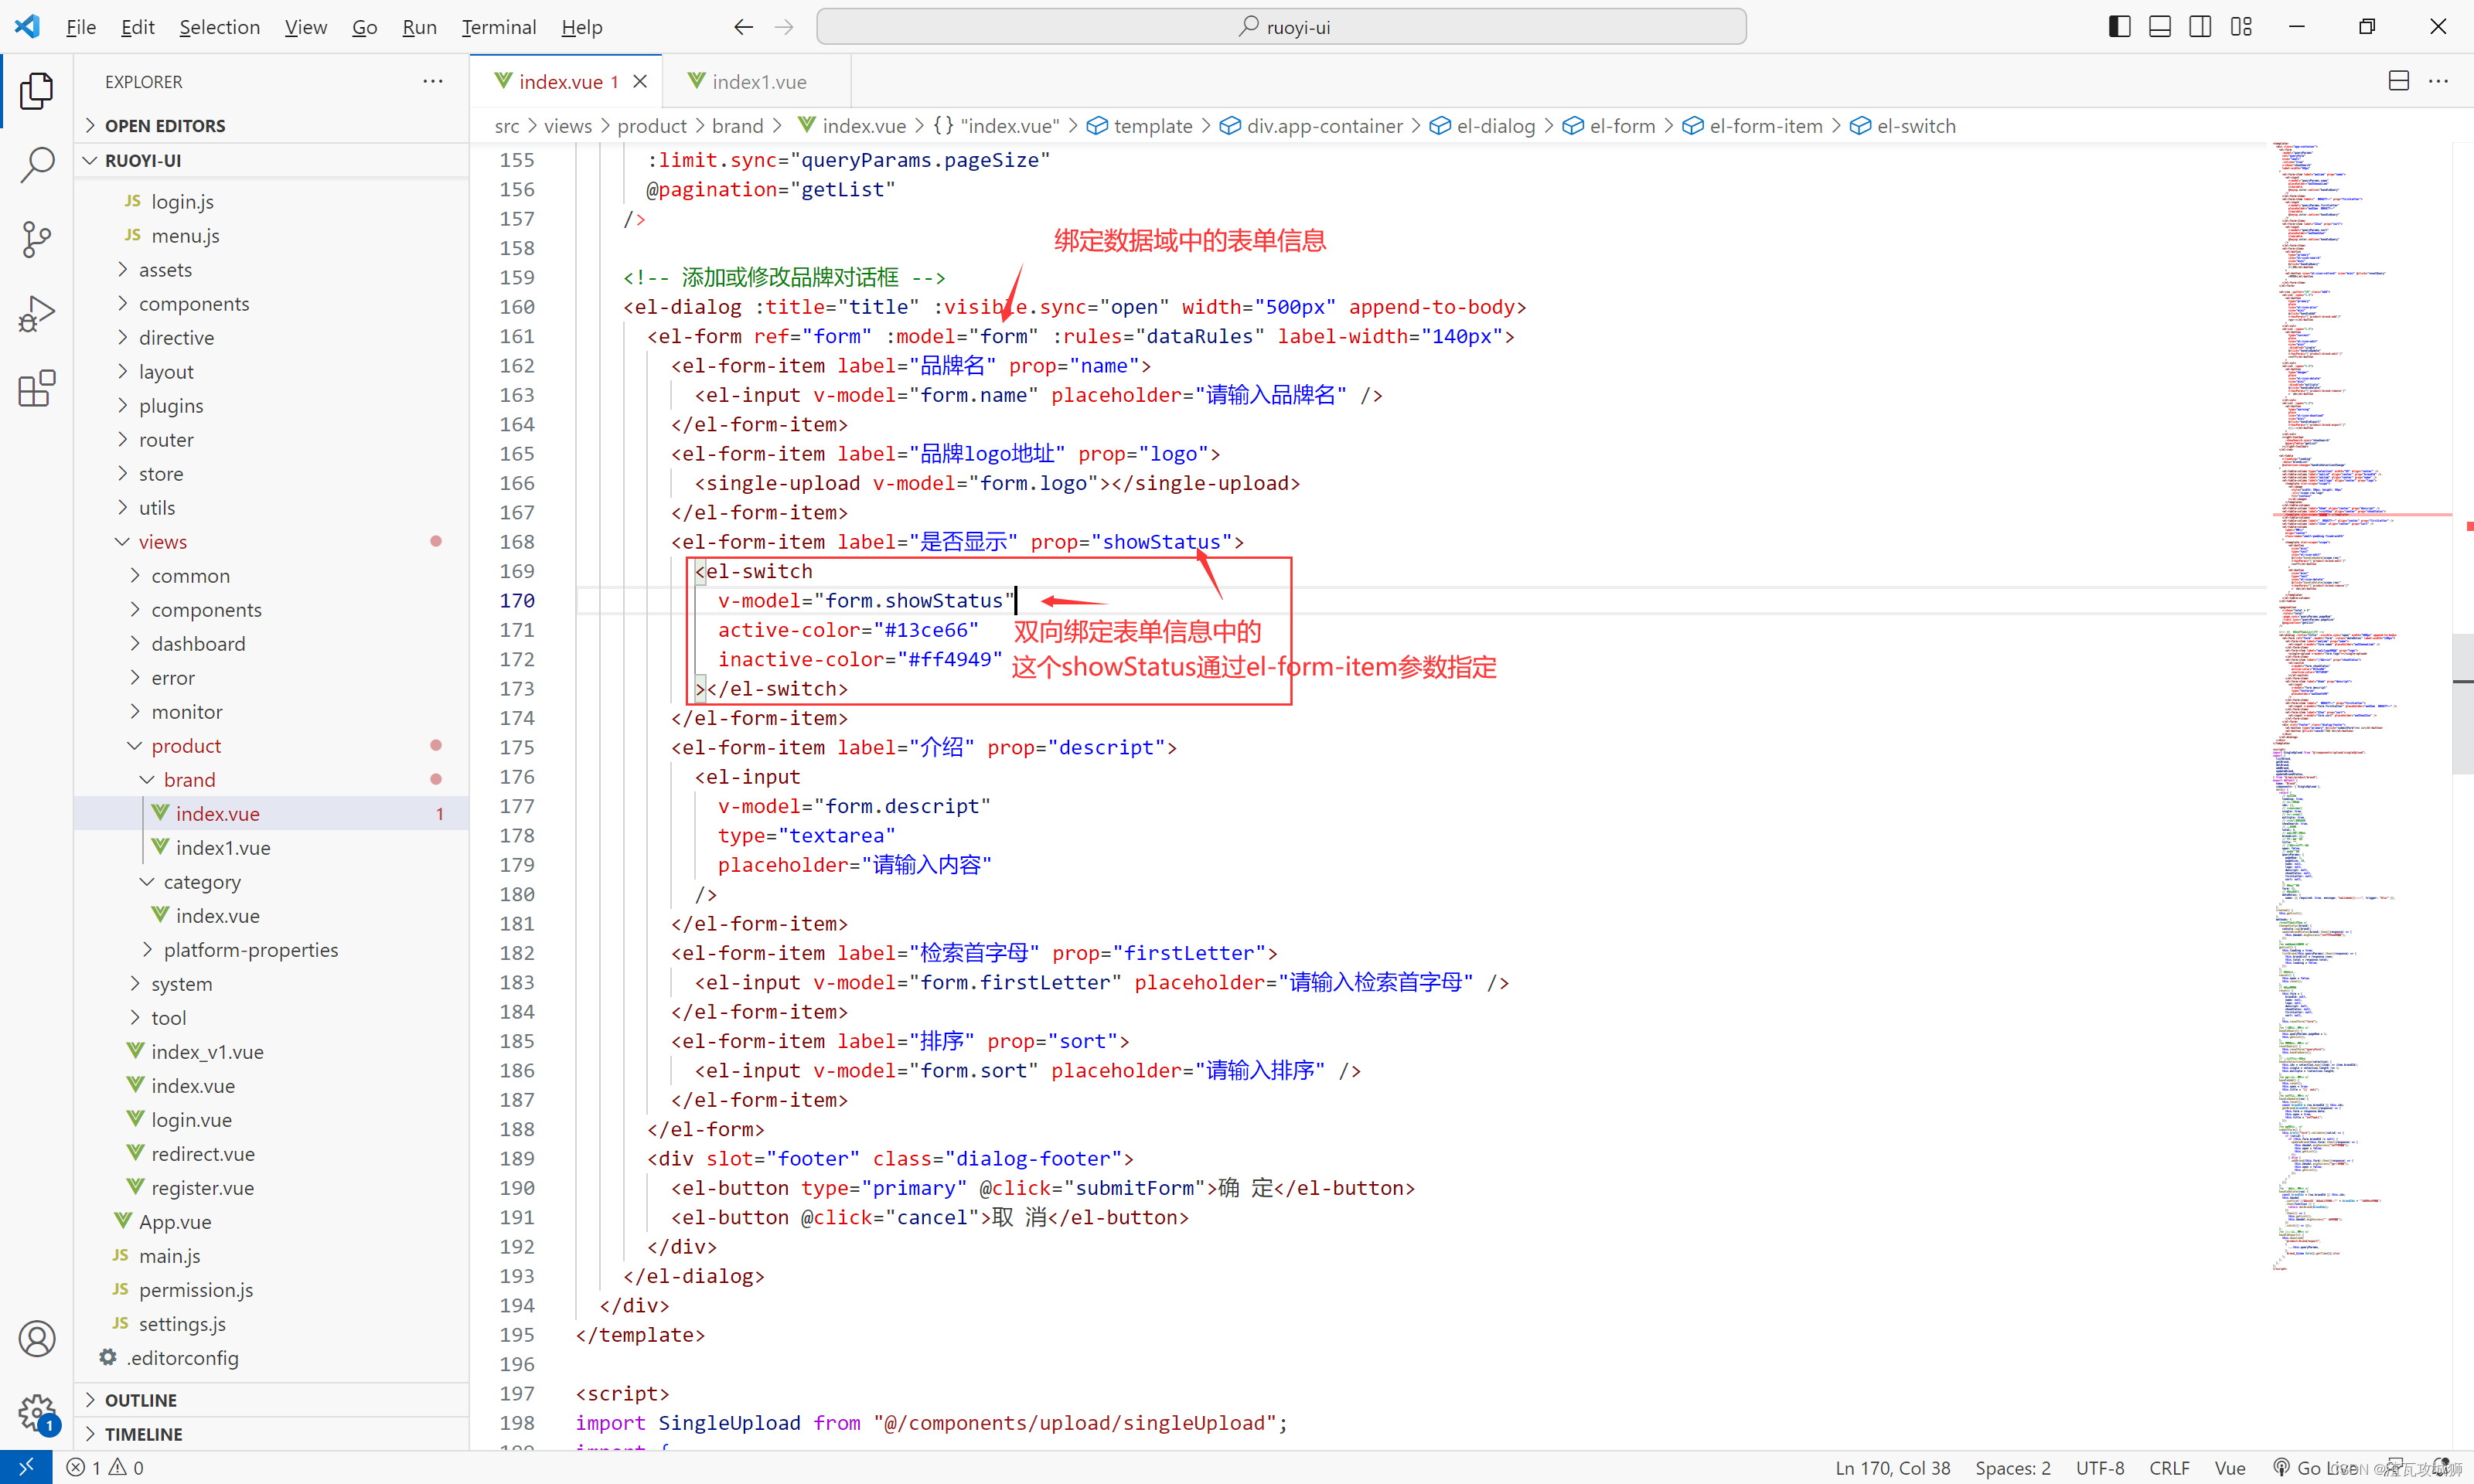
 Don't forget to add it when modifying the page. They're all the same thing, just the binding values are different:
Below I directly give the code for these two places:
<el-table-column label="显示状态" align="center" prop="showStatus">
        <template slot-scope="scope">
          <el-switch
            @change="changeStatus(scope.row)"
            v-model="scope.row.showStatus"
            active-color="#13ce66"
            inactive-color="#ff4949"
            :active-value="1"
            :inactive-value="0">
          </el-switch>
        </template>
      </el-table-column>
<el-form-item label="是否显示" prop="showStatus">
<el-switch
v-model="form.showStatus"
active-color="#13ce66"
inactive-color="#ff4949"
:active-value="1"
:inactive-value="0"
></el-switch>
</el-form-item>At this point, this optimization work has been completed; it is actually very simple, just add a template to the column you want to replace, and then place a switch component. You just need to pay attention to modifying the switching rules of the switch.
2.6.2 Optimization 2: Change the logo address text box to a file upload button on the modification page
This is where I need to spend a lot of time talking about, mainly using oss to upload files. As for the front-end part here, the main thing is to know how to add a file upload button, and then pay attention to the many parameters associated with this button.
The oss upload method used here is to carry the credentials and then directly upload the file to the Alibaba Cloud server.
The key here lies in two points:
1. Where does the upload file component come from?
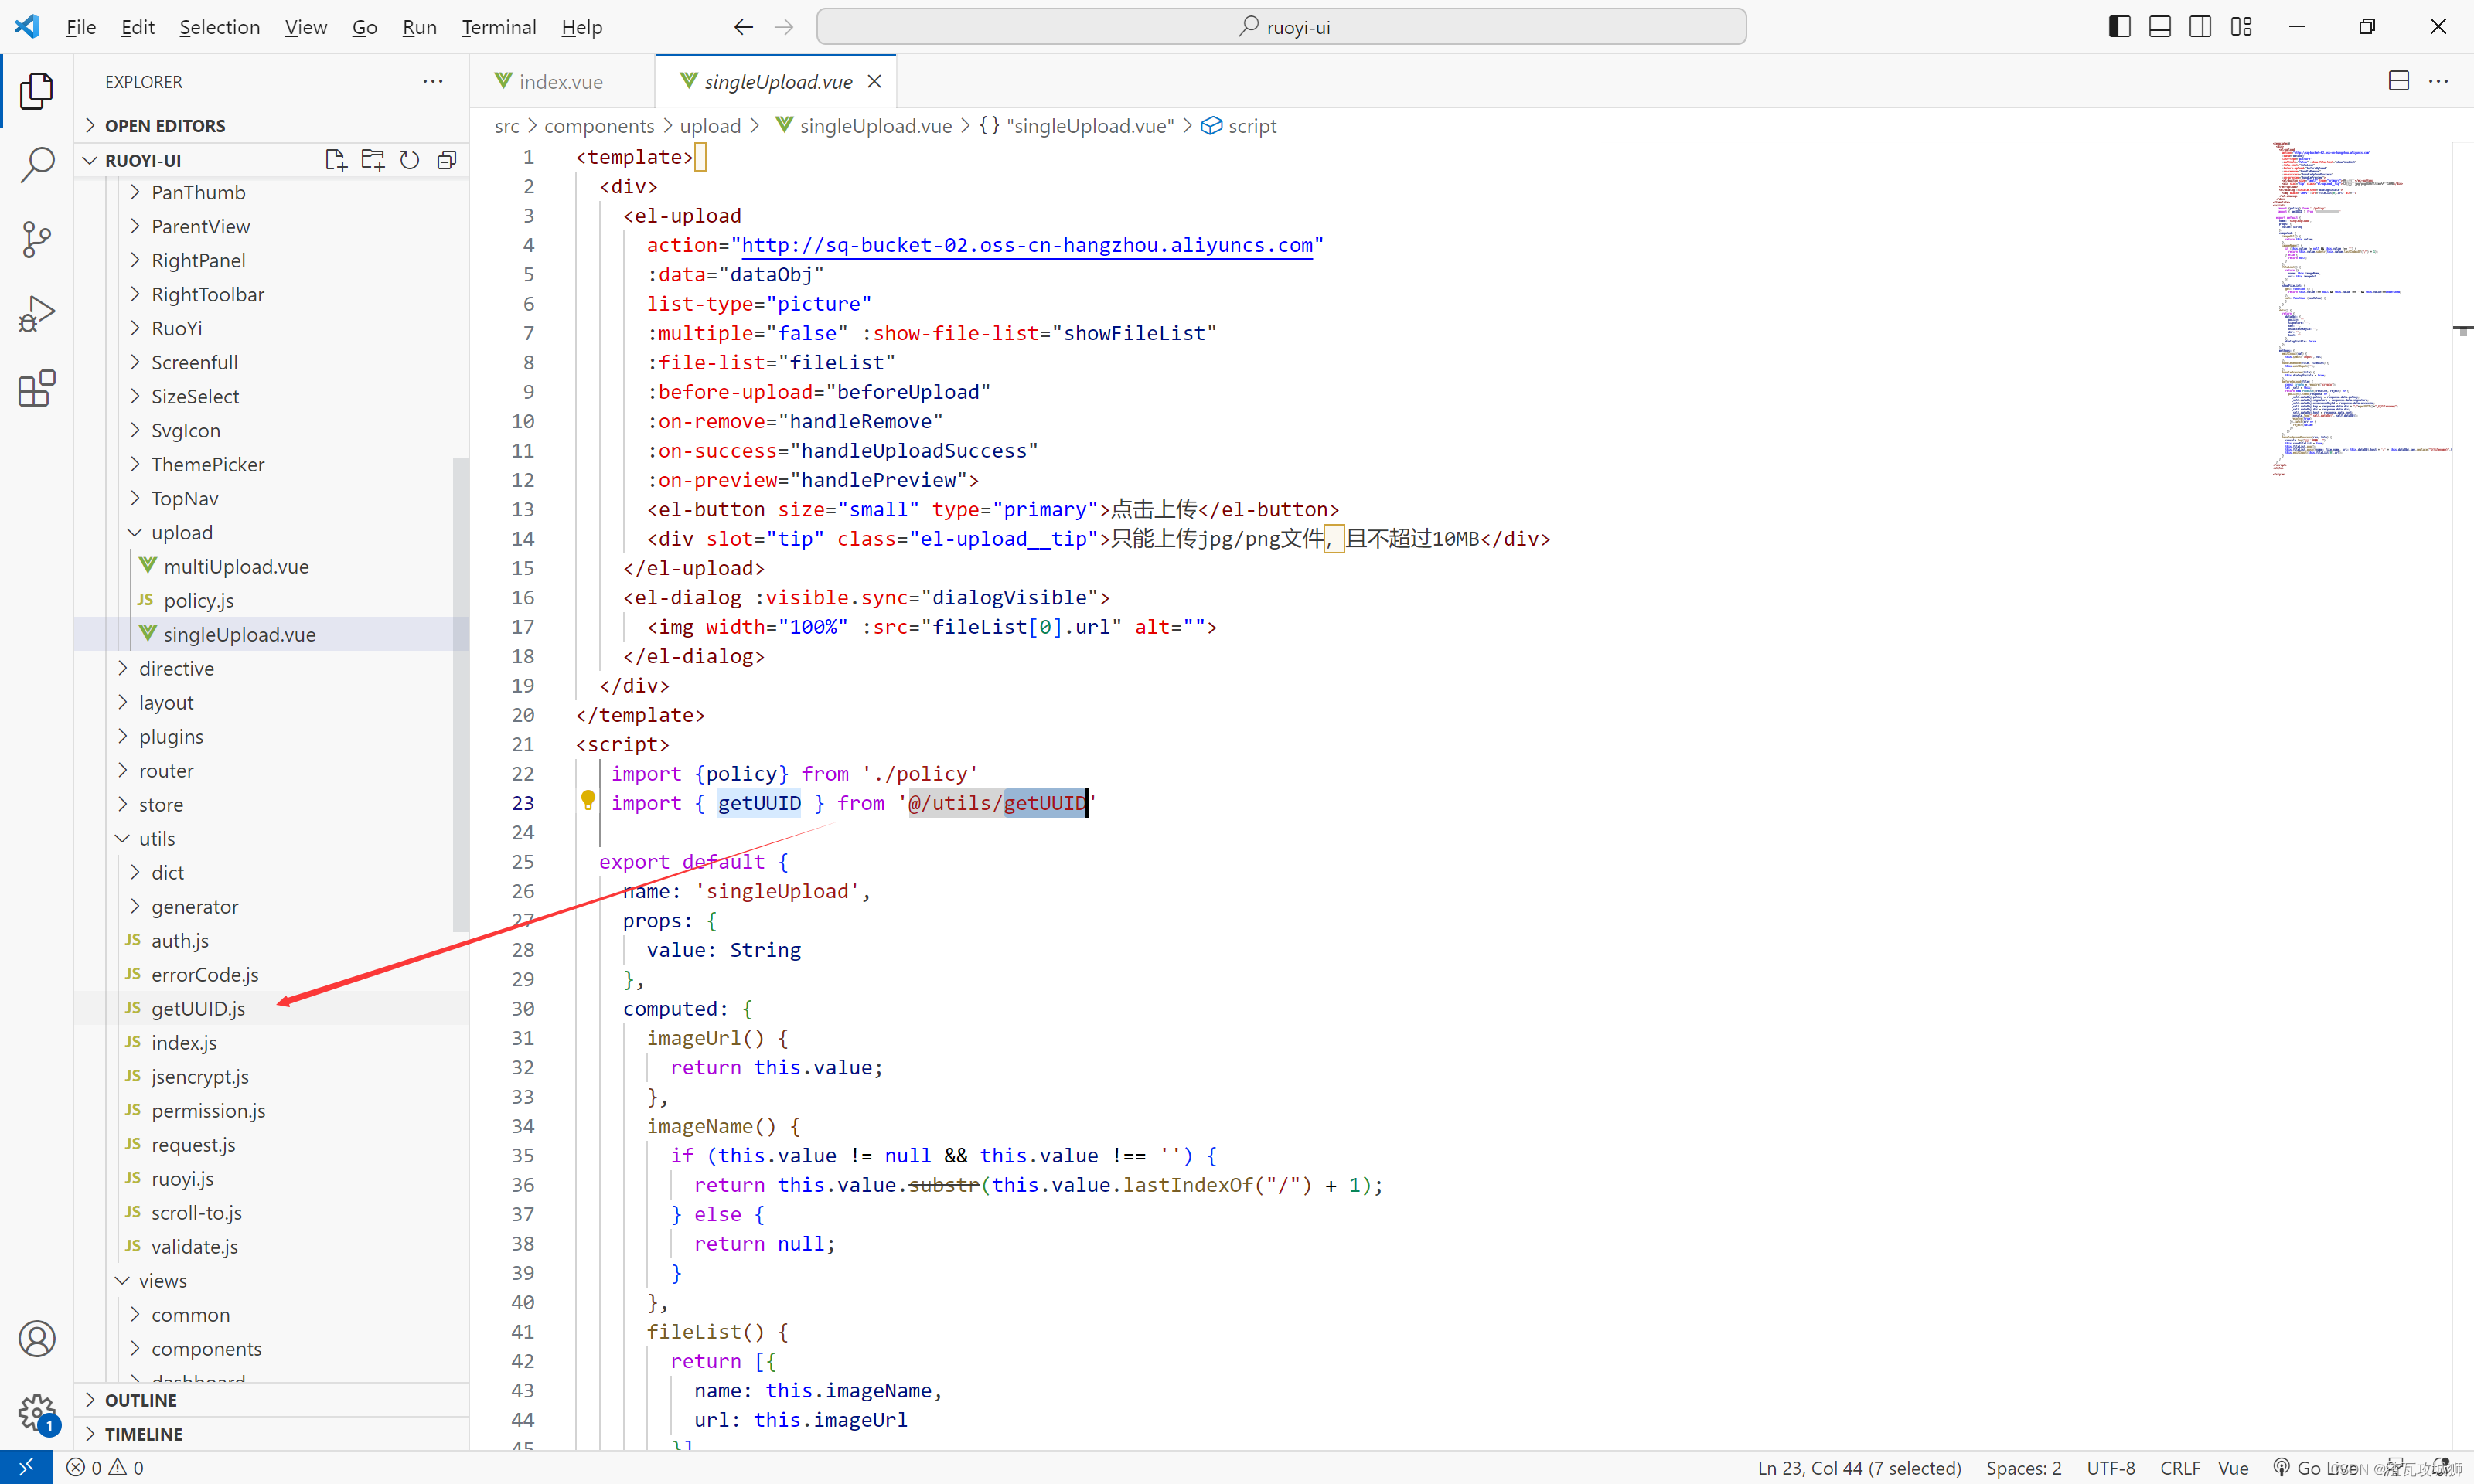
You can use the file upload component that the teacher has written in Guli Mall. You can use it directly. There are single file and multiple files.
I’ll paste the teacher’s code here first, and then talk about the points that need attention:
Single file upload component:
<template>
  <div>
    <el-upload
      action="http://sq-bucket-02.oss-cn-hangzhou.aliyuncs.com"
      :data="dataObj"
      list-type="picture"
      :multiple="false" :show-file-list="showFileList"
      :file-list="fileList"
      :before-upload="beforeUpload"
      :on-remove="handleRemove"
      :on-success="handleUploadSuccess"
      :on-preview="handlePreview">
      <el-button size="small" type="primary">点击上传</el-button>
      <div slot="tip" class="el-upload__tip">只能上传jpg/png文件,且不超过10MB</div>
    </el-upload>
    <el-dialog :visible.sync="dialogVisible">
      <img width="100%" :src="fileList[0].url" alt="">
    </el-dialog>
  </div>
</template>
<script>
   import {policy} from './policy'
   import { getUUID } from '@/utils/getUUID'

  export default {
    name: 'singleUpload',
    props: {
      value: String
    },
    computed: {
      imageUrl() {
        return this.value;
      },
      imageName() {
        if (this.value != null && this.value !== '') {
          return this.value.substr(this.value.lastIndexOf("/") + 1);
        } else {
          return null;
        }
      },
      fileList() {
        return [{
          name: this.imageName,
          url: this.imageUrl
        }]
      },
      showFileList: {
        get: function () {
          return this.value !== null && this.value !== ''&& this.value!==undefined;
        },
        set: function (newValue) {
        }
      }
    },
    data() {
      return {
        dataObj: {
          policy: '',
          signature: '',
          key: '',
          ossaccessKeyId: '',
          dir: '',
          host: ''
        },
        dialogVisible: false
      };
    },
    methods: {
      emitInput(val) {
        this.$emit('input', val)
      },
      handleRemove(file, fileList) {
        this.emitInput('');
      },
      handlePreview(file) {
        this.dialogVisible = true;
      },
      beforeUpload(file) {
        const crypto = require('crypto');
        let _self = this;
        return new Promise((resolve, reject) => {
          policy().then(response => {
            _self.dataObj.policy = response.data.policy;
            _self.dataObj.signature = response.data.signature;
            _self.dataObj.ossaccessKeyId = response.data.accessid;
            _self.dataObj.key = response.data.dir + "/"+getUUID()+"_${filename}";
            _self.dataObj.dir = response.data.dir;
            _self.dataObj.host = response.data.host;
            console.log("_self.dataObj",_self.dataObj);
            resolve(true)
           }).catch(err => {
             reject(false)
           })
         })
      },
      handleUploadSuccess(res, file) {
        console.log("上传成功...")
        this.showFileList = true;
        this.fileList.pop();
        this.fileList.push({name: file.name, url: this.dataObj.host + '/' + this.dataObj.key.replace("${filename}",file.name) });
        this.emitInput(this.fileList[0].url);
      }
    }
  }
</script>
<style>

</style>
Multiple file upload components:
<template>
  <div>
    <el-upload
      action="http://oss-cn-hangzhou.aliyuncs.com"
      :data="dataObj"
      list-type="picture-card"
      :file-list="fileList"
      :before-upload="beforeUpload"
      :on-remove="handleRemove"
      :on-success="handleUploadSuccess"
      :on-preview="handlePreview"
      :limit="maxCount"
      :on-exceed="handleExceed"
    >
      <i class="el-icon-plus"></i>
    </el-upload>
    <el-dialog :visible.sync="dialogVisible">
      <img width="100%" :src="dialogImageUrl" alt />
    </el-dialog>
  </div>
</template>
<script>
import { policy } from "./policy";
import { getUUID } from '@/utils'
export default {
  name: "multiUpload",
  props: {
    //图片属性数组
    value: Array,
    //最大上传图片数量
    maxCount: {
      type: Number,
      default: 30
    }
  },
  data() {
    return {
      dataObj: {
        policy: "",
        signature: "",
        key: "",
        ossaccessKeyId: "",
        dir: "",
        host: "",
        uuid: ""
      },
      dialogVisible: false,
      dialogImageUrl: null
    };
  },
  computed: {
    fileList() {
      let fileList = [];
      for (let i = 0; i < this.value.length; i++) {
        fileList.push({ url: this.value[i] });
      }

      return fileList;
    }
  },
  mounted() {},
  methods: {
    emitInput(fileList) {
      let value = [];
      for (let i = 0; i < fileList.length; i++) {
        value.push(fileList[i].url);
      }
      this.$emit("input", value);
    },
    handleRemove(file, fileList) {
      this.emitInput(fileList);
    },
    handlePreview(file) {
      this.dialogVisible = true;
      this.dialogImageUrl = file.url;
    },
    beforeUpload(file) {
      let _self = this;
      return new Promise((resolve, reject) => {
        policy()
          .then(response => {
            console.log("这是什么${filename}");
            _self.dataObj.policy = response.data.policy;
            _self.dataObj.signature = response.data.signature;
            _self.dataObj.ossaccessKeyId = response.data.accessid;
            _self.dataObj.key = response.data.dir + "/"+getUUID()+"_${filename}";
            _self.dataObj.dir = response.data.dir;
            _self.dataObj.host = response.data.host;
            resolve(true);
          })
          .catch(err => {
            console.log("出错了...",err)
            reject(false);
          });
      });
    },
    handleUploadSuccess(res, file) {
      this.fileList.push({
        name: file.name,
        // url: this.dataObj.host + "/" + this.dataObj.dir + "/" + file.name; 替换${filename}为真正的文件名
        url: this.dataObj.host + "/" + this.dataObj.key.replace("${filename}",file.name)
      });
      this.emitInput(this.fileList);
    },
    handleExceed(files, fileList) {
      this.$message({
        message: "最多只能上传" + this.maxCount + "张图片",
        type: "warning",
        duration: 1000
      });
    }
  }
};
</script>
<style>
</style>
Request the api js file of the backend to obtain the credentials:
import request from '@/utils/request'
export function policy() {
    return request({
        url: "/thirdparty/oss/policy",
        method: "get"
    });
}
There is also a tool class to generate UUID based on the uuid contained in the file name when the file is stored in the final server:
export function getUUID() {
    return "xxxxxxxx-xxxx-xxxx-yxxx-xxxxxxxxxxxx".replace(/[xy]/g, c => {
        const r = (Math.random() * 32) | 0;
        const v = c === "x" ? r : (r & 0x3) | 0x8;
        return v.toString(32).replace("-","");
      });
}
Let me briefly introduce this file upload component file:
In fact, to put it simply: there is a pre-order method before the actual file upload. The purpose of this method is to send a request to the backend to obtain the direct transfer certificate. Only after obtaining this certificate can the direct transfer be carried out. As for how to obtain it Yes, that's a back-end thing. Then after obtaining the certificate, it will carry the certificate and the file to send a request directly to the Alibaba Cloud server, and save it directly to the Alibaba Cloud server.
2. How to use this file upload specifically in our project?
This is what really needs attention, the rest is actually unimportant
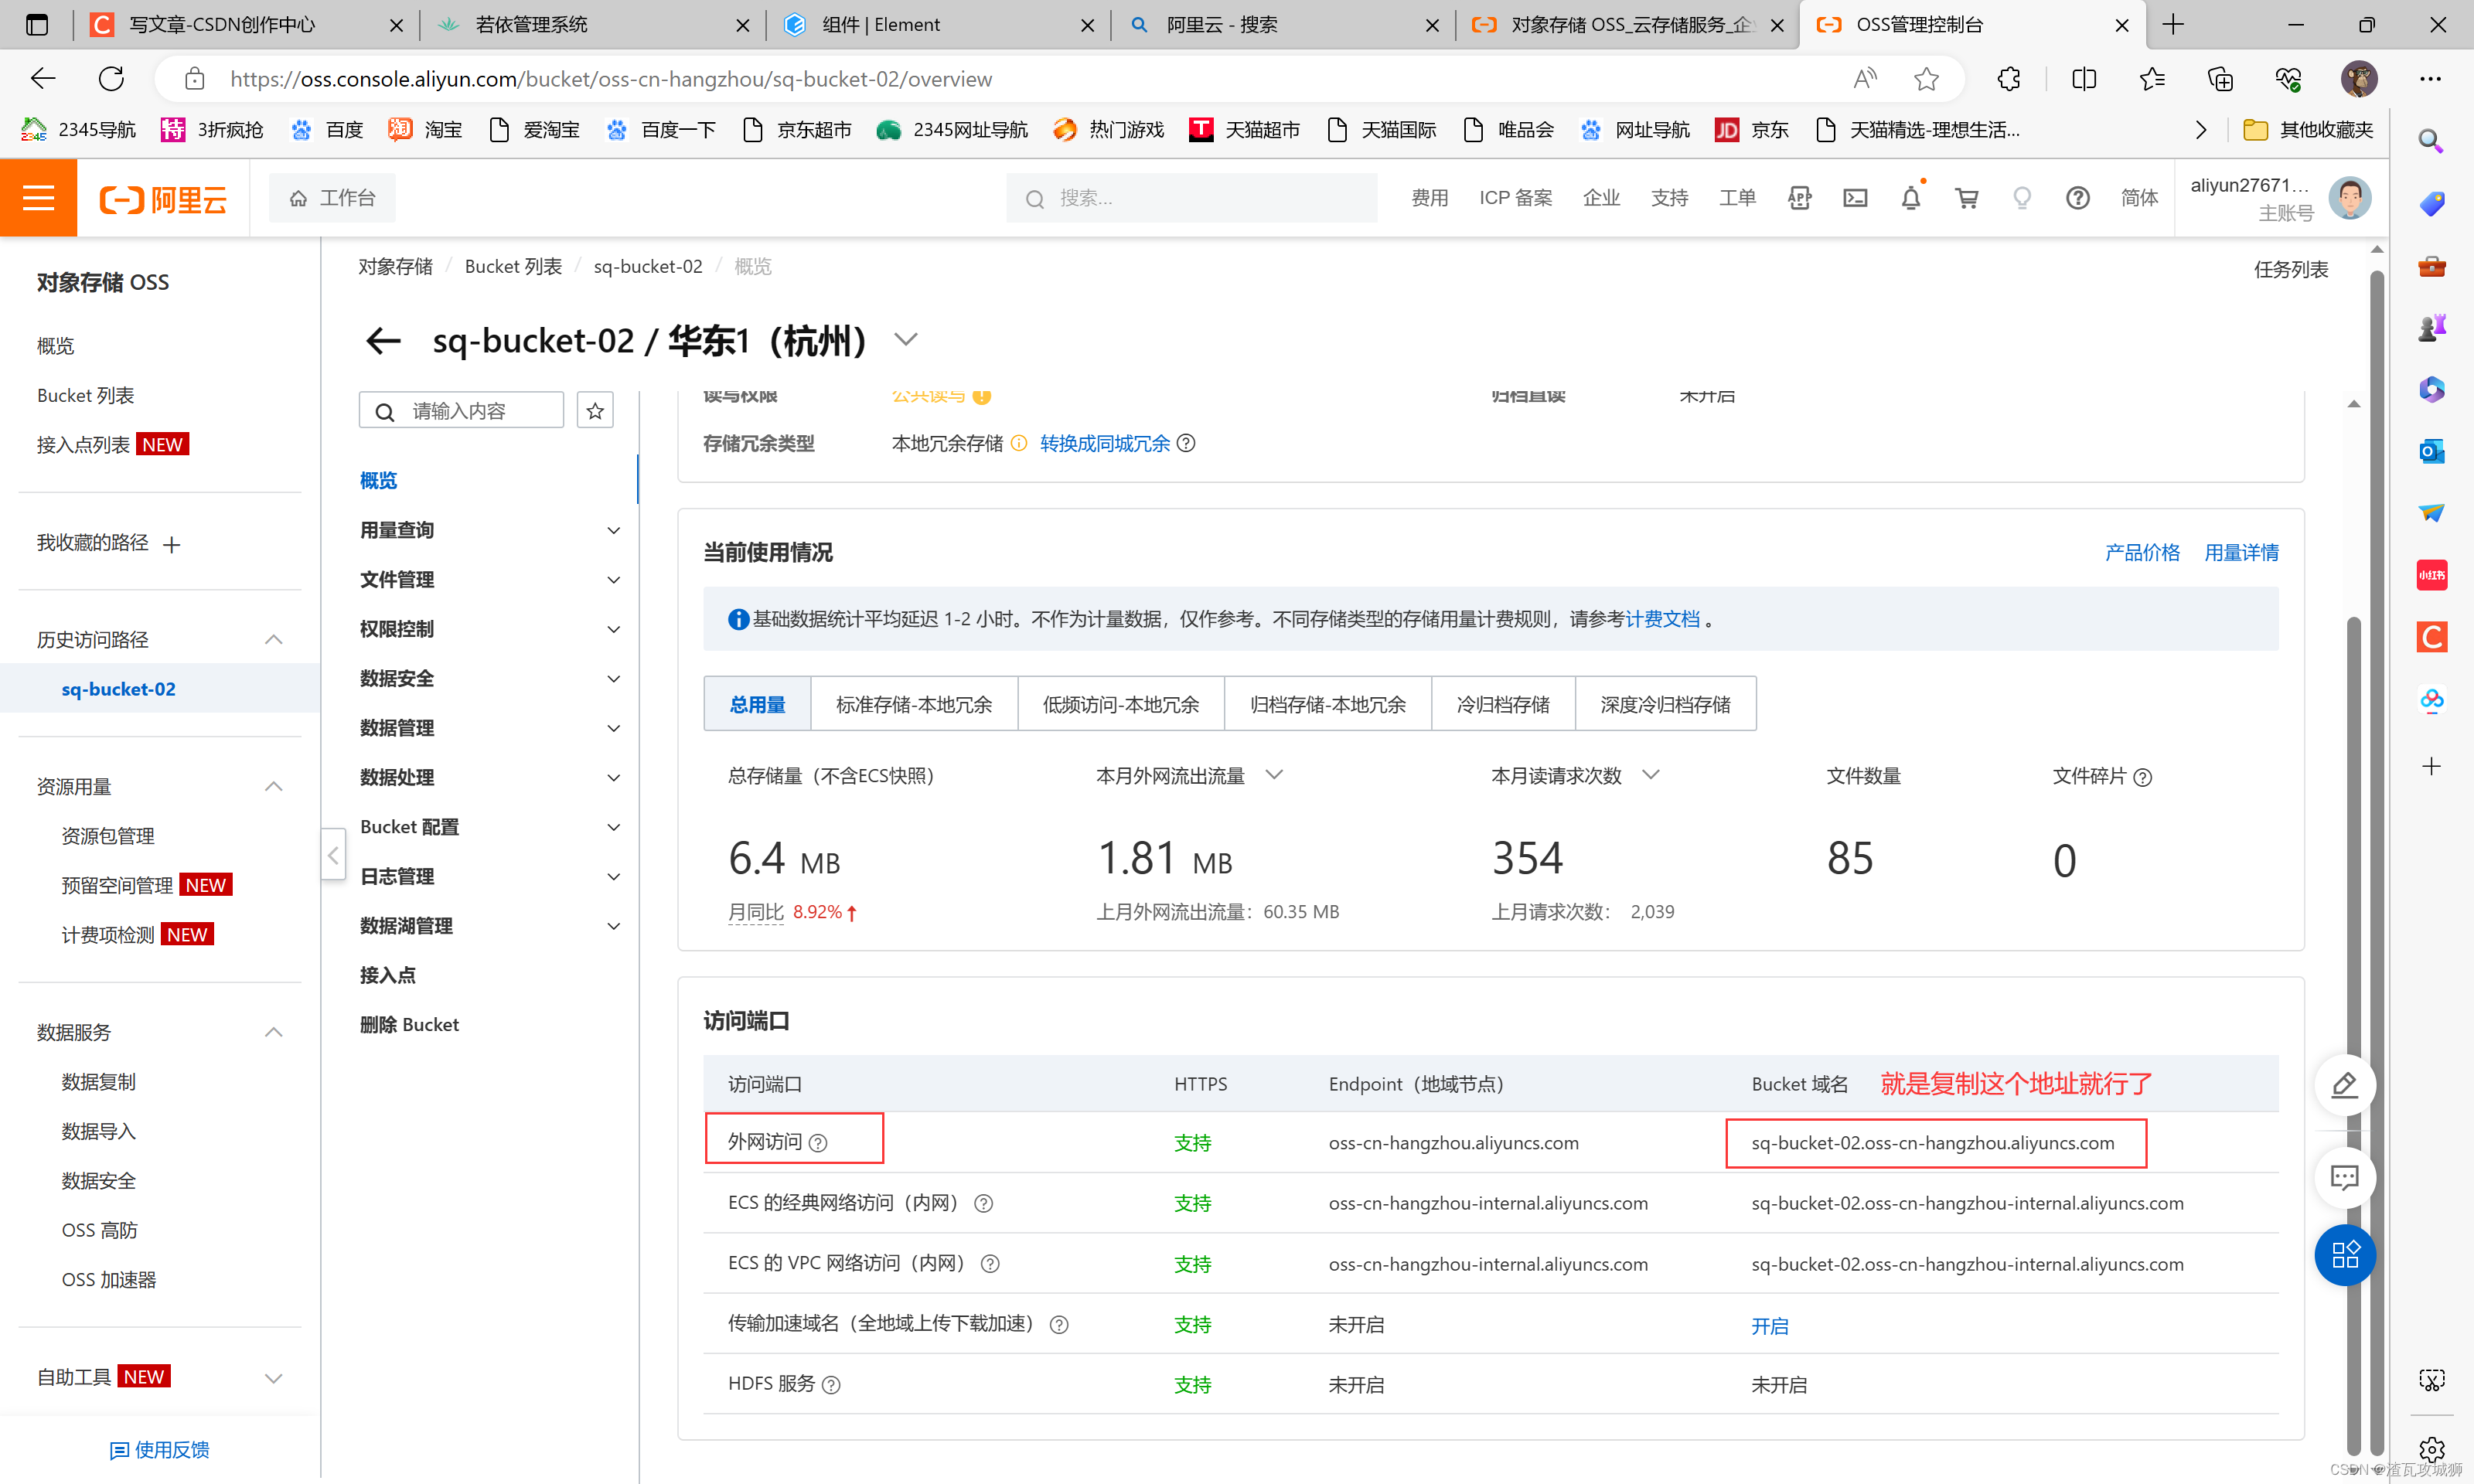
1. Modify the Alibaba Cloud bucket address (folder address) in the single file upload component
Just change it to your own address. The address can be viewed on the Alibaba Cloud official website, at this location:
 The above is actually about modifying the component. The following is actually using the component in our project: the same steps:
1. Import components
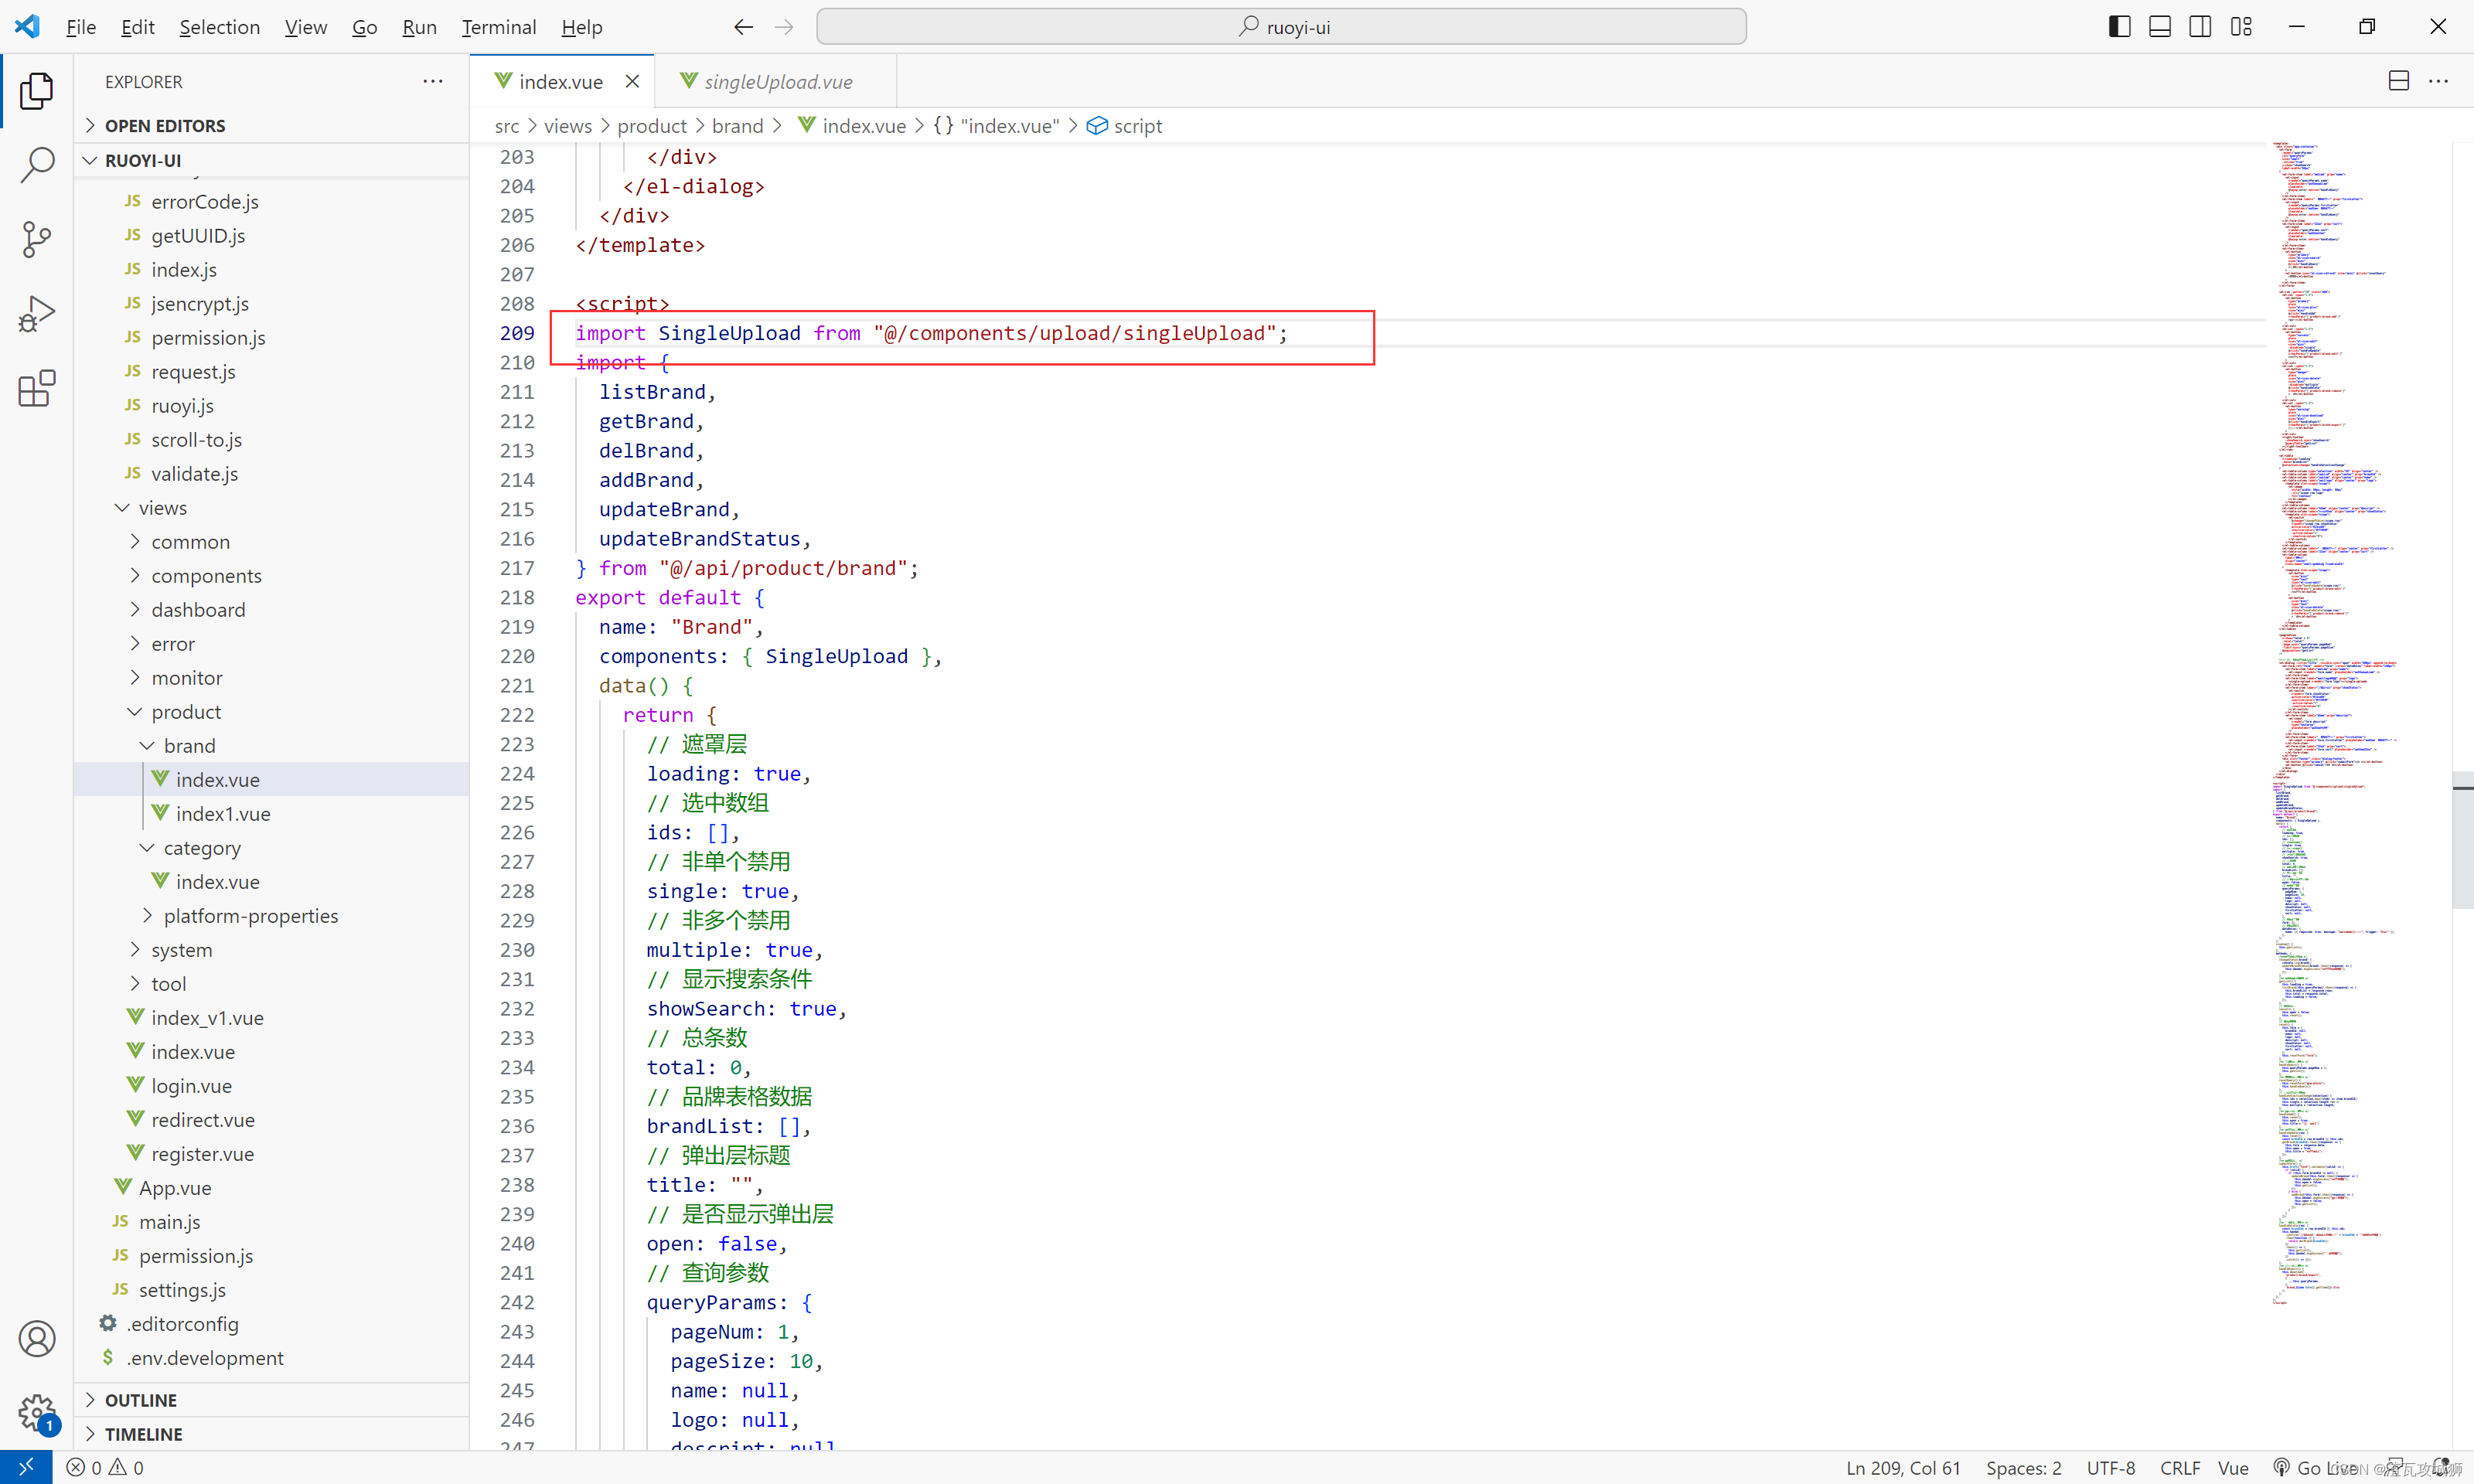
2. Declare the component in the vue instance
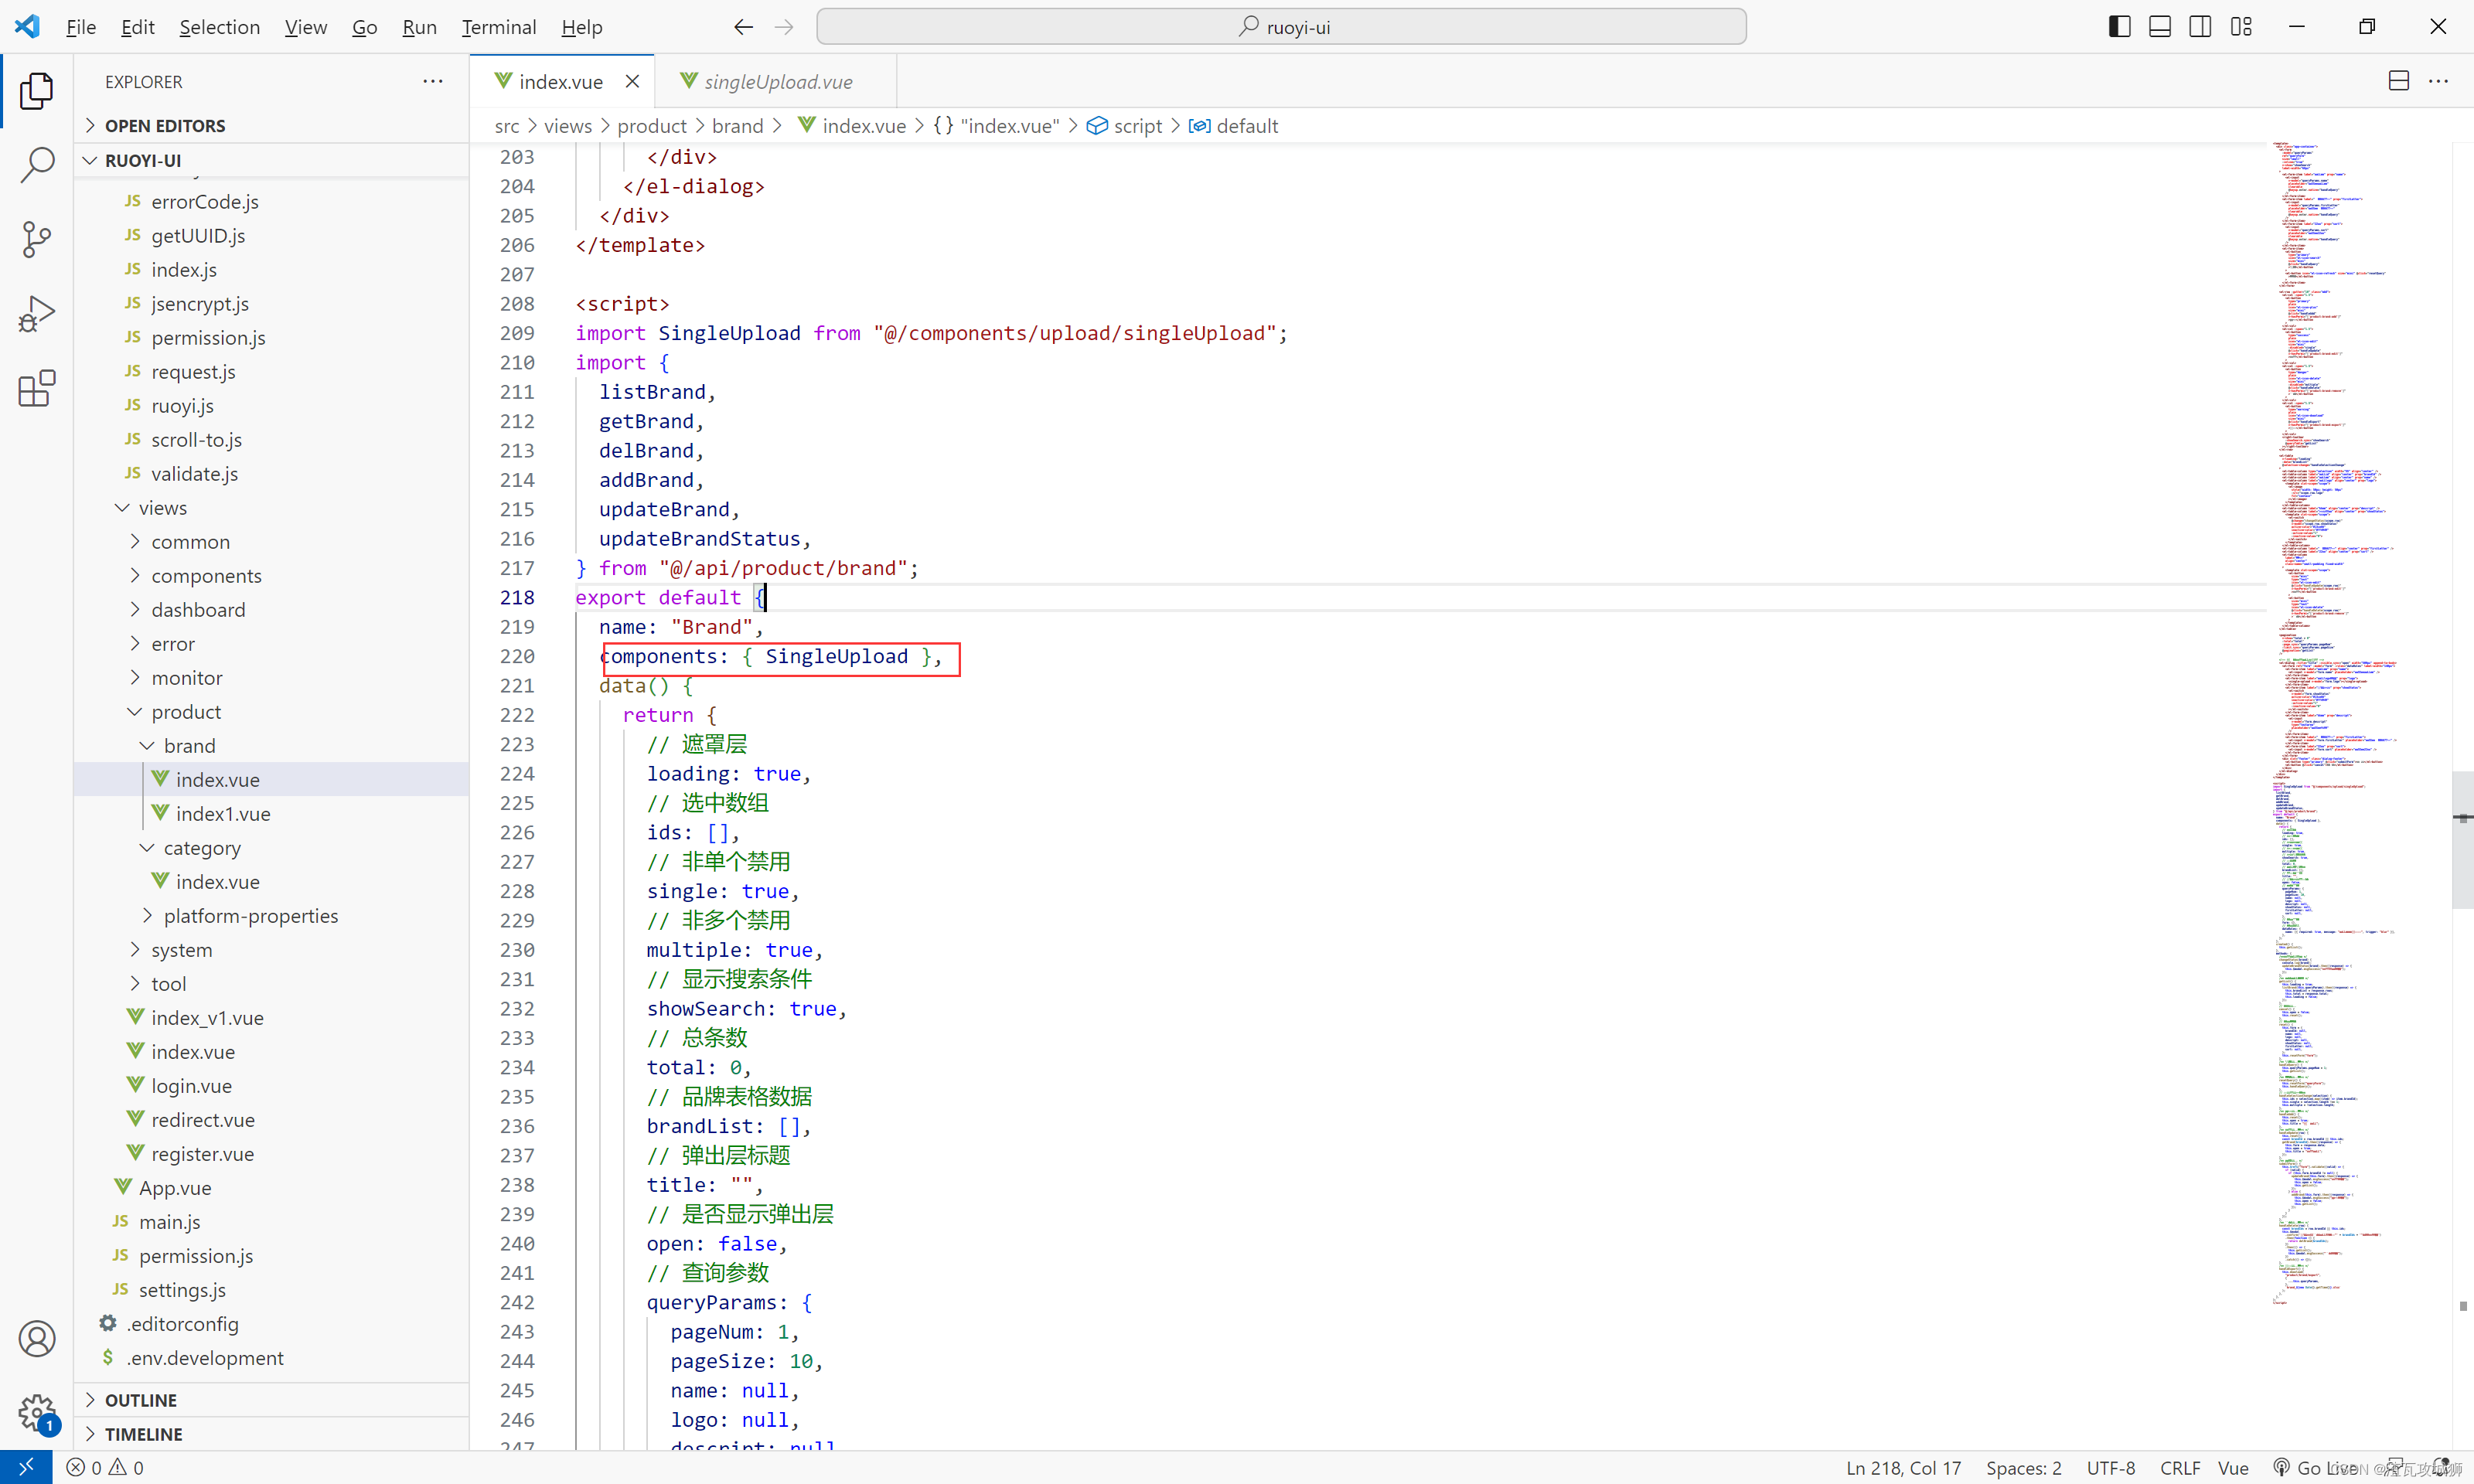
3. Use the component at the desired location in the template

After completing these steps, the file upload component will be displayed on the modification page:
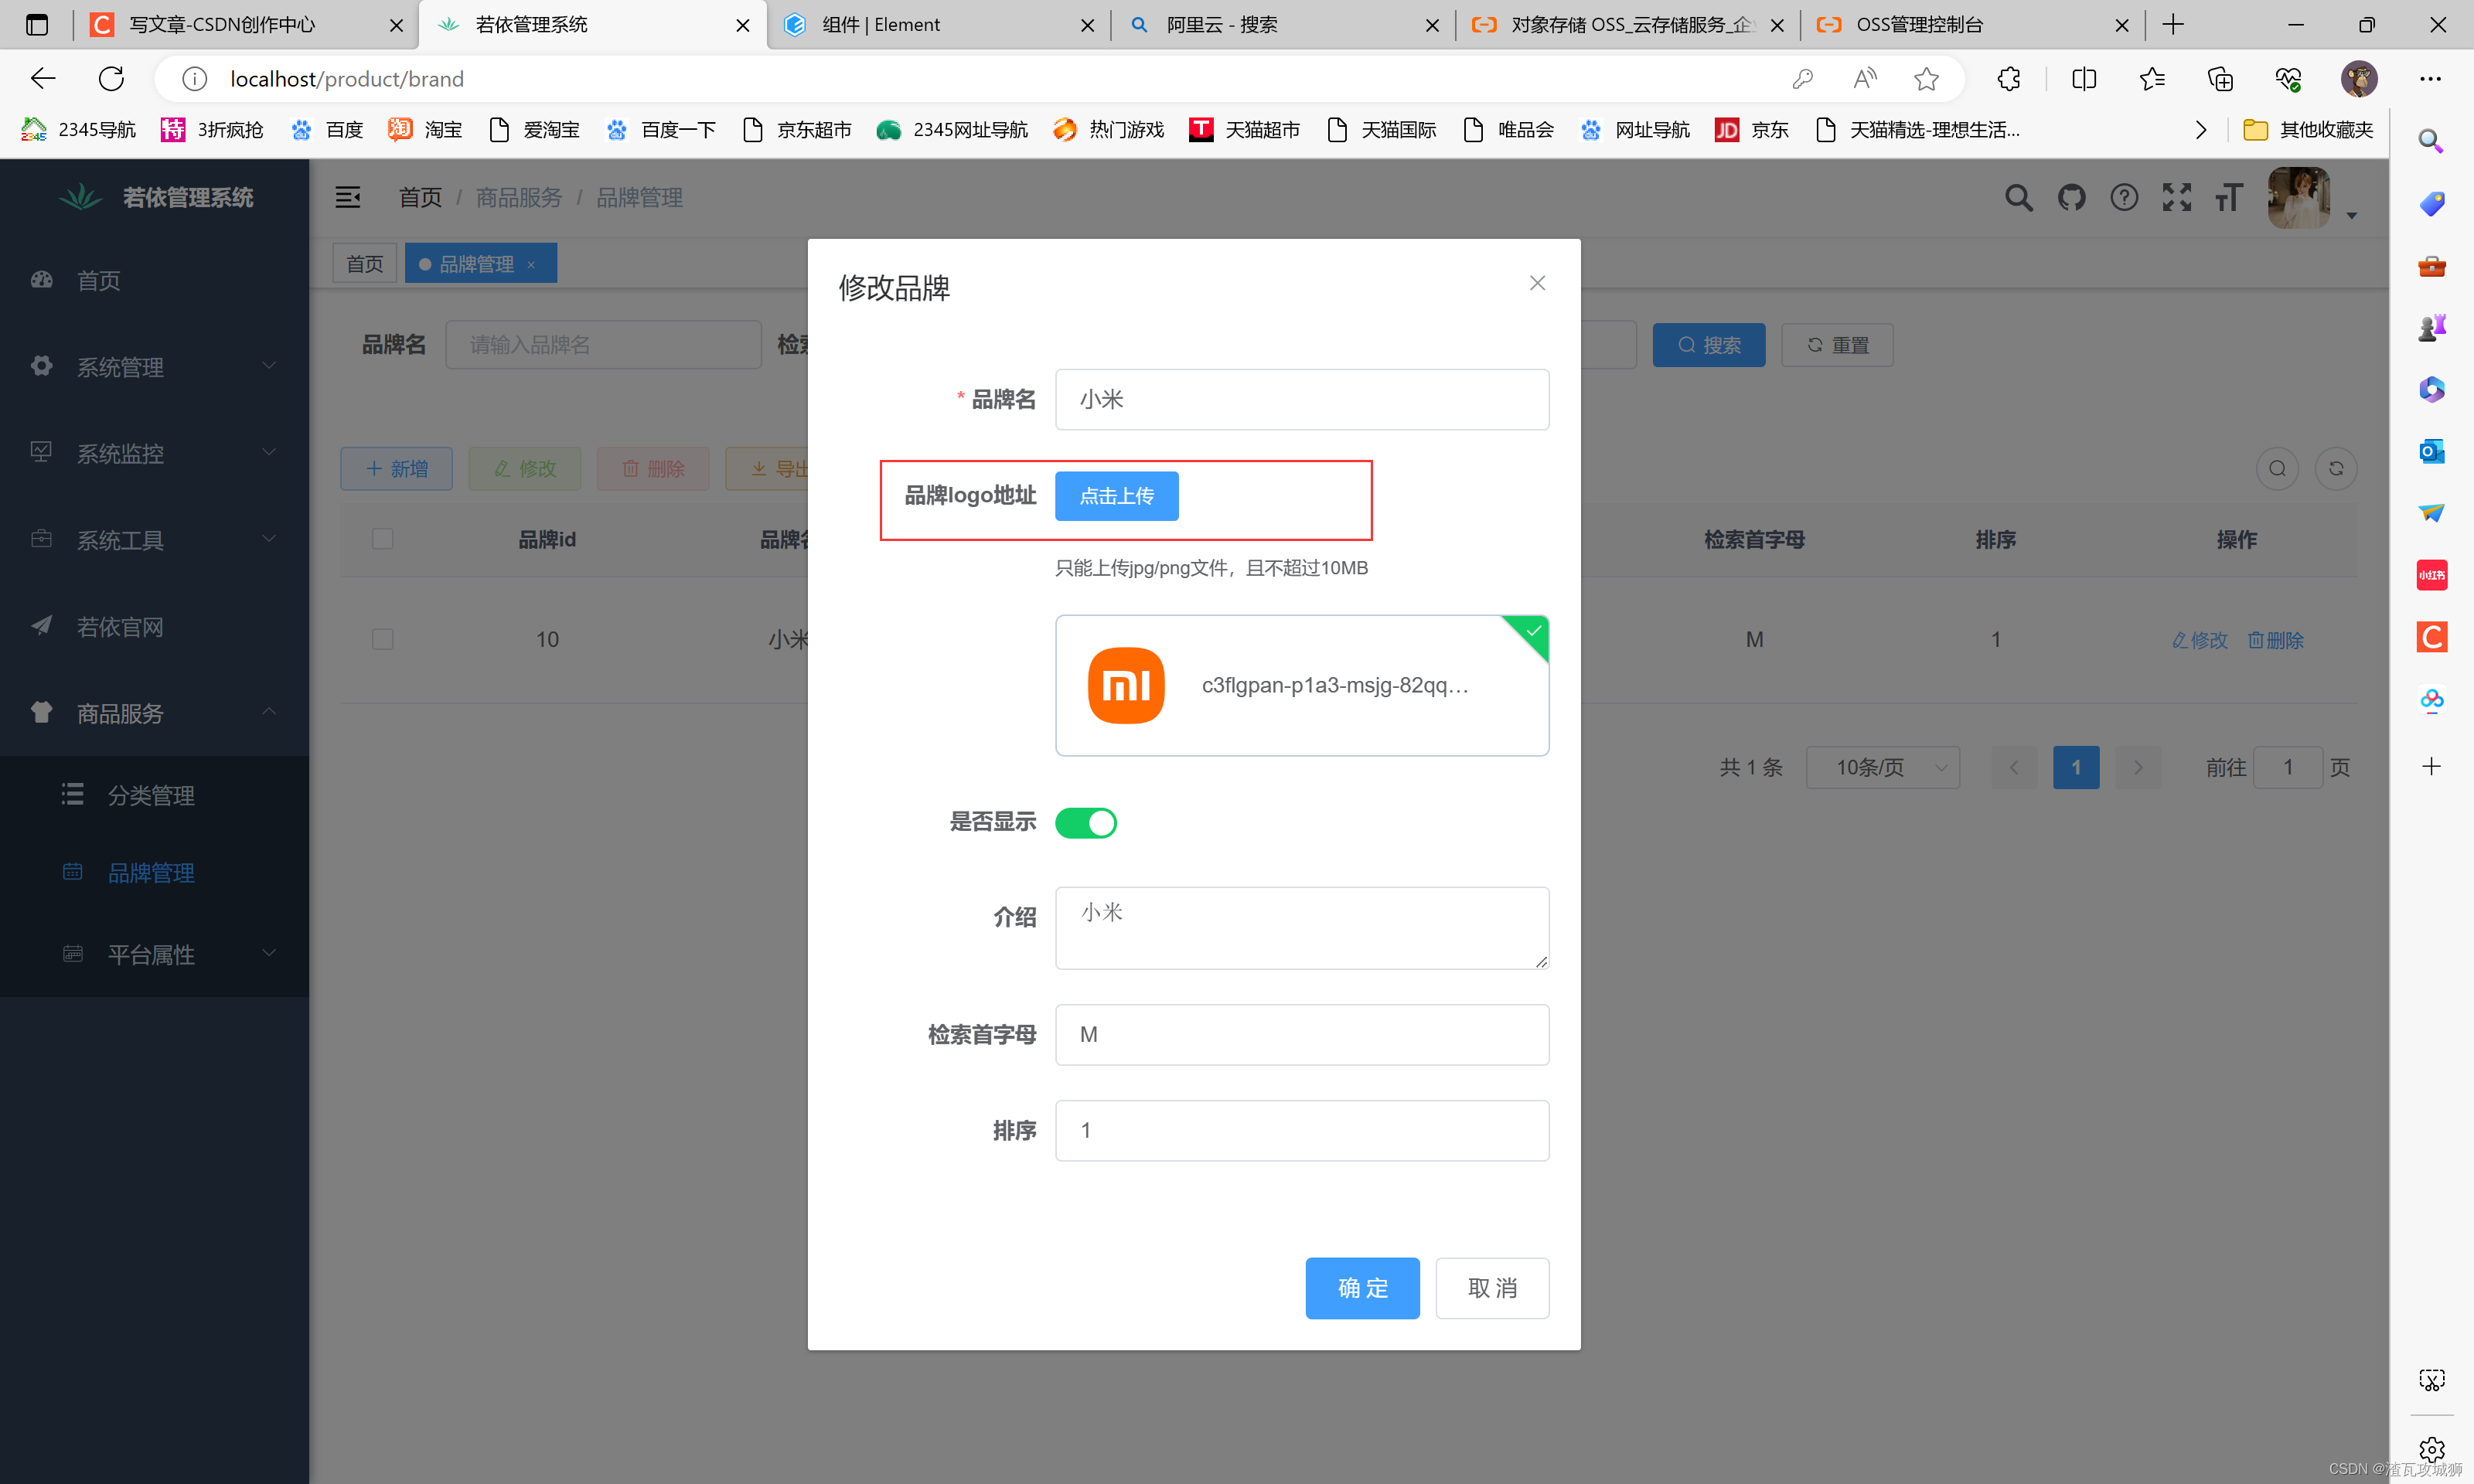 Once it is displayed, it means that the work has been successfully completed. In fact, it is very simple, that is, directly introduce some files required for uploading front-end files directly provided by good teachers into our front-end project, then change the bucket path, and then introduce them into the project and use them directly.
2.6.3 Optimization 3: Change the logo address column of the table list to display an image
After the previous example of changing it to a switch, it becomes very simple. It is also the same since it is in a table. To modify the table column, you only need to use template in that column, and then put the picture component in it.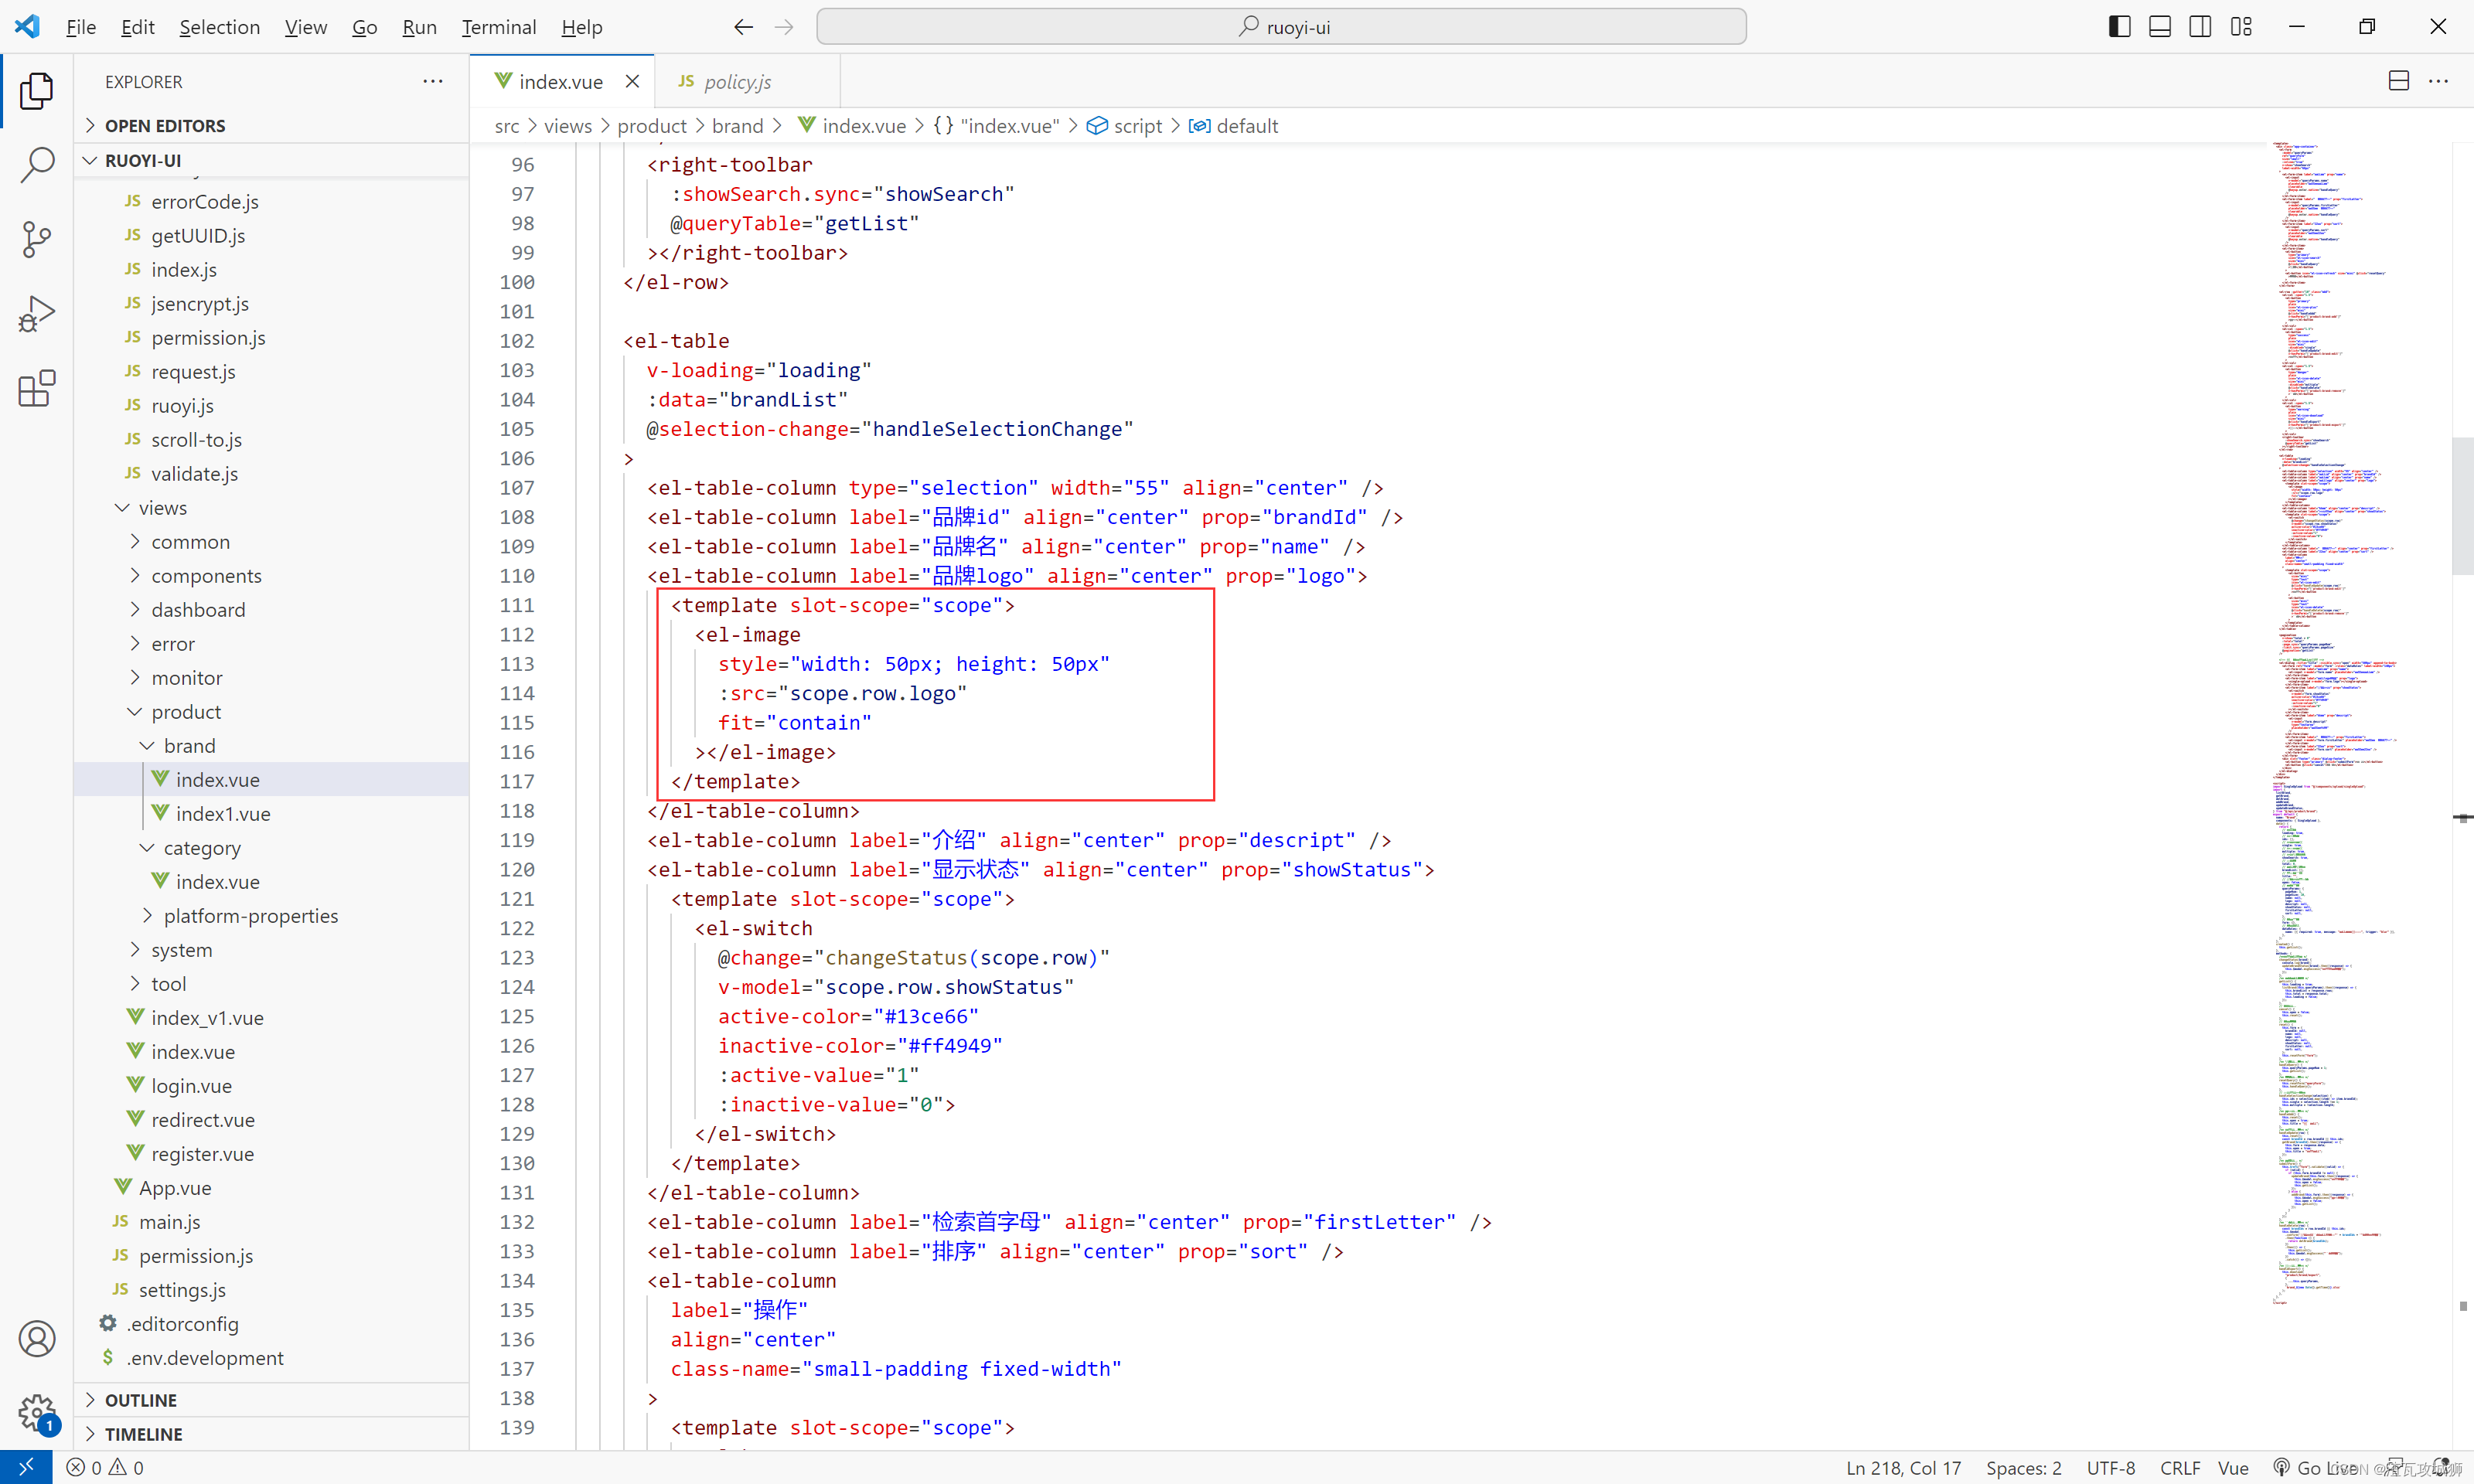
<el-table-column label="品牌logo" align="center" prop="logo">
        <template slot-scope="scope">
          <el-image
            style="width: 50px; height: 50px"
            :src="scope.row.logo"
            fit="contain"
          ></el-image>
        </template>
      </el-table-column>
3. Back-end part
Generally speaking, the backend here is very simple, always, hahaha, of course it just needs to be simple in business. Anyway, so far, the frontend is more complicated than the backend.
The backend here actually has only one interface: the interface for obtaining file upload credentials.
Before talking about this interface, let me first talk about the solution for file upload here;
We are actually quite familiar with file uploading, which is uploading to the server. The oss file uploading technology is used here. There are two commonly used uploading methods for oss file uploading:
The first one: a very simple and clear way, directly sending the file to the back-end server of our project, and then the back-end server calls the oss API to upload the file. In other words, the file is actually sent directly to our back-end server. It goes to the end server, which puts a certain amount of pressure on our back-end server.
The second method: Upload the file directly to the Alibaba Cloud server by carrying the credentials. This method is to first carry some information about the file, such as the file name, bucket name, bucket domain name and other information, and send it to our back-end server, and then The back-end server calls the oss API to obtain the certificate, and then sends it to the front-end. The front-end then carries the certificate and file, and then sends it directly to the oss server. In other words, this method does not actually upload files directly to our own server, which reduces the pressure on our own server.
Okay, now that we have a general understanding of the oss upload method, we now use the second method to upload.
Now that you know the plan, is it difficult to implement it? In fact, it is not difficult. In fact, the job of the backend here is to obtain the credentials. In the final analysis, the credentials obtained here are not obtained directly by us, but by calling the oss API. So what exactly is this API? Here you need to visit the official website of Alibaba Cloud and check the oss object storage documentation on the official website. I will not check it here. It is not important. I will just paste the code here and it will be usable.
By the way, here, because it is an oss file upload, it is not actually a business module. This is a third-party service. Therefore, I created a new third-party service and put all future third-party services here, such as text messages. Services, financial services, logistics services, etc.
Let’s briefly talk about the creation of this service:
This is not a business service, so it does not need to rely on as many dependencies as a business service. It only requires a few simple dependencies. This is also a service. In the future, a gateway will be used to route here, so it must be registered with nacos. center, so the dependence on the cos registration center is indispensable, and now the oss service is needed, so the oss service dependency is indispensable (here I am not directly importing the native oss dependency, but importing the corresponding starter, so that the method is more It is encapsulated and can be used directly. Some parameters only need to be configured in the configuration file)
1. Creation of pom file
I directly provide the pom service of this third-party service here. Here I also directly introduce the comment module. In fact, it can also be introduced directly, but in this way I have to pay attention to excluding some dependencies, such as MP and security dependencies. This is not needed:
<?xml version="1.0" encoding="UTF-8"?>
<project xmlns="http://maven.apache.org/POM/4.0.0"
         xmlns:xsi="http://www.w3.org/2001/XMLSchema-instance"
         xsi:schemaLocation="http://maven.apache.org/POM/4.0.0 http://maven.apache.org/xsd/maven-4.0.0.xsd">
    <modelVersion>4.0.0</modelVersion>
    <parent>
        <groupId>com.sq</groupId>
        <artifactId>gulimall</artifactId>
        <version>1.0-SNAPSHOT</version>
    </parent>

    <artifactId>thirdparty</artifactId>

    <properties>
        <maven.compiler.source>8</maven.compiler.source>
        <maven.compiler.target>8</maven.compiler.target>
        <project.build.sourceEncoding>UTF-8</project.build.sourceEncoding>
    </properties>
    <dependencies>
        <dependency>
            <groupId>com.sq</groupId>
            <artifactId>gulimall-common</artifactId>
            <version>1.0-SNAPSHOT</version>
            <exclusions>
                <exclusion>
                    <groupId>com.baomidou</groupId>
                    <artifactId>mybatis-plus-boot-starter</artifactId>
                </exclusion>
                <exclusion>
                    <groupId>org.springframework.boot</groupId>
                    <artifactId>spring-boot-starter-security</artifactId>
                </exclusion>
            </exclusions>
        </dependency>
        <dependency>
            <groupId>org.springframework.cloud</groupId>
            <artifactId>spring-cloud-starter-alicloud-oss</artifactId>
            <version>0.9.0.RELEASE</version>
        </dependency>
    </dependencies>

</project>
2. Configuration file
application.yml:
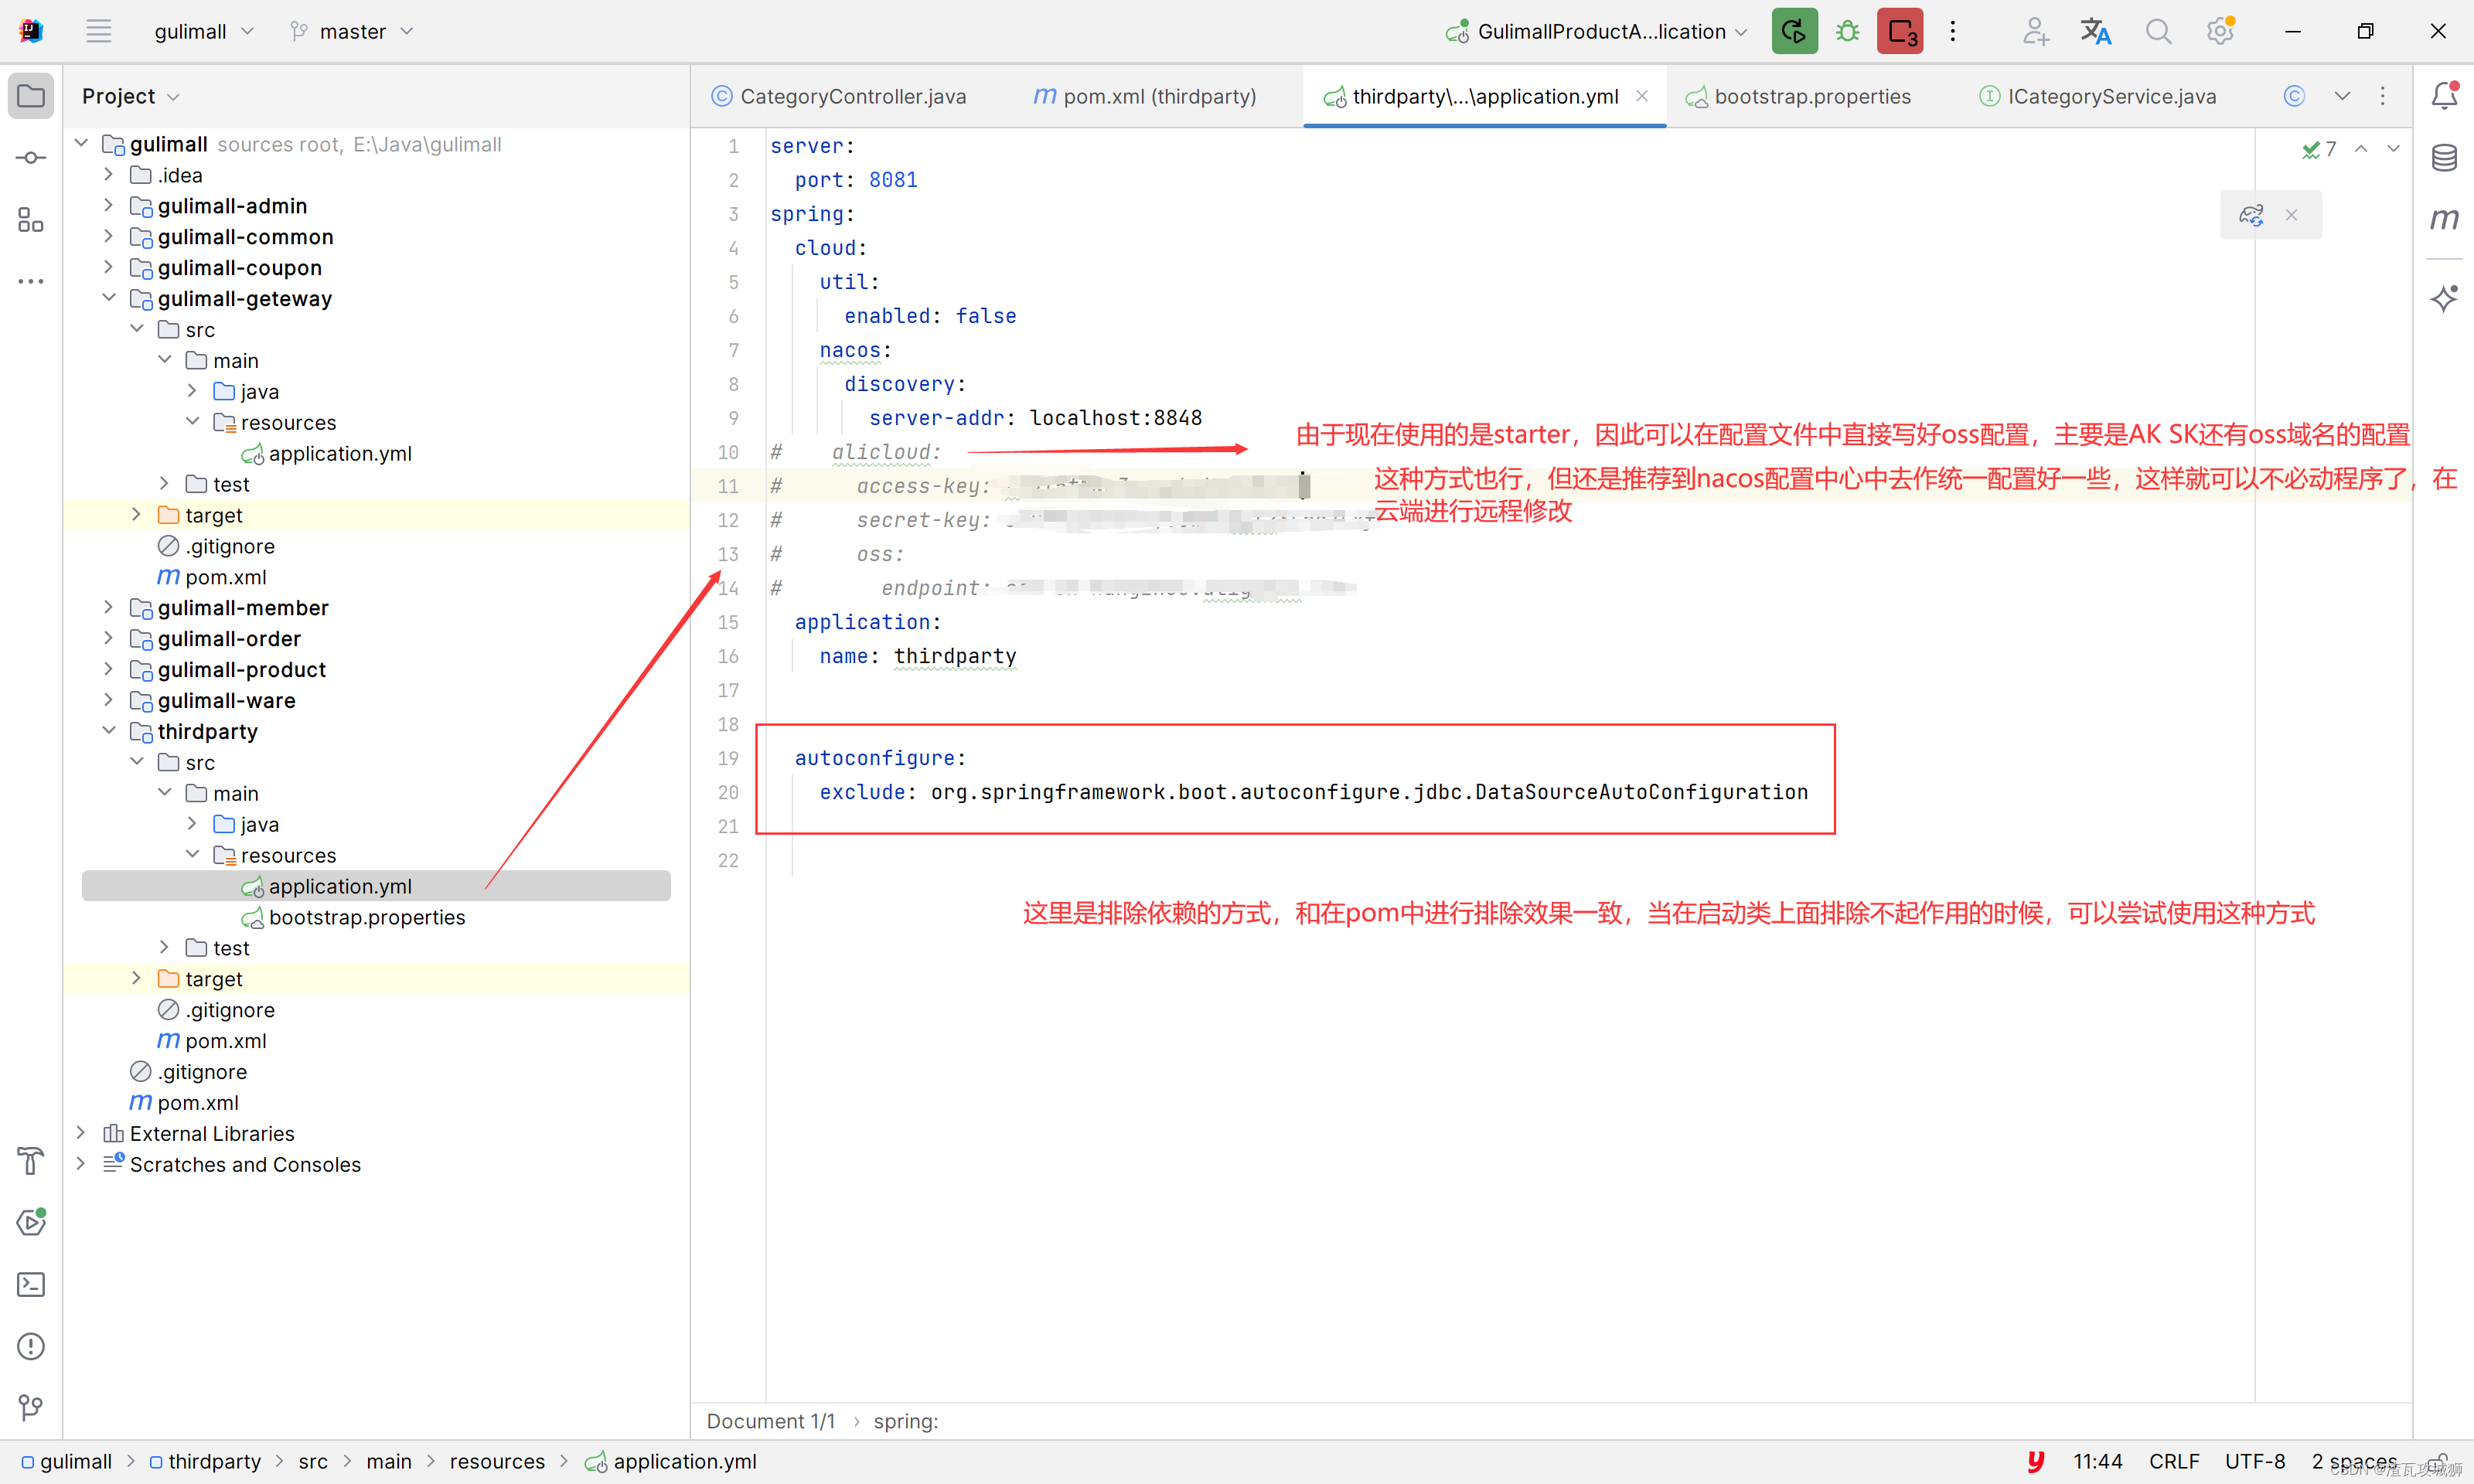
server:
  port: 8081
spring:
  cloud:
    util:
      enabled: false
    nacos:
      discovery:
        server-addr: localhost:8848
#    alicloud:
#      access-key:
#      secret-key:
#      oss:
#        endpoint:
  application:
    name: thirdparty


  autoconfigure:
    exclude: org.springframework.boot.autoconfigure.jdbc.DataSourceAutoConfiguration
Since the nacos configuration center is used here, the bootstrap.properties boot file is also indispensable. It mainly writes the location of the file, the namespece namespace of the file, grouping and other information. The words here are commonly used in the project: that is, in the configuration center The configuration method is to use configuration separation, that is, the application.yml file originally in the Java program configuration file is disassembled into multiple files. For example, the data source can be disassembled into one file, and the registration center is One file, another file for other configurations, etc. are broken down into several files, which makes management easier.
Without further ado, here is the content of bootstrap.properties. In fact, you only need to pay attention to how to configure such multiple files:
spring.cloud.nacos.config.server-addr=localhost:8848
spring.application.name=thirdparty
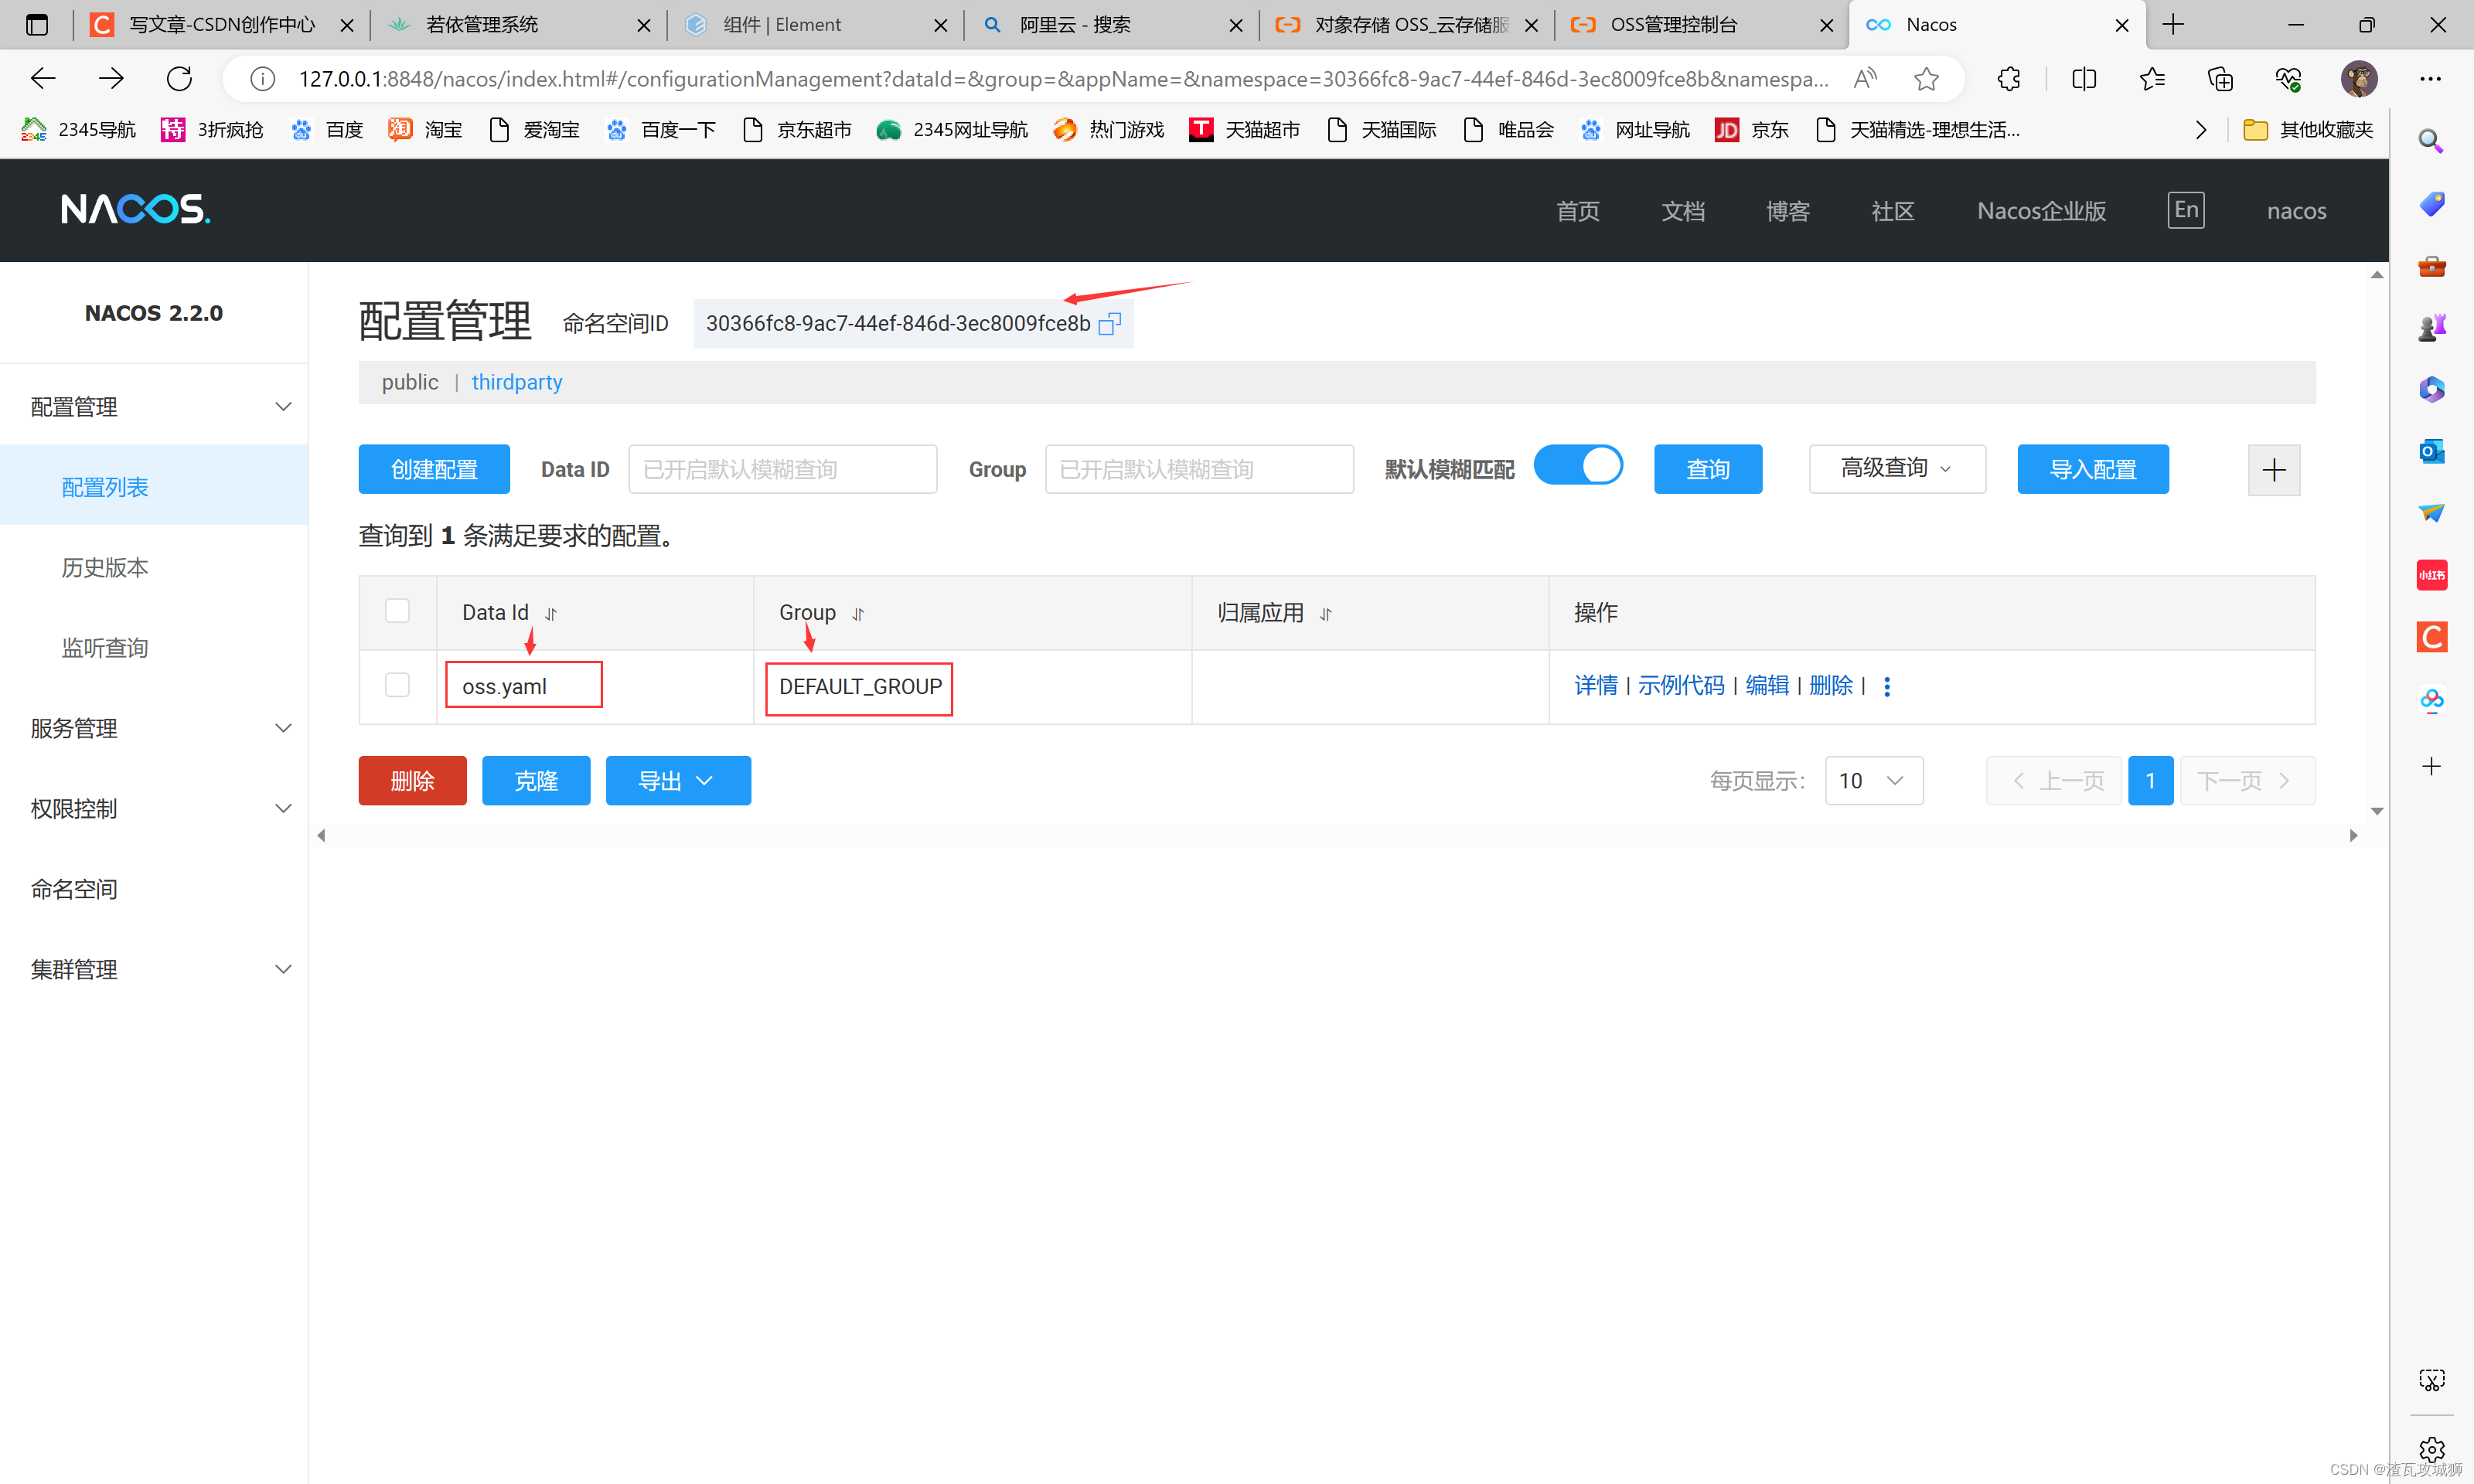
spring.cloud.nacos.config.namespace=30366fc8-9ac7-44ef-846d-3ec8009fce8b
spring.cloud.nacos.config.ext-config[0].data-id=oss.yaml
spring.cloud.nacos.config.ext-config[0].group=DEFAULT_GROUP
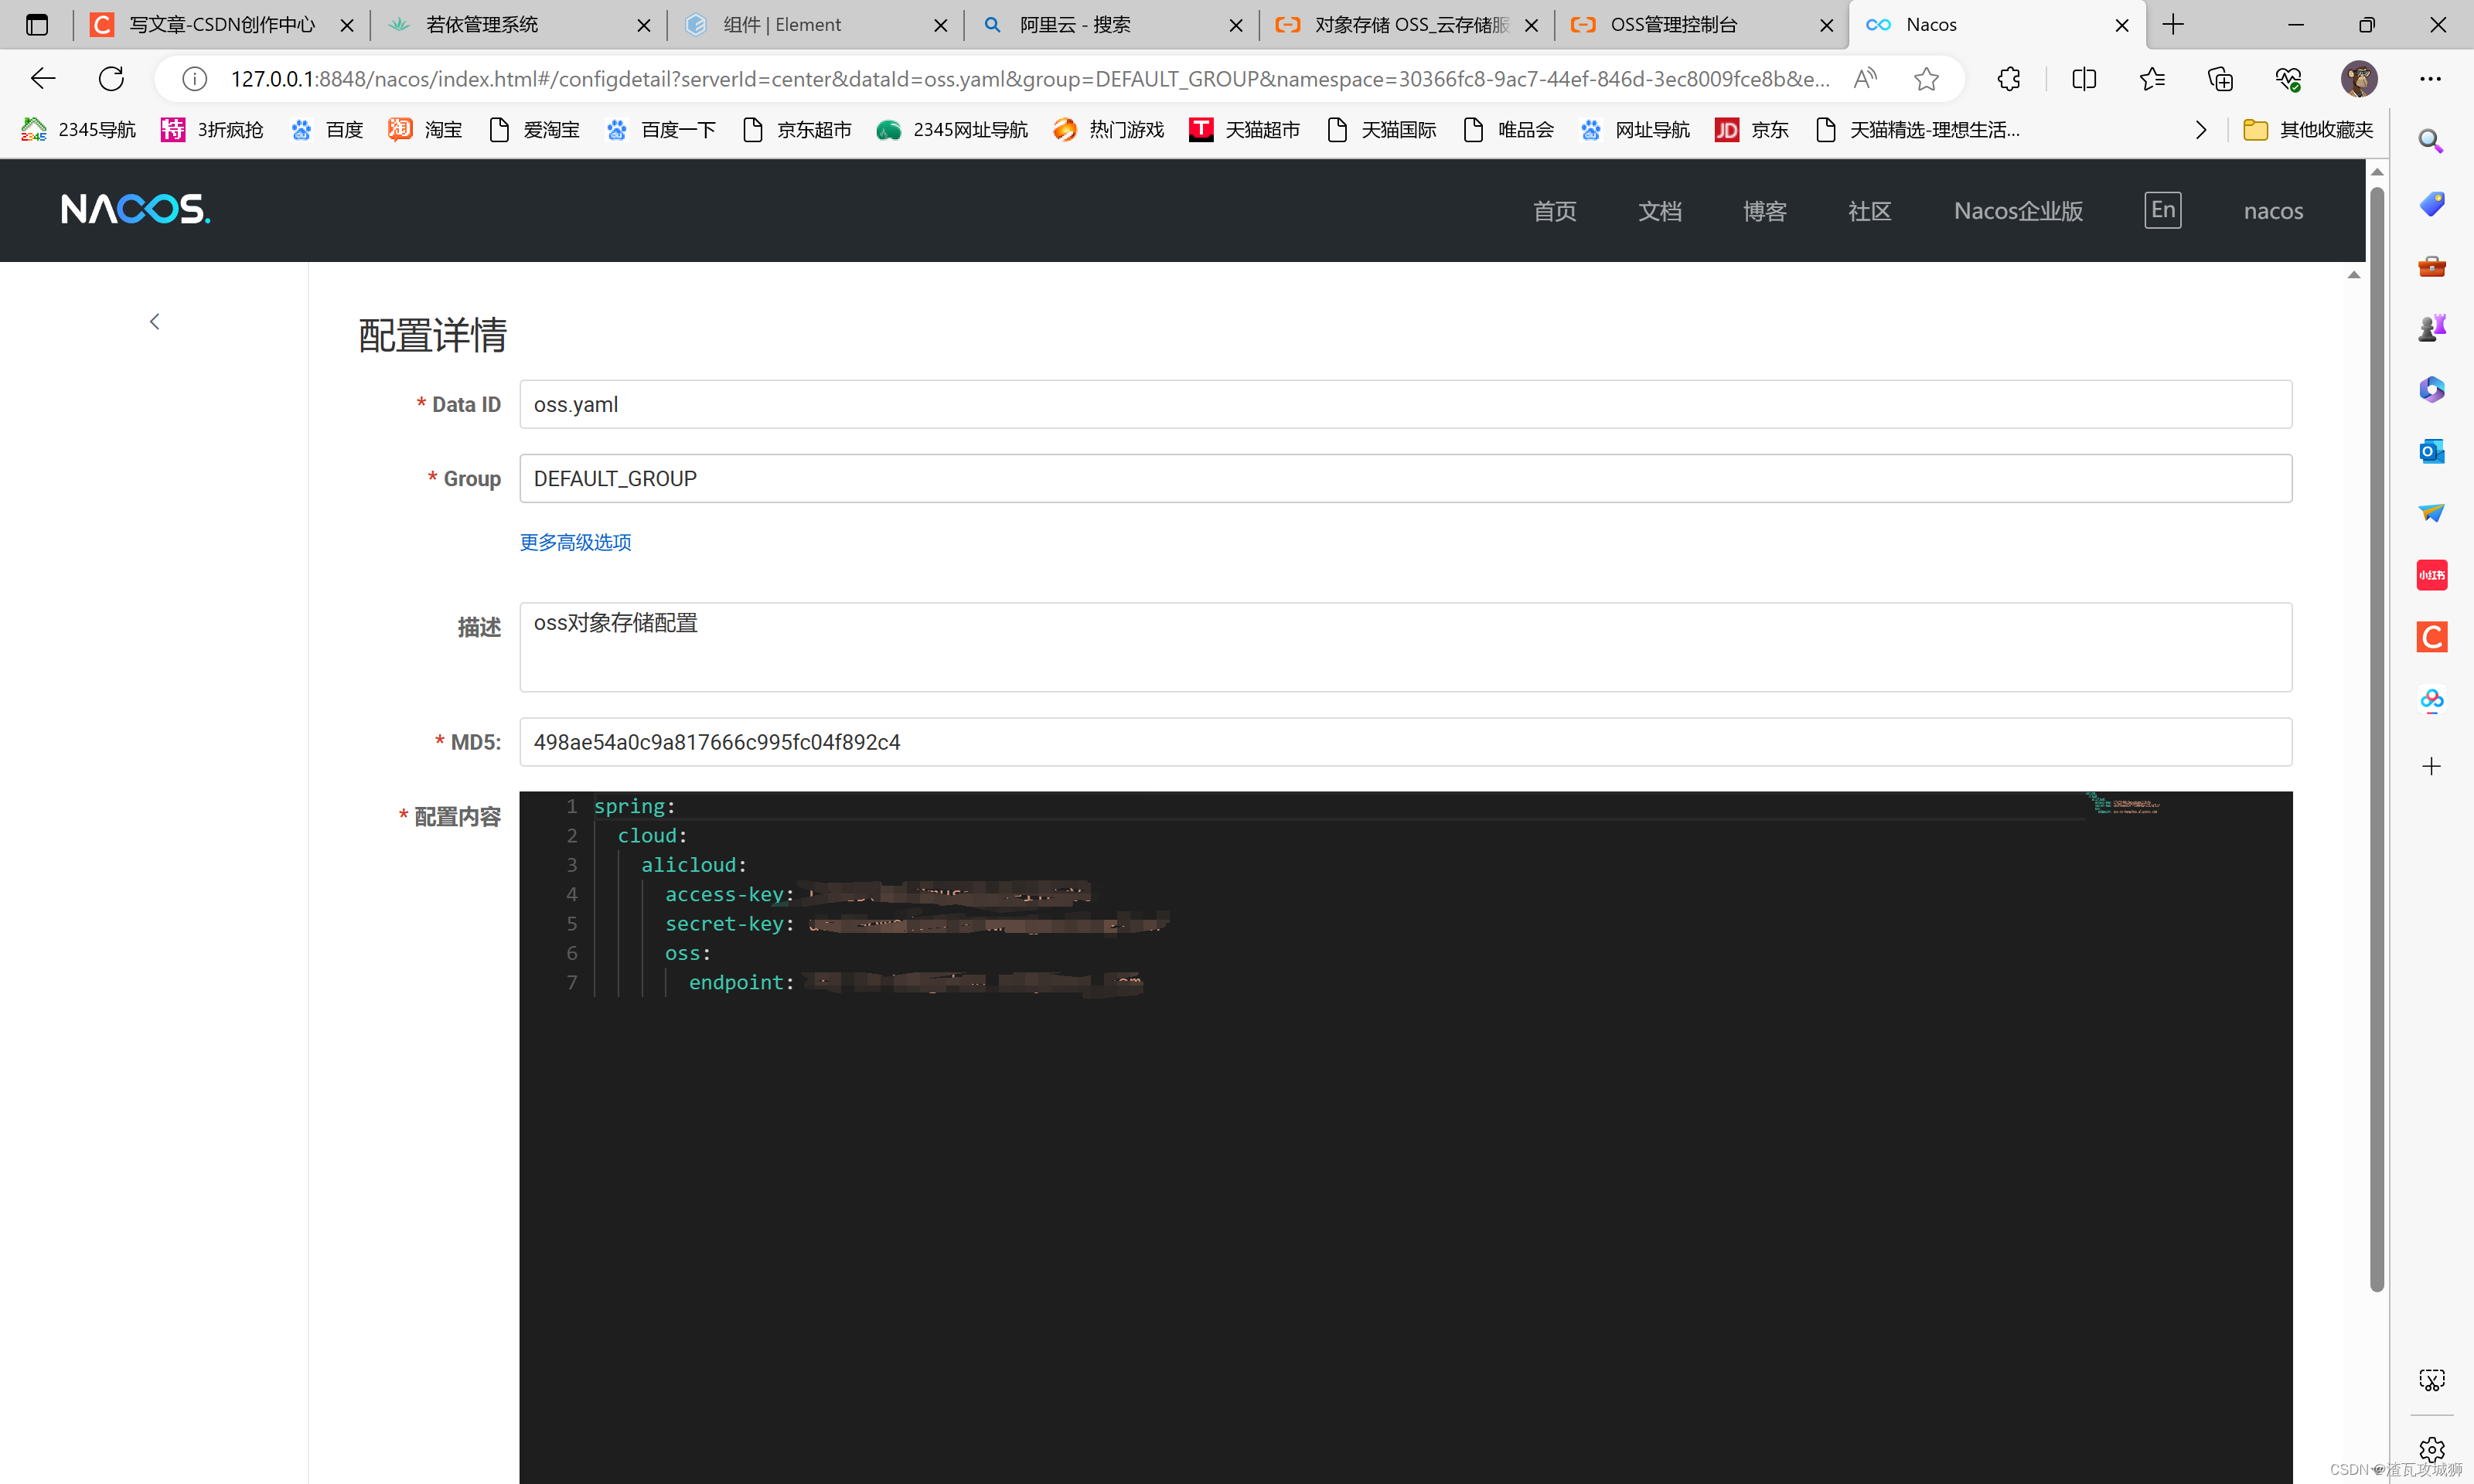
spring.cloud.nacos.config.ext-config[0].refresh=trueThe configuration center looks like this:
 3. Interface
That is to say, directly copy the sample given on the Alibaba Cloud oss official website and change it:
Core file (downloaded from Alibaba Cloud official website oss document)
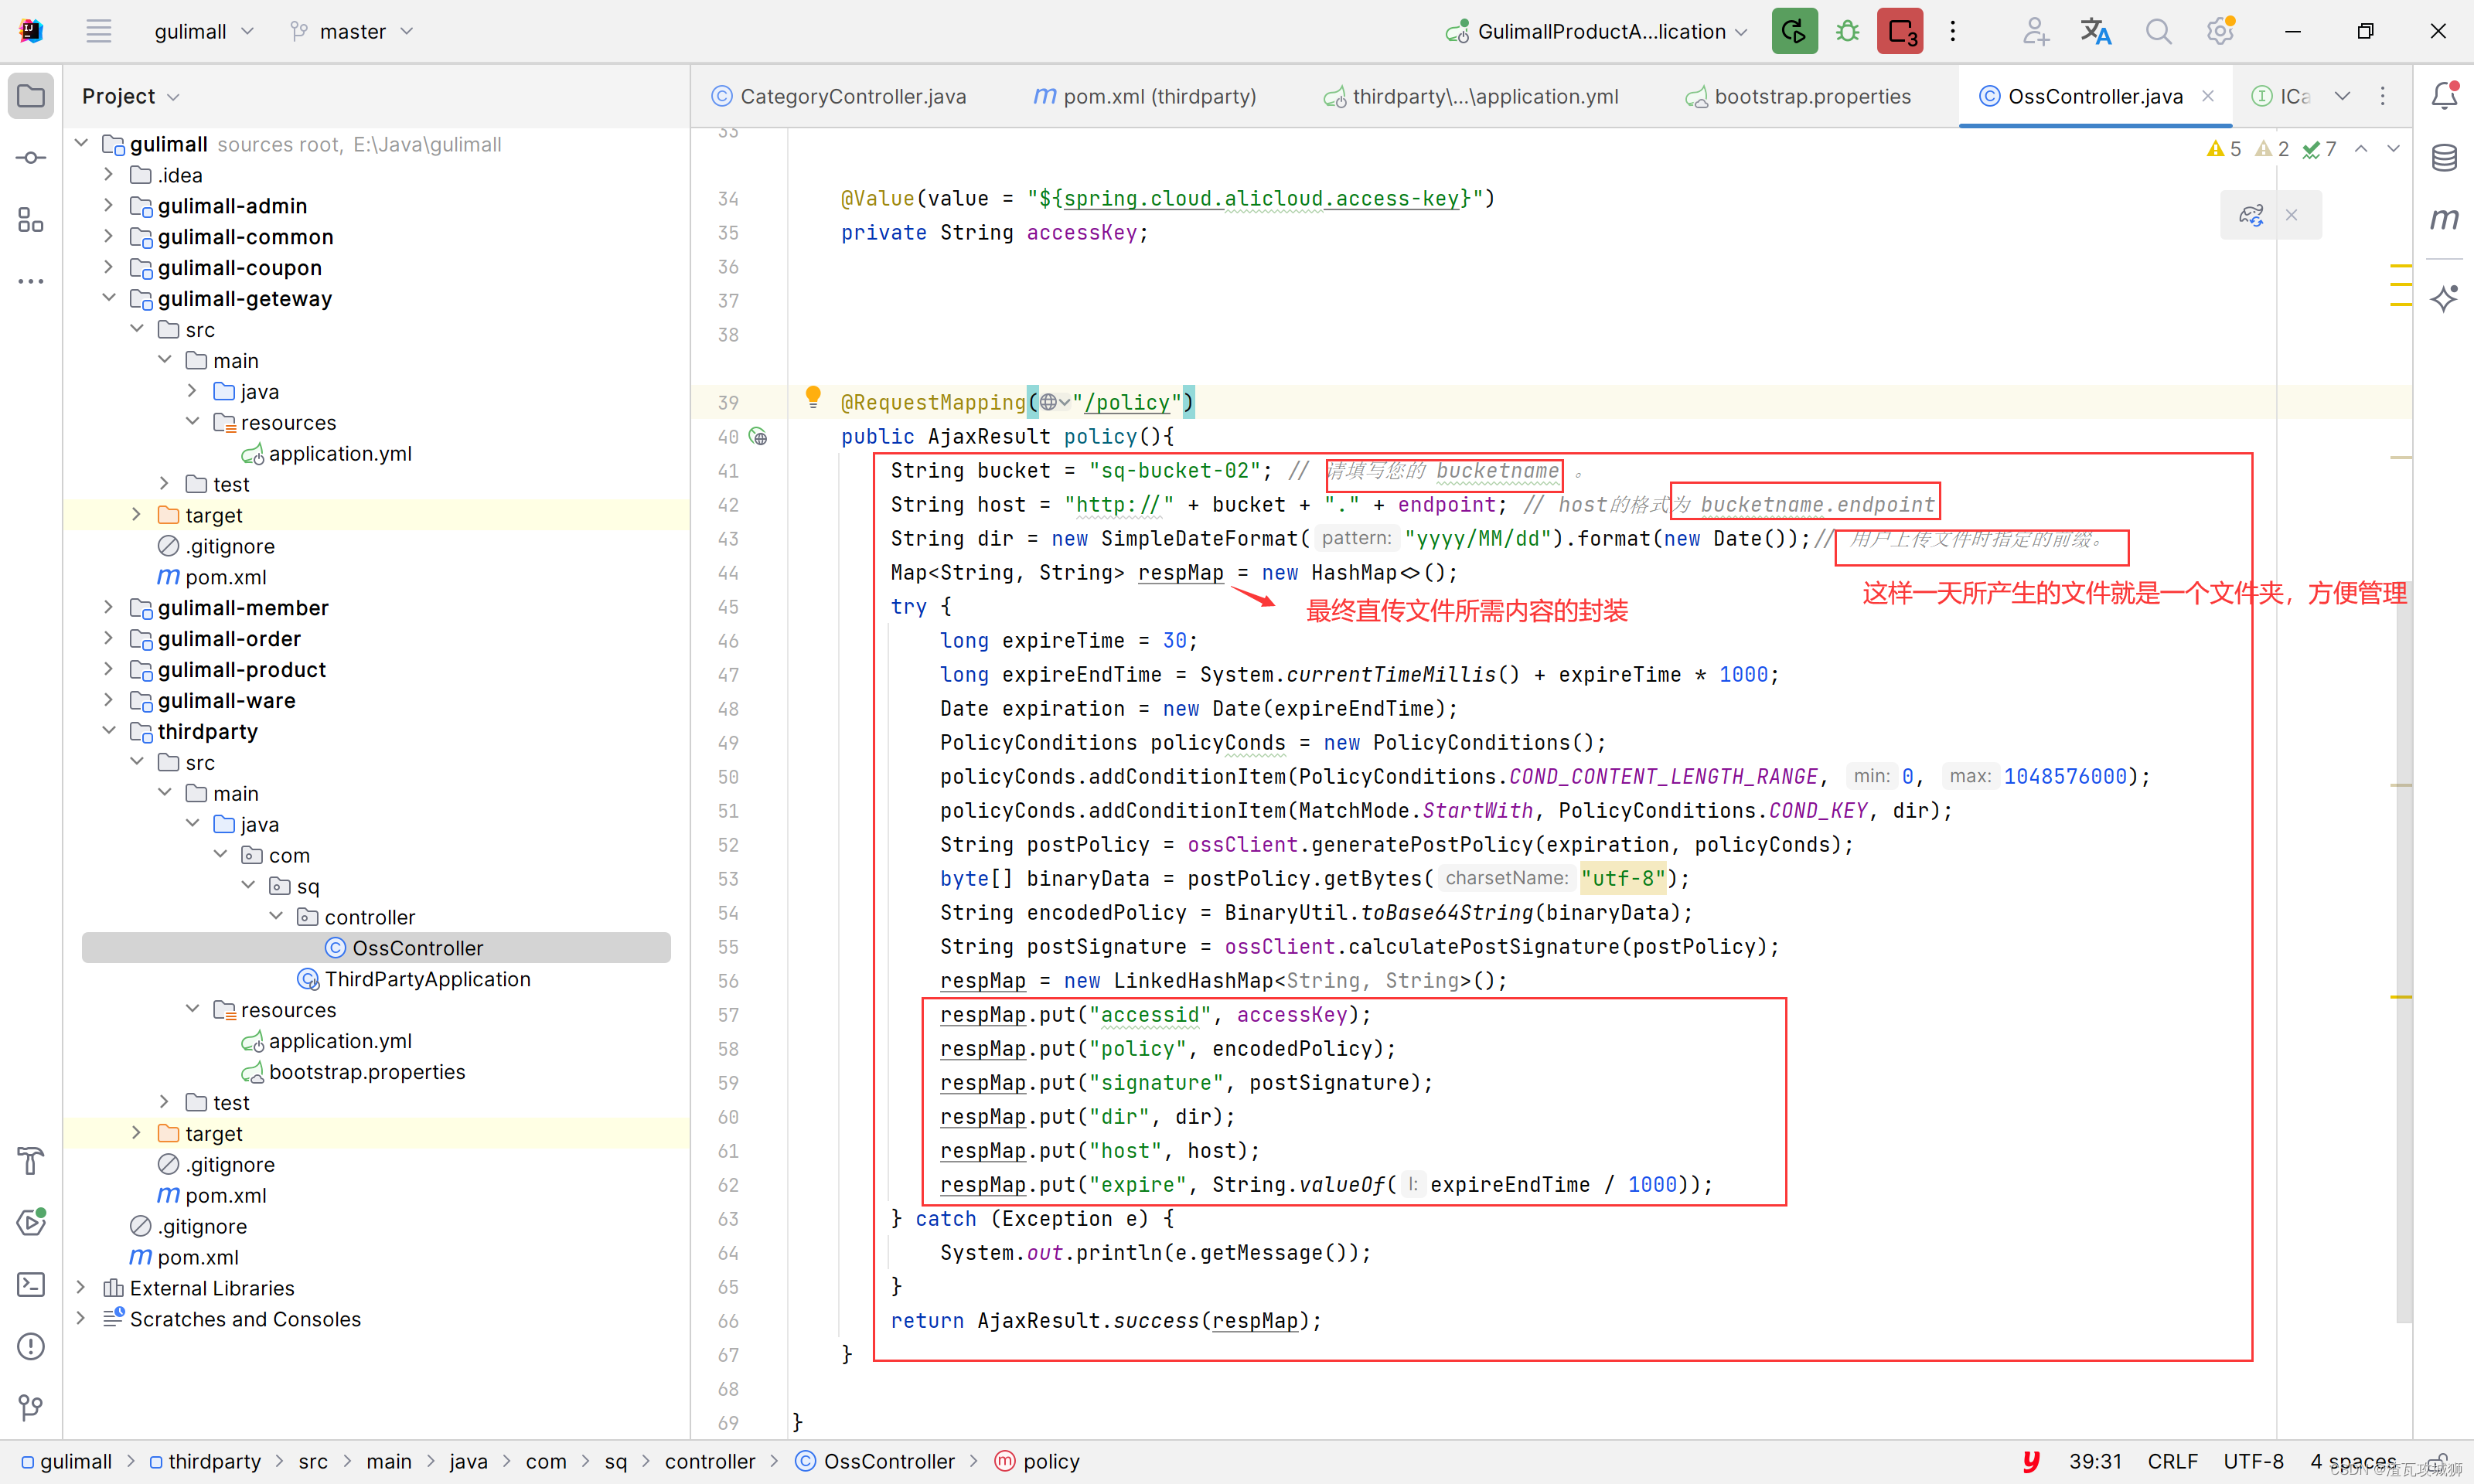
Mainly here, the bucket and dir need to be configured by yourself. Other AKs and endpoints are read from the nacos configuration center.
public AjaxResult policy(){
        String bucket = "sq-bucket-02"; // 请填写您的 bucketname 。
        String host = "http://" + bucket + "." + endpoint; // host的格式为 bucketname.endpoint
        String dir = new SimpleDateFormat("yyyy/MM/dd").format(new Date());// 用户上传文件时指定的前缀。
        Map<String, String> respMap = new HashMap<>();
        try {
            long expireTime = 30;
            long expireEndTime = System.currentTimeMillis() + expireTime * 1000;
            Date expiration = new Date(expireEndTime);
            PolicyConditions policyConds = new PolicyConditions();
            policyConds.addConditionItem(PolicyConditions.COND_CONTENT_LENGTH_RANGE, 0, 1048576000);
            policyConds.addConditionItem(MatchMode.StartWith, PolicyConditions.COND_KEY, dir);
            String postPolicy = ossClient.generatePostPolicy(expiration, policyConds);
            byte[] binaryData = postPolicy.getBytes("utf-8");
            String encodedPolicy = BinaryUtil.toBase64String(binaryData);
            String postSignature = ossClient.calculatePostSignature(postPolicy);
            respMap = new LinkedHashMap<String, String>();
            respMap.put("accessid", accessKey);
            respMap.put("policy", encodedPolicy);
            respMap.put("signature", postSignature);
            respMap.put("dir", dir);
            respMap.put("host", host);
            respMap.put("expire", String.valueOf(expireEndTime / 1000));
        } catch (Exception e) {
            System.out.println(e.getMessage());
        }
        return AjaxResult.success(respMap);
    }
Complete code of interface:
@RestController
@RequestMapping("/thirdparty/oss")
public class OssController {

    @Autowired
    private OSS ossClient;

    @Value(value = "${spring.cloud.alicloud.oss.endpoint}")
    private String endpoint;

    @Value(value = "${spring.cloud.alicloud.access-key}")
    private String accessKey;


    @RequestMapping("/policy")
    public AjaxResult policy(){
        String bucket = "sq-bucket-02"; // 请填写您的 bucketname 。
        String host = "http://" + bucket + "." + endpoint; // host的格式为 bucketname.endpoint
        String dir = new SimpleDateFormat("yyyy/MM/dd").format(new Date());// 用户上传文件时指定的前缀。
        Map<String, String> respMap = new HashMap<>();
        try {
            long expireTime = 30;
            long expireEndTime = System.currentTimeMillis() + expireTime * 1000;
            Date expiration = new Date(expireEndTime);
            PolicyConditions policyConds = new PolicyConditions();
            policyConds.addConditionItem(PolicyConditions.COND_CONTENT_LENGTH_RANGE, 0, 1048576000);
            policyConds.addConditionItem(MatchMode.StartWith, PolicyConditions.COND_KEY, dir);
            String postPolicy = ossClient.generatePostPolicy(expiration, policyConds);
            byte[] binaryData = postPolicy.getBytes("utf-8");
            String encodedPolicy = BinaryUtil.toBase64String(binaryData);
            String postSignature = ossClient.calculatePostSignature(postPolicy);
            respMap = new LinkedHashMap<String, String>();
            respMap.put("accessid", accessKey);
            respMap.put("policy", encodedPolicy);
            respMap.put("signature", postSignature);
            respMap.put("dir", dir);
            respMap.put("host", host);
            respMap.put("expire", String.valueOf(expireEndTime / 1000));
        } catch (Exception e) {
            System.out.println(e.getMessage());
        }
        return AjaxResult.success(respMap);
    }

}
4. Register and configure in the gateway
The last step is very important. Here is a new service. On the front end, it will only send requests to the gateway. As for the gateway to send to our service, we need to configure it in the gateway. The "key information" of this third-party service " is thirdparty, so it can be configured in the gateway.

        - id: thirdparty_path_route
          uri: lb://thirdparty
          predicates:
            - Path=/thirdparty/**
Note: The front-end needs to request this interface before. In that front-end api file, the request path must be consistent with the back-end path.
4. Summary
The workload this time is actually quite large, but if you think about it carefully, it is actually quite simple. Using the reverse-generated front-end code has helped us save 80% of the content.
The front end does three things here:
1. Change the status bar to a switch
2. Change the logo address to a file upload button on the modification page
3. Change the logo column in the table list to a picture
The backend does one thing: obtain credentials.