1. Download bundlepackage
First mysql官网download the appropriate mysql installation tar package ( https://downloads.mysql.com/archives/community/)
Some of the versions I looked for ubuntu14were higher and not supported. Some were looking for a lower version of mysql. What I was looking for wasmysql5.7.26
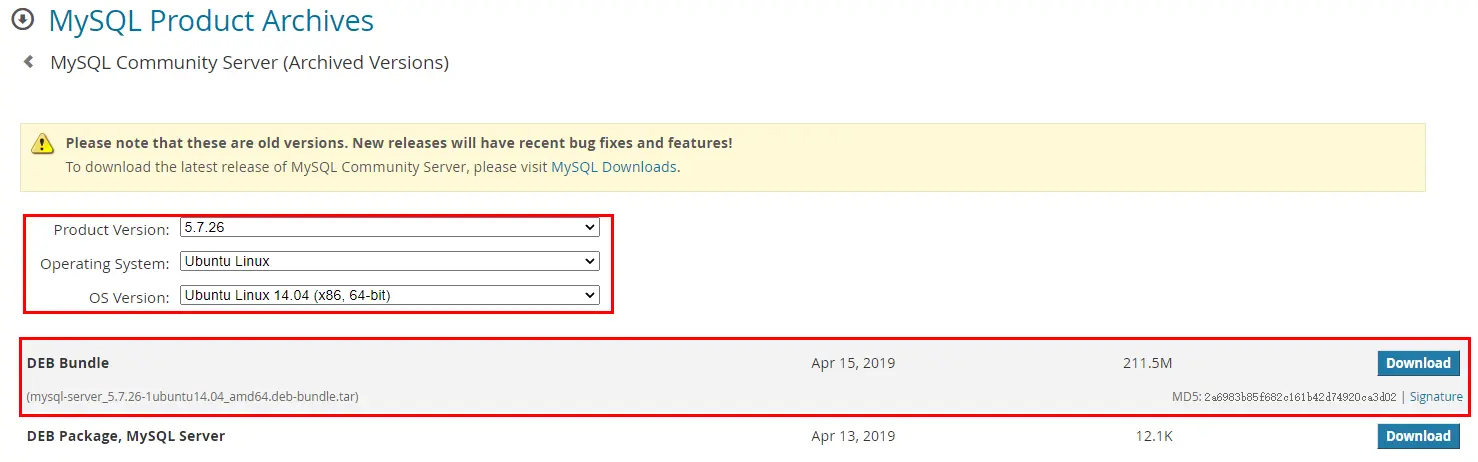
wget https://downloads.mysql.com/archives/get/p/23/file/mysql-server_5.7.26-1ubuntu14.04_amd64.deb-bundle.tar
2. Select the directory to unzip.
After downloading, upload it to the server. I uploaded it to the /opt directory. During execution tar -xvf mysql-server_5.7.26-1ubuntu14.04_amd64.deb-bundle.tar, decompress the tar package.
After decompression is complete, enter the following

3. Install deb packages in order and resolve dependencies. After successful installation, the root password setting interface will appear.
dpkg -i mysql-common_5.7.26-1ubuntu14.04_amd64.deb

dpkg -i libmysqlclient20_5.7.26-1ubuntu14.04_amd64.deb

dpkg -i libmysqlclient-dev_5.7.26-1ubuntu14.04_amd64.deb

dpkg -i libmysqld-dev_5.7.26-1ubuntu14.04_amd64.deb
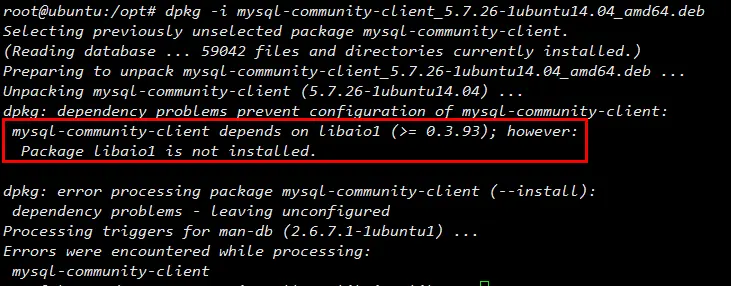
When installing the following step, there may be missing dependencies. Just install it according to your needs.
dpkg -i mysql-community-client_5.7.26-1ubuntu14.04_amd64.deb
The following are the dependency packages that I needed to install at that time
apt-get install -y libaio1 libnuma1
apt-get install -y psmisc libmecab2
Continue to install
dpkg -i mysql-client_5.7.26-1ubuntu14.04_amd64.deb

dpkg -i mysql-community-source_5.7.26-1ubuntu14.04_amd64.deb

dpkg -i mysql-community-server_5.7.26-1ubuntu14.04_amd64.deb
Once installed, a page for filling in the root password will appear.

After filling in the password, press Enter to complete the installation.
4. Start the service
In fact, after the installation is completed, the service is usually up, and you can also confirm it.
service mysql start
5. If you want to set up remote login, you need to create a new user and add permissions
1. Modify /etc/mysql/mysql.conf.d/mysqld.cnfthe file and comment out bind-address = 127.0.0.1this line
Added lower_case_table_names=1ignore case
2. Enter the mysql service. If it is not started, you need to start the mysql service first.
service mysql start
If it has already been started, just enter the following command directly
mysql -u root -p
You will be prompted to enter a password. After entering, enter the mysql service and execute the following statement for authorization ( 允许远程访问)
grant all on *.* to root@'%' identified by '123456' with grant option; flush privileges;
3. Exit the mysql service and restart the mysql service and it will be OK.
6. Modify the data directory location
A more standardized installation still does not use the default location of mysql, and the modification method is not exactly the same as under centos.
- Create a new directory and copy the original data
mkdir -p /home/app/data/mysql
cp -R /var/lib/mysql/* /home/app/data/mysql
chown -R mysql:mysql /home/app/data/mysql
chmod –R 775 /home/app/data/mysql
- Modify parameter file
vim /etc/mysql/mysql.conf.d/mysqld.cnf
#修改
datadir = /home/app/data/mysql
- Modify the startup file.
Note that this step must be modified for Ubuntu, but not for centos, otherwise an error will be reported.
vim /etc/apparmor.d/usr.sbin.mysqld
#把
/var/lib/mysql/ r,
/var/lib/mysql/** rwk,
#改成
/data/mysql/ r,
/data/mysql/** rwk,
- Restart service
service mysql restart