Article directory
Front-end Express installation
- Method 1: Use the scaffolding provided by express to directly create the skeleton of an application
- Install scaffolding npm install -g express-generator
- Create project express express-demo
- Install dependencies npm install
- Start the project node bin/www
- Method 2: Build your own express application structure from scratch;
- Initialize the project npm init
- Install express npm i express
1. Basic use
- Import–>Create–>Listen
- Use reference documentation
const express = require('express');
//  * 创建express服务器
const app=express()
//  * 启动服务器 ,监听端口

app.listen(8000,()=>{


	console.log('启动express 服务器')
})

// 请求
app.post('/login',(req,res)=>{


     res.end('登录成功')
})

app.get('/home',(req,res)=>{


    res.end('home 列表模块')
})
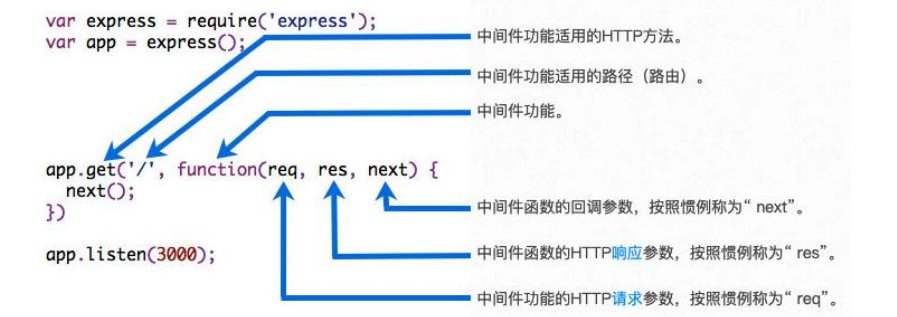
2. Middleware
- The essence of middleware is a callback function passed to express;
- This callback function accepts three parameters:
- request object (request object);
- Response object (response object);
- next function (a function defined in express to execute the next middleware);
重要: The execution process of middleware will only execute the first matching middleware. Please check whether it will be executed later.next
app.post('/login', (req, res, next) => {


    // 中间件中的req与res可以进行修改
    res.aaa = '添加aaa并修改res'
    // 2. JSON结束
    // res.json({message:'登录成功',code:200})
    // res.end('登录成功')
    // 3. next 匹配执行下一个中间件
    next()
})
注意点: If the current middleware function does not end the request-response cycle, next() must be called. This passes control to the next middleware function, otherwise, the request will be suspended.
const express = require('express');
//  * 创建express服务器
const app = express()
//  * 启动服务器 ,监听端口

app.listen(8000, () => {


    console.log('启动express 服务器')
})

// 请求
app.post('/login', (req, res, next) => {


    // 中间件中的req与res可以进行修改
    res.aaa = '添加aaa并修改res'
    // 2. JSON结束
    // res.json({message:'登录成功',code:200})
    // res.end('登录成功')
    // 3. next 匹配执行下一个中间件
    next()
})

app.use((req,res,next)=>{


    console.log('执行下一个中间件next');
})

app.get('/home', (req, res) => {


    res.end('home 列表模块')
})
2.1 Middleware application
- Express mainly provides two methods:
- app/router.use;
- app/router.methods;
app.use
app.use((req,res,next)=>{


    console.log('执行下一个中间件next');
})
app.methods
app.get('/home', (req, res) => {


    res.end('home 列表模块')
})
3. How to register middleware
3.1 Registration of common middleware
use注册The middleware can be matched regardless of the path or request.- At the same time, during the matching process
next(), only the first middleware will be executed.
// 1. use注册的中间件不管什么路径或者请求都可以匹配的上
// 2. 同时在匹配的过程中如何不 next(), 只会执行第一个中间件
app.use((req,res,next)=>{


    console.log('执行下一个中间件next');
    next()
})

app.use(()=>{


    console.log('执行第二个中间件')
})
3.2 path matching middleware
-The path matching middleware only limits the path and does not display the request method.
// 这里的路径匹配中间件只是对路径做限制并没有请求方式做显示
// 不管method如何都可以匹配
app.use('/home',(req,res,next)=>{


	console.log('路径匹配中间件')
})
3.3 method and path matching
- grammar:
app.method(path,middleware) - Matching middleware will only match the first middleware that meets the requirements. Whether the next middleware is executed depends on whether next is called.
// app.method(path,middleware)
app.get('/home',(req,res,next)=>{


	console.log('路径以及方法匹配');
	res.end('匹配成功')
})

// 注册多个中间件
app.get('/home', (req, res, next) => {


	console.log('路径以及方法匹配');
	res.end('匹配成功')
	// 中间的匹配只会匹配第一个符合要求的中间件 , 关于下一个中间件是否执行看有没有调用next
}, (req, res, next)=>{


   console.log('关于这个中间件的执行需要看上一个中间件是否有next');
})
3.4 Case middleware matching and execution method
- Ordinary direct writing
app.post('/login', (req, res, next) => {


	req.on('data', data => {


		let userInfo = data.toString()
		const user = JSON.parse(userInfo)
		if (user.username === 'admin' && user.password===123456) {


			res.end('登录成功')
		}else{


			res.end('账号或者密码错误')
		}
	})

})

//  注册信息
app.post('/register', (req, res, next) => {


	// res.end('注册成功')
	// 注册要查询数据库,看是否存在用户名
   if (true) {


		 req.on('data', data => {


			 let userInfo = data.toString()
			 const user = JSON.parse(userInfo)
			 if (user.username === 'admin' && user.password === 123456) {


				 res.end('注册成功')
			 } else {


				 res.end('账号或者密码错误')
			 }
		 })
	 }

})
- **Optimization
JSON解析,放到body后next()**
// 1. JSON解析,放到body
app.use((req, res, next) => {


	if (req.headers['content-type'] === 'application/json') {


		req.on('data', data => {


			const jsonInfo = JSON.parse(data.toString())
			req.body = jsonInfo
		})
		req.on('end', () => {


			next()
		})
	}
})

// 账号密码
app.post('/login', (req, res, next) => {


  console.log(req.body);
	res.end('登录成功')
})
//  注册信息
app.post('/register', (req, res, next) => {


	console.log(req.body);
})
4. Middleware request data parsing
expressThere are some built-in middleware that help us complete request parsing;
4.1 Parse request body middleware
app.use((req, res, next) => {


	if (req.headers['content-type'] === 'application/json') {


		req.on('data', data => {


			const jsonInfo = JSON.parse(data.toString())
			req.body = jsonInfo
		})
		req.on('end', () => {


			next()
		})
	}
	next()
})
// 账号密码
app.post('/login', (req, res, next) => {


  console.log(req.body);
	res.end('登录成功')
})
- used in the above code
JSON.parse对data数据进行解析, butexpress中提供了 json可以直接进行解析
app.use(express.json())
// 账号密码
app.post('/login', (req, res, next) => {


  console.log(req.body);
	res.end('登录成功')
})
4.2 urlencoded analysis
- Parsing the client uses
urlencodedpassed parameters, then you need to useexpress.urlencoded()

app.use(express.urlencoded())  // 解析客户端利用urlencoded传参
// 解决 body - parser deprecated undefined extended: provide extended option 05urlencoded警告
app.use(express.urlencoded({

     extended: true }))
app.post('/login', (req, res, next) => {


	console.log(req.body);
	res.end('登录成功')
})
5. Third-party middleware
5.1 morgan logging
const express = require('express');
const morgan = require('morgan');
const fs = require('fs');
const app = express()
// cnpm i morgan  安装
// 第三方中间件 合并日志
const writerLog=fs.createWriteStream('./log.txt')
// 日志写入
app.use(morgan('combined', {

     stream: writerLog }))
app.post('/login', (req, res, next) => {


	console.log(req.body);
	res.end('登录成功')
})
5.2 multer file upload
- Install
npm i multer --save MulterOnly handlemultipart/form-dataform data of any type.MulterIt will be inexpress 的 request 对象里添加一个 body 对象(containing the text field information of the form) and thefileorfilesobject (single file is obtained throughreq.fileobtaining, multiple files are obtained throughreq.filesobtaining, the file or files object contains the file information uploaded by the object form).注意点The value of upload.single corresponds to the value in the front-end name, and at the same time,form-datathe value of the key must be kept the same.
const multer = require('multer');
// 对上传的文件名字重起
const upload = multer({


	storage: multer.diskStorage({


		//  文件名称,
		// destination 是用来确定上传的文件应该存储在哪个文件夹中
		// destination 是一个函数,必须创建这个文件夹
		destination(require, file, callback) {


			callback(null, 'uploads/')
		},
		filename(require, file, callback) {


			// originalname是文件上传时的名字,可以根据它获取后缀
			callback(null, Date.now() + '_' + file.originalname)
		}
	})
})
app.post('/upload', upload.single("file"), (req, res, next) => {


	console.log(req.file);  // 文件信息
	res.end('文件上传成功')
})
- Multiple file upload, accepts an array
- while at
multer实例.array(fielname[,maxCount])- receiving a tofielname命名的文件数组;maxCount——限制上传的最大数量,这些文件的信息保存在req.files里面
app.post('/upload', upload.array("file"), (req, res, next) => {


	console.log(req.files);  // 文件信息
	res.end('文件上传成功')
})
Reference analysis
Parse ordinary data in form-data
const formData=  multer()
app.post('/login',formData.any(), (req, res, next) => {


	console.log(req.body);
	res.end('登录成功')
})
6. Parameter analysis params and query
- query is mainly used for paging
app.post('/list', (req, res, next) => {


	// http://localhost:8000/list?offset=10&page=20解析
	console.log(req.query);   // { offset: '10', page: '20' }
	res.end('登录成功')
})
- params is mainly used for passing id
app.post('/user/:id', (req, res, next) => {


	// http://localhost:8000/user/1100

	const id = req.params.id
	res.end(`获取用户${

      id}`)
})
7. Response data
end方式: Similar to the response.end method in http, the usage is consistentjson方法: Many types can be passed in to the json method: object, array, string, boolean, number, null, etc., and they will be converted into json format and returned.status方法: Used to set status code;注意is a function- Other response content references
app.get('/login', (req, res, next) => {


	// 1. 方法一 end
	// res.end(`响应数据---登录成功`)
	//  2. JSON数据响应
	// res.json({


	// 	code: 0, message: '欢迎回来', data: [{


	// 		name: "admin",
	// 		avator:'www.http.ccc.jpg'
	// 	}]
	// })

	//  3. status 方法,设置http状态码
	res.status(201)
	res.json(
		{


			code: 0, message: '欢迎回来', data: [{


				name: "admin",
				avator: 'www.http.ccc.jpg'
			}]
		}
	)
})
8. Routing
express.Routerto create a route handler
useRouter.js
const express = require('express');
const userRouter = express.Router()
userRouter.get('/', (req, res, next) => {


	res.json(
		{


			code: 0, message: 'success', data: [{


				name: "admin",
				password:'123456'
			}, {


					name: "admin",
					password: '123456'
				}]
		}
	)
})
userRouter.get('/:id',(req, res, next) => {


	const id=req.params.id
	res.end(id)
})
userRouter.post('/', (req, res, next) => {


})
userRouter.delete('/:id', (req, res, next) => {


})
userRouter.patch('/:id', (req, res, next) => {


})

module.exports=userRouter
index.js
const userRouter = require('./router/userRouters.js');
app.use('/users', userRouter)
Reference article : Specific use of routing in projects
9. Static resources
express 内置static() 静态资源, directly make the folder a static resource
app.use(express.static('./uploads'))
10 Error handling
- Ordinary error handling requires using front-end data for if judgment processing.
- However, each interface writes a judgment or returns the same error message and status code, which will cause redundancy in the code.
app.post('/login', (req, res, next) => {


	const {

     username, password } = req.body
	if (username !== 'admin' || password !== 123456) {


		res.json({


			code: 1002,
			message: '账号密码错误'
		})
	} else {


		console.log('xx')
		res.json({


			code: 200,
			message: '登录成功'
		})
	}
})
- Simple encapsulation and unified processing
// 中间件处理错误信息
app.post('/login', (req, res, next) => {


	if (username !== 'admin' || password !== 123456) {


		next(1002)
	}
	else {


		next()
	}
})
app.use((errCode, req, res, next) => {


	const code = errCode
	let message = ''
	switch (code) {


		case 1001:
			message = '未知的错误'
			break
		case 1002:
			message = '账号或密码错误'
		default:
			message = '登录成功'
	}
	res.json({


		code: errCode,
		message,
	})
})