reference
Tutorial on how to peck at rice .
Tutorial on Bubu.
text
-
Create a dialog-based MFC project and set the name to Test_TabControl .
-
Resource View -> Right-click Dialog and insert two sub-dialog boxes that need to be displayed on the Tab Control control, IDD_DIALOG1 and IDD_DIALOG2 .

-
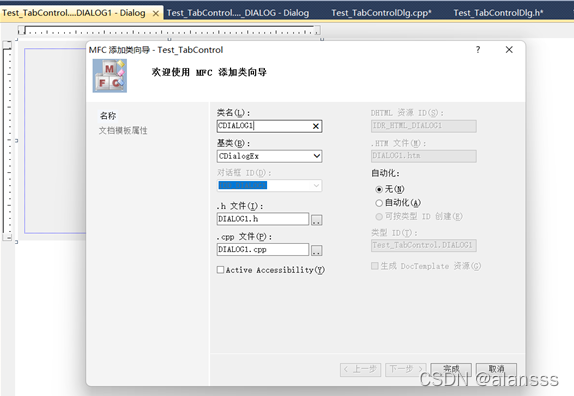
In the main dialog box or two sub-dialog boxes, right-click on the blank space -> Add Class . If you select the class wizard, you need to change the default base class from CWnd to CDialogEx in the pop-up class wizard . Then add the classes corresponding to the two sub-dialog boxes IDD_DIALOG1 and IDD_DIALOG2 . Assume that the class names are CDIALOG1 and CDIALOG2 .

-
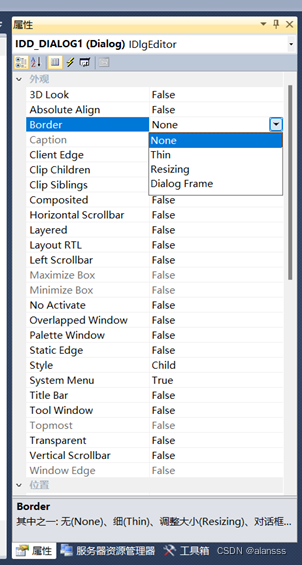
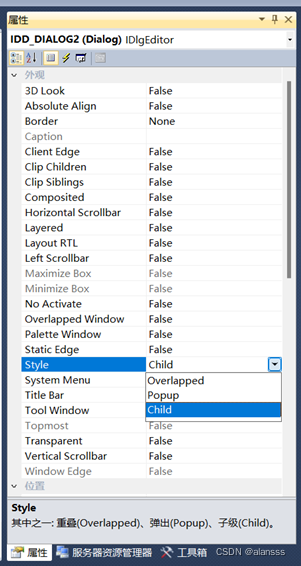
Modify the properties of the two dialog boxes added in the resource view. Switch to the IDD_DIALOG1 and IDD_DIALOG2 dialog interfaces respectively. Under the appearance column in the property bar, change Border to None and Style to child .
-
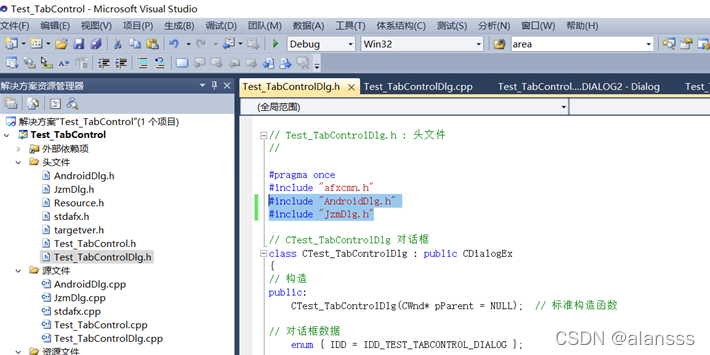
The main dialog box Test_TabControlDlg.h contains the header files of the above two dialog boxes, which also includes the two header files "JzmDlg.h" and "AndroidDlg.h"
#include "AndroidDlg.h"
#include "JzmDlg.h"
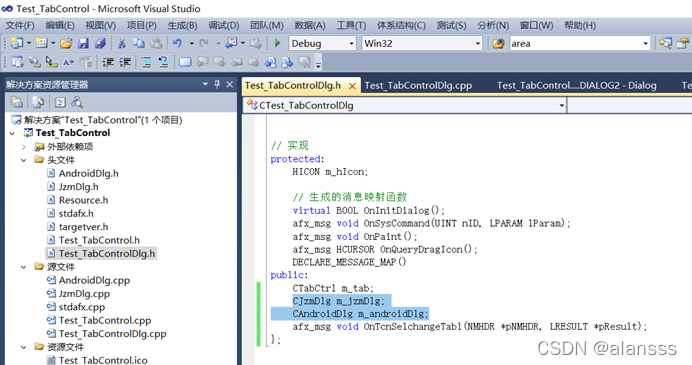
Then continue to add two member variables to the CTest_TabControlDlg class in the "Test_TabControlDlg.h" file: CJzmDlg m_jzmDlg and CAndroidDlg m_androidDlg;
	CJzmDlg m_jzmDlg;
    CAndroidDlg m_androidDlg;
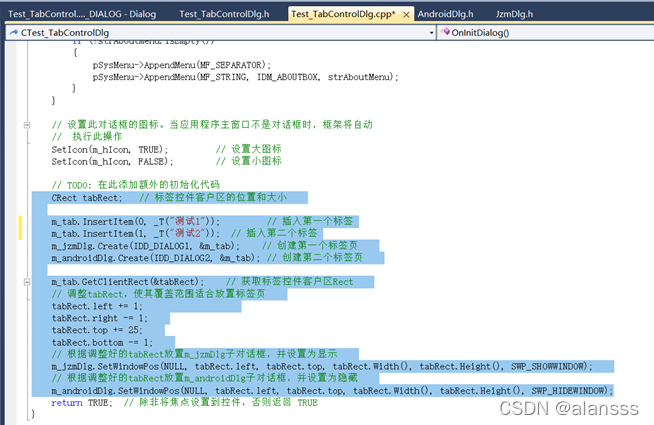
- When the CTest_TabControlDlg dialog box is initialized, we also initialize the label control. Modify the CTest_TabControlDlg::OnInitDialog() function as follows:
In comments:
// TODO: Add additional initialization code here
Then add the following code:
   	CRect tabRect;   // 标签控件客户区的位置和大小

    m_tab.InsertItem(0, _T("测试1"));         // 插入第一个标签
    m_tab.InsertItem(1, _T("测试2"));  // 插入第二个标签
    m_jzmDlg.Create(IDD_DIALOG1, &m_tab);    // 创建第一个标签页
    m_androidDlg.Create(IDD_DIALOG2, &m_tab); // 创建第二个标签页

    m_tab.GetClientRect(&tabRect);    // 获取标签控件客户区Rect
    // 调整tabRect,使其覆盖范围适合放置标签页
    tabRect.left += 1;
    tabRect.right -= 1;
    tabRect.top += 25;
    tabRect.bottom -= 1;
    // 根据调整好的tabRect放置m_jzmDlg子对话框,并设置为显示
    m_jzmDlg.SetWindowPos(NULL, tabRect.left, tabRect.top, tabRect.Width(), tabRect.Height(), SWP_SHOWWINDOW);
    // 根据调整好的tabRect放置m_androidDlg子对话框,并设置为隐藏
    m_androidDlg.SetWindowPos(NULL, tabRect.left, tabRect.top, tabRect.Width(), tabRect.Height(), SWP_HIDEWINDOW);
- Run the program and check the results. At this time, we find that when switching tabs, the tab page does not switch with it, but always displays a dialog box. What we want to achieve is the switching effect of tab pages, so we also need to add a processing function for the notification message TCN_SELCHANGE of the m_tab label control , double-click the Tab control control, and add the following code:
CRect tabRect;    // 标签控件客户区的Rect

    // 获取标签控件客户区Rect,并对其调整,以适合放置标签页
    m_tab.GetClientRect(&tabRect);
    tabRect.left += 1;
    tabRect.right -= 1;
    tabRect.top += 25;
    tabRect.bottom -= 1;

    switch (m_tab.GetCurSel())
    {


    // 如果标签控件当前选择标签1,则显示m_jzmDlg对话框,隐藏m_androidDlg对话框
    case 0:
        m_jzmDlg.SetWindowPos(NULL, tabRect.left, tabRect.top, tabRect.Width(), tabRect.Height(), SWP_SHOWWINDOW);
        m_androidDlg.SetWindowPos(NULL, tabRect.left, tabRect.top, tabRect.Width(), tabRect.Height(), SWP_HIDEWINDOW);
        break;
    // 如果标签控件当前选择标签2,则隐藏m_jzmDlg对话框,显示m_androidDlg对话框
    case 1:
        m_jzmDlg.SetWindowPos(NULL, tabRect.left, tabRect.top, tabRect.Width(), tabRect.Height(), SWP_HIDEWINDOW);
        m_androidDlg.SetWindowPos(NULL, tabRect.left, tabRect.top, tabRect.Width(), tabRect.Height(), SWP_SHOWWINDOW);
        break;
    default:
        break;
    }

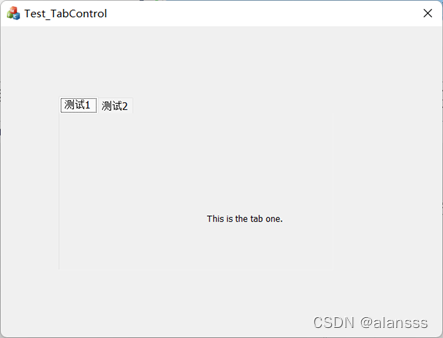
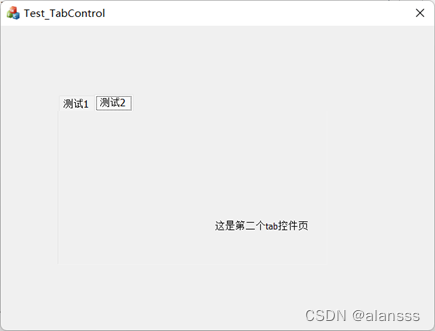
- Run the program again, and the final tab switching effect is as shown in the following two pictures: