Android system startup process and Zygote, SystemServer
Before explaining Zygote, considering that the source code of different system versions is different, the source code analyzed below is based on Android 8.0.0.
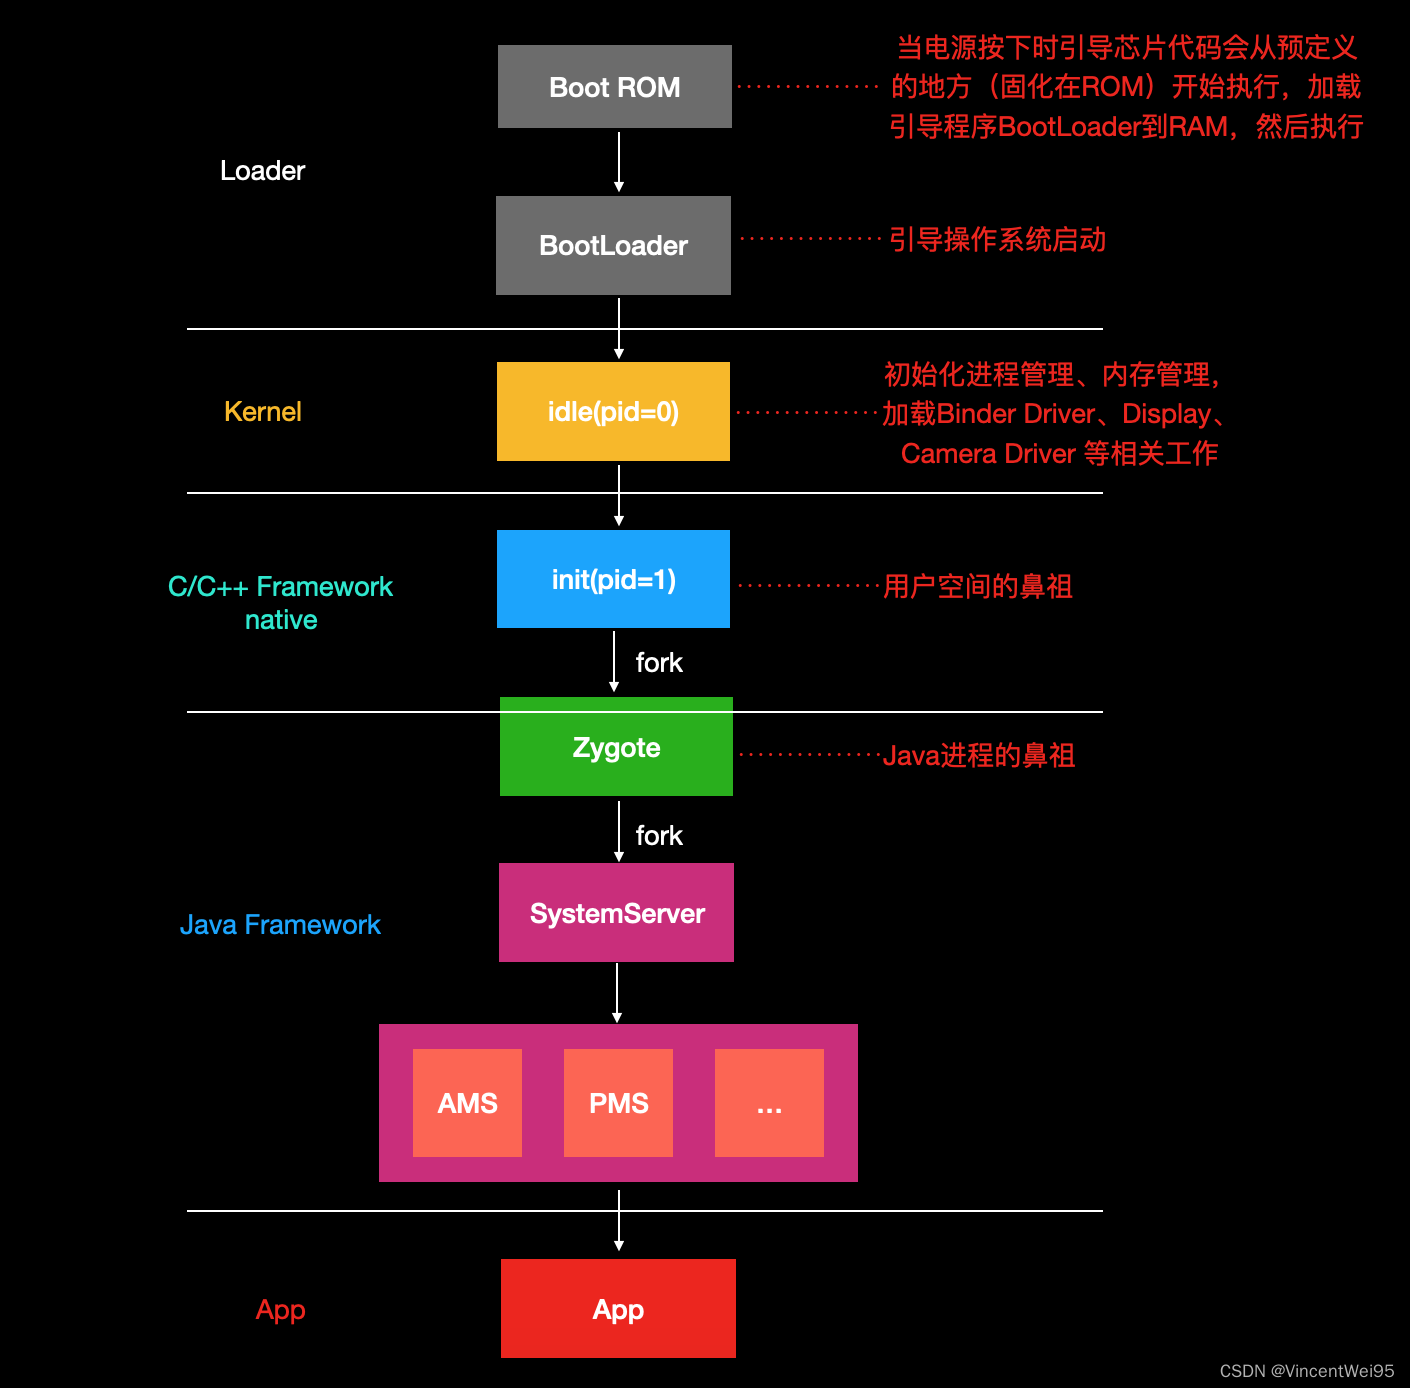
init process
When the system starts, the init process is the second process started after the Linux kernel starts. It is a process created in user space. You can view the pid of the init process through the command adb shell ps:

In the above figure, PID is the ID of the current process, PPID is the ID of the parent process, and the process PIDs of Linux are sorted from front to back in the startup order.
The pid of the init process in the above figure is 1, while the pid of the Linux kernel is 0. This also verifies that the init process is the next process started after the Linux kernel starts.
The init process has two main functions:
-
Start critical system services
-
Guard key services. If one of the key services is killed, the phone will be restarted.
What kind of services are critical services? Key services are essential services for mobile phones, such as network services, Bluetooth services, ringtone services, etc. You can also view other services with ppid=1 through adb shell ps, which are key services started and guarded by the init process:

In the above figure, for example, installd, servicemanager, surfaceflinger and other ppid=1 are all key services started by the init process.
So if you want to implement a system service and don't want to be killed, the best way is to make the service started by the init process and become a key service.
The init process is also an executable program, so it also has corresponding related code. The init.c code is specifically in the Android source code directory/system/core/init/init.cpp.
What we often call init.rc can be understood as a list of tasks to be performed by the init process. It is actually an execution script:
import /init.environ.rc
import /init.usb.rc
import /init.${ro.hardware}.rc
import /init.usb.configfs.rc
import /init.${ro.zygote}.rc // 启动 zygote 的执行脚本

...
You can see that the init.rc task list is actually the file path of other imported task lists to be executed, including the execution script to start zygote. ro.zygote will obtain the corresponding execution script file according to the system type, for example, 32-bit acquisition The one obtained by 64-bit is init.zygote32.rc, and the one obtained by 64-bit is init.zygote64.rc:
system/core/rootdir/init.zygote32.rc

service zygote /system/bin/app_process -Xzygote /system/bin --zygote --start-system-server
    class main
    priority -20
    user root
    group root readproc
    socket zygote stream 660 root system
    onrestart write /sys/android_power/request_state wake
    onrestart write /sys/power/state on
    onrestart restart audioserver
    onrestart restart cameraserver
    onrestart restart media
    onrestart restart netd
    onrestart restart wificond
    writepid /dev/cpuset/foreground/tasks
The first line of script information records the entry location of the program to be executed. App_main.c under /system/bin/app_process will be executed first. -Xzygote /system/bin --zygote --start-system-server is the entry program passed in. parameters.
Start Zygote in native layer
As mentioned above, init.rc is an execution script, which contains the execution file init.zygote32.rc or init.zygote64.rc that starts the Zygote process. This file will execute /frameworks/base/cmds/app_process/app_main.c The main() function starts Zygote:
/frameworks/base/cmds/app_process/app_main.c

#if defined(__LP64__)
static const char ABI_LIST_PROPERTY[] = "ro.product.cpu.abilist64";
static const char ZYGOTE_NICE_NAME[] = "zygote64";
#else
static const char ABI_LIST_PROPERTY[] = "ro.product.cpu.abilist32";
static const char ZYGOTE_NICE_NAME[] = "zygote";
#endif

// argv 就是脚本传入的参数 -Xzygote /system/bin --zygote --start-system-server
int main(int argc, char* const argv[]) {
	...
	while (i < argc) {
		const char* arg = argv[i++];
		if (strcmp(arg, "--zygote") == 0) {
			zygote = true;
			niceName = ZYGOTE_NICE_NAME;
		} else if (strcmp(arg, "--start-system-server") == 0) {
			startSystemServer = true;
		}
		...
	}
	...
	for (; i < argc; ++i) {
		args.add(String8(argv[i]));
	}

	// 将 app_process 修改为 zygote
	if (!niceName.isEmpty()) {
		runtime.setArgv0(niceName.string(), true /* setProcName */);
	}

	if (zygote) {
		// 在 system/core/rootdir/init.zygote32.rc(或 init.zygote.64.rc) 解析到参数 --zygote,所以 zygote == true,通过 runtime.start() 创建 Zygote 进程
		runtime.start("com.android.internal.os.ZygoteInit", args, zygote);
	}
	...
}
The above code changes app_process to Zygote, so Zygote is not this name at the beginning, but is changed to Zygote at startup.
Although Zygote is created in the Framework native layer by executing the main() entry of C language, because the init process is in user space, and the init process created Zygote, so Zygote is in user space.
Let's look at what runtime.start() does:
/frameworks/base/core/jni/AndroidRuntime.cpp

void AndroidRuntime::start(const char* className, const Vector<String8>& options, bool zygote)
{
	...
	// 创建虚拟机,startVm() 有很多虚拟机的参数配置,比如内存大小
	// 内存调优和其他虚拟机的调优就是在这个函数处理
    /* start the virtual machine */
    JniInvocation jni_invocation;
    jni_invocation.Init(NULL);
    JNIEnv* env;
    if (startVm(&mJavaVM, &env, zygote) != 0) {
        return;
    }
    onVmCreated(env);

	// 动态注册 java 调用 native 的 jni
	// 我们在写 java 代码时能声明 native 方法调用 C/C++ 函数,就是因为在这里做了注册处理了映射关系
    /*
     * Register android functions.
     */
    if (startReg(env) < 0) {
        ALOGE("Unable to register all android natives\n");
        return;
    }
    ...

    // 调用 com.android.internal.os.ZygoteInit 的 main 方法
    jmethodID startMeth = env->GetStaticMethodID(startClass, "main",
        "([Ljava/lang/String;)V");
    if (startMeth == NULL) {
		ALOGE("JavaVM unable to find main() in '%s'\n", className);
	} else {
		env->CallStaticVoidMethod(startClass, startMeth, strArray);
	}
	...
}
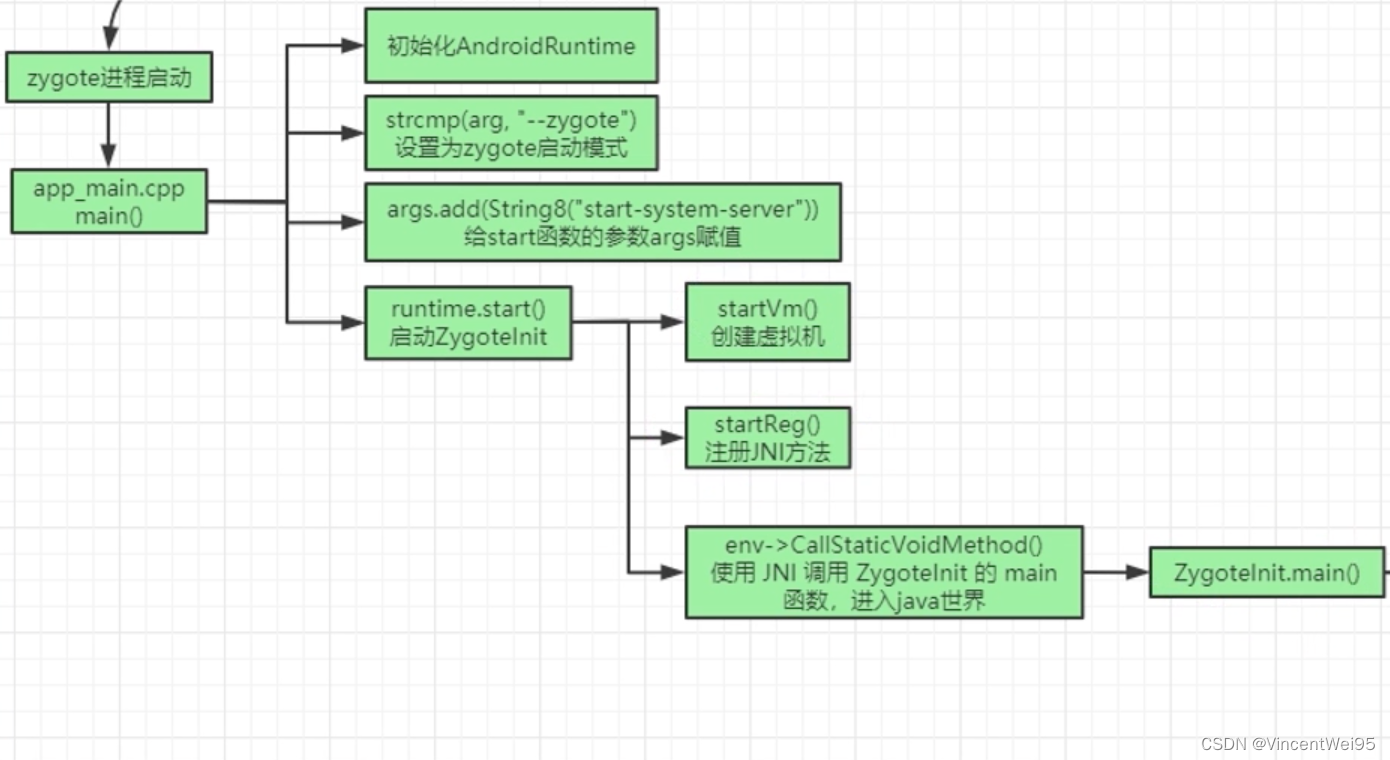
runtime.start() mainly does three things:
-
startVm() creates a virtual machine
-
startReg() dynamically registers java to call native jni
-
Reflection calls main() of ZygoteInit
Create a virtual machine through startVm(). startVm() has many virtual machine parameter configurations, such as heap memory size. If you are a system engineer, memory tuning and other virtual machine tuning are handled by this function.
startReg() dynamically registers java to call the native jni. When we write java code, we can declare the native method to call the C/C++ function because the registration is done here to process the mapping relationship. Take MessageQueue as an example:
// 在 startReg() 动态注册,将 java 和 C/C++ 的函数关联
static const JNINativeMethod gMessageQueueMethods[] = {
	{."nativeInit", "()J", (void*)android_os_MessageQueue_nativeInit },
	...
};

int register_android_os_MessageQueue(JNIEnv* env) {
	...
}
The final step is to call the main() method of ZygoteInit, and here you begin to enter the world of java.
Let’s briefly summarize Zygote’s native processing flow, as shown below:
Java layer starts ZygoteInit
Zygote is created in the native, and passes AndroidRuntime.start() from the native layer to the main() entry of the java layer ZygoteInit to continue processing Zygote related processes:
frameworks/base/core/java/com/android/internal/os/ZygoteInit.java
// argv 就是 init.{ro.zygote}.rc 脚本写的参数
// -Xzygote /system/bin --zygote --start-system-server
public static void main(String argv[]) {
	// 创建 ServerSocket
	ZygoteServer zygoteServer = new ZygoteServer();

	...
	boolean startSystemServer = false;
	String socketName = "zygote";
	String abiList = null;
	boolean enableLazyPreload = false;
	for (int i = 1; i < argv.length; i++) {
		if ("start-system-server".equals(argv[i])) {
			startSystemServer = true;
		} else if ("--enable-lazy-preload".equals(argv[i])) {
			enableLazyPreload = true;
		} else if (argv[i].startsWith(ABI_LIST_ARG)) {
			abiList = argv[i].substring(ABI_LIST_ARG.length());
		} else if (argv[i].startsWith(SOCKET_NAME_ARG)) {
			socketName = argv[i].substring(SOCKET_NAME_ARG.length());
		} else {
			throw new RuntimeException("Unknown command line argument: " + argv[i]);
		}
		...
	}

	zygoteServer.registerServerSocket(socketName);

	...
	// 加载系统类、系统资源等
	if (!enableLazyPreload) {
		...
		preload(bootTimingsTraceLog);
		...
	}
	...
	// 创建 SystemServer
	if (startSystemServer) {
		startSystemServer(abiList, socketName, zygoteServer);
	}

	// ZygoteServer 创建 ServerSocket 作为服务器
	// 开启循环,等待接收 socket 通信 fork app 进程的请求
	// 没有消息会一直阻塞休眠等待,Zygote 进程会一直存活运行
	zygoteServer.runSelectLoop(abiList);

	zygoteServer.closeServerSocket();
	...
}
The main() entry method of ZygoteInit mainly does three things:
- Preload system resources, such as system classes, resources, system shared libraries, etc.
- Creating ZygoteServer is actually a ServerSocket loop waiting to notify the fork child process
- Create SystemServer process
Preload resources
Let’s first look at what preload() does to preload resources:
static void preload(TimingsTraceLog bootTimingsTraceLog) {
	...
	// 系统类加载
	preloadClasses();
	...
	// 系统资源加载
	preloadResources();
	...
	// openGL加载
	preloadOpenGL();
	...
	// 系统共享库加载
	preloadSharedLibraries();
	// 文字资源加载
	preloadTextResources();
	...
}

private static final String PRELOADED_CLASSES = "/system/etc/preloaded-classes";

private static void preloadClasses() {
	...
	InputStream is;
	try {
		// 获取要加载的系统资源文件流
		is = new FileInputStream(PRELOADED_CLASSES);
	} catch (FileNotFoundException e) {
        Log.e(TAG, "Couldn't find " + PRELOADED_CLASSES + ".");
        return;
    }
    ...
	BufferedReader br
			= new BufferedReader(new InputStreamReader(is), 256);

	int count = 0;
	String line;
	while ((line = br.readLine()) != null) {
		...
		try {
			// 读取 /system/etc/preloaded-classes 的类路径并加载
			Class.forName(line, true, null);
		}
		...
	}
	...
}

public static final boolean PRELOAD_RESOURCES = true;

private static void preloadResources() {
	...
	mResources = Resources.getSystem();
	mResources.startPreloading();
	if (PRELOAD_RESOURCES) {
		TypedArray ar = mResources.obtainTypedArray(
				com.android.internal.R.array.preloaded_drawables);
		int N = preloadDrawables(ar);
		ar.recycle();
		ar = mResources.obtainTypedArray(
				com.android.internal.R.array.preloaded_color_state_lists);
		N = preloadColorStateLists(ar);
		ar.recycle();
		...
	}
	mResources.finishPreloading();
}
preload() mainly preloads system classes, system resources, system shared libraries, openGL, text resources, etc., among which system classes are preloaded-classes that are read. Because there are many system classes, only part of the file is intercepted below. You can view the file in the source code:
frameworks/base/preloaded-classes

...
android.app.Activity
android.app.Activity$HostCallbacks
android.app.ActivityManager
android.app.ActivityManager$1
android.app.ActivityManager$RecentTaskInfo
android.app.ActivityManager$RecentTaskInfo$1
android.app.ActivityManager$RunningAppProcessInfo
android.app.ActivityManager$RunningAppProcessInfo$1
android.app.ActivityManager$RunningServiceInfo
android.app.ActivityManager$RunningServiceInfo$1
android.app.ActivityManager$RunningTaskInfo
android.app.ActivityManager$RunningTaskInfo$1
android.app.ActivityManager$StackId
android.app.ActivityManager$TaskDescription
android.app.ActivityManager$TaskDescription$1
android.app.ActivityOptions
android.app.ActivityThread
android.app.ActivityThread$1
android.app.ActivityThread$2
android.app.ActivityThread$ActivityClientRecord
android.app.ActivityThread$ActivityConfigChangeData
android.app.ActivityThread$AppBindData
android.app.ActivityThread$ApplicationThread
android.app.ActivityThread$BindServiceData
android.app.ActivityThread$ContextCleanupInfo
android.app.ActivityThread$CreateServiceData
android.app.ActivityThread$DropBoxReporter
android.app.ActivityThread$EventLoggingReporter
android.app.ActivityThread$GcIdler
android.app.ActivityThread$H
...
It can be found that these full class name paths are the four major components Activity, Fragment, and common controls TextView we use in app development.
So when our app is running, the font library, resources, and system classes come from here, because Zygote has been preloaded in advance when it starts.
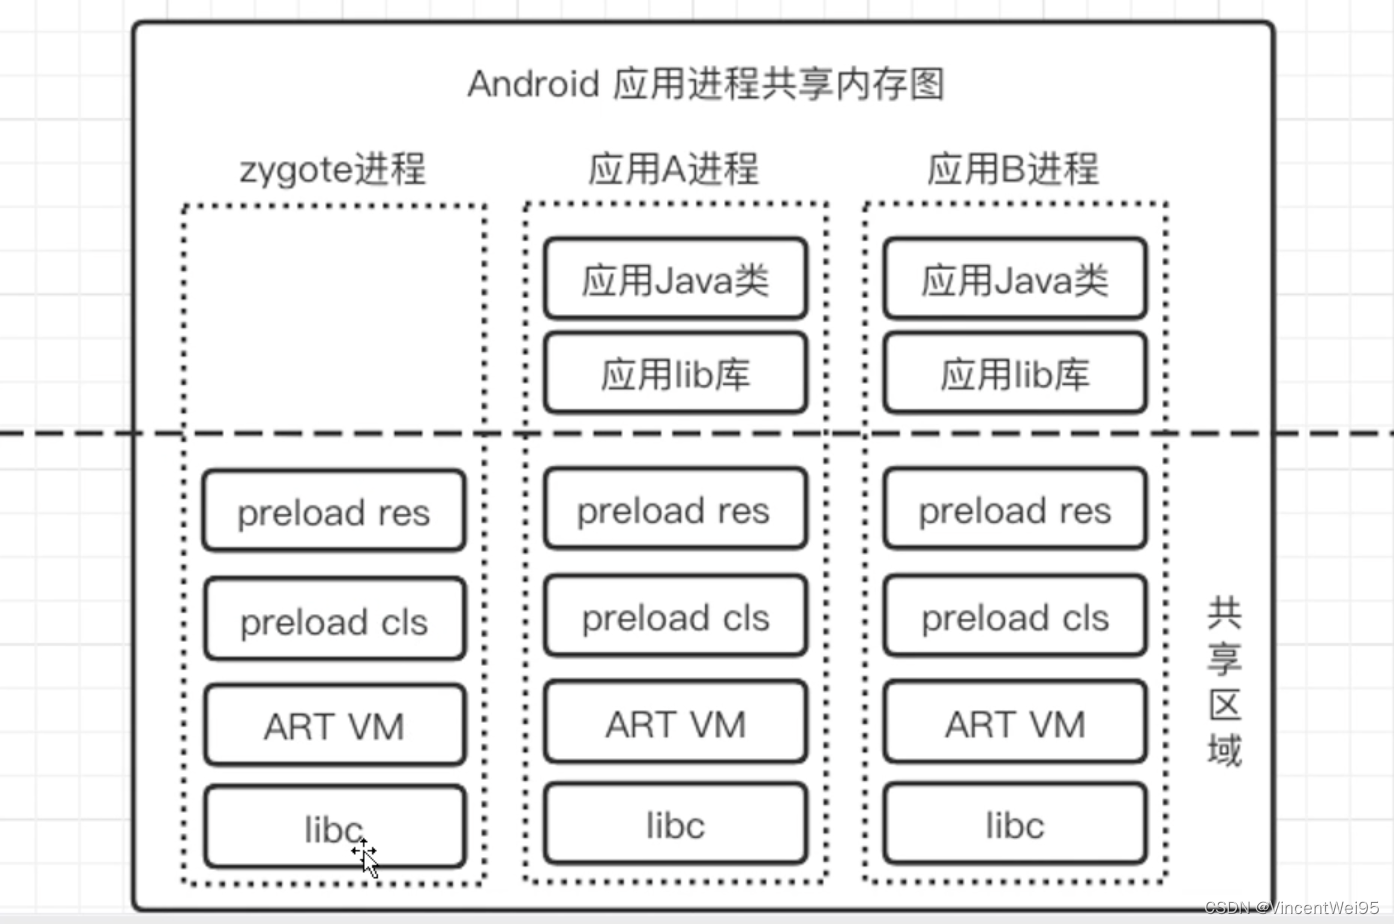
The advantage of preloading these resources in Zygote is that each app does not need to load these resources, but uses these classes and resources that have been preloaded in advance and can be used directly.
It should be noted that because preoload() is called in the main process and is more time-consuming, if you want to optimize the system startup speed, you can also start with this method.
Create a ZygoteServer loop waiting for the fork child process
First we need to understand, what is fork? Fork can be understood as copying, so the Zygote fork process actually copies a process as a child process based on Zygote. The child process owns the resources that Zygote has processed.
One of Zygote's responsibilities is to be responsible for the creation of fork child processes. For example, if you want to receive AMS notification through socket communication to create an app process, AMS is the client at this time, and Zygote is the server. To receive socket messages, you need to create a ServerSocket server and wait in a loop.
class ZygoteServer {

    private LocalServerSocket mServerSocket;

    void registerServerSocket(String socketName) {
        if (mServerSocket == null) {
 			...
            try {
                FileDescriptor fd = new FileDescriptor();
                fd.setInt$(fileDesc);
                // 创建 ServerSocket
                mServerSocket = new LocalServerSocket(fd);
            } catch (IOException ex) {
				...
            }
        }
    }

    void runSelectLoop(String abiList) throws Zygote.MethodAndArgsCaller {
		...

		// 循环等待 socket 消息通知 fork 进程
        while (true) {
 			...
            try {
            	// 没有消息休眠等待
                Os.poll(pollFds, -1);
            } catch (ErrnoException ex) {
                ...
            }
            for (int i = pollFds.length - 1; i >= 0; --i) {
                ...
                boolean done = peers.get(i).runOnce(this);
                ...
            }
        }
    }
}

ZygoteConnection.java

boolean runOnce(ZygoteServer zygoteServer) throws Zygote.MethodAndArgsCaller {
	...

	// fork 子进程
    pid = Zygote.forkAndSpecialize(...);
    ...
}

Zygote.java

public static int forkAndSpecialize(...) {
	...
	int pid = nativeForkAndSpecialize(...);
	...
	return pid;
}

native private static int nativeForkAndSpecialize(...);

frameworks/base/core/jni/com_android_internal_os_Zygote.cpp

static jint com_android_internal_os_Zygote_nativeForkAndSpecialize(...) {
	...
	return ForkAndSpecializeCommon(...);
}

static pid_t ForkAndSpecializeCommon(...) {
	...
	// 调用 Linux 的 fork() 创建进程
	pid_t pid = fork();
	...
}
It can be analyzed from the source code that ZygoteServer actually creates a ServerSocket. In ZygoteInit, runSelectLoop() is called as the server waits for the client socket communication to inform the fork process. The fork process is transferred to the native layer and finally calls the Linux standard function fork().
Create SystemServer process
The SystemServer process will be created in ZygoteInit. SystemServer is the first child process created by Zygote:
ZygoteInit.java

private static boolean startSystemServer(...) {
	...
	pid = Zygote.forkSystemServer(...);
	...

	return true;
}
How to fork has been introduced in the previous section. forkSystemServer() only creates the SystemServer process, so when does SystemServer run? Then analyze the source code below:
ZygoteInit.java

private static boolean startSystemServer(...) {
	...
	pid = Zygote.forkSystemServer(...);
	...
	if (pid == 0) {
		...
		handleSystemServerProcess(parsedArgs);
	}

	return true;
}

private static void handleSystemServerProcess(...) {
	...
	ZygoteInit.zygoteInit(...);
}

public static final void zygoteInit(...) {
	...
	// 初始化运行环境
	RuntimeInit.commonInit();
	// 打开 Binder 驱动,初始化 Binder
	ZygoteInit.nativeZygoteInit();
	// 反射调用 main() 入口函数
	RuntimeInit.applicationInit(targetSdkVersion, argv, classLoader);
}

RuntimeInit.java

protected static void applicationInit(...) {
	...
	// Remaining arguments are passed to the start class's static main
	invokeStaticMain(args.startClass, args.startArgs, classLoader);
}

private static void invokeStaticMain(String className, String[] argv, ClassLoader classLoader) throws Zygote.MethodAndArgsCaller {
    Class<?> cl;

    try {
        cl = Class.forName(className, true, classLoader);
    } catch (ClassNotFoundException ex) {
        ...
    }

    Method m;
    try {
    	// 反射调用 main() 方法
        m = cl.getMethod("main", new Class[] { String[].class });
    } catch (NoSuchMethodException ex) {
    	...
    }
    ...
}
The creation of the SystemServer process is ultimately performed through the reflection main() function.
What is SystemServer used for? Continue to analyze the source code of SystemServer.
SystemServer.java

public static void main(String[] args) {
    new SystemServer().run();
}

private void run() {
	...
	// system_server 进程启动服务管理类
	mSystemServiceManager = new SystemServiceManager(mSystemContext);

	try {
		// 启动引导服务
		startBootstrapServices();
		// 启动核心服务
		startCoreServices();
		// 启动其他服务
		startOtherServices();
		...
	}
	...
}

private void startBootstrapServices() {
	...
	// 启动 AMS 服务,在高版本是 ATMS
    mActivityManagerService = mSystemServiceManager.startService(
            ActivityManagerService.Lifecycle.class).getService();
    mActivityManagerService.setSystemServiceManager(mSystemServiceManager);
    mActivityManagerService.setInstaller(installer);
    ...
    // 启动 PMS
    mPackageManagerService = PackageManagerService.main(mSystemContext, installer,
        mFactoryTestMode != FactoryTest.FACTORY_TEST_OFF, mOnlyCore);
mFirstBoot = mPackageManagerService.isFirstBoot();
mPackageManager = mSystemContext.getPackageManager();
	...
}

private void startCoreServices() {
	// 为了能让 SystemServiceManager 统一的方式管理服务,通过 SystemService 代理这些服务
	mSystemServiceManager.startService(DropBoxManagerService.class);

	mSystemServiceManager.startService(BatteryService.class);

    mSystemServiceManager.startService(UsageStatsService.class);
    mActivityManagerService.setUsageStatsManager(
            LocalServices.getService(UsageStatsManagerInternal.class));

	mWebViewUpdateService = mSystemServiceManager.startService(WebViewUpdateService.class);
}

private void startOtherServices() {
	...
	// 各种系统信息的管理,例如字体、系统设置、开发者选项等
	mActivityManagerService.installSystemProviders();
	...
}
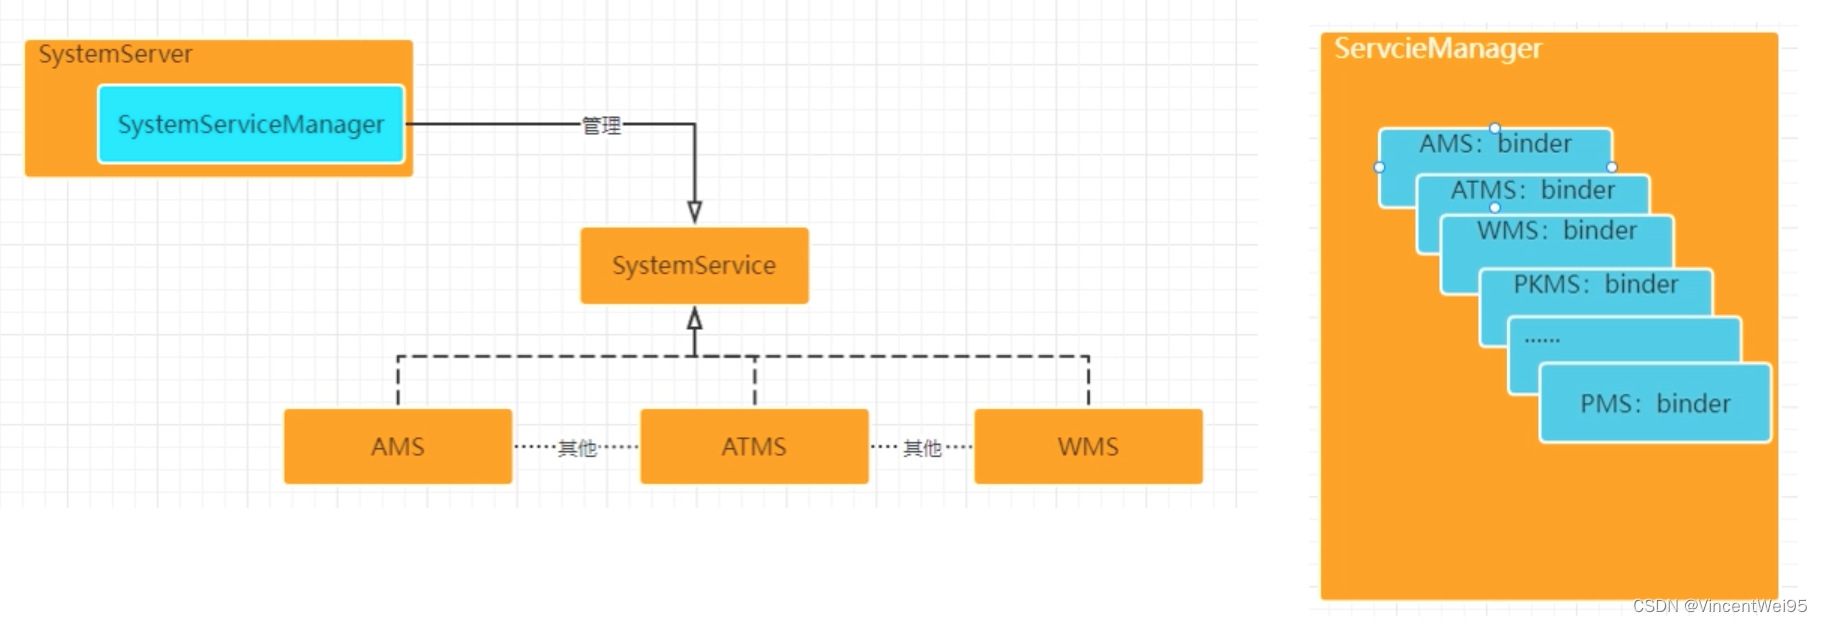
SystemServer is actually the entrance to start the boot service, core service and other services. It can be found that these services are not created through Zygote fork, but directly created by new, so these services are all in the system_server process.
Because there are many services started, SystemServer created SystemServiceManager to manage these services.
In order to be processed in a unified manner, these services are provided to SystemServiceManager for management through the SystemService agent.
Each process in the application layer needs to use these services, so how do these processes obtain these services?
Let’s take the battery service BatteryService as an example:
public abstract class SystemService {
	...
	public abstract void onStart();
	...

    protected final void publishBinderService(String name, IBinder service,
            boolean allowIsolated, int dumpPriority) {
        // 将服务注册到 ServiceManager
        ServiceManager.addService(name, service, allowIsolated, dumpPriority);
    }
}

// 服务通过 SystemService 代理
public final class BatteryService extends SystemService {
    @Override
    public void onStart() {
    	...
		// 注册服务到 ServiceManager
        mBinderService = new BinderService();
        publishBinderService("battery", mBinderService);
    	...
    }
}

public final class SystemServer {

    private void startCoreServices() {
    	...
		mSystemServiceManager.startService(BatteryService.class);
		...
	}
}

public class SystemServiceManager {
    @SuppressWarnings("unchecked")
    public <T extends SystemService> T startService(Class<T> serviceClass) {
        try {
            final String name = serviceClass.getName();
            ...
            final T service;
            try {
                Constructor<T> constructor = serviceClass.getConstructor(Context.class);
                service = constructor.newInstance(mContext);
            } catch (...) {
            	...
            }
            startService(service);
            return service;
        } finally {
            Trace.traceEnd(Trace.TRACE_TAG_SYSTEM_SERVER);
        }
    }

    public void startService(@NonNull final SystemService service) {
        // Register it.
        mServices.add(service);
        // Start it.
        long time = SystemClock.elapsedRealtime();
        try {
            service.onStart();
        } catch (RuntimeException ex) {
            throw new RuntimeException("Failed to start service " + service.getClass().getName()
                    + ": onStart threw an exception", ex);
        }
        warnIfTooLong(SystemClock.elapsedRealtime() - time, service, "onStart");
    }
}
It can be seen that after these services are unified managed by SystemServiceManager, the services will eventually be registered to ServiceManager. ServiceManager records the Binder list where the key is the service name and the value is the service. The application layer process can easily get the Binder to communicate based on the service name. .
ServiceManager is an independent process. Like Zygote, it is also an independent process started when the init.rc script is executed.
Let’s briefly review what SystemServer does:
-
Create SystemServiceManager for unified management of services
-
Start various services such as AMS, PMS, etc.
-
Register the started service to ServiceManager
The SystemServer flow chart is as follows:
Binder is initialized when the child process starts
Zygote fork child process will initialize Binder when starting the child process, such as opening the Binder driver. Each process has its own Binder. The specific call is to call nativeZygoteInit() before the main() function of the child process is executed:
ZygoteInit.java

public static final void zygoteInit(...) {
	...
	// 创建 Binder
	ZygoteInit.nativeZygoteInit();
	...
}

private static final native void nativeZygoteInit();

frameworks/base/core/jni/AndroidRuntime.cpp

static void com_android_internal_os_ZygoteInit_nativeZygoteInit(JNIEnv* env, jobject clazz)
{
    gCurRuntime->onZygoteInit();
}

int register_com_android_internal_os_ZygoteInit(JNIEnv* env)
{
    const JNINativeMethod methods[] = {
        { "nativeZygoteInit", "()V",
            (void*) com_android_internal_os_ZygoteInit_nativeZygoteInit },
    };
    return jniRegisterNativeMethods(env, "com/android/internal/os/ZygoteInit",
        methods, NELEM(methods));
}

frameworks/base/cmds/app_process/app_main.cpp

virtual void onZygoteInit()
{
	// 打开 Binder 驱动
    sp<ProcessState> proc = ProcessState::self();
    ALOGV("App process: starting thread pool.\n");
    // 启动 Binder 线程池
    proc->startThreadPool();
}

frameworks/native/libs/binder/ProcessState.cpp

// Binder 通信数据大小 1M-8k
#define BINDER_VM_SIZE ((1 * 1024 * 1024) - sysconf(_SC_PAGE_SIZE) * 2)
// 最大 Binder 线程数量 15
#define DEFAULT_MAX_BINDER_THREADS 15

sp<ProcessState> ProcessState::self()
{
    Mutex::Autolock _l(gProcessMutex);
    if (gProcess != NULL) {
        return gProcess;
    }
    gProcess = new ProcessState("/dev/binder");
    return gProcess;
}

static int open_driver(const char *driver)
{
	// 打开 Binder 驱动
    int fd = open(driver, O_RDWR | O_CLOEXEC);
    if (fd >= 0) {
        int vers = 0;
        status_t result = ioctl(fd, BINDER_VERSION, &vers);
        if (result == -1) {
            ALOGE("Binder ioctl to obtain version failed: %s", strerror(errno));
            close(fd);
            fd = -1;
        }
        if (result != 0 || vers != BINDER_CURRENT_PROTOCOL_VERSION) {
          ALOGE("Binder driver protocol(%d) does not match user space protocol(%d)! ioctl() return value: %d",
                vers, BINDER_CURRENT_PROTOCOL_VERSION, result);
            close(fd);
            fd = -1;
        }
        size_t maxThreads = DEFAULT_MAX_BINDER_THREADS;
        result = ioctl(fd, BINDER_SET_MAX_THREADS, &maxThreads);
        if (result == -1) {
            ALOGE("Binder ioctl to set max threads failed: %s", strerror(errno));
        }
    } else {
        ALOGW("Opening '%s' failed: %s\n", driver, strerror(errno));
    }
    return fd;
}

ProcessState::ProcessState(const char *driver)
    : mDriverName(String8(driver))
    , mDriverFD(open_driver(driver)) // 打开 binder 驱动
    , mVMStart(MAP_FAILED)
    , mThreadCountLock(PTHREAD_MUTEX_INITIALIZER)
    , mThreadCountDecrement(PTHREAD_COND_INITIALIZER)
    , mExecutingThreadsCount(0)
    , mMaxThreads(DEFAULT_MAX_BINDER_THREADS)
    , mStarvationStartTimeMs(0)
    , mManagesContexts(false)
    , mBinderContextCheckFunc(NULL)
    , mBinderContextUserData(NULL)
    , mThreadPoolStarted(false)
    , mThreadPoolSeq(1)
{
    if (mDriverFD >= 0) {
    	// mmap 内存映射
        // mmap the binder, providing a chunk of virtual address space to receive transactions.
        mVMStart = mmap(0, BINDER_VM_SIZE, PROT_READ, MAP_PRIVATE | MAP_NORESERVE, mDriverFD, 0);
        if (mVMStart == MAP_FAILED) {
            // *sigh*
            ALOGE("Using /dev/binder failed: unable to mmap transaction memory.\n");
            close(mDriverFD);
            mDriverFD = -1;
            mDriverName.clear();
        }
    }

    LOG_ALWAYS_FATAL_IF(mDriverFD < 0, "Binder driver could not be opened.  Terminating.");
}
In this code we can learn a lot about Binder:
- Each process forked by Zygote will initialize its own Binder
- Binder has a thread pool and is multi-threaded. Because process A may have multiple processes communicating with it, the design is concurrent.
- The maximum data size for Binder communication is 1M - 8k
- The maximum number of Binder threads is 15
AMS uses socket to notify the Zygote fork process and follows this process.
Summarize
We started from the system startup init process and analyzed it to the creation of the Zygote process and the creation of the SystemServer process, and roughly sorted out the overall process.
The init process is the second process started after the system kernel is started. This process is in user space. After the init process is started, it will parse init.rc and execute the script to start the Zygote process and ServiceManager process.
Because Zygote is started by the init process, it is also in user space. Zygote's business processing spans the native layer and java layer.
Things Zygote handles at the native layer:
- startVm() creates a virtual machine
- startReg() dynamically registers java to call native jni
- Reflection calls main() of ZygoteInit
Things Zygote handles at the java layer:
- Preload system resources, such as system classes, resources, system shared libraries, etc.
- Creating ZygoteServer is actually ServerSocket waiting to be notified of the fork child process.
- Create SystemServer process
The overall process of Zygote from creation to startup is as follows:

The first child process of Zygote fork is SystemServer.
Things SystemServer handles:
- Create SystemServiceManager for unified management of services
- Start various services such as AMS, PMS, etc.
- Register the started service to ServiceManager
The SystemServer flow chart is as follows:
It also briefly explains the initialization process of Binder when Zygote forks a child process. The initialization of Binder is processed before the process fork completes the execution of the main entry main() method. Through simple process analysis, we can learn some information about Binder:
- Each process forked by Zygote will initialize its own Binder
- Binder has a thread pool and is multi-threaded. Because process A may have multiple processes communicating with it, the design is concurrent.
- The maximum data size for Binder communication is 1M - 8k
- The maximum number of Binder threads is 15
The overall system startup process is as follows:
common problem
1. What is the most original process of Zygote process (or the origin of Zygote)? [The initial name of the Zygote process]
Zygote was originally app_process, which was started when the init process started, and was modified to Zygote in app_main.c.
2. Is Zygote in kernel space or user space?
Because the init process is created in user space, and Zygote is created and started by the init process, Zygote is in user space.
3. When the app process is started, why is it forked from Zygote instead of forked from the init process?
Zygote does a lot of things from creation to startup, such as creating virtual machines, registering jni, preloading resources, etc. The fork process is actually a copy process. If it is not in the Zygote fork process, then the newly created app process will have to go through the above process again. Once, if you fork the child process from Zygote and the app process is created and run, you can directly use the relevant resources without further processing.
The main things the init process does is to mount files (identify various files, which is equivalent to parsing the hard disk), parse init.rc, and process scripts (start Zygote, ServiceManager processes, etc.).
4. Why does Zygote use socket communication instead of Binder?
There are currently two theories on the Internet: one is that it will cause deadlock, and the other is that it will cause read and write errors.
(1) Zygote using binder to communicate will cause deadlock
Assume that Zygote uses Binder to communicate. Because Binder supports multi-threading, there is a concurrency problem. The solution to the concurrency problem is locking. If the process fork is running in a multi-threaded situation, Binder waiting for the lock may occur under the lock mechanism. deadlock.
Why does a deadlock occur? We can use a scenario to analyze.
Assume that AMS uses Binder communication to inform Zygote to fork an app process. In order to ensure that no concurrency problems occur, the communication between AMS and Zygote will be locked. The Binder that AMS needs to communicate with Zygote belongs to Zygote (the Binder obtained must be the Binder of the communicating party). agent), when Zygote forks the process, it will also copy the Binder waiting lock status. So who will unlock the Binder of the child process if it is locked? If the child process is not unlocked, a deadlock will occur.
Let’s analyze it from the principle of fork.
In the memory area, the memory of the static variable mutex will be copied to the child process, and even if there are multiple threads in the parent process, they will not be inherited into the child process. These two characteristics of fork cause deadlock. s reason.
- doit() in the thread is executed first
- When doit is executed, the mutex variable mutex will be locked.
- The contents of the mutex variable will be copied unchanged to the child process that comes out of the fork (before this, the contents of the mutex variable have been rewritten into a locked state by the thread)
- When the child process calls doit again, it will find that the mutex has been locked when it locks the mutex, so it waits until the process that owns the mutex releases it (no one actually owns the mutex lock)
thread Doit will release its own mutex before the execution is completed, but the mutex and the mutex in the child process are already two memories, so even if the mutex lock is released, it will not have any impact on the mutex in the child process, which will eventually lead to death. Lock
(2) Zygote using binder to communicate will cause read and write errors
The fundamental reason is that when you want to create a new ProcessState for Binder communication, you need to mmap to apply for a piece of memory to provide it to the kernel for data exchange.
If it is directly forked, when the child process is communicating with the binder, the kernel will continue to use the address applied for by the parent process to write data, and at this time the child process COW (Copy on Write) will be triggered, causing the address space to be remapped. The child process also attempts to access the address previously mmaped by the parent process, which will cause SIGSEGV and SEGV_MAPERR segment faults.
You can write a demo yourself to try and provide a JNI interface to call fork. When pid == 0, continue to use the binder object obtained by the parent process to make binder calls, and you will get this segfault.
5. What is the relationship between ServiceManager and SystemServiceManager?
ServiceManager and SystemServiceManager are not related.
ServiceManager is an independent process. Like Zygote, it is started by executing the init.rc script. Services started in SystemServer will eventually be registered with ServiceManager for use by the upper layer.
SystemServiceManager is a management class created in SystemServer to manage startup services in the system_server process.
Android PMS (PackageManagerService) principle
What is PMS
PMS (PackageManagerService) is a package management system service provided by Android. It is used to manage all package information, including application installation, uninstallation, updates and parsing AndroidManifest.xml. Under normal circumstances, we will not separate the PMS to explain it separately, because the main purpose of the PMS is to provide services to the AMS (ActivityManagerService).
Have you ever considered why our phones are so slow to start up? This is because PMS will process apk parsing during this period of time when the phone starts up. At least 70% of the startup time is spent on PMS parsing, so this is one of the reasons why the phone starts up slowly.
From an analytical perspective, it can be understood that PMS saves the data required for subsequent provision to AMS. It is a cache that saves application data.
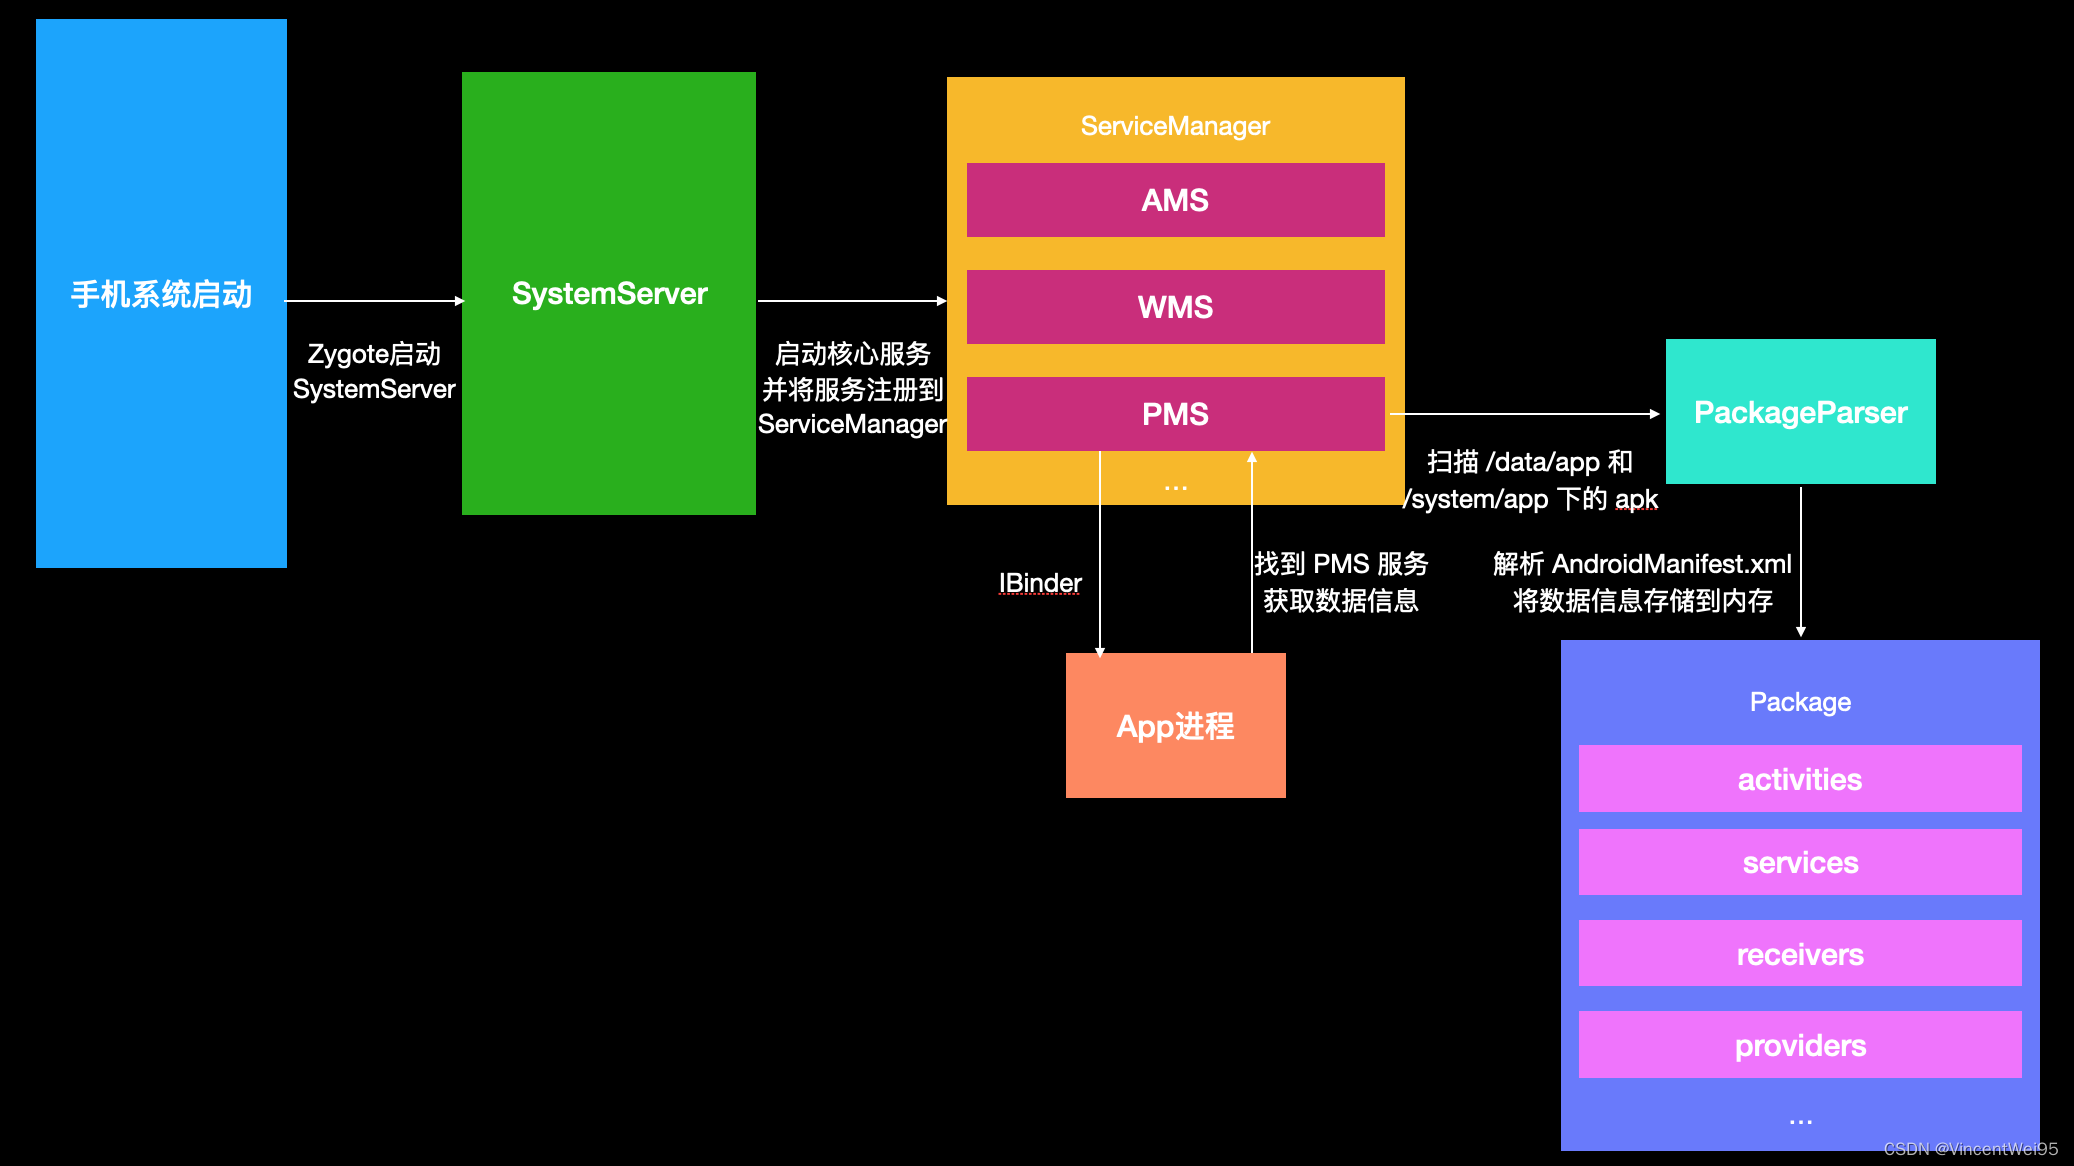
The role of AndroidManifest.xml
When the phone is turned on, the system will scan two directories after starting PMS, which are the directory /data/app where the apk installed by the user is stored, and the directory /system/app where the apk installed by the system is stored.
As mentioned just now, PMS is to serve AMS, so what data does PMS need to provide? Why do you need AndroidManifest.xml?
We all know that AndroidManifest.xml defines all four major components, permissions and other information in the apk. It is a definition file. The most important thing for PMS to parse apk is to scan the apk files in the /data/app and /system/app directories, find the AndroidManifest.xml in the apk package, and then parse the AndroidManifest.xml information and save it to the system memory, so When AMS needs application data, it can find PMS and quickly get relevant information from memory.
If there is no AndroidManifest.xml, the PMS parsing is to save all the class file information in each apk. This amount of data is huge, and the parsing will be very slow, and the mobile phone startup speed will be even slower.
PMS apk parsing process
PMS startup process
All core services in the Android system will be started through SystemServer, and PMS is no exception. SystemServer will start running when the phone is turned on.
SystemServer.java

public static void main(String[] args) {
	new SystemServer().run();
}

private void run() {
	...
	try {
		...
		startBootstrapServices();
		startCoreServices();
		startOtherServices();
		...
	}
	...
}

private void startBootstrapServices() {
	...
	// 启动 AMS
    mActivityManagerService = mSystemServiceManager.startService(
            ActivityManagerService.Lifecycle.class).getService();
    mActivityManagerService.setSystemServiceManager(mSystemServiceManager);
    mActivityManagerService.setInstaller(installer);
    ...
    // 启动 PMS
    mPackageManagerService = PackageManagerService.main(mSystemContext, installer,
            mFactoryTestMode != FactoryTest.FACTORY_TEST_OFF, mOnlyCore);
    mFirstBoot = mPackageManagerService.isFirstBoot();
    mPackageManager = mSystemContext.getPackageManager();
    ...
}

PackageManagerService.java

public static PackageManagerService main(Context context, Installer installer,
        boolean factoryTest, boolean onlyCore) {
    // Self-check for initial settings.
    PackageManagerServiceCompilerMapping.checkProperties();

	// 创建自己的实例
    PackageManagerService m = new PackageManagerService(context, installer,
            factoryTest, onlyCore);
    m.enableSystemUserPackages();
    // 将 PMS 添加到 ServiceManager,AMS 找 PMS 拿数据时就是通过 ServiceManager 找到 PMS
    ServiceManager.addService("package", m);
    final PackageManagerNative pmn = m.new PackageManagerNative();
    ServiceManager.addService("package_native", pmn);
    return m;
}
When SystemServer is started by Zygote and the main() method is called, the run() method of SystemServer is executed to start some core services. For example, AMS is started first and then PMS is started. AMS and PMS are added to ServiceManager, and ServiceManager manages these services. .
ServiceManager only provides addService() and getService() methods. When the app process needs to obtain the corresponding system service, it will get the Binder agent of the corresponding service through ServiceManager and use Binder communication to obtain data:
For example, when calling getPackageManager() in Application, Activity, etc.:
ContextWrapper.java

@Override
public PackageManager getPackageManager() {
	// mBase 是 ContextImpl
    return mBase.getPackageManager();
}

ContextImpl.java

@Override
public PackageManager getPackageManager() {
    if (mPackageManager != null) {
        return mPackageManager;
    }

    IPackageManager pm = ActivityThread.getPackageManager();
    if (pm != null) {
        // Doesn't matter if we make more than one instance.
        return (mPackageManager = new ApplicationPackageManager(this, pm));
    }

    return null;
}

ActivityThread.java

public static IPackageManager getPackageManager() {
    if (sPackageManager != null) {
        //Slog.v("PackageManager", "returning cur default = " + sPackageManager);
        return sPackageManager;
    }
    // 通过 ServiceManager 拿到 PMS
    IBinder b = ServiceManager.getService("package");
    //Slog.v("PackageManager", "default service binder = " + b);
    sPackageManager = IPackageManager.Stub.asInterface(b); // binder 通信
    //Slog.v("PackageManager", "default service = " + sPackageManager);
    return sPackageManager;
}
PMS parsing apk process
A simple understanding of the PMS processing flow is that when the phone is turned on, it will scan the two directories /data/app and /system/app, parse the AndroidManifest.xml of the apk files in these two directories, generate the summary information of the application, and save it as a Java Bean in the memory. .
PackageManagerService.java

// data/app 目录
private static final File sAppInstallDir =
        new File(Environment.getDataDirectory(), "app");

public PackageManagerService(Context context, Installer installer,
        boolean factoryTest, boolean onlyCore) {
	...
	// /system/app 目录
	final File systemAppDir = new File(Environment.getRootDirectory(), "app");
	// 扫描 /system/app 目录下的 apk 文件
    scanDirTracedLI(systemAppDir,
            mDefParseFlags
            | PackageParser.PARSE_IS_SYSTEM_DIR,
            scanFlags
            | SCAN_AS_SYSTEM,
            0);
	...
	// 扫描 /data/app 目录下的 apk 文件
	scanDirTracedLI(sAppInstallDir, 0, scanFlags | SCAN_REQUIRE_KNOWN, 0);
	...
}

private void scanDirTracedLI(File scanDir, final int parseFlags, int scanFlags, long currentTime) {
    Trace.traceBegin(TRACE_TAG_PACKAGE_MANAGER, "scanDir [" + scanDir.getAbsolutePath() + "]");
    try {
        scanDirLI(scanDir, parseFlags, scanFlags, currentTime);
    } finally {
        Trace.traceEnd(TRACE_TAG_PACKAGE_MANAGER);
    }
}

private void scanDirLI(File scanDir, int parseFlags, int scanFlags, long currentTime) {
	final File[] files = scanDir.listFiles();
	...
    try (ParallelPackageParser parallelPackageParser = new ParallelPackageParser(
             mSeparateProcesses, mOnlyCore, mMetrics, mCacheDir,
             mParallelPackageParserCallback)) {
         // Submit files for parsing in parallel
         int fileCount = 0;
         for (File file : files) {
         	 // 判断是否是 .apk 后缀的文件
             final boolean isPackage = (isApkFile(file) || file.isDirectory())
                     && !PackageInstallerService.isStageName(file.getName());
             if (!isPackage) {
                 // Ignore entries which are not packages
                 continue;
             }
             // 添加到子线程交给 PackageParser 解析 apk 文件
             parallelPackageParser.submit(file, parseFlags);
             fileCount++;
         }
         ...
     }
}

ParallelPackageParser.java

public void submit(File scanFile, int parseFlags) {
    mService.submit(() -> {
        ParseResult pr = new ParseResult();
        Trace.traceBegin(TRACE_TAG_PACKAGE_MANAGER, "parallel parsePackage [" + scanFile + "]");
        try {
            PackageParser pp = new PackageParser();
            pp.setSeparateProcesses(mSeparateProcesses);
            pp.setOnlyCoreApps(mOnlyCore);
            pp.setDisplayMetrics(mMetrics);
            pp.setCacheDir(mCacheDir);
            pp.setCallback(mPackageParserCallback);
            pr.scanFile = scanFile; // 传入待解析的 apk 文件
            // 交给 packageParser 解析 apk
            pr.pkg = parsePackage(pp, scanFile, parseFlags);
        } catch (Throwable e) {
            pr.throwable = e;
        } finally {
            Trace.traceEnd(TRACE_TAG_PACKAGE_MANAGER);
        }
        ...
    });
}

protected PackageParser.Package parsePackage(PackageParser packageParser, File scanFile,
        int parseFlags) throws PackageParser.PackageParserException {
    return packageParser.parsePackage(scanFile, parseFlags, true /* useCaches */);
}

PackageParser.java

public static final String APK_FILE_EXTENSION = ".apk";

public static final boolean isApkFile(File file) {
	return isApkPath(file.getName());
}

public static boolean isApkPath(String path) {
	return path.endsWith(APK_FILE_EXTENSION);
}
As can be seen from the source code, PMS actually scans the apks in the two directories /data/app/ and /system/app/, and determines whether the files in the directory are apk. It also simply determines whether the file suffix is .apk. Then start parsing the apk through PackageParser.
It should be noted that the methods of parsing in different system source code versions are also different. In versions 6.0, 7.0, and 8.0, the method of starting parsing is still direct parsing, but in version 10.0, a thread pool is used to put it into a child thread for parsing, which speeds up the process. Improved phone startup speed.
PackageParser class source code analysis
According to the above analysis, the parsing of apk is finally handed over to PackageParser. Continue to see how it is parsed:
PackageParser.java

public Package parsePackage(File packageFile, int flags, boolean useCaches)
        throws PackageParserException {
     // 如果有缓存,直接返回解析后的信息
     Package parsed = useCaches ? getCachedResult(packageFile, flags) : null;
     if (parsed != null) {
         return parsed;
     }
     ...
	 // apk 文件不是目录,所以会走的 parseMonolithicPackage()
     if (packageFile.isDirectory()) {
         parsed = parseClusterPackage(packageFile, flags);
     } else {
         parsed = parseMonolithicPackage(packageFile, flags);
     }
     ...
}

public Package parseMonolithicPackage(File apkFile, int flags) throws PackageParserException {
	...
    final SplitAssetLoader assetLoader = new DefaultSplitAssetLoader(lite, flags);
    try {
    	// 解析 apk
        final Package pkg = parseBaseApk(apkFile, assetLoader.getBaseAssetManager(), flags);
        pkg.setCodePath(apkFile.getCanonicalPath());
        pkg.setUse32bitAbi(lite.use32bitAbi);
        return pkg;
    } catch (IOException e) {
        throw new PackageParserException(INSTALL_PARSE_FAILED_UNEXPECTED_EXCEPTION,
                "Failed to get path: " + apkFile, e);
    } finally {
        IoUtils.closeQuietly(assetLoader);
    }
}

private Package parseBaseApk(File apkFile, AssetManager assets, int flags)
        throws PackageParserException {
    final String apkPath = apkFile.getAbsolutePath();
	...
	// 开始 dom 解析 AndroidManifest.xml
	XmlResourceParser parser = null;
    try {
        final int cookie = assets.findCookieForPath(apkPath);
        ...
        // ANDROID_MANIFEST_FILENAME 就是 AndroidManifest.xml
        parser = assets.openXmlResourceParser(cookie, ANDROID_MANIFEST_FILENAME);
        ...
        final Package pkg = parseBaseApk(apkPath, res, parser, flags, outError);
        ...
        return pkg;

    } catch (PackageParserException e) {
        throw e;
    } catch (Exception e) {
        throw new PackageParserException(INSTALL_PARSE_FAILED_UNEXPECTED_EXCEPTION,
                "Failed to read manifest from " + apkPath, e);
    } finally {
        IoUtils.closeQuietly(parser);
    }
}

private Package parseBaseApk(String apkPath, Resources res, XmlResourceParser parser, int flags,
        String[] outError) throws XmlPullParserException, IOException {
     final String splitName;
     final String pkgName;

     try {
         Pair<String, String> packageSplit = parsePackageSplitNames(parser, parser);
         pkgName = packageSplit.first; // 拿到包名
         splitName = packageSplit.second;

         ...
     }
     ...
     // 后续的流程就是将 xml 解析的信息如权限、四大组件等信息存到 Package
     final Package pkg = new Package(pkgName);
	 ...
     return parseBaseApkCommon(pkg, null, res, parser, flags, outError);
}

public final static class Package implements Parcelable {
	// 包名
	public String packageName;
	...
	// 申请的权限
    public final ArrayList<Permission> permissions = new ArrayList<Permission>(0);
    public final ArrayList<PermissionGroup> permissionGroups = new ArrayList<PermissionGroup>(0);
    // 四大组件
    public final ArrayList<Activity> activities = new ArrayList<Activity>(0);
    public final ArrayList<Activity> receivers = new ArrayList<Activity>(0);
    public final ArrayList<Provider> providers = new ArrayList<Provider>(0);
    public final ArrayList<Service> services = new ArrayList<Service>(0);
    ...
}
The above source code is actually easy to understand. It is to first get the AndroidManifest.xml based on the passed apk file path, and then start to parse the xml file through dom, and store different tag data information in different fields of the Package class, such as permission information, four Large component information, etc., are parsed and stored in memory to facilitate subsequent AMS to find PMS to obtain data.
Starting from version 9.0, caching of parsed results will be enabled by default. If there is a cache, the parsed result information will be returned directly. Otherwise, the AndroidManifest.xml of each apk file will be parsed:
ParallelPackageParser.java

protected PackageParser.Package parsePackage(PackageParser packageParser, File scanFile,
        int parseFlags) throws PackageParser.PackageParserException {
    // 开启缓存
    return packageParser.parsePackage(scanFile, parseFlags, true /* useCaches */);
}

PackageParser.java

public Package parsePackage(File packageFile, int flags, boolean useCaches)
        throws PackageParserException {
    // 如果有缓存,直接返回
    Package parsed = useCaches ? getCachedResult(packageFile, flags) : null;
    if (parsed != null) {
        return parsed;
    }
    ...
}
The above is the apk parsing process of PMS. Simply put, the data information to be used by AMS is parsed and stored in memory in advance, so that information such as Activity can be quickly located.
When we download and install applications from the app store or use adb install, we also go through the above parsing process.
summary
Let’s briefly summarize the PMS apk parsing process:
- The mobile phone system starts, Zygote starts SystemServer, SystemServer starts AMS, PMS, and registers with ServiceManager
- PMS scans all apk files in the /data/app/ and /system/app/ directories, obtains the AndroidManifest.xml file of each apk file, and performs dom analysis
- Parse AndroidManifest.xml and convert data information such as permissions and four major components into Java Beans and record them in memory.
- When AMS needs to obtain apk data information, it obtains the Binder agent of PMS through ServiceManager and obtains it through Binder communication.
Do you know what the PMS parsing process does?
After understanding the process of PMS parsing apk, we can implement the dynamic loading function based on the principle hook, use PackageParser to manually parse an apk file downloaded from the network, and then add it to the memory of PMS through reflection to realize the dynamic loading function.
The following demo implements a simple dynamic loading function, adding the broadcast of an external apk file to the PMS cache.
First prepare the broadcast that needs to be added dynamically, which is placed in the external apk file hook-debug.apk:
public class HookReceiver extends BroadcastReceiver {
    @Override
    public void onReceive(Context context, Intent intent) {
        Log.i("HookReceiver", "hook receiver receive message");
        // 给宿主广播发消息
        Intent sendIntent = new Intent();
        sendIntent.setAction("com.example.demo.main");
        context.sendBroadcast(sendIntent);
    }
}

<?xml version="1.0" encoding="utf-8"?>
<manifest xmlns:android="http://schemas.android.com/apk/res/android"
    package="com.example.hook">

    <application
        android:allowBackup="true"
        android:icon="@mipmap/ic_launcher"
        android:label="@string/app_name"
        android:roundIcon="@mipmap/ic_launcher_round"
        android:supportsRtl="true"
        android:theme="@style/Theme.Demo" >
        <!-- 清单文件也需要添加广播注册,PackageParser 动态加载时需要使用 -->
        <receiver android:name=".HookReceiver"
            android:exported="true">
            <intent-filter>
                <action android:name="com.example.demo.hook" />
            </intent-filter>
        </receiver>
    </application>
</manifest>
After packaging the external apk, for the convenience of demonstration, the demo is to import the apk into the cache directory. Next is dynamic parsing:
public class HookPackageParser {

    public void parse(Context context, File apkFile) throws Exception {
        Class<?> packageParserClazz = Class.forName("android.content.pm.PackageParser");
        Method parsePackageMethod = packageParserClazz.getDeclaredMethod("parsePackage", File.class, int.class);
        parsePackageMethod.setAccessible(true);
        Object packageParserObj = packageParserClazz.newInstance();

        // 调用 PackageParser.parsePackage() 获取到解析后的 Package
        Object packageObj = parsePackageMethod.invoke(packageParserObj, apkFile, PackageManager.GET_RECEIVERS);

        // 获取 receivers 成员变量
        Field receiversField = packageObj.getClass().getDeclaredField("receivers");
        List receivers = (List) receiversField.get(packageObj);

        DexClassLoader dexClassLoader = new DexClassLoader(
                apkFile.getAbsolutePath(),
                context.getDir("plugin", Context.MODE_PRIVATE).getAbsolutePath(),
                null,
                context.getClassLoader());

        Class<?> componentClazz = Class.forName("android.content.pm.PackageParser$Component");
        Field intentsField = componentClazz.getDeclaredField("intents");
        for (Object receiverObj : receivers) {
            String name = (String) receiverObj.getClass().getField("className").get(receiverObj);
            try {
                BroadcastReceiver hookReceiver = (BroadcastReceiver) dexClassLoader.loadClass(name).newInstance();
                List<? extends IntentFilter> filters = (List<? extends IntentFilter>) intentsField.get(receiverObj);
                for (IntentFilter filter : filters) {
                    context.registerReceiver(hookReceiver, filter);
                }
            } catch (Exception e) {
                // ignore
            }
        }
    }
}

public class MainActivity extends AppCompatActivity {
    @Override
    protected void onCreate(Bundle savedInstanceState) {
        super.onCreate(savedInstanceState);
        setContentView(R.layout.activity_main);
        checkPermission(this);

		// 注册一个用于接收 hook 广播发送的消息验证是否动态装载了外部 apk 的广播
        IntentFilter filter = new IntentFilter();
        filter.addAction("com.example.demo.main");
        registerReceiver(new MainReceiver(), filter);
    }

    private boolean checkPermission(Activity activity) {
        if (Build.VERSION.SDK_INT >= Build.VERSION_CODES.M && activity.checkSelfPermission(
                Manifest.permission.WRITE_EXTERNAL_STORAGE) != PackageManager.PERMISSION_GRANTED) {
            activity.requestPermissions(new String[]{
                    Manifest.permission.READ_EXTERNAL_STORAGE,
                    Manifest.permission.WRITE_EXTERNAL_STORAGE
            }, 1);

        }
        return false;
    }

    // 先 hook 外部 apk 的 HookReceiver
    public void hookReceiver(View view) {
        HookPackageParser packageParser = new HookPackageParser();
        File directory = getCacheDir();
        String path = directory.getAbsolutePath() + "/hook-debug.apk";
        File file = new File(path);
        if (!file.exists()) {
            throw new RuntimeException("hook apk no exist");
        }

        try {
            packageParser.parse(this, file);
        } catch (Exception e) {
            e.printStackTrace();
        }
    }

    // hook 后尝试发送广播看是否生效
    public void sendBroadcast(View view) {
        Intent intent = new Intent();
        intent.setAction("com.example.demo.hook");
        sendBroadcast(intent);
    }

    private static class MainReceiver extends BroadcastReceiver {
        @Override
        public void onReceive(Context context, Intent intent) {
            Log.i("MainReceiver", "receive hook receiver message");
        }
    }
}
PackageParser needs to be obtained through reflection, and then reflection calls its parsePackage() to pass in the apk path to complete the parsing to obtain the Package object, then reflect the activities, providers, receivers, and services variables of PMS, and add the data we parsed into it, and this is achieved. Dynamic loading.
Android AMS (Activity Manager Service) Principle
What is AMS
AMS (ActivityManagerService) is mainly responsible for the startup, switching, and scheduling of the four major components in the system, as well as the management and scheduling of application processes. Normally, we will not separate AMS to explain it separately, because AMS needs to obtain information through PMS (PackageManagerService).
The following nodes will be interspersed with PMS (PackageManagerService) related content when explaining AMS.
What would happen without PMS and AMS?
From the principles of Android PMS, we can learn that PMS will run the AndroidManifest.xml that parses all apk when the phone is turned on, store each apk information in the memory, and provide a query interface. It can be considered that PMS acts as a package information cache.
One of the responsibilities of AMS is to manage and schedule Activity. When you need to start an Activity, you will first find PMS to query the Activity information to be jumped and then process a series of subsequent operations.
We can think about a question: Why does Android provide AMS and PMS? What would happen without AMS and PMS?
Assume that you want to start the Activity of a certain process. In a brief summary, you will go through five steps:
- Traverse the data/app directory to obtain all apk files in this directory
- Unzip all apk and get AndroidManifest.xml
- DOM parses AndroidManifest.xml, parses out the Activity tag, generates the corresponding data class, and stores it in memory.
- Find the Activity information to be jumped from the memory, obtain the full class name of the Activity, and construct the object through reflection
- Execute the Activity life cycle in sequence
If this is done every time the process is scheduled, you can imagine that the efficiency will be very low.
In order to quickly locate the Activity to be jumped, the first three steps will be handed over to PMS. PMS will parse and save it to the memory in advance when starting up. In this way, when AMS needs to jump to an Activity, it can be directly retrieved from PMS. By extracting information from the data stored in the memory, the operation can be completed faster.
After AMS gets the information to create an Activity from PMS and creates it, it will need to consider the life cycle of the Activity. The Activity cannot be destroyed as soon as it exits, so AMS needs to manage the life cycle of the created Activity. Each application and process has its own ActivityThread, so AMS also needs a cache center to manage the life cycle of the Activity. ActivityThread plays this role (more specifically, the mActivities variable under ActivityThread).
ActivityThread.java

final ArrayMap<IBinder, ActivityClientRecord> mActivities = new ArrayMap<>();

private Activity performLaunchActivity(ActivityClientRecord r, Intent customIntent) {
	...
	Activity activity = null;
	try {
		// 创建 Activity
		java.lang.ClassLoader cl = appContext.getClassLoader();
		activity = mInstrumentation.newActivity(
			cl, component.getClassName(), r.intent);
		...
	} catch (Exception e) {
		...
	}
	...
	try {
		...
		if (activity != null) {
			...
 			r.activity = activity; // ActivityClientRecord 记录 Activity
		}
		mActivities.put(r.token, r); // 将创建的 Activity 存储到 map
	} catch (SuperNotCalledException e) {
		...
	}
	...
	return activity;
}

public static final class ActivityClientRecord {
	...
	Activity activity; // 持有 Activity
	...
}
You can see that there is a member variable of mActivities in the source code of ActivityThread, and ActivityClientRecord holds a reference to Activity. mActivities management will be used in subsequent life cycle processing methods such as performXxxActivity().
App startup process
In Android, whether starting an application or starting an Activity within the application, the startActivity() method is called. Generally speaking, it will go through three steps:
- Tell AMS to start a specified Activity
- AMS finds the Activity information to be started from PMS
- Start the specified Activity
Next, we analyze the entire process of startActivity() through the source code (API 28).
Activity.java

@Override
public void startActivity(Intent intent) {
    this.startActivity(intent, null);
}

@Override
public void startActivity(Intent intent, @Nullable Bundle options) {
    if (options != null) {
        startActivityForResult(intent, -1, options);
    } else {
        // Note we want to go through this call for compatibility with
        // applications that may have overridden the method.
        startActivityForResult(intent, -1);
    }
}

public void startActivityForResult(@RequiresPermission Intent intent, int requestCode,
           	@Nullable Bundle options) {
	if (mParent == null) {
		...
		// 委托给 Instrumentation
        Instrumentation.ActivityResult ar =
            mInstrumentation.execStartActivity(
                this, mMainThread.getApplicationThread(), mToken, this,
                intent, requestCode, options);
        ....
	}
	...
}
When we call startActivity(), we will eventually call startActivityForResult(), and the upper layer of the application will delegate the Android core service to Instrumentation. Instrumentation is specifically responsible for processing all activities related to Application and Activity, that is, communication with AMS will be entrusted to Instrumentation.
Instrumentation.java

public ActivityResult execStartActivity(
          Context who, IBinder contextThread, IBinder token, Activity target,
          Intent intent, int requestCode, Bundle options) {
	...
	try {
		...
		// 找到 AMS 告知要启动 Activity
        int result = ActivityManager.getService()
            .startActivity(whoThread, who.getBasePackageName(), intent,
                    intent.resolveTypeIfNeeded(who.getContentResolver()),
                    token, target != null ? target.mEmbeddedID : null,
                    requestCode, 0, null, options);
        ...
	}
	...
}
Instrumentation will tell AMS to start an Activity.
It should be noted that the source code processing of different system versions here is also different. Before 9.0, AMS was used, and after 9.0, ATMS (ActivityTaskManagerService) was used:
public ActivityResult execStartActivity(
          Context who, IBinder contextThread, IBinder token, Activity target,
          Intent intent, int requestCode, Bundle options) {
	...
	try {
		...
		// 9.0 之后会通过 ATMS 告知要启动 Activity
        int result = ActivityTaskManager.getService().startActivity(whoThread,
        		 who.getBasePackageName(), who.getAttributionTag(), intent,
        		 intent.resolveTypeIfNeeded(tho.getContentResolver()), token,
        		 target != null ? target.mEmbeddedID : null, requestCode, 0, null, options);
        ...
	}
	...
}
The current source code is analyzed based on API 28, so we return to the source code analysis of API 28.
ActivityManager.getService().startActivity() This code can be split into two parts: ActivityManager.getService() and startActivity().
Let’s look at ActivityManager.getService() first:
ActivityManager.java

public static IActivityManager getService() {
    return IActivityManagerSingleton.get();
}

private static final Singleton<IActivityManager> IActivityManagerSingleton =
        new Singleton<IActivityManager>() {
            @Override
            protected IActivityManager create() {
            	// 通过 ServiceManager 获取 AMS 服务
            	// IActivityManager 是 binder 代理
                final IBinder b = ServiceManager.getService(Context.ACTIVITY_SERVICE);
                final IActivityManager am = IActivityManager.Stub.asInterface(b);
                return am;
            }
        };

public abstract class Singleton<T> {
	private T mInstance;

	protected abstract T create();

	public final T get() {
		synchronized (this) {
			if (mInstance == null) {
				mInstance = create();
			}
			return mInstance;
		}
	}
}
ActivityManager.getService() will get IActivityManager, which is a binder proxy object. It can be seen from the code that when the ActivityManager.getService() object is used to call the method, cross-process communication is actually taking place. The binder proxy object communicates with AMS, and the process in which the communication occurs is system_server. At the same time, this is also a good hook point.
At this point, the first step of telling AMS to start the Activity has been completed.
Let's continue analyzing the source code.
ActivityManagerService.java

@Override
public final int startActivity(IApplicationThread caller, String callingPackage,
        Intent intent, String resolvedType, IBinder resultTo, String resultWho, int requestCode,
        int startFlags, ProfilerInfo profilerInfo, Bundle bOptions) {
    // 有多个 startActivityAsUser() 重载方法,为了方便查看省略了多个方法调用
    return startActivityAsUser(...);
}

public final int startActivityAsUser(...) {
	...
	// mActivityStartController.obtainStarter 返回 ActivityStarter 对象
    return mActivityStartController.obtainStarter(intent, "startActivityAsUser")
            .setCaller(caller)
            .setCallingPackage(callingPackage)
            .setResolvedType(resolvedType)
            .setResultTo(resultTo)
            .setResultWho(resultWho)
            .setRequestCode(requestCode)
            .setStartFlags(startFlags)
            .setProfilerInfo(profilerInfo)
            .setActivityOptions(bOptions)
            .setMayWait(userId)
            .execute();
}
Use AMS to call the startActivity() method, mainly to find mActivityStartController.obtainStarter() to obtain the ActivityStarter object. It is obvious that the builder mode is used to configure relevant parameters, focusing on the execute() method.
According to the steps we set at the beginning, the second step is for AMS to find PMS to obtain information related to the jump Activity. So how does AMS communicate with PMS?
ActivityStarter.java

int execute() {
	try {
		if (mRequest.mayWait) {
			return startActivityMayWait(...);
		} else {
			return startActivity(...);
		}
	} finally {
		...
	}
}

private int startActivityMayWait(...) {
	...
	// AMS 和 PMS 产生关联,从 PMS 获取信息
	ResolveInfo rInfo = mSupervisor.resolveIntent(...);
	...
	return res;
}

ActivityStackSupervisor.java

ResolveInfo resolveIntent(...) {
	// mService 是 AMS
	synchronized (mService) {
		...
		try {
			// mService.getPackageManagerInternalLocked() 返回 PackageManagerInternalImpl
			return mService.getPackageManagerInternalLocked().resolveIntent(...);
		} finally {
			....
		}
	}
	...
}

ActivityManagerService.java

PackageManagerInternal getPackageManagerInternalLocked() {
    if (mPackageManagerInt == null) {
        mPackageManagerInt = LocalServices.getService(PackageManagerInternal.class);
    }
    return mPackageManagerInt;
}

PackageManagerService.java

// PackageManagerInternalImpl 的作用是,它作为内部类能拿到外部类的引用
// 所以可以充当 AMS 和 PMS 的桥梁,让 AMS 能获取到 PMS
private class PackageManagerInternalImpl extends PackageManagerInternal {
	...

    @Override
    public ResolveInfo resolveIntent(Intent intent, String resolvedType,
            int flags, int userId, boolean resolveForStart, int filterCallingUid) {
        // 作为桥梁外部调用相关方法时都转发给 PMS
        // ResolveInfo 持有 ActivityInfo、serviceInfo 等信息
        return resolveIntentInternal(
                intent, resolvedType, flags, userId, resolveForStart, filterCallingUid);
    }

    ...
}

ResolveInfo.java

public class ResolveInfo implements Parcelable {
	public ActivityInfo activityInfo;
	public ServiceInfo serviceInfo;
	public ProviderInfo providerInfo;
	...
}
The communication between AMS and PMS obtains the ResolveInfo packaging object, which can store ActivityInfo, ServiceInfo and other information. The reason for not returning ActivityInfo directly should be that the same set of logic can be reused when starting other components such as Service, because the acquisition methods are basically the same. .
The communication between AMS and PMS is not direct communication, but through PMS's PackageManagerInternalImpl internal class as a bridge. The internal class holds a reference to the external class, so PackageManagerInternalImpl can directly access PMS. This approach can not only implement functions, but also reduce the coupling between AMS and PMS and limit public api access.
Now that you have completed the second step and obtained the Activity information to be started from the PMS, you can start the third step to start the Activity.
ActivityStarter.java

private int startActivityMayWait(...) {
	...
	// AMS 和 PMS 产生关联,从 PMS 获取信息
	ResolveInfo rInfo = mSupervisor.resolveIntent(...);
	...
	// 从封装的 ResolveInfo 获取到要跳转的 ActivityInfo 信息
	ActivityInfo aInfo = mSupervisor.resolveActivity(intent, rInfo, startFlags, profilerInfo);
	...
	// 开始启动 Activity
	int res = startActivity(...);
	...
	return res;
}

private int startActivity(...) {
	int result = START_CANCELED;
	try {
		...
        result = startActivityUnchecked(r, sourceRecord, voiceSession, voiceInteractor,
                 startFlags, doResume, options, inTask, outActivity);
	} finally {
		...
	}
	...
}

private int startActivityUnchecked(final ActivityRecord r, ActivityRecord sourceRecord,
         IVoiceInteractionSession voiceSession, IVoiceInteractor voiceInteractor,
         int startFlags, boolean doResume, ActivityOptions options, TaskRecord inTask,
         ActivityRecord[] outActivity) {
	...
	mSuperVisor.resumeFocusedStackTopActivityLocked(mTargetStack, mStartActivity,
			mOptions);
	...
}

ActivityStackSupervisor.java

boolean resumeFocusedStackTopActivityLocked(
        ActivityStack targetStack, ActivityRecord target, ActivityOptions targetOptions) {
   if (!readyToResume()) {
        return false;
    }

    if (targetStack != null && isFocusedStack(targetStack)) {
        return targetStack.resumeTopActivityUncheckedLocked(target, targetOptions);
    }

    final ActivityRecord r = mFocusedStack.topRunningActivityLocked();
    if (r == null || !r.isState(RESUMED)) {
        mFocusedStack.resumeTopActivityUncheckedLocked(null, null);
    } else if (r.isState(RESUMED)) {
        // Kick off any lingering app transitions form the MoveTaskToFront operation.
        mFocusedStack.executeAppTransition(targetOptions);
    }

    return false;
}

ActivityStack.java

boolean resumeTopActivityUncheckedLocked(ActivityRecord prev, ActivityOptions options) {
	...
	try {
		...
		result = resumeTopActivityInnerLocked(prev, options);
		...
	}
}

private boolean resumeTopActivityInnerLocked(ActivityRecord prev, ActivityOptions options) {
	...
	mStackSupervisor.startSpecificActivityLocked(next, true, false);
	...
}

void startSpecificActivityLocked(ActivityRecord r,
        boolean andResume, boolean checkConfig) {
	...
	// 先判断要启动的 Activity 进程是否已经存在
	if (app != null && app.thread != null) {
		try {
			...
			// 进程已经存在,启动 Activity
			realStartActivityLocked(r, app, andResume, checkConfig);
			return;
		} catch (RemoteException e) {
			...
		}
	}

	// 如果进程不存在,AMS 通知 zygote 启动进程,最终反射调用 ActivityThread.main()
	// 有多个 startProcessLocked() 重载方法,为了方便查看省略了多个方法调用
    mService.startProcessLocked(...);
}

ActivityManagerService.java

private boolean startProcessLocked(...) {
	...
	// 其中一个 startProcessLocked() 提供了要启动的进程为 ActivityThread
	final String entryPoint = "android.app.ActivityThread";
	... // 省略其他 startProcessLocked() 调用
	if (mConstants.FLAG_PROCESS_START_ASYNC) {
		...
		// 传入要启动的进程
		final ProcessStartResult startResult = startProcess(app.hostingType, entryPoint, ...)
	}
	...
}

private ProcessStartResult startProcess(String entryPoint, ...) {
	try {
		...
		startResult = Process.start(entryPoint, ...);
		...
	} finally {
		...
	}
}

Process.java

public static final ProcessStartResult start(final String processClass, ...) {
	return zygoteProcess.start(processClass, ...);
}
According to the analysis of the source code above, before starting the Activity, it actually needs to be subdivided into two processes:
-
If the process of the Activity to be started has not been created, AMS will notify the Zygote fork process, and will eventually call the main() method of ActivityThread reflectively, and then go through the subsequent Activity creation and subsequent life cycle processes.
-
The process has been created, realStartActivityLocked() creates Activity and subsequent life cycle processes
The startup of Activity involves the life cycle. Since AMS is a service that manages and schedules Activity, it needs to be related to the started Activity. How does AMS manage the life cycle of Activity?
ActivityThread.java

final ApplicationThread mAppThread = new ApplicationThread();

public static void main(String[] args) {
	...
	ActivityThread thread = new ActivityThread();
    thread.attach(false, startSeq);
    ...
}

private void attach(boolean system, long startSeq) {
	...
	if (!system) {
		...
		final IActivityManager mgr = ActivityManager.getService();
		try {
			// 将 ApplicationThread 给到 AMS 作为句柄管理
			mgr.attachApplication(mAppThread, startSeq);
		} catch (RemoteException ex) {
			...
		}
		...
	}
	...
}

private class ApplicationThread extends IApplicationThread.Stub {
	// AMS 下发管理四大组件,将处理转发给变量名为 mH 的 Handler
	...

	@Override
	public void scheduleTransaction(ClientTransaction transaction) {
		ActivityThread.this.scheduleTransaction(transaction);
	}
}

class H extends Handler {
	// Activity 生命周期等消息的处理
	...
}
In the main() method of ActivityThread, you can see from the source code that an ApplicationThread is created, and then this object is given to AMS. The Activity life cycle actually uses ApplicationThread as a handle and gives it to AMS. AMS can use this handle to issue and manage the Activity. life cycle; the same AMS also manages the four major components and other processing of the process through ApplicationThread. In ApplicationThread, the Handler forwards message-driven processing.
Before starting the Activity, you need to start creating the Application first. AMS gets ApplicationThread and calls attachApplication():
ActivityManagerService.java

public class ActivityManagerService extends IActivityManager.Stub
        implements Watchdog.Monitor, BatteryStatsImpl.BatteryCallback {

    @Override
    public final void attachApplication(IApplicationThread thread, long startSeq) {
        synchronized (this) {
            ...
            attachApplicationLocked(thread, callingPid, callingUid, startSeq);
            ...
        }
    }

    @GuardedBy("this")
    private final boolean attachApplicationLocked(IApplicationThread thread,
            int pid, int callingUid, long startSeq) {
		...
		if (app.isolatedEntryPoint != null) {
			...
		} else if (app.instr != null) {
		   // 通过 ApplicationThread 和 App 进程通信
           thread.bindApplication(processName, appInfo, providers,
                   app.instr.mClass,
                   profilerInfo, app.instr.mArguments,
                   app.instr.mWatcher,
                   app.instr.mUiAutomationConnection, testMode,
                   mBinderTransactionTrackingEnabled, enableTrackAllocation,
                   isRestrictedBackupMode || !normalMode, app.persistent,
                   new Configuration(getGlobalConfiguration()), app.compat,
                   getCommonServicesLocked(app.isolated),
                   mCoreSettingsObserver.getCoreSettingsLocked(),
                   buildSerial, isAutofillCompatEnabled);
		} else {
			...
		}
		...

        if (normalMode) {
            try {
            	// 创建完 Application 后走 Activity 生命周期流程
                if (mStackSupervisor.attachApplicationLocked(app)) {
                    didSomething = true;
                }
            } catch (Exception e) {
                Slog.wtf(TAG, "Exception thrown launching activities in " + app, e);
                badApp = true;
            }
        }
	}
}

ActivityThread.java

private class ApplicationThread extends IApplicationThread.Stub {

    public final void bindApplication(...) {
		...
		// 在 ActivityThread 也是获取的 AMS 数据创建 application
		AppBindData data = new AppBindData();
        data.processName = processName;
        data.appInfo = appInfo;
        data.providers = providers;
        data.instrumentationName = instrumentationName;
        data.instrumentationArgs = instrumentationArgs;
        data.instrumentationWatcher = instrumentationWatcher;
        data.instrumentationUiAutomationConnection = instrumentationUiConnection;
        data.debugMode = debugMode;
        data.enableBinderTracking = enableBinderTracking;
        data.trackAllocation = trackAllocation;
        data.restrictedBackupMode = isRestrictedBackupMode;
        data.persistent = persistent;
        data.config = config;
        data.compatInfo = compatInfo;
        data.initProfilerInfo = profilerInfo;
        data.buildSerial = buildSerial;
        data.autofillCompatibilityEnabled = autofillCompatibilityEnabled;
        sendMessage(H.BIND_APPLICATION, data); // 消息驱动发消息给到 Handler
	}
}

class H extends Handler {
	public static final int BIND_APPLICATION        = 110;
	...

	public void handleMessage(Message msg) {
		switch (mssg.what) {
			case BIND_APPLICATION:
			AppBindData data = (AppBindData) msg.obj;
			handleBindApplication(data);
			break;
			...
		}
	}
}

private void handleBindApplication(AppBindData data) {
	...
	// 反射创建 Instrumentation 负责管理 application 和 activity 相关所有活动处理
	try {
		final ClassLoader cl = instrContext.getClassLoader();
		mInstrumentation = (Instrumentation)
			cl.loadClass(data.instrumentationName.getClassName()).newInstance();
	} catch (Exception e) {
		...
	}
	...
	try {
		// info 是 LoadedApk,反射创建 application
		app = data.info.makeApplication(data.restrictedBackupMode, null);
		...
	}
	...
}

public final class LoadedApk {

    public Application makeApplication(boolean forceDefaultAppClass,
            Instrumentation instrumentation) {
		...
		// 创建 application
		Application app = null;
		try {
			ClassLoader cl = getClassLoader();
			ContextImpl appContext = ContextImpl.createAppContext(mActivityThread, this);
			app = mActivityThread.mInstrumentation.newApplication(
				cl, appClass, appContext);
		} catch (Exception e) {
			...
		}
		...
		if (instrumentation != null) {
			try {
				// 调用 application.onCreate()
				instrumentation.callApplicationOnCreate(app);
			} catch (Exception e) {
				...
			}
		}
		...
	}
}
attachApplication() actually does three things:
- Create Instrumentation, responsible for managing all activity processing related to Application and Activity
- CreateApplication
- Create Activity and start the life cycle process
We mentioned above that the creation and subsequent life cycle process of Activity start from the realStartActivityLocked() method. Let us continue to analyze the creation process of Activity.
ActivityManagerService.java

public class ActivityManagerService extends IActivityManager.Stub
        implements Watchdog.Monitor, BatteryStatsImpl.BatteryCallback {
    final ActivityStackSupervisor mStackSupervisor;

    @Override
    public final void attachApplication(IApplicationThread thread, long startSeq) {
        synchronized (this) {
            ...
            attachApplicationLocked(thread, callingPid, callingUid, startSeq);
            ...
        }
    }

    @GuardedBy("this")
    private final boolean attachApplicationLocked(IApplicationThread thread,
            int pid, int callingUid, long startSeq) {
		...
		if (mStackSupervisor.attachApplicationLocked(app)) {
		}
		...
	}
}

ActivityStackSupervisor.java

public class ActivityStackSupervisor extends ConfigurationContainer implements DisplayListener,
        RecentTasks.Callbacks {

   	boolean attachApplicationLocked(ProcessRecord app) throws RemoteException {
		...
		if (realStartActivityLocked(activity, app, top == activity) {
		}
		...
	}

    final boolean realStartActivityLocked(ActivityRecord r, ProcessRecord app,
            boolean andResume, boolean checkConfig) throws RemoteException {
		...
		// app.thread 是 ApplicationThread
		// Create activity launch transaction.
		final ClientTransaction clientTransaction = ClientTransaction.obtain(app.thread,
			r.appToken);
        clientTransaction.addCallback(LaunchActivityItem.obtain(...));

        final ActivityLifecycleItem lifecycleItem;
        if (andResume) {
			lifecycleItem = ResumeActivityItem.obtain(mService.isNextTransitionForward());
		} else {
			lifecycleItem = PauseActivityItem.obtain();
		}
		// 执行完 LaunchActivityItem 事务后要处在的生命周期状态
		clientTransaction.setLifecycleStateRequest(lifecycleItem);

		// mService 是 AMS
		// Schedule transaction.
		mService.getLifecycleManager().scheduleTransaction(clientTransaction);
		...
	}
}
ClientTransaction is a client transaction management class, which represents different Activity life cycles through different states LaunchActivityItem, ResumeActivityItem, PauseActivityItem, etc., and is managed in a state-by-state manner.
It is mentioned above that AMS manages the life cycle of Activity through the ApplicationThread handle. When creating ClientTransaction.obtain(), you can also see that the life cycle processing issued by ApplicationThread is passed in:
ClientTransaction.java

public class ClientTransaction implements Parcelable, ObjectPoolItem {
    private IApplicationThread mClient;

	// 记录事务结束后要处在的生命周期状态,后面会用到
    public void setLifecycleStateRequest(ActivityLifecycleItem stateRequest) {
        mLifecycleStateRequest = stateRequest;
    }

    public void schedule() throws RemoteException {
        mClient.scheduleTransaction(this);
    }

    public static ClientTransaction obtain(IApplicationThread client, IBinder activityToken) {
        ClientTransaction instance = ObjectPool.obtain(ClientTransaction.class);
        if (instance == null) {
            instance = new ClientTransaction();
        }
        instance.mClient = client; // 存储的 ApplicationThread
        instance.mActivityToken = activityToken;

        return instance;
    }
}
Continue to analyze what mService.getLifecycleManager().scheduleTransaction(clientTransaction) does:
ActivityManagerService.java

public class ActivityManagerService extends IActivityManager.Stub
        implements Watchdog.Monitor, BatteryStatsImpl.BatteryCallback {

	ClientLifecycleManager getLifecycleManager() { return mLifecycleManager; }
}

class ClientLifecycleManager {

	void scheduleTransaction(ClientTransaction transaction) throws RemoteException {
		final IApplicationThread client = transaction.getClient();
		transaction.schedule();
		...
	}
}

ClientTransaction.java

public class ClientTransaction implements Parcelable, ObjectPoolItem {
    private IApplicationThread mClient;

    public void schedule() throws RemoteException {
        mClient.scheduleTransaction(this); // 拿着 ApplicationThread 下发通知
    }
}

ActivityThread.java

private class ApplicationThread extends IApplicationThread.Stub {
    @Override
    public void scheduleTransaction(ClientTransaction transaction) throws RemoteException {
    	// 在 ActivityThread 是找不到 scheduleTransaction 方法的
    	// 而是在 ActivityThread 的父类 ClientTransactionHandler 调用
        ActivityThread.this.scheduleTransaction(transaction);
    }
}
AMS takes the ApplicationThread handle and tells ActivityThread to create an Activity. In the source code of ActivityThread, you will find that the ActivityThread.this.scheduleTransaction() code is not found. In fact, it is placed in the parent class ClientTransactionHandler inherited by ActivityThread.
ClientTransactionHandler.java

public abstract class ClientTransactionHandler {

	void scheduleTransaction(ClientTransaction transaction) {
		transaction.preExecute(this);
		// 通过 Handler 发了一条消息
		sendMessage(ActivityThread.H.EXECUTE_TRANSACTION, transaction);
	}
}

public final class ActivityThread extends ClientTransactionHandler {
	// TransactionExecutor的构造传入的 ActivityThread
    private final TransactionExecutor mTransactionExecutor = new TransactionExecutor(this);

	class H extends Handler {
		public static final int EXECUTE_TRANSACTION = 159;

		public void handleMessage(Message msg) {
			switch (msg.what) {
				case EXECUTE_TRANSACTION:
				final ClientTransaction transaction = (ClientTransaction) msg.obj;
				mTransactionExecutor.execute(transaction);
				break;
			}
		}
	}
}

TransactionExecutor.java

public class TransactionExecutor {
	// ActivityThread
	private ClientTransactionHandler mTransactionHandler;

    public TransactionExecutor(ClientTransactionHandler clientTransactionHandler) {
        mTransactionHandler = clientTransactionHandler;
    }

	public void execute(ClientTransaction transaction) {
		...

		executeCallbacks(transaction);

        executeLifecycleState(transaction);
		...
	}

    public void executeCallbacks(ClientTransaction transaction) {
    	final List<ClientTransactionItem> callbacks = transaction.getCallbacks();
		...
		final int size = callbacks.size();
		for (int i = 0; i < size; ++i) {
			final ClientTransactionItem item = callbacks.get(i);
			...
			// 执行事务,这里是设置了 LaunchActivityItem
			item.execute(mTransactionHandler, token, mPendingActions);
			...
		}
	}

	private void executeLifecycleState(ClientTransaction transaction) {
		final ActivityLifecycleItem lifecycleItem = transaction.getLifecycleStateRequest();
		...
		// 执行完事务后处在的生命周期状态,这里是 ResumeActivityItem
		lifecycleItem.execute(mTransactionHandler, token, mPendingActions);
	}
}
After the Handler receives the message, it starts transaction processing, and the TransactionExecutor is responsible for processing the transaction. It mainly depends on two functions:
- executeCallbacks(): execute specific transactions, such as LaunchActivityItem
- executeLifecycleState(): Which state to be in after executing the transaction, such as ResumeActivityItem, PauseActivityItem
LaunchActivityItem.java

public class LaunchActivityItem extends ClientTransactionItem {

	@Override
	public void execute(ClientTransactionHandler client, IBinder token,
		PendingTransactionActions pendingActions) {
        ActivityClientRecord r = new ActivityClientRecord(token, mIntent, mIdent, mInfo,
                mOverrideConfig, mCompatInfo, mReferrer, mVoiceInteractor, mState, mPersistentState,
                mPendingResults, mPendingNewIntents, mIsForward,
                mProfilerInfo, client);
        // 最终到 ActivityThread 开始创建 Activity
        client.handleLaunchActivity(r, pendingActions, null /* customIntent */);
	}
}

ActivityThread.java

public final class ActivityThread extends ClientTransactionHandler {

	@Override
	public Activity handleLaunchActivity(ActivityClientRecord r,
            PendingTransactionActions pendingActions, Intent customIntent) {
		...
		final Activity a = performLaunchActivity(r, customIntent);
		...
	}

    private Activity performLaunchActivity(ActivityClientRecord r, Intent customIntent) {
		...
		// 通过 Instrumentation 反射创建 Activity
		ContextImpl appContext = createBaseContextForActivity(r);
		Activity activity = null;
		try {
			ClassLoader cl = appContext.getClassLoader();
			activity = mInstrumentation.newActivity(
				cl, component.getClassName(), r.intent);
			...
		}
		...
		// 调用 Activity 生命周期 onCreate()
        if (r.isPersistable()) {
            mInstrumentation.callActivityOnCreate(activity, r.state, r.persistentState);
        } else {
            mInstrumentation.callActivityOnCreate(activity, r.state);
        }
	}
}
A brief summary of what realStartActivityLocked() does:
ClientTransaction was created to handle the execution transaction of the life cycle. It can be considered as the execution class of AMS that specifically handles the Activity life cycle. Different life cycles are represented by different states, the life cycle of onCreate() represented by LaunchActivityItem, and the life cycle of onResume() represented by ResumeActivityItem. The specific execution of the transaction will eventually be sent to the corresponding ActivityLifecycleItem, and callbacks will be executed by these state classes. Activity life cycle.
At this point, the analysis of the App startup process ends here.
Summarize the startup process of the overall App:
- When startActivity() is called, it will actually go to Instrumentation, which communicates with AMS.
- Instrumentation will find the ServiceManager to obtain the AMS (actually obtain the binder agent) and call startActivity(). Before 9.0, you get AMS, and after 9.0, you get ATMS.
- AMS finds PMS and obtains the started Activity information
- Then determine whether the process of the Activity that needs to be started already exists. If it does not exist, AMS notifies the Zygote fork process through the socket, and then calls the main() of ActivityThread reflectively to create Instrumentation, Application and Activity and follow the life cycle process.
- If the process of the Activity that needs to be started already exists, create the Activity and follow the life cycle process
The specific process is as follows:
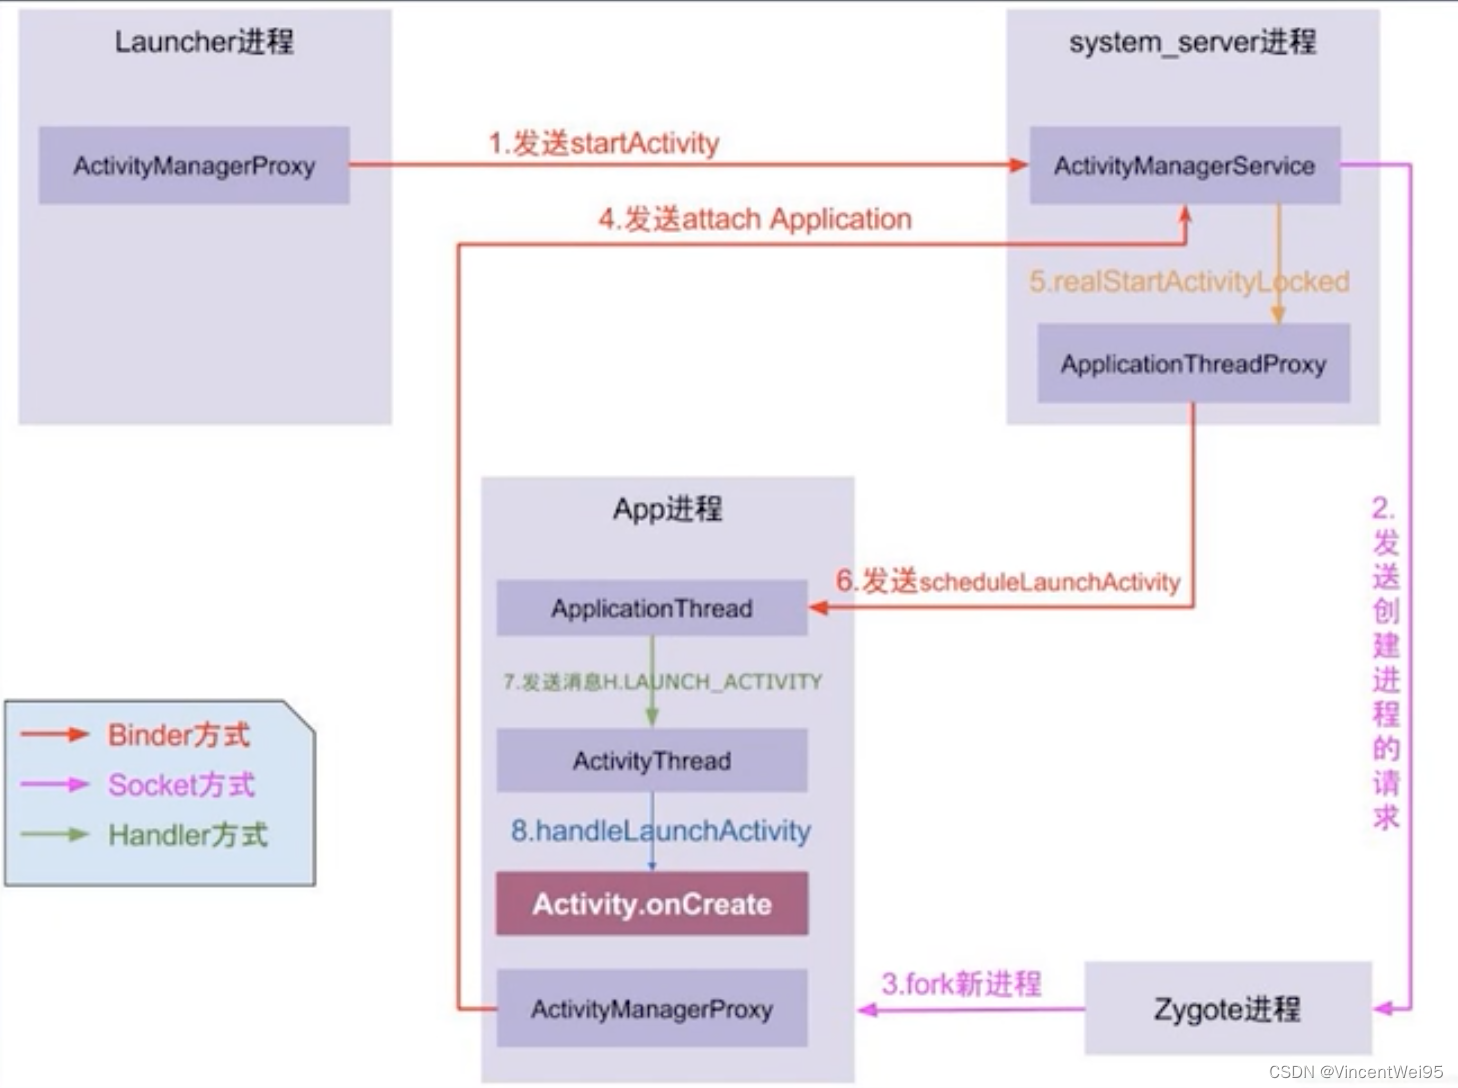
hook starts an interface that is not registered in AndroidManifest.xml
The source code of AMS has been analyzed. So what are the application scenarios of AMS source code?
We often encounter a scenario in business. If the user is not logged in, he will jump to the login interface, and if he is logged in, he will jump to other interfaces. Therefore, there will be writing similar to this:
if (isLogin) {
	startActivity(new Intent(context, LoginActivity.class);
} else {
	startActivity(new Intent(context, OtherActivity.class);
}
When a project has a large number of areas where it is necessary to determine the login and then jump to the interface, if there are subsequent business changes, such as modifying the jump login interface, this hard-coding method is highly intrusive, requires a wide range of modifications, and is not conducive to maintenance.
Maybe you will say: I can use implicit intent to define actions in AndroidManifest.xml, and then use constant classes to provide unified management of actions:
AndroidManifest.xml

<manifest>
	<application>
		<activity name="LoginActivity">
			<intent-filter>
				<action name="android.intent.action.login" />
			</intent-filter>
		</activity>
	</application>
</manifest>

public class Constants {
	public static final String ACTION_LOGIN = "android.intent.action.login";
}

if (isLogin) {
	startActivity(new Intent(context, Constants.ACTION_LOGIN);
} else {
	startActivity(new Intent(context, OtherActivity.class);
}
Then I will add another condition: I want to start the login interface normally without registering it in AndroidManifest.xml. Is this possible?
This is not possible under normal circumstances, but after we become familiar with the source code of AMS and PMS, we can use hooks to bypass system detection and start an Activity normally.
To put it simply, hook is to bypass system processing and achieve the same effect in different ways. However, this process still requires some information created by the system to help us complete the processing.
But there are generally three prerequisites for using hooks:
- Find the appropriate hook point: In Java, it is usually a static member variable or member method. Non-static member variables cannot be hooked because the hook point will be obtained through reflection.
- Compatibility of hook: Hook will use the API of the system source code, but different versions of the source code will have different hook points and hook methods.
- Familiar with source code principles: ensure that system processes can be hooked correctly under normal conditions
According to the case mentioned at the beginning that each jump requires authentication, we try to use hooks to only write specific business jumps in the code, and automatically jump to the login interface without logging in, otherwise jump to the specific business interface. The demo will be implemented on the source code of API 28.
There are two major difficulties in achieving this effect:
- How to bypass the check when not in the AndroidManifest.xml registration interface?
- After bypassing the check, how can I start this Activity normally?
Not in the AndroidManifest.xml registration interface, it was mentioned at the beginning of the article that the principle analysis of AMS is inseparable from PMS, because AMS will ask PMS to get Activity information during the process of starting Activity, so this problem is more specifically how to bypass it. Inspection of PMS.
In order to achieve this effect, what the hook can do is to intercept startActivity(), replace the Intent information carrying the target Activity, and add additional information to the Intent while retaining the original data. In this way, the process can be executed normally under the inspection of PMS.
So where are the appropriate hooks? Instrumentation has a process for communicating with AMS. We need to get the binder agent of AMS. Here we re-post the source code:
ActivityManager.java

// 已经创建好的 IActivityManager,更具体说要拿到 mInstance,是一个很好的 hook 点
public static IActivityManager getService() {
    return IActivityManagerSingleton.get();
}

private static final Singleton<IActivityManager> IActivityManagerSingleton =
        new Singleton<IActivityManager>() {
            @Override
            protected IActivityManager create() {
                final IBinder b = ServiceManager.getService(Context.ACTIVITY_SERVICE);
                final IActivityManager am = IActivityManager.Stub.asInterface(b);
                return am;
            }
        };

public abstract class Singleton<T> {
	private T mInstance;

	protected abstract T create();

	public final T get() {
		synchronized (this) {
			if (mInstance == null) {
				mInstance = create();
			}
			return mInstance;
		}
	}
}
The hook does not completely create the information by itself, but uses the system api or the information created in advance. mInstance, which is the IActivityManager, is the object we want to use. We need to intercept its processing when calling startActivity() and replace our Intent. , which requires the use of dynamic agents. code show as below:
public class Hooker {

    public void hook() throws Exception {
        hookAms();
    }

    public void hookAms() throws Exception {
        if (proxyActivity == null) {
            throw new NullPointerException("proxyActivity is null");
        }

        Class ActivityManagerClz = Class.forName("android.app.ActivityManager");
        Field IActivityManagerSingletonField = ActivityManagerClz.getDeclaredField("IActivityManagerSingleton");
        IActivityManagerSingletonField.setAccessible(true);
        // 获取到 ActivityManager 的 IActivityManagerSingleton 内部静态成员变量
        Object IActivityManagerSingletonObj = IActivityManagerSingletonField.get(null);

        Class SingletonClz = Class.forName("android.util.Singleton");
        Field mInstanceField = SingletonClz.getDeclaredField("mInstance");
        mInstanceField.setAccessible(true);
        // 拿到 ActivityManagerService 的 binder 代理
        // 做这一步是为了绕过 AMS 的鉴权,因为要设置的 LoginActivity 也是没有在 AndroidManifest.xml 注册,也就是要绕过 PMS
        Object IActivityManagerObj = mInstanceField.get(IActivityManagerSingletonObj);

        Class IActivityManagerClz = Class.forName("android.app.IActivityManager");
        Object proxyIActivityManager = Proxy.newProxyInstance(
                Thread.currentThread().getContextClassLoader(),
                new Class[] {IActivityManagerClz}, new AmsInvocationHandler(IActivityManagerObj));
        // 将 IActivityManagerSingleton 的 mInstance 成员替换为我们自己的代理对象
        // 将 mInstance 的调用都跑我们的代理
        mInstanceField.set(IActivityManagerSingletonObj, proxyIActivityManager);
    }

    private class AmsInvocationHandler implements InvocationHandler {
        private final Object iActivityManagerObject;

        public AmsInvocationHandler(Object iActivityManagerObject) {
            this.iActivityManagerObject = iActivityManagerObject;
        }

        @Override
        public Object invoke(Object proxy, Method method, Object[] args) throws Throwable {
            // 系统使用 mInstance 的调用都会走到代理
            if ("startActivity".contains(method.getName())) {
                Intent intent = null;
                int index = 0;
                for (int i = 0; i < args.length; i++) {
                    Object arg = args[i];
                    if (arg instanceof Intent) {
                        intent = (Intent) args[i];
                        index = i;
                        break;
                    }
                }
                if (intent != null) {
                    Intent proxyIntent = new Intent();
                    ComponentName componentName = new ComponentName(context, proxyActivity);
                    proxyIntent.setComponent(componentName);
                    proxyIntent.putExtra("oldIntent", intent);
                    args[index] = proxyIntent; // 替换真实意图
                }
            }
            return method.invoke(iActivityManagerObject, args);
        }
    }
}
The problem of bypassing PMS has been solved. Next is the second question: How to start Activity normally?
The creation and life cycle process of Activity are all completed under the Handler message driver. The specific source code is located in the mH member variable of ActivityThread:
ActivityThread.java

final H mH = new H();

class H extends Handler {
	public static final int EXECUTE_TRANSACTION = 159;

	public void handleMessage(Message msg) {
		switch (msg.what) {
			case EXECUTE_TRANSACTION:
			final ClientTransaction transaction = (ClientTransaction) msg.obj;
			mTransactionExecutor.execute(transaction);
			break;
		}
	}
}
Unfortunately, the handleMessage() message cannot be intercepted in ActivityThread.
In fact, Handler has already provided us with hook points:
Handler.java

final Callback mCallback;

public void dispatchMessage(Message msg) {
    if (msg.callback != null) {
        handleCallback(msg);
    } else {
        if (mCallback != null) {
        	// 如果 mCallback 不为空,先处理 mCallback 的 handleMessage()
        	// 如果 mCallback 的 handleMessage() 返回 false,调用兜底的 handleMessage()
            if (mCallback.handleMessage(msg)) {
                return;
            }
        }
        handleMessage(msg);
    }
}
We can set up our own mCallback, so that the message can be intercepted and processed in advance before the handleMessage() is called. The message that needs to be intercepted will return true and will not be delivered. Otherwise, it will return false and proceed normally without affecting the startup process.
The complete code is as follows:
public class Hooker {
    private final Context context;
    private Class<?> proxyActivity;

    public Hooker(@NonNull Context context) {
        this.context = context;
    }

    public void setProxyActivity(@NonNull Class<?> proxyActivity) {
        this.proxyActivity = proxyActivity;
    }

    public void hook() throws Exception {
        hookAms();
        hookSystemHandler();
    }

    public void hookAms() throws Exception {
        if (proxyActivity == null) {
            throw new NullPointerException("proxyActivity is null");
        }

        Class ActivityManagerClz = Class.forName("android.app.ActivityManager");
        Field IActivityManagerSingletonField = ActivityManagerClz.getDeclaredField("IActivityManagerSingleton");
        IActivityManagerSingletonField.setAccessible(true);
        // 获取到 ActivityManager 的 IActivityManagerSingleton 内部静态成员变量
        Object IActivityManagerSingletonObj = IActivityManagerSingletonField.get(null);

        Class SingletonClz = Class.forName("android.util.Singleton");
        Field mInstanceField = SingletonClz.getDeclaredField("mInstance");
        mInstanceField.setAccessible(true);
        // 拿到 ActivityManagerService 的 binder 代理
        // 做这一步是为了绕过 AMS 的鉴权,因为要设置的 LoginActivity 也是没有在 AndroidManifest.xml 注册,也就是要绕过 PMS
        Object IActivityManagerObj = mInstanceField.get(IActivityManagerSingletonObj);

        Class IActivityManagerClz = Class.forName("android.app.IActivityManager");
        Object proxyIActivityManager = Proxy.newProxyInstance(
                Thread.currentThread().getContextClassLoader(),
                new Class[] {IActivityManagerClz}, new AmsInvocationHandler(IActivityManagerObj));
        // 将 IActivityManagerSingleton 的 mInstance 成员替换为我们自己的代理对象
        // 将 mInstance 的调用都跑我们的代理
        mInstanceField.set(IActivityManagerSingletonObj, proxyIActivityManager);
    }

    public void hookSystemHandler() throws Exception {
        Class ActivityThreadClz = Class.forName("android.app.ActivityThread");
        Field field = ActivityThreadClz.getDeclaredField("sCurrentActivityThread");
        field.setAccessible(true);
        Object ActivityThreadObj = field.get(null);

        Field mHField = ActivityThreadClz.getDeclaredField("mH");
        mHField.setAccessible(true);
        Handler mHObj = (Handler) mHField.get(ActivityThreadObj);

        Field mCallbackField = Handler.class.getDeclaredField("mCallback");
        mCallbackField.setAccessible(true);
        ProxyHandlerCallback proxyCallback = new ProxyHandlerCallback();
        mCallbackField.set(mHObj, proxyCallback);
    }

    private class ProxyHandlerCallback implements Handler.Callback {
		public static final int EXECUTE_TRANSACTION = 159;

        @Override
        public boolean handleMessage(Message msg) {
            if (msg.what == EXECUTE_TRANSACTION) {
                try {
                    Class<?> ClientTransactionClz = Class.forName("android.app.servertransaction.ClientTransaction");
                    if (!ClientTransactionClz.isInstance(msg.obj)) {
                        return false;
                    }

                    Class<?> LaunchActivityItemClz = Class.forName("android.app.servertransaction.LaunchActivityItem");

                    Field mActivityCallbacksField = ClientTransactionClz.getDeclaredField("mActivityCallbacks");
                    mActivityCallbacksField.setAccessible(true);
                    Object mActivityCallbacksObj = mActivityCallbacksField.get(msg.obj);
                    List list = (List) mActivityCallbacksObj;
                    if (list.size() == 0) {
                        return false;
                    }

                    Object LaunchActivityItemObj = list.get(0);
                    if (!LaunchActivityItemClz.isInstance(LaunchActivityItemObj)) {
                        return false;
                    }

                    Field mIntentField = LaunchActivityItemClz.getDeclaredField("mIntent");
                    mIntentField.setAccessible(true);
                    Intent mIntent = (Intent) mIntentField.get(LaunchActivityItemObj);
                    Intent realIntent = mIntent.getParcelableExtra("oldIntent");
                    if (realIntent != null) {
                        SharedPreferences sp = context.getSharedPreferences("name", MODE_PRIVATE);
                        boolean isLogin = sp.getBoolean("isLogin", false);
                        if (isLogin) {
                            mIntent.setComponent(realIntent.getComponent());
                        } else {
                            ComponentName componentName = new ComponentName(context, LoginActivity.class);
                            mIntent.putExtra("extraIntent", realIntent.getComponent().getClassName()); // 提供给登陆界面登陆成功后跳转到哪个目标页面
                            mIntent.setComponent(componentName);
                        }
                    }
                } catch (Exception e) {
                    e.printStackTrace();
                }
            }
            return false; // 返回 false 不影响系统的执行
        }
    }

    private class AmsInvocationHandler implements InvocationHandler {
        private final Object iActivityManagerObject;

        public AmsInvocationHandler(Object iActivityManagerObject) {
            this.iActivityManagerObject = iActivityManagerObject;
        }

        @Override
        public Object invoke(Object proxy, Method method, Object[] args) throws Throwable {
            // 系统使用 mInstance 的调用都会走到代理
            if ("startActivity".contains(method.getName())) {
                Intent intent = null;
                int index = 0;
                for (int i = 0; i < args.length; i++) {
                    Object arg = args[i];
                    if (arg instanceof Intent) {
                        intent = (Intent) args[i];
                        index = i;
                        break;
                    }
                }
                if (intent != null) {
                    Intent proxyIntent = new Intent();
                    ComponentName componentName = new ComponentName(context, proxyActivity);
                    proxyIntent.setComponent(componentName);
                    proxyIntent.putExtra("oldIntent", intent);
                    args[index] = proxyIntent; // 替换真实意图
                }
            }
            return method.invoke(iActivityManagerObject, args);
        }
    }
}
This will complete our effect. Let’s write a demo to test:
<?xml version="1.0" encoding="utf-8"?>
<manifest xmlns:android="http://schemas.android.com/apk/res/android"
    package="com.example.demo">

    <application
        android:allowBackup="true"
        android:icon="@mipmap/ic_launcher"
        android:label="@string/app_name"
        android:roundIcon="@mipmap/ic_launcher_round"
        android:supportsRtl="true"
        android:theme="@style/Theme.Demo">
        <activity android:name=".MainActivity"
            android:exported="true">
            <intent-filter>
                <action android:name="android.intent.action.MAIN" />

                <category android:name="android.intent.category.LAUNCHER" />
            </intent-filter>
        </activity>
        <!-- 没有注册 LoginActivity -->
        <activity android:name=".Page1Activity" />
        <activity android:name=".Page2Activity" />
    </application>
</manifest>

public class MainActivity extends AppCompatActivity {
    private Hooker hooker;

    @Override
    protected void onCreate(Bundle savedInstanceState) {
        super.onCreate(savedInstanceState);
        setContentView(R.layout.activity_main);

        hooker = new Hooker(this);
    }

    public void logout(View view) {
        SharedPreferences sp = getSharedPreferences("name", MODE_PRIVATE);
        sp.edit().putBoolean("isLogin", false).apply();
    }

    public void startPage1(View view) {
        hooker.setProxyActivity(Page1Activity.class);
        try {
            hooker.hook();
        } catch (Exception e) {
            e.printStackTrace();
        }
        startActivity(new Intent(this, Page1Activity.class));
    }

    public void startPage2(View view) {
        hooker.setProxyActivity(Page2Activity.class);
        try {
            hooker.hook();
        } catch (Exception e) {
            e.printStackTrace();
        }
        startActivity(new Intent(this, Page2Activity.class));
    }
}

public class LoginActivity extends AppCompatActivity {

    @Override
    protected void onCreate(@Nullable Bundle savedInstanceState) {
        super.onCreate(savedInstanceState);
        setContentView(R.layout.activity_login);
    }

    public void login(View view) throws ClassNotFoundException {
        SharedPreferences sp = getSharedPreferences("name", MODE_PRIVATE);
        sp.edit().putBoolean("isLogin", true).apply();

        String className = getIntent().getStringExtra("extraIntent");
        if (!TextUtils.isEmpty(className)) {
            startActivity(new Intent(this, Class.forName(className)));

            finish();
        }
    }
}
