1. Background
What is JUnit 5? First of all, we have to talk about the Java unit testing framework JUnit. It and another framework TestNG occupy the main market of unit testing frameworks in the Java field. Among them, JUnit has a long development history and constantly evolving rich functions, and is favored by most Java developers. the favor of the reader.
Speaking of the history of JUnit, JUnit originated in 1997. The initial version was completed on an airplane trip by two programming masters Kent Beck and Erich Gamma. Due to the lack of mature tools in the Java testing process at that time, the two people were on the plane. We collaborated on the design and implementation of the JUnit prototype, aiming to become a more useful Java testing framework.
Now more than 20 years later, JUnit has evolved through various versions and has developed to version 5.x, providing better support for JDK 8 and higher versions (such as supporting Lambda) and richer test forms (such as Repeated testing, parameterized testing).
After understanding JUint, let's look back at JUnit 5. This version can be said to be a major upgrade of the JUnit unit testing framework. It first requires a running environment of Java 8 or above. Although it can also be compiled and run in older versions of JDK, it must be fully used. JUnit 5 functionality, JDK 8 environment is essential.
In addition, JUnit 5 differs from previous versions of JUnit by being split into several different modules consisting of three different sub-projects.
JUnit 5 = JUnit Platform + JUnit Jupiter + JUnit Vintage
-
JUnit Platform : A basic service used to start the test framework on the JVM, providing support for executing tests through the command line, IDE and build tools.
-
JUnit Jupiter : Contains the new programming model and extension model of JUnit 5, which is mainly used for writing test code and extension code.
-
JUnit Vintage : Used to run JUnit3.x and JUnit4.x test cases compatible with JUnit 5.

Why you need JUnit 5
After talking about what JUnit 5 is, let's think about another question: Why do we need a JUnit 5?
Since the emergence of testing frameworks like JUnit, the field of Java unit testing has gradually matured, and developers have also had higher requirements for unit testing frameworks: more testing methods and less dependence on other libraries.
Therefore, everyone is looking forward to the birth of a more powerful testing framework. JUnit, as the leader in the field of Java testing, has launched JUnit 5 version. Its main features are:
-
Provides new assertions and test annotations , supporting test class embedding
-
Richer testing methods: support dynamic testing, repeated testing, parameterized testing , etc.
-
Implemented modularization to decouple different modules such as test execution and test discovery, reducing dependencies
-
Provide support for Java 8, such as Lambda expressions, Sream API, etc.
Introduction to common usage of JUnit 5
Next, let's take a look at some common uses of JUnit 5 to help us quickly master the use of JUnit 5.
First, introduce the dependency coordinates of JUnit 5 into the Maven project. It should be noted that the current JDK environment must be Java 8 or above.
<dependency>
  <groupId>org.junit.jupiter</groupId>
  <artifactId>junit-jupiter-engine</artifactId>
  <version>5.5.2</version>
  <scope>test</scope>
</dependency>
<dependencyManagement>
<dependencies>
<dependency>
<groupId>org.junit.jupiter</groupId>
<artifactId>junit-jupiter-api</artifactId>
<version>${junit-jupiter.version}</version>
</dependency>
<dependency>
<groupId>org.junit.jupiter</groupId>
<artifactId>junit-jupiter-engine</artifactId>
<version>${junit-jupiter.version}</version>
</dependency>
</dependencies>
</dependencyManagement>First test case
Introducing JUnit 5, we can quickly write a simple test case and learn about JUnit 5 from this test case:
@DisplayName("我的第一个测试用例")
public class MyFirstTestCaseTest {

    @BeforeAll
    public static void init() {
        System.out.println("初始化数据");
    }

    @AfterAll
    public static void cleanup() {
        System.out.println("清理数据");
    }

    @BeforeEach
    public void tearup() {
        System.out.println("当前测试方法开始");
    }

    @AfterEach
    public void tearDown() {
        System.out.println("当前测试方法结束");
    }

    @DisplayName("我的第一个测试")
    @Test
    void testFirstTest() {
        System.out.println("我的第一个测试开始测试");
    }

    @DisplayName("我的第二个测试")
    @Test
    void testSecondTest() {
        System.out.println("我的第二个测试开始测试");
    }
}
Run this test case directly and you can see the console log as follows:

You can see that the test item name displayed in the results in the left column is the name we set using @DisplayName on the test class and method . This annotation was introduced by JUnit 5 and is used to define a test class and specify the display of use cases in the test report. Name, this annotation can be used on classes and methods. Using it on a class indicates that the class is a test class, and using it on a method indicates that the method is a test method.
@Target({ ElementType.TYPE, ElementType.METHOD })
@Retention(RetentionPolicy.RUNTIME)
@Documented
@API(status = STABLE, since = "5.0")
public @interface DisplayName {
	String value();
}
Let’s take a look at the pair of annotations ** @BeforeAll ** and @AfterAll used in the sample code . They define the operations of the entire test class before the start and end. They can only modify static methods and are mainly used during the test process. Initialization and cleanup of required global data and external resources. Different from them, the methods marked with @BeforeEach and @AfterEach will be executed before and at the end of each test case method, and are mainly responsible for the preparation and destruction of the running environment required by the test case.
In addition to these basic annotations during the testing process, there are more rich and powerful annotations. Let's learn one by one next.
Disable execution of tests: @Disabled
When we want to skip a certain test method when running a test class and run other test cases normally, we can use the @Disabled annotation to indicate that the test method is unavailable and will not be blocked when executing the test method of the test class. JUnit execution.
Let’s take a look at the running effect after using @Disbaled. Add the following code to the original test class:
@DisplayName("我的第三个测试")
@Disabled
@Test

void testThirdTest() {

System.out.println("我的第三个测试开始测试");

}
After running, you will see the console log as follows. Methods marked with @Disabled will not be executed, and only individual method information will be printed:

@Disabled can also be used on a class to mark all test methods under the class as not to be executed. It is generally used when combining tests on multiple test classes.
Embedded test class: @Nested
As the classes and codes we write gradually increase, more and more corresponding test classes will need to be tested. In order to solve the problem of the explosion in the number of test classes, JUnit 5 provides the @Nested annotation, which can logically group test case classes in the form of static internal member classes. And each static inner class can have its own life cycle methods, which will be executed in hierarchical order from outside to inside. Additionally, nested classes can also be marked with @DisplayName so that we can use the correct test name. Let’s take a look at the simple usage:
@DisplayName("内嵌测试类")
public class NestUnitTest {
    @BeforeEach
    void init() {
        System.out.println("测试方法执行前准备");
    }

    @Nested
    @DisplayName("第一个内嵌测试类")
    class FirstNestTest {
        @Test
        void test() {
            System.out.println("第一个内嵌测试类执行测试");
        }
    }

    @Nested
    @DisplayName("第二个内嵌测试类")
    class SecondNestTest {
        @Test
        void test() {
            System.out.println("第二个内嵌测试类执行测试");
        }
    }
}
After running all test cases, you can see the following results on the console:

Repeated testing: @RepeatedTest
In JUnit 5, there is new support for setting the number of runs for test methods, allowing test methods to be run repeatedly. When you want to run a test method N times, you can mark it with @RepeatedTest, as shown in the following code:
@DisplayName("重复测试")
@RepeatedTest(value = 3)
public void i_am_a_repeated_test() {
	System.out.println("执行测试");
}
After running, the test method will be executed three times. The running effect in IDEA is as shown in the figure below:

This is the basic usage. We can also modify the name of the repeatedly run test method and use the built-in variables provided by @RepeatedTest to use them as placeholders on its attributes. Let’s first look at the usage nameand effects:

The variable used within the @RepeatedTest annotation currentRepetitionrepresents the number of times it has been repeated, totalRepetitionsthe variable represents the total number of repetitions, and displayNamethe variable represents the display name of the test method. We can directly use these built-in variables to redefine the name of the test method when it is run repeatedly.
new assertion
In terms of assertion API design, JUnit 5 has made significant improvements and made full use of the new features of Java 8, especially Lambda expressions, and finally provided a new assertion class: org.junit.jupiter.api.Assertions . Many assertion methods accept Lambda expression parameters. One advantage of using Lambda expressions in assertion messages is that it is lazily evaluated. If the message construction is expensive, this can save time and resources to a certain extent.
Now you can also group multiple assertions within a method, using the assertAll method as follows:
@Test
void testGroupAssertions() {
    int[] numbers = {0, 1, 2, 3, 4};
    Assertions.assertAll("numbers",
            () -> Assertions.assertEquals(numbers[1], 1),
            () -> Assertions.assertEquals(numbers[3], 3),
            () -> Assertions.assertEquals(numbers[4], 4)
    );
}
If any assertion in the grouped assertion fails, a MultipleFailuresError error will be thrown.
Test for timeout operation: assertTimeoutPreemptively
When we want to test the execution time of a time-consuming method and do not want the test method to wait indefinitely, we can perform a timeout test on the test method. JUnit 5 introduces an assertion method for this, providing extensive support for timeouts assertTimeout.
Suppose we want the test code to be executed within one second, we can write the following test case:
@Test
@DisplayName("超时方法测试")
void test_should_complete_in_one_second() {
  Assertions.assertTimeoutPreemptively(Duration.of(1, ChronoUnit.SECONDS), () -> Thread.sleep(2000));
}
This test fails because code execution sleeps for two seconds, whereas we expect the test case to succeed in one second. But if we set the sleep time to one second, the test will still occasionally fail. This is because during the execution of the test method, in addition to the target code, there are additional codes and instructions that take time to execute, so there is no way to limit the timeout. to a completely exact match of the time parameters.
Exception test: assertThrows
Methods with exceptions in our code are usually captured and processed using try-catch. For testing code with exceptions thrown, JUnit 5 provides a method to test. The first parameter is the exception type, and the second parameter is the exception type Assertions#assertThrows(Class<T>, Executable). Each is a functional interface parameter, which is similar to the Runnable interface. It does not require parameters and has no returns. It supports the use of Lambda expressions. For specific usage, please refer to the code below:
@Test
@DisplayName("测试捕获的异常")
void assertThrowsException() {
  String str = null;
  Assertions.assertThrows(IllegalArgumentException.class, () -> {
    Integer.valueOf(str);
  });
}
When an exception occurs in the code in the Lambda expression, it will be compared with the exception type of the first parameter. If it does not belong to the same type of exception, a prompt similar to the following will be output to the console :org.opentest4j.AssertionFailedError: Unexpected exception type thrown ==> expected: <IllegalArgumentException> but was: <...Exception>
JUnit 5 Parameterized Testing
To use JUnit 5 for parameterized testing, in addition to the basic dependency of junit-jupiter-engine, you also need another module dependency: junit-jupiter-params , which mainly provides an API for writing parameterized tests. In the same way, introduce the corresponding dependencies of the same version into the Maven project:
<dependency>
  <groupId>org.junit.jupiter</groupId>
  <artifactId>junit-jupiter-params</artifactId>
  <version>5.5.2</version>
  <scope>test</scope>
</dependency>
Basic data source testing: @ValueSource
@ValueSource is the simplest data parameter source provided by JUnit 5. It supports Java's eight basic types and strings and Class. When used, it is assigned to the corresponding type attribute on the annotation and passed in an array. The sample code is as follows:
public class ParameterizedUnitTest {
    @ParameterizedTest
    @ValueSource(ints = {2, 4, 8})
    void testNumberShouldBeEven(int num) {
        Assertions.assertEquals(0, num % 2);
    }

    @ParameterizedTest
    @ValueSource(strings = {"Effective Java", "Code Complete", "Clean Code"})
    void testPrintTitle(String title) {
        System.out.println(title);
    }
}
@ParameterizedTest is a necessary annotation for parameterized testing, replacing the @Test annotation. Any parameterized test method needs to be marked with this annotation.
Run the test, and the results are as shown in the figure below. The target method will be run for each parameter in @ValueSource. Once a parameter fails to run the test, it means that the test method fails.

CSV data source test: @CsvSource
Through @CsvSource, you can inject a set of data in the specified CSV format (comma-separated-values), and use each comma-separated value to match the parameters corresponding to a test method. The following is an example of use:
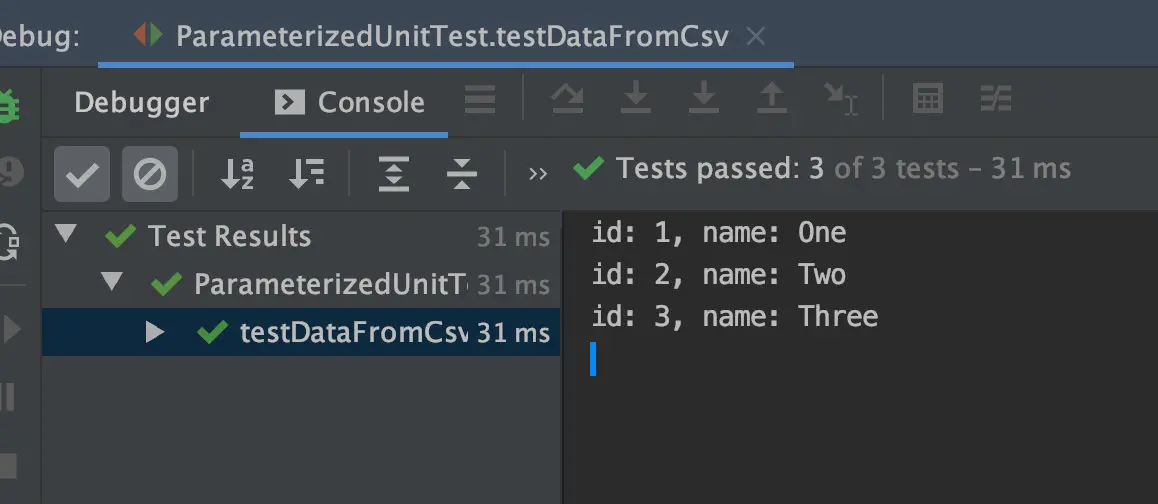
@ParameterizedTest
@CsvSource({"1,One", "2,Two", "3,Three"})
void testDataFromCsv(long id, String name) {
	System.out.printf("id: %d, name: %s", id, name);
}
The running results are as shown in the figure. In addition to separating parameters with commas, @CsvSource also supports custom symbols. Just modify its delimiter. The default is ,.
JUnit also provides a way to read external CSV format file data as a data source implementation. We only need to use @CsvFileSource to specify the resource file path. It is as simple to use as @CsvSource and will not be repeated here.
The resource file path specified by @CsvFileSource must
/start with and search for files in the current test resource directory.
In addition to the three data source methods mentioned above, JUnit also provides the following three data sources:
- @EnumSource : Allows us to pass in parameter values to the specified Enum enumeration type to construct a specific value in the enumeration type.
- @MethodSource : Specify a method that returns a Stream/Array/Iterable object as the data source. Note that this method must be static and cannot accept any parameters.
- @ArgumentSource : Use the parameter class that implements the ArgumentsProvider interface as a data source. Overriding its
provideArgumentsmethod can return a custom type of Stream<Arguments>, which can be used as data required by the test method.
Students who are interested in the above three data source annotations can refer to the ParameterizedUnitTest class of the sample project, which will not be introduced one by one here.
Conclusion
By now, you must have a basic understanding and mastery of JUnit 5. It is said that unit testing is an essential part of improving software quality and improving R&D efficiency. Start by being able to write unit tests with JUnit 5 and develop the habit of writing test code. Improve your own development efficiency through continuous practice, so that the code you write has a better quality guarantee.