Some problems you may encounter when using Server
- 1. How to find the relationship between GPU model and driver version?
- 2. How to check the current server kernel version?
- 3. Commands that may be used when using Nvidia
- 4. Some configurations of Jupyter Notebook
- 5. General operations of TensorFlow
- 6. Some operations using PyTorch
- 7. Modify the installation source to a domestic address
1. How to find the relationship between GPU model and driver version?
When installing a new CUDA driver, you need to find the driver version corresponding to the current GPU, which can be https://www.nvidia.com/Download/Find.aspx?lang=en-usobtained by logging in. The login interface is as follows:
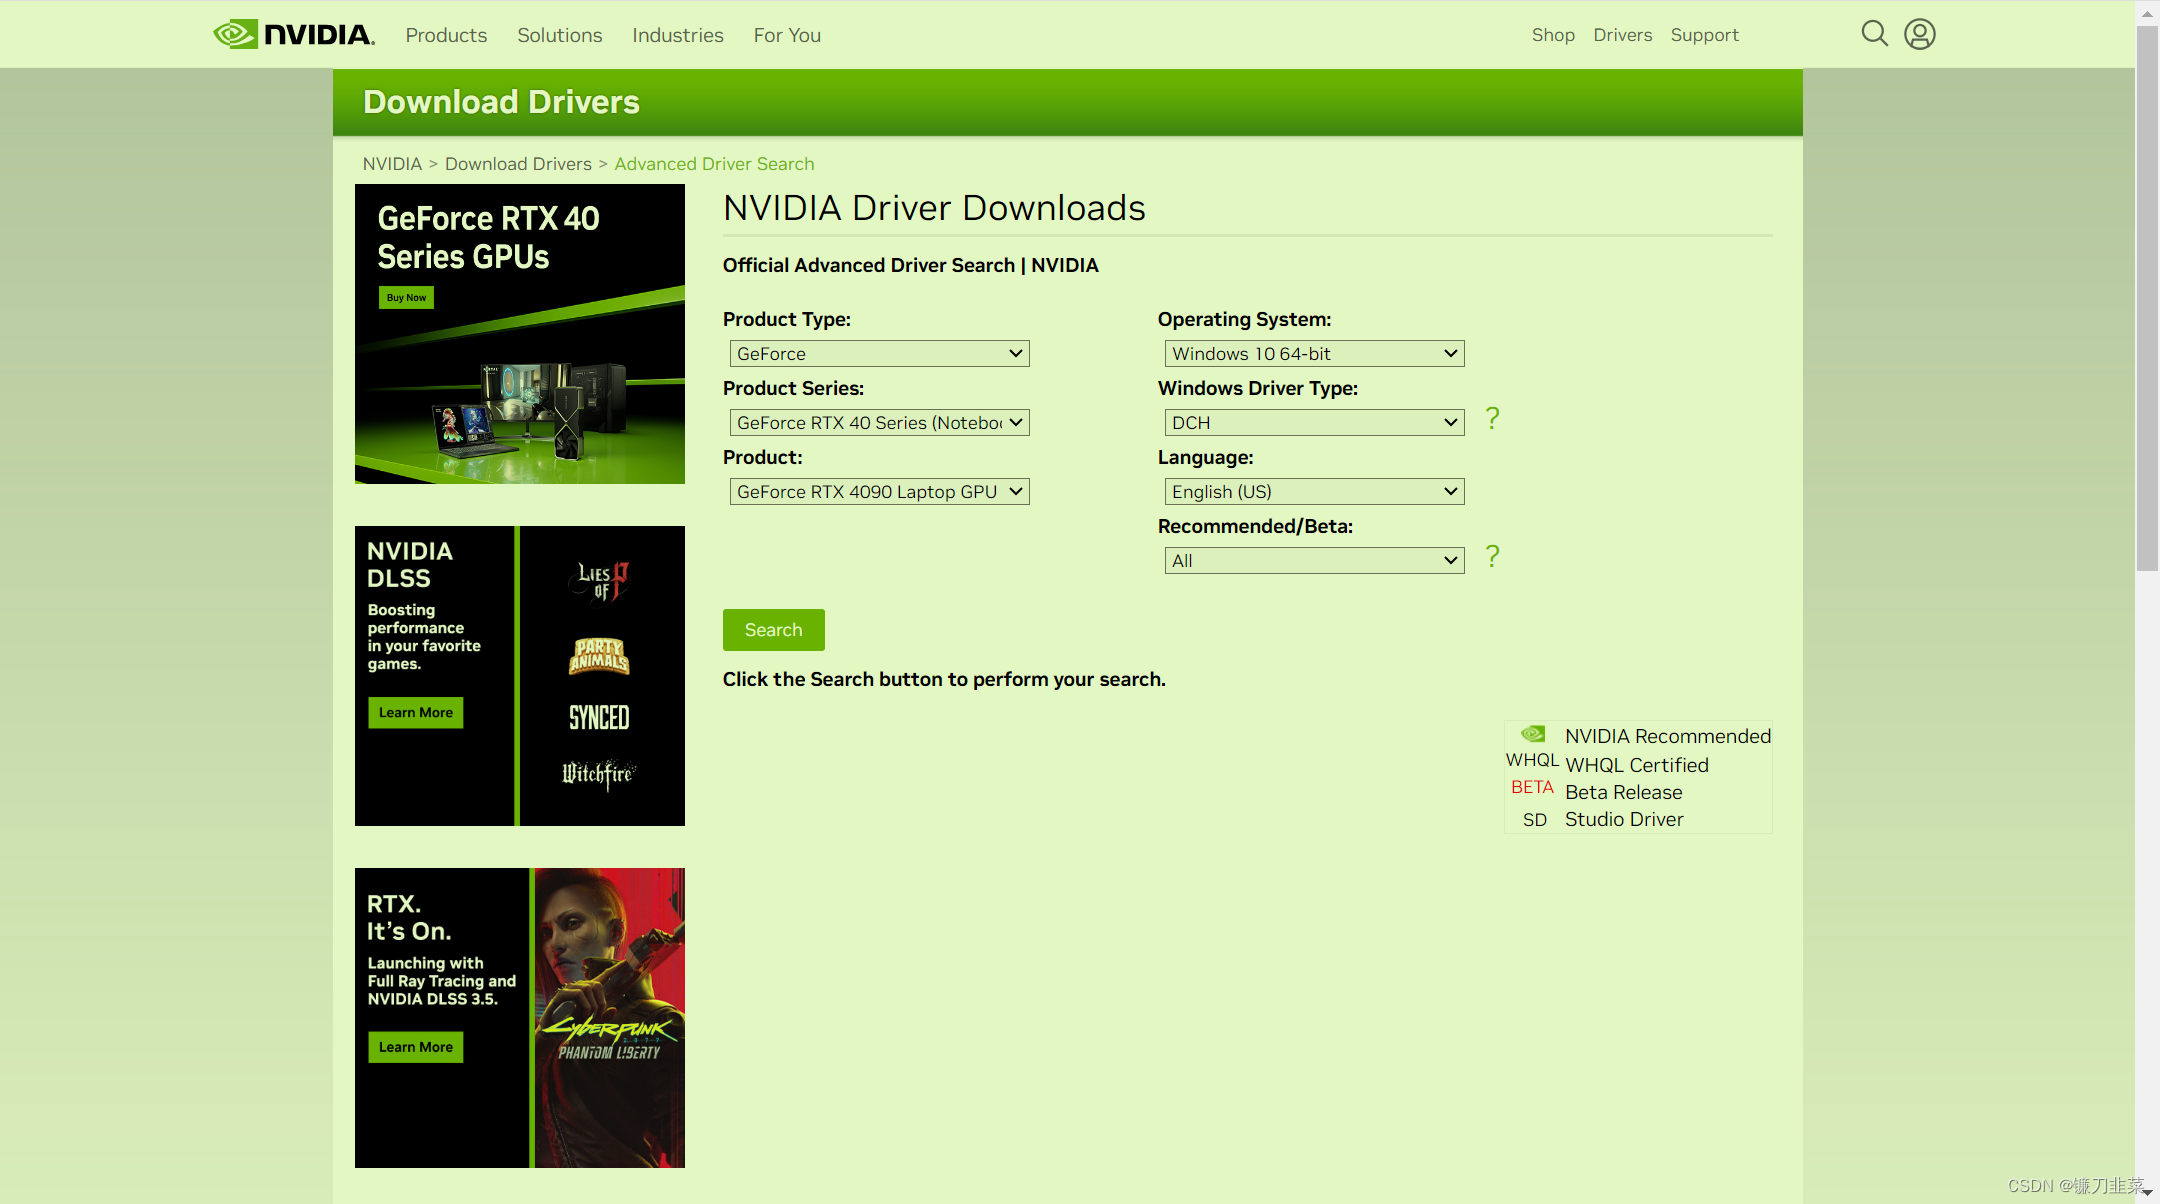
enter the corresponding GPU model to obtain the corresponding driver.
2. How to check the current server kernel version?
1) View the kernel list:
$ sudo dpkg --get-selections | grep linux-image
linux-image-5.0.0-23-generic                    deinstall
linux-image-5.0.0-25-generic                    deinstall
linux-image-5.0.0-27-generic                    deinstall
linux-image-5.0.0-29-generic                    deinstall
linux-image-5.0.0-31-generic                    deinstall
linux-image-5.0.0-32-generic                    deinstall
2) Check the currently used kernel version:
$ uname -r
5.4.0-146-generic
3) Delete non-currently used kernels:
$ sudo apt-get remove linux-image-***-generic
3. Commands that may be used when using Nvidia
1) Check the basic information of the graphics card
$ nvidia-smi
Tue Sep  5 23:43:55 2023
+-----------------------------------------------------------------------------+
| NVIDIA-SMI 470.182.03   Driver Version: 470.182.03   CUDA Version: 11.4     |
|-------------------------------+----------------------+----------------------+
| GPU  Name        Persistence-M| Bus-Id        Disp.A | Volatile Uncorr. ECC |
| Fan  Temp  Perf  Pwr:Usage/Cap|         Memory-Usage | GPU-Util  Compute M. |
|                               |                      |               MIG M. |
|===============================+======================+======================|
|   0  NVIDIA TITAN X ...  Off  | 00000000:02:00.0 Off |                  N/A |
| 26%   46C    P8    11W / 250W |      0MiB / 12196MiB |      0%      Default |
|                               |                      |                  N/A |
+-------------------------------+----------------------+----------------------+
|   1  NVIDIA TITAN X ...  Off  | 00000000:03:00.0 Off |                  N/A |
| 30%   52C    P8    12W / 250W |      0MiB / 12196MiB |      0%      Default |
|                               |                      |                  N/A |
+-------------------------------+----------------------+----------------------+
|   2  NVIDIA TITAN X ...  Off  | 00000000:82:00.0 Off |                  N/A |
| 34%   58C    P8    15W / 250W |      0MiB / 12196MiB |      0%      Default |
|                               |                      |                  N/A |
+-------------------------------+----------------------+----------------------+
|   3  NVIDIA TITAN X ...  Off  | 00000000:83:00.0 Off |                  N/A |
| 32%   55C    P8    13W / 250W |      0MiB / 12196MiB |      0%      Default |
|                               |                      |                  N/A |
+-------------------------------+----------------------+----------------------+

+-----------------------------------------------------------------------------+
| Processes:                                                                  |
|  GPU   GI   CI        PID   Type   Process name                  GPU Memory |
|        ID   ID                                                   Usage      |
|=============================================================================|
|  No running processes found                                                 |
+-----------------------------------------------------------------------------+
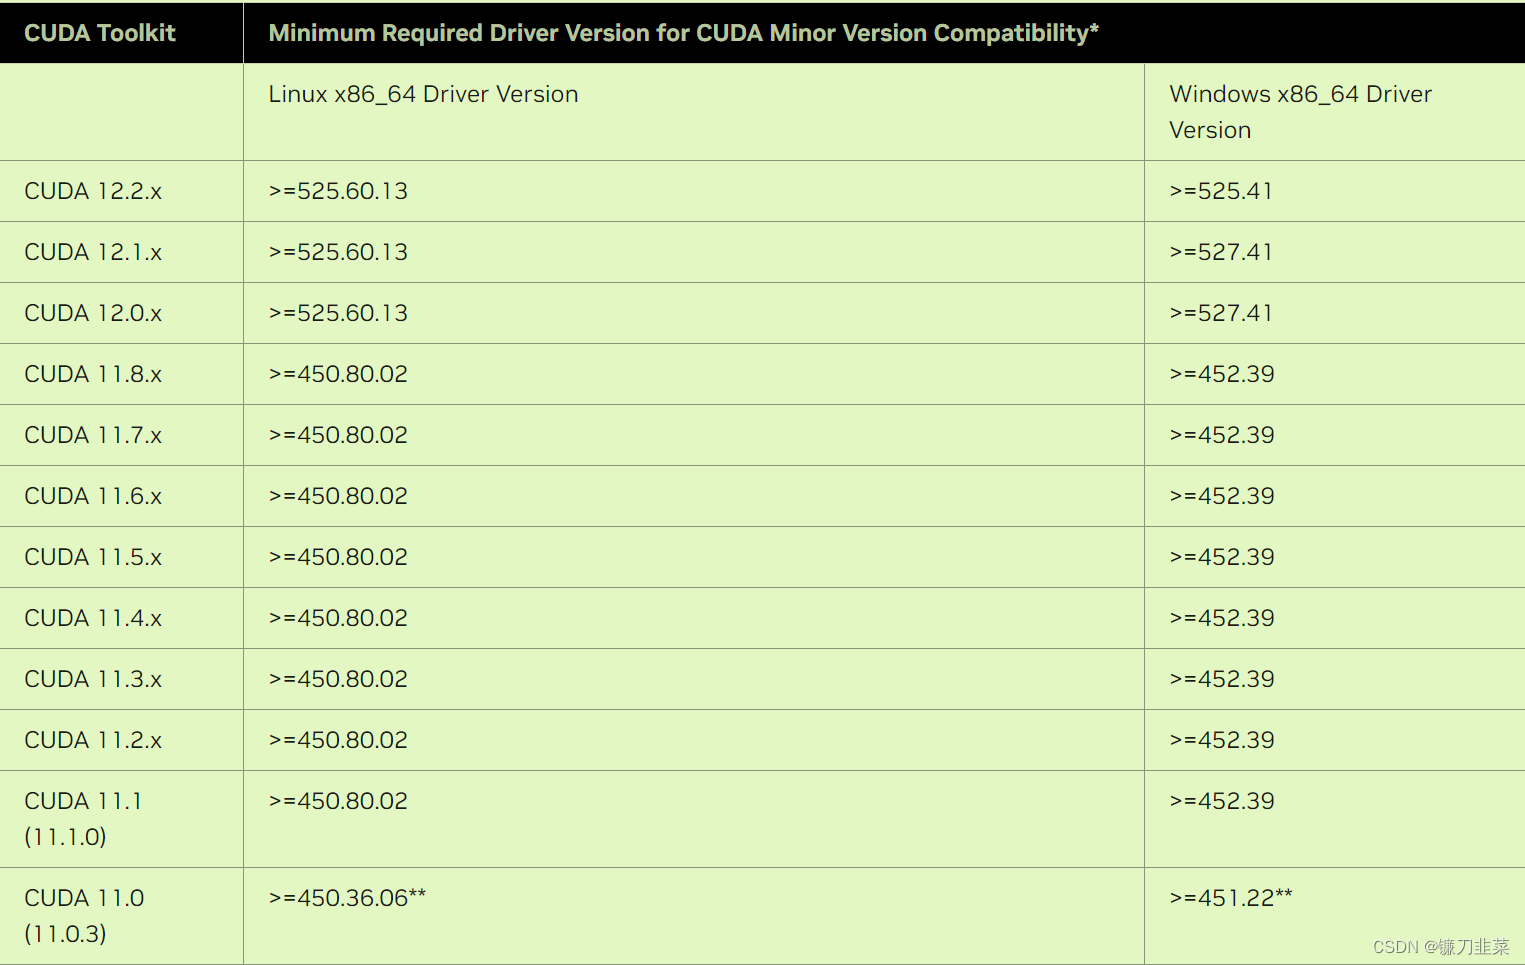
2) The corresponding relationship between Nvidia driver and CUDA runtime version
can be checked through Nvidia official website, the address is: https://docs.nvidia.com/cuda/cuda-toolkit-release-notes/index.html. The correspondence between its latest driver and CUDA runtime version is as follows:
3) Use conda to install TensorFlow.
When using Conda to install Tensorflow-GPU, it will automatically download dependencies, such as the most important CUDA and cuDNN.
Find the TensorFlow package:
$ conda search tensorflow
Install TensorFlow-GPU 2.4.1
$ conda install tensorflow-gpu=2.4.1
4) Use pip to install TensorFlow
and install cudatookit:
$ pip install cudatoolkit==11.8.0
Install cudnn:
$ pip install cudnn
Install TensorFlow-GPU 2.4.1:
$ pip install tensorflow-gpu==2.4.1
The specific version will be adapted according to the actual situation! ! !
4. Some configurations of Jupyter Notebook
Some configurations of Jupyter Notebook can facilitate our code development work.
1) Generate configuration file
$ jupyter notebook --generate-config
The file will be generated in the current user directory: .jupyter/jupyter_notebook_config.py
2) Generate the current user login password.
Open ipython and create a ciphertext password:
$ ipython
Python 3.8.16 (default, Mar  2 2023, 03:21:46)
Type 'copyright', 'credits' or 'license' for more information
IPython 8.12.2 -- An enhanced Interactive Python. Type '?' for help.

In [1]:from notebook.auth import passwd
In [2]:passwd()
Enter password:
Verify password:
3) Modify the configuration file.
Modify the configuration file as follows:
$ vim ~/.jupyter/jupyter_notebook_config.py
c.NotebookApp.ip = '*'  # 设置所有ip皆可访问
c.NotebookApp.password = u'argon2:$argon....'   # 粘贴上一步生成的密文
c.NotebookApp.open_browser = False  # 禁止自动打开浏览器
c.NotebookApp.port = 8899  # 指定端口
4) Start jupyter notebook.
It is best to start it in the background without recording logs:
$ nohup jupyter notebook >/dev/null 2>&1 &
Then you can enter http://YOUIP:port in the browser to enter the jupyter notebook interface:

5. General operations of TensorFlow
1) Verify whether TensorFlow installation is successful:
$ python
Python 3.8.16 (default, Mar  2 2023, 03:21:46)
[GCC 11.2.0] :: Anaconda, Inc. on linux
Type "help", "copyright", "credits" or "license" for more information.
>>> import tensorflow as tf
2023-09-06 00:18:25.800736: I tensorflow/core/platform/cpu_feature_guard.cc:182] This TensorFlow binary is optimized to use available CPU instructions in performance-critical operations.
To enable the following instructions: AVX2 FMA, in other operations, rebuild TensorFlow with the appropriate compiler flags.
2023-09-06 00:18:28.733394: W tensorflow/compiler/tf2tensorrt/utils/py_utils.cc:38] TF-TRT Warning: Could not find TensorRT
>>> print(tf.__version__)
2.12.0
>>> print(tf.test.is_gpu_available())
WARNING:tensorflow:From <stdin>:1: is_gpu_available (from tensorflow.python.framework.test_util) is deprecated and will be removed in a future version.
Instructions for updating:
Use `tf.config.list_physical_devices('GPU')` instead.
2023-09-06 00:19:04.284931: W tensorflow/core/common_runtime/gpu/gpu_device.cc:1956] Cannot dlopen some GPU libraries. Please make sure the missing libraries mentioned above are installed properly if you would like to use GPU. Follow the guide at https://www.tensorflow.org/install/gpu for how to download and setup the required libraries for your platform.
Skipping registering GPU devices...
False
>>> print(tf.config.list_physical_devices('GPU'))
2023-09-06 00:19:26.509357: W tensorflow/core/common_runtime/gpu/gpu_device.cc:1956] Cannot dlopen some GPU libraries. Please make sure the missing libraries mentioned above are installed properly if you would like to use GPU. Follow the guide at https://www.tensorflow.org/install/gpu for how to download and setup the required libraries for your platform.
Skipping registering GPU devices...
[]
If normal execution is successful, the currently available GPU number is returned. Apparently there is a problem here, some libraries are missing.
Note: It is recommended to use conda to install TensorFlow.
6. Some operations using PyTorch
1) Log in to the PyTorch official website and select the installation configuration.
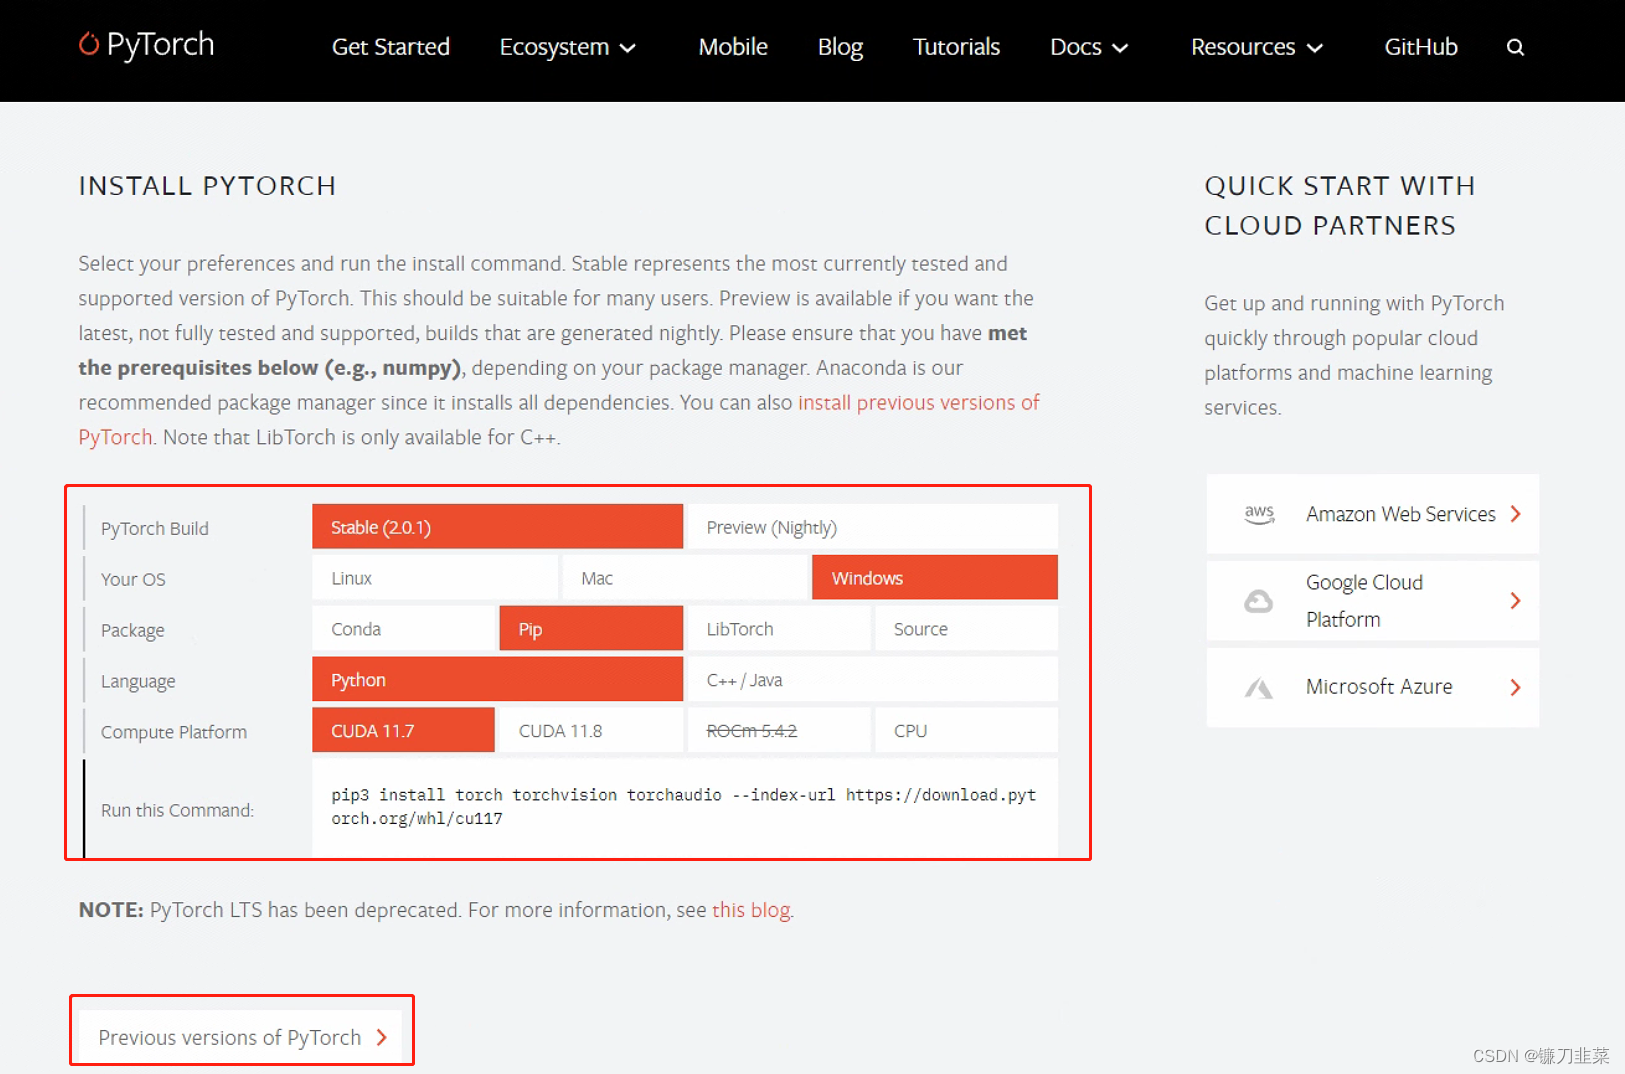
You can choose the latest version, or follow the link below to choose the older version.
2) Install using CUDA.
Here we choose to install the v1.13.0 PyTorch GPU version based on the CUDA version.
# CUDA 11.6
conda install pytorch==1.13.0 torchvision==0.14.0 torchaudio==0.13.0 pytorch-cuda=11.6 -c pytorch -c nvidia
If it cannot be executed or the download is very slow, you can remove -c pytorchit because -cthe parameter specifies the channel for downloading PyTorch, which has a higher priority than domestic mirrors.
3) Install using pip
# CUDA 11.6
pip install torch==1.13.0+cu116 torchvision==0.14.0+cu116 torchaudio==0.13.0 --extra-index-url https://download.pytorch.org/whl/cu116
5) Verify whether the installation is successful
>>> import torch
>>> print(torch.__version__)
2.0.1+cu117
>>> print(torch.cuda.is_available())
True
7. Modify the installation source to a domestic address
1) Modify the conda installation source to Tsinghua source
. Create a file in the user's current directory .condarc, and then put the following content into the file:
channels:
  - defaults
show_channel_urls: true
default_channels:
  - https://mirrors.tuna.tsinghua.edu.cn/anaconda/pkgs/main
  - https://mirrors.tuna.tsinghua.edu.cn/anaconda/pkgs/r
  - https://mirrors.tuna.tsinghua.edu.cn/anaconda/pkgs/msys2
custom_channels:
  conda-forge: https://mirrors.tuna.tsinghua.edu.cn/anaconda/cloud
  msys2: https://mirrors.tuna.tsinghua.edu.cn/anaconda/cloud
  bioconda: https://mirrors.tuna.tsinghua.edu.cn/anaconda/cloud
  menpo: https://mirrors.tuna.tsinghua.edu.cn/anaconda/cloud
  pytorch: https://mirrors.tuna.tsinghua.edu.cn/anaconda/cloud
  pytorch-lts: https://mirrors.tuna.tsinghua.edu.cn/anaconda/cloud
  simpleitk: https://mirrors.tuna.tsinghua.edu.cn/anaconda/cloud
  deepmodeling: https://mirrors.tuna.tsinghua.edu.cn/anaconda/cloud/
2) Modify the pip installation source
and select the Tsinghua source here.
Temporary use: pip install -i https://pypi.tuna.tsinghua.edu.cn/simple some-package
Set as default:
python -m pip install --upgrade pip
pip config set global.index-url https://pypi.tuna.tsinghua.edu.cn/simple