How to use common operating system commands
1. Remote
Log in
method one
ssh [ 远程主机用户名] @ [远程服务器主机名或IP地址] -p port
The port can be the default (-p specifies the port).
Method 2
ssh -l [远程主机名用户] [远程服务器主机名或IP 地址] -p root
------------------------------------------------------------
-l :指定登录名称
-p:指定登录端口(等服务的端口非默认时,需要使用-p指定端口进行登录)
SSH (remote login) service for linux
Upload files, download files
# 下载文件 (如果操作的是文件夹则必须加上-r)
scp -r 目标用户名@目标主机IP地址:/目标文件的绝对路径  /保存到本机的绝对/相对路径

# 上传文件
cp -r 本地要上传的文件名  用户名@ip:要上传到到远程的路径

-------------------------------------------------------------
举例:
scp -r [email protected]:/home/mydir/ ./lili/test

在后续会提示输入“yes”此时,只能输“yes”而不能简单输入“Y”
2. Addition, deletion and modification of files
mkdir – Create directory
mkdir 文件名

mkdir -p 文件名  //递归创建,若上级目录不存在,会按目录层级自动创建目录
rmdir – remove empty directories
rmdir 目录名
rm – delete files
rm -rf 文件或目录
------------------
-r 删除目录
-f 强制执行
touch - create new file
touch 文件名
3. Copy
cp – copy a file or directory
cp -rp 原文件或目录+要复制到的目录
-------------------------------------
-r 表示复制的是目录
-p 表示保留文件属性
若要改名,名字加在要复制到的目录后面即可
若此时已在当前目录下,则文件路径可不写,但要复制的文件和要复制到的位置要写
mv – cut files and rename them
mv 原文件或目录+目标目录  //剪切

mv 文件名+更改名
4. Decompression
gzip/gunzip – compress/decompress .gz compressed files
gzip 文件

gunzip 压缩文件
tar – packaging directory
tar 选项[-zcf]+压缩后的文件名称+压缩前的文件名
---------------------------------------------------
	-c	打包
	-v	显示详细信息
	-f	指定文件名
	-z	打包同时压缩
--------------------------------------------------
tar 选项[-zcf]+压缩后的文件名称+压缩前的文件名  //解压缩
	-x	解包
	-v	显示详细信息
	-f	指定解压文件
	-z	解压缩
zip/unzip – compress a file or directory/unzip a .zip compressed file
zip 选项[-r] 压缩后文件名+文件或目录

unzip 选项[-r] 压缩后文件名+文件或目录
-----------------------------------
	-r	压缩目录
bzip2/bunzip2 – compress/decompress files
bzip2 选项[-k][文件]
---------------------------------
		-k 产生压缩文件后保留原文件
----------------------------------

bunzip2 选项[-k] 压缩文件
--------------------------------
		-k 解压缩后保留原文件
5. View system resources
1. Top View process status
2. vmstat – virtual memory statistics
This is virtual memory statistics. You can also check the status of CPU, process, memory, virtual memory, and hard disk IO.

| Field | illustrate |
|---|---|
| procs process information | r represents the number of processes waiting to run. The larger the system is, the busier it is. b represents the number of processes that cannot be awakened. The larger it is, the busier the system is. |
| memory information: | Swap memory, free memory, buff buffer, cache cache capacity, the unit is KB |
| swap information: | si is the amount of data exchanged from disk to memory, so is the amount of data exchanged from memory to disk, in KB. The larger the number, the worse the performance. Operation and maintenance must frequently exchange data between disk and memory. |
| io information: | The amount of data read from the bi block device and written to the block device by bo. The larger the amount, the busier the IO will be. |
| system information: | in represents the number of interrupted processes per second, and cs is the number of event switches per second. The larger the number, the busier the communication between the system and the interface device. |
| cpu field | us non-kernel process cpu occupancy, sy kernel occupancy, id idle cpu, wa waiting for io, st virtual machine cpu occupancy |
3、free -h
Check the memory usage.

The parameters here are similar to those introduced in top above, except that a -h parameter is added for easier viewing.
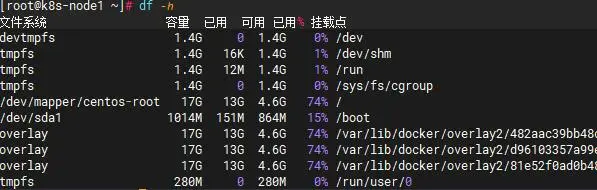
4、df -h
Here is the view of disk usage
5. Check the folder size
du -sh * View the file size in the current path

6. View port
lsof -I :端口号
ss -nplt
netstat -anp
7. Check the process ps
ps -ef
ps aux(a代表所有进程、u显示归属用户以及内存使用、x显示没有控制端的进程、-e显示所用进程、-l长格式显示详细信息)
-------------------------------------------------------------
这里uid就是那个用户、pid就是进程的id、ppid父进程id、tty就是那个终端运行,rss实际占用物理内存大小,vsz就是虚拟内存、Time进程占用cpu时间、stat进程状态,start进程启动时间、time进程占用cpu运算时间,command运行进程的命令。
6. Network management
ifconfig – View and set network card information
ifconfig 网卡名称+IP地址
traceroute – displays the path of a packet to a host
如果在某个节点断了,则在该节点出了问题
traceroute www.baidu.com
netstat - displays network related information
netstat 选项
-----------------------------------------------
		-t	TCP协议
		-u	UDP协议
		-l	监听
		-r	路由
		-n	显示IP地址和端口号
setup – change IP
mount - mount command
mount -t 文件系统+设备文件名+挂载点
7. Service start and stop commands
self start
1. Directly modify the configuration file and add the boot file in the configuration file:
/etc/rc.local
/etc/rc.d/rc.local
#如:通过修改文件 /etc/rc.local(或者/etc/rc.d/rc.local)
# 1.编辑rc.local文件
vi /etc/rc.local

# 2.修改rc.local文件,在 exit 0 前面加入以下命令。保存并退出。
/etc/init.d/mysqld start                    # mysql开机启动
/etc/init.d/nginx start                     # nginx开机启动
supervisord -c /etc/supervisor/supervisord.conf         # supervisord开机启动
/bin/bash /server/scripts/test.sh >/dev/null 2>/dev/null

# 3.最后修改rc.local文件的执行权限
chmod +x /etc/rc.local
chmod 755 /etc/rc.local
2. Place the files that need to be started under the startup reading directory of the os.
# 1.将(脚本)启动文件移动到 /etc/init.d/或者/etc/rc.d/init.d/目录下。(前者是后者的软连接)
mv /www/wwwroot/test.sh /etc/rc.d/init.d
3. Set through chkconfig command
# 1.将(脚本)启动文件移动到 /etc/init.d/或者/etc/rc.d/init.d/目录下。(前者是后者的软连接)
mv /www/wwwroot/test.sh /etc/rc.d/init.d

# 2.启动文件前面务必添加如下三行代码,否侧会提示chkconfig不支持。
#!/bin/sh             告诉系统使用的shell,所以的shell脚本都是这样
#chkconfig: 35 20 80        分别代表运行级别,启动优先权,关闭优先权,此行代码必须
#description: http server     自己随便发挥!!!,此行代码必须
/bin/echo $(/bin/date +%F_%T) >> /tmp/test.log

# 3.增加脚本的可执行权限
chmod +x /etc/rc.d/init.d/test.sh

# 4.添加脚本到开机自动启动项目中。添加到chkconfig,开机自启动。
 cd /etc/rc.d/init.d
 chkconfig --add test.sh
 chkconfig test.sh on

# 5.关闭开机启动
 chkconfig test.sh off

# 6.从chkconfig管理中删除test.sh
 chkconfig --del test.sh

# 7.查看chkconfig管理
 chkconfig --list test.sh
4. Customize the service file, add it to the system service, and manage it through Systemctl
1. Write the service file
格式如下:
[Unit]:服务的说明
Description:描述服务
After:描述服务类别

[Service]服务运行参数的设置
Type=forking      是后台运行的形式
ExecStart        为服务的具体运行命令
ExecReload       为服务的重启命令
ExecStop        为服务的停止命令
PrivateTmp=True     表示给服务分配独立的临时空间
注意:启动、重启、停止命令全部要求使用绝对路径
2. The file is saved in the directory: with 754 permissions. Directory path: /usr/lib/systemd/system.
如上面的supervisord.service文件放在这个目录下面。
cat /usr/lib/systemd/system/nginx.service
cat /usr/lib/systemd/system/supervisord.service
3. Set up auto-start at boot (execute in any directory)
If an error is reported when executing the startup command, execute: systemctl daemon-reload
设置开机自启动
systemctl enable nginx.service
systemctl enable supervisord

停止开机自启动
systemctl disable nginx.service
systemctl disable supervisord

验证一下是否为开机启动
systemctl is-enabled nginx
systemctl is-enabled supervisord
4.Service file example:
# supervisord.service进程管理服务文件
[Unit]
Description=Process Monitoring and Control Daemon  # 内容自己定义:Description=Supervisor daemon
After=rc-local.service nss-user-lookup.target

[Service]
Type=forking
ExecStart=/usr/bin/supervisord -c /etc/supervisor/supervisord.conf
ExecStop= /usr/bin/supervisorctl shutdown
ExecReload=/usr/bin/supervisorctl reload
Restart=on-failure
RestartSec=42s
KillMode=process

[Install]
WantedBy=multi-user.target

# nginx.service服务文件
[Unit]
Description=nginx - high performance web server
After=network.target remote-fs.target nss-lookup.target

[Service]
Type=forking
ExecStart=/usr/local/nginx/sbin/nginx -c /usr/local/nginx/conf/nginx.conf
ExecReload=/usr/local/nginx/sbin/nginx -s reload
ExecStop=/usr/local/nginx/sbin/nginx -s stop

[Install]
WantedBy=multi-user.target

# redis.service服务文件
[Unit]
Description=Redis
After=network.target remote-fs.target nss-lookup.target

[Service]
Type=forking
ExecStart=/usr/local/bin/redis-server /etc/redis.conf
ExecStop=kill -INT `cat /tmp/redis.pid`
User=www
Group=www

[Install]
WantedBy=multi-user.target
Power on and off again
1. Shutdown command
1.halt:立刻关机

2.poweroff:立刻关机

3.shutdown -h now:立刻关机(root用户使用)

4.shutdown -h 10:10分钟后自动关机

注:若使用shutdown命令设置关机,可以使用shutdown -c命令取消关机
2. Restart command
1.reboot:立刻重启

2.shutdown -r now:立刻重启

3.shutdown -r 10:10分钟自动重启(root用户使用)

4.shutdown -r 23.25 :在时间为23.23时候重启(root用户使用特定时间重启)

注:若使用shutdown命令设置关机,可以使用shutdown -c命令取消重启
3. Specific instructions
1.shutdown - the safest shutdown command. Shutdown and restart are completed through the combination of parameters -h or -r. It should be noted that this command can only be used with root user permissions.
2.halt - the simplest shutdown command. When Halt is executed, it will kill the application process, execute the sync system call, and stop the kernel after the file system write operation is completed.
3.poweroff - the most commonly used shutdown command
4.reboot——restart command
5.init——init 0 means shutdown; init 1 means restart
- How to output the query results of a certain command to a file, the method is: add after the command
>
> 文件全路径名
# 比如通过ls指令查看/users/ems目录下的所有文件及目录名称,
# 并将该ls指令查询结果输出到/users/ems/ls.txt文件中保存。该方法为:
ls /users/ems  >/users/ems/ls.txt
- View the home directory of a user: After logging in to the operating system as the user, enter cd ~ or cd, and then enter pwd
cd ~
cd
pwd
- ls command:
ls(选项)(参数)
----------------------------------------------------
常用组合
[1]查看文件详情:ls -l 或 ll
[2]增强对文件大小易读性,以人类可读的形式显示文件大小: ls -lh
[3]对文件或者目录进行从大到小的排序: ls -lhs
[4]查看当前目录下的所有文件或者目录,包括隐藏文件: ls -la
[5]只查看当前目录下的目录文件: ls -d
[6]按照时间顺序查看,从上到倒下时间越来越近: ls -ltr
[7]查看文件在对应的inode信息:ls -li
Example:
Use the ems user to log in to the operating system, and then use the ls command and the corresponding command parameters in the ems home directory to achieve: View all hidden directories and files in the current directory. The viewing results are arranged in positive/reverse order according to the file modification time. View Permissions, size, modification time and other attributes of files and directories.
Complete command executed: ls -lhatr.
Screenshot of the result: