Table of contents
(3) Story 2 (Closed operation):
overview:
As we all
know , computer vision (Computer Version short for CV) is a major research direction in the development of artificial intelligence and robotics technology today , and opencv is a third-party library that specifically provides technical and functional support for computer vision programming. , is naturally a content that needs to be focused on.
In this issue, we will first talk about the relevant principles and function analysis of the opening and closing operations of images , and demonstrate some classic cases for your reference.
Without further ado, I am Kamen Black , let’s start today’s study!
Text part:

print("祝大家每天快乐,love and peace!")Principles and functions:
——First glimpse into the doorway
Principle analysis:
In fact, we implement opening and closing operations mainly through two wonderful functions: dilate and its brother erode .
Among them, dilate is used for morphological expansion of images , while erode is used for morphological erosion of images . Analogous to our metaphor from the previous issue, the effect of dilate is equivalent to a heavy downpour , while the effect of erode is equivalent to a continuous drought .
That is to say:
The function of dilate visualization is to grow the pixels of the image outward to achieve the purpose of increasing the area;
The function of erode visualization is to degrade the pixels of the image inward to achieve the effect of area reduction.
But to study the principles of expansion and corrosion in detail, we need to understand the two most critical concepts: structural elements and anchor points .
(1) Structural element - equivalent to a mask (can also be understood as a window ), it can slide on the manipulated image , and can select a part of the pixel frame of the manipulated image at each moment . Structural elements are usually rectangular and can vary in length and width.
(2) Anchor point - for structural elements. As the name suggests, the structural element is like an anchor. The point that fixes the center of gravity is the connection position between the structural element and the manipulated image. By default, the anchor point is the center point on the shape of the structural element . The anchor point selection method will be introduced in the function analysis below.
After understanding these two concepts, we can simply explain the operating principles of expansion and corrosion ( hereinafter, the operated image is called A, and the operated image is B, to avoid complicated text ):
(1) Erosion - perform frame selection processing on a pixel of A and the structural element, that is, the anchor point of the structural element coincides with a pixel of A, and then observe the pixels of all the pixels of A selected by the mask frame of the structural element. Pixel value, take the minimum value as the pixel value of this pixel of B. Implement the above operations for each pixel of A to generate B.
The formula expression is:
Among them, dst(x,y) represents the pixel value of the pixel with coordinates (x,y) in B;
element(x,y) represents the structural element (in fact, it can be expressed directly as element. The structural element itself has nothing to do with each pixel, and (x,y) is added just to make it more vivid);
(x',y') represents the coordinates of each position in the structural element relative to the anchor point. For example, the coordinates of the anchor point are (0,0), and the coordinates 2 rows below and 3 columns above the anchor point are (2,-3 );
src(x+x',y+y') represents the pixel value of the pixel with coordinates (x+x',y+y') in A;
min means taking the minimum value.
(2) Expansion - Perform a frame selection process on a pixel of A and a structural element, that is, overlap the anchor point of the structural element with a pixel of A, and then observe the pixels of all A pixels selected by the mask frame of the structural element. Pixel value, take the maximum value as the pixel value of this pixel of B. Implement the above operations for each pixel of A to generate B.
The formula expression is:
Among them, dst(x,y) represents the pixel value of the pixel with coordinates (x,y) in B;
element(x,y) represents the structural element (in fact, it can be expressed directly as element. The structural element itself has nothing to do with each pixel, and (x,y) is added just to make it more vivid);
(x',y') represents the coordinates of each position in the structural element relative to the anchor point. For example, the coordinates of the anchor point are (0,0), and the coordinates 2 rows below and 3 columns above the anchor point are (2,-3 );
src(x+x',y+y') represents the pixel value of the pixel with coordinates (x+x',y+y') in A.
max means taking the maximum value.
After understanding the operating principle, there are still a few points that need to be briefly explained to resolve future doubts of readers in advance:
(1) Calculation method of center point coordinates : If the number of rows and columns of a structural element is an odd number, then the center point must be easy to find, but what if the number of rows or columns is an even number? At this time, take the number of rows as an example. If the total number of rows of structural elements is an even number, then the number of rows where the center point is located can be calculated as follows: Total number of rows/2+1, which is the number of rows where the center point is located. The same goes for the number of columns. Note: Here, the first digit of the row number (column number) is 1, not 0.
In fact, regardless of whether the number of rows (number of columns) is an odd or even number, it can be calculated using this formula:
Among them, the ceil function means rounding the operand upward. For example, for operands in the range of (2,3], the result of the ceil function is always 3.
(2) The selection range of the structural element exceeds the manipulated image : the structural element slides on the manipulated image. If it does not exceed the range, the pixel value of the manipulated image can be calculated according to the formula. But what if it exceeds the manipulated image? At this time, there are two situations: one is the situation where the boundary is not expanded, and the other is the situation where the boundary is expanded.
① The case of unexpanded boundaries : We directly do not consider the situation outside the operated image, only the situation within the range. If it is an erosion operation, only the minimum value among the framed pixel values in the operated image is considered; if it is a dilation operation, only the maximum value among the framed pixel values in the operated image is considered.
② The situation when the boundary is expanded: If the boundary is expanded, the value of the expanded boundary must be considered and the operation shall be performed according to the corresponding situation . For example, if the expanded border type (borderType, described below) is cv2.BORDER_CONSTANT, and the expanded value (borderValue, also described below) is 0, it is equivalent to a circle around the manipulated image. Another circle of 0 (
the magic of love goes around in circles). As long as the area can be selected by the mask and is outside the range, the pixel value must be displayed as 0. If the expansion value is 3, it is 3 that goes around again and again.
Visual display:
Using only words may still seem too abstract, so let’s give a more intuitive explanation through graphics:
(1) The structural elements are as shown on the right:  , by default the anchor point is at the center point. According to our center point coordinate calculation method, its center point is below
The position of the diagonal cross in the figure is:  .
.
(2) The operated image is as shown on the right:  .
.
(3) Image display after the subsequent corrosion and expansion operations:
①Image after corrosion: 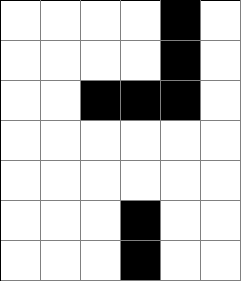 ;
;
②Image after expansion:  .
.
Based on actual operations, it can be proven that morphological corrosion and expansion operations comply with the principles and rules described in this article.
Function analysis:
①Preparation for use:
As in previous issues, we still call our old tool partner ---- opencv as the prerequisite for us to use rectangle.
import cv2②Usage:
This part has been explained in the previous issue, so it will not be repeated here.
③ Grammar description:
There are two functions in this issue: erode and dilate, which are explained separately.
(1) Corrosion operation:
Usage syntax: dst = cv2.erode(src, kernel, dst, anchor, iterations, borderType, borderValue)
Parameter description: The first dst : the target image obtained after morphological erosion through the erode function, the data type is (array) array type;
src : The source image processed using the erode function, the data type is also an (array) array type;
kernel : the structural element mentioned above. Structuring elements can be constructed through the cv2.getStructuringElement function, or through the ones or array functions in the numpy library. Next, there is a further brief explanation of using the cv2.getStructuringElement function to build structuring elements:
Usage syntax: kernel = cv2.getStructuringElement(shape, ksize, anchor)
Parameter description: kernel: the structural element constructed through the getStructuringElement function;
shape: The shape of the structural element, with the following optional values: cv2.MORPH_RECT (rectangle), cv2.MORPH_CROSS (cross), cv2.MORPH_ELLIPSE (oval);
ksize: The number of rows and columns of the structural element, the value format is (x, y), where x represents the number of columns and y represents the number of rows ( this is counterintuitive, please note );
anchor: The anchor point of the structural element . If it does not take a value or if the value is (-1,-1), the center point of the structural element is used as the anchor point. Here, only the mask shape of cv2.MORPH_CROSS (cross shape) is related to the selection of the anchor point. The other shapes have nothing to do with the selection of the anchor point here and can be arbitrarily selected.
;
Second dst : The description is the same as the first dst and will not be repeated. The default is None;
anchor : The anchor point of the structural element . If it does not take a value or if the value is (-1,-1), the center point of the structural element is used as the anchor point. It is different from the anchor point of the getStructuringElement function. The anchor point selection here affects the structural elements of all shapes ;
iterations : Number of iterations. The Nth iteration uses the dst of the N-1th iteration as src for operation, and other parameters remain unchanged;
borderType : The way to expand the border. The default value is None, which means no border expansion is performed. The specific types are shown in the figure below:
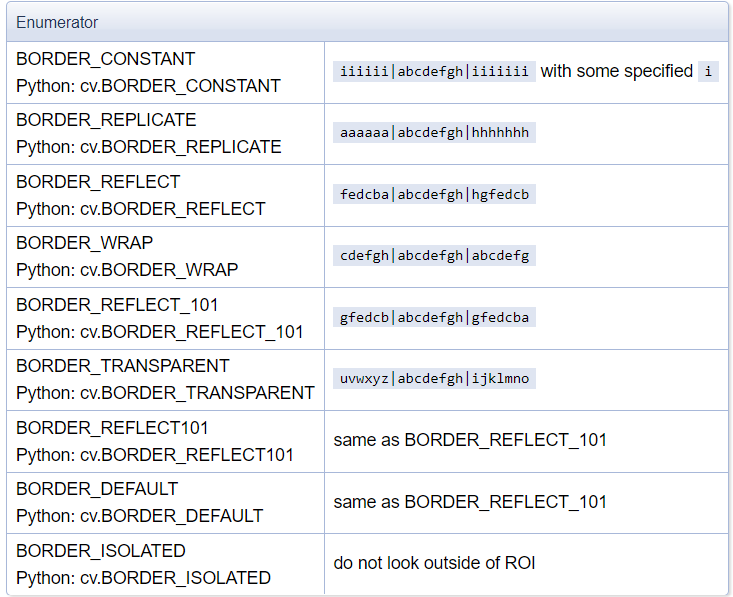
Table source: The type of borderType in opencv , the erode and dilate functions do not support the value of the BORDER_WRAP type;
borderValue : When the borderType value is cv2.BORDER_CONSTANT, the elements that extend the border are filled with borderValue. The default value of borderValue is (0, 0, 0). Of course, you can specify other values. The three elements represent BGR respectively. Note that they are not RGB.
(2) Expansion operation:
Usage syntax: dst = cv2.dilate(src, kernel, dst, anchor, iterations, borderType, borderValue)
Parameter description: The same as the erode function, so no details will be given.
Attached below are the native documents related to the erode and dilate functions for reference:
def erode(src: Mat, kernel, dst: Mat = ..., anchor=..., iterations=..., borderType=..., borderValue=...) -> typing.Any:
    '''
    ·"erode(src, kernel[, dst[, anchor[, iterations[, borderType[, borderValue]]]]]) -> dst
    ·@brief Erodes an image by using a specific structuring element.

    ·The function erodes the source image using the specified structuring element that determines the
    ·shape of a pixel neighborhood over which the minimum is taken:

    ·\\f[\\texttt{dst} (x,y) =  \\min _{(x',y'):  \\, \\texttt{element} (x',y') \\ne0 } \\texttt{src} (x+x',y+y')\\f]

    ·The function supports the in-place mode. Erosion can be applied several ( iterations ) times. In
    ·case of multi-channel images, each channel is processed independently.

    ·@param src input image; the number of channels can be arbitrary, but the depth should be one of
    ·CV_8U, CV_16U, CV_16S, CV_32F or CV_64F.
    ·@param dst output image of the same size and type as src.
    ·@param kernel structuring element used for erosion; if `element=Mat()`, a `3 x 3` rectangular
    ·structuring element is used. Kernel can be created using #getStructuringElement.
    ·@param anchor position of the anchor within the element; default value (-1, -1) means that the
    ·anchor is at the element center.
    ·@param iterations number of times erosion is applied.
    ·@param borderType pixel extrapolation method, see #BorderTypes. #BORDER_WRAP is not supported.
    ·@param borderValue border value in case of a constant border
    ·@sa  dilate, morphologyEx, getStructuringElement"
    ...
    '''
def dilate(src: Mat, kernel, dst: Mat = ..., anchor=..., iterations=..., borderType=..., borderValue=...) -> typing.Any:
'''
·"dilate(src, kernel[, dst[, anchor[, iterations[, borderType[, borderValue]]]]]) -> dst
·@brief Dilates an image by using a specific structuring element.
·The function dilates the source image using the specified structuring element that determines the
·shape of a pixel neighborhood over which the maximum is taken:
·\\f[\\texttt{dst} (x,y) = \\max _{(x',y'): \\, \\texttt{element} (x',y') \\ne0 } \\texttt{src} (x+x',y+y')\\f]
·The function supports the in-place mode. Dilation can be applied several ( iterations ) times. In
·case of multi-channel images, each channel is processed independently.
·@param src input image; the number of channels can be arbitrary, but the depth should be one of
·CV_8U, CV_16U, CV_16S, CV_32F or CV_64F.
·@param dst output image of the same size and type as src.
·@param kernel structuring element used for dilation; if elemenat=Mat(), a 3 x 3 rectangular
·structuring element is used. Kernel can be created using #getStructuringElement\n.
·@param anchor position of the anchor within the element; default value (-1, -1) means that the
·anchor is at the element center.
·@param iterations number of times dilation is applied.
·@param borderType pixel extrapolation method, see #BorderTypes. #BORDER_WRAP is not suported.\
·@param borderValue border value in case of a constant border
·@sa erode, morphologyEx, getStructuringElement"
...
'''Cases and operations:
- -Small scale chopper
Next, we will still use the small incident between the two lakes in the previous issue as our case operation:
(1) Story background:
It is said that a long, long time ago, there were two lakes, they were very close to each other, leaning on each other like lovers, and there was a small river in the middle connecting them as a link between them. People nearby call one of them Tiezhu Lake , the other Cuihua Po , and the small river in the middle is called Qingshou River , because it is like two small lakes just holding hands. Days like this, after a long time, seem to continue like this. . . (You know what I’m going to say next:))

(2) Story 1 (open operation):
But as time passed like this for a long time, it was like a person suffering from the seven-year itch, and the two lakes began to dislike each other's constant company. So they complained to God, hoping to separate the two of them, hoping to give each other some space to live their own lives. God heard their pleas and said yes, but they must accept the test, which is a long-lasting drought that will sever the river holding hands between them and evaporate their own lakes.
The two lakes had long been fed up with each other, so they both accepted the test without saying anything. Soon, the drought came. At first, the two lakes were acceptable, but they just felt that their capacity had been reduced a little. But later on, the drought still had a huge impact. Because of the drought all day long, plants continued to die, animals also looked for other places to live, and the villagers who lived there gradually left this sad place. Finally, the Lian Shou River evaporated completely, and the two lakes were completely separated. But the surrounding environment is already in ruins, and the lake has lost its vitality. Tiezhu Lake and Cuihua Po also began to recall the past time. Compared with this time, it was extremely brilliant and beautiful.
Gradually, time passed, the drought ended and the rainy season arrived. As the rainwater continued to pour, the area of the two lakes began to slowly expand, and the hope of interconnection began to arise in their hearts. However, with the end of the rainy season, the two lakes have only recovered to approximately the same area as before, but they are still not connected to each other. The riverbed of the Hands-Hand River has long become an insurmountable high ground between the two.
import cv2
import numpy as np

img = cv2.imread("F://src.jpg")

kernel = cv2.getStructuringElement(cv2.MORPH_ELLIPSE,(10,10))

img1 = cv2.erode(img,kernel,iterations=2)
img2 = cv2.dilate(img1,kernel,iterations=3)

cv2.imwrite("F://rst1.jpg",img2)

cv2.imshow("src",img)
cv2.imshow("rst1",img2)
cv2.waitKey(5000)
cv2.destroyAllWindows()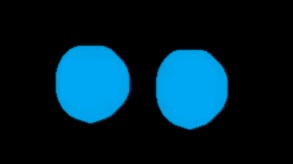
(3) Story 2 (Closed operation):
The two lakes prayed to God again, hoping to connect them again. God responded, if they really want to do this, they can fulfill your wish this time, but there is still one condition, that is, this time you are not just connected by a hand-holding river, but a complete integration. Synthesize a lake to achieve a situation where you are in me and I am in you. And, this is the last wish, once they become one, they can never be separated again.
This time, neither Tiezhu nor Cuihua came to an immediate conclusion. They both thought and deliberated for a long time. Finally they told God their choice: they both wanted to become one. God says yes and will grant your wishes. Then, it rained heavily. The rain was not only heavy, but also long-lasting. It was so long that the riverbed of the Hand-Hand River was refilled with water and continued to expand. The rain was too heavy, and the environment once again became unsuitable for the survival of animals and plants. The area around the lake was once again without traces of life. But this time, the two lakes had no complaints. They chose to accept it silently, support each other, and stay together until the last moment. .
Finally, the rain stopped and the sun appeared, sparking ripples on the lake that had merged into one. With the end of the rainy season, the area of the lake slowly returned to its normal size, but it has never been separated since. Later, people knew that there were two lakes merged into one, but they no longer remembered the names of the two lakes. They only knew that there was a lake called Hexinhai . Every year, many couples come here to pray, hoping that their love for each other will be like the origin of Hexinhai. Although they have gone through all kinds of hardships, they will never leave each other when they return, and they will spend their days together.
import cv2
import numpy as np

img = cv2.imread("F://rst1.jpg")

kernel = cv2.getStructuringElement(cv2.MORPH_ELLIPSE,(10,10),anchor=(0,0))

img1 = cv2.dilate(img,kernel,iterations=6)
img2 = cv2.erode(img1,kernel,iterations=3)

cv2.imwrite("F://rst2.jpg",img2)

cv2.imshow("rst1",img)
cv2.imshow("rst2",img2)
cv2.waitKey(5000)
cv2.destroyAllWindows()
I believe that the most precious love is not love at first sight, but the loyalty and responsibility to each other that can still shine through the waves and sands. Only pearls that have passed the test of wind and frost and the deposition of time can become lustrous and translucent pearls. As it is said in the "Motto" inscription written by Cui Yuan of the Eastern Han Dynasty: " In nirvana, there is no zi, and there is light in the warmth. "
Conclusion:
In this article, we learned about the basic principles of expansion and corrosion , and also learned some points to pay attention to during the operation, such as the calculation method of the center point coordinates, various situations in which the frame selection of structural elements exceeds the manipulated image, etc., we learned The meaning and setting method of each parameter in the erode and dilate functions . Finally, a beautiful (
old-fashioned) love story is used as the background to demonstrate actual cases of opening and closing operations . Overall, the content of this issue is quite substantial. I hope everyone can learn knowledge and gain happiness.
Okay, that’s all the content above. I hope you can pay more attention , like and collect it . This will be of great help to me. Thank you all!

Okay, this is Kamen Black . I wish you peace and prosperity, see you all next time! ! !
Yo-yo~~