Article directory
1. Installation package preparation
MySQL installation package version: mysql-8.0.26-1.el7.x86_64.rpm-bundle.tar
Upload the installation package to the Linux server: The upload path is /root/softwares

2. Installation steps
1.Create the installation path
[root@cq03 ~]# mkdir /usr/local/mysql
2. Unzip the installation package
Unzip the MySQL installation package to the /usr/local/mysql path
[root@cq03 softwares]# tar -xvf mysql-8.0.26-1.el7.x86_64.rpm-bundle.tar -C /usr/local/mysql/
After decompressing the installation package, switch the path to MySQL.
[root@cq03 softwares]# cd /usr/local/mysql
3. Unzip the following installation packages in sequence
3.1 common
[root@cq03 softwares]# rpm -ivh mysql-community-common-8.0.26-1.el7.x86_64.rpm
3.2 client
[root@cq03 softwares]# rpm -ivh mysql-community-client-plugins-8.0.26-1.el7.x86_64.rpm
3.3 libs
[root@cq03 softwares]# rpm -ivh mysql-community-libs-8.0.26-1.el7.x86_64.rpm
If you execute this command and the following error occurs,
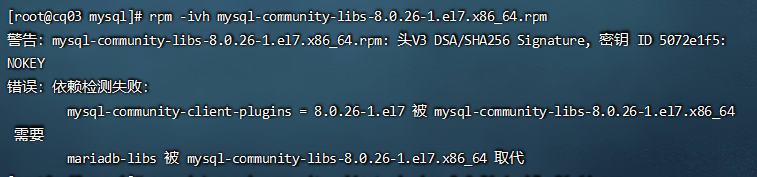
the solution: How to solve the problem when decompressing the libs file
If the above problems do not occur, skip it
3.4 libs-compat
[root@cq03 softwares]# rpm -ivh mysql-community-libs-compat-8.0.26-1.el7.x86_64.rpm
3.5 devel
[root@cq03 softwares]# rpm -ivh mysql-community-devel-8.0.26-1.el7.x86_64.rpm
If the following error occurs when executing this command:

Solution: How to solve the problem when decompressing the devel file.
If no error occurs, skip this step.
3.6 client
[root@cq03 softwares]# rpm -ivh mysql-community-client-8.0.26-1.el7.x86_64.rpm
3.7 server
[root@cq03 softwares]# rpm -ivh mysql-community-server-8.0.26-1.el7.x86_64.rpm
3. Start MySQL
1. Start the MySQL service
[root@cq03 mysql]# systemctl start mysqld
2. Set to start at boot
[root@cq03 mysql]# systemctl enable mysqld
3. View MySQL randomly generated passwords
[root@cq03 mysql]# grep 'password' /var/log/mysqld.log
The marked place is the randomly generated password

4. Log in to MySQL
[root@cq03 mysql]# mysql -u root -p
Then enter the password found in the previous step
4. Modify the password policy mechanism
Note: The syntax this time is slightly different from previous versions of MySQL.
# 修改密码策略等级为low
set global validate_password.policy=low;
# 密码的最小长度
set global validate_password.length=6;
# 设置密码中至少要包含0个大小写字母
set global validate_password.mixed_case_count=0;
# 设置密码中至少包含0个数字
set global validate_password.number_count=0;
# 设置密码中至少包含0个特殊字符
set global validate_password.special_char_count=0;

查看密码策略
show variables like '%validate_password%';
5.Change password
ALTER USER 'root'@'localhost' IDENTIFIED BY '123456';
4. Remote authorization
If you want to connect to mysql remotely, you need to perform remote authorization operations.
Note: Be sure to turn off the firewall mechanism, otherwise other problems may occur
Statements from previous versions of MySQL cannot be used here, otherwise the following error will occur.

Just use the following statements.
grant all privileges on *.* to root@'%' with grant option;
Then you can remotely control MySQL
5. Remote access to MySQL
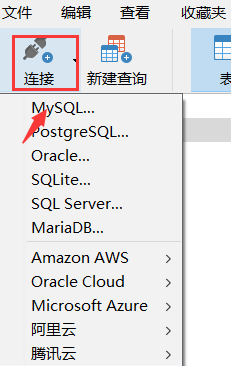
Tools used: Navicat
1. Steps
Click the box and then the option pointed to by the arrow.
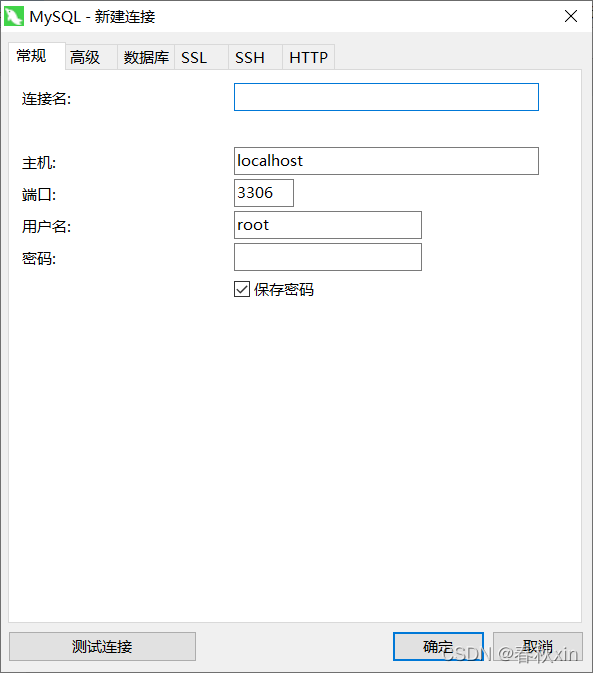
Enter the following interface:
Connection name : You can name it arbitrarily, but do not have the same name as other connections.
Host : Unchanged
Port : Unchanged
Username : The MySQL username of the linux server
Password : The MySQL corresponding password of the linux server, which is the password you just set.
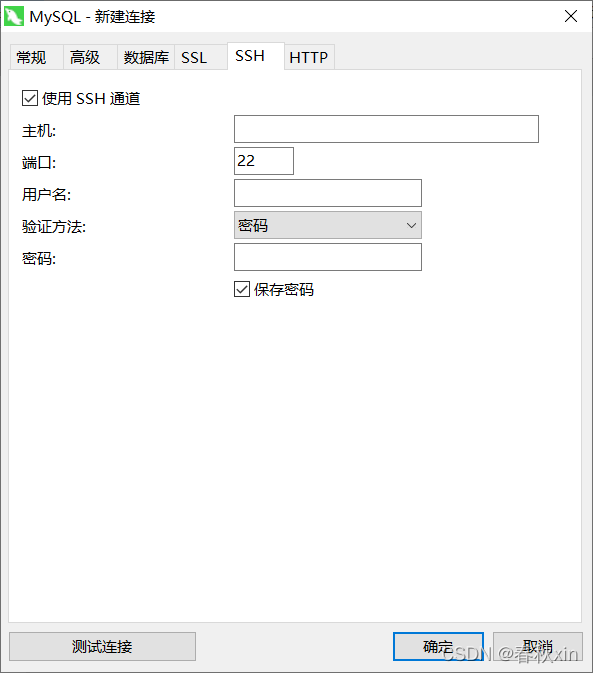
Then click the SSH option above and select Use SSH channel
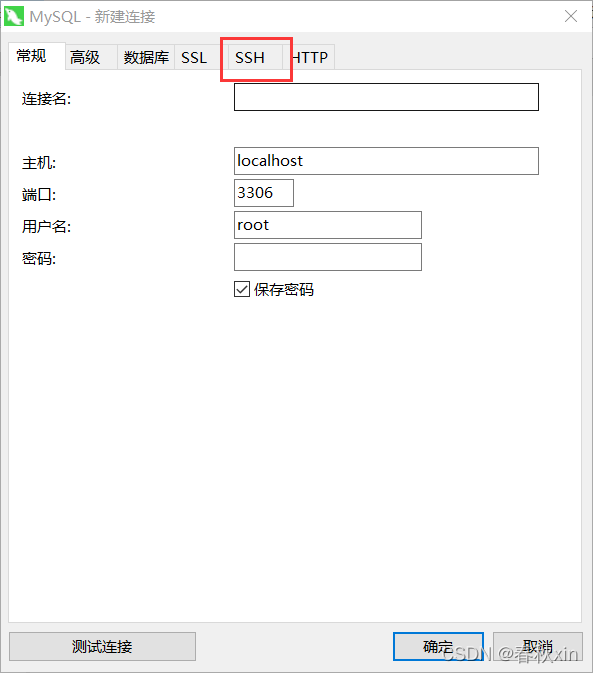
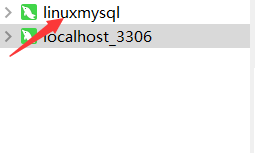
to check the host : linux server corresponding If you don’t remember the IP address, you can enter the command in the Linux command interface: ip addr and then find the corresponding IP address and enter the user name : the user name of the Linux server Password : the corresponding password of the Linux server If a new connection appears, then congratulations, you are here All done! Double-click to open it for remote operation.
Summarize
The above is the tutorial on installing MySQL8.0.26 under Linux CentOs7. It is for everyone’s learning reference only, welcome to communicate!