Understand MQTT in one article, how to use MQTT to subscribe and publish messages in SpringBoot
Introduction: I introduced RabbitMQ and how to integrate and use RabbitMQ in the SpringBoot project before. Friends who have seen it say that it is written in more detail. I hope to summarize the currently popular MQTT. So next, what is MQTT? What role does it play in IoT? How to use MQTT in the project?
I introduced RabbitMQ and how to integrate and use RabbitMQ in the SpringBoot project before. Friends who have seen it say that it is written in more detail. I hope to summarize the currently popular MQTT. So next, what is MQTT? What role does it play in IoT? How to use MQTT in the project?
1. Introduction to MQTT
1.1 What is MQTT?
MQTT (Message Queuing Telemetry Transport, Message Queuing Telemetry Transport Protocol) is a "lightweight" communication protocol based on the publish/subscribe (publish/subscribe) model. The protocol is built on the TCP/IP protocol and was developed by IBM in 1999. Released in year.
The biggest advantage of MQTT is that it uses very little code and limited bandwidth to provide real-time and reliable messaging services for connecting remote devices.

MQTT has the advantages of concise protocol, light weight, strong scalability, low overhead, and low bandwidth occupation. There are already multiple language versions such as PHP, JAVA, Python, C, C#, and Go, and it can basically be used on any platform. It has a wide range of applications in the Internet of Things, small devices, mobile applications, etc., and is especially suitable as a communication protocol for the Internet of Things.
1.2 MQTT features
MQTT is a client-server based message publish/subscribe transport protocol. The MQTT protocol is lightweight, simple, open and easy to implement. These characteristics make it widely applicable. In many cases, including constrained environments such as machine-to-machine (M2M) communication and the Internet of Things (IoT).
The MQTT protocol is a protocol designed for communication between remote sensors and control devices with limited hardware performance and working in low-bandwidth, unreliable networks. It has the following main features:
-
1. Use the publish/subscribe messaging model to provide many-to-many message publishing and decouple applications;
-
2. Message transmission with shielded payload content;
-
3. Provide network connection using TCP/IP;
-
4. Supports three types of message publishing quality of service (QoS):
-
QoS 0 (at most once): Message publishing relies entirely on the underlying TCP/IP network. Message loss or duplication can occur. This level can be used in the following situations, environmental sensor data, it does not matter if the data is lost once, because there will be a second transmission soon.
-
QoS 1 (at least once): Message arrival is guaranteed, but message duplication may occur.
-
QoS 2 (only once): Ensures messages arrive once. This level can be used in situations where duplication or loss of messages can lead to incorrect results in a billing system.
-
5. The transmission data is small, the overhead is very small (the fixed-length header is 2 bytes), and the protocol exchange is minimized to reduce network traffic; (with very little code and limited bandwidth, it provides real-time and reliable connection to remote devices Message service.)
1.3 MQTT application scenarios
As a low-overhead, low-bandwidth instant messaging protocol, MQTT has a wide range of applications in the Internet of Things, small devices, and mobile applications. The MQTT service is only responsible for the reception and delivery of messages. After the application system is connected to the MQTT server, it can realize functions such as data collection, analysis, business processing, storage and storage, and data display. Common application scenarios mainly include the following aspects:
(1) Message push: For example, PC push announcements, Android push services, and some instant messaging software such as WeChat and Yixin also use push technology.
(2) Intelligent food ordering: Through the MQTT message queue product, consumers can scan the code to order food at the dining table, and connect with the merchant's back-end system to realize self-service ordering and payment.
(3) Information update: Realize display update management of electronic labels in shopping malls, supermarkets and other places, and multimedia screens in public places.
(4) Scan the QR code to exit the station: The most common parking lot is to scan the QR code to pay and the pole will automatically lift; the subway gate is to scan the QR code to enter and exit the station.
2. Role composition of MQTT
2.1 MQTT client and server
2.1.1 Server (Broker)
EMQX is an MQTT Broker. emqx is just software developed based on erlang language. Other MQs include ActiveMQ, RabbitMQ, HiveMQ, etc.
EMQX server: https://www.emqx.io/zh/downloads?os=Windows
2.1.2 Client (publish/subscribe)
EMQX client: https://mqttx.app/zh
This is a client used for testing and verification. The actual project is to implement the producers and consumers of our messages through code.
2.2 Several concepts in MQTT
Compared with message queues such as RabbitMQ, MQTT is relatively simple, consisting of only Broker, Topic, publisher, and subscriber. Next, let’s briefly sort out some of the most common concepts in daily use of MQTT:
- 1. Topic topic: the main propagation channel of MQTT messages. We publish messages to the topic, subscribe to the topic, read the message from the topic and perform business logic processing. The topic is the channel of the message.
- 2. Producer: the sender of MQTT messages, they send messages to the topic
- 3. Consumers: Receivers of MQTT messages. They subscribe to the topics they need and get messages from them.
- 4. Broker service: message forwarder, through which messages are carried. EMQX is our broker. We don’t need to care about its specific implementation during use.
In fact, the usage process of MQTT is: the producer sends a message to a certain topic of the broker -> the broker delivers the message through the topic -> the consumers who subscribe to the topic get the message and perform the corresponding business logic
3. Installation and use of EMQX
The following takes Windows as an example to demonstrate how to install and use EXQX under Windows.
step 1 : Download the EMQ installation package and configure the EMQ environment
EMQX server: https://www.emqx.io/zh/downloads?os=Windows
Step 2 : Download the compressed package and unzip it, enter the bin folder with cmd
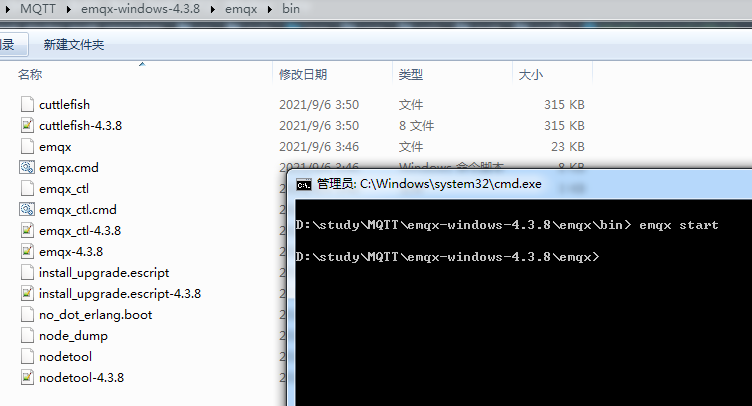
step 3 : Start the EMQX service
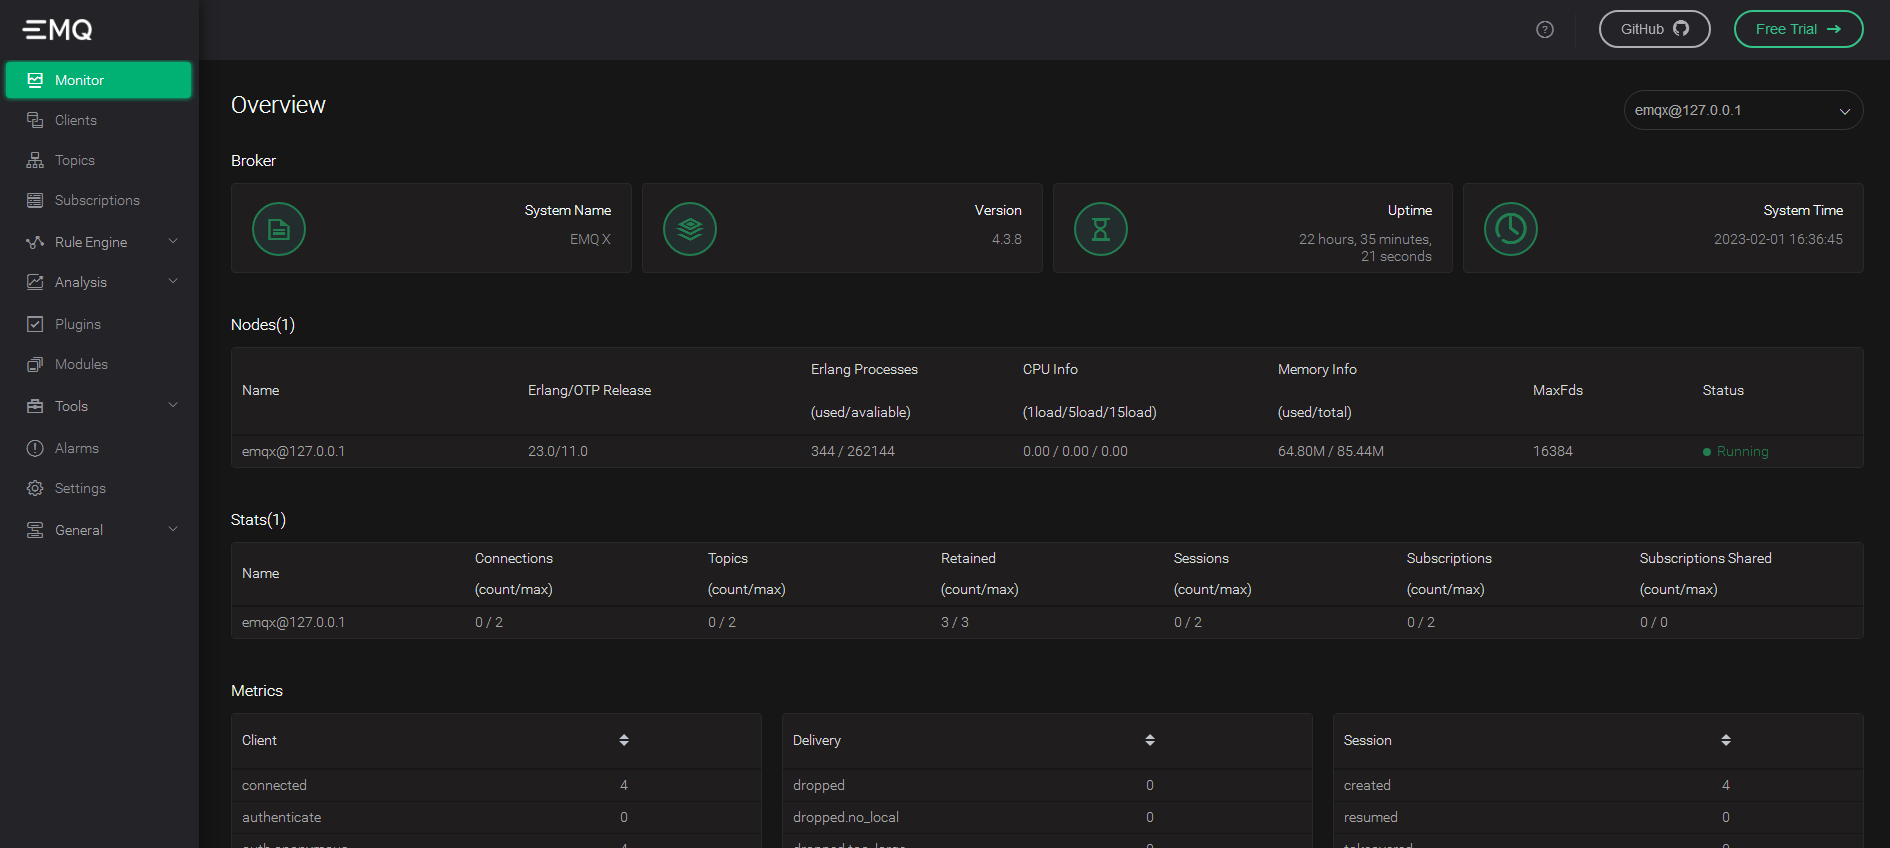
Enter on the command line: emqx startstart the service, check in the browser and enter: http://localhost:18083/ to enter the login page. The default username and password are admin/public. After successful login, you will enter the emqx backend management page, as shown in the figure below:
4. Use SpringBoot to integrate the MQTT protocol
The previous section introduced the MQTT protocol and how to install and start the MQTT service. Next, we demonstrate how to integrate MQTT in the SpringBoot project to implement message subscription and publishing.
4.1 Create project
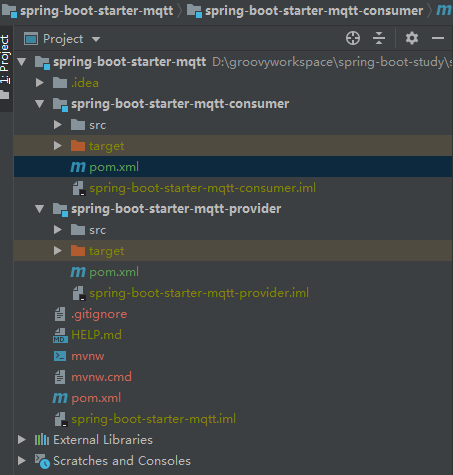
First, create a parent project, and create a message provider module and a message consumer module spring-boot-starter-mqttunder the parent project .spring-boot-starter-mqtt-providerspring-boot-starter-mqtt-consumer
4.2 Implementing producers
Next, modify spring-boot-starter-mqtt-providerthe code related to the producer module to realize the function module of message publishing.
4.2.1 Import dependency packages
Modify the pom.xml file and add MQTT-related dependencies. The specific sample code is as follows:
<dependencies>
        <dependency>
            <groupId>org.springframework.boot</groupId>
            <artifactId>spring-boot-starter</artifactId>
        </dependency>

        <dependency>
            <groupId>org.springframework.boot</groupId>
            <artifactId>spring-boot-starter-web</artifactId>
        </dependency>

        <dependency>
            <groupId>org.springframework.boot</groupId>
            <artifactId>spring-boot-starter-test</artifactId>
            <scope>test</scope>
        </dependency>

        <dependency>
            <groupId>org.springframework.integration</groupId>
            <artifactId>spring-integration-mqtt</artifactId>
            <version>5.3.2.RELEASE</version>
        </dependency>

        <dependency>
            <groupId>org.projectlombok</groupId>
            <artifactId>lombok</artifactId>
            <version>1.18.4</version>
        </dependency>

    </dependencies>
4.2.2 Modify configuration file
Modify the application.yml configuration file and add MQTT related configurations. The sample code is as follows:
spring:
  application:
    name: provider
    #MQTT配置信息
  mqtt:
    #MQTT服务地址,端口号默认11883,如果有多个,用逗号隔开
    url: tcp://127.0.0.1:11883
    #用户名
    username: admin
    #密码
    password: public
    #客户端id(不能重复)
    client:
      id: provider-id
    #MQTT默认的消息推送主题,实际可在调用接口是指定
    default:
      topic: topic
server:
  port: 8080
4.2.3 Message producer client configuration
Create the MqttProviderConfig configuration class, read the relevant configuration in application.yml, and initialize the MQTT connection. The sample code is as follows:
import lombok.extern.slf4j.Slf4j;
import org.eclipse.paho.client.mqttv3.*;
import org.eclipse.paho.client.mqttv3.persist.MemoryPersistence;
import org.springframework.beans.factory.annotation.Value;
import org.springframework.context.annotation.Configuration;

import javax.annotation.PostConstruct;

@Configuration
@Slf4j
public class MqttProviderConfig {


    @Value("${spring.mqtt.username}")
    private String username;

    @Value("${spring.mqtt.password}")
    private String password;

    @Value("${spring.mqtt.url}")
    private String hostUrl;

    @Value("${spring.mqtt.client.id}")
    private String clientId;

    @Value("${spring.mqtt.default.topic}")
    private String defaultTopic;

    /**
     * 客户端对象
     */
    private MqttClient client;

    /**
     * 在bean初始化后连接到服务器
     */
    @PostConstruct
    public void init(){


        connect();
    }

    /**
     * 客户端连接服务端
     */
    public void connect(){


        try{


            //创建MQTT客户端对象
            client = new MqttClient(hostUrl,clientId,new MemoryPersistence());
            //连接设置
            MqttConnectOptions options = new MqttConnectOptions();
            //是否清空session,设置false表示服务器会保留客户端的连接记录(订阅主题,qos),客户端重连之后能获取到服务器在客户端断开连接期间推送的消息
            //设置为true表示每次连接服务器都是以新的身份
            options.setCleanSession(true);
            //设置连接用户名
            options.setUserName(username);
            //设置连接密码
            options.setPassword(password.toCharArray());
            //设置超时时间,单位为秒
            options.setConnectionTimeout(100);
            //设置心跳时间 单位为秒,表示服务器每隔 1.5*20秒的时间向客户端发送心跳判断客户端是否在线
            options.setKeepAliveInterval(20);
            //设置遗嘱消息的话题,若客户端和服务器之间的连接意外断开,服务器将发布客户端的遗嘱信息
            options.setWill("willTopic",(clientId + "与服务器断开连接").getBytes(),0,false);
            //设置回调
            client.setCallback(new MqttProviderCallBack());
            client.connect(options);
        } catch(MqttException e){


            e.printStackTrace();
        }
    }
    public void publish(int qos,boolean retained,String topic,String message){


        MqttMessage mqttMessage = new MqttMessage();
        mqttMessage.setQos(qos);
        mqttMessage.setRetained(retained);
        mqttMessage.setPayload(message.getBytes());
        //主题的目的地,用于发布/订阅信息
        MqttTopic mqttTopic = client.getTopic(topic);
        //提供一种机制来跟踪消息的传递进度
        //用于在以非阻塞方式(在后台运行)执行发布是跟踪消息的传递进度
        MqttDeliveryToken token;
        try {


            //将指定消息发布到主题,但不等待消息传递完成,返回的token可用于跟踪消息的传递状态
            //一旦此方法干净地返回,消息就已被客户端接受发布,当连接可用,将在后台完成消息传递。
            token = mqttTopic.publish(mqttMessage);
            token.waitForCompletion();
        } catch (MqttException e) {


            e.printStackTrace();
        }
    }
}
4.2.4 Producer client message callback
Create the MqttProviderCallBack class and inherit MqttCallback to implement related message callback events. The sample code is shown in the figure below:
import org.eclipse.paho.client.mqttv3.IMqttDeliveryToken;
import org.eclipse.paho.client.mqttv3.MqttCallback;
import org.eclipse.paho.client.mqttv3.MqttMessage;

public class MqttConsumerCallBack implements MqttCallback{


    /**
     * 客户端断开连接的回调
     */
    @Override
    public void connectionLost(Throwable throwable) {


        System.out.println("与服务器断开连接,可重连");
    }

    /**
     * 消息到达的回调
     */
    @Override
    public void messageArrived(String topic, MqttMessage message) throws Exception {


        System.out.println(String.format("接收消息主题 : %s",topic));
        System.out.println(String.format("接收消息Qos : %d",message.getQos()));
        System.out.println(String.format("接收消息内容 : %s",new String(message.getPayload())));
        System.out.println(String.format("接收消息retained : %b",message.isRetained()));
    }

    /**
     * 消息发布成功的回调
     */
    @Override
    public void deliveryComplete(IMqttDeliveryToken iMqttDeliveryToken) {


        System.out.println(String.format("接收消息成功"));
    }
}
4.2.5 Create a Controller to implement the message publishing function
Create a SendController controller class to implement the message sending function. The sample code is as follows:
@Controller
public class SendController {


    @Autowired
    private MqttProviderConfig providerClient;

    @RequestMapping("/sendMessage")
    @ResponseBody
    public String sendMessage(int qos,boolean retained,String topic,String message){


        try {


            providerClient.publish(qos, retained, topic, message);
            return "发送成功";
        } catch (Exception e) {


            e.printStackTrace();
            return "发送失败";
        }
    }
}
4.3 Implement consumers
The generator message publishing module is completed before, and the consumer module is modified spring-boot-starter-mqtt-consumerto realize the functions of message subscription and processing.
4.3.1 Import dependent packages
Modify the pom.xml file and add MQTT-related dependencies. The specific sample code is as follows:
<dependencies>
        <dependency>
            <groupId>org.springframework.boot</groupId>
            <artifactId>spring-boot-starter</artifactId>
        </dependency>

        <dependency>
            <groupId>org.springframework.boot</groupId>
            <artifactId>spring-boot-starter-web</artifactId>
        </dependency>

        <dependency>
            <groupId>org.springframework.boot</groupId>
            <artifactId>spring-boot-starter-test</artifactId>
            <scope>test</scope>
        </dependency>

        <dependency>
            <groupId>org.springframework.integration</groupId>
            <artifactId>spring-integration-mqtt</artifactId>
            <version>5.3.2.RELEASE</version>
        </dependency>

        <dependency>
            <groupId>org.projectlombok</groupId>
            <artifactId>lombok</artifactId>
            <version>1.18.4</version>
        </dependency>

    </dependencies>
4.3.2 Modify configuration file
Modify the application.yml configuration file and add MQTT related configurations. The sample code is as follows:
spring:
  application:
    name: consumer
  #MQTT配置信息
  mqtt:
    #MQTT服务端地址,端口默认为11883,如果有多个,用逗号隔开
    url: tcp://127.0.0.1:11883
    #用户名
    username: admin
    #密码
    password: public
    #客户端id(不能重复)
    client:
      id: consumer-id
    #MQTT默认的消息推送主题,实际可在调用接口时指定
    default:
      topic: topic
server:
  port: 8085
4.3.3 Consumer client configuration
Create the consumer client configuration class MqttConsumerConfig, read the relevant configuration in application.yml, and initialize the MQTT connection. The sample code is as follows:
import javax.annotation.PostConstruct;

import org.eclipse.paho.client.mqttv3.MqttClient;
import org.eclipse.paho.client.mqttv3.MqttConnectOptions;
import org.eclipse.paho.client.mqttv3.MqttException;
import org.eclipse.paho.client.mqttv3.persist.MemoryPersistence;
import org.springframework.beans.factory.annotation.Value;
import org.springframework.context.annotation.Configuration;

@Configuration
public class MqttConsumerConfig {


    @Value("${spring.mqtt.username}")
    private String username;

    @Value("${spring.mqtt.password}")
    private String password;

    @Value("${spring.mqtt.url}")
    private String hostUrl;

    @Value("${spring.mqtt.client.id}")
    private String clientId;

    @Value("${spring.mqtt.default.topic}")
    private String defaultTopic;

    /**
     * 客户端对象
     */
    private MqttClient client;

    /**
     * 在bean初始化后连接到服务器
     */
    @PostConstruct
    public void init(){


        connect();
    }

    /**
     * 客户端连接服务端
     */
    public void connect(){


        try {


            //创建MQTT客户端对象
            client = new MqttClient(hostUrl,clientId,new MemoryPersistence());
            //连接设置
            MqttConnectOptions options = new MqttConnectOptions();
            //是否清空session,设置为false表示服务器会保留客户端的连接记录,客户端重连之后能获取到服务器在客户端断开连接期间推送的消息
            //设置为true表示每次连接到服务端都是以新的身份
            options.setCleanSession(true);
            //设置连接用户名
            options.setUserName(username);
            //设置连接密码
            options.setPassword(password.toCharArray());
            //设置超时时间,单位为秒
            options.setConnectionTimeout(100);
            //设置心跳时间 单位为秒,表示服务器每隔1.5*20秒的时间向客户端发送心跳判断客户端是否在线
            options.setKeepAliveInterval(20);
            //设置遗嘱消息的话题,若客户端和服务器之间的连接意外断开,服务器将发布客户端的遗嘱信息
            options.setWill("willTopic",(clientId + "与服务器断开连接").getBytes(),0,false);
            //设置回调
            client.setCallback(new MqttConsumerCallBack());
            client.connect(options);
            //订阅主题
            //消息等级,和主题数组一一对应,服务端将按照指定等级给订阅了主题的客户端推送消息
            int[] qos = {

    1,1};
            //主题
            String[] topics = {

    "topic1","topic2"};
            //订阅主题
            client.subscribe(topics,qos);
        } catch (MqttException e) {


            e.printStackTrace();
        }
    }

    /**
     * 断开连接
     */
    public void disConnect(){


        try {


            client.disconnect();
        } catch (MqttException e) {


            e.printStackTrace();
        }
    }


    /**
     * 订阅主题
     */
    public void subscribe(String topic,int qos){


        try {


            client.subscribe(topic,qos);
        } catch (MqttException e) {


            e.printStackTrace();
        }
    }
}
4.3.4 Consumer client message callback
Create the MqttConsumerCallBack class and inherit MqttCallback to implement related message callback events. The sample code is shown in the figure below:
import org.eclipse.paho.client.mqttv3.IMqttDeliveryToken;
import org.eclipse.paho.client.mqttv3.MqttCallback;
import org.eclipse.paho.client.mqttv3.MqttMessage;

public class MqttConsumerCallBack implements MqttCallback{


    /**
     * 客户端断开连接的回调
     */
    @Override
    public void connectionLost(Throwable throwable) {


        System.out.println("与服务器断开连接,可重连");
    }

    /**
     * 消息到达的回调
     */
    @Override
    public void messageArrived(String topic, MqttMessage message) throws Exception {


        System.out.println(String.format("接收消息主题 : %s",topic));
        System.out.println(String.format("接收消息Qos : %d",message.getQos()));
        System.out.println(String.format("接收消息内容 : %s",new String(message.getPayload())));
        System.out.println(String.format("接收消息retained : %b",message.isRetained()));
    }

    /**
     * 消息发布成功的回调
     */
    @Override
    public void deliveryComplete(IMqttDeliveryToken iMqttDeliveryToken) {


        System.out.println(String.format("接收消息成功"));
    }
}
4.3.5 Create a Controller to establish and disconnect MQTT connections
Next, create the Controller controller MqttController and implement methods such as establishing and disconnecting MQTT connections. The sample code is as follows:
import com.weiz.mqtt.config.MqttConsumerConfig;
import org.springframework.beans.factory.annotation.Autowired;
import org.springframework.beans.factory.annotation.Value;
import org.springframework.stereotype.Controller;
import org.springframework.web.bind.annotation.RequestMapping;
import org.springframework.web.bind.annotation.ResponseBody;

@Controller
public class MqttController {


    @Autowired
    private MqttConsumerConfig client;

    @Value("${spring.mqtt.client.id}")
    private String clientId;

    @RequestMapping("/connect")
    @ResponseBody
    public String connect(){


        client.connect();
        return clientId + "连接到服务器";
    }

    @RequestMapping("/disConnect")
    @ResponseBody
    public String disConnect(){


        client.disConnect();
        return clientId + "与服务器断开连接";
    }
}
4.4 Test verification
First, start the producer spring-boot-starter-mqtt-providerand consumer spring-boot-starter-mqtt-consumeprojects respectively, open the browser, enter the address http://localhost:18083/, and you can see the two connected clients in the EMQX management interface. As shown below:

Next, call the producer's message publishing interface to verify whether the message publishing is successful. Use Pomstman to call the message sending interface: http://localhost:8080/sendMessage, as shown in the following figure:
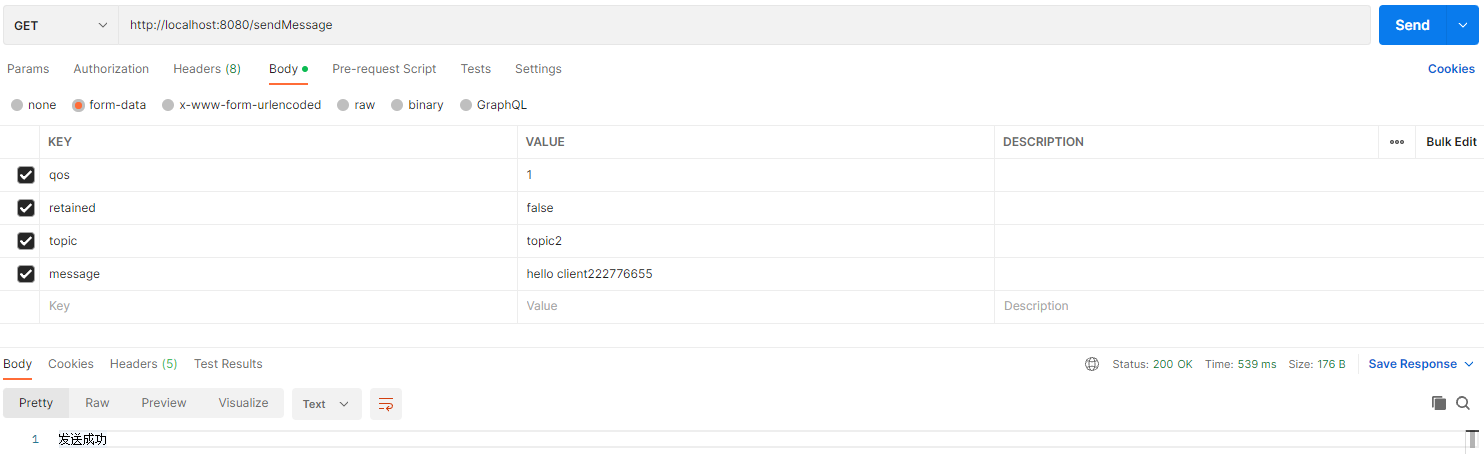
As can be seen from the above figure, the producer module has successfully sent the message. Next, check the consumer module to verify whether the message is processed successfully. As shown below:
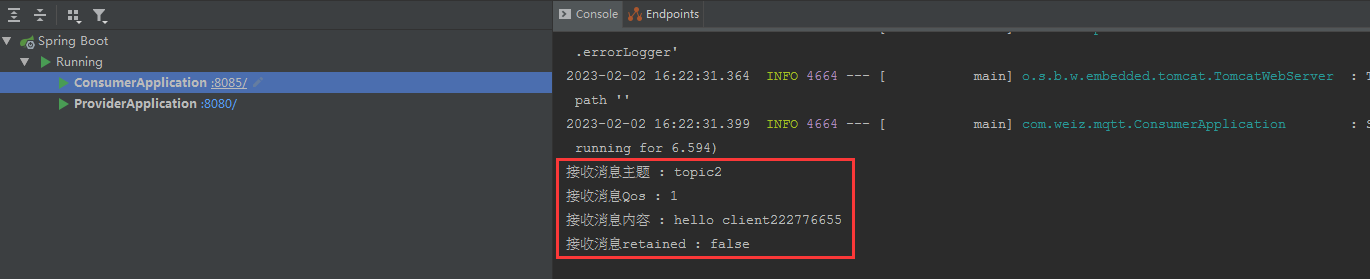
It can be found from the log output that the consumer has successfully received the message sent by the producer, which shows that we have successfully integrated MQTT in the Spring Boot project to implement the functions of message publishing and subscription.
at last
The above are the details of how to use MQTT in Spring Boot. You can study and learn more about the use of MQTT in Spring Boot. For example: How to use the qos mechanism to ensure that data will not be lost? Queuing and ordering of messages? Application in cluster mode? etc.
Introduction and use of MQTT
text
The Internet of Things is an important part of the new generation of information technology and an important development stage in the "information age". Its English name is: "Internet of things (IoT)". As the name suggests, the Internet of Things is the Internet of things connected. This has two meanings: first, the core and foundation of the Internet of Things is still the Internet, which is an extended and expanded network based on the Internet; Exchange and communication, that is, things are closely related. The Internet of Things is widely used in the integration of networks through communication sensing technologies such as intelligent sensing, identification technology and ubiquitous computing. It is therefore known as the third wave of the development of the world's information industry after computers and the Internet.
In the application of the Internet of Things, MQTT is a perfect protocol tool for information transmission.
1. Introduction to MQTT
MQTT (Message Queuing Telemetry Transport, Message Queuing Telemetry Transport Protocol) is a lightweight protocol based on the publish/subscribe mode. This protocol is built on the TCP/IP protocol. The biggest advantage of MQTT is that it can Provide real-time and reliable messaging services to connected remote devices with minimal code and limited bandwidth. As a low-cost, low-bandwidth instant messaging protocol, it has wide applications in the Internet of Things, small devices, mobile applications, etc.
MQTT is a client-server based message publish/subscribe transport protocol. The MQTT protocol is lightweight, simple, open and easy to implement. These features make it applicable to a wide range of applications. In many cases, including in constrained environments such as machine-to-machine (M2M) communications and the Internet of Things (IoT). It has been widely used in communication sensors through satellite links, medical equipment for occasional dialing, smart homes, and some miniaturized devices.
2. Characteristics
The MQTT protocol is a protocol designed to communicate with remote sensors and control devices over low-bandwidth, unreliable networks. It has the following main features:
(1) Use the publish/subscribe messaging model to provide one-to-many message publishing and decouple applications.
(2) Message transmission with shielded payload content.
(3) Use TCP/IP to provide network connectivity.
The mainstream MQTT is based on TCP connections for data push, but there is also a UDP-based version called MQTT-SN. Since these two versions are based on different connection methods, they naturally have different advantages and disadvantages.
(4) There are three types of message publishing service quality:
"At most once", message publishing completely relies on the underlying TCP/IP network. Message loss or duplication can occur. This level can be used in situations where, for environmental sensor data, it doesn't matter if a read record is lost because a second one will be sent soon. This method is mainly used for ordinary APP push. If your smart device is not connected to the Internet when the message is pushed, and the push was not received in the past, it will not be received if it is connected to the Internet again.
"At least once" ensures that the message arrives, but message duplication may occur.
"Only once" ensures that the message arrives once. This level can be used in some billing systems with stricter requirements. In billing systems, duplicate or missing messages can lead to incorrect results. This highest-quality message publishing service can also be used for push notifications on instant messaging apps, ensuring that users receive it only once.
(5) Small transmission, the overhead is very small (the fixed-length header is 2 bytes), and the protocol exchange is minimized to reduce network traffic.
This is why it is said in the introduction that it is very suitable for "in the field of Internet of Things, communication between sensors and servers, and collection of information." You must know that the computing power and bandwidth of embedded devices are relatively weak, so it is more suitable to use this protocol to transmit messages. But that's it.
3. Implementation method
Implementing the MQTT protocol requires communication between the client and the server. During the communication process, there are three identities in the MQTT protocol: publisher (Publish), agent (Broker) (server), and subscriber (Subscribe). Among them, the message publisher and subscriber are both clients, the message agent is the server, and the message publisher can be a subscriber at the same time.
The messages transmitted by MQTT are divided into two parts: topic and payload:
(1) Topic can be understood as the type of message. After a subscriber subscribes, he will receive the message content (payload) of the topic;
(2) Payload can be understood as the content of the message, which refers to the specific content that the subscriber wants to use.
4. Construction of MQTT (ubuntu)
1. apt-get installs mqtt related packages


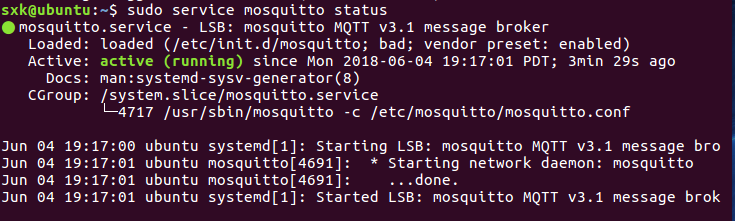
2. Test whether mosquitto is running correctly
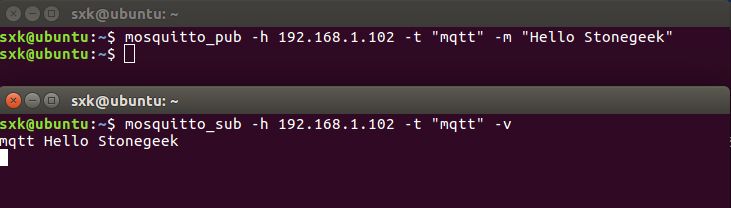
3. Test mqtt on the local terminal
Open a terminal and subscribe to the topic
mosquitto_sub -h 192.168.1.102 -t "mqtt" -v
[-h] Specify the MQTT server to connect
[-t] Subscribe to the topic, here is mqtt
[-v] Print more debugging information
Open another terminal and publish the topic
mosquitto_pub -h 192.168.1.102 -t "mqtt" -m "Hello Stonegeek"
[-h] Specify the MQTT server to connect
[-t] Push messages to the specified topic
[-m] Specify the message content
Results display
5. MQTT permission configuration
Previously, we have successfully built the Mosquitto server, but the default is to allow anonymous users to log in. For officially launched projects, user authentication is required (of course, users are generally mapped to the database, but here we will directly write the user configuration file)
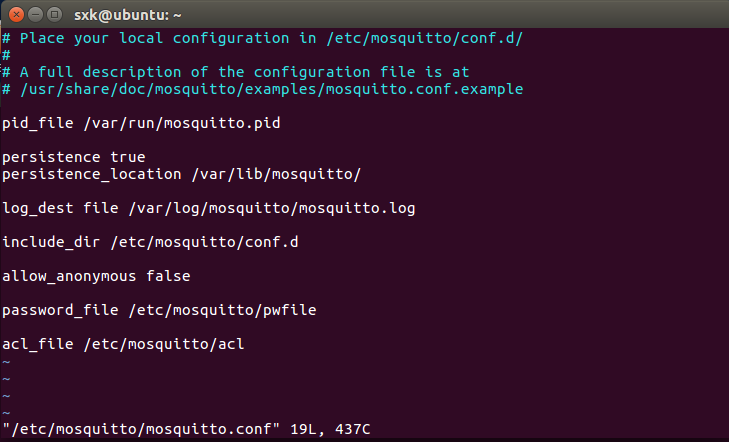
1. The configuration file of the Mosquitto server is /etc/mosquitto/mosquitto.conf. The user authentication method and read configuration are all carried out in this file.
Configuration file parameter description:
| ID | allow_anonymous | password_file | acl_file | result |
|---|---|---|---|---|
| 1 | True (default) | Allow anonymous login | ||
| 2 | False | password_file | Enable user verification mechanism | |
| 3 | False | password_file | acl_file | Turn on user authentication mechanism, but access control does not work |
| 4 | True | password_file | acl_file | If the username and password are not empty, user authentication will be automatically performed and will be subject to access control restrictions; if the username and password are empty, user verification will not be performed and will be subject to access control restrictions. |
| 5 | False | Unable to start service |
allow_anonymous allows anonymous
password-file password file
acl_file access control list
2. Modify the configuration file
Command: sudo vi /etc/mosquitto/mosquitto.conf
3. Add user information

Command explanation: -c creates a user, /etc/mosquitto/pwfile.example creates the user into the pwfile.example file, and admin is the user name.
You will also be prompted to enter your password twice in a row. Note that you do not need to add -c when creating a user for the second time. If -c is added, the user created for the first time will be overwritten.
So far, two users have been successfully created. If you check the pwfile.example file, you will find that there are two more users.
4. Add the relationship between Topic and user

5. User authentication test
(1) Restart Mosquitto steps
Check the progress of mosquitto
Command: ps -aux|grep mosquitto

(2) Kill the process
Command: sudo kill -9 pid

(3) Start
Command: mosquitto -c /etc/mosquitto/mosquitto.conf
(4) Start the subscription terminal (without adding users)

Start the subscription (add user)

(5) Launch the publishing side

6. MQTT implementation (Java language)
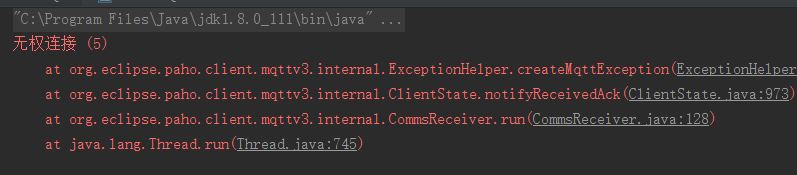
Note: Since we configured MQTT user permission control above, the following users can only use stonegeek to log in, otherwise the project will run and report an error, and there is only the mtopic theme in the access control list we set above, so we must use this theme , otherwise, the subscriber will not receive the published topic content (already tested)
The following is the publication/subscription of the MQTT service implemented in our Java language
1. Add Maven dependencies
    <dependency>
      <groupId>org.eclipse.paho</groupId>
      <artifactId>org.eclipse.paho.client.mqttv3</artifactId>
      <version>1.1.1</version>
    </dependency>
2、ServerMQTT.class
package com.stonegeek;
import org.eclipse.paho.client.mqttv3.MqttClient;
import org.eclipse.paho.client.mqttv3.MqttConnectOptions;
import org.eclipse.paho.client.mqttv3.MqttDeliveryToken;
import org.eclipse.paho.client.mqttv3.MqttException;
import org.eclipse.paho.client.mqttv3.MqttMessage;
import org.eclipse.paho.client.mqttv3.MqttPersistenceException;
import org.eclipse.paho.client.mqttv3.MqttTopic;
import org.eclipse.paho.client.mqttv3.persist.MemoryPersistence;
public class ServerMQTT {
//tcp://MQTT安装的服务器地址:MQTT定义的端口号
public static final String HOST = "tcp://192.168.1.102:1883";
//定义一个主题
public static final String TOPIC = "mtopic";
//定义MQTT的ID,可以在MQTT服务配置中指定
private static final String clientid = "server11";
private MqttClient client;
private MqttTopic topic11;
private String userName = "stonegeek";
private String passWord = "123456";
private MqttMessage message;
/**
* 构造函数
* @throws MqttException
*/
public ServerMQTT() throws MqttException {
// MemoryPersistence设置clientid的保存形式,默认为以内存保存
client = new MqttClient(HOST, clientid, new MemoryPersistence());
connect();
}
/**
* 用来连接服务器
*/
private void connect() {
MqttConnectOptions options = new MqttConnectOptions();
options.setCleanSession(false);
options.setUserName(userName);
options.setPassword(passWord.toCharArray());
// 设置超时时间
options.setConnectionTimeout(10);
// 设置会话心跳时间
options.setKeepAliveInterval(20);
try {
client.setCallback(new PushCallback());
client.connect(options);
topic11 = client.getTopic(TOPIC);
} catch (Exception e) {
e.printStackTrace();
}
}
/**
*
* @param topic
* @param message
* @throws MqttPersistenceException
* @throws MqttException
*/
public void publish(MqttTopic topic , MqttMessage message) throws MqttPersistenceException,
MqttException {
MqttDeliveryToken token = topic.publish(message);
token.waitForCompletion();
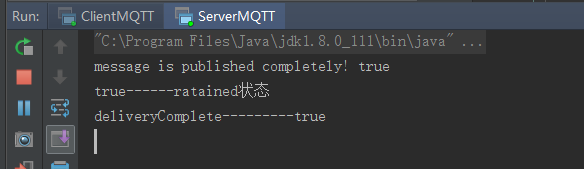
System.out.println("message is published completely! "
+ token.isComplete());
}
/**
* 启动入口
* @param args
* @throws MqttException
*/
public static void main(String[] args) throws MqttException {
ServerMQTT server = new ServerMQTT();
server.message = new MqttMessage();
server.message.setQos(1);
server.message.setRetained(true);
server.message.setPayload("hello,topic11".getBytes());
server.publish(server.topic11 , server.message);
System.out.println(server.message.isRetained() + "------ratained状态");
}
}
3、ClientMQTT.class
package com.stonegeek;
import java.util.concurrent.ScheduledExecutorService;
import org.eclipse.paho.client.mqttv3.MqttClient;
import org.eclipse.paho.client.mqttv3.MqttConnectOptions;
import org.eclipse.paho.client.mqttv3.MqttException;
import org.eclipse.paho.client.mqttv3.MqttTopic;
import org.eclipse.paho.client.mqttv3.persist.MemoryPersistence;


public class ClientMQTT {


    public static final String HOST = "tcp://192.168.1.102:1883";
    public static final String TOPIC = "mtopic";
    private static final String clientid = "client11";
    private MqttClient client;
    private MqttConnectOptions options;
    private String userName = "stonegeek";
    private String passWord = "123456";

    private ScheduledExecutorService scheduler;

    private void start() {


        try {


            // host为主机名,clientid即连接MQTT的客户端ID,一般以唯一标识符表示,MemoryPersistence设置clientid的保存形式,默认为以内存保存
            client = new MqttClient(HOST, clientid, new MemoryPersistence());
            // MQTT的连接设置
            options = new MqttConnectOptions();
            // 设置是否清空session,这里如果设置为false表示服务器会保留客户端的连接记录,这里设置为true表示每次连接到服务器都以新的身份连接
            options.setCleanSession(true);
            // 设置连接的用户名
            options.setUserName(userName);
            // 设置连接的密码
            options.setPassword(passWord.toCharArray());
            // 设置超时时间 单位为秒
            options.setConnectionTimeout(10);
            // 设置会话心跳时间 单位为秒 服务器会每隔1.5*20秒的时间向客户端发送个消息判断客户端是否在线,但这个方法并没有重连的机制
            options.setKeepAliveInterval(20);
            // 设置回调
            client.setCallback(new PushCallback());
            MqttTopic topic = client.getTopic(TOPIC);
            //setWill方法,如果项目中需要知道客户端是否掉线可以调用该方法。设置最终端口的通知消息
            options.setWill(topic, "close".getBytes(), 2, true);

            client.connect(options);
            //订阅消息
            int[] Qos  = {

    1};
            String[] topic1 = {

    TOPIC};
            client.subscribe(topic1, Qos);

        } catch (Exception e) {


            e.printStackTrace();
        }
    }

    public static void main(String[] args) throws MqttException {


        ClientMQTT client = new ClientMQTT();
        client.start();
    }
}
4、PushCallback.class
package com.stonegeek;
import org.eclipse.paho.client.mqttv3.MqttCallback;
import org.eclipse.paho.client.mqttv3.IMqttDeliveryToken;
import org.eclipse.paho.client.mqttv3.MqttMessage;
/**
* Created by StoneGeek on 2018/6/5.
* 博客地址:http://www.cnblogs.com/sxkgeek
* 发布消息的回调类
*
* 必须实现MqttCallback的接口并实现对应的相关接口方法CallBack 类将实现 MqttCallBack。
* 每个客户机标识都需要一个回调实例。在此示例中,构造函数传递客户机标识以另存为实例数据。
* 在回调中,将它用来标识已经启动了该回调的哪个实例。
* 必须在回调类中实现三个方法:
*
* public void messageArrived(MqttTopic topic, MqttMessage message)接收已经预订的发布。
*
* public void connectionLost(Throwable cause)在断开连接时调用。
*
* public void deliveryComplete(MqttDeliveryToken token))
* 接收到已经发布的 QoS 1 或 QoS 2 消息的传递令牌时调用。
* 由 MqttClient.connect 激活此回调。
*/
public class PushCallback implements MqttCallback{
public void connectionLost(Throwable cause) {
// 连接丢失后,一般在这里面进行重连
System.out.println("连接断开,可以做重连");
}
public void deliveryComplete(IMqttDeliveryToken token) {
System.out.println("deliveryComplete---------" + token.isComplete());
}
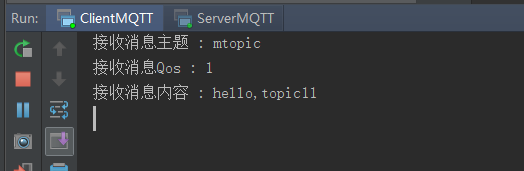
public void messageArrived(String topic, MqttMessage message) throws Exception {
// subscribe后得到的消息会执行到这里面
System.out.println("接收消息主题 : " + topic);
System.out.println("接收消息Qos : " + message.getQos());
System.out.println("接收消息内容 : " + new String(message.getPayload()));
}
}
5. Result display
MQTT client reconnection
There are two main methods for MQTT client reconnection:
The first type: automatic reconnection
set org.eclipse.paho.client.mqttv3.MqttConnectOptions#setAutomaticReconnectto true
MqttConnectOptions options = new MqttConnectOptions();
options.setAutomaticReconnect(true);
Then callback is implemented org.eclipse.paho.client.mqttv3.MqttCallbackExtended. This interface provides a callback method when the connection is completed. After the connection is completed, some operations are performed, such as subscribing to the topic.
public MyMqttCallback implements MqttCallbackExtended {


        /**
         * 连接成功会进入到这里
         * @param reconnect
         * @param serverURI
         */
        @Override
        public void connectComplete(boolean reconnect, String serverURI) {


			// 可以做订阅主题
        }
}
In this way, when the connection is disconnected, MqttClient will automatically reconnect internally, and the connectComplete() method will be called back every time the connection is successful.
Second type: Custom reconnection
If setAutomaticReconnect is not specified, it is true
public void connectionLost(Throwable throwable)Reconnections can be handled in
@Override
    public void connectionLost(Throwable throwable) {


        System.out.println("失去连接:" + throwable.getMessage());
        int times = 1;
        while (!client.isConnected()) {


            try {


                System.out.println("重新连接, 第" + (times++) + "次");
                client.reconnect();
                System.out.println("重连成功");
                break;
            } catch (MqttException e) {


                e.printStackTrace();
                System.out.println("重连失败, msg:" + e.getMessage());
            }
            // 每隔10秒重试一次
            try {


                TimeUnit.SECONDS.sleep(10);
            } catch (InterruptedException e) {


                e.printStackTrace();
            }
        }
        // 执行到这里,说明连接成功,重新订阅主题
        xxx
    }