Article directory
- Answers to the after-school exercises of Episode 6 (Part 2): Compilation of SOS distress lights
- Button lighting (below)
Answers to the after-school exercises of Episode 6 (Part 2): Compilation of SOS distress lights
Distress signal principle
Source: Asking Knowledge: How do you express SOS with lights?
Three short, three long and three short
SOS is a universal distress signal in the world. If it is represented by a light signal, three short lights represent the letter S, three long lights represent the letter O, and then the following Three short lights represent S.
The long lighting time of the light is three times the short lighting time, and the short lighting time is the same as the interval between two lighting times of the LED. There is also an off interval of three times the short lighting time between a letter and the next letter.
Chongge code and analysis
Module design:
math.h:
#ifndef __MATH_H  //if no define
#define __MATH_H

#include "stc.h"		//调用头文件,具体引用路径根据options选择的调用路径而定
#include "usb.h"

#define MAIN_Fosc 24000000UL		//定义一个IRC系统时钟

int  Add( int parm1,int parm2  );		//加法
int  Sub( int parm1,int parm2  );		//减法
int  Mul( int parm1,int parm2  );		//乘法


void SOS_Led(void);
void delay_ms(u16 ms);	//unsigned int


#endif
math.c:
Add function definition:
#include "math.h"

int  Add( int parm1,int parm2  )
{
	return parm1 + parm2;
}


int  Sub( int parm1,int parm2  )
{
	return parm1 - parm2;
}

int  Mul( int parm1,int parm2  )
{
	return parm1 * parm2;
}


void SOS_Led(void)
{
	P60 = 0;			//点亮
	delay_ms(200);
	P60 = 1;			//熄灭
	delay_ms(200);
	P60 = 0;			//点亮
	delay_ms(200);
	P60 = 1;			//熄灭
	delay_ms(200);
	P60 = 0;			//点亮
	delay_ms(200);
	P60 = 1;			//熄灭
	delay_ms(200);

	P60 = 0;			//点亮
	delay_ms(500);
	P60 = 1;			//熄灭
	delay_ms(500);
	P60 = 0;			//点亮
	delay_ms(500);
	P60 = 1;			//熄灭
	delay_ms(500);
	P60 = 0;			//点亮
	delay_ms(500);
	P60 = 1;			//熄灭
	delay_ms(500);

	P60 = 0;			//点亮
	delay_ms(200);
	P60 = 1;			//熄灭
	delay_ms(200);
	P60 = 0;			//点亮
	delay_ms(200);
	P60 = 1;			//熄灭
	delay_ms(200);
	P60 = 0;			//点亮
	delay_ms(200);
	P60 = 1;			//熄灭
	delay_ms(200);

	delay_ms(3000);

}

void delay_ms(u16 ms)	//unsigned int
{
	u16 i;
	do
	{
		i = MAIN_Fosc/6000;
		while(--i);
	}while(--ms);
}
In the main program demo.c: #include "math.h", and directly call: SOS_Led() in the main function body main() function to implement the SOS function.
First, place the function declarations of void SOS_Led(void) and void delay_ms(u16 ms) in the header file math.h:
Then, move the function definitions of void SOS_Led(void) and void delay_ms(u16 ms) to math.c:
MAIN_Fosc is used in the delay function and needs to be added. In main.c:
#define MAIN_Fosc 24000000UL //#define 名称 需要定义的内容
while main program part
while(1)		//死循环
	{
		if( DeviceState != DEVSTATE_CONFIGURED ) 	//
			continue;
		if( bUsbOutReady )
		{
			usb_OUT_done();


			printf("计算Add( 1,2 )结果为:%d\r\n",Add( 1,2 ));

			printf("计算Sub( 5,2 )结果为:%d\r\n",Sub( 5,2 ));

			printf("计算Mul( 5,3 )结果为:%d\r\n",Mul( 5,3 ));

		}
		P40 = 0;	//三极管引脚输出低电平

		SOS_Led();
	}
Compile normally and start flashing.
Button lighting (below)
1.Principle of button
Although the buttons look strange, they are essentially the connection between two pins.
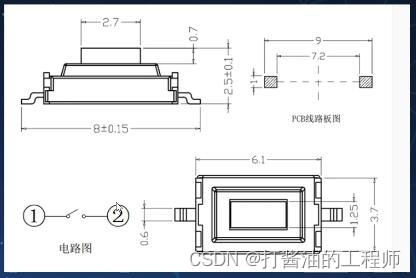
In some cases, the two pins are connected after pressing the button;
in some cases, the two pins are disconnected after the button is pressed.
Schematic diagram:
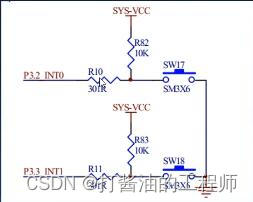
There is a pull-up resistor, if the button is not pressed. This is a complete disconnect signal.
The MCU 3.2 pin is connected to a VCC. VCC flows into the IO port of P3.2 INT0 through R10 and R82. After the button is pressed, the rear part of the resistor is connected to GND, all positions of the wire
are 0V, and R10 is a current limiting resistor to protect the IO port. After analysis, it is a high level when it is not pressed, and a low level is detected when it is pressed.
You can use the above method to judge whether the button is pressed or not.
Tips: Keystroke elimination
Assume: when the button SW17 is released, P3.2 is high level; when the button is pressed, P3.2 is low level.
The buttons are mechanical. When the mechanical switch is pressed and pops up, there will be a vibration. The vibration time is shown in the figure below:

after the low level is 10ms, it will be detected again. If it is still low, it will be judged as low level. 10ms is Debounce time to be processed.
During the process of pressing and releasing, the voltage will fluctuate up and down.
2. Key code implementation process
Sample code 1:
if( KEY == 0 )
{
    Delay_ms(10);
    if( KEY == 0 )
        {
        执行功能
        }
}
Sample code 2:
if( KEY == 0 )
{
    Delay_ms(10);
    if( KEY == 0 )
        {
        while(KEY == 0);
        执行功能
        }
}
Project example
Copy the template project folder 1.C-Printf and rename it: 3. Button control LED.
According to the schematic diagram, define 2 KEY:
#define KEY1 P32  //定义一个按键引脚KEY1
#define KEY2 P33  //定义一个按键引脚KEY2
Copy the Delay_ms function and declare it.
Add control code:
if( KEY1 == 0 )
{
Delay_ms(10);
if( KEY1 == 0 )
{
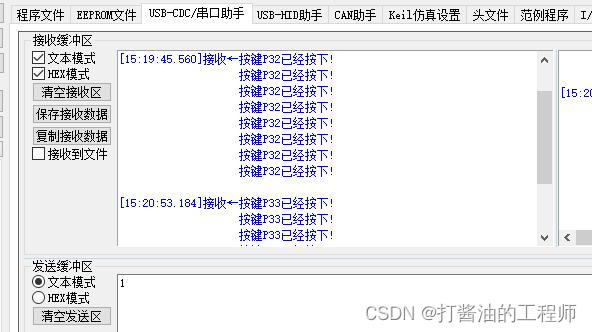
printf("按键P32已经按下!\r\n");
}
}
if( KEY2 == 0 )
{
Delay_ms(10);
if( KEY2 == 0 )
{
printf("按键P33已经按下!\r\n");
}
}
Serial port printout
3. Application of buttons
- 3.1 The LED lights up when the button is pressed and goes out when released.
Adding codes P22 = 0 and P23 = 0 can light up the LED, but it will not go out after the button is released.
It is also necessary to add judgment to achieve release and extinguishment, and the original indicator light on the board will turn on and off in the same state:
complete code:
		if( KEY1 == 0 )
			{
				Delay_ms(10);
				if( KEY1 == 0 )
					{
						printf("按键P32已经按下!\r\n");
						P22 = 0;

					}
			}
		else //如果没有按下
			{
				P22 = 1;
			}

		if( KEY2 == 0 )
			{
				Delay_ms(10);
				if( KEY2 == 0 )
					{
						printf("按键P33已经按下!\r\n");
						P23 = 0;

					}
			}
		else //如果没有按下
			{
				P23 = 1;
			}
- 3.2 Press the button and the LED will turn off, release it and light it up.
Reverse the level of P22 and P23 ports (just use the invert~ operation), release it and light it up, which is opposite to the original on-board indicator light state.
Implementation code:
		if( KEY1 == 0 )
			{
				Delay_ms(10);
				if( KEY1 == 0 )
					{
						printf("按键P32已经按下!\r\n");
						P22 =  0;  //实现按下点亮,抬起熄灭
						//P22 = !0;  //取反操作实现按下熄灭,抬起点亮

					}
			}
		else //如果没有按下
			{
				P22 =  1;
				//P22 = !1; //取反操作实现按下熄灭,抬起点亮
			}

		if( KEY2 == 0 )
			{
				Delay_ms(10);
				if( KEY2 == 0 )
					{
						printf("按键P33已经按下!\r\n");
						P23 =  0;  //实现按下点亮,抬起熄灭
						//P23 = !0;  //取反操作实现按下熄灭,抬起点亮

					}
			}
		else //如果没有按下
			{
				P22 =  1;
				//P23 = !1; //取反操作实现按下熄灭,抬起点亮
			}
- 3.3 When the button is pressed once, the LED state changes once.
The initial idea is that when pressed, the IO state is inverted, P23 = !P23;
after pressing, the waiting state is wrong. Need to increase the delay: Delay_ms(200); //Prevent detection from being too fast.
But long press the button (keep pressing it) and the LED flashes. It is necessary to add a restriction code that only executes once:
						printf("按键P33已经按下!\r\n");
						P23 =  !P23; //LED取反1次
						while( KEY2 == 0 ) //如果按键一直是按下,一直空循环,实现只执行1次
						{

						}
Can it be modified to release and then execute? Similar to the long press applied to the side of the manual, look at the code:
						while( KEY2 == 0 ) //如果按键松开,则结束空循环,则执行以下程序
						{

						}
						printf("按键P33已经松开!\r\n");
						P23 =  !P23; //LED取反1次
- 3.4 Press the button once, and the LED will move one step to the left (flowing light effect).
To operate a group of lights, take P2 as an example:
we write it in hexadecimal: P2 = 0xFE; //1111 1110 Set the initial state.
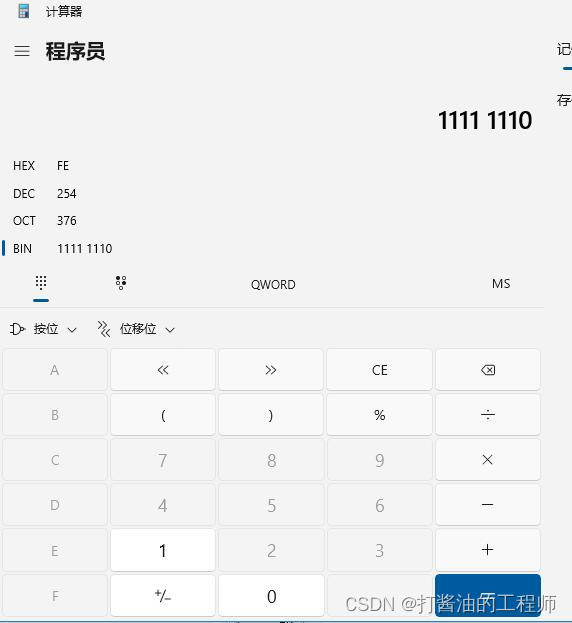
In the initial state, the rightmost light is lit first, 1111 1101
is shifted to the left by 1 position, the second light is lit, and the right is the last digit. If 0 is added, the 1st and 2nd lights are both lit, 1111 1100, and the changes are
only If you want to light up a light, you need +1 operation, which becomes: 1111 1101 Only the second light is on.
Here, a separate variable is used to calculate, and the P2 port status after a certain key press is obtained, and the value is assigned:
u8 LED_Data = 0XFD; //8个2进制位的变量
P2 = LED_Data;  //1111 1110 设定初始状态
Control code:
if( KEY2 == 0 ) //判断按键有没有按下
{
Delay_ms(10);
if( KEY2 == 0 ) //按键确实按下了
{
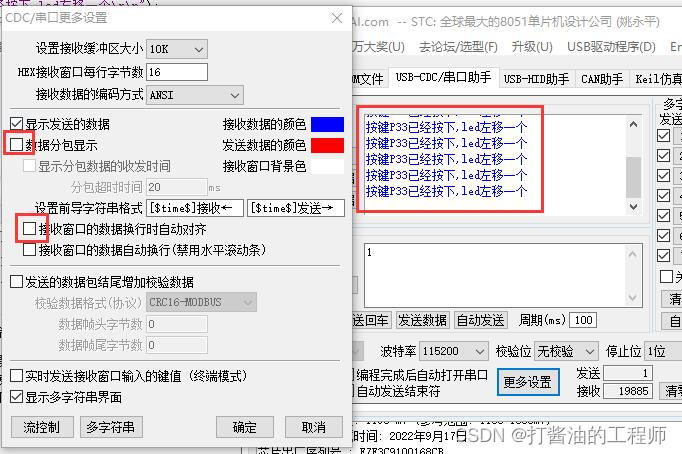
printf("按键P33已经按下,led左移一个\r\n");
LED_Data = ( (LED_Data<<1) +1 ); //本来是直接输出P2,先计算,后输出
if( LED_Data == 0xFF )
LED_Data = 0xFD;
P2 = LED_Data;
while(KEY2 == 0); //如果按键一直是按下的,一直执行while
//while函数体如果无实际执行需要,即花括号内为空,可以直接跟;结束语句,
// {
//
// }
}
}
Note : If the while function body is only used for judgment and there is no need for actual code execution, that is, if the curly braces are empty, you can directly end the statement with ";".
STC-ISP serial port tool settings
In order to simplify the serial port output data, you can perform simplified settings of the serial port tool to send characters to the display program:
Homework: After pressing P32 (KEY1) once, the light moves one to the right.
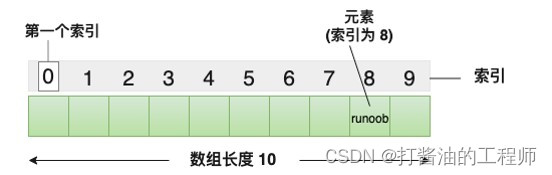
- 4. The use of arrays
The use of arrays is divided into the following two steps
1. Definition
Type name [length] = {value};
For example, to implement a running water lamp, several states are as follows:
1111 1110 0XFE
1111 1101 0XFD
1111 1011 0XFB
1111 0111 0XF7
1110 1111 0XEF 1101 1111 0XDF
1011 1111 0XBF
0111 1111
0 If X7F
wants to implement running lights, it can directly output the above status.
For example, add test code to the last line of the main while loop:
		P2 = 	0XFB;	Delay_ms(500);
		P2 = 	0XF7;	Delay_ms(500);
		P2 = 	0XEF;	Delay_ms(500);
		P2 = 	0XDF;	Delay_ms(500);
		P2 = 	0XBF;	Delay_ms(500);
		P2 = 	0X7F;	Delay_ms(500);
Effect: The running water lamp from right to left lights up for 500ms each time and lights up in sequence.
2. Use
assignment: name [index] = value
. Taking the above-mentioned running water lamp as an example, the data is: 0XFB, unsigned 8 bits, the index (total data amount) is 8, and the definition data is:
u8 LED_DataTab[8] = {0XFE,0XFD,0XFB,0XF7,0XEF,0XDF,0XBF,0X7F};
Vertical column selection text : Select the left side of the character to be selected with the cursor, hold down alt+shift, and drag to select the row or column required to be selected. You can copy it after inverting it.
Use the variable num to implement the running water lamp:
		P2 = 	LED_DataTab[num+1]; Delay_ms(500);//1111 0111  0XF7
		num++;
The above code implements the running water lamp once, and then it is all on.
Troubleshoot the problem, why: num++ has a range and needs to be limited: if (num > 7) num = 1; //num can only be up to 7. After reaching 7, it starts from 1 and returns to the far right.
Lighting control can be achieved by modifying the LED_DataTab array value. For example, if the value is assigned: LED_DataTab[3] = 0XFD;, the first light will still be lit for the third time.
You can change the data at will to achieve fancy lighting.
Summarize
1. Learn how to use keys
2. Master arrays
Exercise after class: Press the button to switch the LED to output different effects.
4 lights and 4 lights are on, or 3 lights and 3 lights are on, 2 and 2 lights move to the left and so on. Proficient in coding to implement key functions.