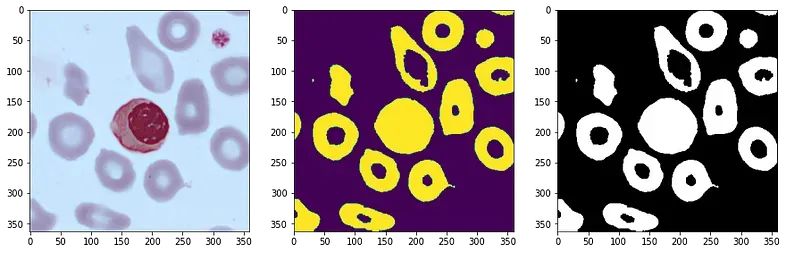
Today's article will discuss and guide you through identifying objects in images and masking those objects using OpenCV. let's start!
HSV color scale
Please take a moment to observe the pictures below. Each tile seems to be a different color, right? But here's the interesting thing: if we think about it carefully, we can actually classify them all as green. However, if we look closely, we will notice that they are different shades of green. What's going on here?
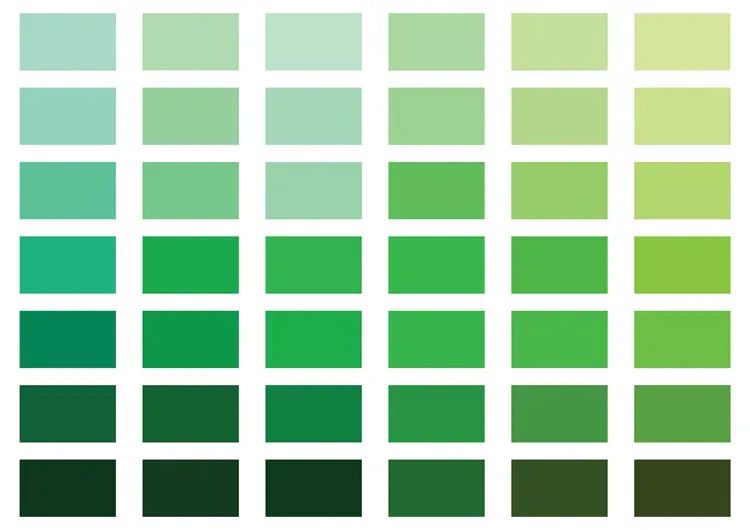
green tint
Although these tiles have the same overall color, they have different components that make up their respective specific shades of green. As we discussed earlier, these components are called red, green, and blue (RGB). So, while they both fall into the green category, their RGB combinations are different, resulting in the different green hues we observe.
But wait, is there something more behind this? Are there other reasons behind this interesting phenomenon? Indeed!
You must have seen this tab in drawing software before.
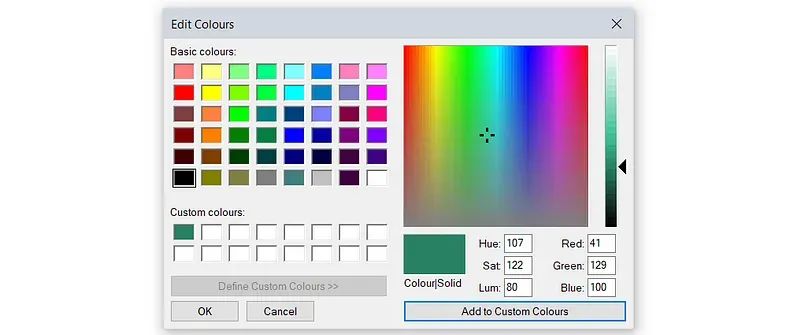
Define custom colors on paint
You can see that in addition to (R)ed, (G)reen, and (B)lue, there are 3 parameters, namely (H)ue, (S)at, and (L)um (HSL hue).
Thanks to HSL and HSV we can achieve so many shades. HSV stands for Hue, Saturation, and Value. Let's talk about HSV, which will be useful for our work in OpenCV.
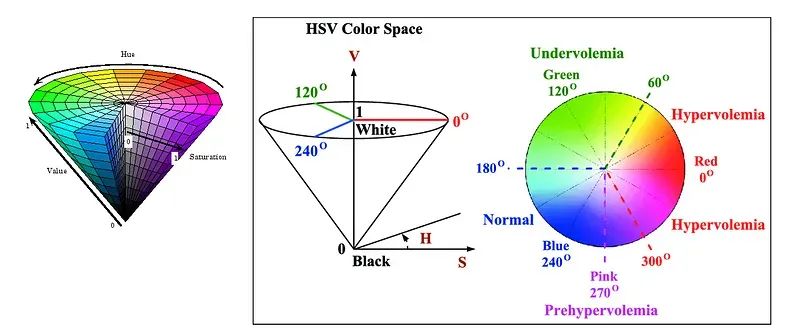
HSV color cone
H = Hue : When we talk about hue, we are talking about color in its purest form. Think about the colors you see in a rainbow—red, orange, yellow, green, blue, indigo, and violet. Each one is a different hue, representing a specific wavelength of light.
The hue range is 0 to 360 degrees.
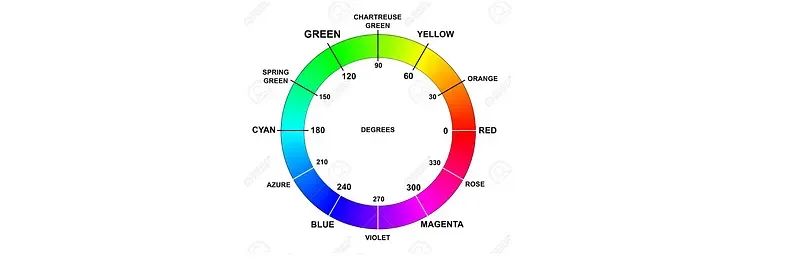
S = Saturation : Saturation refers to the vividness and intensity of a color. Highly saturated colors are bright and rich, while desaturated colors appear more muted or light. Saturation gives color depth and impact.
Saturation ranges from 0–1 (or 0–255) .
V = Value : Color value relates to the lightness or darkness of a color. It is determined by the amount of light reflected or absorbed by an object. Colors with high values are bright, while colors with low values are dark. Value plays a vital role in creating contrast and adding depth to a visual composition.
Values range from 0–1 (or 0–255) .
Let us understand why we need to convert BGR images to HSV colors.
Improved color handling
Simplified color-based analysis
Robustness to lighting changes
Compatibility with human perception
Now we will see how to use HSV images in Spyder OpenCV.
object mask
Suppose you have 3 license plates.
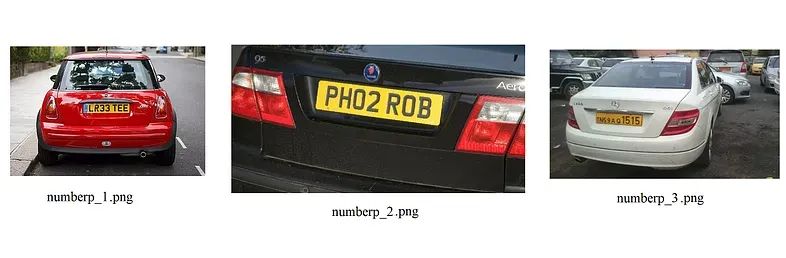
We are trying to extract the license plate numbers of these vehicles. Can we do this with BGR images?
Of course we can't. The reason behind this is that the orange/yellow color we see here is made up of different components of (R)ed, (G)reen, (B)lue and they are not constant. Additionally, the brightness, saturation, and exposure are completely different from image to image.
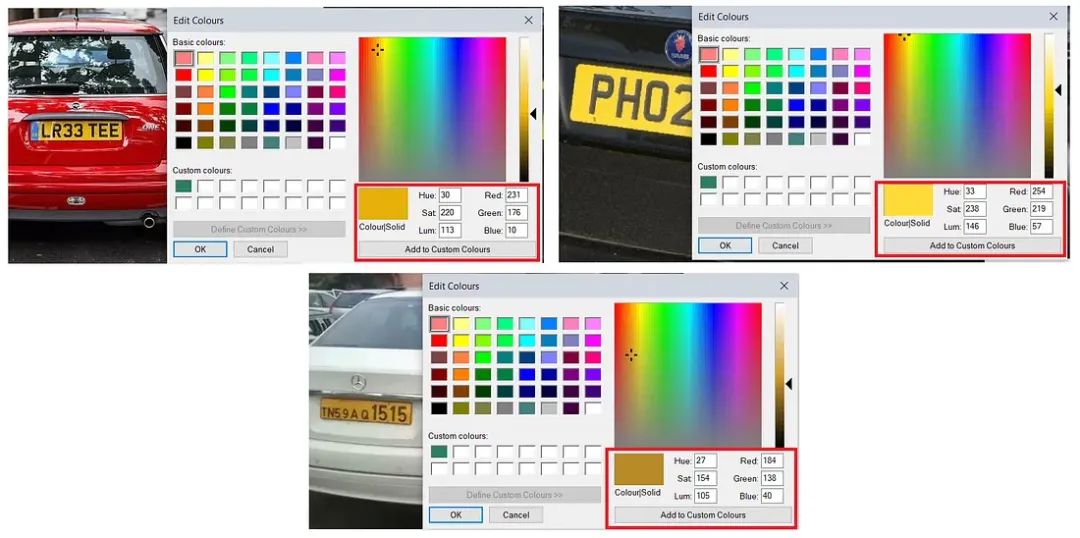
Orange RBG component in each image
So it is obvious that we cannot extract a certain color from a BGR image. We need to convert this BGR image to HSV image. Let's see how to do this.
#import necessary libraries
import cv2
import numpy as np
import matplotlib.pyplot as plt

#using opencv to read an image
#BGR Image
plate_image_1 = cv2.imread("C:/users/public/pictures/numberp_1.png")
Let's imagine this plate_image_1 .
cv2.namedWindow("BGR Image", cv2.WINDOW_NORMAL);
cv2.imshow("BGR Image",plate_image_1);

cv2.waitKey(0) & 0xFF
cv2.destroyAllWindows()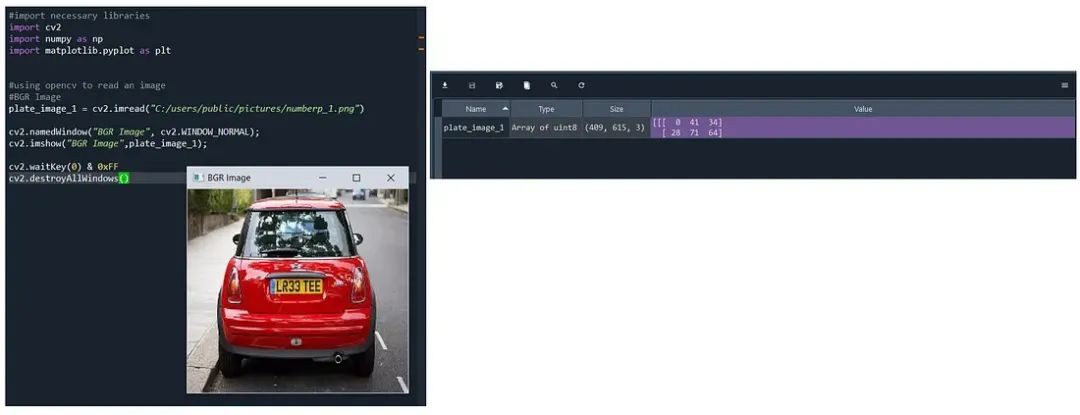
Now let's convert this plate_image_1 to HSV format. For this we use cv2.cvtColor(). We can use this function to convert BGR/RGB to HSV, RGB to BGR, convert between RGB/BGR and grayscale and many more options.

HSV_im_1 = cv2.cvtColor(plate_image_1,cv2.COLOR_BGR2HSV)Let's imagine this HSV image.
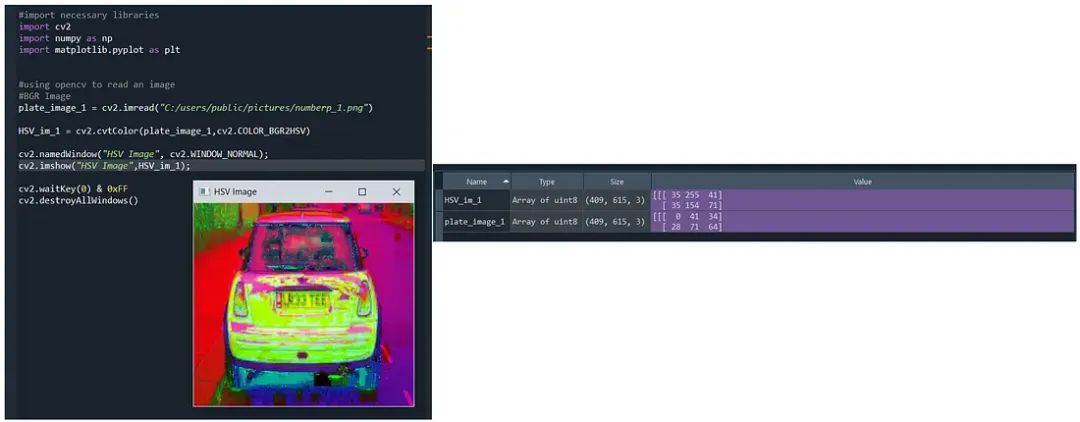
Convert BGR image to HSV color scale using OpenCV
This looks really weird to us and we'll see how we can extract the orange/yellow color from it.
Previously we discussed how brightness, saturation and exposure differ completely from image to image. To solve this problem, we define a range for the colors to extract. To be precise, we define the upper and lower boundaries for a color as we wish.
This is done by looking at the HSV color cone .
First, we determine the range of hue. Hue ranges from 0 to 360. Every 30 degrees we get a different color. Let's look at it's orange color.
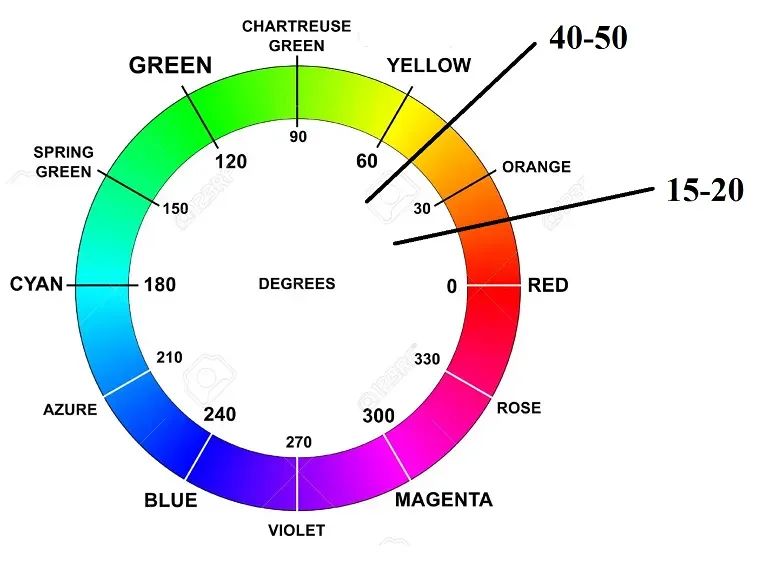
By roughly estimating the lower hue at 15-20 degrees and the upper hue at 40-50 degrees, we can clearly determine the range that contains each hue of orange.
For saturation and lightness, we get the entire range from 0 to 1 to accommodate all changes in brightness in the image. This provides an accurate representation of lighter or darker tones within the color spectrum.

Let's define it in Spyder.
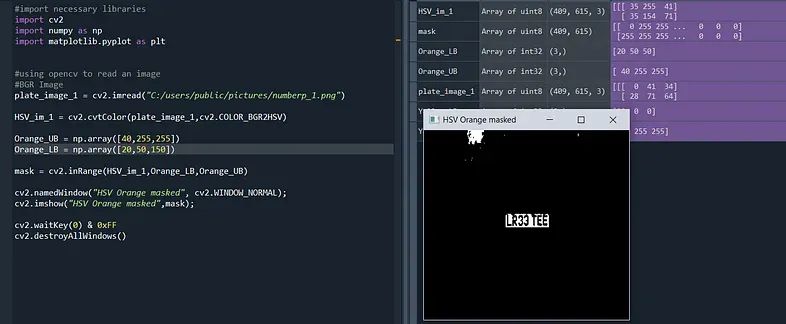
Orange_UB = np.array([40,255,255])
Orange_LB = np.array([20,0,0])
Now we define a mask to track the orange color in the image. This is done using cv2.inRange() . We introduce upper and lower bounds and the images required to perform masking.
mask = cv2.inRange(HSV_im_1,Orange_LB,Orange_UB)Let's imagine this mask.
cv2.namedWindow("HSV Orange masked", cv2.WINDOW_NORMAL);
cv2.imshow("HSV Orange masked",mask);

cv2.waitKey(0) & 0xFF
cv2.destroyAllWindows()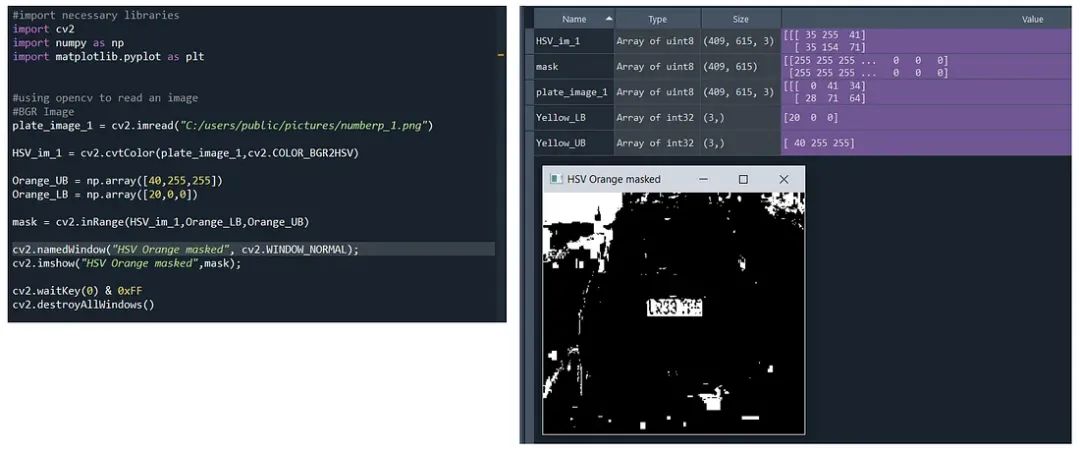
Almost there! ! We can see the license plate almost clearly, but there are other unnecessary pixels that are obscured. How do we optimize our masks? We need to vary the saturation and range of values until we get a satisfactory mask.
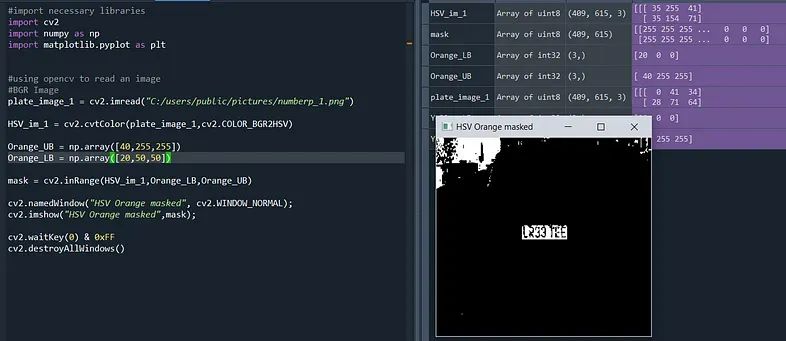
about there! Let's fine-tune it a little more.
Looks good! !
This is how we extract objects of a specific color (range) from an image.
Complete code
#import necessary libraries
import cv2
import numpy as np
import matplotlib.pyplot as plt

#using opencv to read an image #BGR Image
plate_image_1 = cv2.imread("C:/users/public/pictures/numberp_1.png")

#converting BGR to HSV
HSV_im_1 = cv2.cvtColor(plate_image_1,cv2.COLOR_BGR2HSV)

#defining HSV range
Orange_UB = np.array([40,255,245])
Orange_LB = np.array([20,55,180])

#masking
mask = cv2.inRange(HSV_im_1,Orange_LB,Orange_UB)

#visualizing
cv2.namedWindow("HSV Orange masked", cv2.WINDOW_NORMAL);
cv2.imshow("HSV Orange masked",mask);

cv2.waitKey(0) & 0xFF
cv2.destroyAllWindows()
☆ END ☆
If you see this, it means you like this article, please forward it and like it. Search "uncle_pn" on WeChat. Welcome to add the editor's WeChat "woshicver". A high-quality blog post will be updated in the circle of friends every day.
↓ Scan the QR code to add editor↓
