5. Login function
Complete login processing through the most basic login operations
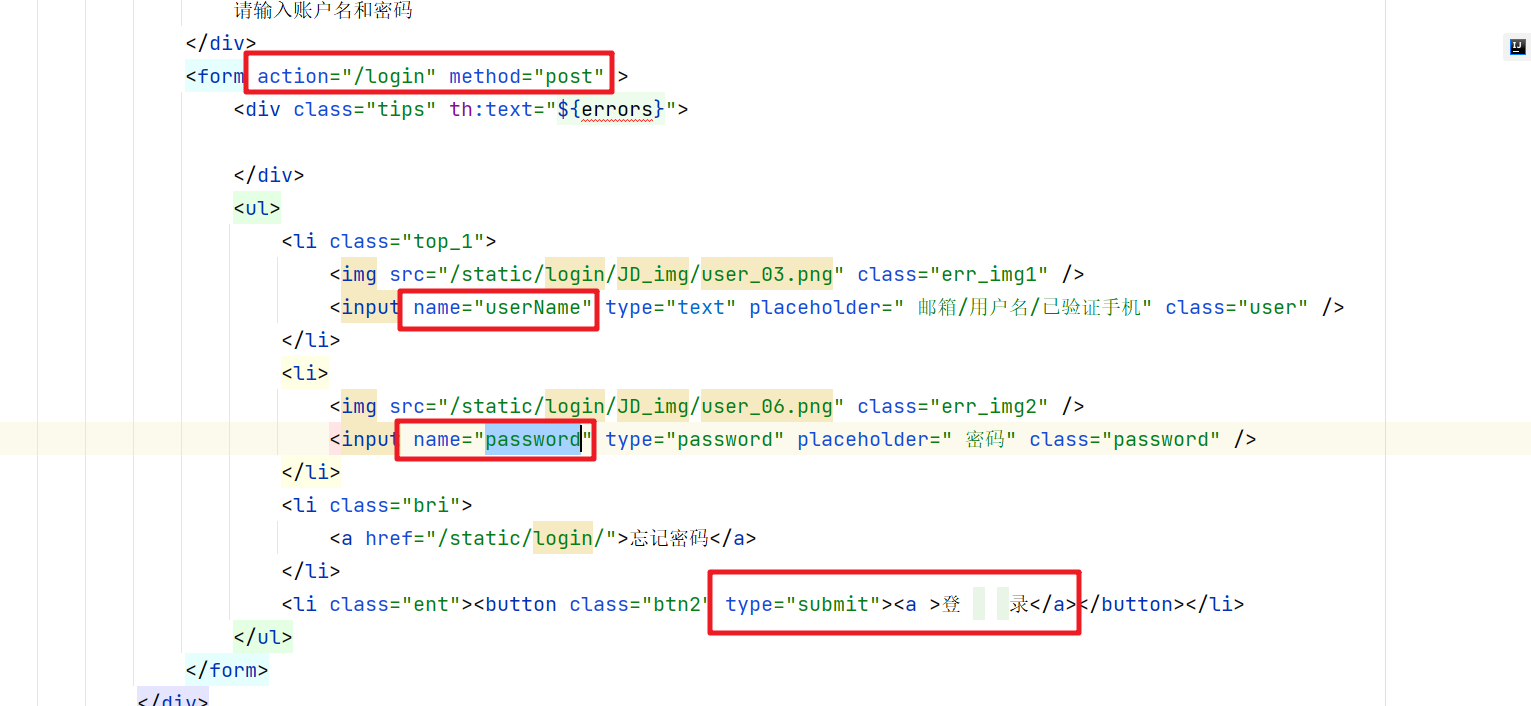
Login page processing
Processing of authentication services
    /**
     * 注册的方法
     * @return
     */
    @PostMapping("/login")
    public String login(LoginVo loginVo , RedirectAttributes redirectAttributes){


        R r = memberFeginService.login(loginVo);
        if(r.getCode() == 0){


            // 表示登录成功
            return "redirect:http://msb.mall.com/home";
        }

        redirectAttributes.addAttribute("errors",r.get("msg"));

        // 表示登录失败,重新跳转到登录页面
        return "redirect:http://msb.auth.com/login.html";


    }
Authentication logic of member center
    @RequestMapping("/login")
    public R login(@RequestBody MemberLoginVO vo){


        MemberEntity entity = memberService.login(vo);
        if(entity != null){


            return R.ok();
        }

        return R.error(BizCodeEnume.USERNAME_PHONE_VALID_EXCEPTION.getCode(),
                BizCodeEnume.USERNAME_PHONE_VALID_EXCEPTION.getMsg());
    }
Specific authentication processing in service
    @Override
    public MemberEntity login(MemberLoginVO vo) {


        // 1.根据账号或者手机号来查询会员信息
        MemberEntity entity = this.getOne(new QueryWrapper<MemberEntity>()
                .eq("username", vo.getUserName())
                .or()
                .eq("mobile", vo.getUserName()));
        if(entity != null){


            // 2.如果账号或者手机号存在 然后根据密码加密后的校验来判断是否登录成功
            BCryptPasswordEncoder encoder = new BCryptPasswordEncoder();
            boolean matches = encoder.matches(vo.getPassword(), entity.getPassword());
            if(matches){


                // 表明登录成功
                return entity;
            }
        }
        return null;
    }
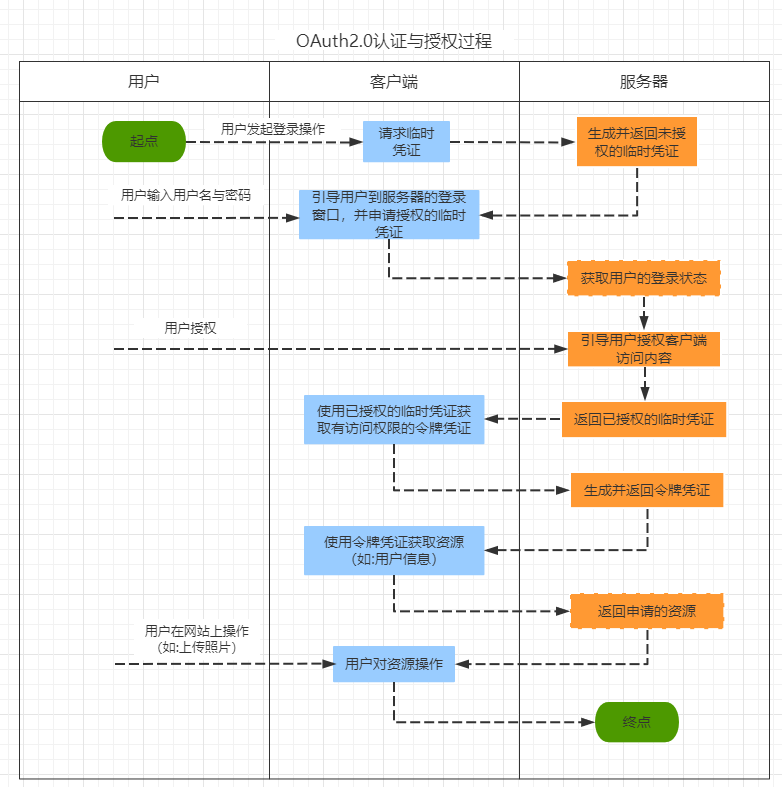
6.Auth2.0
OAuth2.0 is a continuation of the OAuth protocol, but is not forward compatible with OAuth 1.0 (that is, OAuth1.0 is completely abolished). OAuth
2.0 focuses on simplicity for client developers. Either by structuring approved interactions between the resource owner and the HTTP provider on behalf of the user, or by allowing third-party applications to gain access on the user's behalf.
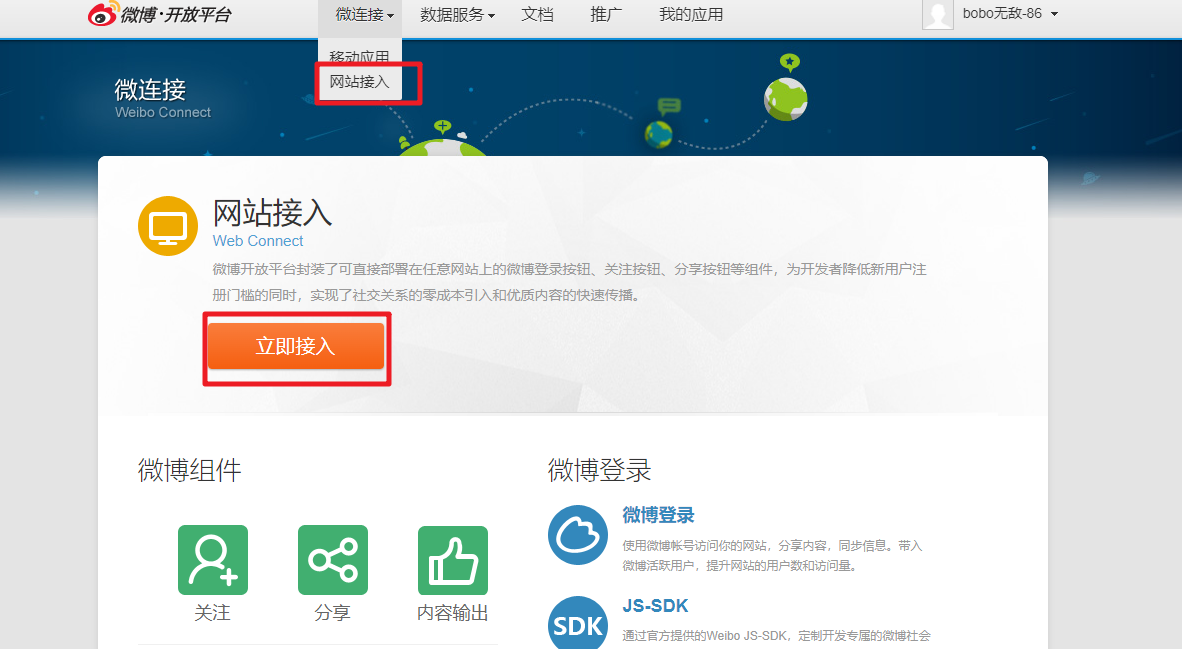
6.1 Weibo open platform
Address: https://open.weibo.com/

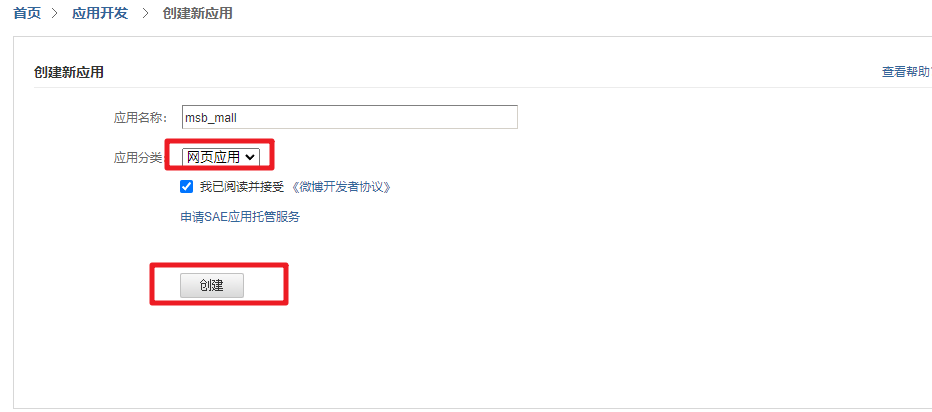
Create app
Basic information after creation:

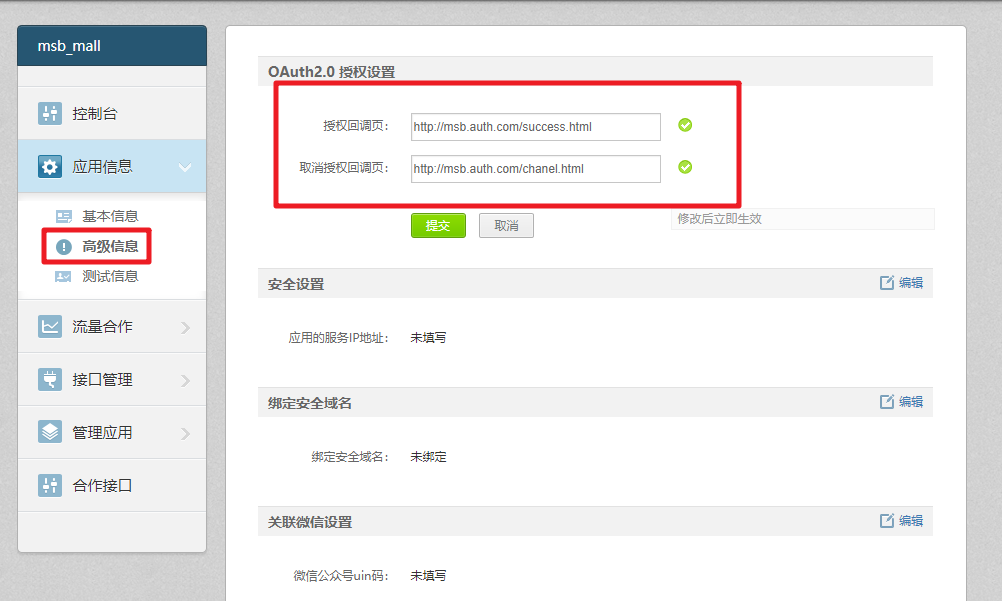
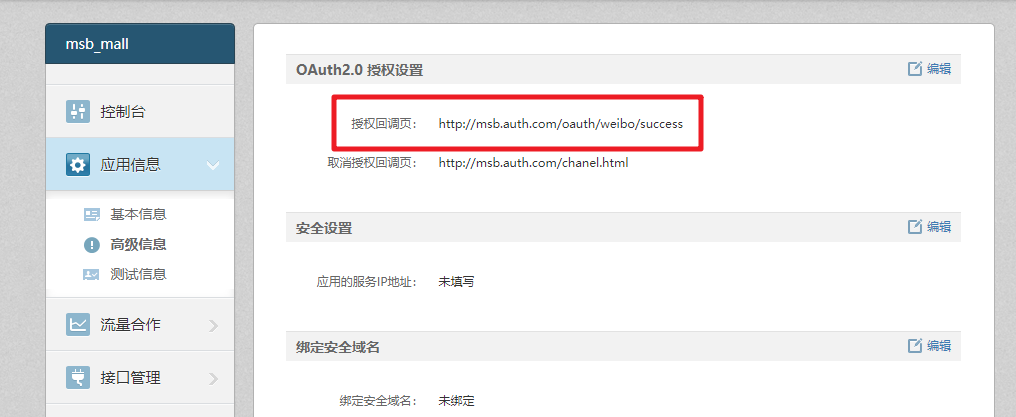
Authorization settings:
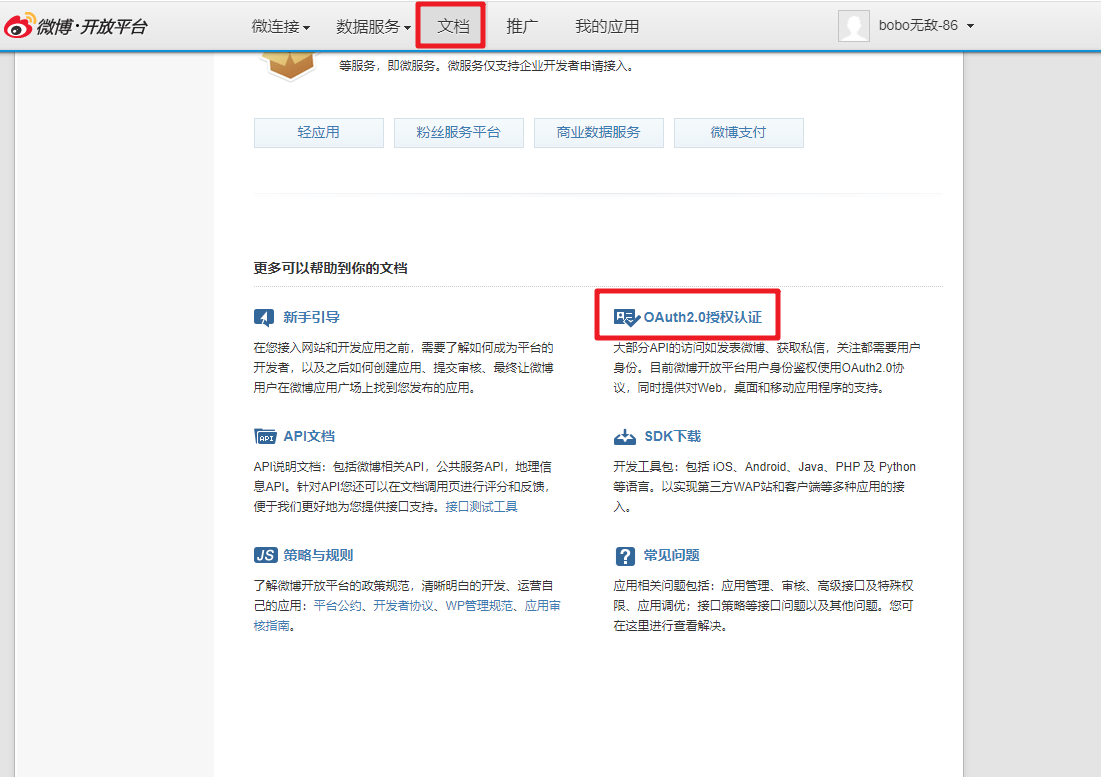
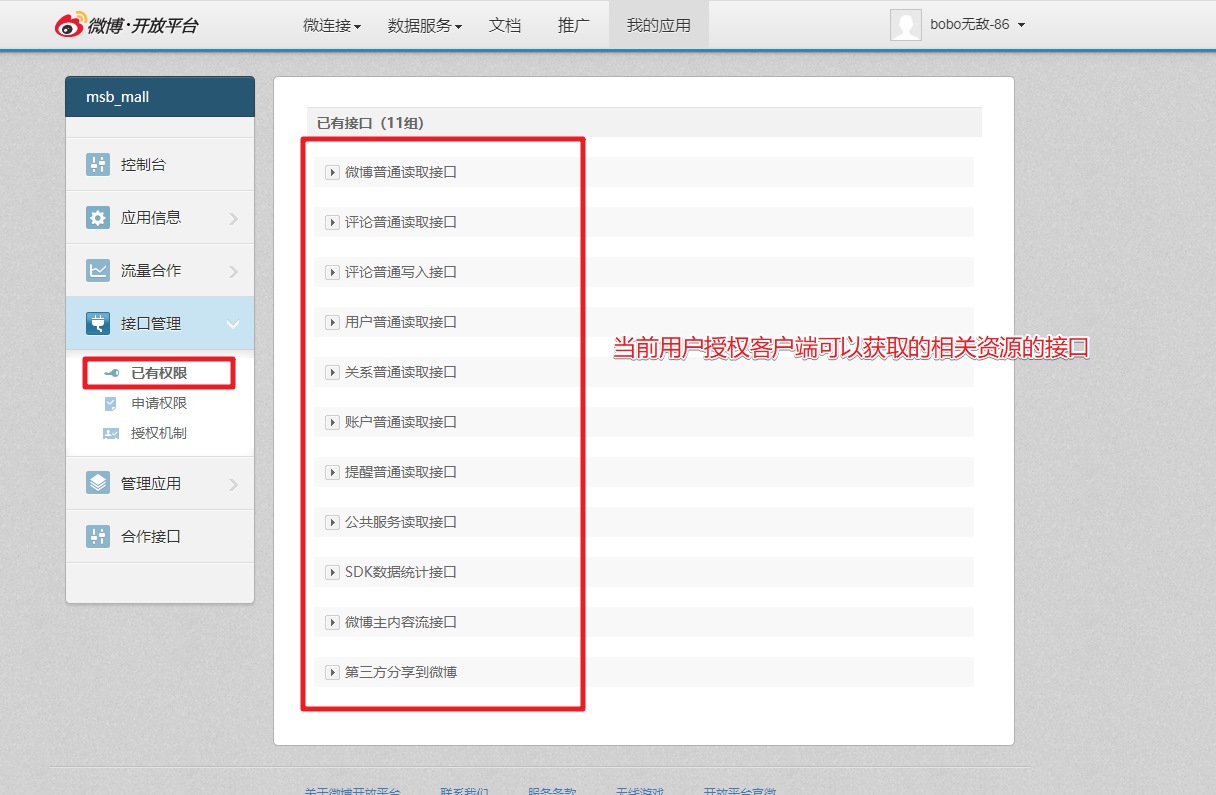
Social Authentication Document:
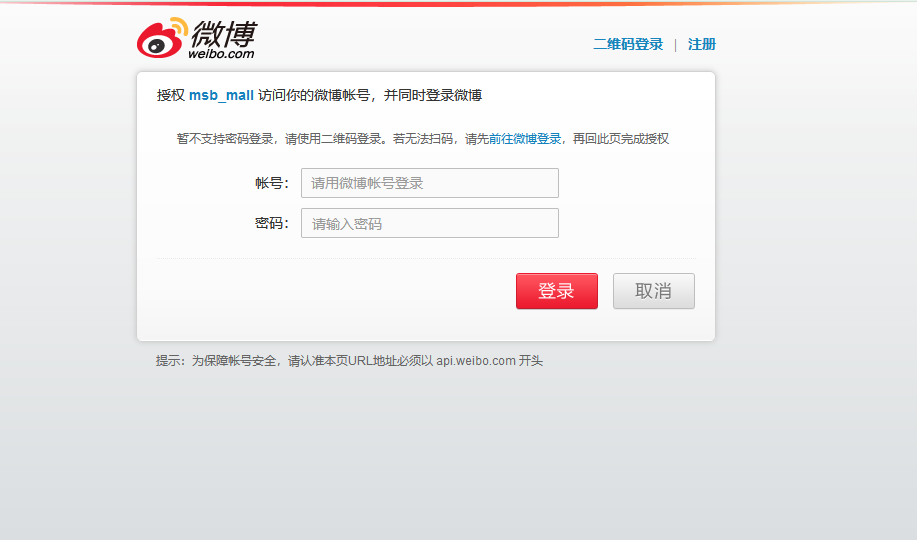
Weibo Web side authorized operations:
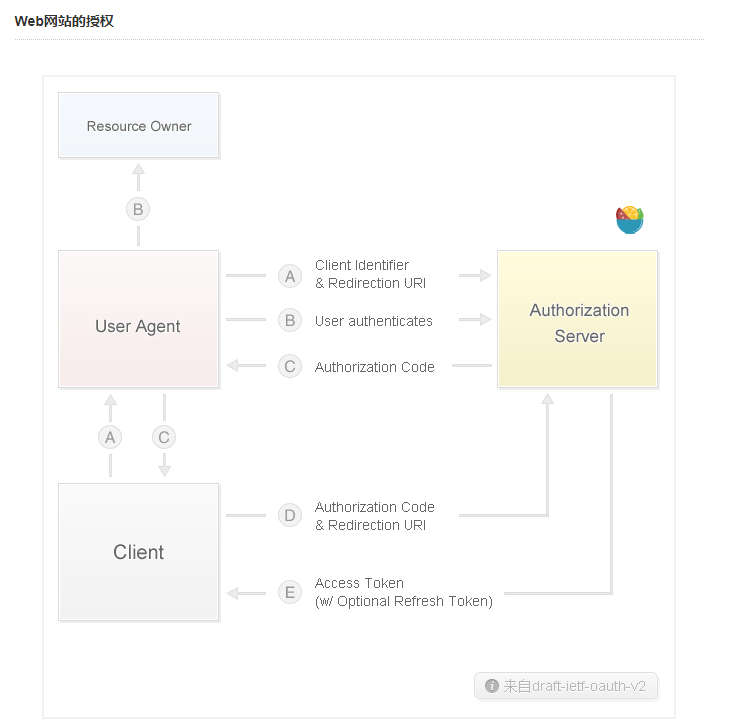
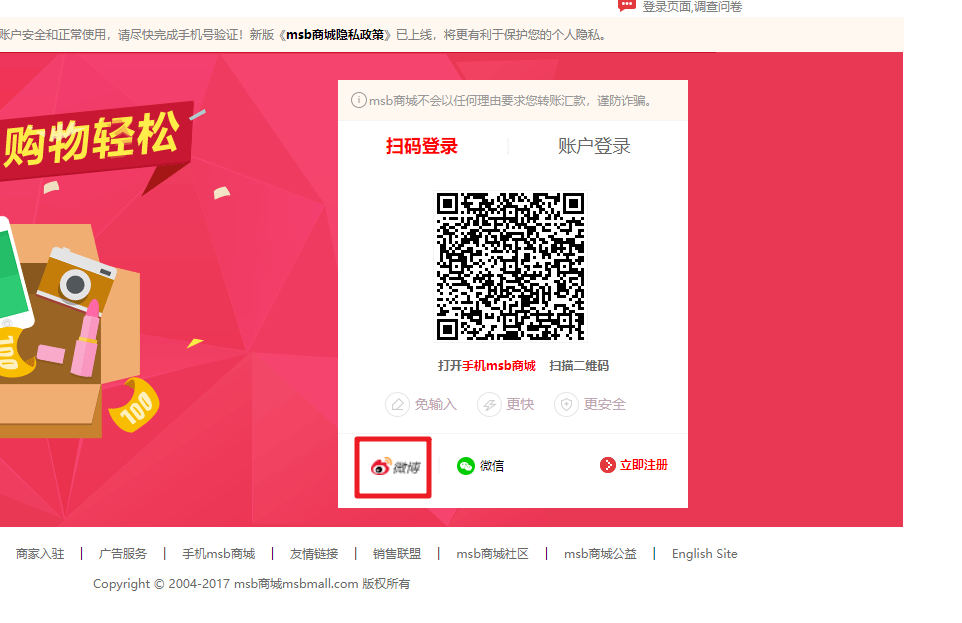
Guide users to click the button to jump to the corresponding authorization page.
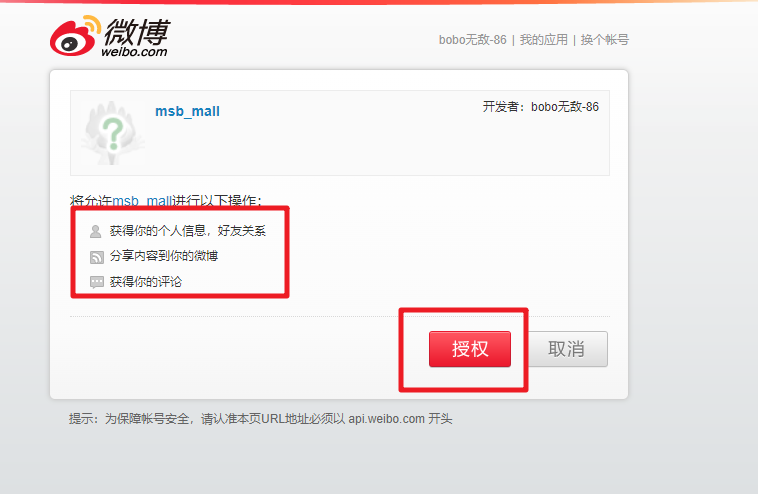
Click the authorization button to view the code information of the callback interface.
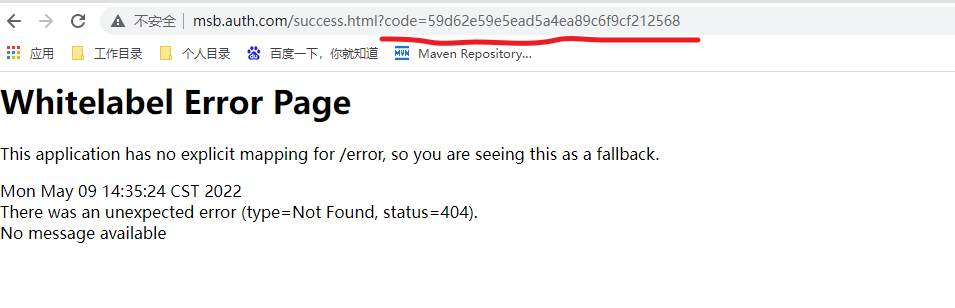
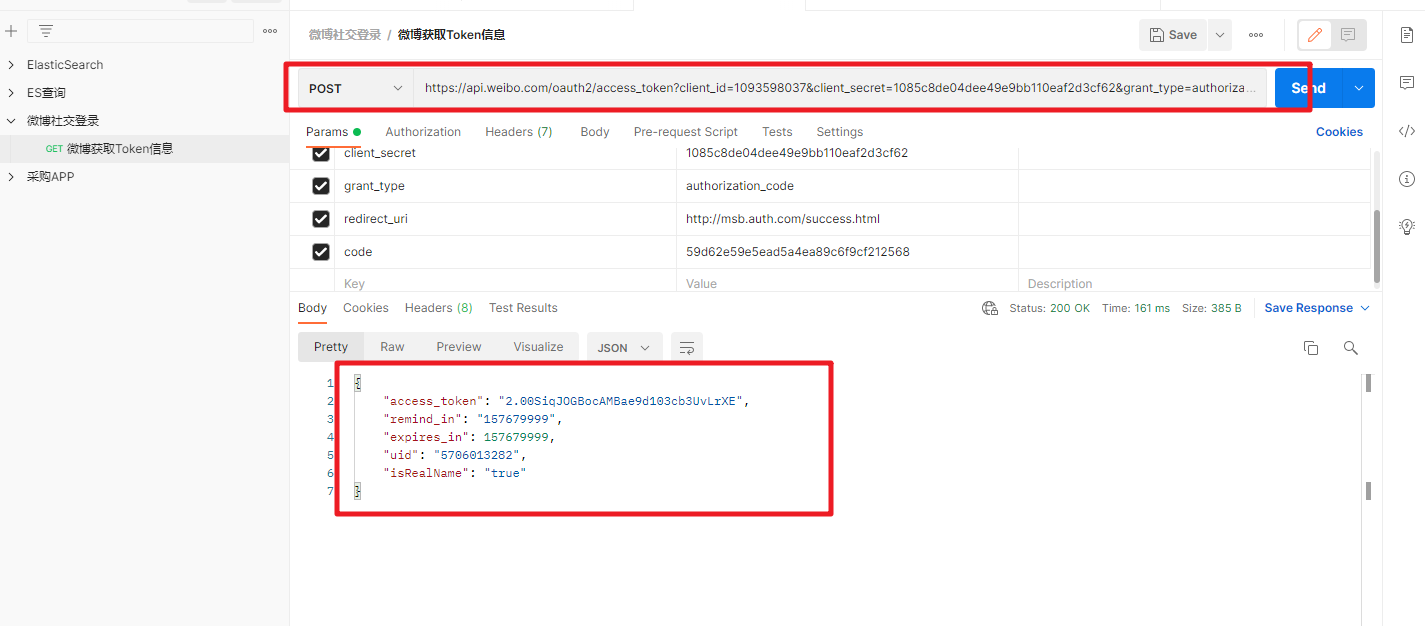
Obtained code information: 59d62e59e5ead5a4ea89c6f9cf212568
Then based on the code information, we can go to the authorization server to obtain the corresponding AccessToken.
https://api.weibo.com/oauth2/access_token?client_id=1093598037&client_secret=1085c8de04dee49e9bb110eaf2d3cf62&grant_type=authorization_code&redirect_uri=http://msb.auth.com/success.html&code=59d62e59e5ead5a4ea89c6f9cf212568
Obtaining Token information only supports POST submission.

In PostMan, the corresponding token information was successfully obtained through post submission.
After obtaining the Token information, we can go to the resource server to obtain the object information.
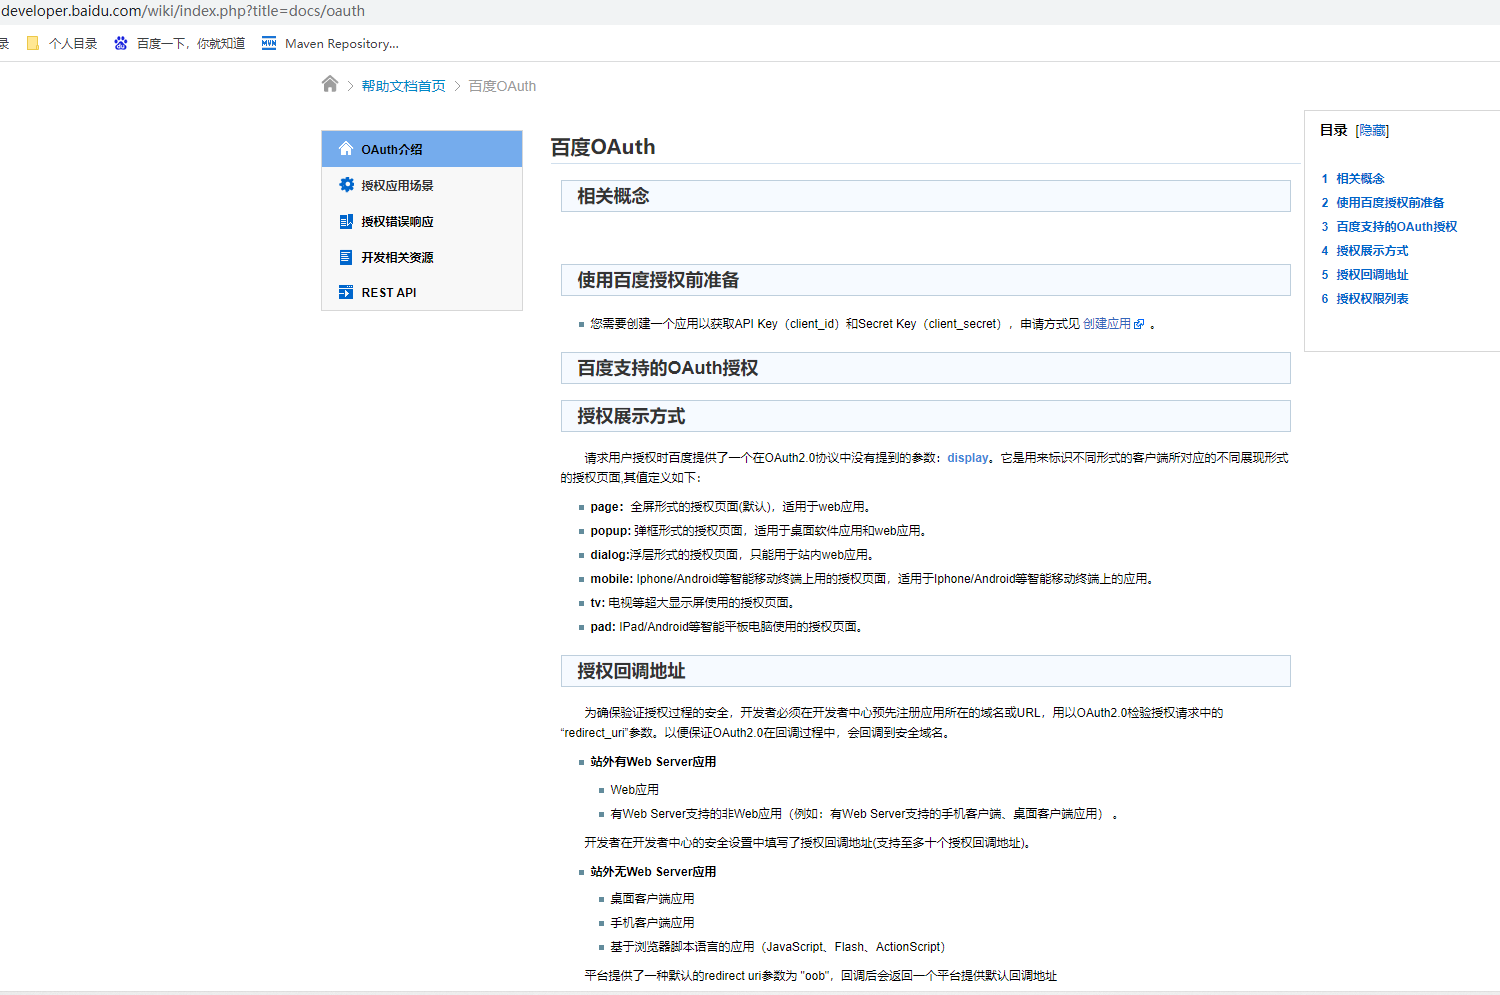
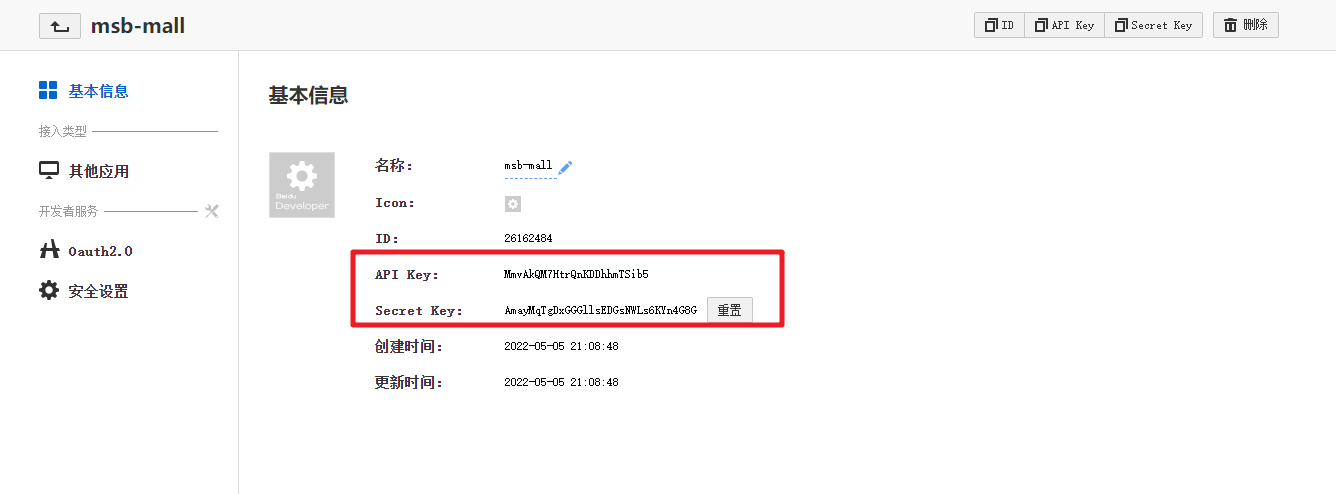
6.2 Baidu Open Platform
address:
Auth2.0 operation: https://developer.baidu.com/wiki/index.php?title=docs/oauth
Create an application: http://developer.baidu.com/console#app/project

Creation completed:
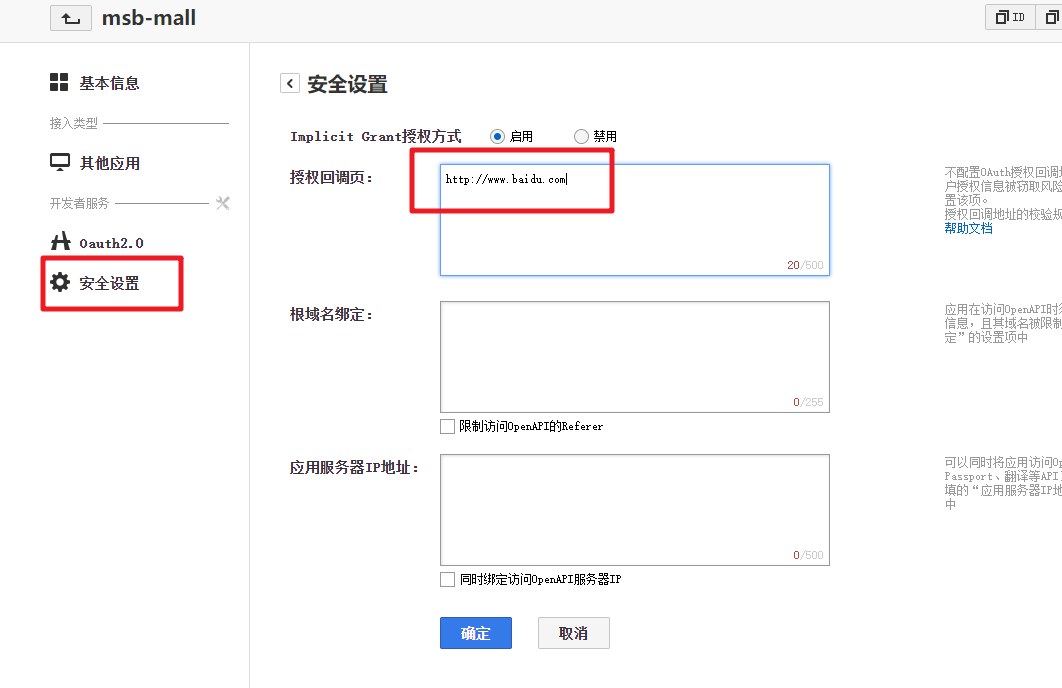
Guide users to jump to the authorized address:
http://openapi.baidu.com/oauth/2.0/authorize?
	response_type=code&
	client_id=YOUR_CLIENT_ID&
	redirect_uri=YOUR_REGISTERED_REDIRECT_URI&
	scope=email&
	display=popup
Change the address to our own: http://openapi.baidu.com/oauth/2.0/authorize?response_type=code&client_id=MmvAkQM7HtrQnKDDhhmTSib5&redirect_uri=http://www.baidu.com&display=popup
Obtained Code information
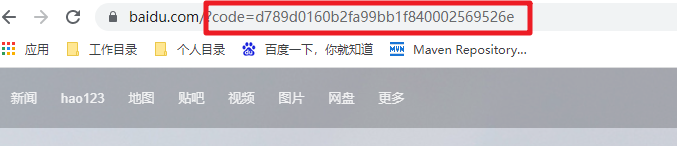
code:d789d0160b2fa99bb1f840002569526e
Obtain the corresponding token information
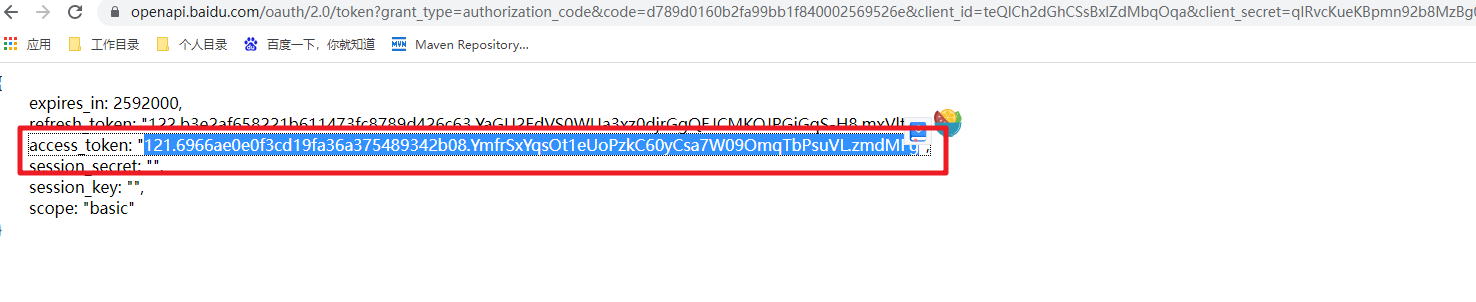
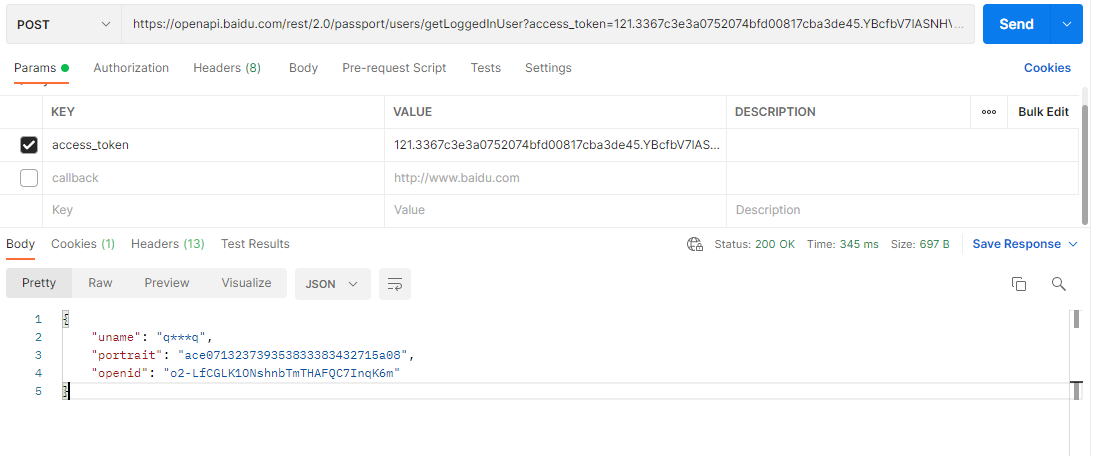
Token:121.6966ae0e0f3cd19fa36a375489342b08.YmfrSxYqsOt1eUoPzkC60yCsa7W09OmqTbPsuVL.zmdMFg
Token access address: https://openapi.baidu.com/rest/2.0/passport/users/getLoggedInUser?access_token=121.6966ae0e0f3cd19fa36a375489342b08.YmfrSxYqsOt1eUoPzkC60yCsa7W09OmqTbPsuVL.zmdMFg
7. Social login implementation
7.1 code processing
Obtain the code in the background service and obtain the Token information accordingly.
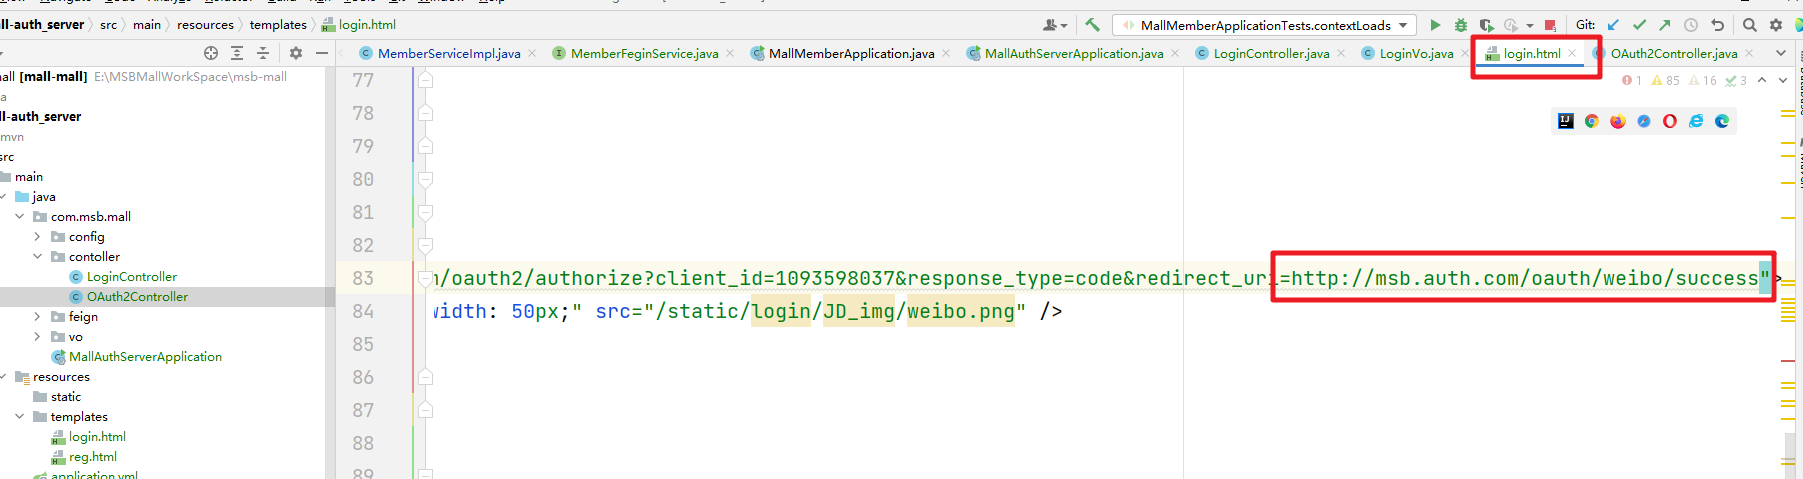
Then the imported link address needs to be adjusted synchronously:
7.2 Obtain Token information
According to the code information obtained in the previous step, we can obtain the corresponding Token information
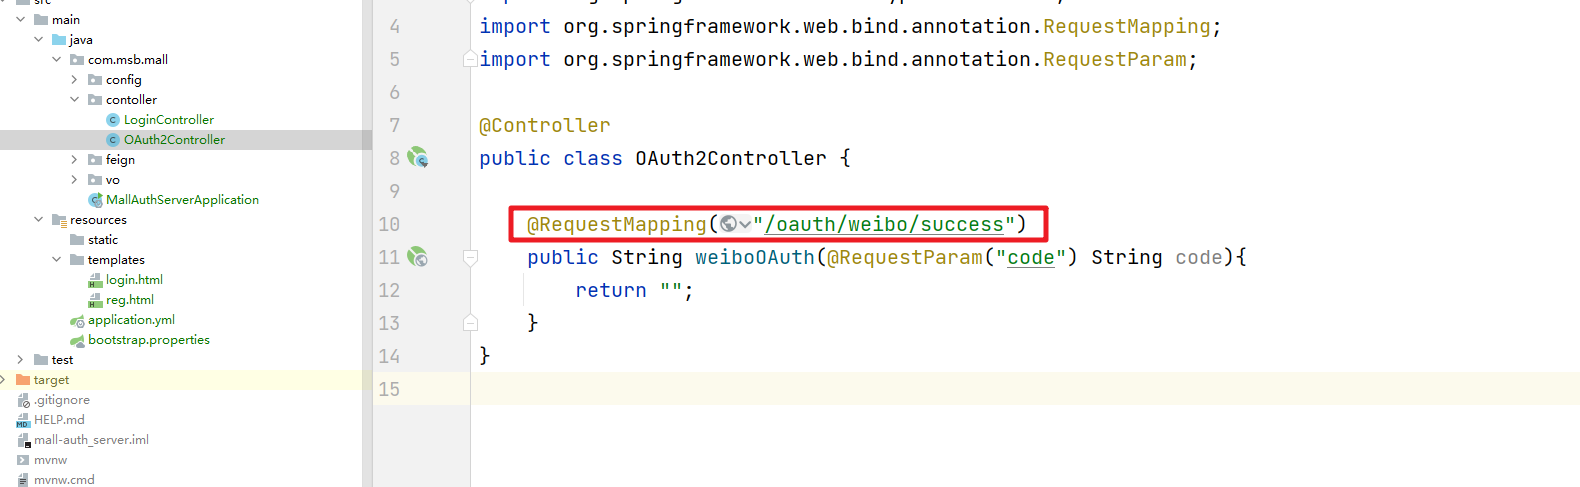
    @RequestMapping("/oauth/weibo/success")
    public String weiboOAuth(@RequestParam("code") String code) throws Exception {


        Map<String,String> body = new HashMap<>();
        body.put("client_id","1093598037");
        body.put("client_secret","1085c8de04dee49e9bb110eaf2d3cf62");
        body.put("grant_type","authorization_code");
        body.put("redirect_uri","http://msb.auth.com/oauth/weibo/success");
        body.put("code",code);
        // 根据Code获取对应的Token信息
        HttpResponse post = HttpUtils.doPost("https://api.weibo.com"
                , "/oauth2/access_token"
                , "post"
                , new HashMap<>()
                , null
                , body
        );
        int statusCode = post.getStatusLine().getStatusCode();
        if(statusCode != 200){


            // 说明获取Token失败,就调回到登录页面
            return "redirect:http://msb.auth.com/login.html";
        }
        // 说明获取Token信息成功
        String json = EntityUtils.toString(post.getEntity());
        SocialUser socialUser = JSON.parseObject(json, SocialUser.class);
        // 注册成功就需要调整到商城的首页
        return "redirect:http://msb.mall.com/home.html";
    }
7.3 Login and registration
Add corresponding new ones to the table structure
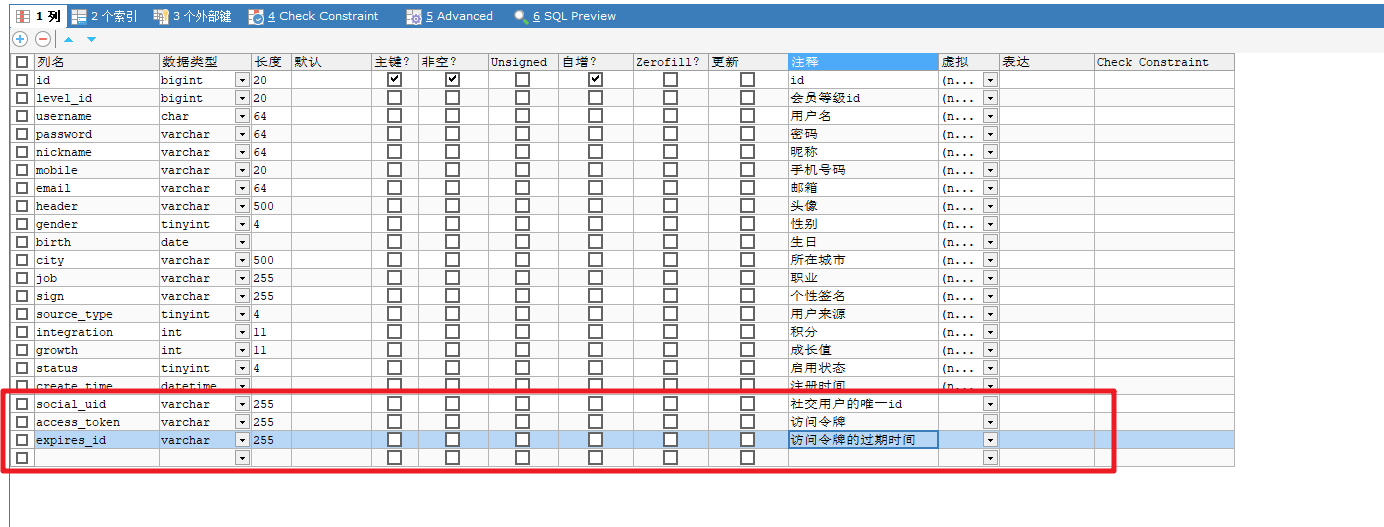
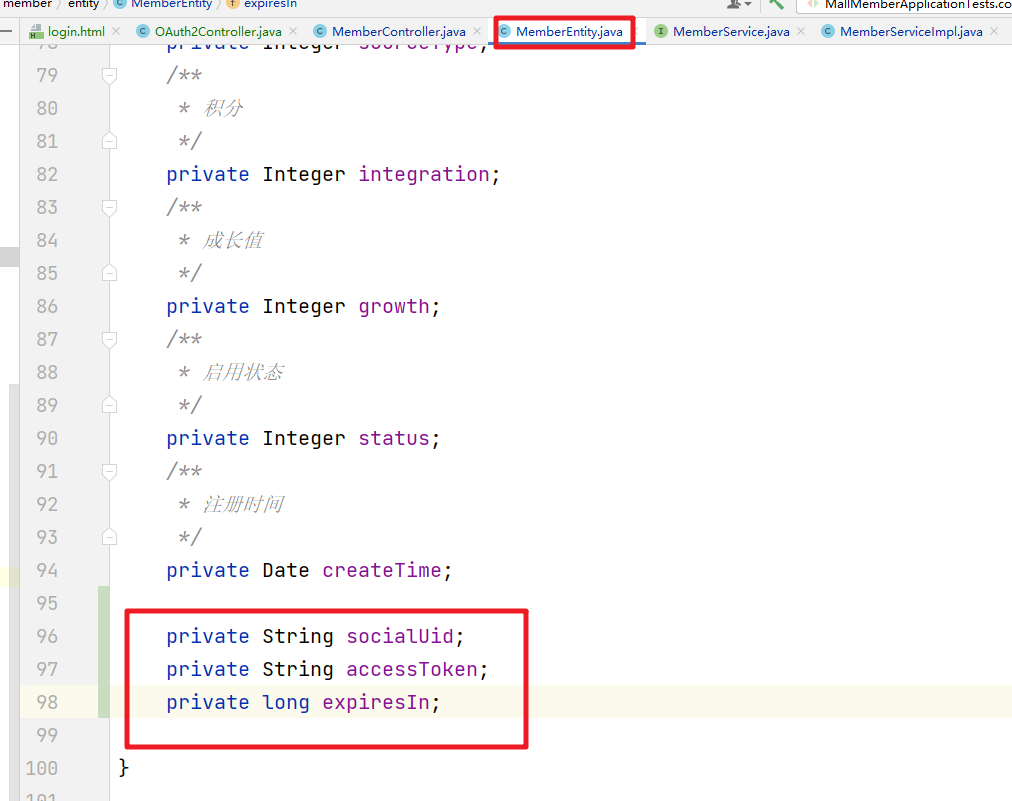
Then add the corresponding attributes to the corresponding entity object
Implement registration and login logic in service
    /**
     * 社交登录
     * @param vo
     * @return
     */
    @Override
    public MemberEntity login(SocialUser vo) {


        String uid = vo.getUid();
        // 如果该用户是第一次社交登录,那么需要注册
        // 如果不是第一次社交登录 那么就更新相关信息 登录功能
        MemberEntity memberEntity = this.getOne(new QueryWrapper<MemberEntity>().eq("social_uid", uid));
        if(memberEntity != null){


            // 说明当前用户已经注册过了 更新token和过期时间
            MemberEntity entity = new MemberEntity();
            entity.setId(memberEntity.getId());
            entity.setAccessToken(vo.getAccessToken());
            entity.setExpiresIn(vo.getExpiresIn());
            this.updateById(entity);
            // 在返回的登录用户信息中我们同步的也保存 token和过期时间
            memberEntity.setAccessToken(vo.getAccessToken());
            memberEntity.setExpiresIn(vo.getExpiresIn());
            return memberEntity;
        }
        // 表示用户是第一提交,那么我们就需要对应的来注册
        MemberEntity entity = new MemberEntity();
        entity.setAccessToken(vo.getAccessToken());
        entity.setExpiresIn(vo.getExpiresIn());
        entity.setSocialUid(vo.getUid());
        // 通过token调用微博开发的接口来获取用户的相关信息
        try {


            Map<String,String> querys = new HashMap<>();
            querys.put("access_token",vo.getAccessToken());
            querys.put("uid",vo.getUid());
            HttpResponse response = HttpUtils.doGet("https://api.weibo.com"
                    , "/2/users/show.json"
                    , "get"
                    , new HashMap<>()
                    , querys
            );
            if(response.getStatusLine().getStatusCode() == 200){


                String json = EntityUtils.toString(response.getEntity());
                JSONObject jsonObject = JSON.parseObject(json);
                String nickName = jsonObject.getString("screen_name");
                String gender = jsonObject.getString("gender");
                entity.setNickname(nickName);
                entity.setGender("m".equals(gender)?1:0);
            }
        }catch (Exception e){


        }
        // 注册用户信息
        this.save(entity);
        return entity;
    }
7.4 Concatenation of logins
In the Auth service, we need to call related services in MemberService through Feign to complete the final series.
    @RequestMapping("/oauth/weibo/success")
    public String weiboOAuth(@RequestParam("code") String code) throws Exception {


        Map<String,String> body = new HashMap<>();
        body.put("client_id","1093598037");
        body.put("client_secret","1085c8de04dee49e9bb110eaf2d3cf62");
        body.put("grant_type","authorization_code");
        body.put("redirect_uri","http://msb.auth.com/oauth/weibo/success");
        body.put("code",code);
        // 根据Code获取对应的Token信息
        HttpResponse post = HttpUtils.doPost("https://api.weibo.com"
                , "/oauth2/access_token"
                , "post"
                , new HashMap<>()
                , null
                , body
        );
        int statusCode = post.getStatusLine().getStatusCode();
        if(statusCode != 200){


            // 说明获取Token失败,就调回到登录页面
            return "redirect:http://msb.auth.com/login.html";
        }
        // 说明获取Token信息成功
        String json = EntityUtils.toString(post.getEntity());
        SocialUser socialUser = JSON.parseObject(json, SocialUser.class);
        R r = memberFeginService.socialLogin(socialUser);
        if(r.getCode() != 0){


            // 登录错误
            return "redirect:http://msb.auth.com/login.html";
        }
        String entityJson = (String) r.get("entity");
        System.out.println("----------------->" + entityJson);
        // 注册成功就需要调整到商城的首页
        return "redirect:http://msb.mall.com/home";
    }
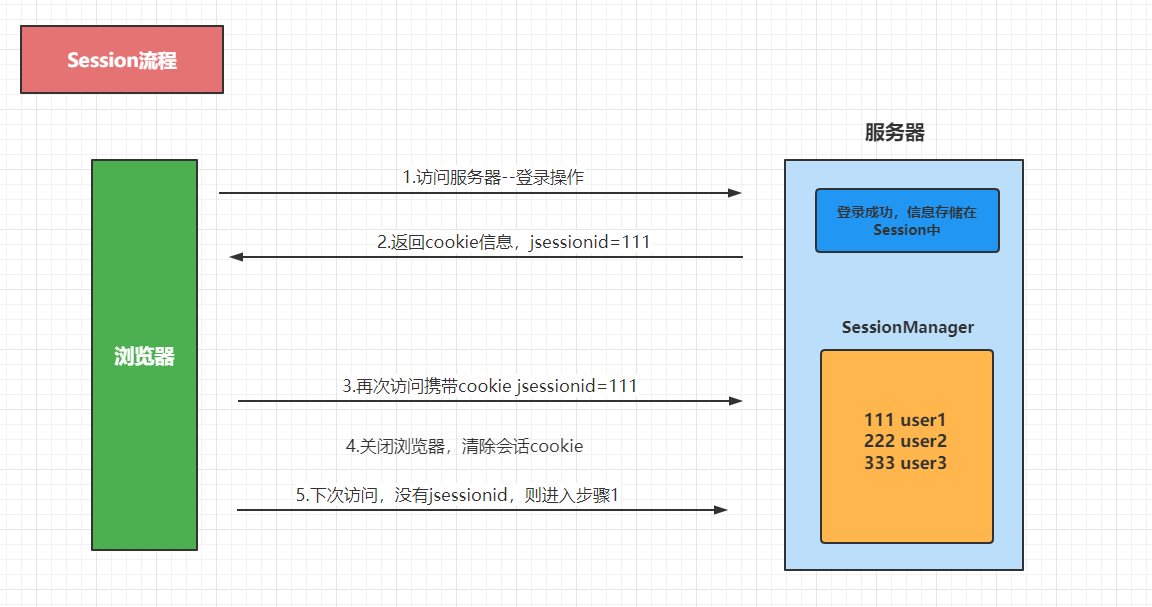
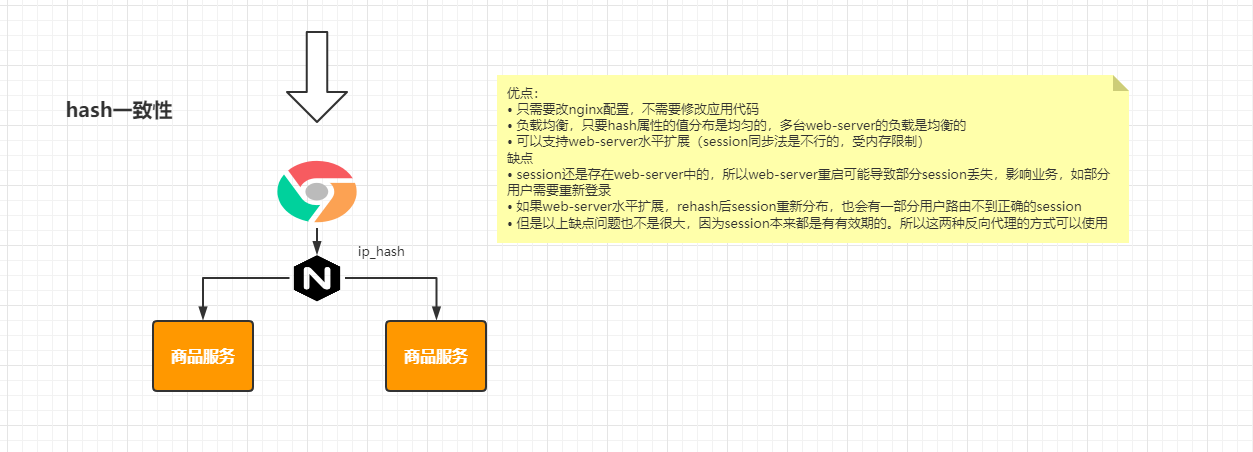
2. Distributed session
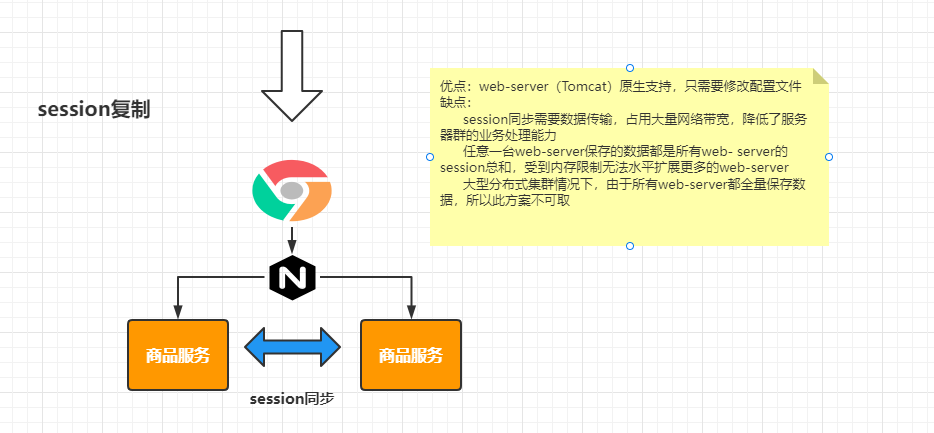
1.session problem

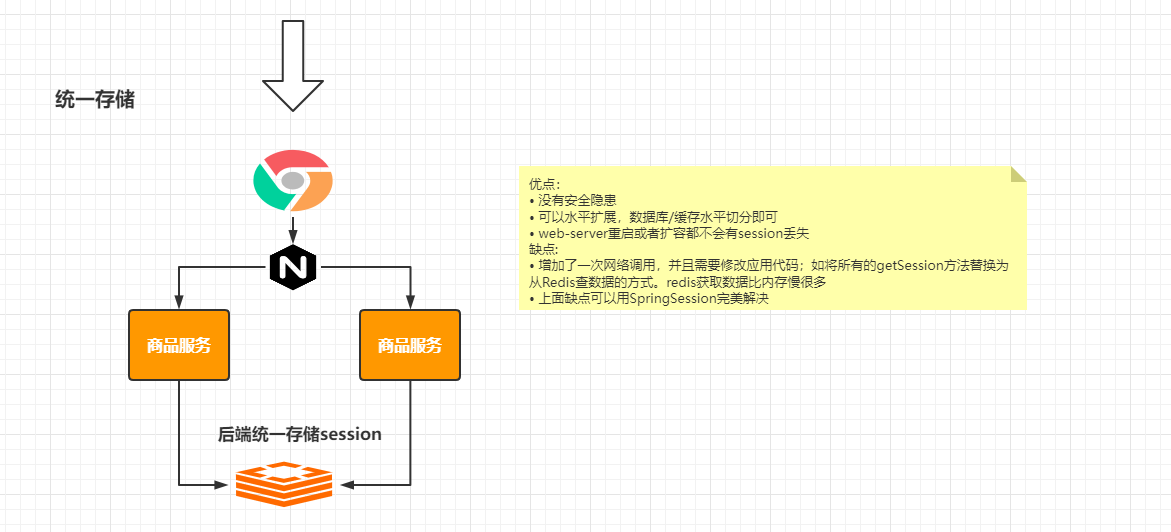
2.SpringSession integration
We use SpringSession to realize Session sharing, and Session data is stored in Redis.
SpringSession operation guide:
https://docs.spring.io/spring-session/docs/2.5.6/reference/html5/guides/boot-redis.html
Import related dependencies
        <dependency>
            <groupId>org.springframework.session</groupId>
            <artifactId>spring-session-data-redis</artifactId>
        </dependency>
Set the corresponding configuration
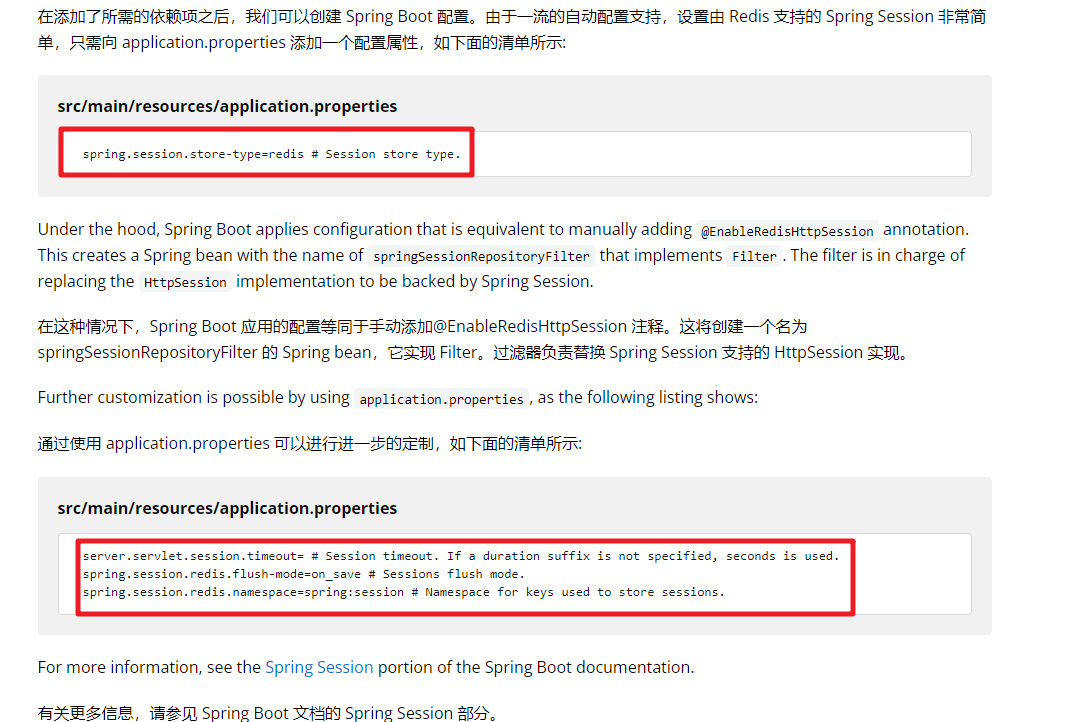
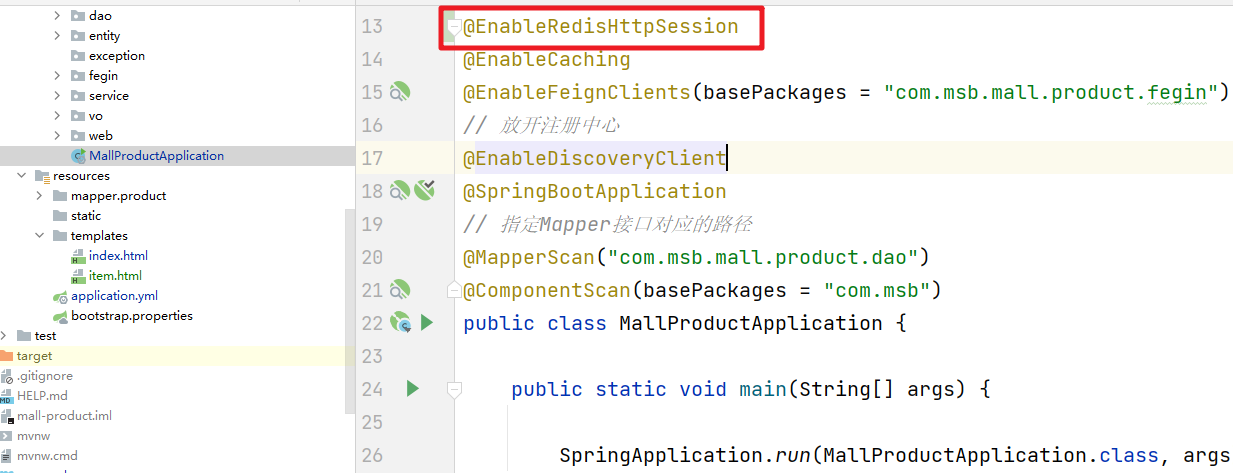
Finally, we need to add some comments and let go of the operation
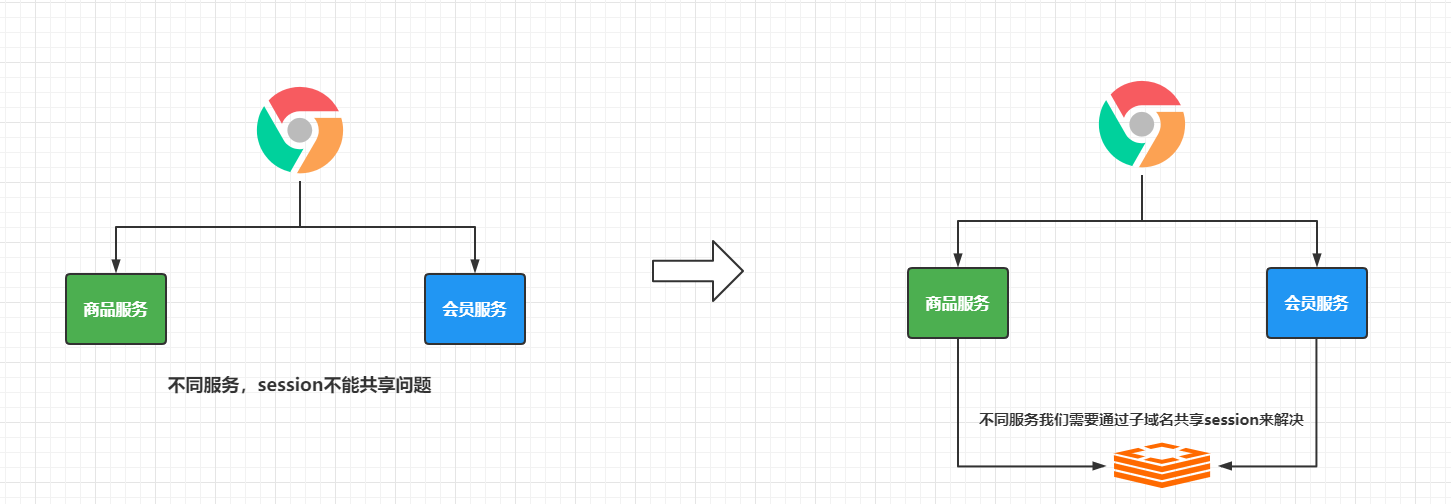
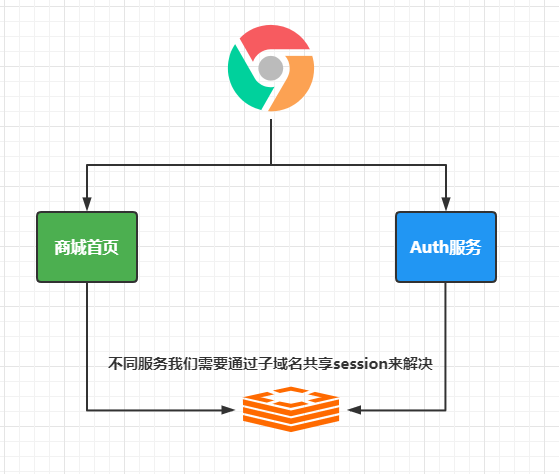
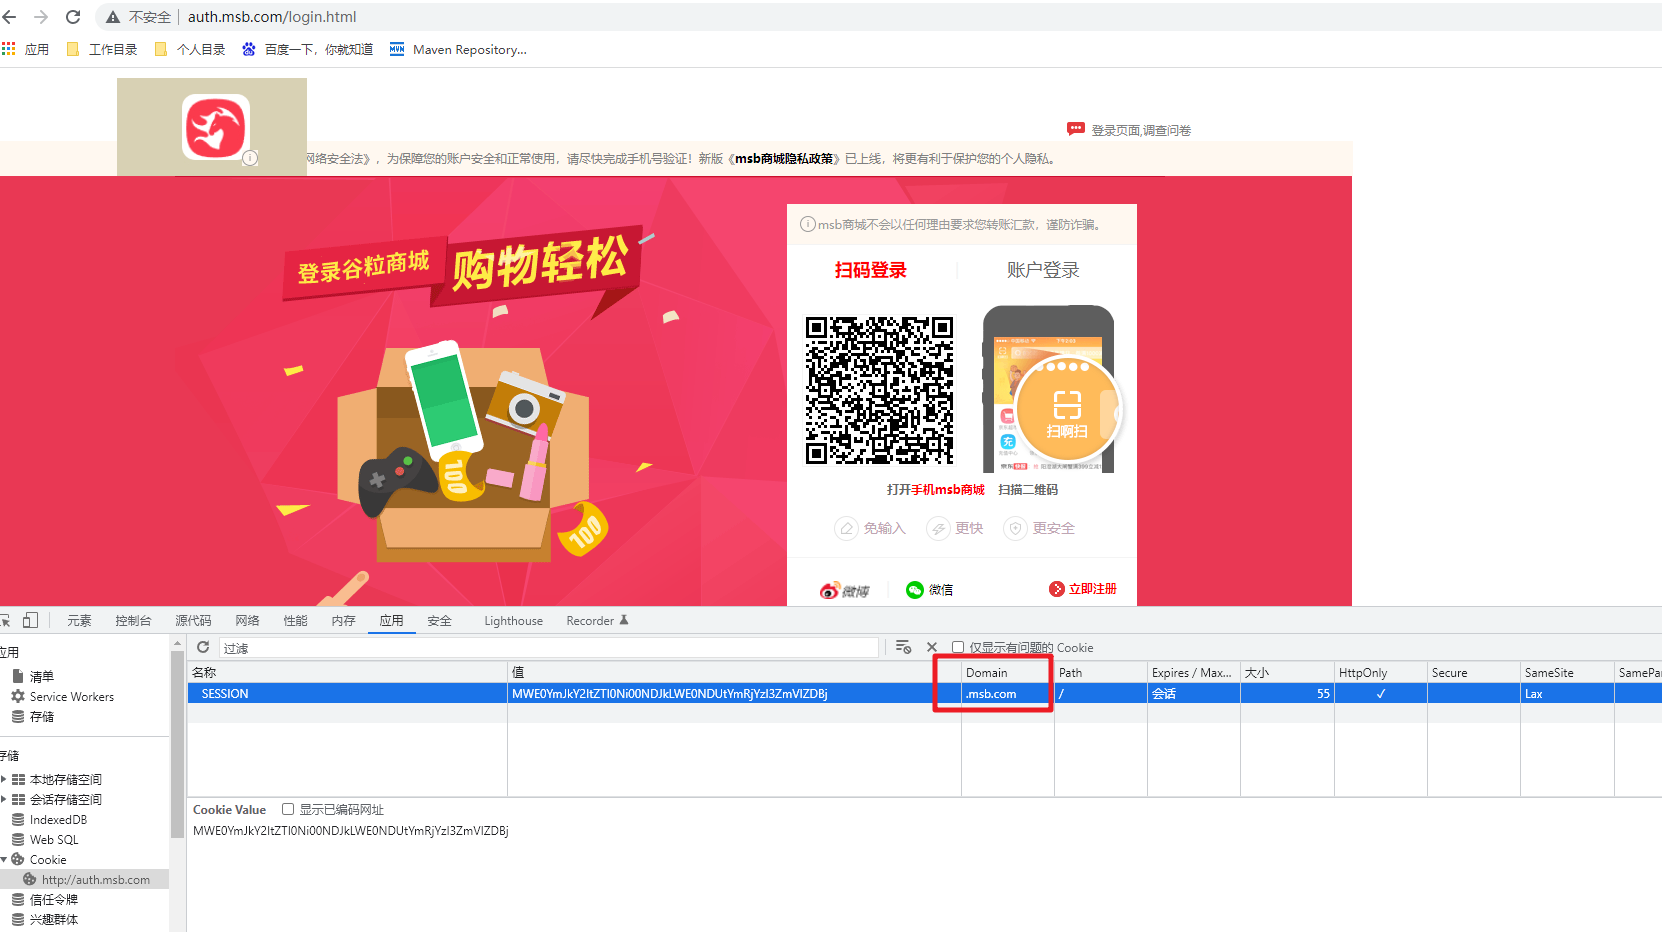
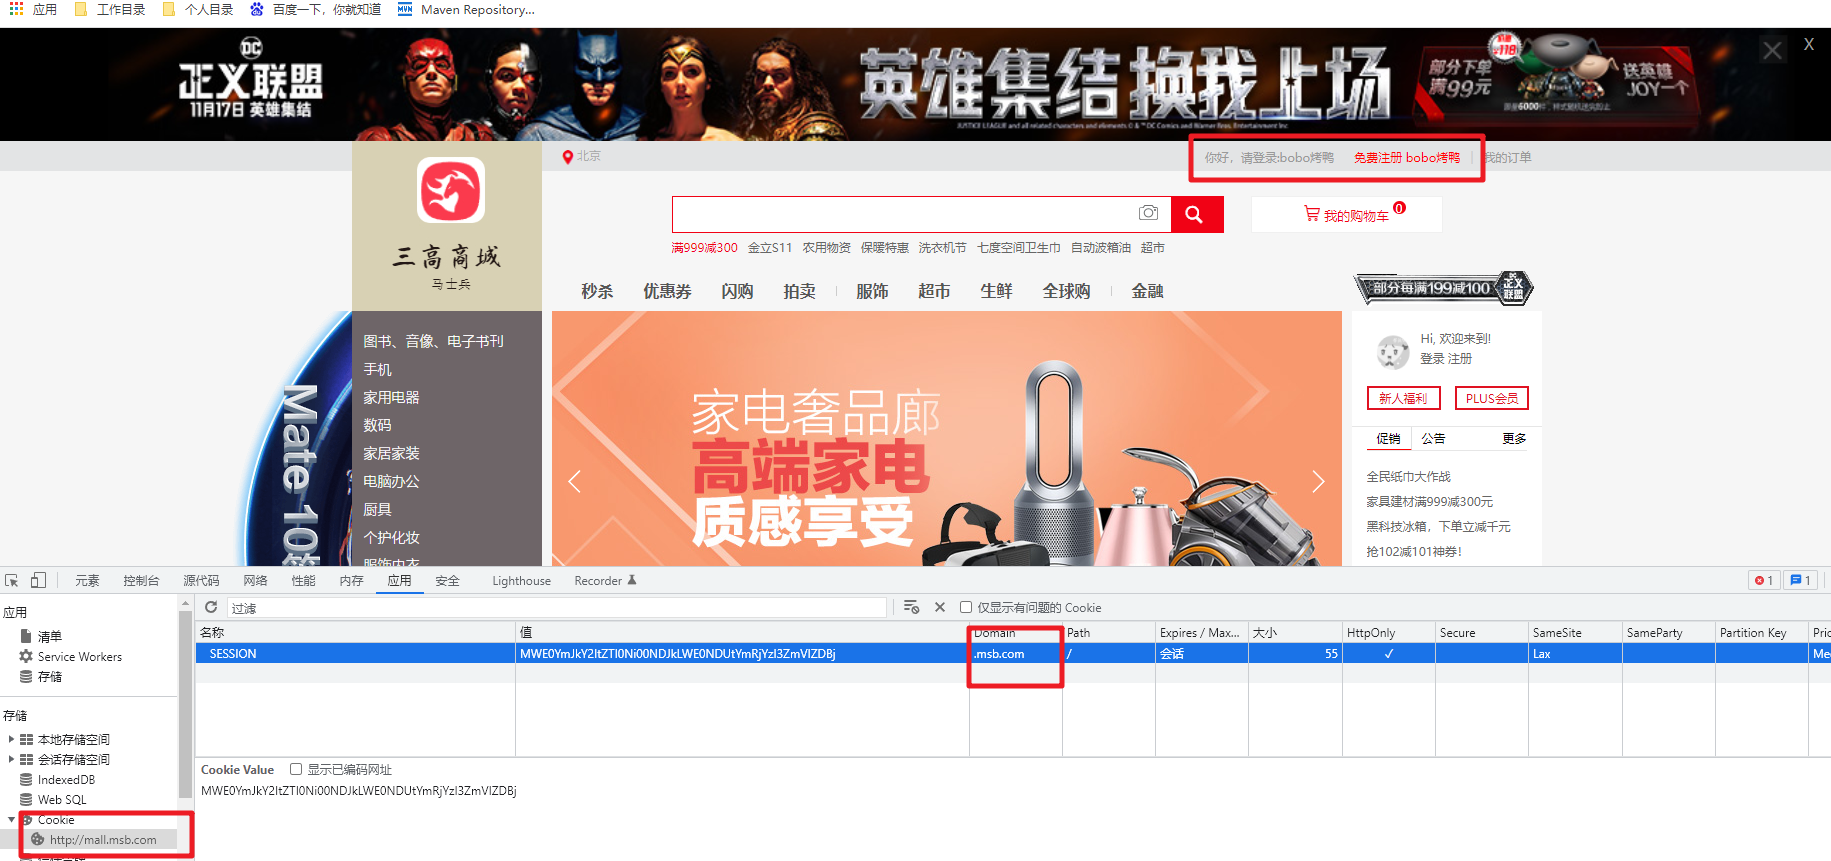
Then after integrating SpringSession in both the Auth service and the mall homepage, we can see the Session data on the mall homepage. Note that the domain name of the cookie is manually modified here.
3. Customize Cookies
Adjustment of session domain name through custom cookies
@Configuration
public class MySessionConfig {


    /**
     * 自定义Cookie的配置
     * @return
     */
    @Bean
    public CookieSerializer cookieSerializer(){


        DefaultCookieSerializer cookieSerializer = new DefaultCookieSerializer();
        cookieSerializer.setDomainName("msb.com"); // 设置session对应的一级域名
        cookieSerializer.setCookieName("msbsession");
        return cookieSerializer;
    }

    /**
     * 对存储在Redis中的数据指定序列化的方式
     * @return
     */
    @Bean
    public RedisSerializer<Object> redisSerializer(){


        return new GenericJackson2JsonRedisSerializer();
    }
}
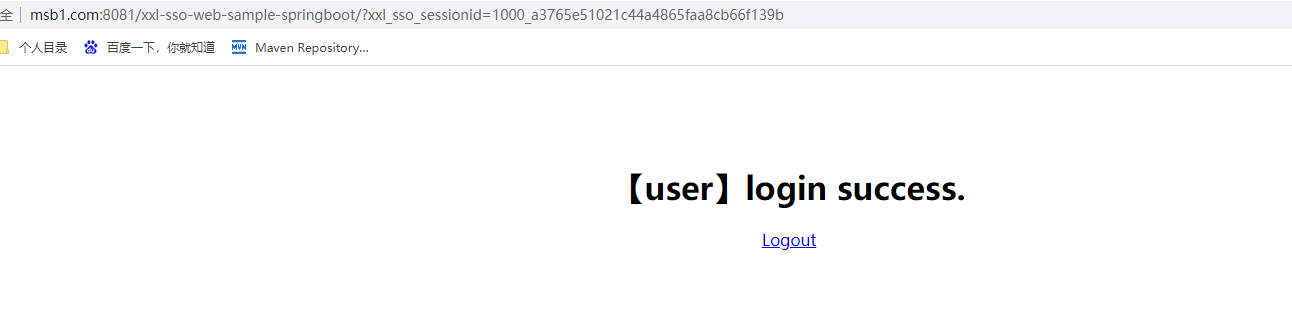
4. Single sign-on case demonstration
xxl-sso case code address: https://gitee.com/xuxueli0323/xxl-sso?_from=gitee_search
The downloaded code is decompressed and imported through idea, and then the property files in server and simple are modified. At the same time, we need to set the corresponding domain name in the host.
127.0.0.1 ssoserver.com
127.0.0.1 msb1.com
127.0.0.1 msb2.com
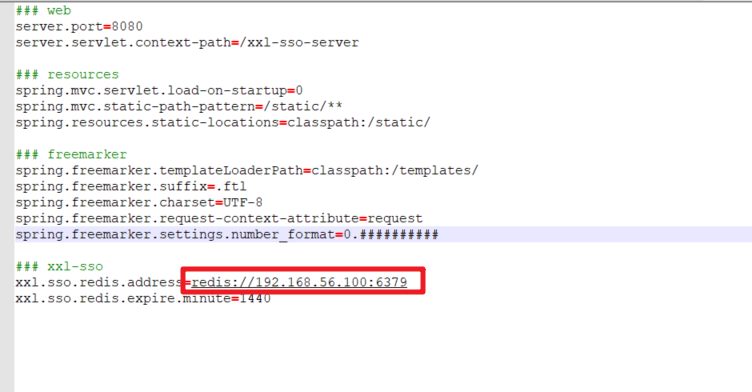
In the server configuration file, modify the Redis service address
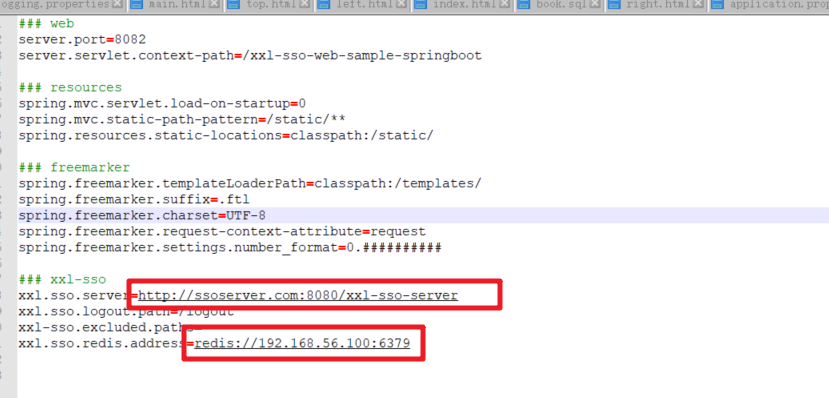
Then modify the server address and the redis service address in simple
Then start the service tests separately