Table of contents
1 Introduction to R3LIVE framework
4 Where to start reading R3LIVE
1 Introduction to R3LIVE framework
R3LIVE is a SLAM method that integrates imu, camera and laser proposed by the Mars Laboratory of the University of Hong Kong. R3LIVE consists of two subsystems, a laser inertial odometer (LIO) and a visual inertial odometer (VIO). The LIO subsystem (FAST-LIO) utilizes measurement data from lidar and inertial sensors and builds the geometry of the map (i.e. 3D point locations). The VIO subsystem uses data from the visual-inertial sensors and renders the map's textures (ie 3D point colors). More specifically, the VIO subsystem directly and efficiently fuses visual data by minimizing frame-to-map photometric errors. The system R3LIVE proposed in this paper is developed based on our previous work R2LIVE, and its VIO architecture design is completely different from R2LIVE.

2 R3LIVE launch file
In R3LIVE, we can see that there are three launch files. r3live_bag.launch is the launch file of LIVOX lidar, r3live_bag_ouster.launch is the launch file of 64-line lidar, and r3live_reconstruct_mesh.launch is the launch file of texture map. Change the corresponding topic name when running your own recorded data set and running online.
- First of all, the first part is to define some radar topics processed by R3LIVE and the import of IMU vision and config configuration files.
- Then the second part is to set some configuration parameters corresponding to the specific radar
- The third step is to start the r3live_LiDAR_front_end node and the r3live_mapping node, which is what we need to read carefully in conjunction with the paper
- The last step is to start rviz
<launch>
    <!-- Subscribed topics -->
    <param name="LiDAR_pointcloud_topic" type="string" value= "/laser_cloud_flat" />    <!-- 订阅的lidar topic -->
    <param name="IMU_topic" type="string" value= "/livox/imu" />                        <!-- 订阅的IMU topic -->
    <param name="Image_topic" type="string" value= "/camera/image_color" />             <!-- 订阅的image topic -->
    <param name="r3live_common/map_output_dir" type="string" value="$(env HOME)/r3live_output" /><!-- 输出的map文件夹 -->
    <rosparam command="load" file="$(find r3live)/../config/r3live_config.yaml" />      <!-- 加载的yaml参数文件 -->

    <!-- 前端处理节点 -->
    <node pkg="r3live" type="r3live_LiDAR_front_end" name="r3live_LiDAR_front_end"  output="screen" required="true"/>
    <!-- 建图节点 -->
    <node pkg="r3live" type="r3live_mapping" name="r3live_mapping" output="screen" required="true" />

    <!-- rviz可视化 - 默认打开 -->
    <arg name="rviz" default="1" />
    <group if="$(arg rviz)">
        <node name="rvizvisualisation" pkg="rviz" type="rviz" output="log"
            args="-d $(find r3live)/../config/rviz/r3live_rviz_config.rviz" />
    </group>
</launch>
3 R3LIVE’s r3live_config file
The configuration file sets the parameters of each module. It is worth noting that:
- lidar_type changes for different radar types
- When using your own data set, you need to modify image_width, image_height, camera_intrinsic, camera_dist_coeffs, camera_ext_R, camera_ext_t, corresponding to the size and internal and external parameters of the camera.
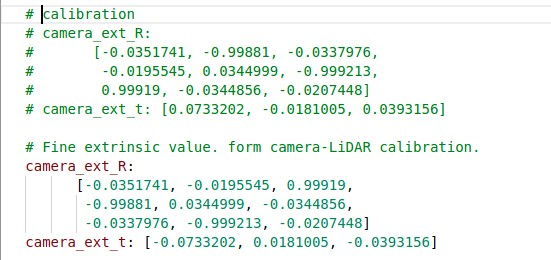
Note: When using the external parameters set by yourself in R3LIVE, you must invert the results of the external parameters obtained here, otherwise you will not get the final point cloud coloring effect. The specific operation is to reverse R diagonally, and T takes a negative sign.
Lidar_front_end:
   lidar_type: 1   # 1 for Livox-avia, 3 for Ouster-OS1-64
   N_SCANS: 6
   using_raw_point: 1
   point_step: 1

r3live_common:
   if_dump_log: 0                   # If recording ESIKF update log. [default = 0]
   record_offline_map: 1            # If recording offline map. [default = 1]
   pub_pt_minimum_views: 3          # Publish points which have been render up to "pub_pt_minimum_views" time. [default = 3]
   minimum_pts_size: 0.01           # The minimum distance for every two points in Global map (unit in meter). [default = 0.01]
   image_downsample_ratio: 1        # The downsample ratio of the input image. [default = 1]
   estimate_i2c_extrinsic: 1        # If enable estimate the extrinsic between camera and IMU. [default = 1]
   estimate_intrinsic: 1            # If enable estimate the online intrinsic calibration of the camera lens. [default = 1]
   maximum_vio_tracked_pts: 600     # The maximum points for tracking. [default = 600]
   append_global_map_point_step: 4  # The point step of append point to global map. [default = 4]

r3live_vio:
   image_width: 1280
   image_height: 1024
   camera_intrinsic:
      [863.4241, 0.0, 640.6808,
      0.0,  863.4171, 518.3392,
      0.0, 0.0, 1.0 ]
   camera_dist_coeffs: [-0.1080, 0.1050, -1.2872e-04, 5.7923e-05, -0.0222]  #k1, k2, p1, p2, k3
   # Fine extrinsic value. form camera-LiDAR calibration.
   camera_ext_R:
         [-0.00113207, -0.0158688, 0.999873,
            -0.9999999,  -0.000486594, -0.00113994,
            0.000504622,  -0.999874,  -0.0158682]
   # camera_ext_t: [0.050166, 0.0474116, -0.0312415]
   camera_ext_t: [0,0,0]
   # Rough extrinsic value, form CAD model, is not correct enough, but can be online calibrated in our datasets.
   # camera_ext_R:
   #    [0, 0, 1,
   #     -1, 0, 0,
   #     0, -1, 0]
   # camera_ext_t: [0,0,0]

r3live_lio:
   lio_update_point_step: 4   # Point step used for LIO update.
   max_iteration: 2           # Maximum times of LIO esikf.
   lidar_time_delay: 0        # The time-offset between LiDAR and IMU, provided by user.
   filter_size_corner: 0.30
   filter_size_surf: 0.30
   filter_size_surf_z: 0.30
   filter_size_map: 0.30
4 Where to start reading R3LIVE
In CmakeList we noticed the cpp files that the two main node nodes depend on. We can know that the r3live_LiDAR_front_end node will run first
# 前端里程计节点
add_executable(r3live_LiDAR_front_end src/loam/LiDAR_front_end.cpp)
target_link_libraries(r3live_LiDAR_front_end ${catkin_LIBRARIES} ${PCL_LIBRARIES})
add_executable(test_timer src/tools/test_timer.cpp)

# 后端建图节点
add_executable(r3live_mapping src/r3live.cpp
                src/r3live_lio.cpp
                src/loam/include/kd_tree/ikd_Tree.cpp
                src/loam/include/FOV_Checker/FOV_Checker.cpp
                src/loam/IMU_Processing.cpp
                src/rgb_map/offline_map_recorder.cpp
                # From VIO
                src/r3live_vio.cpp
                src/optical_flow/lkpyramid.cpp
                src/rgb_map/rgbmap_tracker.cpp
                src/rgb_map/image_frame.cpp
                src/rgb_map/pointcloud_rgbd.cpp
              )
target_link_libraries(r3live_mapping
                          ${catkin_LIBRARIES}
                          ${Boost_LIBRARIES}
                          ${Boost_FILESYSTEM_LIBRARY}
                          ${Boost_SERIALIZATION_LIBRARY} # serialization
                          ${OpenCV_LIBRARIES}
                          # ${OpenMVS_LIBRARIES}
                          pcl_common
                          pcl_io)
This part of the content is similar to that of FAST-LIO2. The laser point cloud first extracts feature points in the LiDAR_front_end node, and sends the processed information through the /laser_cloud_flat completion node. Like FAST-LIO2, R3LIVE only uses surface features as ESIKF Fusion.