DingTalk official website scrolling animation
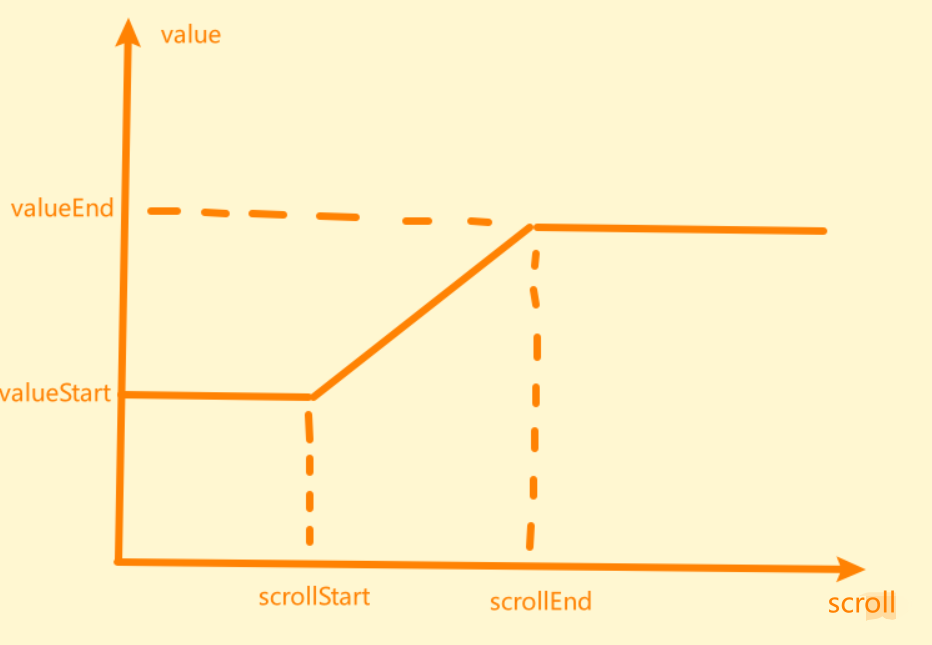
The scrolling effect can be regarded as a coordinate axis. At this time, the abscissa is not the time, but the scrolling distance. Later, a function will be written to calculate the scrolling distance (that is, when scrolling to a certain position, the scrolling distance Value) into the function, it will return you a value, this value is when you scroll to this position, some properties of the animation wrapped inside should be changed, such as opacit, transform, of course, these values that should be changed depend on some Obtained by function calculation. At this time, it reminded me of the lost mathematics in high school, relying on functions to obtain dynamic values.
Now let me introduce what the values of the four variables in this figure represent.
- scrollStart: When scrolling to which position, the animation is triggered, and then the calculation of the slash is started to get the changing attribute value, thereby changing the css style. I set this to trigger the animation when the head disappears completely
- scrollEnd: When scrolling to which position, stop triggering the animation, and then slide to keep it like that. At this time, those attributes are already dead. I set this to stop triggering animation when the black part goes up.
- valueStart: the initial transparency and offset
- valueEnd: After the end, the transparency is 1, and the offset can be set by itself
Well, there is no need to introduce HTML and CSS~~~~
HTML
data-order="0" is to control the order in which the blocks come out
<!DOCTYPE html>
<html lang="en">
  <head>
    <meta charset="UTF-8" />
    <meta http-equiv="X-UA-Compatible" content="IE=edge" />
    <meta name="viewport" content="width=device-width, initial-scale=1.0" />
    <title>ding talk</title>
    <link rel="stylesheet" href="./index.css" />
  </head>
  <body>
    <div class="header">HEADER</div>
    <div class="playground">
      <div class="animation-container">
        <div class="list">
          <div data-order="0" class="list-item"></div>
          <div data-order="1" class="list-item"></div>
          <div data-order="2" class="list-item"></div>
          <div data-order="3" class="list-item"></div>
          <div data-order="2" class="list-item"></div>
          <div data-order="1" class="list-item"></div>
          <div data-order="0" class="list-item"></div>
          <div data-order="0" class="list-item"></div>
          <div data-order="1" class="list-item"></div>
          <div data-order="2" class="list-item"></div>
          <div data-order="3" class="list-item"></div>
          <div data-order="2" class="list-item"></div>
          <div data-order="1" class="list-item"></div>
          <div data-order="0" class="list-item"></div>
        </div>
      </div>
    </div>
    <div class="footer">FOOTER</div>
    <script src="./index.js"></script>
  </body>
</html>
CSS
* {


  margin: 0;
  padding: 0;
  box-sizing: border-box;
}
html {


  overflow-x: hidden;
}
.header,
.footer {


  height: 100vh;
  display: flex;
  justify-content: center;
  align-items: center;
  font-size: 4em;
}
.playground {


  height: 4000px;
  background: #000;
}

.animation-container {


  position: sticky;
  height: 100vh;
  top: 0;
}

.list {


  position: absolute;
  top: 50%;
  left: 50%;
  transform: translate(-50%, -50%);
  width: 80%;
  aspect-ratio: 2/1;
  border-radius: 10px;
  display: grid;
  grid-template-columns: repeat(7, 1fr);
  grid-template-rows: repeat(2, 1fr);
  place-items: center;
}

.list-item {


  width: 60%;
  aspect-ratio: 1/1;
  background: #fff;
  border-radius: 10px;
}

.list-item:nth-child(3n + 1) {


  background: linear-gradient(#3e90f7, #246bf6);
}
.list-item:nth-child(3n + 2) {


  background: linear-gradient(#53b655, #469c50);
}
.list-item:nth-child(3n + 3) {


  background: linear-gradient(#f3a93c, #f4ad3d);
}
JS
Note: Look here and here, you must pay attention, I have already written the order of writing js code at that time, please be sure to read the functions I wrote in this order, otherwise your head will be very confused, and the idea is very clear when you follow the order
Figure 1
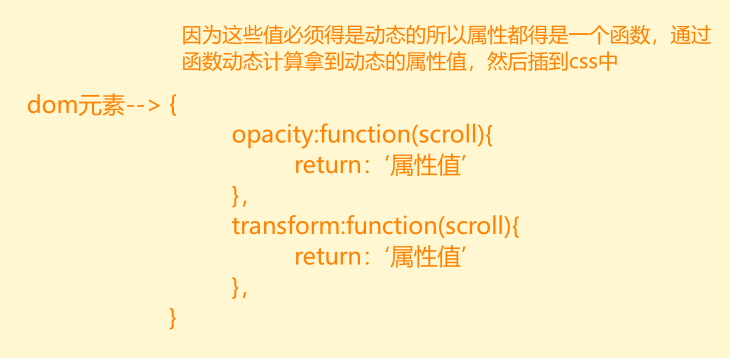
Figure II
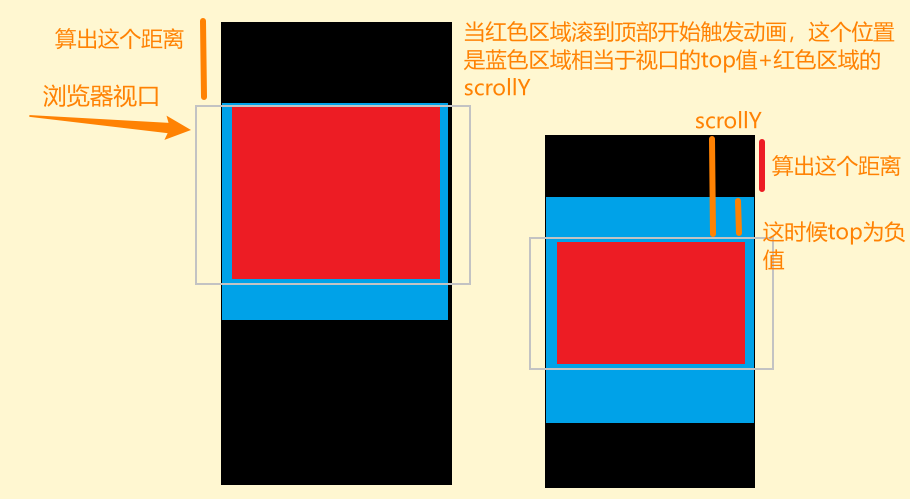
Figure three
//***********第一步看这里
//拿到三个dom元素
const items = document.querySelectorAll('.list-item');
const playGround = document.querySelector('.playground');
const list = document.querySelector('.list');
//这个就是我上面提及到的函数,传入横坐标的scroll值给一个value,return出来的就是value值
function createAnimation(xStart, xEnd, yStart, yEnd) {
return function (x) {
//第一阶段
if (x <= xStart) {
return yStart;
}
//第三阶段
if (x >= xEnd) {
return yEnd;
}
//斜线部分(高中函数知识,也可以理解为yStart + ((x - xStart) * (yEnd - yStart) / (xEnd - xStart)) )
return yStart + ((x - xStart) / (xEnd - xStart)) * (yEnd - yStart);
};
}
//上面这个函数可以这样死调用:const p = createAnimation(100,1000,0,1)
//p(100),传入的是100,就返回一个value值是1,但是这样太死了,我们滚动的时候怎么会知道传入什么值呢,所以可以想到这里的100应该又得是一个变量,而不是一个死的值
//***********第二步看这里
//做一个数据结构,也就是一个映射
//如最上面图所示:
const animationMap = new Map();
//***********第五步看这里
//完善这个animationMap
function updateAnimationMap() {
//先清空map,因为考虑到缩放浏览器页面大小啥的需要一直计算,这里也可以不写
animationMap.clear();
//防止没有方块
if (items.length === 0) {
return;
}
//拿到蓝色部分的矩形区域
const playGroundRect = playGround.getBoundingClientRect();
const scrollY = window.scrollY;
//如上图2所示,计算出的该触发动画的滚动值 也就是scrollStart值
const playGroundTop = playGroundRect.top + scrollY;
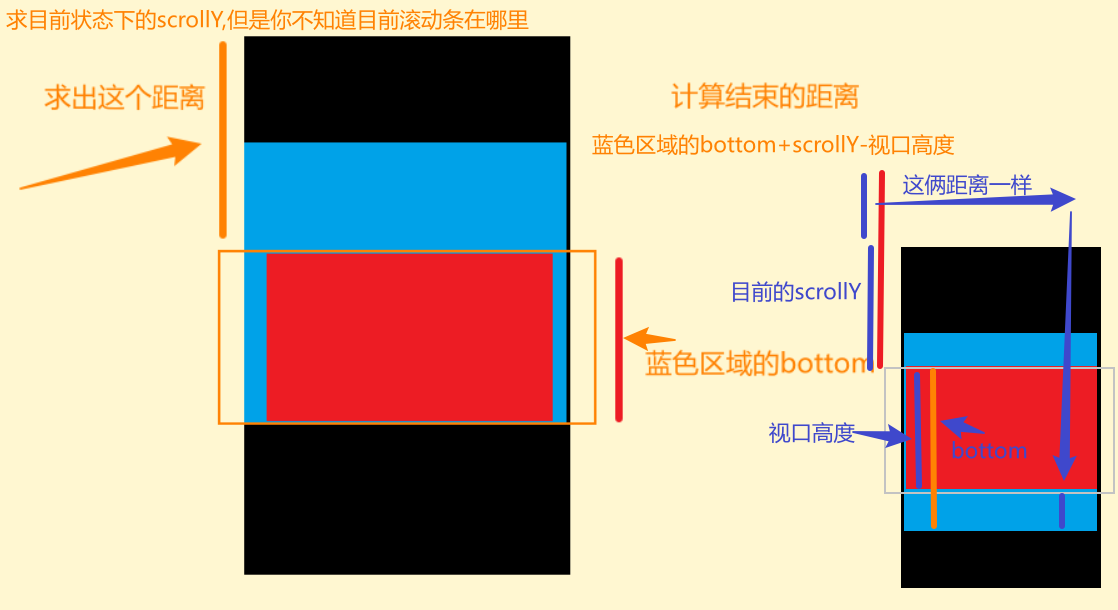
//如上图3所示,结束距离,scrollEnd
const playGroundBottom = playGroundRect.bottom + scrollY - window.innerHeight;
//方块的矩形区域
const listRect = list.getBoundingClientRect();
//循环所以items,因为是每个小方块在动态变化样式
for (let i = 0; i < items.length; i++) {
const item = items[i];
//拿到order,也就是html中写的出来的顺序,相差600个滚动位置出来下一组方块
const scrollStart = playGroundTop + item.dataset.order * 600;
const scrollEnd = playGroundBottom;
//拿到方块的宽高左右距离来使方块处于一直居中状态
const itemWidth = item.clientWidth;
const itemHeight = item.clientHeight;
const itemLeft = item.offsetLeft;
const itemTop = item.offsetTop;
//动态计算opacity属性值
const opacityAnimation = createAnimation(scrollStart, scrollEnd, 0, 1);
//动态计算scale属性值
const scaleAnimation = createAnimation(scrollStart, scrollEnd, 0.5, 1);
//动态计算translateX属性值
const translateXAnimation = createAnimation(
scrollStart,
scrollEnd,
listRect.width / 2 - itemLeft - itemWidth / 2,
0
);
//动态计算translateY属性值
const translateYAnimation = createAnimation(
scrollStart,
scrollEnd,
listRect.height / 2 - itemTop - itemHeight / 2,
0
);
//之前第三步中说到键是dom元素,值就是dom元素指向的那整个对象,所以要把这整个对象加到map中去并且是个函数
const animations = {
opacity: function (scrollY) {
//return出去的属性值,为什么要写函数,因为这个属性值也要根据动态计算
return opacityAnimation(scrollY);
},
transform: function (scrollY) {
const scaled = scaleAnimation(scrollY);
const x = translateXAnimation(scrollY);
const y = translateYAnimation(scrollY);
//用模板字符串插入到css中
return `translate(${
x}px, ${
y}px) scale(${
scaled})`;
},
};
//将每个item加到animationMap中去
animationMap.set(item, animations);
}
}
updateAnimationMap();
//***********第三步看这里
//更新我们的样式
function updateStyles() {
//拿到当前我们滚动的位置
const scrollY = window.scrollY;
//循环map,也就是图1里面的键值对,键是dom元素,值就是dom元素指向的那整个对象,这里我写的item和animations。
//提示:这里的时候还没有得出animationMap,只是先这样写着,让自己思路清晰,一步一步来,所以得去这个函数上面继续完善animationMap函数
for (const [item, animations] of animationMap) {
//设置每一个dom元素的属性
//遍历对象,设置dom元素样式
for (const prop in animations) {
//提示:别忘记animations对象里面的属性值是一个函数喔,所以得传一个参数scrollY
item.style[prop] = animations[prop](scrollY);
}
}
}
updateStyles();
//***********第四步看这里
//监听滚动事件,调用updateStyles函数
window.addEventListener('scroll', updateStyles);
window.addEventListener('resize', () => {
updateAnimationMap();
updateStyles();
});
Woohoo, I have learned everything here, give the blogger a thumbs up, and inspire the struggle of the front-end staff~~~