There are third-party platforms for blogs, and they can also be self-built. There are blog gardens and CSDN earlier, and there are more emerging ones in recent years, such as: WordPress, segmentFault, Jianshu, Nuggets, Zhihu column, Github Page, etc.
What I want to talk about this time is how Github Page + Hexo builds a personal blog! Github Page is a free static web page hosting service provided by Github (so it would be a waste of free space if you don’t use it hahaha), it can be used to host static web pages such as blogs and project official websites. Support Jekyll, Hugo, and Hexo to compile static resources. This time our protagonist is Hexo. The specific content will be introduced in the article below.
prepare the environment
Prepare the node and git environment.
First, install NodeJS , because Hexo is a blog framework driven by Node.js. Compared with the Jekyll framework mentioned above, it is faster and more concise. Because the Tian*chao network is blocked, try Giving up after failing to install Jekyll.
Then, install git, a distributed version control system for project version control management, the author is the father of Linux. If you are not familiar with Git, you can refer to Liao Xuefeng's Git tutorial.
The installation methods of the two tools are different for different platforms. You can understand the installation step by step by yourself, and I won’t go into details here. After the installation is successful, open git bash (Windowns) or terminal (Mac), which will be collectively referred to as the command line below.
Enter the corresponding command in the command line to verify whether it is successful, and if successful, there will be a corresponding version number.
git version
node -v
npm -v
image

Install Hexo
If the above environment is ready, you can use npm to start installing Hexo. You can also check Hexo's detailed documentation.
Enter the following command at the command line:
npm install -g hexo-cli
After installing Hexo, execute the following command, and Hexo will create the required files in the specified folder.
hexo init myBlog
cd myBlog
npm install
After the creation is complete, the directory of the specified folder is as follows:
├── _config.yml # 网站的配置信息,您可以在此配置大部分的参数。
├── package.json
├── scaffolds # 模版文件夹
├── source  # 资源文件夹,除 _posts 文件,其他以下划线_开头的文件或者文件夹不会被编译打包到public文件夹
|   ├── _drafts # 草稿文件
|   └── _posts # 文章Markdowm文件
└── themes  # 主题文件夹
Well, if the above command does not report any error, congratulations, run the hexo s command, where s is the abbreviation of server, enter http://localhost:4000 in the browser and press Enter to preview the effect.
hexo s
The following is my local preview effect, which replaced the next theme, which is not the theme by default.  The local blog has been built successfully, and the next step is to deploy it to Github Page.
Sign up for Github
First of all, if you do not have a Github account, register for one first, the specific process is as follows

Click Start project or new repository below to create a new warehouse

Note that Github can only host a static site using the code of a warehouse with the same name, which is not mentioned in many online tutorials.

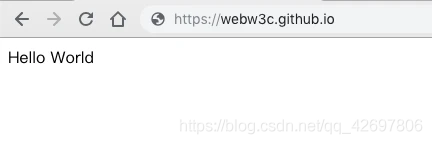
Then open the warehouse to create an index.html file, and write some content first, such as Hello World.


At this time, open http://yourusername.github.io and you can see your site, isn’t it very simple! The content of index.html is just a temporary preview effect. After deploying the Hexo file, you can see your own blog at http://yourusername.github.io !
Configure SSH keys
To use the git tool, you must first configure the SSH key to prepare for deploying the local blog to Github.
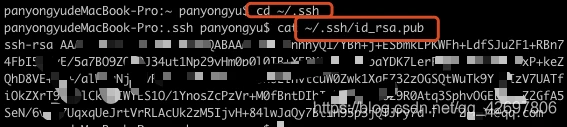
Open the command line and enter cd ~/.ssh. If there is no error or prompt, the description has been generated before. You can directly use the cat ~/.ssh/id_rsa.pub command to view the SSH key on the machine.
cat ~/.ssh/id_rsa.pub`在这里插入代码片`
If it has not been created before, execute the following command to globally configure the local account:
git config --global user.name "用户名"
git config --global user.email "邮箱地址"
Then start generating the key SSH key
ssh-keygen -t rsa -C '上面的邮箱'
Follow the prompts and press Enter three times to generate the ssh key. Obtain your SSH key by viewing the contents of the ~/.ssh/id_rsa.pub file

(This picture is quoted from Code Cloud)
For the first use, you need to confirm and add the host to the local SSH trusted list. If the content Hi xxx! You've successfully authenticated, but GitHub does not provide shell access. is returned, it proves that the addition is successful.
ssh -T git@github.com

It’s not over yet, you have to log in to Github to add the SSH key you just generated, and add it according to the following steps: Create

a new SSH key, the title is whatever you want, the key is the one you just generated, confirm the creation, and you’re done! ! Then you will see the key you just added in your SSH keys list.

Deploy to Github
At this point, the local and Github are doing almost the same job, and it's time to connect the two. You can also check the deployment tutorial on the official website.
Don't worry, you need to modify the configuration and install the deployment plug-in before deployment.
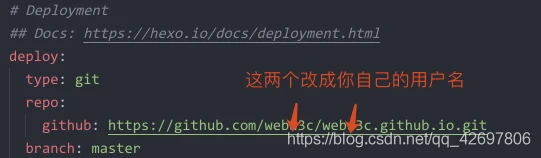
First: Open the _config.yml configuration file configuration parameters in the project root directory. Pull to the end of the file and fill in the following configuration (it can also be deployed to multiple warehouses at the same time, which will be discussed later):
Second: Install a deployment plug-in hexo-deployer-git .
npm install hexo-deployer-git --save
Finally, execute the following command to deploy and upload. The following g is the abbreviation of generate, and d is the abbreviation of deploy:
hexo g -d
After a while, visit the URL in the browser: https://yourusername.github.io and you will see your blog! !
start writing
Once the blog is set up, I will start writing articles. Here is a brief introduction. Detailed documents can be found on the hexo official website.
To create a new article, enter the following command
hexo new '文章标题'
After the execution is complete, you can see a post file "Article Title.md" under /source/_posts. .md is a file in Markdown format. The specific usage can be found on the Internet. The syntax is relatively simple.
Enter your article content in the Markdown article

and execute the following command
hexo g
hexo s
You can see that your article is displayed on the blog, the following is just now

Finally, just deploy it to your Github!
hexo clean
hexo g -d
Before deployment, it is best to execute the hexo clean command to clear the cache file (db.json) and the generated static file (public). In some cases (especially after changing the theme), you may want to run this command if you find that your changes to the site do not take effect anyway.
In addition, if your article is not published temporarily, you can save it in the draft first. The method of generating a draft is similar to that of an article. Hexo new draft "article title". After generation, you will see your draft article in /source/_drafts. When you want to publish, just execute the publish command to publish to the blog.
hexo publish [layout] <filename>
Static image bed
Where is the best place to put some pictures used in the article? After comparing several free picture beds Qiniu, sm.ms and Weibo map bed, I finally decided to choose Weibo. Qiniu’s domain name seems to be unavailable for testing recently. Although there is a solution, I’m afraid it will still be used in the future. There will be other problems, so I gave up. After all, free things are the most expensive, especially things like cloud storage. The word-of-mouth of sm.ms is also good. It seems to be developed by individuals. It has been free for several years. If you have the same worry, you will give up. It is best to hug Sina’s thigh. I feel that Sina should be more reliable. The only problem is that if there is If Sina bans external links one day, it will not work, let's see.
You can go to the chrome online application store to download a chrome plug-in called Weibo Picture Bed. The picture below is the interface of the plug-in.

theme configuration
You can go to the theme page of the official website or find what you like online. Many of them are good. I use the next theme. You can modify the corresponding configuration according to the documentation on the official website of the theme to achieve the effect you want. For example, setting the font, enabling the tipping function, adding a comment system, setting the 404 page of Tencent Charity, data statistics, content sharing and other functions. Here I will briefly talk about some configurations I personally use.
1. Add comment system
Note that I have switched to gitalk now, and the following is the valine tutorial I wrote before. I will update or add the corresponding content in this part later. Of course, if you want to use valine, you can continue to refer to the following method configuration
Add the valine comment system, open the /themes/next/_config.yml file, search for valine, enable valine, and set enable to true.

Then log in to leanCloud or register an account, log in to create an app after registration, and then go to the settings to find AppId and AppKey, copy and paste them to the corresponding places in the theme configuration file, which are the two places of appid and appkey in the above picture.

2. Configure Tencent Public Welfare 404 page
- Create 404.html under the blog root directory/source folder (see the figure and code below for details);
- Add the above 3 lines of code above the html;
There are actually three js used by Tencent Public Welfare, search_children.js, data.js and page.js. If your site protocol is http, you can add it directly according to the method of the next file, but if it is https, you can add it directly. An error will be reported, because the Tencent Public Welfare 404 page does not yet support https, so I can directly add the content of page.js to the page and it will be successful

. .
layout: false
title: "404"
---
Here are a few js links used above, from the official access document of Tencent Public Welfare 404
<script type="text/plain" src="http://www.qq.com/404/search_children.js" charset="utf-8" homePageUrl="https://pojian.xyz" homePageName="回到我的博客主页"></script>
<script src="https://qzone.qq.com/gy/404/data.js" charset="utf-8"></script>
<script src="https://qzone.qq.com/gy/404/page.js" charset="utf-8"></script>
You can also directly copy the 404 page code on my Github, the following is the preview effect.

In addition, if you need to customize the personalized 404 page, just delete the corresponding Tencent JS and directly modify the above 404.html file.
3. Add word count and reading time
First install a plugin
$ npm install hexo-symbols-count-time --save
Then add the following configuration to the configuration file in the blog root directory
 #文章字数统计
  symbols_count_time:
  symbols: true
  time: true
  total_symbols: true
  total_time: true
Finally, open the symbols_count_time field under the configuration file of the next theme

and restart hexo to see the effect

4. Open fancybox
Open the theme configuration file and search for fancybox and set it to true. In addition, vendors can fill in the corresponding CDN address to open it

5. Article sharing
Baidu sharing has a pitfall of https. I put the file on my own server according to the online method. I have tested it on other websites before and it can be used, but it reports an error in hexo. I don’t know the details. For some reason, it may be a problem with the hexo version, because some people can, and some people report the same error as me, and forgot to take a screenshot. Because this function is not very necessary, I will not continue to climb. Changed share.js to achieve the same function, you can see the effect at the end of this article for details.
Bind domain name
If you feel that directly using the domain name of github.io as your blog link is not professional enough, if you are not enough programmers, then buy a domain name resolution and bind it to your blog. I also recommend this.
Mine was registered on Aliwan.com, and the registration process is relatively routine, so I won’t go into details here.
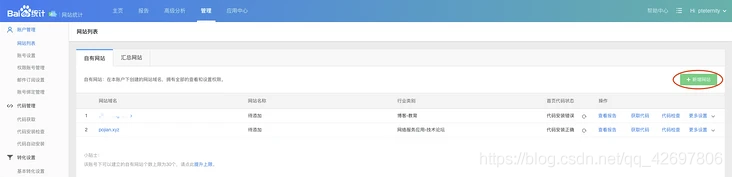
After registering and logging in to the console, find your domain name, click the resolution button on the right to enter the resolution list, click

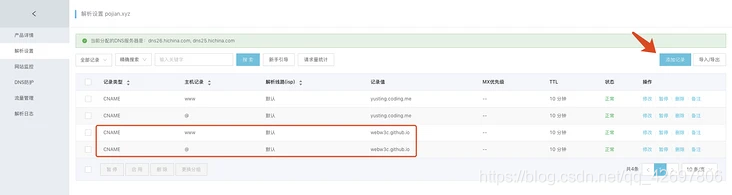
"Add Record" on the right to add two records of CNAME type, as shown in the figure above, and fill in your own Github address for the latter record value.
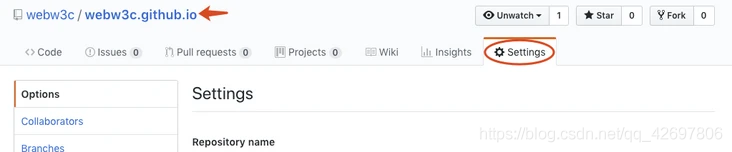
After the records are added, you need to go to Github to set up and bind the domain name you purchased. Enter your blog warehouse and click Setting, then pull it to GitHub Pages, fill in the domain name you applied for and save it.

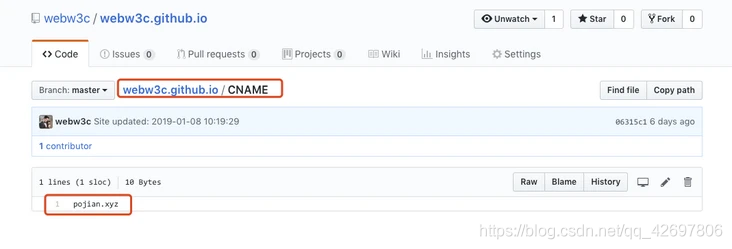
Here, when you click Save, Github Pages will automatically generate a CNAME file for you in the root directory, and the content inside is the address of the domain name you bind
Note that if you operate according to the above method, there will be a small problem, that is, when you execute hexo d to deploy your local articles to Github, your local files will completely overwrite all the content on your existing warehouse, including Github The CNAME file created by Pages for you, so that when you access the domain name, you will not be able to access it again. So, you need to manually create a CNAME file in the local root directory/source directory, the content is your domain name address, because the files in the source directory will not be deleted during deployment, so it will also be deployed After being deployed together, you need to go to your warehouse Settings again, pull it to GitHub Pages and bind your domain name again, so that there will be no problem in the future.
After a while, you can use the domain name you applied to visit your blog!
SEO optimization
Next, let’s talk about Baidu’s collection. It is said that Github blocked Baidu’s spiders, and some people said no. The specifics are not very clear. Github suffered the largest DDoS attack in history in 2015. Some foreign media pointed out that Baidu did it. It is not specific. I know, but I feel that it is more difficult for Baidu to include Github for confirmation, and it takes a long time, so let’s optimize it.
1. The code is deployed to coding at the same time
What is the solution? It is to host the blog site on the domestic coding platform at the same time, so that the collection will be much easier, and at the same time it will not affect the code on Github. Coding is a domestic platform that provides code hosting services, which is similar to Github. The method of use is similar to that of Github. Let me explain in detail how to deploy the code to coding and Github at the same time, making it easier for Baidu to include it.
After registering and logging in to coding, create a new warehouse. Note that when creating a new project, the naming rules are the same as those on Github, which is username.coding.me. You can see the picture below, and don’t forget to add the SSH key to build the
 warehouse Then enter the warehouse, select the Page service on the left, bind a new domain name in the settings, click Bind after inputting, then go
 to your domain name resolution console to modify and add two CNAME records pointing to your Page address, see Figure, pay attention to the record value, replace it with your own.

Finally, modify the deployment configuration in the _config.yml configuration file in the root directory, add the git address of coding to it, and
 finally execute the deployment command
hexo clean
hexo g -d
At this time, you can see the code you submitted for deployment in the coding warehouse, and your user name .coding.me can also visit your blog site. Here, the codes of Github and coding are updated at the same time without affecting each other. The bound domain name resolution may take a while to take effect.
2. Baidu submit link
After deploying to coding, Baidu can't include it, and we still need to continue to optimize. If you enter site: your domain name in Baidu search, if the following results appear, it proves that the website has not been included by Baidu. Now, we click the submit URL below to enter Baidu Webmaster Tools to submit.

3. Baidu webmaster platform adds website management
Register Baidu Webmaster Tools and add a website

There are three steps in the process of adding a website. The main operation is concentrated in the last step of the website verification method. I choose HTML tag verification, and you can add the code to your website according to the following method. Students who use the next theme can directly enter the theme

. Search baidu_site_verification under the configuration file and fill in the value of content in the meta tag in the third step.

Finally, click Complete to verify.
Fourth, add a sitemap site map
The site map contains the site links on your website, which is convenient for search engine spiders to crawl. Search spiders will crawl through the links in the site map to grab new content. So we need to generate a sitemap file to help optimize the website, and install the generated plug-in
npm install hexo-generator-sitemap --save
npm install hexo-generator-baidu-sitemap --save
Then add the corresponding configuration items to the configuration file in the root directory of the blog
# sitemap
sitemap:
  path: sitemap.xml
baidusitemap:
  path: baidusitemap.xml
Pay attention to indentation, or you will not compile and report an error
Also modify the URL under a root directory configuration file, change the value of the url item to the address of your own site that you added in the Baidu webmaster platform, so that the url in the generated sitemap.xml file is the address of your site, look at the picture below

5. Add the spider protocol robots.txt
Add the robots.txt file, which is the spider protocol. Create a new robots.txt file and add the following content, and put the robots.txt under the /source file. As we said earlier, the files under the /source directory will be packaged and uploaded.
# hexo robots.txt
User-agent: *
Allow: /
Allow: /archives/

Disallow: /vendors/
Disallow: /js/
Disallow: /css/
Disallow: /fonts/
Disallow: /vendors/
Disallow: /fancybox/

Sitemap: https://pojian.xyz/sitemap.xml
Sitemap: https://pojian.xyz/baidusitemap.xml
The one behind Allow is your menu, and the bottom Sitemap address please change it to your own address
After completion, restart hexo, execute hexo g -d to regenerate the file and submit it, and the corresponding xml file will be generated in the public directory. You can access the sitemap file through http://xxx.com/sitemap.xml and http://xxx.com/baidusitemap.xml, and access the robots.txt file through http://xxx.com/robots.txt.
You can go to Baidu webmaster to check whether the robots.txt file is valid

6. Automatic push
Baidu has several methods of automatic push, active push, sitemap, and manual submission.
Automatic push is a lightweight link submission component. The automatically pushed JS code is placed in the source code of each page on the site. When the page is accessed, the page link will be automatically pushed to Baidu, which will help new pages be discovered by Baidu faster. How to install it?
If yours is the next theme, just open the theme configuration file and search to find baidu_push and set it to true

If you are not using the next theme, you can also manually paste the following code into your site, usually in the head public file
<script>
(function(){


    var bp = document.createElement('script');
    var curProtocol = window.location.protocol.split(':')[0];
    if (curProtocol === 'https') {


        bp.src = 'https://zz.bdstatic.com/linksubmit/push.js';
    }
    else {


        bp.src = 'http://push.zhanzhang.baidu.com/push.js';
    }
    var s = document.getElementsByTagName("script")[0];
    s.parentNode.insertBefore(bp, s);
})();
</script>
Seven, active push
Here, a third-party plug-in hexo-baidu-url-submit is used for active push
installation
npm install hexo-baidu-url-submit --save
Add the desired configuration to the configuration file in the root directory
# 百度链接提交-主动推送配置
baidu_url_submit:
  count: 3 ## 提交最新的一个链接
  host: pojian.xyz ## 在百度站长平台中注册的域名
  token: 3GIEYsuq5ZTkvDBm ## 请注意这是您的秘钥,所以请不要把博客源代码发布在公众仓库里!
  path: baidu_urls.txt ## 文本文档的地址, 新链接会保存在此文本文档里
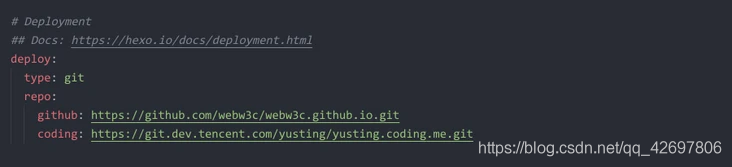
Add a new deployment configuration. Note that this is a bit different from before. Add a dash before the type -
deploy:
  - type: git
    repo:
      github: https://github.com/webw3c/webw3c.github.io.git
      coding: https://git.dev.tencent.com/yusting/yusting.coding.me.git
  - type: baidu_url_submitter
Finally, when executing hexo deploy, the new connection will be pushed.
Implementation principle
When generating a new link, hexo generate will generate a text file containing the latest link. When
submitting a new link, hexo deploy will read the link from the above file and submit it to the Baidu search engine
Eight, manual push
Just directly fill in the link you need to submit and submit it manually.
Finally, you can see whether it has been successfully included by Baidu.

If the capture is successful, it proves that it has been included. It seems that it is usually not so fast. I waited for about two days to capture it.
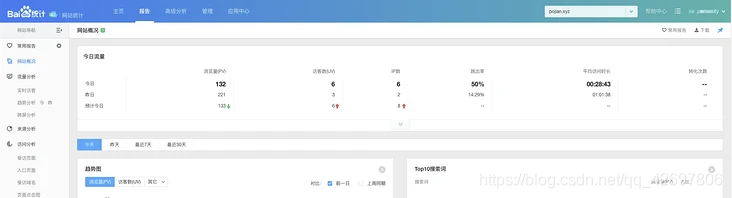
Nine, add Baidu statistics
Add Baidu statistics to view some data related to your website, which is convenient for your own site
Multi-terminal simultaneous writing
The principle is to use the branch function of Git, such as creating a new blog branch to store the source files of Hexo, and the master branch is used to store the compiled static files, so that when using another computer to write, just pull the blog branch Come down and write and then push to the branch. The specific content or steps will be updated later.
phone writing
I can’t seem to find any information on the Internet, but by installing the SSH client on the mobile phone to remotely operate the server, it should be possible to install and configure the node / git / hexo environment to write. The principle is similar to writing on multiple computers, but it’s not easy to do so. , stop tossing ha.