There are many ways to deploy machine models to production. One of the common approaches is to implement it as a Web service. The most popular type is REST API. Its role is to deploy and run 24/7, waiting to receive JSON requests from clients, extract the input, and send it to the ML model to predict the outcome. The result is then wrapped into a response and returned to the user

Recommendation: Use NSDT editor to quickly build programmable 3D scenes
1. Simple implementation mode
You start googling this question with "deploying machine learning as a REST API". You will receive a million results. If you put in the effort and read this. In many of the top results, you'll see a common pattern for solving this problem, as shown in the image below.
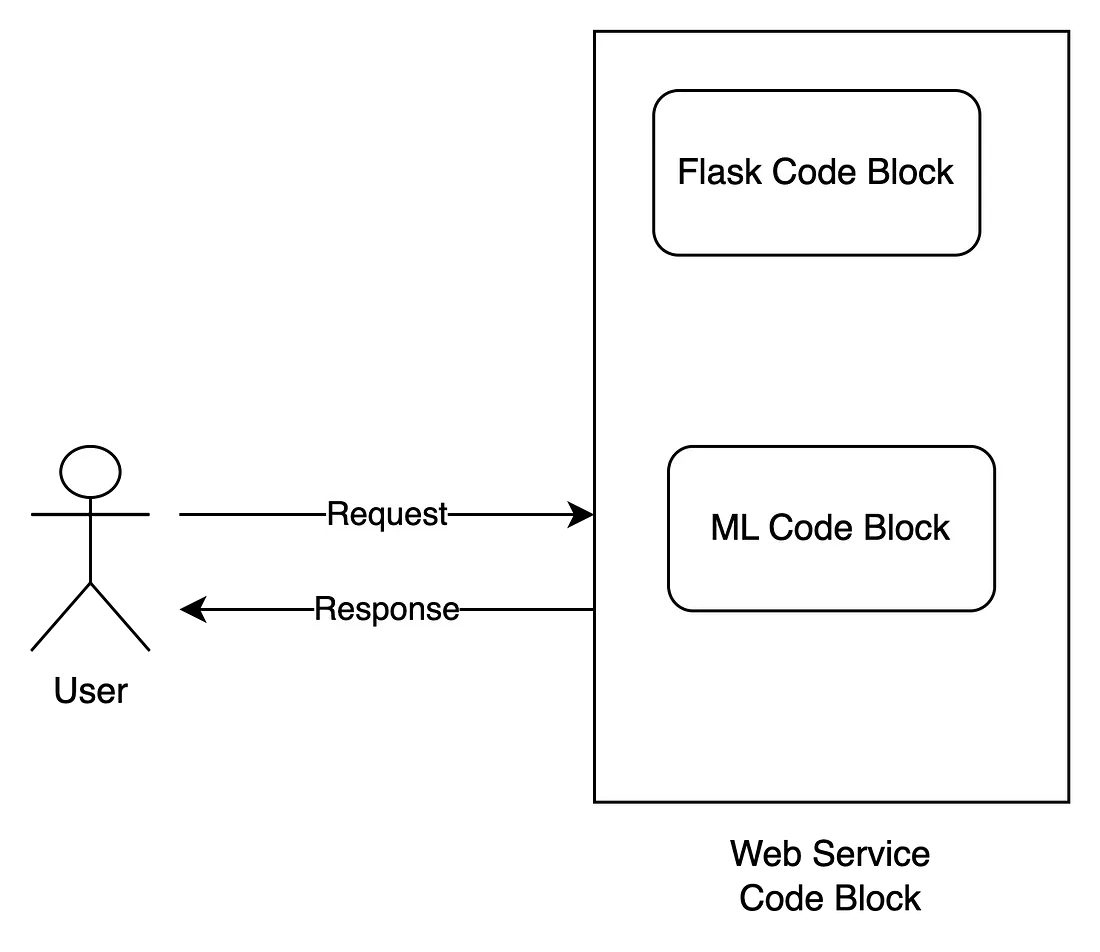
The popular way is that we need a web framework (Flask, Diango or FastAPI) for building the API. Next, we will need machine learning to take the input and return a prediction. To help the system run in production, we need to wrap additional WSGI (if we use Flask) or ASGI (if we use FastAPI) outside of the web module.
It is worth noting here that the machine learning model in this approach is usually implemented in the same code block as the web framework (Flask/FastAPI/…). This means that the machine learning model runs in the same process as the web module. This causes many problems:
- For a Flask/FastAPI process, only one ML model process can be started.
- At one runtime point, the ML model can only handle one request
- If we want to scale the application, we can use WSGI (such as guvicorn) or ASGI (such as uvicorn) to create many child processes, which increases the number of web modules and machine learning models, since they are implemented in the same process.
- For some heavy tasks, ML models can take a long time (even seconds) to run inference. Because they are created in the same block of code in the web module, it blocks other requests while we need to wait for all tasks to complete before processing the next one.
So is there a better way? For heavy and long-running tasks, is there any way to process them without blocking client requests? Today, I'm going to cover an approach that may not be new but doesn't seem to have been applied to deploying machine learning ML to production: using a task queue distributed system.
2. What is a task queue?
Task queues are used as a mechanism for distributing work across threads or machines.
The input to a task queue is a unit of work, called a task, and a dedicated worker process then constantly monitors the queue to perform new work. – Celery Github
A task queue is a tool that allows you to run different software programs in separate machines/processes/threads. In an application, there are some parts (tasks) that often run for a long time or we don't know when they are finished. For these tasks, it is better to run them in separate processes or distributed machines, and when they complete, we will be notified of the check results. This doesn't block other parts. This is suitable for long-running tasks such as sending emails, scraping web content, or in this case running ML models. Let us consider the description below.
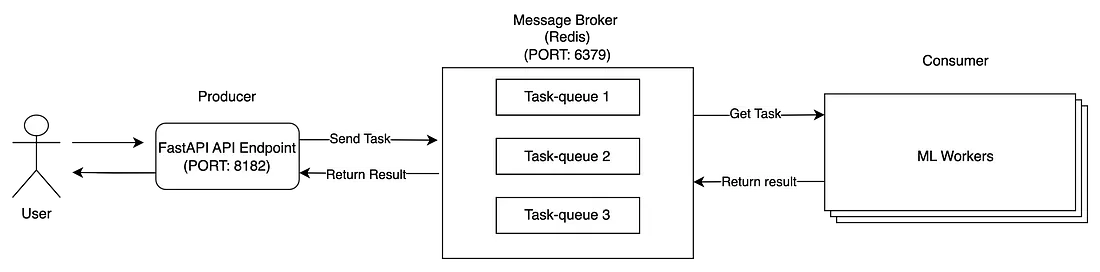
The architecture of the distributed task queue consists of three main modules: producers, consumers and message brokers.
- The client sends a request to our Flask application (Producer).
- Producers send task messages to Message Broker.
- ML Workers (consumers) consume messages from a message broker. After the task completes, save the result to Message Broker and update the task status.
- After sending a task to the message broker, FastAPI applications can also monitor the status of the task from the message broker. When the status is complete, it retrieves the result and returns it to the client
The three modules are started in different processes or distributed machines so that they can live independently. There are many tools for developing task queues, spread across several programming languages, and in this blog, I'll focus on Python and use Celery, the most popular task queue tool for Python projects. To learn more about the benefits of Celery and the distributed task queue system, check out this great explainer. Now, let's jump to the question below.
3. Travel time prediction model
To illustrate this, I'll try to build a simple machine learning model that can help predict the average travel time given a pick-up location, a drop-off location, and a trip length. This will be a regression model. Note that I'm not focusing on building the accuracy model in this blog, but just using it to set up the web service API. Model weights and how we build the model can be found at this link.
3.1 API overview
We will develop a web API for serving machine learning models, which consists of 3 modules: web, redis, and ML models. These modules are Dockerized and deployed into containers.
├── apps
│   └── api
│       ├── api_routers.py
│       └── main.py
├── boot
│   ├── docker
│   │   ├── celery
│   │   │   ├── cuda90.yml
│   │   │   └── trip
│   │   │       ├── Dockerfile
│   │   │       └── entrypoint.sh
│   │   ├── compose
│   │   │   └── trip_duration_prediction
│   │   │       ├── docker-compose.cpu.yml
│   │   │       ├── docker-compose.dev.yml
│   │   │       ├── docker-compose.yml
│   │   │       ├── docker-services.sh
│   │   │       ├── my_build.sh
│   │   └── uvicorn
│   │       ├── Dockerfile
│   │       ├── entrypoint.sh
│   │       └── requirements.txt
│   └── uvicorn
│       └── config.py
├── config.py
├── core
│   ├── managers
│   ├── schemas
│   │   ├── api_base.py
│   │   ├── health.py
│   │   └── trip.py
│   ├── services
│   │   ├── trip_duration_api.py
│   │   └── trip_duration_prediction_task.py
│   └── utilities
├── repo
│   ├── logs
│   └── models
│       └── lin_reg.bin
├── tasks
│   └── trip
│       └── tasks.py
└── tests
    ├── http_test
    │   └── test_api.py
    └── model_test
        └── test_trip_prediction_task.py
Here are the details of the repository folder structure:
- apps: defines the main application and API router for the web module using FastAPI
- boot: Define Dockerfile image for web module, ML module and docker-compose file to link 3 modules. It also contains the configuration for each docker image and the corresponding yml file for the package repository.
- config.py: The configuration file defines various configurations about CELERY_BROKER_URL, CELERY_RESULT_BACKEND, TRIP_DURATION_MODEL, TRIP_DURATION_THRESHOLD, etc...
- core: defines all implementation scripts used in the Web, Redis, Worker modules
- repo: stores application and task logs when the API starts. It also stores the model weights
- tasks: Define Celery task scripts
- tests: define the unit tests for the API
3.2 Web module
In the web module, I use FastAPI as the web framework. FastAPI offers many niche features such as: ultra-fast, integration with Uvicorn, automatic checking of type validation using Pydantic, automatic documentation generation, and more...
Let's see how to start the FastAPI application: boot/docker/uvicorn/entrypoint.sh, this is where I start the FastAPI application
#!/usr/bin/env sh

USERNAME="$(id -u -n)"
MODULE="apps.api"
SOCKET="0.0.0.0:8182"
MODULE_APP="${MODULE}.main:app"
CONFIG_PATH="boot/uvicorn/config.py"
REPO_ROOT="repo"
LOGS_ROOT="${REPO_ROOT}/logs/apps/api"
LOGS_PATH="${LOGS_ROOT}/daemon.log"

sudo mkdir -p ${LOGS_ROOT} && \
sudo chown -R ${USERNAME} ${LOGS_ROOT} && \
sudo chown -R ${USERNAME} ${REPO_ROOT} && \

gunicorn \
    --name "${MODULE}" \
    --config "${CONFIG_PATH}" \
    --bind "${SOCKET}" \
    --log-file "${LOGS_PATH}" \
    "${MODULE_APP}"
Then, I define the API router and message schema - apps/api/api_routers.py:
import os
import json
from typing import Dict

from loguru import logger
from fastapi import Request, APIRouter

import config
from core.schemas.trip import TripAPIRequestMessage, TripAPIResponseMessage
from core.schemas.health import Health
from core.services.trip_duration_api import TripDurationApi

API_VERSION = config.API_VERSION
MODEL_VERSION = config.MODEL_VERSION

api_router = APIRouter()


@api_router.get("/health", response_model=Health, status_code=200)
def health() -> Dict:
    return Health(
        name=config.PROJECT_NAME, api_version=API_VERSION, model_version=MODEL_VERSION
    ).dict()


@api_router.post(
    f"/{config.API_VERSION}/trip/predict",
    tags=["Trips"],
    response_model=TripAPIResponseMessage,
    status_code=200,
)
def trip_predict(request: Request, trip_request: TripAPIRequestMessage):
    api_service = TripDurationApi()
    results = api_service.process_raw_request(request, trip_request)
    return results
core/schemas/trip.py:

from core.schemas.api_base import APIRequestBase, APIResponseBase


class TripAPIRequestMessage(APIRequestBase):
    PULocationID: int
    DOLocationID: int
    trip_distance: float

    class Config:
        schema_extra = {
            "example": {
                "request_id": "99999",
                "PULocationID": 130,
                "DOLocationID": 250,
                "trip_distance": 3.0,
            }
        }


class TripAPIResponseMessage(APIResponseBase):
    duration: float

    class Config:
        schema_extra = {"example": {"reply_code": 0, "duration": 12.785509620119132}}
core/services/trip_duration_api.py:

import collections

import celery
from loguru import logger
from fastapi import Request
from fastapi.encoders import jsonable_encoder

import config
from core.schemas.trip import TripAPIRequestMessage, TripAPIResponseMessage
from core.utilities.cls_time import Timer

task_celery = config.CeleryTasksGeneralConfig
celery_app = celery.Celery()
celery_app.config_from_object(task_celery)


class TripDurationApi:
    # pylint: disable=too-many-instance-attributes
    def call_celery_matching(
        self,
        pu_location_id: int,
        do_location_id: int,
        trip_distance: float,
    ):
        """
        :type celery_result: celery.result.AsyncResult
        """
        celery_result = celery_app.send_task(
            task_celery.task_process_trip,
            args=[
                pu_location_id,
                do_location_id,
                trip_distance,
            ],
            queue=task_celery.task_trip_queue,
        )

        return celery_result

    def process_api_request(self):
        celery_result = self.call_celery_matching(
            self.trip_request.PULocationID,
            self.trip_request.DOLocationID,
            self.trip_request.trip_distance,
        )

        results: dict = {}
        try:
            results = celery_result.get(timeout=60)
            celery_result.forget()
            results = results or {}
        except celery.exceptions.TimeoutError:
            results = {}

        reply_code: int = results.pop("reply_code", 1)
        duration: float = float(results.pop("duration", 0.0))

        self.response = TripAPIResponseMessage(reply_code=reply_code, duration=duration)
        self.status_code = 200
        self.timings = results.pop("timings", {})
        self.results = results
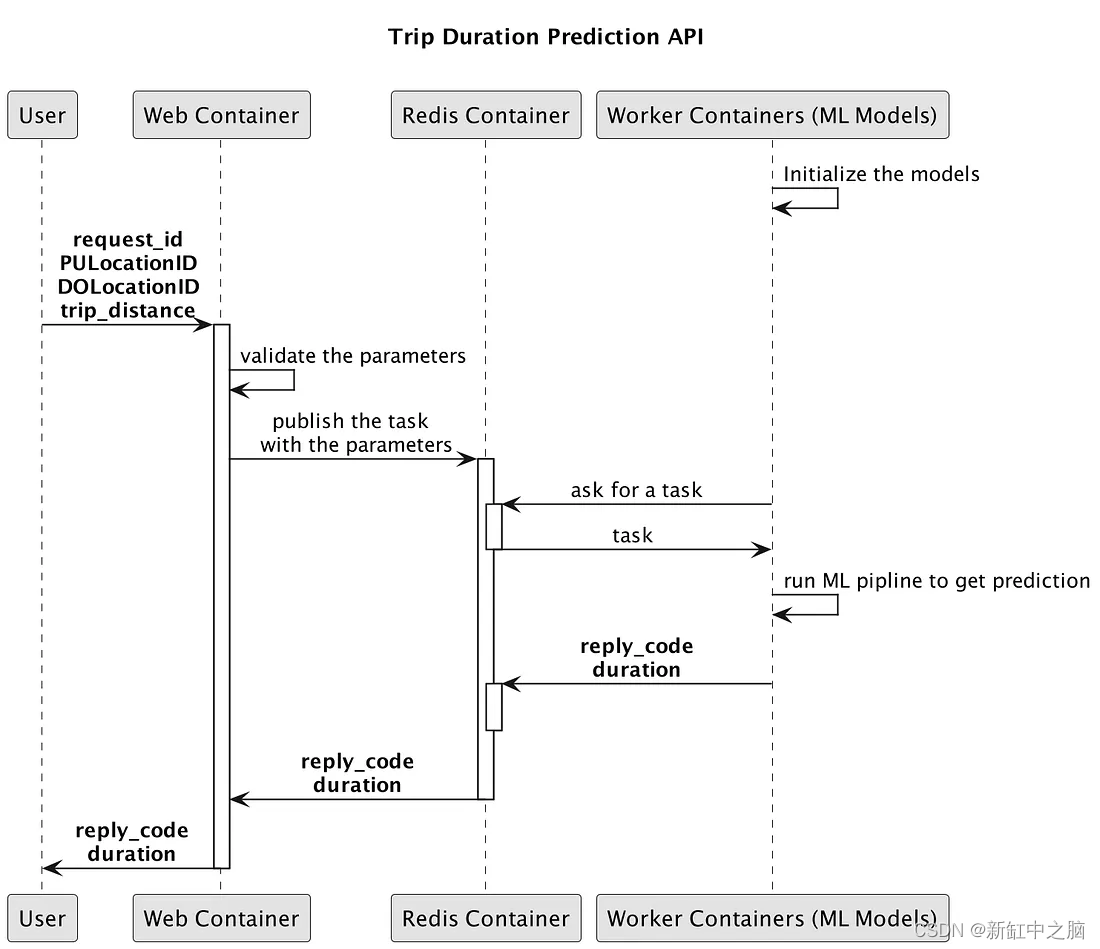
Next, I define a class called trip_duration_api.py where I handle the request logic.
- In the function process_request_api, it collects request information
- The call_celery_matching function will be added as a task to a message broker Redis queue deployed in another container. ML modules deployed in other containers will pop the job from Redis and start processing it. The result is a promise that will notify the web module's backend when the worker has completed the task or when the due time has elapsed. Please pay attention to lines 29 and 35, where you need to enter task_celery.task_process_trip as the Celery task name and task_celery.task_trip_queue as the Celery queue
- Lines 12 to 14 help the web module connect with the ML module via Celery
Everything is combined and built into a single docker image.
Web Dockerfile:
ARG VM_BASE
FROM $VM_BASE

ARG VM_USER
ARG VM_HOME
ARG VM_CODE
ARG VM_PIP

COPY . $VM_CODE
WORKDIR $VM_CODE/
RUN rm -rf libs
RUN apk add --no-cache sudo \
    && apk add --no-cache --virtual .build-deps gcc musl-dev g++\
    && pip install --no-cache-dir -r $VM_PIP \
    && apk del .build-deps

RUN apk add --no-cache bash

RUN adduser --disabled-password --gecos '' $VM_USER \
    && addgroup sudo \
    && adduser $VM_USER sudo \
    && echo '%sudo ALL=(ALL) NOPASSWD:ALL' >> /etc/sudoers \
    && chown -R $VM_USER $VM_HOME

USER $VM_USER

WORKDIR $VM_CODE/
EXPOSE 8182
ENTRYPOINT ["boot/docker/uvicorn/entrypoint.sh"]
3.3 Worker module
In celery, each piece of work that can be done in a separate process or machine is called a task. Tasks can vary from scraping web content to sending emails, or even complex running machine models. Tasks can be triggered at runtime or periodically. Once deployed, each worker thread can run in a process, a green thread... depending on the type of Celery we're using. To get a better understanding of Celery execution pools, you can read more on this blog. In this API, I choose Celery pool type gevent. The entry point for Celery can be found in boot/docker/celery/trip/entrypoint.sh
#!/usr/bin/env bash

USERNAME="$(id -u -n)"
MODULE="tasks.trip"
REPO_ROOT="repo"
LOGS_ROOT="${REPO_ROOT}/logs/tasks/trip"
LOGS_PATH="${LOGS_ROOT}/daemon.log"

sudo mkdir -p ${LOGS_ROOT} && \
sudo chown -R ${USERNAME} ${LOGS_ROOT} && \
sudo chown -R ${USERNAME} ${REPO_ROOT} && \
source activate venv && \
python -m celery worker \
    -A ${MODULE} \
    -Q ${MODULE} \
    -P gevent \
    --prefetch-multiplier=1 \
    --concurrency=4 \
    --loglevel=INFO \
    --logfile="${LOGS_PATH}"
Note that on line 18, my Celery type of choice is gevent. The prefetch multiplier is the number of messages to prefetch at a time, which means it will only reserve one task per worker process at a time. Concurrency is the number of green threads created per Celery instance.
Celery configuration
Celery configuration is defined in config.py:
class CeleryTasksGeneralConfig:
    task_trip_queue = "tasks.trip"
    task_trip_prefix = "tasks.trip.tasks"
    task_process_trip = f"{task_trip_prefix}.predict_ride"

    broker_url = os.environ.get("CELERY_BROKER_URL", None)
    result_backend = os.environ.get("CELERY_RESULT_BACKEND", None)
    worker_prefetch_multiplier = int(
        os.environ.get("CELERY_WORKER_PREFETCH_MULTIPLIER", 1)
    )
The above file contains all the configuration needed for Celery to run. Lines 6 and 7 set the proxy URL and the resulting backend (Redis in this case). These configurations will be taken from the docker image's env file, which I explain later when defining docker-compose.
When a producer sends a message to a message broker, it needs to define which task to consume and on which queue. Then, based on the queue name and task name, Celery can dispatch the message to the correct consumer worker thread processing that task. So, in line 2, I define the queue name as "tasks.trip" and the task_name as "tasks.trip.tasks.predict_ride". Recall that these parameters are used in the file core/services/trip_duration_api.py when the web module executes the Celery tasks.
Celery tasks
Celery tasks are implemented in tasks/trip/tasks.py
import celery

import config
from core.utilities.cls_loguru_config import loguru_setting
from core.services.trip_duration_prediction_task import TripDurationTask

loguru_setting.setup_app_logging()

app = celery.Celery()
app.config_from_object(config.CeleryTasksGeneralConfig)
app.autodiscover_tasks(["tasks.trip"])


@celery.shared_task(time_limit=60, soft_time_limit=60)
def predict_ride(pu_location_id: int, do_location_id: int, trip_distance: float):
    return TripDurationTask().process(pu_location_id, do_location_id, trip_distance)
Lines 9 to 11 are where I assign the tasks to the corresponding task names. In this way, when the client calls the travel task in the future, Celery will trigger the execution of the task in the script file. In line 14, I set the maximum time to execute the task to 60 seconds, which means that if the task is not completed within 60 seconds, the task will fail and the client will be notified of the error.
Travel Time Prediction Task
import pickle
import collections

# import boto3
from loguru import logger

import config
from core.utilities.cls_time import DictKeyTimer
from core.utilities.cls_constants import APIReply

# s3 = boto3.resource("s3")

# TRIP_DURATION_MODEL_KEY = config.ModelConfig.s3_trip_model_key()
# TRIP_DURATION_MODEL_BUCKET = config.ModelConfig.s3_bucket()


TRIP_DURATION_MODEL_PATH = config.ModelConfig.trip_duration_model()
with open(TRIP_DURATION_MODEL_PATH, "rb") as f_in:
    dv, model = pickle.load(f_in)


def preprare_feature(pu_location_id: int, do_location_id: int, trip_distance: float):
    features = {}
    features["PU_DO"] = f"{pu_location_id}_{do_location_id}"
    features["trip_distance"] = trip_distance
    return features


class TripDurationTask:
    @classmethod
    def process(cls, pu_location_id: int, do_location_id: int, trip_distance: float):
        try:
            timings = collections.OrderedDict()
            step_name = "feature_prepare"
            with DictKeyTimer(timings, step_name):
                features = preprare_feature(
                    pu_location_id, do_location_id, trip_distance
                )
            step_name = "model_predict"
            with DictKeyTimer(timings, step_name):
                pred = cls.predict(features)
                logger.info(f"Predict duration:{pred}")

            result = {
                "duration": pred,
                "reply_code": APIReply.SUCCESS,
                "timings": timings,
            }
        # pylint: disable=broad-except
        except Exception:
            result = {
                "duration": 0.0,
                "reply_code": APIReply.ERROR_SERVER,
                "timings": timings,
            }
        return result

    @classmethod
    def predict(cls, features: dict):
        X = dv.transform(features)
        preds = model.predict(X)
        return float(preds[0])
The above file is the main location where the ML model is implemented. From line 17 to line 19, I load the model weights stored in the repo/models folder. The rest is self-explanatory, where the regression model takes inputs including pick-up location, drop-off location, and travel distance, and then predicts the travel time.
4. Connect everything with Docker Compose
As I explained at the beginning, we need 3 modules: Web, Redis and ML modules. In order to connect these three parts and enable them to communicate with each other, I use docker-compose to define three docker image definitions. When the application starts, three corresponding containers are created and communicate with each other in the docker network. Details can be found in boot/docker/compose/trip_duration_prediction/docker-compose.yml.
version: "2.3"
services:

  web:
    build:
      context: "${DC_UNIVERSE}"
      dockerfile: "${WEB_VM_FILE}"
      args:
        VM_BASE: "${WEB_VM_BASE}"
        VM_USER: "${WEB_VM_USER}"
        VM_HOME: "${WEB_VM_HOME}"
        VM_CODE: "${WEB_VM_CODE}"
        VM_PIP: "${WEB_VM_PIP}"
    platform: linux/amd64
    image: ${DOCKER_IMAGE_PROJECT_ROOT_NAME}_web:${COMMIT_ID}
    ports:
      - "${HTTP_PORT}:8182"
    volumes:
      - "${HOST_REPO_DIR}:${WEB_VM_CODE}/repo"
    restart: always
    environment:
      VERSION: "${WEB_VERSION}"
      PROJECT_APP: "${WEB_VM_PROJECT_APP}"
      REDIS_HOST: "redis"
      REDIS_PORT: "${REDIS_PORT}"
      CELERY_BROKER_URL: "redis://redis:${REDIS_PORT}"
      CELERY_RESULT_BACKEND: "redis://redis:${REDIS_PORT}"

  redis:
    image: redis:latest
    restart: on-failure
    expose:
      - "${REDIS_PORT}"
    command: redis-server --port "${REDIS_PORT}"

  worker:
    build:
      context: "${DC_UNIVERSE}"
      dockerfile: "${WORKER_VM_FILE}"
      args:
        VM_BASE: "${WORKER_VM_BASE}"
        VM_USER: "${WORKER_VM_USER}"
        VM_HOME: "${WORKER_VM_HOME}"
        VM_CODE: "${WORKER_VM_CODE}"
        VM_CONDA: "${WORKER_VM_CONDA}"
    platform: linux/amd64
    volumes:
      - "${HOST_REPO_DIR}:${WORKER_VM_CODE}/repo"
    image: ${DOCKER_IMAGE_PROJECT_ROOT_NAME}_worker:${COMMIT_ID}
    restart: always
    runtime: nvidia
    environment:
      NVIDIA_VISIBLE_DEVICES: "0"
      PROJECT_APP: "${WORKER_VM_PROJECT_APP}"
      REDIS_HOST: "redis"
      REDIS_PORT: "${REDIS_PORT}"
      CELERY_BROKER_URL: "redis://redis:${REDIS_PORT}"
      CELERY_RESULT_BACKEND: "redis://redis:${REDIS_PORT}"
.env 文件包含运行 docker-compose 时运行的所有参数,可以在  boot/docker/compose/trip_duration_prediciton/.env中找到。

DC_UNIVERSE=../../../..

HTTP_PORT=8182
REDIS_PORT=6379
GPU_MEMORY_SET=800


WEB_VERSION=v1
WEB_VM_FILE=boot/docker/uvicorn/Dockerfile
WEB_VM_BASE=python:3.8-alpine
WEB_VM_USER=docker
WEB_VM_HOME=/home/docker
WEB_VM_CODE=/home/docker/workspace
WEB_VM_PIP=./boot/docker/uvicorn/requirements.txt
WEB_VM_PROJECT_APP=apps.api

WORKER_VM_FILE=boot/docker/celery/trip/Dockerfile
WORKER_VM_BASE=nvidia/cuda:9.0-cudnn7-devel-ubuntu16.04
WORKER_VM_USER=docker
WORKER_VM_HOME=/home/docker
WORKER_VM_CODE=/home/docker/workspace
WORKER_TORCH_DIR=/home/docker/.torch/models
WORKER_VM_CONDA=./boot/docker/celery/cuda90.yml
WORKER_VM_PROJECT_APP=tasks.trip
5. Test the application
Run the entire application. As you can see in the image below, when I start the API, there are three containers running.
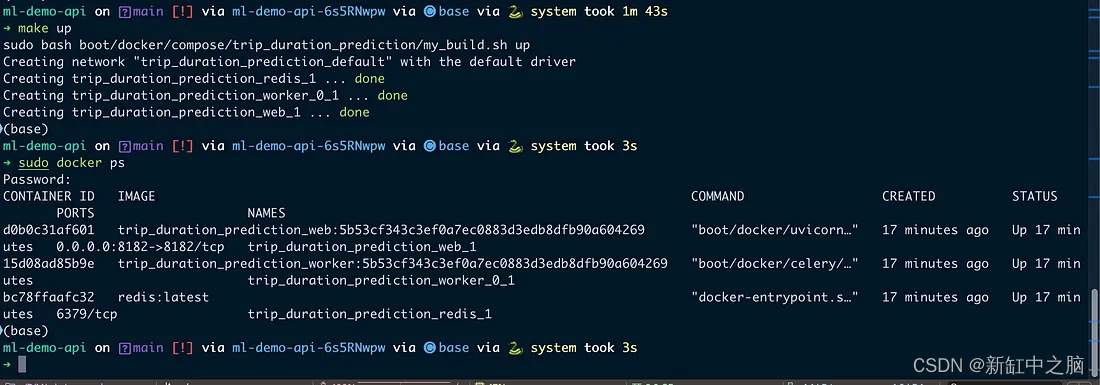
3 docker containers up and running
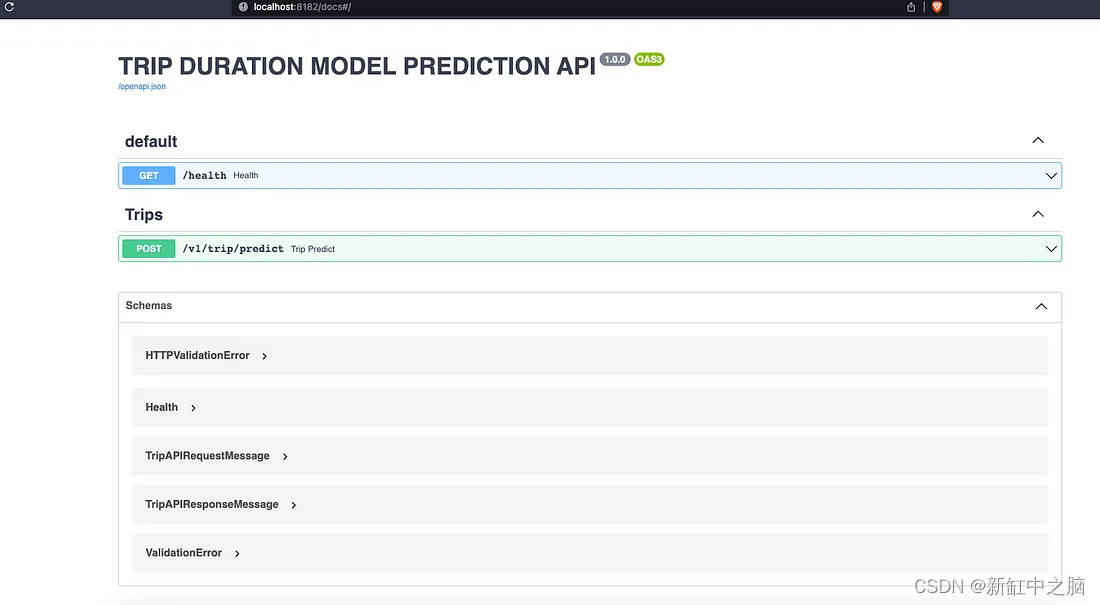
The web container runs on port 8182, and we can access the API documentation through the address: localhost:8182/docs. This is one of the niche features of FastAPI, when we complete the API implementation with zero effort, we will get the Swagger documentation immediately.
API Swagger Documentation
Then, let's try running the API endpoint at /v1/trip/predict to see the predictions and check the log returns.
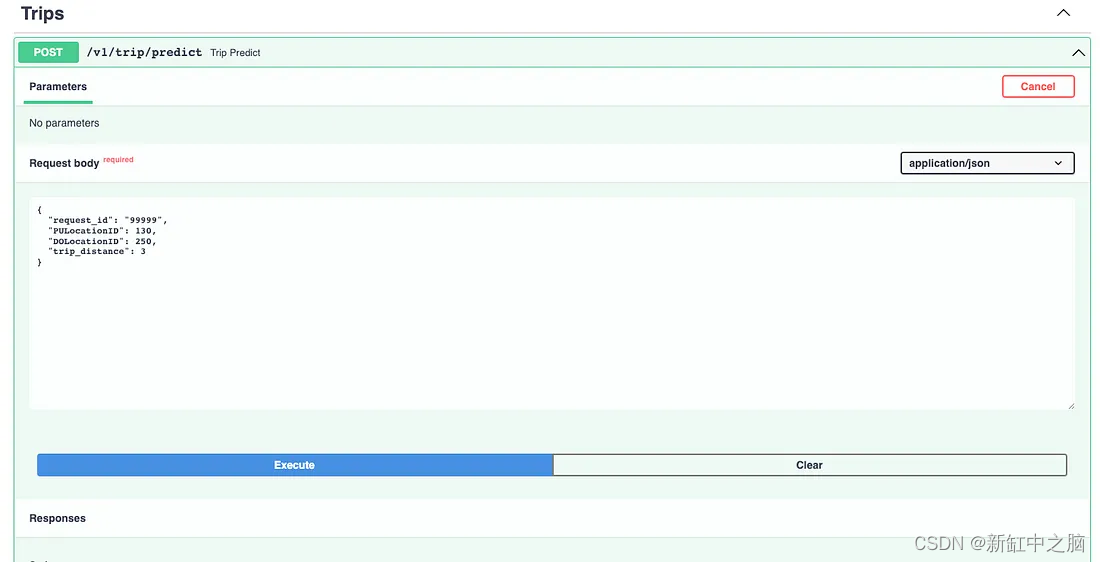
Stroke Prediction Termination Point
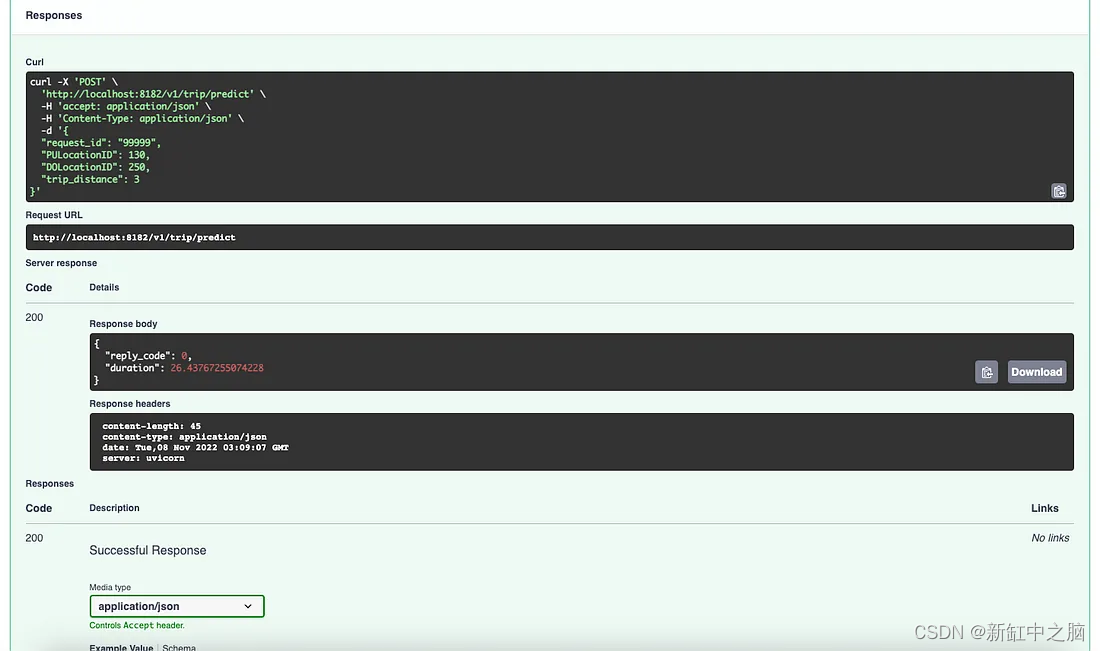
Trip Prediction Response

Logging for the web module
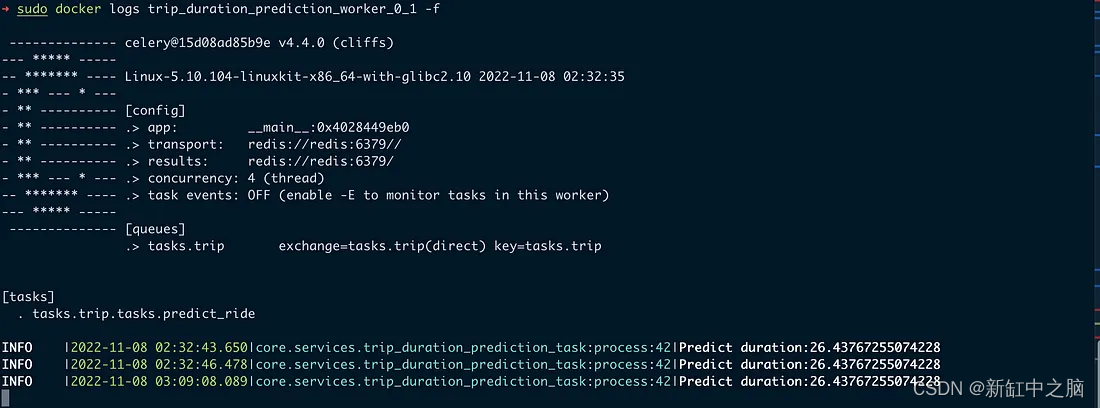
Logging for the worker module
Once a request is sent from the client to the web module, it will be processed asynchronously in a worker thread using Celery as a separate process or thread. This brings a lot of benefits:
- Heavy tasks are handled in a separate process/thread which can help increase the number of requests we can handle as it doesn't block client calls.
- ML modules are implemented in another thread, packaged in a separate docker image, which means that data scientists or machine learning engineers can keep their implementation code and packages independently.
- If the number of requests increases, we can easily increase the number of ML modules to handle the surge in requests, while the web module can remain the same
6. Conclusion
In this blog, I introduced how to use the task queue distributed architecture to implement APIs serving ML modules. Using Celery, FastAPI, and Redis can help better handle long-running tasks like ML runtimes, improving overall performance.
The original idea was something I developed and improved while working at my previous company. Thank you Shan Hong and Jonathan, they are great former colleagues, I learned a lot of good things from them.
If you want to refer to the full code, please check out github.
Original Link: Queue-based ML Service Implementation—BimAnt