If this article is an original article, please indicate the source of the original article when reprinting.
The blog address of this article: https://hpzwl.blog.csdn.net/article/details/132077288
Qt development column: Three-party library development technology
Previous: " Qt+GDAL Development Notes (1): Compile GDAL library, build development environment and basic Demo in mingw32 of windows system "
Next: Stay tuned...
foreword
The previous article used the mingw32 version of gdal, and the process was tortuous. In order to build a better and more convenient environment, the msvc method on windows is more friendly to the library.
related blog
" Kylin System Development Notes (12): Compile the GDAL library on the domestic Kylin system, build a basic development environment and a basic demo" "Qt +
GDAL Development Notes (1): Compile the GDAL library on the windows system mingw32, build a development environment and foundation Demo》
" Qt+GDAL Development Notes (2): Compile GDAL library, build development environment and basic Demo in windows system msvc207x64 "
Introduction to Geodetic Coordinates
overview
Geodetic coordinates are the coordinates of the reference ellipsoid in geodetic surveying. The position of the ground point P is expressed by the longitude L of the earth, the latitude B of the earth and the height H of the earth.
principle
当点在参考椭球面上时,仅用大地经度和大地纬度表示。大地经度是通过该点的大地子午面与起始大地子午面(通过格林尼治天文台的子午面)之间的夹角。规定以起始子午面起算,向东由0°至180°称为东经;向西由0°至180°称为西经。大地纬度是通过该点的法线与赤道面的夹角,规定由赤道面起算,由赤道面向北从0°至90°称为北纬;向南从0°到90°称为南纬。大地高是地面点沿法线到参考椭球面的距离。
北京54坐标系:BJZ54
北京54坐标系(BJZ54)是指北京54坐标系为参心大地坐标系,大地上的一点可用经度L54、纬度M54和大地高H54定位,它是以克拉索夫斯基椭球为基础,经局部平差后产生的坐标系。
- 长半轴a = 6378245m
- 短半轴b = 6356863.0188m
- 第一偏心率平方e2 = 0.006693421622
- 扁率α =1/298.3
世界大地坐标系统:WGS-84
WGS-84坐标系是世界大地坐标系统,其坐标原点在地心,采用WGS-84椭球(1984世界大地坐标系)。
WGS-84坐标系是美国国防部研制确定的大地坐标系,是一种协议地球坐标系。
WGS-84坐标系的定义是:原点是地球的质心,空间直角坐标系的Z轴指向BIH(1984.0)定义的地极(CTP)方向,即国际协议原点CIO,它由IAU和IUGG共同推荐。X轴指向BIH定义的零度子午面和CTP赤道的交点,Y轴和Z,X轴构成右手坐标系。
WGS-84椭球采用国际大地测量与地球物理联合会第17届大会测量常数推荐值,采用的两个常用基本几何参数:
- 长半轴a = 6378137m
- 短半轴b = 6356752.3142m
- 第一偏心率平方e2 = 0.00669437999013
- 扁率 α= 1/298.257223563
国家大地坐标系:CGCS2000
2000国家大地坐标系,是我国当前最新的国家大地坐标系,英文名称为China Geodetic Coordinate System 2000,英文缩写为CGCS2000。
2000国家大地坐标系的原点为包括海洋和大气的整个地球的质量中心;2000国家大地坐标系的Z轴由原点指向历元2000.0的地球参考极的方向,该历元的指向由国际时间局给定的历元为1984.0的初始指向推算,定向的时间演化保证相对于地壳不产生残余的全球旋转,X轴由原点指向格林尼治参考子午线与地球赤道面(历元2000.0)的交点,Y轴与Z轴、X轴构成右手正交坐标系。采用广义相对论意义下的尺度。
- 长半轴a = 6378137m
- 短半轴b = 6356752.314m
- 第一偏心率平方e2 = 0.00669438002290
- 扁率α = 1/298.257222101
GDAL库
概述
GDAL(Geospatial Data Abstraction Library)是一个在X/MIT许可协议下的开源栅格空间数据转换库。它利用抽象数据模型来表达所支持的各种文件格式。它还有一系列命令行工具来进行数据转换和处理。 OGR是GDAL项目的一个分支,提供对矢量数据的支持。 有很多著名的GIS类产品都使用了GDAL/OGR库,包括ESRI的ARCGIS 9.3,Google Earth和跨平台的GRASS GIS系统。利用GDAL/OGR库,可以使基于Linux的地理空间数据管理系统提供对矢量和栅格文件数据的支持。
功能特征
- GDAL提供对多种栅格数据的支持,包括Arc/Info ASCII Grid(asc),GeoTiff (tiff),Erdas Imagine Images(img),ASCII DEM(dem) 等格式。
- GDAL uses an abstract data model (abstract data model) to parse the data formats it supports. The abstract data model includes datasets, coordinate systems, affine geographic coordinate transformations (Affine Geo Transform), and geodetic control points (GCPs). Metadata, Raster Band, Color Table, Subdatasets Domain, Image_Structure Domain, XML Domains.
- GDALMajorObject class: an object with metadata.
- GDALDdataset class: usually a collection of associated raster bands extracted from a raster file and the metadata of these bands;
- GDALDdataset is also responsible for the georeferencing transform and coordinate system definition of all raster bands.
- GDALDriver class: file format driver class, GDAL will create an entity of this class for each supported file format to manage the file format.
- GDALDriverManager class: file format driver management class, used to manage the GDALDriver class.
OGR Architecture
- Geometry class: Geometry (including OGRGeometry and other classes) encapsulates the vector data model of OpenGIS, and provides some geometric operations, mutual conversion between WKB (Well Knows Binary) and WKT (Well Known Text) formats, and spatial reference system ( projection).
- Spatial Reference class: OGRSpatialReference encapsulates the definition of projection and datum.
- Feature class: OGRFeature encapsulates the definition of a complete feature, and a complete feature includes a geometry and a series of attributes of the geometry.
- Feature Definition class: OGRFeatureDefn encapsulates feature attributes, type, name and its default spatial reference system. An OGRFeatureDefn object usually corresponds to a layer.
- Layer类:OGRLayer是一个抽象基类,表示数据源类OGRDataSource里面的一层要素(feature)。
- Data Source类:OGRDataSource是一个抽象基类,表示含有OGRLayer对象的一个文件或一个数据库。
- Drivers类:OGRSFDriver对应于每一个所支持的矢量文件格式。类OGRSFDriver由类OGRSFDriverRegistrar来注册和管理。
下载地址
Home:https://gdal.org/download.html
选择3.2.1版本
关于编译顺序
因为首先选择的是之前vs2019编译成功的版本,但是本次vs2017x64无解了。
gdal依赖proj,proj又依赖sqlite,所以本篇先sqlite,再proj,最后gdal。
编译SQLite 3.34.1(windows msvc2017x64版本)
步骤一:下载解压
https://www.sqlite.org/download.html

步骤二:使用VS2017新建VC++空工程


步骤三:添加文件到工程


步骤四:添加宏命令

_USRDLL
SQLITE_ENABLE_RTREE
SQLITE_ENABLE_COLUMN_METADATA
SQLITE_ENABLE_FTS5
SQLITE_ENABLE_UNLOCK_NOTIFY

步骤六:修改sqlite3.def
sqlite3_unlock_nofity

步骤七:修改目标
这里release和debug都要改成配置类型“静态库(.lib)”:

步骤八:编译成功
编译:


编译PROJ 6.2.0(windows msvc2017x64版本)
步骤一:下载解压
https://proj.org/download.html

步骤二:CMake配置,添加sqlite3

(注意:配置的时候选择编译器就要选择x64的,不要去vs里面再建,有些环境变量需要CMake带进去)
没有添加SQLIte,则会报错:

添加:


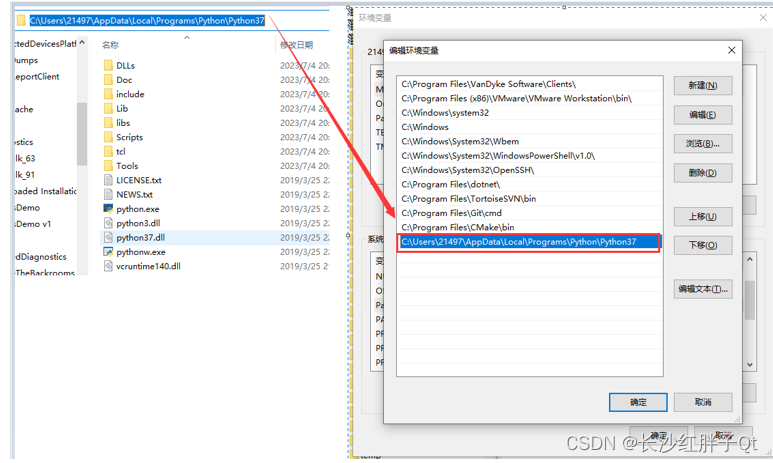
安装python到系统,自己下个python3.7.3版本,装到系统,然后将python的可执行文件添加进系统变量:
Then restart CMake before continuing:

The next corresponding version of sqlite3.exe:


Continue to configure, configure through:

Step 3: CMake generates the project

Step 4: Open compilation (open with vs2017)

(PS: If there is no x64 here, you need to configure configure to select x64 in CMakeGui, and an error will be reported if you create a new one here)
Step 5: Compile successfully


Compile GDAL (windows msvc2017x64 version)
Step 1: Download and decompress
Before doing osgearth to compile the 2019x64 version of Qt5.15, this time I compiled the 2017x64 version of qt5.9.3.

Step 2: Modify the source code
Modify the nmake.opt file in the directory as follows:
the code on line 41 is modified to:

!IFNDEF MSVC_VER
#MSVC_VER=1800 # VS2013
#MSVC_VER=1900 # VS2015
MSVC_VER=1910 # vs2017
#MSVC_VER=1921 # VS2019
!ENDIF
WIN64=1
Step 3: Open vs2017 command line compilation


Find the directory and enter the command:
nmake /f makefile.vc MSVC_VER=1910 WIN64=1 DEBUG=1
An error occurred:

The modification is as follows (when you despised it earlier, please pay attention to the prefix_install path configuration of proj to see where the install is located):

Compiling into the pit can't solve it:

Then continue compiling:
nmake /f makefile.vc MSVC_VER=1910 WIN64=1 DEBUG=1
Step 4: Compile
nmake /f makefile.vc MSVC_VER=1910 WIN64=1 DEBUG=1

This is when configuring proj before without removing multiple shell32 and ole32, and then continue:

This is without introducing sqlite, re-imported under gdal;

Then continue, finally compiled successfully, most of the problems, it took two days,:


Step Five: Install Extraction
(debug here means debug mode)
nmake /f makefile.vc MSVC_VER=1910 WIN64=1 DEBUG=1 install


You have to do a devinstall:
nmake /f makefile.vc MSVC_VER=1910 WIN64=1 DEBUG=1 devinstall


The header files are finally out.
Step 6: Go through the non-debugging mode
I used to think that DEBUG is to print debugging information during the compilation process. Now it seems that the generated library is not in debug mode. We need release, so do it again:
nmake /f makefile.vc MSVC_VER=1910 WIN64=1
nmake /f makefile.vc MSVC_VER=1910 WIN64=1 install
nmake /f makefile.vc MSVC_VER=1910 WIN64=1 devinstall

Step Seven: Adjust Engineering Tests
Import the windows library to the pri file, as shown in the figure below:

Modular

Demo source code
GDALManager.at
INCLUDEPATH += $$PWD
DEPENDPATH += $$PWD

HEADERS += \
    $$PWD/GDALManager.h

SOURCES += \
    $$PWD/GDALManager.cpp


win32 {


    # windows Qt5.9.3 msvc2017x64 版本 gdal
    INCLUDEPATH += $$PWD/gdal-3.2.1_msvc2017x64/include
    LIBS += -L$$PWD/gdal-3.2.1_msvc2017x64/lib
    LIBS += -lgdal_i


    # 引入也失败了,当前不深
#    # windows Qt5.9.3 mingw32 版本 sqlite3
#    INCLUDEPATH += $$PWD/gdal3.2.1_qt593_mingw32/sqlite3/include
#    LIBS += -L$$PWD/gdal3.2.1_qt593_mingw32/sqlite3/lib
#    LIBS += -lsqlite3

#    # windows Qt5.9.3 mingw32 版本 proj6.2.0
#    INCLUDEPATH += $$PWD/gdal3.2.1_qt593_mingw32/proj6.2.0/include
#    LIBS += -L$$PWD/gdal3.2.1_qt593_mingw32/proj6.2.0/lib
#    LIBS += -lproj

#    # windows Qt5.9.3 mingw32 版本 gdal3.2.1
#    INCLUDEPATH += $$PWD/gdal3.2.1_qt593_mingw32/gdal3.2.1/include
#    LIBS += -L$$PWD/gdal3.2.1_qt593_mingw32/gdal3.2.1/lib
#    LIBS += -lgdal
}else {


    DEFINES += LINUX

    # GDAL系统安装的默认路径位/usr/local
    # 系统库,头文件路径和库文件默认已包含
    LIBS += -lgdal
    # PROJ系统安装的默认路径位/usr/local
    # 系统库,头文件路径和库文件默认已包含
    LIBS += -lproj
}
GDALManager.h
#ifndef GDALMANAGER_H
#define GDALMANAGER_H

#include <QObject>

class GDALManager : public QObject
{


    Q_OBJECT
public:
    explicit GDALManager(QObject *parent = 0);

signals:

public:
    static void testEnv();                     // v1.0.0 测试环境

private:
};

#endif // GDALMANAGER_H
GDALManager.cpp
#include "GDALManager.h"

#include "gdal.h"

#include <QDebug>
#include <QDateTime>
//#define LOG qDebug()<<__FILE__<<__LINE__
//#define LOG qDebug()<<__FILE__<<__LINE__<<__FUNCTION__
//#define LOG qDebug()<<__FILE__<<__LINE__<<QThread()::currentThread()
//#define LOG qDebug()<<__FILE__<<__LINE__<<QDateTime::currentDateTime().toString("yyyy-MM-dd")
#define LOG qDebug()<<__FILE__<<__LINE__<<QDateTime::currentDateTime().toString("yyyy-MM-dd hh:mm:ss:zzz")

GDALManager::GDALManager(QObject *parent)
    : QObject(parent)
{


    // 注册所有驱动
    GDALAllRegister();
}

void GDALManager::testEnv()
{


    QString version = QString(GDALVersionInfo("RELEASE_NAME"));
    LOG << version;
}
Project template v1.1.0

Previous: " Qt+GDAL Development Notes (1): Compile GDAL library, build development environment and basic Demo in mingw32 of windows system "
Next: Stay tuned...
If this article is an original article, please indicate the source of the original article when reprinting.
The blog address of this article: https://hpzwl.blog.csdn.net/article/details/132077288