I. Introduction
The company's project has done a cluster to achieve request distribution. Since there will be more or less request failures or system exceptions online, in order to view the log information of failed requests, we have to open all service log files for problem location analysis. Operation It sounds very troublesome. Therefore, our development team decided to design a log viewing system to solve the above problems.
2. Implementation ideas
By default, the application service log information will be saved in the directory of the local server. In order to view the logs conveniently, we should output the logs of multiple servers into one log file.
Due to the Logback logging framework and RabbitMQ message queue used by the project, the two can just be integrated.
Therefore, we can output the log in the project code to the RabbitMQ queue, read the queue data through Logstash, and finally output it to a log file.
3. Prepare the environment
Test environment: CentOS 7 system with IP 192.168.2.13
3.1 RabbitMQ configuration
First, you need to build the RabbitMQ environment.
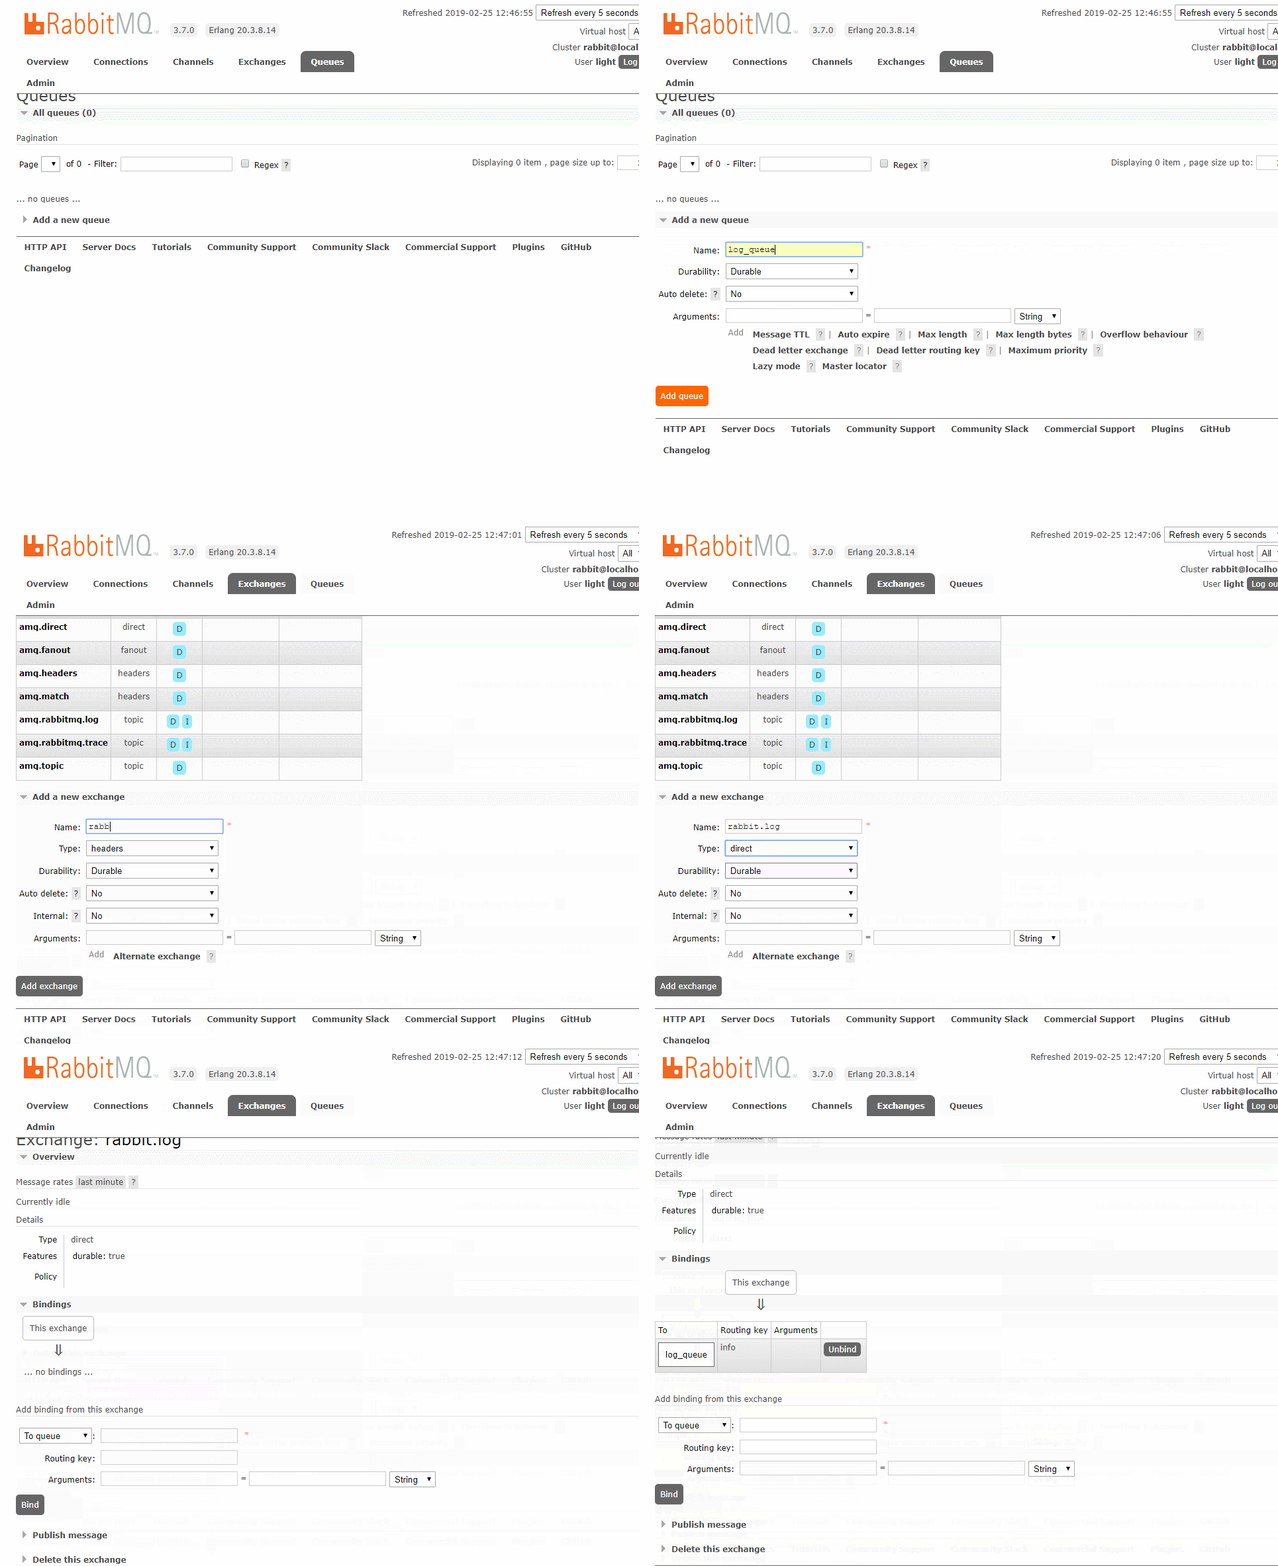
After the construction is complete, log in to the management interface of RabbitMQ, and you need to perform the following steps:
- Create a queue named log_queue
- Create an exchange (direct type) called rabbit.log
- Bind the log_queue queue to the rabbit.log switch
Operation demonstration diagram:
3.2 Logstash configuration file
input {


  rabbitmq {


       type =>"all"
       durable => true
       exchange => "rabbit.log"
       exchange_type => "direct"
       key => "info"
       host => "192.168.2.13"
       port => 5672
       user => "light"
       password => "light"
       queue => "log_queue"
       auto_delete => false
  }

}

output {


    file {


      path => "/usr/test-log/test-%{+YYYY-MM-dd}.log"
      codec => multiline {


            pattern => "^\d"
            negate => true
            what => "previous"
        }

    }
}
Note: multiline is a Logstash plugin and needs to be installed manually.
The configuration indicates that the Logstash service reads log information from RabbitMQ and outputs it to the specified directory file.
4. Coding
4.1 Dependencies
List the main dependencies:
<dependency>
	<groupId>org.springframework.boot</groupId>
	<artifactId>spring-boot-starter-amqp</artifactId>
</dependency>

<dependency>
	<groupId>org.springframework.amqp</groupId>
	<artifactId>spring-rabbit</artifactId>
</dependency>
4.2 Log files
named logback-spring.xml
<?xml version="1.0" encoding="UTF-8"?>
<configuration debug="false">

    <!--定义日志文件的存储地址 勿在 LogBack 的配置中使用相对路径-->
    <property name="LOG_HOME" value="d:/" />

    <!-- 控制台输出 -->
    <appender name="STDOUT" class="ch.qos.logback.core.ConsoleAppender">
        <encoder class="ch.qos.logback.classic.encoder.PatternLayoutEncoder">
             <!--格式化输出,%d:日期;%thread:线程名;%-5level:级别,从左显示5个字符宽度;%msg:日志消息;%n:换行符-->
            <pattern>%d{yyyy-MM-dd HH:mm:ss.SSS} [%thread] %-5level %logger{50} - %msg%n</pattern>
        </encoder>
    </appender>

    <appender name="RABBITMQ"
		class="org.springframework.amqp.rabbit.logback.AmqpAppender">
		<layout>
			<pattern><![CDATA[ %d %p %t [%c] - <%m>%n ]]></pattern>
		</layout>
		<!--rabbitmq地址 -->
		<addresses>192.168.2.13:5672</addresses>
		<username>light</username>
		<password>light</password>
		<declareExchange>true</declareExchange>
		<exchangeType>direct</exchangeType>
		<exchangeName>rabbit.log</exchangeName>
		<routingKeyPattern>info</routingKeyPattern>
		<generateId>true</generateId>
		<charset>UTF-8</charset>
		<durable>true</durable>
		<deliveryMode>NON_PERSISTENT</deliveryMode>
		<autoDelete>false</autoDelete>
	</appender>

	<logger name="com.light.rabbitmq" level="info" additivity="false">
        <appender-ref ref="STDOUT"/>
        <appender-ref ref="RABBITMQ"/>
    </logger>

    <!-- 日志输出级别,level 默认值 DEBUG,root 其实是 logger,它是 logger 的根 -->
    <root level="INFO">
        <appender-ref ref="STDOUT" />
        <appender-ref ref="RABBITMQ" />
    </root>

</configuration>
The exchangeType and exchangeName in the configuration are the type and name of the exchange we created above.
4.3 Test class
Custom exception:
public class CustomException extends RuntimeException{


	private static final long serialVersionUID = 1L;

	private int code;

	private String msg;

	public CustomException(int code, String msg) {


		super(msg);
		this.code = code;
		this.msg = msg;
	}

	public int getCode() {


		return code;
	}

	public void setCode(int code) {


		this.code = code;
	}

	public String getMsg() {


		return msg;
	}

	public void setMsg(String msg) {


		this.msg = msg;
	}

}
Simulate printing logs:
@Component
public class DemoTask {


	private static Logger logger = LoggerFactory.getLogger(DemoTask.class);

	private int num = 1;

	@Scheduled(fixedRate = 3000)
	public void writeLog() {


		try {


			if (num % 5 == 0) {


			  throw new CustomException(500, "自定义异常错误");
			}
			logger.info("==={}===={}","hello rabbitmq", System.currentTimeMillis());
			num++;
		} catch (CustomException e) {


			e.printStackTrace();
			logger.error("=={}==", e);
		}

	}
}
5. Code testing
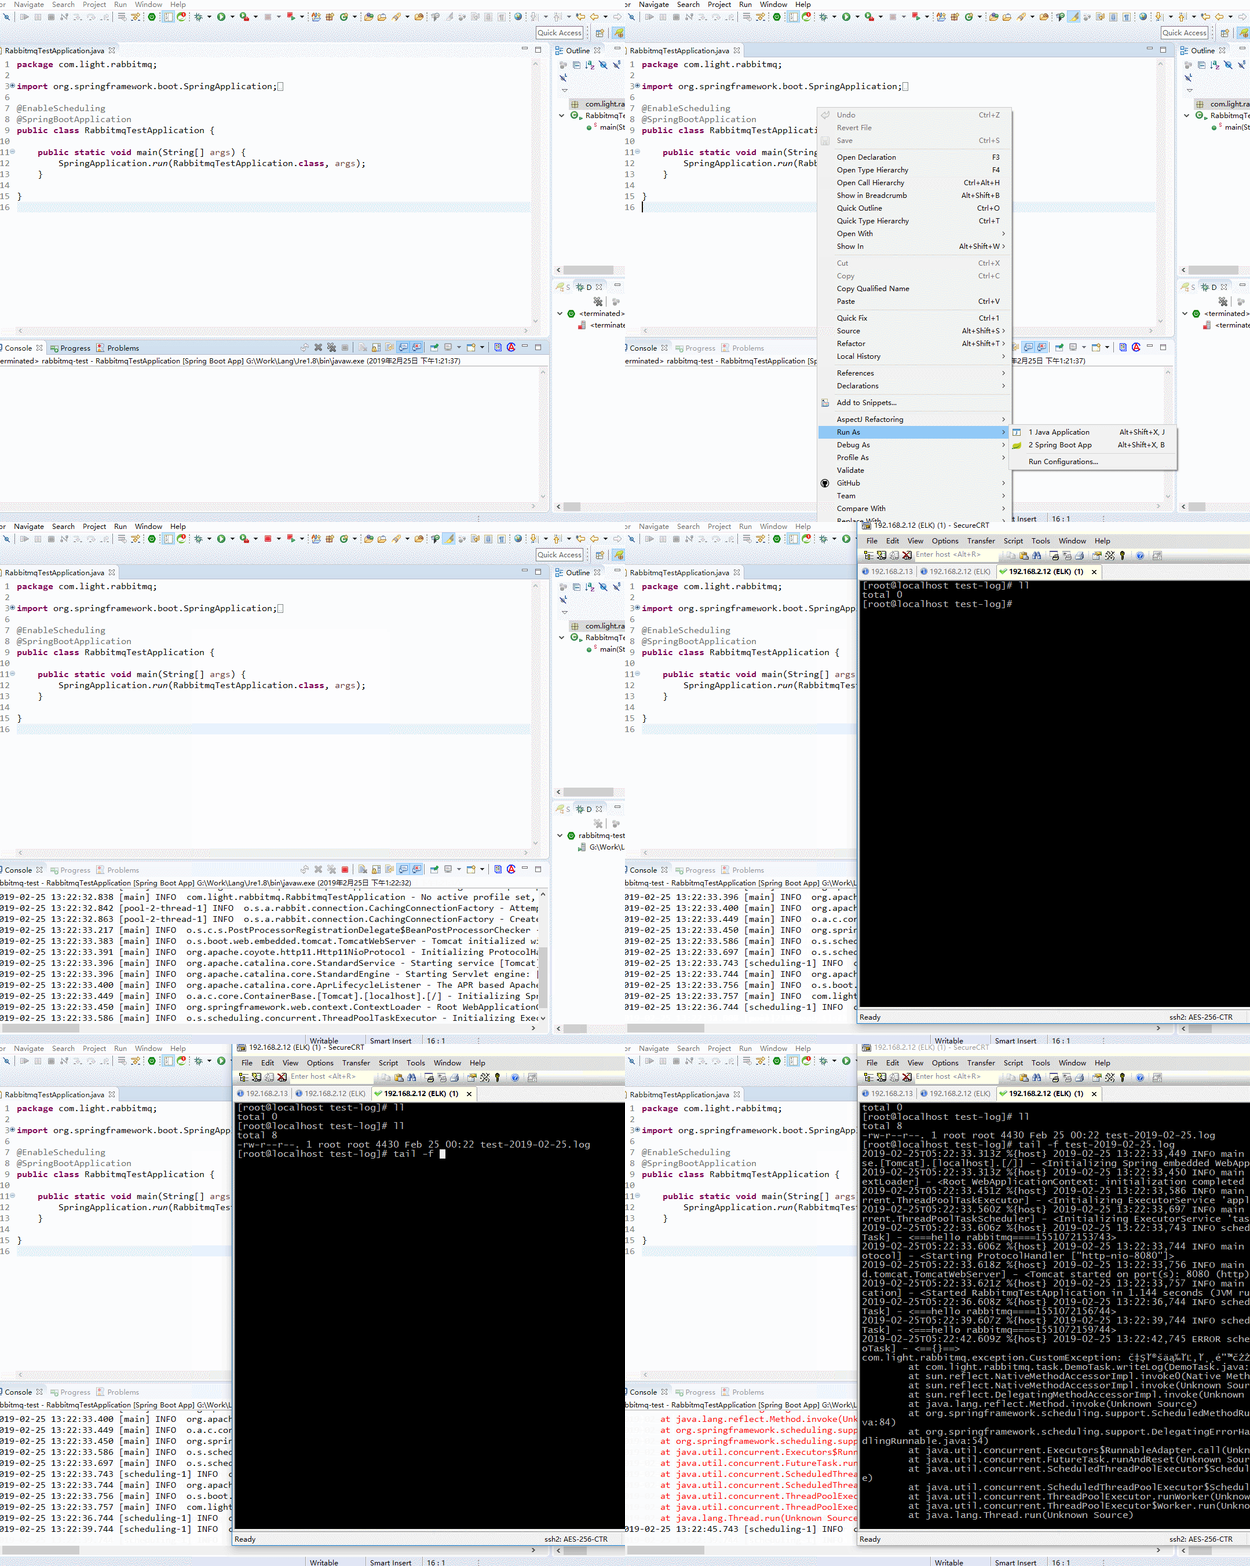
Execute the startup class:
@EnableScheduling
@SpringBootApplication
public class RabbitmqTestApplication {


	public static void main(String[] args) {


		SpringApplication.run(RabbitmqTestApplication.class, args);
	}

}
The execution result is as follows:
The log information of code execution has been output to the specified log file.
Replenish
Since the logs of multiple servers are printed to the same file, in order to distinguish the source of the logs, we need to print out the IP address of the host corresponding to the log information. The specific implementation steps are as follows:
- custom log converter
Need to inherit the ClassicConverter class
public class CustomLogConverter  extends ClassicConverter {


    public String convert(ILoggingEvent event) {


    	try {


            return InetAddress.getLocalHost().getHostAddress();
        } catch (UnknownHostException e) {


            e.printStackTrace();
        }
        return null;
    }
}
- Modify the logback-spring.xml file
Only the key configuration information is posted below
 <conversionRule conversionWord="ip" converterClass="com.light.rabbitmq.log.CustomLogConverter" />

 <appender name="RABBITMQ"
		class="org.springframework.amqp.rabbit.logback.AmqpAppender">
	<layout>
		<pattern><![CDATA[%ip %date{yyyy-MM-dd HH:mm:ss} | %highlight(%-5level) | %yellow(%thread) | %green(%logger) | %msg%n ]]></pattern>
	</layout>
</appender>

