This article includes the environment under vscode, including the construction of the debugging environment, node or launch file operation, single node debugging, multi-node/launch file (roslaunch) debugging, and the most common problems and solutions in each process.
1. Related plug-in installation
- ROS plugin.
- C++ configuration: install the two plug-ins c/c++ and C++ Intellisense .
- Configure CMakeLists.txt file syntax highlighting. In Extensions, enter txt to install Txt Syntax .
- Configure msg, srv, action syntax highlighting. In Extensions, enter msg to install Msg Language Support .
2. Import or create a new workspace
2.1 Import workspace
Open the previously built workspace folder directly in vscode.
2.2 Create a new workspace
New via command line
- new folder
mkdir -p <workspace>/src - Then compile
catkin_make, the system will automatically create "build", "devel" folders and other configuration files under the test folder.
New via vscode
- Create a new folder
mkdir -p <workspace>/src, (or create a new folder through vscode) - Shortcut key
ctrl+shif+p, then entercatkin_make, selectROS Create Catkin Package
.vscodeWhen creating a new workspace, a folder will be automatically generated under the root directory of the workspace , and there will be 2 .json files in it. c_cpp_properties.jsonand setting.json. If it is not generated, try restarting vscode. Or generate manually by pressing Ctrl + Shift + P,enter c/c++: edit configurations(JSON), .
3. Environment configuration
3.1 Smart Code Prompt
-
Compile the output information file and execute:
catkin_make -DCMAKE_EXPORT_COMPILE_COMMANDS=Yes
This command will output acompile_commands.jsonfile under the build folder of the ROS workspace -
Add the following information files to
c_cpp_properties.jsonthe appropriate locations in the file:"name": "ROS", "intelliSenseMode": "gcc-x64", "compilerPath": "/usr/bin/g++", "cStandard": "c11", "cppStandard": "c++11", "compileCommands": "${workspaceFolder}/build/compile_commands.json"Some of them can also be replaced by:
"compilerPath": "/usr/bin/gcc",
"cStandard": "c11",
"cppStandard": "c++17",
"intelliSenseMode": "clang-x64",
Note: If no code hints are displayed, use Ctrl+space.
You can basically find all the header files, and then you can use code hints to code the code.
4. Compile ros in vscode
Ctrl+Shift+P, and then typetasks: Configure Task,- If selected
catkin_make:build,.vscodethe file will be automatically generated under the foldertask.json. - Then
Ctrl+Shift+Byou can compile (in fact, the default is to usecatkin_make)
The automatically generated content is as follows:
{


  "version": "2.0.0",
  "tasks": [
    {


      "type": "catkin_make",
      "args": [
        "--directory",
        "/home/lyh/MyFiles/Codes/catkin_ws"
      ],
      "problemMatcher": [
        "$catkin-gcc"
      ],
      "group": "build", //代表将我们定义的这个task添加到build组里面,这样就可以中Ctrl+Shift+B快捷键来找到编译命令
      "label": "catkin_make: build" //代表提示的描述性信息(该组命令的名称)
    }
  ]
}
In addition, you can also add some other used parameters, for example: "group": {"kind":"build","isDefault":true}, "isDefault":truemeans to execute the command directly, if it is false, you need to select it in the build drop-down; and other catkin_makevariable parameters added after the command. Simple example:
{


  "version": "2.0.0",
  "tasks": [
    {


      "type": "catkin_make",
      "args": [
        "--directory",
        "/home/lyh/MyFiles/Codes/catkin_ws",
        "-j4", //使用4个线程编译
        "-DCMAKE_BUILD_TYPE=Debug",
        "-DCATKIN_WHITELIST_PACKAGES=<package_name>"
      ],
      "problemMatcher": [
        "$catkin-gcc"
      ],
      "group": {


        "kind":"build",
        "isDefault":true
        },
      "label": "catkin_make: build"
    }
  ]
}
Note : Before using ctrl + shif + bshortcut keys to compile, or click Terminal-> Run Build Taskcompile, you need to put the folder of the workspace where the compiled package is located in the first position of the vscode workspace, otherwise the package to be compiled cannot be selected.
Important note : Make sure that #set(CMAKE_BUILD_TYPE Release)this sentence in CMakeList.txt is commented out, otherwise even if it is set during compilation -DCMAKE_BUILD_TYPE=Debug, it will not be able to enter the breakpoint during debugging.
5. Run the node
5.1 Method 1: Run with vscode
- To start roscore, start roscore by pressing
Ctrl + Shift + P, enter .ros:start core - Run the node: By pressing
Ctrl + Shift + P, enterros:run a rose executable, enter the corresponding package and node, and parameters in sequence.
5.2 Method 2: Use the command line
There are too many steps to use vscode, it is recommended to use the command line. directly under the terminal rosrun <package> <node> <args>.
6. Debugging
6.1 Single program debugging
ROS: Attach mode
The mode is commonly used for single programs attach, and the settings are as follows:
-
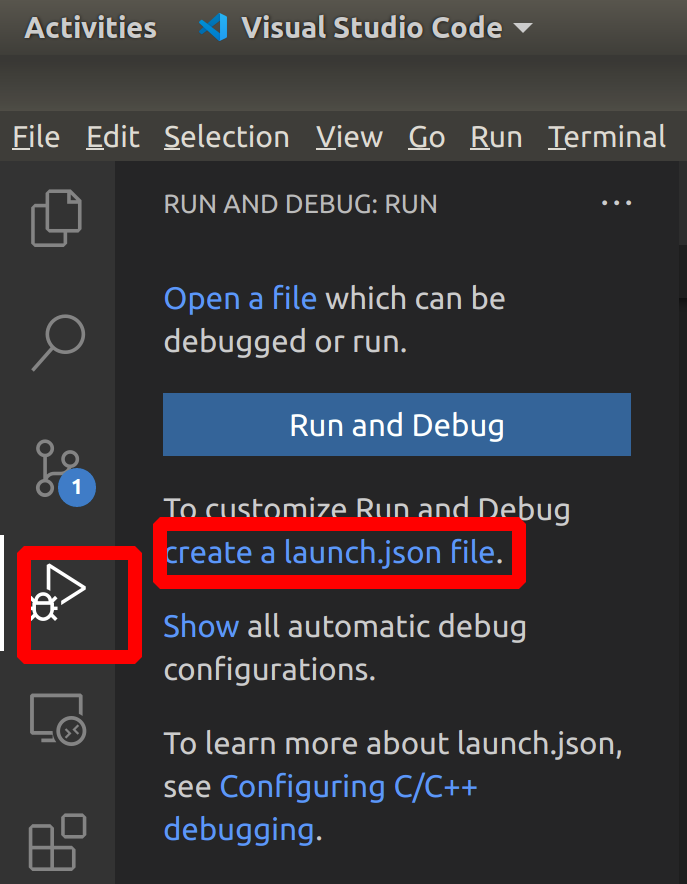
Create a new configuration: Click the icons in the figure in sequence, and then select
ROS,ROS: Attachto.vscodeautomatically generate a file under the folderlaunch.json(or use Ctrl + Shift + D to add a configuration from the drop-down list to automatically generate the file).
Its default configuration is as follows:{ // Use IntelliSense to learn about possible attributes. // Hover to view descriptions of existing attributes. // For more information, visit: https://go.microsoft.com/fwlink/?linkid=830387 "version": "0.2.0", "configurations": [ { "name": "ROS: Attach", //调试配置的名称,此处为ROS: Attach "request": "attach", "type": "ros" } ] }It can also be added by clicking the Add configuration button at the bottom right:
-
Compile the program (make sure the build type is RelWithDebInfo or Debug):
Cmakelists.txtadd inSET(CMAKE_BUILD_TYPE "RelWithDebInfo")ortask.jsonadd in args"-DCMAKE_BUILD_TYPE=RelWithDebInfo". (Some blog posts say it must beRelWithDebInfo, but the official website of the ROS plug-in says that you can also use the debug mode to use tasks to automatically build before starting debug session , and you can test both of them). -
Debugging C++: first set a breakpoint, then run the node, then run ROS: Attach configuration
-
debug python
GDB debugging
Set the compilation mode to debug, and configure the launch file as follows:
{


    "version": "0.2.0",
    "configurations": [
        {


            "name": "(gdb) Launch", // 配置名称,将会在调试配置下拉列表中显示
            "type": "cppdbg",  // 调试器类型 该值自动生成
            "request": "launch",  // 调试方式,还可以选择attach
            "program": "${workspaceRoot}/devel/lib/waypoint_follower/pure_persuit", //要调试的程序(完整路径,支持相对路径)
            "args": [],  // 传递给上面程序的参数,没有参数留空即可
            "stopAtEntry": false,  // 是否停在程序入口点(停在main函数开始)
            "cwd": "${workspaceRoot}",  // 调试程序时的工作目录
            "environment": [], //针对调试的程序,要添加到环境中的环境变量. 例如: [ { "name": "squid", "value": "clam" } ]
            "externalConsole": false,   //如果设置为true,则为应用程序启动外部控制台。 如果为false,则不会启动控制台,并使用VS Code的内置调试控制台。
            "MIMode": "gdb",  // VSCode要使用的调试工具名称
            "setupCommands": [
                {


                    "description": "Enable pretty-printing for gdb",
                    "text": "-enable-pretty-printing",
                    "ignoreFailures": true
                }
            ]
        }
    ]
}
It is worth mentioning that if the node runs with parameters, you can add and run it after the node when rosrun runs the node; you need to enter a large number of parameters, you can write a yaml file, and then, rosparam load <your_yaml_file> <namespace>asrosparam load test_name.yaml /workspace
6.2 Multi-program/multi-node debugging, launch file debugging
-
Create a launch file: Create a new launch folder and add a launch file to it.
<launch> <node name="talker" pkg="beginner_tutorials" type="talker" output="screen" /> <node name="listener" pkg="beginner_tutorials" type="listener" output="screen" /> </launch> -
Add the ROS: Launch configuration in
.vscodethe folder , where "target" is set to the absolute path of the launch file, and the new configuration is as follows (including ROS: Attach):launch.josn
{


    // Use IntelliSense to learn about possible attributes.
    // Hover to view descriptions of existing attributes.
    // For more information, visit: https://go.microsoft.com/fwlink/?linkid=830387
    "version": "0.2.0",
    "configurations": [
        {


            "name": "ROS: Launch",
            "type": "ros",
            "request": "launch",
            "target": "/home/lyh/MyFiles/Codes/catkin_ws/src/beginner_tutorials/launch/launch_debug_test.launch"
        },
        {


            "name": "ROS: Attach",
            "request": "attach",
            "type": "ros"
        }
    ]
}
- Other running and debugging methods are similar to ROS: Attach
There are 4 json files involved in the whole process:
c_cpp_properties.json, mainly the includePath parameter, which needs to be added when there is a custom header file.setting.json, mainly ROS uses python programming, python related configuration, and other configurations. If you are using C++, no changes are required.launch.json, which is required when configuring the debug mode. In C++ startup mode, the program parameter needs to be changed; in ros_launch mode, the target parameter needs to be changed-task.json, related to compilation, can be ignored if the command line is used to compile.
7. issue
- ROS no code prompt/smart prompt
If no code prompt is displayed, use Ctrl+space (if not, execute the content in the brackets below)
(edit the c_cpp_properties.json" file in the .vscode folder of the workspace and add it "name": "ROS",below intelliSenseMode": "gcc-x64")
Reference link: