The rapid development of speech recognition technology provides infinite possibilities for realizing more intelligent applications. This article aims to introduce a simple audio recording and speech recognition application based on Python. The article briefly introduces the application of related technologies, focusing on audio recording, while speech recognition focuses on calling related speech recognition libraries. This article will first outline some basic audio concepts, and then explain in detail how to use the PyAudio library and the SpeechRecognition library to implement audio recording functions. Finally, build a simple speech recognition sample application, which can monitor the start and end of the audio in real time, and transmit the recorded audio data to the Whisper speech recognition library for speech recognition, and finally output the recognition results to the simple PyQt5-based page.
See all the code in this article: Python-Study-Notes
Article directory
0 Audio Basic Concepts
With the rapid development of deep learning technology, end-to-end speech recognition has been widely used. However, we still need to have a certain understanding of the most basic concepts related to audio, such as sampling frequency and number of sampling bits. Sound is a mechanical wave caused by a vibrating object while audio is an electronic representation of sound. PCM (Pulse Code Modulation) encoding is a common method of converting an analog audio signal to digital form. In this process, audio sampling refers to collecting the amplitude value of the sound at fixed intervals over a period of time to convert the continuous sound analog signal into discrete digital data. The sampling frequency indicates the number of samples taken per second, while the number of sampling bits indicates the quantization level of each sample, that is, the fineness and dynamic range of the sound. For a detailed introduction to audio concepts, see: Digital Audio Basics Starting from PCM .
Sampling frequency
Audio signals are usually continuous analog waveforms, which need to be discretized in order to store them. This is achieved by sampling, i.e. measuring the amplitude of the sound signal at fixed time intervals. The sampling process is to extract the frequency value of each point of the analog signal. The higher the sampling rate, that is, the more data points extracted within 1 second, the better the audio quality, but it also increases the storage and processing costs. The Nyquist–Shannon sampling theorem emphasizes that the sampling frequency must be higher than twice the signal's maximum frequency to ensure full recovery of the original analog signal from the sampled values. In the field of audio signal sampling, two main sampling frequencies are commonly used: 16kHz and 44.1kHz.
For example, 16kHz means 16,000 samples per second, and the human speech sound frequency ranges from 200Hz to 8kHz. The sampling frequency of 16kHz is enough to capture the frequency characteristics of human speech, while reducing the burden of audio data storage and processing. Therefore, the commonly used voice sampling frequency is 16kHz. The human ear can perceive sound from 20Hz to 20kHz. In order to present high-quality audio, a sampling frequency of 44.1kHz is usually selected to cover the upper limit of human audible sound.
Sample Bits and Channels
A sampled signal is a continuous analog value, and in order to convert it to digital form, the signal needs to be quantized. Quantization is the mapping of continuous analog values to discrete digital values, usually using a fixed number of sampling bits (such as 16 or 24 bits) to represent the amplitude range of a sample. For example, use 16 bits (16bit), that is, double-byte binary signals to represent audio samples, and the value range of 16 bits is from -32768 to 32767, and there are 65536 possible values in total. Therefore, the final analog audio signal is divided into 65536 numerical levels in amplitude. A higher number of sampling bits can represent a greater range of sound amplitudes and retain more detailed information. Commonly used bit depths include 8-bit, 16-bit, and 24-bit, with 8-bit being the minimum requirement, 16-bit for general applications, and 24-bit for professional audio work.
The channel refers to the transmission channel of the audio signal in the playback system or recording system. A channel usually corresponds to a single audio signal source or signal stream and is responsible for transmitting that signal to speakers or recording equipment. In a stereo system, there are usually two channels, namely the left channel and the right channel, which are used to separately process the left and right sound signals from the audio source to achieve a spatial stereo effect. The concept of sound channel can also be extended to multi-channel systems, such as 5.1-channel, 7.1-channel, etc., which can support more audio sources and richer sound experience, such as surround sound.
Commonly used audio encoding formats
The audio data obtained by PCM encoding is the most original, and it needs to be encoded twice for storage and network transmission. These secondary audio encoding formats are re-encoded and compressed on the basis of PCM encoding, and are divided into lossless compression and lossy compression according to the compression method. Lossless compression refers to completely preserving the sound quality of audio data relative to PCM encoding. However, lossless compressed audio files are usually slightly larger than lossy compressed audio files. Lossy compression In the encoding process, in order to reduce the file size, the information and sound quality of some audio data are sacrificed.
Common audio encoding formats for lossless compression include: WAV/WAEV (Waveform Audio File Format), FLAC (Free Lossless Audio Codec), AIFF (Audio Interchange File Format), etc. Common audio coding formats for lossy compression include: MP3 (MPEG Audio Layer III), AAC (Advanced Audio Coding), WMA (Windows Media Audio), etc.
After obtaining the encoded audio data, it is necessary to use a suitable file format to save the encoded data. An audio encoding may correspond to one file format, or may correspond to multiple file formats, usually one. For example, WAV encoded data corresponds to the .wav file format, and MP3 encoded data corresponds to the .mp3 file format. The PCM encoded data corresponds to the .raw or .pcm file format, and the AAC encoded data corresponds to the .acc or .mp4 file format, etc.
Audio vs. video concept comparison
| concept | audio | video |
|---|---|---|
| dimension | The sound information transmitted by sound waves is one-dimensional | The moving image information transmitted through the image sequence is two-dimensional |
| core features | Including pitch, volume, rhythm, etc., expressed by frequency and amplitude | Including screen content, color, etc., represented by pixels and colors |
| signal frequency | In terms of sampling rate, human beings are more sensitive to sound perception, so the audio sampling rate is much greater than the video frame rate | In terms of frame rate, video is played through multiple still images at a certain speed to simulate smooth animation |
| Sampling accuracy | Used to represent the amplitude value of the sound, common 16bit | Used to represent the color and brightness value of the image, usually 8bit (256 colors) |
| processing technology | Equalization, compression, noise reduction, etc. | Editing, special effects, codec, etc. |
| aisle | Expressed in channels, such as mono and binaural | Expressed in color channels, such as GRAY, RGB, RGBA |
| storage | Easy to transport and store, takes up less space | Requires greater storage space and bandwidth to transmit and save |
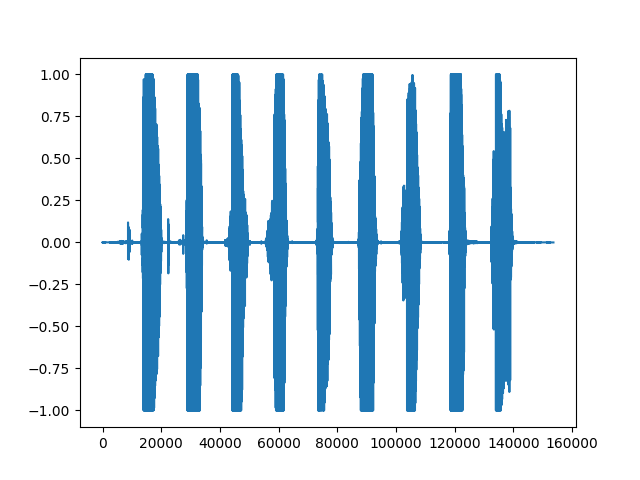
The following code shows reading a wav file with an audio content of 123456789 and drawing a waveform of the audio data.
# 导入用于绘图的matplotlib库
from matplotlib import pyplot as plt
# 导入用于读取音频文件的soundfile库
# pip install soundfile
import soundfile as sf

# 从demo.wav文件中读取音频数据和采样率,data为numpy数组
data, samplerate = sf.read('asr_example_hotword.wav', dtype='float32')

# 保存音频
sf.write("output.wav", data=data, samplerate=samplerate)

# 打印音频数据的形状和打印采样率
# data为一个numpy数组,samplerate为一个整数
print('data shape: {}'.format(data.shape))
print('sample rate: {}'.format(samplerate))

# 绘制音频波形
plt.figure()
plt.plot(data)
plt.show()
The result of running the code is as follows, which represents the sample point index of the audio data, that is, the time axis of the audio. Each sample point corresponds to each frame of audio data, increasing from left to right. The vertical axis represents the normalized audio intensity of the audio signal at each time point. The read data is expressed in float32 format, and the range of numerical sampling values is -32678~32678. The soundfile library will divide by 32678 (2^16/2) to normalize to the interval [-1, 1].
1 PyAudio
1.1 Introduction and installation of PyAudio
PyAudio is a Python library for processing audio input and output, and the implementation of its main variables and interfaces depends on the C language version of PortAudio . PyAudio provides functions for recording audio from a microphone or other input devices, saving audio files, processing audio data in real time, and playing audio files or live audio streams. In addition, PyAudio also allows you to meet different application requirements by setting parameters such as sampling rate, bit depth, and number of channels, as well as supporting callback functions and event-driven mechanisms. See PyAudio official website: PyAudio . The installation of PyAudio requires Python3.7 and above environment.
The PyAudio installation command under Windows is as follows:
python -m pip install pyaudio
PyAudio under Linux follows the command as follows:
sudo apt-get install python3-pyaudio
python -m pip install pyaudio
The version of PyAudio used in this article is 0.2.13.
1.2 Audio recording and playback
1.2.1 Audio playback
The following code shows playing local audio files based on PyAudio.
# wave为python处理音频标准库
import wave
import pyaudio

# 定义每次从音频文件中读取的音频采样数据点的数量
CHUNK = 1024

filepath = "demo.wav"
# 以音频二进制流形式打开音频文件
with wave.open(filepath, 'rb') as wf:
    # 实例化PyAudio并初始化PortAudio系统资源
    p = pyaudio.PyAudio()

    # 打开音频流
    # format: 指定音频流的采样格式。其中wf.getsampwidth()用于获取音频文件的采样位数(sample width)。
    # 采样位数指的是每个采样点占用的字节数。通常情况下,采样位数可以是1字节(8位)、2字节(16位)等。
    # channels:指定音频流的声道数。声道数可以是单声道(1)或立体声(2)
    # rate:指定音频流的采样率。采样率表示每秒钟音频采样的次数,常见的采样率有44100Hz或16000Hz
    # output:是否播放音频
    stream = p.open(format=p.get_format_from_width(wf.getsampwidth()),
                    channels=wf.getnchannels(),
                    rate=wf.getframerate(),
                    output=True)

    # 从音频文件播放样本数据
    while True:
        # data为二进制数据
        data = wf.readframes(CHUNK)
        # len(data)表示读取数据的长度
        # 在此len(data)应该等于采样点占用的字节数wf.getsampwidth()乘以CHUNK
        if len(data):
            stream.write(data)
        else:
            break

    # 或者使用python3.8引入的海象运算符
    # while len(data := wf.readframes(CHUNK)):
    #     stream.write(data)

    # 关闭音频流
    stream.close()

    # 释放PortAudio系统资源
    p.terminate()
1.2.2 Audio recording
The following code shows calling microphone recording based on PyAudio and saving the recording result as a local file.
import wave
import pyaudio

# 设置音频流的数据块大小
CHUNK = 1024
# 设置音频流的格式为16位整型,也就是2字节
FORMAT = pyaudio.paInt16
# 设置音频流的通道数为1
CHANNELS = 1
# 设置音频流的采样率为16KHz
RATE = 16000
# 设置录制时长为5秒
RECORD_SECONDS = 5

outfilepath = 'output.wav'
with wave.open(outfilepath, 'wb') as wf:
    p = pyaudio.PyAudio()
    # 设置wave文件的通道数
    wf.setnchannels(CHANNELS)
    # 设置wave文件的采样位数
    wf.setsampwidth(p.get_sample_size(FORMAT))
    # 设置wave文件的采样率
    wf.setframerate(RATE)

    # 打开音频流,input表示录音
    stream = p.open(format=FORMAT, channels=CHANNELS, rate=RATE, input=True)

    print('Recording...')
    # 循环写入音频数据
    for _ in range(0, RATE // CHUNK * RECORD_SECONDS):
        wf.writeframes(stream.read(CHUNK))
    print('Done')

    stream.close()
    p.terminate()
1.2.3 Full duplex audio recording and playback
A full-duplex system (full-duplex) can perform two-way data transmission at the same time, while a half-duplex system (half-duplex) can only perform one-way data transmission at the same time. In a half-duplex system, when one device transmits data, the other device must wait for the transmission to complete before processing the data. The following code demonstrates full-duplex (full-duplex) audio recording and playback, that is, audio recording and playback at the same time without waiting for one operation to complete before another.
import pyaudio

RECORD_SECONDS = 5
CHUNK = 1024
RATE = 16000

p = pyaudio.PyAudio()
# frames_per_buffer设置音频每个缓冲区的大小
stream = p.open(format=p.get_format_from_width(2),
                channels=1,
                rate=RATE,
                input=True,
                output=True,
                frames_per_buffer=CHUNK)

print('recording')
for i in range(0, int(RATE / CHUNK * RECORD_SECONDS)):
    # read读取音频然后writer播放音频
    stream.write(stream.read(CHUNK))
print('done')

stream.close()
p.terminate()
1.3 The use of callback function
In the previous code, PyAudio performs audio playback or recording in a way that blocks the main thread, which means that the code cannot handle other tasks at the same time. In order to solve this problem, PyAudio provides a callback function that enables the program to operate in a non-blocking manner when performing audio input and output, that is, to process other tasks while processing the audio stream. The PyAudio callback function is executed in a separate thread. When the audio stream data is available, the callback function is automatically called to process the audio data immediately. The PyAudio callback function has a fixed parameter interface, and the function is introduced as follows:
def callback(in_data,       # 录制的音频数据的字节流,如果没有录音则为None
            frame_count,    # 每个缓冲区中的帧数,本次读取的数据量
            time_info,      # 有关音频流时间信息的字典
            status_flags)   # 音频流状态的标志位
The following code shows playing audio as a callback function.
import wave
import time
import pyaudio

filepath = "demo.wav"
with wave.open(filepath, 'rb') as wf:
    # 当音频流数据可用时,回调函数会被自动调用
    def callback(in_data, frame_count, time_info, status):
        # 读取了指定数量的音频帧数据
        data = wf.readframes(frame_count)
        # pyaudio.paContinue为常量,表示继续进行音频流的处理
        # 根据需要更改为pyaudio.paAbort或pyaudio.paComplete等常量来控制处理流程的中断和结束
        return (data, pyaudio.paContinue)

    p = pyaudio.PyAudio()

    # stream_callback设置回调函数
    stream = p.open(format=p.get_format_from_width(wf.getsampwidth()),
                    channels=wf.getnchannels(),
                    rate=wf.getframerate(),
                    output=True,
                    stream_callback=callback)

    # 判断音频流是否处于活动状态
    while stream.is_active():
        time.sleep(0.1)
    stream.close()

    p.terminate()
The following code shows how to use the callback function to realize the full-duplex mode of audio recording and playback. In case of timeout, close the audio stream and release related resources by calling stream.close(). Once the audio stream is closed, no further audio data can be transmitted. If you want to continue recording after pausing for a period of time during the recording process, you can use stream.stop_stream() to suspend the data transmission of the audio stream, that is, temporarily stop the reading and writing of audio, but keep the stream object in the open state. Subsequently, the data transmission of the audio stream can be restarted by calling stream.start_stream().
import time
import pyaudio

# 录音时长
DURATION = 5

def callback(in_data, frame_count, time_info, status):
    # in_data为麦克风输入的音频流
    return (in_data, pyaudio.paContinue)

p = pyaudio.PyAudio()
stream = p.open(format=p.get_format_from_width(2),
                channels=1,
                rate=16000,
                input=True,
                output=True,
                stream_callback=callback)

start = time.time()
#  当音频流处于活动状态且录音时间未达到设定时长时
while stream.is_active() and (time.time() - start) < DURATION:
    time.sleep(0.1)

# 超过时长关闭音频流
stream.close()
p.terminate()
1.4 Device Management
PyAudio provides host Api and device Api to get audio devices, but host Api and device Api represent different levels and functions. details as follows:
- host Api: It is an abstraction of the underlying audio system, representing the audio interface available on the system, and providing the function of interacting with the underlying audio device. Each host Api has its own characteristics and set of supported functions, such as the data format used, sampling rate, etc. Common host APIs include ALSA, PulseAudio, CoreAudio, etc.
- device Api: Refers to specific audio input or output devices, such as microphones, speakers, or headphones. Each audio device belongs to a specific audio host Api, and has different parameter configurations, such as sampling rate, buffer size, etc.
This article mainly introduces the more commonly used device Api. The functions of device Api in PyAudio are as follows:
-
get_device_info_by_index(index):
Obtain the detailed information of the specified device through an integer index. This function returns a dictionary containing device information, including device name, number of input/output channels, supported sample rate range, etc. -
get_default_input_device_info():
Get the details of the default input device. This function returns a dictionary containing device information. -
get_default_output_device_info():
Get the details of the default output device. This function returns a dictionary containing device information. -
get_device_count():
Gets the number of audio devices available on the computer, which can be microphones, speakers, audio interfaces, etc.
The default device is the audio default device of the current operating system, and the default audio input and output device can be changed through the operating system audio control page. The following code shows the use of these functions:
import pyaudio

# 获取指定设备的详细信息
def get_device_info_by_index(index):
    p = pyaudio.PyAudio()
    device_info = p.get_device_info_by_index(index)
    p.terminate()
    return device_info

# 获取默认输入设备的详细信息
def get_default_input_device_info():
    p = pyaudio.PyAudio()
    default_input_info = p.get_default_input_device_info()
    p.terminate()
    return default_input_info

# 获取默认输出设备的详细信息
def get_default_output_device_info():
    p = pyaudio.PyAudio()
    default_output_info = p.get_default_output_device_info()
    p.terminate()
    return default_output_info

# 获取计算机上可用音频设备的数量
def get_device_count():
    p = pyaudio.PyAudio()
    device_count = p.get_device_count()
    p.terminate()
    return device_count

# 示例用法
index = 0
print("可用音频设备数量:", get_device_count())
print("设备{}的信息:{}".format(index, get_device_info_by_index(index)))
print("默认录音设备的信息:", get_default_input_device_info())
print("默认播放设备的信息:", get_default_output_device_info())
For the above code, the returned default playback device information dictionary is as follows:
默认播放设备的信息:
{

    'index': 3,
 'structVersion': 2,
 'name': '扬声器 (Realtek High Definition Au',
 'hostApi': 0,
 'maxInputChannels': 0,
 'maxOutputChannels': 2,
 'defaultLowInputLatency': 0.09,
 'defaultLowOutputLatency': 0.09,
 'defaultHighInputLatency': 0.18,
 'defaultHighOutputLatency': 0.18,
 'defaultSampleRate': 44100.0}
This device is also the current default audio device of the system, and the meanings of each parameter are as follows:
'index': 3: The index number of the device, which is used to uniquely identify the device in the device list.'structVersion': 2: The version number of the device information structure, used to indicate the data structure version of the device information.'name': '扬声器 (Realtek High Definition Au': The name of the device, indicating that the device is a Realtek High Definition speaker.'hostApi': 0: Device sound card driver mode, from PortAudio, if you want to know more about it, see: hostApi in pyaudio sound card information .'maxInputChannels': 0: The maximum number of input channels supported by the device, where 0 means that the device has no input function and does not support recording.'maxOutputChannels': 2: The maximum number of output channels supported by the device, where 2 means that the device supports 2 output channels, that is, stereo audio can be played.'defaultLowInputLatency': 0.09: The default low input delay, in seconds, indicates the minimum time required for an audio input signal to enter the device.'defaultLowOutputLatency': 0.09: The default low output delay, in seconds, indicates the minimum time required for the output signal from the device to reach the audio output.'defaultHighInputLatency': 0.18: The default high input delay, in seconds, indicates the maximum time required from the audio input signal to enter the device.'defaultHighOutputLatency': 0.18: The default high output delay, in seconds, indicates the maximum time required for the output signal from the device to reach the audio output.'defaultSampleRate': 44100.0: Default sampling rate, indicating that the default audio sampling rate supported by the device is 44100 hertz (Hz). This is the number of samples the audio device takes per unit of time, affecting the quality and frequency range of the sound.
If you want to specify a device for audio recording or recording, specify the index of the device in the open function, the code is as follows:
import pyaudio

p = pyaudio.PyAudio()

# 获取可用的设备数量
device_count = p.get_device_count()

# 遍历设备,打印设备信息和索引
for i in range(device_count):
    device_info = p.get_device_info_by_index(i)
    print(f"Device {

      i}: {

      device_info['name']}")

# 选择所需的录音设备的索引
input_device_index = 1
# 选择所需的播放设备的索引
output_device_index = 2

# 打开音频流,并指定设备
stream = p.open(format=p.get_format_from_width(2),
                channels=1,
                rate=16000,
                input=True,
                output=True,
                input_device_index = input_device_index,
                output_device_index = output_device_index)

# 操作输出设备和录音设备
# ...
2 SpeechRecognition
2.1 Introduction and installation of SpeechRecognition
SpeechRecognition is a Python library for speech recognition that supports multiple speech recognition engines to convert audio to text. The address of the SpeechRecognition open source warehouse is: speech_recognition . Based on the PyAudio library, SpeechRecognition encapsulates more comprehensive and comprehensive audio recording functions. This article mainly introduces the use of SpeechRecognition to record audio. Audio recording using SpeechRecognition requires Python3.8 and above environment, and minimum PyAudio 0.2.11 version. After installing PyAudio, the SpeechRecognition installation command is as follows:
pip install SpeechRecognition
The main classes of SpeechRecognition are:
AudioData
The AudioData class is used to represent voice data, the main parameters and functions are as follows:
parameter
frame_data: audio byte stream datasample_rate: audio sample ratesample_width: number of audio samples
function
get_segment: Returns the AudioData object of the audio data within the specified time periodget_raw_data: returns the raw byte stream of the audio dataget_wav_data: Returns the wav format byte stream of the audio dataget_aiff_data: Returns the aiff format byte stream of the audio dataget_flac_data: Returns the flac format byte stream of the audio data
Microphone
The Microphone class is a class that encapsulates PyAudio and is used to drive microphone device functions. Therefore, the construction parameters and the main parameters and functions of PyAudio are as follows:
parameter
device_index: The index number of the microphone device, if not specified will use PyAudio's default audio input settingsformat: The sample format is a 16-bit integer, not specified will use PyAudio's default audio input settingsSAMPLE_WIDTH: The number of audio samples, if not specified, PyAudio's default audio input settings will be usedSAMPLE_RATE: Sample rate, not specified will use PyAudio's default audio input settingsCHUNK: Number of frames stored in each buffer, default is 1024audio: PyAudio objectstream: The audio stream opened by calling the open function of PyAudio
function
get_pyaudio: Used to get the version number of PyAudio and call the PyAudio librarylist_microphone_names: Returns a list of the names of all microphone devices available in the current systemlist_working_microphones: Returns a list of the names of all working microphone devices in the current system. The functioning of a microphone device is assessed by, for a certain device, attempting to record a brief audio segment, and then checking to see if audio data with a certain amount of audio energy is successfully recorded.
Recognizer class
The Recognizer class is the main class for speech recognition. It provides a series of parameters and functions to process audio input. The main parameters and functions are as follows:
parameter
energy_threshold = 300: Used to record the lowest audio energy, based on the audio root mean square RMS to calculate the energydynamic_energy_threshold = True: Whether to use dynamic energy thresholddynamic_energy_adjustment_damping = 0.15: damping coefficient for energy threshold adjustmentdynamic_energy_ratio = 1.5: dynamic energy ratiopause_threshold = 0.8: Duration in seconds of non-speech audio before a complete phrase is considered to be overoperation_timeout = None: Timeout time (in seconds) after the internal operation (such as API request) starts, if no timeout is set, it will beNonephrase_threshold = 0.3: The minimum duration (in seconds) required for a speech to be considered, speech below this value will be ignored (used to filter noise)non_speaking_duration = 0.5: Duration of non-speech audio in seconds
function
record: read data from an audio sourceadjust_for_ambient_noise: used to automatically adjust the energy_threshold parameter according to the ambient noise level of the microphone before recording audiolisten: Audio recording, the result returns AudioData classlisten_in_background: Used to record audio in the background and call the callback function
The listen function of the Recognizer class is divided into three stages for each recording:
-
Recording Start
This phase means that recording is started but no sound is input. If the currently obtained sound fragment energy value is lower thanenergy_threshold, it is considered that there is no sound input. Once the energy value of the currently obtained sound clip is higher thanenergy_threshold, enter the next stage. This stage will save up tonon_speaking_durationthe length of the audio clip. Ifdynamic_energy_thresholdTrue, it will be dynamically adjusted according to the environmentenergy_threshold.
The listen function provides input parameterstimeoutto control the duration of this stage. If the recording is in this stagetimeoutfor seconds, the recording will stop and an error message will be returned.timeoutThe default is None. -
Recording
This stage means that there is sound input. If the sound clip energy value falls belowenergy_thresholdcontinuously for more thanpause_threshold2 seconds, the recording ends. At this stage energy_threshold has always been a fixed value and will not be dynamically adjusted.
The listen function provides input parametersphrase_time_limitto control the maximum duration of this stage, and thephrase_time_limitrecording will end if the recording is in this stage for seconds. -
Recording end
In this stage, if the sound segment time obtained in the recording stage is less thanphrase_threshold2 seconds, the recording result will not be returned and the next recording start stage will be entered. If it exceedsphrase_thresholdseconds, convert the audio clip to an audio stream and return it as an AudioData object.
2.2 Sample code
audio recording
import speech_recognition as sr

# 创建一个Recognizer对象,用于语音识别
r = sr.Recognizer()

# 设置相关阈值
r.non_speaking_duration = 0.3
r.pause_threshold = 0.5

# 创建一个Microphone对象,设置采样率为16000
# 构造函数所需参数device_index=None, sample_rate=None, chunk_size=1024
msr = sr.Microphone(sample_rate=16000)

# 打开麦克风
with msr as source:
    # 如果想连续录音,该段代码使用for循环
    # 进行环境噪音适应,duration为适应时间,不能小于0.5
    # 如果无噪声适应要求,该段代码可以注释
    r.adjust_for_ambient_noise(source, duration=0.5)
    print("开始录音")

    # 使用Recognizer监听麦克风录音
    # phrase_time_limit=None表示不设置时间限制
    audio = r.listen(source, phrase_time_limit=None)

    print("录音结束")

    # 将录音数据写入.wav格式文件
    with open("microphone-results.wav", "wb") as f:
        # audio.get_wav_data()获得wav格式的音频二进制数据
        f.write(audio.get_wav_data())

    # 将录音数据写入.raw格式文件
    with open("microphone-results.raw", "wb") as f:
        f.write(audio.get_raw_data())

    # 将录音数据写入.aiff格式文件
    with open("microphone-results.aiff", "wb") as f:
        f.write(audio.get_aiff_data())

    # 将录音数据写入.flac格式文件
    with open("microphone-results.flac", "wb") as f:
        f.write(audio.get_flac_data())
audio file reading
# 导入speech_recognition库,别名为sr
import speech_recognition as sr

# 创建一个Recognizer对象r,用于语音识别
r = sr.Recognizer()

# 设置音频文件路径
filepath = "demo.wav"

# 使用AudioFile打开音频文件作为音频源
with sr.AudioFile(filepath) as source:
    # 使用record方法记录从音频源中提取的2秒音频,从第1秒开始
    audio = r.record(source, offset=1, duration=2)

    # 创建一个文件用于保存提取的音频数据
    with open("microphone-results.wav", "wb") as f:
        # 将提取的音频数据写入文件
        f.write(audio.get_wav_data())
The use of callback functions
import time
import speech_recognition as sr

# 这是从后台线程调用的回调函数
def callback(recognizer, audio):
    # recognizer是Recognizer对象的实例。audio是从麦克风捕获到的音频数据
    print(type(audio))

r = sr.Recognizer()
m = sr.Microphone()
with m as source:
    # 我们只需要在开始监听之前校准一次
    r.adjust_for_ambient_noise(source)

# 在后台开始监听
stop_listening = r.listen_in_background(m, callback)

# 进行一些无关的计算,持续5秒钟
for _ in range(50):
    # 即使主线程正在做其他事情,我们仍然在监听
    time.sleep(0.1)

# 调用此函数请求停止后台监听
stop_listening(wait_for_stop=False)
Microphone device view
import speech_recognition as sr

# 获取麦克风设备名称列表
def list_microphone_names():
    mic_list = sr.Microphone.list_microphone_names()
    for index, mic_name in enumerate(mic_list):
        print("Microphone {}: {}".format(index, mic_name))
    print("\n")


# 获取可用的工作麦克风列表
def list_working_microphones():
    mic_list = sr.Microphone.list_working_microphones()
    for index, mic_name in mic_list.items():
        print("Microphone {}: {}".format(index, mic_name))
    print("\n")


# 获得pyaudio对象
def get_pyaudio():
    audio = sr.Microphone.get_pyaudio().PyAudio()
    # 获取默认音频输入设备信息
    print(audio.get_default_input_device_info())
    print("\n")
    return audio


print("所有麦克风列表")
list_microphone_names()
print("可运行麦克风列表")
list_working_microphones()
print("默认音频输入设备信息")
get_pyaudio()
3 Speech Recognition Example Application
This example gives a non-streaming speech recognition sample application based on the SpeechRecognition library and the Whisper speech recognition library. Generally speaking, speech recognition is divided into streaming speech recognition and non-streaming speech recognition:
- Streaming speech recognition refers to performing speech recognition in real time during the speech input process, that is, outputting recognition results while receiving speech data, so as to realize speech recognition with high real-time performance. In streaming speech recognition, the speech is divided into small streams, and the recognition results can be obtained in real time by continuously sending these streams. As speech input increases, streaming speech recognition can also optimize the output of partial results. Streaming speech recognition has a relatively low accuracy rate, but is highly real-time, and is suitable for scenarios that require quick response, such as real-time voice assistants, telephone customer service, meeting records, etc. Technically, streaming speech recognition needs to process audio streams in real time, requiring algorithms with low latency and high throughput, and usually uses various optimization strategies to improve real-time performance.
- Non-streaming speech recognition refers to analyzing and recognizing the complete speech input at one time after waiting for the speech input to end. Non-streaming speech recognition has high precision and is suitable for some scenarios that do not require real-time response or recognize the entire speech at one time, such as command recognition, speech transcription, speech search, speech translation, etc. Technically, non-streaming speech recognition focuses on the overall accuracy and semantic understanding of speech, and usually uses complex models and algorithms to improve recognition accuracy.
Whisper is OpenAI's open source general multilingual speech recognition model library. Whisper uses a sequence-to-sequence Transformer model that supports multi-language speech recognition, and its English recognition level is close to that of humans. For the installation and use of Whisper, please refer to the Whisper open source repository or the reference article: Whisper voice-to-text tutorial . The provided speech recognition example implements simple speech start and end detection, and performs corresponding speech recognition and result display. The program code structure is as follows:
.
├── asr.py 语音识别类
├── record.py 录音类
└── run.py 界面类
After installing the SpeechRecognition library and Whisper library, run the run.py file to open the sample application.
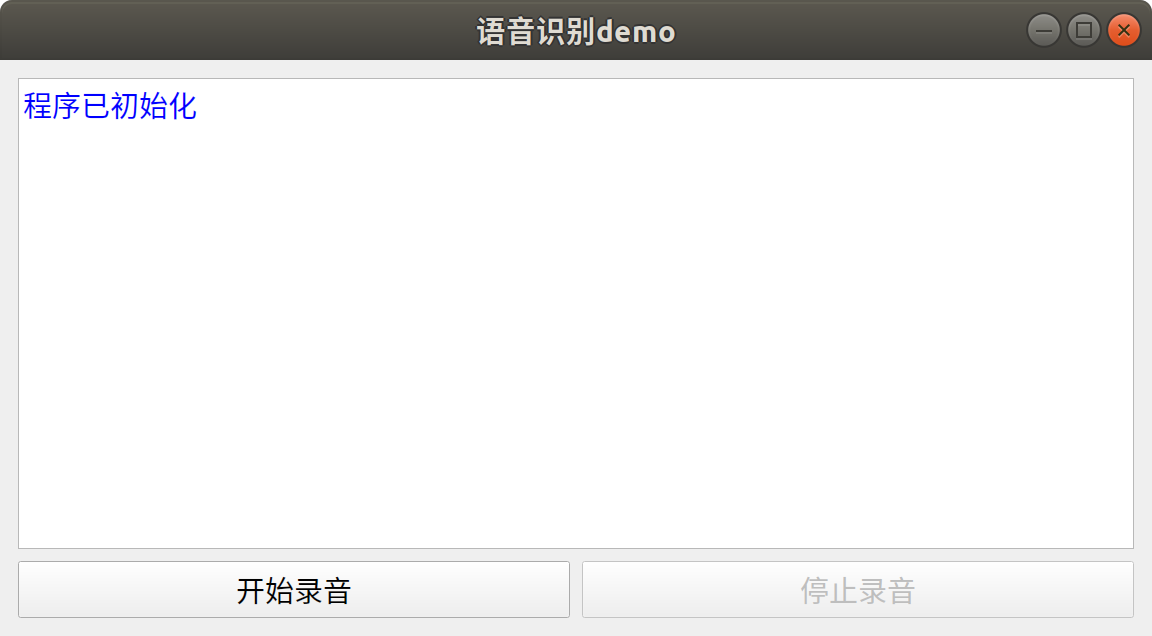
interface class
The interface class provides a simple application interface written based on PyQt5, as shown below. When the interface is initialized, the recording class and speech recognition class will be initialized at the same time. After clicking the start recording button, the program will automatically monitor the beginning and end of the speaking audio in a loop. After each speech, the program will automatically perform speech recognition and display the recognition results on the interface. Clicking the stop button will wait for the recording to end and stop the voice monitoring.
# run.py
from PyQt5 import QtGui
from PyQt5.QtWidgets import *
from PyQt5.QtCore import QSize, Qt
import sys
from record import AudioHandle


class Window(QMainWindow):
    """
    界面类
    """

    def __init__(self):
        super().__init__()
        # --- 设置标题
        self.setWindowTitle('语音识别demo')
        # --- 设置窗口尺寸
        # 获取系统桌面尺寸
        desktop = app.desktop()
        # 设置界面初始尺寸
        self.width = int(desktop.screenGeometry().width() * 0.3)
        self.height = int(0.5 * self.width)
        self.resize(self.width, self.height)
        # 设置窗口最小值
        self.minWidth = 300
        self.setMinimumSize(QSize(self.minWidth, int(0.5 * self.minWidth)))

        # --- 创建组件
        self.showBox = QTextEdit()
        self.showBox.setReadOnly(True)
        self.startBtn = QPushButton("开始录音")
        self.stopBtn = QPushButton("停止录音")
        self.stopBtn.setEnabled(False)

        # --- 组件初始化
        self.initUI()

        # --- 初始化音频类
        self.ahl = AudioHandle()
        # 连接用于传递信息的信号
        self.ahl.infoSignal.connect(self.showInfo)
        self.showInfo("<font color='blue'>{}</font>".format("程序已初始化"))

    def initUI(self) -> None:
        """
        界面初始化
        """
        # 设置整体布局
        mainLayout = QVBoxLayout()
        mainLayout.addWidget(self.showBox)
        # 设置底部水平布局
        blayout = QHBoxLayout()
        blayout.addWidget(self.startBtn)
        blayout.addWidget(self.stopBtn)
        mainLayout.addLayout(blayout)

        mainWidget = QWidget()
        mainWidget.setLayout(mainLayout)
        self.setCentralWidget(mainWidget)

        # 设置事件
        self.startBtn.clicked.connect(self.record)
        self.stopBtn.clicked.connect(self.record)

    def record(self) -> None:
        """
        录音控制
        """
        sender = self.sender()
        if sender.text() == "开始录音":
            self.stopBtn.setEnabled(True)
            self.startBtn.setEnabled(False)
            # 开启录音线程
            self.ahl.start()
        elif sender.text() == "停止录音":
            self.stopBtn.setEnabled(False)
            # waitDialog用于等待录音停止
            waitDialog = QProgressDialog("正在停止录音...", None, 0, 0)
            waitDialog.setWindowTitle("请等待")
            waitDialog.setWindowModality(Qt.ApplicationModal)
            waitDialog.setCancelButton(None)
            waitDialog.setRange(0, 0)

            # 设置 Marquee 模式
            waitDialog.setWindowFlag(Qt.WindowContextHelpButtonHint, False)
            waitDialog.setWindowFlag(Qt.WindowCloseButtonHint, False)
            waitDialog.setWindowFlag(Qt.WindowMaximizeButtonHint, False)
            waitDialog.setWindowFlag(Qt.WindowMinimizeButtonHint, False)
            waitDialog.setWindowFlag(Qt.WindowTitleHint, False)
            # 关闭对话框边框
            waitDialog.setWindowFlags(self.windowFlags() | Qt.FramelessWindowHint)

            # 连接关闭信号,即ahl线程结束则waitDialog关闭
            self.ahl.finished.connect(waitDialog.accept)
            # 结束录音线程
            self.ahl.stop()
            if self.ahl.isRunning():
                # 显示对话框
                waitDialog.exec_()

            # 关闭对话框
            self.ahl.finished.disconnect(waitDialog.accept)
            waitDialog.close()

            self.startBtn.setEnabled(True)

    def showInfo(self, text: str) -> None:
        """
        信息展示函数
        :param text: 输入文字,可支持html
        """
        self.showBox.append(text)
        if not self.ahl.running:
            self.stopBtn.click()

    def closeEvent(self, event: QtGui.QCloseEvent):
        """
        重写退出事件
        :param event: 事件对象
        """
        # 点击停止按钮
        if self.ahl.running:
            self.stopBtn.click()
        del self.ahl
        event.accept()


if __name__ == '__main__':
    app = QApplication(sys.argv)
    ex = Window()
    # 获取默认图标
    default_icon = app.style().standardIcon(QStyle.SP_MediaVolume)

    # 设置窗口图标为默认图标
    ex.setWindowIcon(default_icon)

    ex.show()
    sys.exit(app.exec_())
Recording
The recording class can be used to monitor the audio input from the microphone and call the speech recognition class for recognition. The function of automatically judging the start and end of speaking can be realized by setting parameters such as sampling rate, adaptation time, and maximum recording time. At the same time, through the signal mechanism of PyQt5, different types of information are displayed on the interface, including warning information and recognition results.
# record.py
import speech_recognition as sr
from PyQt5.QtCore import QThread, pyqtSignal
import time, os
import numpy as np
from asr import ASR


class AudioHandle(QThread):
    """
    录音控制类
    """

    # 用于展示信息的pyqt信号
    infoSignal = pyqtSignal(str)

    def __init__(self, sampleRate: int = 16000, adjustTime: int = 1, phraseLimitTime: int = 5,
                 saveAudio: bool = False, hotWord: str = ""):
        """
        :param sampleRate: 采样率
        :param adjustTime: 适应环境时长/s
        :param phraseLimitTime: 录音最长时长/s
        :param saveAudio: 是否保存音频
        :param hotWord: 热词数据
        """
        super(AudioHandle, self).__init__()
        self.sampleRate = sampleRate
        self.duration = adjustTime
        self.phraseTime = phraseLimitTime
        # 用于设置运行状态
        self.running = False
        self.rec = sr.Recognizer()
        # 麦克风对象
        self.mic = sr.Microphone(sample_rate=self.sampleRate)
        # 语音识别模型对象
        # hotWord为需要优先识别的热词
        # 输入"秦剑 无憾"表示优先匹配该字符串中的字符
        self.asr = ASR(prompt=hotWord)
        self.saveAudio = saveAudio
        self.savePath = "output"

    def run(self) -> None:
        self.listen()

    def stop(self) -> None:
        self.running = False

    def setInfo(self, text: str, type: str = "info") -> None:
        """
        展示信息
        :param text: 文本
        :param type: 文本类型
        """
        nowTime = time.strftime("%H:%M:%S", time.localtime())
        if type == "info":
            self.infoSignal.emit("<font color='blue'>{} {}</font>".format(nowTime, text))
        elif type == "text":
            self.infoSignal.emit("<font color='green'>{} {}</font>".format(nowTime, text))
        else:
            self.infoSignal.emit("<font color='red'>{} {}</font>".format(nowTime, text))

    def listen(self) -> None:
        """
        语音监听函数
        """
        try:
            with self.mic as source:
                self.setInfo("录音开始")
                self.running = True
                while self.running:
                    # 设备监控
                    audioIndex = self.mic.audio.get_default_input_device_info()['index']
                    workAudio = self.mic.list_working_microphones()
                    if len(workAudio) == 0 or audioIndex not in workAudio:
                        self.setInfo("未检测到有效音频输入设备!!!", type='warning')
                        break
                    self.rec.adjust_for_ambient_noise(source, duration=self.duration)
                    self.setInfo("正在录音")
                    # self.running为否无法立即退出该函数,如果想立即退出则需要重写该函数
                    audio = self.rec.listen(source, phrase_time_limit=self.phraseTime)
                    # 将音频二进制数据转换为numpy类型
                    audionp = self.bytes2np(audio.frame_data)
                    if self.saveAudio:
                        self.saveWav(audio)
                    # 判断音频rms值是否超过经验阈值,如果没超过表明为环境噪声
                    if np.sqrt(np.mean(audionp ** 2)) < 0.02:
                        continue
                    self.setInfo("音频正在识别")
                    # 识别语音
                    result = self.asr.predict(audionp)
                    self.setInfo(f"识别结果为:{

      result}", "text")
        except Exception as e:
            self.setInfo(e, "warning")
        finally:
            self.setInfo("录音停止")
            self.running = False

    def bytes2np(self, inp: bytes, sampleWidth: int = 2) -> np.ndarray:
        """
        将音频二进制数据转换为numpy类型
        :param inp: 输入音频二进制流
        :param sampleWidth: 音频采样宽度
        :return: 音频numpy数组
        """

        # 使用np.frombuffer函数将字节序列转换为numpy数组
        tmp = np.frombuffer(inp, dtype=np.int16 if sampleWidth == 2 else np.int8)
        # 确保tmp为numpy数组
        tmp = np.asarray(tmp)

        # 获取tmp数组元素的数据类型信息
        i = np.iinfo(tmp.dtype)
        # 计算tmp元素的绝对最大值
        absmax = 2 ** (i.bits - 1)
        # 计算tmp元素的偏移量
        offset = i.min + absmax

        # 将tmp数组元素转换为浮点型,并进行归一化
        array = np.frombuffer((tmp.astype(np.float32) - offset) / absmax, dtype=np.float32)

        # 返回转换后的numpy数组
        return array

    def saveWav(self, audio: sr.AudioData) -> None:
        """
        保存语音结果
        :param audio: AudioData音频对象
        """
        nowTime = time.strftime("%H_%M_%S", time.localtime())
        os.makedirs(self.savePath, exist_ok=True)
        with open("{}/{}.wav".format(self.savePath, nowTime), 'wb') as f:
            f.write(audio.get_wav_data())
Speech Recognition
The Speech Recognition class utilizes Whisper for speech recognition. When using Whisper for speech recognition, you can specify the initial prompt by setting the initial_prompt parameter. The initial_prompt parameter is a string used to provide some initial contextual information before the model generates text. Passing this information to the Whisper model helps it better understand the context and context of the task. By setting an appropriate initial_prompt, the model can be guided to generate responses related to a specific topic or provide some prior knowledge in the dialogue. For example, hot vocabulary recognition, whether the result is simplified or traditional characters. initial_prompt is not a required parameter, if there is no initial prompt in place, you can choose not to use it, leaving the model completely free to generate responses. However, it should be noted that if the input speech is ambient noise or a small Whisper model is used, the setting of initial_prompt may cause the speech recognition output to be initial_prompt.
Whisper provides 5 models of models, 4 of which support plain English versions to balance speed and accuracy. The larger the Whisper model, the higher the accuracy and the slower the speed. This article uses the small model by default. Here are the model names, approximate video memory requirements, and relative speeds for these available models:
| model | Parameter amount | english model only | multilingual model | required video memory | Relative velocity |
|---|---|---|---|---|---|
| tiny | 39M | tiny.en |
tiny |
~1GB | ~32x |
| base | 74M | base.en |
base |
~1GB | ~16x |
| small | 244M | small.en |
small |
~2GB | ~6x |
| medium | 769M | medium.en |
medium |
~5GB | ~2x |
| large | 1550M | N/A | large |
~10GB | 1x |
# asr.py
import whisper
import numpy as np


class ASR:
    """
    语音识别模型类
    """

    def __init__(self, modelType: str = "small", prompt: str = ""):
        """
        :param modelType: whisper模型类型
        :param prompt: 提示词
        """
        # 模型默认使用cuda运行,没gpu跑模型很慢。
        # 使用device="cpu"即可改为cpu运行
        self.model = whisper.load_model(modelType, device="cuda")
        # prompt作用就是提示模型输出指定类型的文字
        # 这里使用简体中文就是告诉模型尽可能输出简体中文的识别结果
        self.prompt = "简体中文" + prompt

    def predict(self, audio: np.ndarray) -> str:
        """
        语音识别
        :param audio: 输入的numpy音频数组
        :return: 输出识别的字符串结果
        """

        # prompt在whisper中用法是作为transformer模型交叉注意力模块的初始值。transformer为自回归模型,会逐个生成识别文字,
        # 如果输入的语音为空,initial_prompt的设置可能会导致语音识别输出结果为initial_prompt
        result = self.model.transcribe(audio.astype(np.float32), initial_prompt=self.prompt)
        return result["text"]