I found that there are many blogs plagiarized from each other on the Internet, and many of the contents in them are unclear or even wrong. Today I will write an article on how to create an environment from scratch.
1. Anaconda installation
jump over
2. Installation environment
1. What environment to install - check the official website according to the CUDA version
First of all, using Pytorch is nothing more than wanting to use the GPU of your computer to accelerate calculations, then we need to know the Cuda version of the graphics card on this computer. Take the following as an example, use the following command to query the cuda version:
nvidia-smi
You can see that the CUDA version is 12.1. According to this CUDA, we have to go to Pytorch's official website to check that we want to download torch and torchvision (or torchaudio).
The URL is: download.pytorch.org/whl/torch_stable.html
For example, the CUDA here is version 12.1 (actually it is a very high CUDA version). In the above URL, we search for "cu121", but we cannot find it. The pytorch official website currently only provides 11.8 CUDA support, but the community has clearly indicated that it is compatible with higher versions of CUDA. That is to say, in this example, as long as the cuda version of torch you installed is lower than 12.1, there is no problem . For example, an environment I installed before can run successfully:
![]()
However, the safest way is to install torch corresponding to the CUDA version, but we don’t require it here, just choose the 11.8 version and it’s ok:
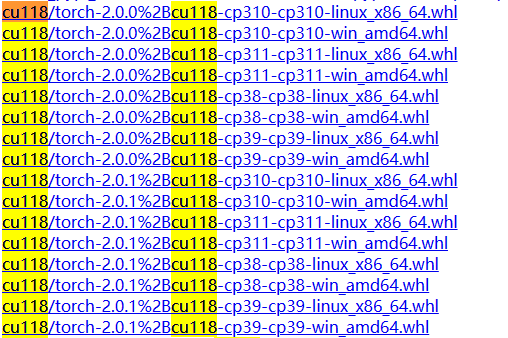
It can be seen that there are many versions of torch and corresponding python versions under version 11.8. If we choose to install version 2.0.1 of torch, we can choose python of version 3.8-3.11.
So after checking, clear the target: cu118+python3.8+torch2.0.1+torchvision0.15.2
2. How to install the environment - conda+pip
First, create an environment named test (in order to prevent duplicate names, you can use conda env list to view the list of existing environments):
conda create -n test python=3.8
Here I am confirming to you the necessary packages for the installation environment, just enter y and press Enter. If the download is too slow, you can switch to Tsinghua source:
pip config set global.index-url https://pypi.tuna.tsinghua.edu.cn/simple(If you don't want to set all downloads to Tsinghua source, you can also try the second method mentioned later.)
Then we activate the environment and use the pip we just installed to install the torch and torchvision we need:
conda activate testpip install torch==2.0.1+cu118 torchvision==0.15.2+cu118 -f https://download.pytorch.org/whl/torch_stable.htmlAnother way to use other sources is to add immediately after the above pip statement:
-i https://pypi.tuna.tsinghua.edu.cn/simple
So you can download and install happily. As for installing python packages, the requirements.txt will not be mentioned.
After the installation is successful, enter the following statement in python to check whether the installation is successful:

3. Copy the environment, delete the environment, and change the environment name
This article is well written: Conda Common Commands
(If there are any problems in the future, it may be updated)