1. (cv::normalize) norm normalization
Normalization is to limit the data that needs to be processed to a certain range that you need after processing (through a certain algorithm).
CV_EXPORTS_W void normalize( InputArray src, InputOutputArray dst, double alpha = 1, double beta = 0,
                             int norm_type = NORM_L2, int dtype = -1, InputArray mask = noArray());
- src: the original array (vector) or matrix (expand it as an array).
- dst: normalized result
- alpha: the norm value to normalize or the lower bound for range normalization
- beta: the lower bound of range normalization, which will not be used when norm normalization
- norm_type: Normalization type, including NORM_INF (infinite norm), NORM_L1 (1 norm), NORM_INFL2 (2 norm), NORM_MINMAX (range normalization)
- dtype: When it is a negative value, the output data type is consistent with the input data type, otherwise it is consistent with the src channel, depth =CV_MAT_DEPTH(dtype).
- mask: optional MASK
1.1. Introduction to the mathematical formula type of normalization selection (norm_type)
This function provides four normalization methods, and the following four parameters can be selected according to the needs. The following four normalization methods will be focused on.
- NORM_MINMAX: The values of the array are translated or scaled to a specified range, linearly normalized.

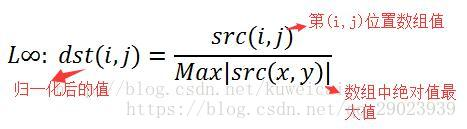
- NORM_INF: Normalized array (Chebyshev distance) L∞ norm (maximum absolute value)
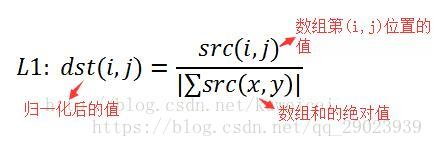
- NORM_L1 : L1-norm (sum of absolute values) of the normalized array (Manhattan distance)
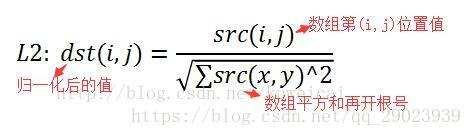
- NORM_L2: (Euclidean distance) L2-norm of the normalized array
Example:
src={10, 23, 71}
After NORM_L1 operation, get: dst={0.096, 0.221, 0.683}
After NORM_INF operation, get: dst={0.141, 0.324, 1}
After NORM_L2 operation, get: dst={0.133, 0.307, 0.947}
NORM_MINMAX operation results in: dst={0, 0.377, 1}
//程序DEMO流程:
//读取图片--》判断并显示图片--》转换为灰度图--》转换为浮点数类型数组--》四种归一化方式
//1)scale and shift by NORM_MINMAX
//2)scale and shift by NORM_INF
//3)scale and shift by NORM_L1
//4)scale and shift by NORM_L2
//--》归一化的范围设置为1.0 - 0
//--》不同的归一化方式结果出来要乘以对应的数值
//--》将结果转换为CV_8UC1
//--》显示图片

#include"opencv2\opencv.hpp"
#include"iostream"

using namespace std;
using namespace cv;

int main(int argc, char** argv)
{


    Mat src = imread("../data/test2.jpg");
    if (src.empty())
    {


        printf("Could not load image...\n");
        return -1;
    }
    imshow("srcImg", src);

    Mat src_gray, src_gray_f;
    cvtColor(src, src_gray, COLOR_RGB2GRAY);//转换为灰度图
    src_gray.convertTo(src_gray_f, CV_32F);//转换为浮点数类型数组

    //scale and shift by NORM_MINMAX
    Mat dst = Mat::zeros(src_gray.size(), CV_32FC1);
    normalize(src_gray_f, dst, 1.0, 0, NORM_MINMAX);
    Mat result = dst * 255;
    result.convertTo(dst, CV_8UC1);
    imshow("NORM_MINMAX", dst);

    //scale and shift by NORM_INF
    normalize(src_gray_f, dst, 1.0, 0, NORM_INF);
    result = dst * 255;
    result.convertTo(dst, CV_8UC1);
    imshow("NORM_INF", dst);

    //scale and shift by NORM_L1
    normalize(src_gray_f, dst, 1.0, 0, NORM_L1);
    result = dst * 100000000;
    result.convertTo(dst, CV_8UC1);
    imshow("NORM_L1", dst);

    //scale and shift by NORM_L2
    normalize(src_gray_f, dst, 1.0, 0, NORM_L2);
    result = dst * 10000;
    result.convertTo(dst, CV_8UC1);
    imshow("NORM_L2", dst);

    waitKey(0);
    return 0;
}
Results of the:

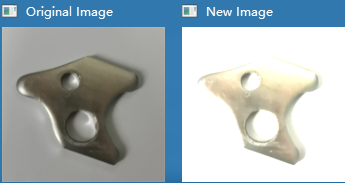
2. Change the contrast and brightness of the image: g(i,j)=α⋅f(i,j)+β
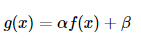
new_image(i,j) = alpha*image(i,j) + beta
#include <opencv2/core/core.hpp>
#include <opencv2/highgui/highgui.hpp>
#include <iostream>
using namespace std;
using namespace cv;
double alpha; /**< 控制对比度 */
int beta;    /**< 控制亮度 */
int main(int argc, char** argv)
{


    // 读入用户提供的图像
    Mat image = imread("../data/test2.jpg");
    Mat new_image = Mat::zeros(image.size(), image.type()); //初始像素值等于零,与原始图像相同的大小和类型
    // 初始化
    cout << " Basic Linear Transforms " << endl;
    cout << "-------------------------" << endl;
    cout << "* Enter the alpha value 输入alpha值:[1.0-3.0]: ";
    cin >> alpha;
    cout << "* Enter the beta value 输入beta值:[0-100]: ";
    cin >> beta;
    //要执行我们将访问图像中的每个像素。由于我们使用BGR图像,
    //我们将每像素(B,G和R)有三个值,因此我们也将分别访问它们
    // 执行运算 new_image(i,j) = alpha*image(i,j) + beta
    for (int y = 0; y < image.rows; y++)
    {


        for (int x = 0; x < image.cols; x++)
        {


            for (int c = 0; c < 3; c++)
            {


                new_image.at<Vec3b>(y, x)[c] = saturate_cast<uchar>(alpha * (image.at<Vec3b>(y, x)[c]) + beta);
            }
        }
    }
    namedWindow("Original Image", 1);// 创建窗口
    namedWindow("New Image", 1);// 创建窗口
    imshow("Original Image", image);// 显示图像
    imshow("New Image", new_image);// 显示改变后图像
    waitKey();// 等待用户按键
    return 0;
}
2.1. (cv::src.convertTo) scale and convert to another data type
Instead of using a for loop to access each pixel, we can directly use the following command:
src.convertTo(dst, type, scale, shift)
- src: The img parameter is the image data source, and its type is Mat.
- dst: destination matrix;
- type: the required output matrix type, or more specifically, the depth of the output matrix, if it is a negative value (commonly -1), the output matrix is of the same type as the input matrix;
- scale: scaling factor;
- shift: the value added after scaling the input array elements;
#include <opencv2/core/core.hpp>
#include <opencv2/highgui/highgui.hpp>
#include <iostream>
using namespace std;
using namespace cv;
double alpha; /**< 控制对比度 */
int beta;    /**< 控制亮度 */
int main(int argc, char** argv)
{


    // 读入用户提供的图像
    Mat image = imread("../data/test3.jpg");
    Mat new_image = Mat::zeros(image.size(), image.type()); //初始像素值等于零,与原始图像相同的大小和类型
    // 初始化
    cout << " Basic Linear Transforms " << endl;
    cout << "-------------------------" << endl;
    cout << "* Enter the alpha value 输入alpha值:[1.0-3.0]: ";
    cin >> alpha;
    cout << "* Enter the beta value 输入beta值:[0-100]: ";
    cin >> beta;
    // 执行运算 new_image(i,j) = alpha*image(i,j) + beta
    //我们可以不用 for 循环来访问每个像素,而是直接采用下面这个命令:
    image.convertTo(new_image, -1, alpha, beta);
    namedWindow("Original Image", 1);// 创建窗口
    namedWindow("New Image", 1);// 创建窗口
    imshow("Original Image", image);// 显示图像
    imshow("New Image", new_image);// 显示改变后图像
    waitKey();// 等待用户按键
    return 0;
}
The execution results of the above two methods:
 Basic Linear Transforms
-------------------------
* Enter the alpha value 输入alpha值:[1.0-3.0]: 2.2
* Enter the beta value 输入beta值:[0-100]: 50
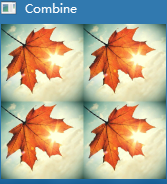
3. (cv::hconcat) and (cv::vconcat) image stitching functions
#include <iostream>
#include <core/core.hpp>
#include <opencv2/imgproc/imgproc.hpp>
#include <opencv2/highgui/highgui.hpp>
using namespace std;
using namespace cv;
int main()
{


	Mat combine, combine1, combine2;
	Mat a = imread("../data/test2.jpg");
	Mat b = imread("../data/test2.jpg");
	Mat c = imread("../data/test2.jpg");
	Mat d = imread("../data/test2.jpg");
	hconcat(a, b, combine1);	//水平拼接
	hconcat(c, d, combine2);	//水平拼接
	vconcat(combine1, combine2, combine);	//垂直拼接
	namedWindow("Combine", WINDOW_AUTOSIZE);
	imshow("Combine", combine);
	waitKey(0);
	system("pause");
	return 0;
}
Results of the:
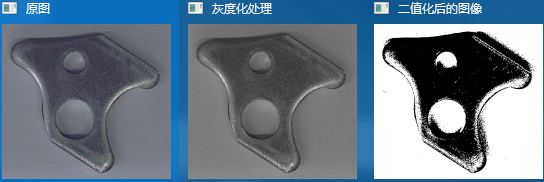
4. Image binarization
The binarization of the image is to set the gray value of the pixels on the image to 0 or 255, which will make the whole image appear obvious black and white effect. In digital image processing, binary image occupies a very important position. Binarization of image greatly reduces the amount of data in the image, thus highlighting the outline of the target.
4.1. (cv::threshold) image binarization
double threshold( InputArray src,OutputArray dst,double threshold,double maxval,int type );
- src: the original array, which can be of Mat type.
- dst: output array, must be consistent with the type of src.
- threshold: threshold
- maxval: use the maximum value of CV_THRESH_BINARY and CV_THRESH_BINARY_INV.
- type: threshold type
type=CV_THRESH_BINARY: if src(x,y)>threshold, dst(x,y) = max_value; otherwise, dst(x,y)=0; type=CV_THRESH_BINARY_INV: if src(x,y)
> threshold,dst(x,y) = 0; otherwise, dst(x,y) = max_value.
type=CV_THRESH_TRUNC: if src(x,y)>threshold, dst(x,y) = max_value; otherwise dst(x, y) = src(x,y)
.type=CV_THRESH_TOZERO: if src(x,y)>threshold, dst(x,y) = src(x,y); otherwise dst(x,y) = 0.
type=CV_THRESH_TOZERO_INV: If src(x,y)>threshold, dst(x,y) = 0; otherwise dst(x,y) = src(x,y).
#include "opencv2/imgproc/imgproc.hpp"
#include "opencv2/highgui/highgui.hpp"
using namespace cv;
using namespace std;
int main()
{


	//定义变量
	Mat img = imread("./image/test3.jpg");
	imshow("原图", img);
	//灰度化处理
	cvtColor(img, img, COLOR_BGR2GRAY);
	imshow("灰度化处理", img);
	// 转为二值图
	threshold(img, img, 100, 255, THRESH_BINARY);
	//adaptiveThreshold(img, img, 255, ADAPTIVE_THRESH_MEAN_C, THRESH_BINARY, 45, 10);
	imshow("二值化后的图像", img);
	waitKey(0);
	return 0;
}
Results of the:
4.2. Custom image binarization
This statement means that if the threshold value is less than 100, then the middle is true, that is, the pixel value less than 70 is 1, and the value greater than 70 is 0; if the threshold value is greater than 100, then the right side is true, that is, the pixel value greater than 70 is 1, Less than 70 is 0.
#include "opencv2/imgproc/imgproc.hpp"
#include "opencv2/highgui/highgui.hpp"
using namespace cv;
using namespace std;
void main()
{


	Mat img;
	int threshval = 170;//设定阈值
	Mat result;
	Mat bw = img;
	img = imread("./image/test6.jpg", 0);
	imshow("原图", img);
	bw = threshval < 100 ? (img < 70) : (img > 70);//二值化
	imshow("二值化后的图像", bw);
	waitKey(0);
}
Results of the:
