a basic introduction
In our current development, the use of microservice architecture is very common. If the front-end directly accesses each microservice system, it will be very inconvenient to manage microservices. If nginx is used for routing and forwarding, some complex business Verification is impossible. So we have to introduce the concept of gateway, and integrate some public request verification, response processing and flow control rules into the gateway layer, which will make our service management simple and convenient, without having to pay attention to each microservice, just go to Just follow the gateway.
At present, the common gateways are as follows, let’s make a comparison:
Zuul 1.x : It is based on the Servlet framework, which causes a thread to process a connection request. There are some problems in this way, such as: serious internal delay, and many device failures will cause more surviving links and threads increased situation.
Zuul 2.x : It is an optimization of zuul 1.x. It was released in May 2019. It uses Netty to realize the asynchronous non-blocking conversion model and solves the problems in 1.x. One thread per CPU core handles all requests and responses, and the life cycle of requests and responses is handled through events and callbacks.
nginx+lua : Using nginx’s reverse proxy and load balancing can achieve unification of entrances and high availability of services. Using lua scripts can achieve simple logic processing, but it cannot be integrated into the existing spring cloud system, nor can it Ways to implement some complex business logic. For example, integrating nacos, sentinel and other components, unable to perform login verification, etc.
Gateway : Gateway appeared in the period of Zuul 1.x. Its purpose is to replace Zuul. Because some problems in Zuul 1.x cannot meet the requirements of spring cloud architecture, Gateway was born. Its bottom layer is also implemented using Netty, its performance is 1.6 times that of Zuul 1.x, and it has many built-in functions, such as forwarding and monitoring.
The use of Gateway will involve the following important information, which is used to complete routing forwarding and business logic processing:
id : the unique identifier of each route
uri : the actual address that the gateway forwards to after receiving the request;
order : used for the order among multiple routes, the smaller the value, the higher the order;
predicate : Assertion, the function is to perform conditional matching, and only after the assertion match is passed, routing will be forwarded;
filter : filter, used to process request or response data, such as authentication, message conversion, etc.;
The execution process of a Gateway request is as follows: 1. Gateway server receives the request; 2. The request will be extracted by HttpWebHandllerAdapter to assemble the gateway context; 3. Then the context of the gateway will be passed to DispatcherHandler, which is responsible for distributing the request to RoutePredicateHandlerMapping; 4. RoutePredicateHandlerMapping Perform routing search, and then determine whether the assertion condition is met; 5. If the assertion is successful, the filtering chain will be created and called by FilteringWebHandler; 6. The request will go through PreFilter->Microservice->PostFilter, and finally return. The execution flow chart is as follows:

Next, let's take a look at the microservice architecture diagram when using the gateway, which is just a simplified one, and the actual scene will be more complicated:

Two Gateway use
1 Basic use
Before using the gateway, we need to build a spring cloud architecture microservice. I use nacos as the registration center here. This article only introduces the gateway. First create a common spring boot project, and then introduce the following dependencies:
Introduce the following dependencies in dependencyManagement:
<dependencyManagement>
        <dependencies>
            <!-- alibaba的相关组件 -->
            <dependency>
                <groupId>com.alibaba.cloud</groupId>
                <artifactId>spring-cloud-alibaba-dependencies</artifactId>
                <version>2.2.5.RELEASE</version>
                <type>pom</type>
                <scope>import</scope>
            </dependency>
            <!-- cloud原生的相关组件 -->
            <dependency>
                <groupId>org.springframework.cloud</groupId>
                <artifactId>spring-cloud-dependencies</artifactId>
                <version>Hoxton.SR5</version>
                <type>pom</type>
                <scope>import</scope>
            </dependency>
        </dependencies>
    </dependencyManagement>
Here you need to pay attention to the corresponding relationship between versions. The version corresponding to alibaba can be viewed in the article of nacos, and the corresponding version of cloud native can be viewed here: spring cloud corresponds to spring boot version
Then introduce the following dependencies to use the basic functions of GateWay:
<dependency>
    <groupId>org.springframework.cloud</groupId>
    <artifactId>spring-cloud-starter-gateway</artifactId>
</dependency>
After introducing the above dependencies, we will modify the configuration file next. Here is the most basic configuration. We will introduce the detailed configuration later:
spring:
  cloud:
    gateway:
      routes:
        - id: gateway-test  #路由Id,可以自己随意命名,只要保证id唯一即可
          uri: http://ip:port/  #转发到的具体地址
          predicates: # 断言
            - Path=/self/**  #断言规则,这里是路径匹配规则,**代表的是任意字符。
2 load balancing
In the current microservice architecture, each microservice deploys multiple nodes, so how does the gateway implement routing? Gateway implements routing in two ways, one is automatic and the other is manual.
Because there is a load here, here we use it with nacos. In the actual production environment, it will be used with the registration/discovery center. We first introduce the corresponding dependencies of nacos, see my previous nacos series articles for details, and then add the registration information of nacos to the configuration file.
Next, let's look at the way of automatic implementation. The following configurations need to be made in the configuration file:
spring:
  cloud:
    # nacos注册与发现的相关配置
    nacos:
      discovery:
        server-addr: 127.0.0.1:8848
    gateway:
      discovery:
        locator:
          enabled: true #开启自动路由功能,默认为false
Automatic implementation is to open the above automatic routing configuration, and then use it in conjunction with nacos. When we register in nacos, we will register a ${application.name}, and automatic implementation is processed through this value. If we now have A request needs to be forwarded to the service center where ${application.name} is the gateway-client. Now there are two gateway-client service nodes, and the interface address is /self/test. Then we directly visit http://{gateway address}/ gateway-client/self/test, so that the service of gateway-client will be accessed through the gateway, and load balancing will be realized automatically. But one problem with this method is that the service name will be exposed on the request path, so we generally don't use this method.
The second is manual implementation. First, let’s look at the configuration file:
spring:
  cloud:
    nacos:
      discovery:
        server-addr: 127.0.0.1:8848
    gateway:
      routes:
        - id: gateway-client #路由Id,保证唯一性
          uri: lb://gateway-client # 跳转服务地址,通过注册中心匹配服务,并实现负载均衡
          predicates: #断言
            - Path=/self/**
In this way, we need to no longer configure the http address in the uri position of the configuration file, but use lb://{the registered name of the calling service in nacos}, so that when we visit http://{gateway address}/self /test, the route will be forwarded to our corresponding microservices and achieve load balancing. One thing to note here is that if a routing rule is configured, the priority of the routing rule is greater than that of the automatic route.
3 Affirmations
Assertions were mentioned when introducing the basic concepts above. They are used to judge forwarding. Only when the assertion verification passes, can they be routed to the corresponding address. There are a total of twelve kinds of assertions in Gateway. Next, we will describe these twelve kinds of assertions through the following configuration file.
spring:
  cloud:
    gateway:
      routes:
        - id: nacos-client #路由Id,保证唯一性
          uri: lb://nacos-client # 跳转服务地址,通过注册中心匹配服务,并实现负载均衡
          predicates: #断言
            # 第一种,访问路径匹配,这是最基本的一种匹配方式,只要访问的路径能够匹配上,则进行路由转发
            - Path=/self/**
            # 第二种,在指定时间之前访问才能通过,如果超出指定时间,则无法访问,值为具体的时间
            # 第三种,After代表在指定时间之后才能访问,使用方式和Before一样
            # 第四种,Between标识在指定时间段之内才能访问,开始时间与结束时间之间使用“,”分割
            - Before=2022-08-04T20:20:40.675+08:00[Asia/Shanghai]
            # 第五种,Cookie匹配,他后面需要匹配两个参数,使用“,”分割,第一个参数cookie中的一个那么,第二个参数使用正则表达式,代表的是这个name对应的值应该满足的规则
            # 下面这个规则代表的意思是,cookie中字段name对应的值必须是字母
            - Cookie=name,[a-z]+
            # 第六种,请求头匹配,它后面也是需要配置两个参数,使用“,”分割,第一个参数是请求头中一个字段名,第二个参数使用正则表达式,表示这个字段的值应该满足的规则
            # 下面这个规则代表的是,请求头中X-Request-Id的值为数字
            - Header=X-Request-Id,\d+
            # 第七种,请求来源,限制调用改接口的host必须满足的要求
            - Host=**.mashibing.com
            # 第八种,接口调用方式,允许配置多个,使用“,”分割,下面代表的GET/POST请求
            - Method=GET,POST #匹配get请求或者post请求
            # 第九种,请求参数的匹配,后面的值可以配置必须的参数名称和一个可选的该参数值的正则匹配规则
            #如果只配置一个参数,则代表请求参数中中必须要包含,配置两个参数,代表的是必须包含该参数,并且该参数的值必须符合对应的规则
            - Query=id,*
            # 第十种,匹配指定的ip或者ip段
            - RemoteAddr=127.0.0.1/24
            # 第十一种,权重匹配,单独说明
            # 第十二种,根据http中中请求头中的X-Forwarded-For进行匹配
            - XForwardedRemoteAddr=127.0.0.1/24
Instructions for adding weights separately below
spring:
  cloud:
    gateway:
      # 第十种,权重配置,代表的80%的请求转发到https://www.high.com,20%的请求转发到https:///www.low.com
      routes:
      - id: weight_high
        uri: https://www.high.com
        predicates:
        - Weight=group1, 8
      - id: weight_low
        uri: https:///www.low.com
        predicates:
        - Weight=group1, 2
Some students may have doubts, what should I do if the cookie forwarding needs to match multiple values? We can configure multiple cookie assertions to achieve this. If we mentioned the concept of assertion chain when we introduced the basic concepts earlier, each node in the assertion chain is an assertion rule. When the assertion chain is executed, each assertion rule will be verified. Only through routing and forwarding. The above assertion rules come from the official website, interested students can go to the official website for further study: gateway assertion usage
4 filters
There are two life cycles of filters in Gateway, before request and after request, so we can process request data or response data. Gateway itself comes with 41 filters, including 32 single filters (GatewayFilte) and 9 global filters (GlobalFilter).
Next, we will introduce its usage with a built-in filter. Interested students can go to the official website to learn about the usage rules of the remaining filters, GatewayFilter , GlobalFilter
We can use the built-in filter directly through the configuration file. Here we use StripPrefix, which belongs to GatewayFilter. Let's take a look at the configuration file:
spring:
  cloud:
    gateway:
      routes:
        - id: nacos-client #路由Id,保证唯一性
          uri: lb://nacos-client # 跳转服务地址,通过注册中心匹配服务,并实现负载均衡
          predicates: #断言
            - Path=/self/** #访问路径
          filters:
            # 这个过滤器代表的是,在进行路由转发的时候,去除掉访问地址中指定位置,这个位置使用/进行的分割
            # 以http://127.0.0.1:9007/self/client/test,下面的意思就是将client去除,最终的访问地址为http://127.0.0.1:9007/self/test
            - StripPrefix=2
Of course, if the Gateway only has these 32 filters, it will definitely not be able to meet our requirements. As we said earlier, the Gateway can implement some common processing of services, such as authentication, message conversion, and so on. These are achieved through custom filters. Then, let's introduce the writing of custom filters.
@Component
// 新建一个自定义filter,它需要实现两个接口
// Ordered接口的功能是用来定义该过滤器的优先级
// GlobalFilter的功能是来编写我们具体的业务逻辑
public class SelfFilter implements Ordered, GlobalFilter {

   // 具体的业务逻辑编写,这里采用伪代码的方式编写
    // exchange,通过这个参数我们可以获取到请求参数以及响应参数
    // chain过滤器链,将自定义过滤器添加到这个链中,以及执行过滤器链中其它的过滤器
    @Override
    public Mono<Void> filter(ServerWebExchange exchange, GatewayFilterChain chain) {
        // 1.通过exchange获取请求数据,可以对请求数据进行报文转换或者鉴权操作
        // 如果处理失败,直接返回,并且直接退出,不再执行其它过滤器

        // 2.通过exchange获取响应数据,对响应数据进行数据处理

        // 3.执行下一个过滤器
        return chain.filter(exchange);
    }

    // 数值越小,加载的优先级越高
    @Override
    public int getOrder() {
        return 0;
    }
}
Above we introduced the use of the gateway. We configure routing rules through configuration files. In addition to configuration files, we can also use coding to configure routing rules, but this method is not recommended. The reason is that if you write code, the coupling between the routing rules and the project will be very serious. If you modify the routing rules, you need to modify the code and publish it. If we use the configuration file method, we can use the dynamic refresh function of the configuration center to configure the routing rules in the configuration center, and then when the routing rules need to be modified, they can be modified through the configuration center, so that there is no need to publish the version. So it's easy for everyone to understand that there is another way
@Configuration
public class GatewayConfig {

    @Bean
    // 构建路由规则
    public RouteLocator selfLocator(RouteLocatorBuilder routeLocatorBuilder){
        // 构建routes
        RouteLocatorBuilder.Builder routes = routeLocatorBuilder.routes();
        // 构建具体路由,
        routes.route("gateway-client", r -> r.path("/self/**").uri("lb://")).build();
        // 返回所有的路由规则
        return routes.build();
    }

}
Three gateways integrate sentinel
In previous articles, we introduced sentinel, which is used for service governance and can limit and downgrade services. In the current microservice architecture, we can configure sentinel individually for each microservice, but this This method will make our sentinel configuration too scattered and inconvenient to manage. Of course, for some special interfaces, we also need to configure them on microservices and enter the feign interface, but most of the interfaces are directly oriented to the front-end page. The request of the front-end page They will all be placed on the gateway, and then routed to the interface of the corresponding microservice. For this interface, we can completely limit and downgrade the gateway. Next, we will introduce how the gateway integrates sentinel to realize the limit through the gateway. stream downgrade. For the integration of sentinel, please refer to my previous article, so I won't explain it here. Let's directly introduce how the gateway uses sentinel. It should be noted that current limiting on gateways is only supported after sentinel 1.6.0.
First we need to introduce the following dependencies
        <dependency>
            <groupId>com.alibaba.cloud</groupId>
            <artifactId>spring-cloud-alibaba-sentinel-gateway</artifactId>
        </dependency>

        <dependency>
            <groupId>com.alibaba.csp</groupId>
            <artifactId>sentinel-spring-cloud-gateway-adapter</artifactId>
        </dependency>
Next, let's start the gateway service, and see what is the difference between the sentinel console of the gateway and the console of ordinary services, and how to use it.
The picture below is the sentinel console of the gateway, which can be compared with the consoles of other common projects when using sentinel
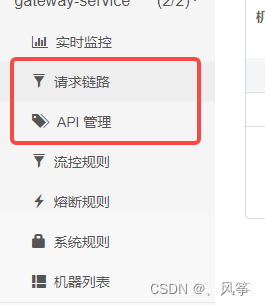
We will find that in gateway's sentinel console, there are two functions that ordinary projects do not have, namely request link and API management.
There are two ways to configure the sentinel of the gateway, one is routeId; the other is grouping. Then we will explain them separately.
1 routeId current limiting method
This method is the most basic gateway current limiting method, and its configuration interface is as follows:
![]()
The position of the red box in the figure is actually the registered name of the service routed to by the gateway in nacos. Click flow control, there will be the following pop-up window
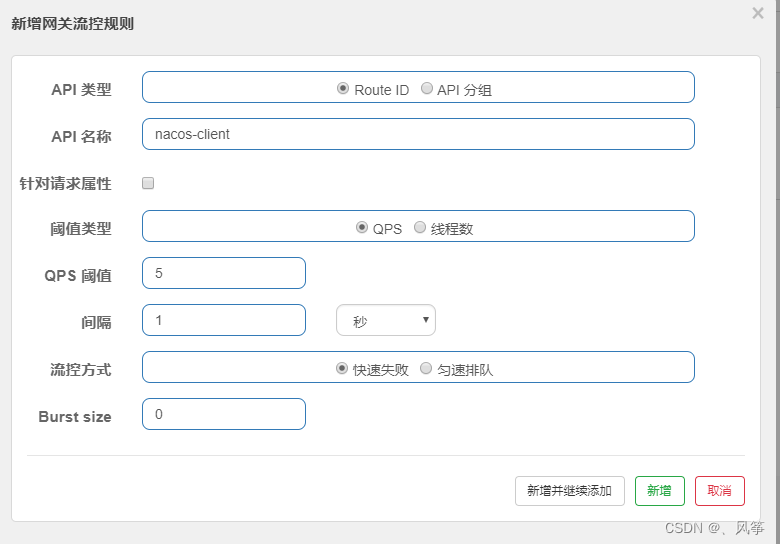
We do not need to change the api name. The fields inside are basically the same as those in the console of ordinary projects, except that there is an extra Burst size field, which means the maximum allowed threshold. If its value is less than the threshold, then he has no effect, and will only take effect when its value is greater than the threshold. For example, if the qps threshold is set to 5, and the Burst Size is set to 10, it means that the qps is within 10.
When we use this method to configure, it means that the qps threshold of each interface of this service is 5. Obviously, this method is not suitable in a production environment, because different interfaces have different visits. If we deal with it uniformly, it is not friendly. We prefer to be able to precisely control the visits of each interface. Then this involves another configuration method.
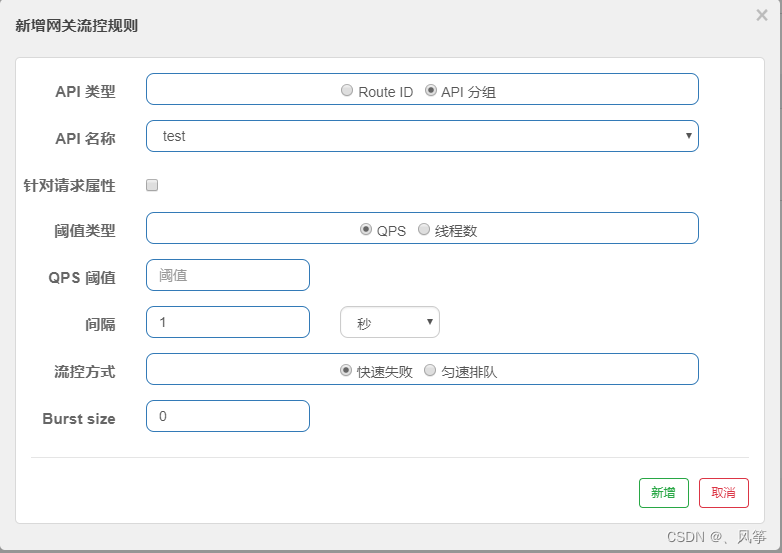
2 group current limit configuration
To use the group current limit configuration, we need to enter the API management first, and click Add API group:

The API name is actually the group name, and the group name is required to be unique here. Then each group has its own grouping rules. There are three types of grouping rules:
Exact : must match exactly with the value in the match string to enter this group
Prefix : must match the prefix of the value in the matching string to enter this group
Regular : must match the regular expression of the value in the matching string to enter this group
After adding the corresponding group in the API management, we enter the flow control rules, click Add Gateway Flow Control Rule, select the API group in it, and then select the corresponding group information to restrict the flow control rules.
For a detailed introduction to sentinel, you can refer to previous related articles on sentinel. Here, when used in a production environment, it is generally used with the configuration center. Configure the current limiting rules in the configuration center, and then use the dynamic refresh function of the configuration center to modify the current limiting rules and persist the current limiting rules in the configuration center to prevent flow control after restarting. Regular hours.