With the basis of the previous color recognition and tracking, we can set the color path and let the unmanned vehicle drive automatically along the specified route. Video: PID control unmanned vehicle automatic driving
With the foundation of the knowledge in the previous chapters, it is relatively simple, and it is also an application of color recognition. It is mainly to master some basic knowledge in automatic driving, so that you can further understand the various problems encountered in unmanned driving. question
1. Import library and initialize
from jetbotmini import Camera
from jetbotmini import bgr8_to_jpeg
from IPython.display import display
from jetbotmini import Robot
import numpy as np
import torch
import torchvision
import cv2
import traitlets
import ipywidgets.widgets as widgets
import numpy as np

#初始化摄像头
camera = Camera.instance(width=300, height=300)
#初始化机器人马达
robot = Robot()

#使用PID控制
import PID

turn_gain = 1.7
turn_gain_pid = PID.PositionalPID(0.15, 0, 0.05)
This part is very simple. The camera is still initialized for color recognition. The robot is also called a motor, which is used to drive the movement of the wheels. Add a PID control to make the unmanned vehicle more stable.
2. Display components
# 红色数组
color_lower=np.array([156,43,46])
color_upper = np.array([180, 255, 255])

image_widget = widgets.Image(format='jpeg', width=300, height=300)
speed_widget = widgets.FloatSlider(value=0.4, min=0.0, max=1.0, description='speed')

display(widgets.VBox([
    widgets.HBox([image_widget]),
    speed_widget,
]))

width = int(image_widget.width)
height = int(image_widget.height)

def execute(change):
    global turn_gain
    target_value_speed = 0

    #更新图片值
    frame = camera.value
    frame = cv2.resize(frame, (300, 300))
    frame = cv2.GaussianBlur(frame,(5,5),0)
    hsv =cv2.cvtColor(frame,cv2.COLOR_BGR2HSV)
    mask=cv2.inRange(hsv,color_lower,color_upper)
    mask=cv2.erode(mask,None,iterations=2)
    mask=cv2.dilate(mask,None,iterations=2)
    mask=cv2.GaussianBlur(mask,(3,3),0)
    cnts=cv2.findContours(mask.copy(),cv2.RETR_EXTERNAL,cv2.CHAIN_APPROX_SIMPLE)[-2]

    # 检测到目标
    if len(cnts)>0:
        cnt = max (cnts,key=cv2.contourArea)
        (color_x,color_y),color_radius=cv2.minEnclosingCircle(cnt)
        if color_radius > 10:
            # 将检测到的颜色标记出来
            cv2.circle(frame,(int(color_x),int(color_y)),int(color_radius),(255,0,255),2)
            # 中心偏移量
            center = (150 - color_x)/150

            #转向增益PID调节
            turn_gain_pid.SystemOutput = center
            turn_gain_pid.SetStepSignal(0)
            turn_gain_pid.SetInertiaTime(0.2, 0.1)

            #将转向增益限制在有效范围内
            target_value_turn_gain = 0.15 + abs(turn_gain_pid.SystemOutput)
            if target_value_turn_gain < 0:
                target_value_turn_gain = 0
            elif target_value_turn_gain > 2:
                target_value_turn_gain = 2

            #将输出电机速度保持在有效行驶范围内
            target_value_speedl = speed_widget.value - target_value_turn_gain * center
            target_value_speedr = speed_widget.value + target_value_turn_gain * center
            if target_value_speedl<0.3:
                target_value_speedl=0
            elif target_value_speedl>1:
                target_value_speedl = 1
            if target_value_speedr<0.3:
                target_value_speedr=0
            elif target_value_speedr>1:
                target_value_speedr = 1
            #设置马达速度
            robot.set_motors(target_value_speedl, target_value_speedr)
    # 没有检测到目标
    else:
        robot.stop()

    # 更新图像显示至小部件
    image_widget.value = bgr8_to_jpeg(frame)
Here is the key part, detect the target (here is the red color), and then control the speed of the left and right motors through the detected position, drive the driving and turning of the unmanned vehicle, and display the tracking situation of the unmanned vehicle through the image component in the background, which is convenient See the various states of the unmanned vehicle during the entire driving process.
3. Call and execute
execute({'new': camera.value})
camera.unobserve_all()
camera.observe(execute, names='value')
Here is what was introduced earlier, by calling the observer method to update the data of the camera, using a callback method of execute defined above.
4. Stop driverless cars
import time
camera.unobserve_all()
time.sleep(1.0)
robot.stop()
5. Reversing
The previous introduction is about driving forward and turning, and there is still a lack of a function that can reverse the car. Well, it is very simple, just call the backward function
robot.backward(0.8)
time.sleep(0.5)
robot.stop()
6. Adjust the color array
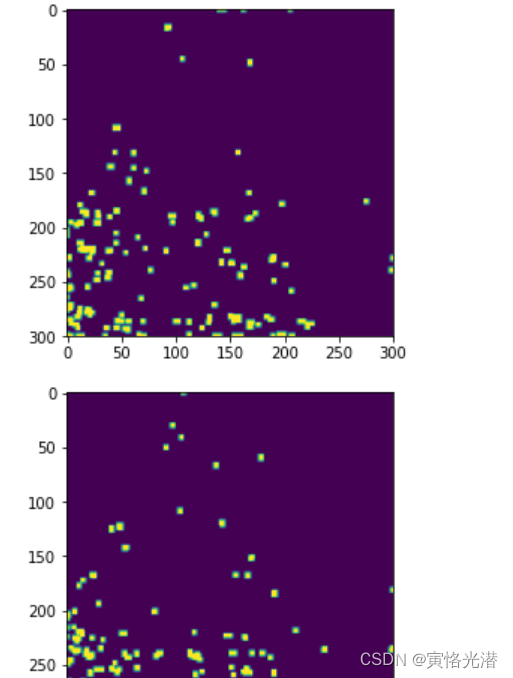
I am pasting it on the floor with red tape here, so I use a red array. Of course, we can display the mask here to test whether the color array is set properly. The code is as follows
from  matplotlib import pyplot as plt
%matplotlib inline
from IPython import display

for i in range(10):
    frame = camera.value
    frame = cv2.resize(frame, (300, 300))
    frame_=cv2.GaussianBlur(frame,(5,5),0)
    hsv=cv2.cvtColor(frame,cv2.COLOR_BGR2HSV)
    mask=cv2.inRange(hsv,color_lower,color_upper) # 颜色数组的取值范围
    mask=cv2.erode(mask,None,iterations=2)
    mask=cv2.dilate(mask,None,iterations=2)
    mask=cv2.GaussianBlur(mask,(3,3),0)
    plt.imshow(mask)
    plt.show()
    #display.clear_output(wait=True)
Here I annotate display.clear_output(wait=True) , and 10 pictures will be continuously generated, all of which will be displayed in Jupyter. We can also remove the comment, so that each generation will clear the previous picture, which is convenient for better observation. The 10 consecutive pictures have also been made into animations for everyone to understand:
If there is no mask or less, you need to adjust the color array to better match the line.
7. Analog steering wheel
Sometimes you don’t want automatic driving to control, and many scenes require remote control by humans. For example, in dangerous places such as mines, the best way is to be able to remotely control construction vehicles to carry out operations.
With the above understanding of forward, backward and turning, we can make a simulated steering wheel to control the unmanned vehicle.
7.1. Button components
# 创建按钮
button_layout = widgets.Layout(width='100px', height='80px', align_self='center')
stop_button = widgets.Button(description='停止', button_style='danger', layout=button_layout)
forward_button = widgets.Button(description='向前', layout=button_layout)
backward_button = widgets.Button(description='向后', layout=button_layout)
left_button = widgets.Button(description='向左', layout=button_layout)
right_button = widgets.Button(description='向右', layout=button_layout)

# 显示按钮
middle_box = widgets.HBox([left_button, stop_button, right_button], layout=widgets.Layout(align_self='center'))
controls_box = widgets.VBox([forward_button, middle_box, backward_button])
display(controls_box)
As shown in the picture:
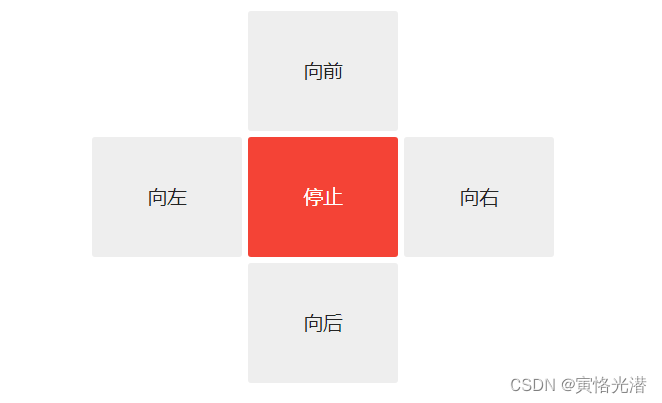
For the layout of the steering wheel, create a layer through widgets.Layout , create a button on it through widgets.Button , and then use widgets.HBox and widgets.VBox to layout the buttons horizontally and vertically. Horizontal : horizontal, horizontal. Vertical : vertical
7.2. Direction control method
def stop(change):
    robot.stop()

def step_forward(change):
    robot.forward(0.8)
    time.sleep(0.5)
    robot.stop()

def step_backward(change):
    robot.backward(0.8)
    time.sleep(0.5)
    robot.stop()

def step_left(change):
    robot.left(0.6)
    time.sleep(0.5)
    robot.stop()

def step_right(change):
    robot.right(0.6)
    time.sleep(0.5)
    robot.stop()
The method of adding stop buttons front, back, left, and right is very simple, that is, to control the speed of the left and right motors.
7.3. Button action
After defining the respective methods, you only need to bind the methods to the respective buttons.
stop_button.on_click(stop)
forward_button.on_click(step_forward)
backward_button.on_click(step_backward)
left_button.on_click(step_left)
right_button.on_click(step_right)
In this way, you can click the button to remotely control the unmanned vehicle.
8. Heartbeat switch
The last is to introduce the heartbeat switch, a simple method to detect whether the connection between the unmanned vehicle and the browser still exists. The heartbeat period (in seconds) can be adjusted by the slider shown below. If there is no round-trip communication between the browsers within two heartbeats, the heartbeat's status (state) attribute value will be set to dead . Once connected To restore the connection, the status attribute will be set to alive
from jetbotmini import Heartbeat

heartbeat = Heartbeat()

# 这个函数将在心跳状态改变时被调用
def handle_heartbeat_status(change):
    if change['new'] == Heartbeat.Status.dead:
        robot.stop()

heartbeat.observe(handle_heartbeat_status, names='status')

period_slider = widgets.FloatSlider(description='period', min=0.001, max=0.5, step=0.01, value=0.5)
traitlets.dlink((period_slider, 'value'), (heartbeat, 'period'))

display(period_slider, heartbeat.pulseout)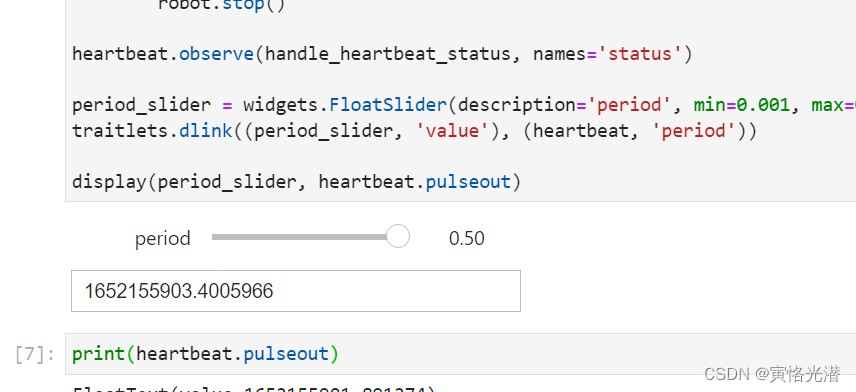
The relevant knowledge points of automatic driving have been introduced. If there are any mistakes, please correct them. Let’s learn and make progress together!