Use matlab to import or read data to Excel (COM method and xlswrite, xlsread method)
Updated in December 2020, adding the drawing of Chart charts. It is possible to use matlab to draw histograms, scatter diagrams and other charts in excel.
Update in April 2021, fix the bug that the x2column function converts incorrectly when x is greater than 1352
It’s too long to read the version. Conclusion: xlswrite and xlsread have simple methods and simple functions. The COM method is complicated and the function is complicated.
Enough nonsense, this article will not write the foreword and introduction.
1 Matlab comes with functions
1.1 Write to Excel
Matlab has its own function xlswrite, which can be used to write excel data.
The format is:
xlswrite(filename,A,sheet,xlRange)
The first filename is the name of excel, such as 'WriteIt.xlsx';
A is the data to be written, preferably in cell format;
sheet is the table to be written, 1 represents the first table, if not, it will be Create a new one. It can also be replaced by a name, such as 'sheet1';
xlRange is the data input range of excel, the format is 'A1:F6', which means to select the range between A1 and F6 to input data
In the new version 2019, it is not recommended to use xlswrite, and replaced it with a new function writecell.
The basic usage is similar to that of xlswrite.
1.2 Reading Excel
Matlab comes with function xlsread to read excel function, the format is
[Read_num,Read_txt,Read_all] =xlsread('WriteIt.xlsx');
There are 3 outputs, representing output numbers (mat format), output text (cell format), and total output (cell format).
After the 2019 version, matlab does not recommend xlsread, and replaces it with the readcell function, and the usage is similar.
1.3 Example
code show as below:
clear
clc

%利用matlab自带的函数写入excel
Size=3;
A=magic(Size);
data=cell(4,3);
data(2:4,:)=num2cell(A);
data(1,1:3)={'a','b','c'};
range=['A1:',char(abs('A')-1+Size),num2str(Size+1)];
%2019版本
% writecell(data,'WriteIt.xlsx','Sheet',1,'Range',range,'AutoFitWidth',true);
%2006版本
xlswrite('WriteIt.xlsx',data,1,range);

%利用matlab自带的函数读取excel数据
%2019版本
% Read_data=readcell('WriteIt.xlsx');
%2006版本
[Read_num,Read_txt,Read_all] =xlsread('WriteIt.xlsx');
The Excel format of the actual output is as follows:

2 COM methods
References in this chapter:
Actual Matlab file and data interface technology (Jiang Zelin, Liu Wei)
Microsoft related online documents ( https://docs.microsoft.com/zh-cn/office/vba/api/excel.workbook )
The COM method is to use the COM interface provided by Excel to call some functions in Excel in Matlab.
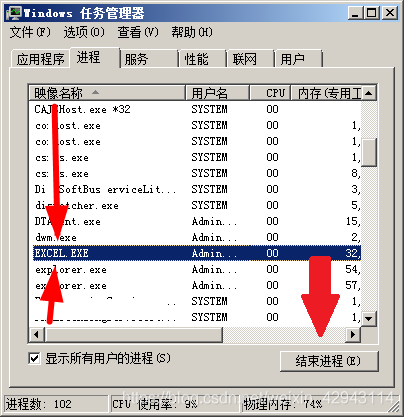
If an error occurs during the debugging process, you need to manually end the EXCEL.EXE process in the process column of the task manager, so that the program can be re-executed normally. Not needed if debugged correctly.
2.1 Reading and writing files

The picture above is a demonstration document named 'experiment.xlsx'. The file contains two Sheets, namely 'Rocket Launch' and 'Appendix'.
The left side of the picture above is the 'Rocket Launch' Sheet, which includes number format settings, fill color settings, font settings, alignment settings, text color settings, text size settings, text bold and italic settings.
The right side of the picture above is the 'Appendix' Sheet, which contains the setting of the formula. The formula in column B is B2=100-($A2)^2, which is filled down.
The current program in this article does not contain information including but not limited to: merged cells, border information, chart drawing, conditional formatting, filtering, etc.
The following program demonstrates the example of reading all relevant information in the 'experiment.xlsx' file, and then creating an excel file to write all the read information.
%读取格式,写成函数形式

%复制表格
filename='实验.xlsx';
Excel_Data=Read_Excel(filename);
filename2='实验2.xlsx';
Write_Excel(filename2,Excel_Data);


%后面是相关函数
function Write_Excel(filename,Excel_Data)
% file=fullfile(pwd, file);%加上全路径
exl=actxserver('excel.application');
exlWkbk=exl.WorkBooks.Add();
E_WS=exlWkbk.Worksheets;
%创建2个表格
sheet_N=size(Excel_Data,1);
for k=1:sheet_N
    E_WS.Item(k).Select;%选择第k个表格
    E_WS_k=E_WS.Item(k);
    E_WS_k.Name=Excel_Data{k,1};%建立名字
    if sheet_N>1 && k<sheet_N
        E_WS.Item(1).Select;%选择第一个表格
        E_WS.Add([], E_WS.Item(E_WS.Count));%在后面添加一个新sheet
    end
    E_WS.Item(k).Select;%重新选择回第k个表格
    exlSheet1=exl.Activesheet;%选中当前工作表
    Data_K=Excel_Data{k,2};%获取当前工作表数据
    num_rows=size(Data_K,1);%行数
    num_columns=size(Data_K,2);%列数
    for x=1:num_columns
        X=x2columns(x);%把列转换为Excel的索引格式
        for y=1:num_rows
            dat_range=[X,num2str(y),':',X,num2str(y)];
            %选中要写入的范围
            rngObj=exlSheet1.Range(dat_range);
            %选中到Font上
            Data_Font=rngObj.Font;
            %写入字体颜色
            Color10=Data_K(y,x).TextColor;
            Color16=[dec2hex(Color10(1),2),dec2hex(Color10(2),2),dec2hex(Color10(3),2)];%由三组16进制数组成,分别为BGR对应的16进制
            Data_Font.Color=hex2dec(Color16);
            %改变字体格式
            Data_Font.Name=Data_K(y,x).TextStyle;%字体
            Data_Font.Size=Data_K(y,x).TextSize;%文字大小
            Data_Font.Bold=Data_K(y,x).IfBold;%是否加粗
            Data_Font.Italic=Data_K(y,x).IfItalic;%是否倾斜
            %选中到cell上
            Data_Cells=rngObj.Cells;
            %单元格数字格式
            Data_Cells.NumberFormat=Data_K(y,x).Format;%输出单元格数字格式
            %宽度和高度
            Data_Cells.ColumnWidth=Data_K(y,x).Width;
            Data_Cells.RowHeight=Data_K(y,x).Height;
            %设置对齐方式
            XYA=Data_K(y,x).XYAlignment;
            Data_Cells.HorizontalAlignment=XYA(1);%水平对齐
            Data_Cells.VerticalAlignment=XYA(2);%垂直对齐
            %选中到Interior上
            Data_Interior=rngObj.Interior;
            %设置背景颜色
            Color10=Data_K(y,x).BGColor;
            Color16=[dec2hex(Color10(1),2),dec2hex(Color10(2),2),dec2hex(Color10(3),2)];%由三组16进制数组成,分别为BGR对应的16进制
            Data_Interior.Color=hex2dec(Color16);

            %写入范围内的数据内容
            if strcmp(Data_K(y,x).Data,Data_K(y,x).Formula)
                rngObj.Value=Data_K(y,x).Data;%值
            else
                rngObj.Formula=Data_K(y,x).Formula;%公式
            end
            %设置边框(默认边框)
            Data_Borders=rngObj.Borders;
            Color16=[dec2hex(212,2),dec2hex(212,2),dec2hex(212,2)];%由三组16进制数组成,分别为BGR对应的16进制
            Data_Borders.Color=hex2dec(Color16);
        end
    end

end

exlWkbk.SaveAs(filename);

exlWkbk. Close;
exl.Quit;
exl.delete;


end


function Excel_Data=Read_Excel(filename)

%读取ReadMe文件
exl = actxserver('excel.application');
exlWkbk=exl.Workbooks;
%打开excel文件
exlFile=exlWkbk.Open(filename);
Num_Sheets=exlFile.Sheets.Count;%总的sheet数量
Excel_Data=cell(Num_Sheets,2);%创建储存cell
%按照sheet进行遍历循环
for k=1:Num_Sheets

    E_WS=exlFile.Worksheets;
    E_WS.Item(k).Select;%选择第k个表格
    %打开sheet表格
    exlSheet1=exlFile.Sheets.Item(k);
    Sheet_Name=exlSheet1.Name;%表格名字
    %读取最大最小范围
    %获取行数
    robj2=exlSheet1.Columns.End(4);%exlSheet1.Columns.methods在这里可以查到
    num_rows=robj2.row;
    %获取列数
    robj3=exlSheet1.Rows.End(2);
    num_columns=robj3.column;
    %生成储存矩阵,用stuct结构储存
    Data_All=struct([]);
    %遍历循环每个sheet内的单元格
    for x=1:num_columns
        X=x2columns(x);
        %每行进行循环
        for y=1:num_rows
            dat_range=[X,num2str(y),':',X,num2str(y)];
            %选中要读取的范围
            rngObj=exlSheet1.Range(dat_range);
            %读取范围内的数据内容
            Data_I=rngObj.Value;%值
            Data_All(y,x).Data=Data_I;
            Data_Formula_I=rngObj.Formula;%公式
            Data_All(y,x).Formula=Data_Formula_I;
            %选中到Font上
            Data_Font=rngObj.Font;
            %查看字体颜色
            Text_Color_I=dec2hex(Data_Font.Color,6);%由三组16进制数组成,分别为RGB对应的16进制
            Data_All(y,x).TextColor=[hex2dec(Text_Color_I(1:2)),hex2dec(Text_Color_I(3:4)),hex2dec(Text_Color_I(5:6))];
            %查看字体格式
            Data_All(y,x).TextStyle=Data_Font.Name;%字体
            Data_All(y,x).TextSize=Data_Font.Size;%文字大小
            Data_All(y,x).IfBold=Data_Font.Bold;%是否加粗
            Data_All(y,x).IfItalic=Data_Font.Italic;%是否倾斜
            %选中到cell上
            Data_Cells=rngObj.Cells;
            %单元格数字格式
            Format_I=Data_Cells.NumberFormat;%输出单元格数字格式
            Data_All(y,x).Format=Format_I;
            %宽度和高度
            Width_I=Data_Cells.ColumnWidth;
            Height_I=Data_Cells.RowHeight;
            Data_All(y,x).Width=Width_I;
            Data_All(y,x).Height=Height_I;
            %查看对齐方式
            A_X_I=Data_Cells.HorizontalAlignment;%水平对齐
            A_Y_I=Data_Cells.VerticalAlignment;%垂直对齐
            Data_All(y,x).XYAlignment=[A_X_I,A_Y_I];
            %选中到Interior上
            Data_Interior=rngObj.Interior;
            %查看背景颜色
            Data_BGColor_I=dec2hex(Data_Interior.Color,6);%由三组16进制数组成,分别为RGB对应的16进制
            Data_All(y,x).BGColor=[hex2dec(Data_BGColor_I(1:2)),hex2dec(Data_BGColor_I(3:4)),hex2dec(Data_BGColor_I(5:6))];
        end
    end
    Excel_Data{k,1}=Sheet_Name;
    Excel_Data{k,2}=Data_All;
end
%关闭
exlWkbk.Close;
exl.Quit;
exl.delete;
end


function X=x2columns(x)
    %生成列编号
    if x<=26
        X=char(abs('A')-1+x);
    elseif x<702
        X=[char(abs('A')-1+ fix((x-1)/26) ),char(abs('A')-1+mod(x-1,26)+1)];
    elseif x==702
         X='ZZ';
    elseif x<=16384
        X=[char(abs('A')-1+ fix(x/26/26) ),char(abs('A')-1+ fix((x-1)/26)-fix(x/26/26)*26 ),char(abs('A')-1+mod(x-1,26)+1)];
    elseif x>16384
        error('列数过多,目前程序不支持,请自行更改代码')
    end
end
Some corresponding options are described below.
Horizontal Alignment option
| name | value |
|---|---|
| in the center | -4108 |
| keep left | -4131 |
| Keep Right | -4152 |
| justify | -4130 |
| Center across columns | 7 |
Reference: https://docs.microsoft.com/zh-cn/office/vba/api/excel.xlhalign
Vertical alignment VerticalAlignment option
| name | value |
|---|---|
| lower down | -4107 |
| in the center | -4108 |
| lean on | -4160 |
Reference: https://docs.microsoft.com/zh-cn/office/vba/api/excel.xlvalign
Border style description
| name | value |
|---|---|
| solid line | 1 |
| wireless | -4142 |
| dotted line | -4115 |
| double solid line | -4119 |
| Dotted line | 4 |
Region border position
| name | value |
|---|---|
| border from top left to bottom right | 5 |
| border from bottom left to top right | 6 |
| border at the bottom of the area | 9 |
| border on the left edge of the region | 7 |
| Border on the right edge of the region | 10 |
| border at the top of the region | 8 |
| Horizontal border for all cells | 12 |
| Vertical borders for all cells | 11 |
Reference: https://docs.microsoft.com/zh-cn/office/vba/api/excel.xlbordersindex
Color description
For example, if the color value in Excel is 16422450, it needs to be converted to RGB:
1 将16422450转换为16进制:'FA9632'
2 将这个16进制划分为3部分,分别对应B通道'FA',G通道'96',和R通道'32'
3 将这3个16进制转换为10进制,则对应B通道250,G通道150,和R通道50
4 这个颜色的RGB为:[50,150,250]
2.1.1 Application 1: Drawing with Excel
The principle is to use Matlab to set the color of each unit and adjust the length and width. The rest are empty. Using this can also achieve different background color effects with different values.
Involves customizing data, and modifying existing Excel files.
Set the view zoom to 25%, the final output effect:

relevant code
clear
clc
%绘制excel画
C=imread('landOcean.jpg');
C2=imresize(C, [128,256]);
xLength=size(C2,2);
yLength=size(C2,1);
%创建生成Excel用到的数据
Data_K=struct([]);
for x=1:xLength
    for y=1:yLength
        %其余变量都是空和默认
        Data_K(y,x).Data=NaN;
        Data_K(y,x).Formula='';
        Data_K(y,x).TextColor=[0,0,0];
        Data_K(y,x).TextStyle='等线';
        Data_K(y,x).TextSize=11;
        Data_K(y,x).IfBold=false;
        Data_K(y,x).IfItalic=false;
        Data_K(y,x).Format='G/通用格式';
        Data_K(y,x).XYAlignment=[1,-4107];
        %只设置宽度和颜色
        Data_K(y,x).Width=0.4374*4;%代表4mm
        Data_K(y,x).Height=2.7682*4;%代表4mm
        Color=[C2(y,x,3),C2(y,x,2),C2(y,x,1)];%BGR的顺序
        %Color16=[dec2hex(Color(1),2),dec2hex(Color(2),2),dec2hex(Color(3),2)];%由三组16进制数组成,分别为BGR对应的16进制
        Data_K(y,x).BGColor=Color;
    end
end

Excel_Data=cell(1,2);
Excel_Data{1,1}='landOcean';%Sheet名称
Excel_Data{1,2}=Data_K;
%将数据写入到Excel
Write_Excel('landOcean.xlsx',Excel_Data)

%下面代码为删除边框用
exl=actxserver('excel.application');
exlWkbk=exl.Workbooks;
%打开excel文件
exlFile=exlWkbk.Open('landOcean.xlsx');
exlSheet1=exlFile.Sheets.Item(1);
%选择图像范围
X=x2columns(xLength);
dat_range=['A1:',X,num2str(yLength)];
rngObj=exlSheet1.Range(dat_range);
%删除边框
Data_Borders=rngObj.Borders;
Data_Borders.LineStyle=-4142;
%之后处理收尾
exlFile.Save;%修改之后必须保存
exlWkbk.Close;
exl.Quit;
exl.delete;


function Write_Excel(filename,Excel_Data)
% file=fullfile(pwd, file);%加上全路径
exl=actxserver('excel.application');
exlWkbk=exl.WorkBooks.Add();
E_WS=exlWkbk.Worksheets;
%创建N个表格
sheet_N=size(Excel_Data,1);
for k=1:sheet_N
    E_WS.Item(k).Select;%选择第k个表格
    E_WS_k=E_WS.Item(k);
    E_WS_k.Name=Excel_Data{k,1};%建立名字
    if sheet_N>1 && k<sheet_N
        E_WS.Item(1).Select;%选择第一个表格
        E_WS.Add([], E_WS.Item(E_WS.Count));%在后面添加一个新sheet
    end
    E_WS.Item(k).Select;%重新选择回第k个表格
    exlSheet1=exl.Activesheet;%选中当前工作表
    Data_K=Excel_Data{k,2};%获取当前工作表数据
    num_rows=size(Data_K,1);%行数
    num_columns=size(Data_K,2);%列数
    for x=1:num_columns

        X=x2columns(x);%把列转换为Excel的索引格式
        for y=1:num_rows
            dat_range=[X,num2str(y),':',X,num2str(y)];
            %选中要写入的范围
            rngObj=exlSheet1.Range(dat_range);
            %选中到Font上
            Data_Font=rngObj.Font;
            %写入字体颜色
            Color10=Data_K(y,x).TextColor;
            Color16=[dec2hex(Color10(1),2),dec2hex(Color10(2),2),dec2hex(Color10(3),2)];%由三组16进制数组成,分别为BGR对应的16进制
            Data_Font.Color=hex2dec(Color16);
            %改变字体格式
            Data_Font.Name=Data_K(y,x).TextStyle;%字体
            Data_Font.Size=Data_K(y,x).TextSize;%文字大小
            Data_Font.Bold=Data_K(y,x).IfBold;%是否加粗
            Data_Font.Italic=Data_K(y,x).IfItalic;%是否倾斜
            %选中到cell上
            Data_Cells=rngObj.Cells;
            %单元格数字格式
            Data_Cells.NumberFormat=Data_K(y,x).Format;%输出单元格数字格式
            %宽度和高度
            Data_Cells.ColumnWidth=Data_K(y,x).Width;
            Data_Cells.RowHeight=Data_K(y,x).Height;
            %设置对齐方式
            XYA=Data_K(y,x).XYAlignment;
            Data_Cells.HorizontalAlignment=XYA(1);%水平对齐
            Data_Cells.VerticalAlignment=XYA(2);%垂直对齐
            %选中到Interior上
            Data_Interior=rngObj.Interior;
            %设置背景颜色
            Color10=Data_K(y,x).BGColor;
            Color16=[dec2hex(Color10(1),2),dec2hex(Color10(2),2),dec2hex(Color10(3),2)];%由三组16进制数组成,分别为BGR对应的16进制
            Data_Interior.Color=hex2dec(Color16);
            %写入范围内的数据内容
            if strcmp(Data_K(y,x).Data,Data_K(y,x).Formula)
                rngObj.Value=Data_K(y,x).Data;%值
            else
                rngObj.Formula=Data_K(y,x).Formula;%公式
            end
            %设置边框(默认边框)
            Data_Borders=rngObj.Borders;
            Color16=[dec2hex(212,2),dec2hex(212,2),dec2hex(212,2)];%由三组16进制数组成,分别为BGR对应的16进制
            Data_Borders.Color=hex2dec(Color16);
        end
    end

end


exlWkbk.SaveAs(filename);

exlWkbk.Close;
exl.Quit;
exl.delete;


end

function X=x2columns(x)
    %生成列编号
    if x<=26
        X=char(abs('A')-1+x);
    elseif x<702
        X=[char(abs('A')-1+ fix((x-1)/26) ),char(abs('A')-1+mod(x-1,26)+1)];
    elseif x==702
         X='ZZ';
    elseif x<=16384
        X=[char(abs('A')+ fix((x-703)/26/26) ),char(abs('A')+mod(fix( (x-703)/26 ),26) ),char(abs('A')+mod(x-1,26))];
    elseif x>16384
        error('列数过多,目前程序不支持,请自行更改代码')
    end
end
This program is slower. If you want to speed up, you can delete the rest of the code except for the color, such as Font, alignment, border settings, etc.
2.2 Fast writing and editing of pure data
If you edit the settings one by one, the speed will be very slow, so in order to speed up, you can directly set the value in the range.
The following shows a program that generates 5 sheets of Excel tables, renames each sheet, and writes data. Without any other format settings, the writing speed is fast, suitable for rapid batch generation of Excel.
code show as below:
clear
clc
close all

file='WriteIt.xlsx';
% file=fullfile(pwd, file);
exl=actxserver('excel.application');
exlWkbk=exl.WorkBooks.Add();
E_WS=exlWkbk.Worksheets;

%创建5个表格
sheet_N=5;
for k=1:sheet_N
    E_WS.Item(k).Select;%选择第k个表格
    E_WS_k=E_WS.Item(k);
    E_WS_k.Name=['表格',num2str(k)];
    if sheet_N>1 && k<sheet_N
        E_WS.Item(1).Select;%选择第一个表格
        E_WS.Add([], E_WS.Item(E_WS.Count));%在后面添加一个新sheet
    end
    E_WS.Item(k).Select;%选择第k个表格
    %创建数据和写入范围
    Size=2*k+1;
    A=magic(Size);
    data=num2cell(A);
    range=['A1:',char(abs('A')-1+Size),num2str(Size)];
    %整体赋值方法
    E_WS.Item(k).Select;%选择第k个表格
    ran=exl.Activesheet.get('Range', range);
    ran.value=data;

end
exlWkbk.SaveAs(file);

exlWkbk. Close;
exl.Quit;
exl.delete;
2.3 Drawing of Chart in Excel
Here is a lot of reference to the macro code recorded by Excel. First create a table without data, then add data.
Output effect:

The code of matlab is as follows
clear
clc
close all

file='Test.xlsx';
%创建文件
exl=actxserver('excel.application');
exlWkbk=exl.WorkBooks.Add();
E_WS=exlWkbk.Worksheets;
%选择第一个表格
E_WS.Item(1).Select
%exlSheet1=exlFile.Sheets.Item(1);
%选中当前活动表格
exlASh=exl.Activesheet;
%添加数据
data=num2cell(rand(5,2));
range='A1:B5';
ran=exl.Activesheet.get('Range', range);
ran.value=data;

%选择当前表格中的形状选项
exlASh_Shape=exlASh.Shapes;

%选择最开始的数据(这个数据是为了创建表格用)
exlASh.Range('A1:A2').Select;
%添加表格
Exl_AddCh=exlASh_Shape.AddChart2();%默认是直方图
Exl_Ch=Exl_AddCh.Chart;
Exl_Ch.ChartType='xlXYScatterSmooth';
Exl_Ch.FullSeriesCollection(1).Delete;
%重新定义系列和数据点
Exl_Ch.SeriesCollection.NewSeries;
Ch_Data_1=Exl_Ch.FullSeriesCollection(1);%系列1
Ch_Data_1.Name='系列1';
Ch_Data_1.XValues='=Sheet1!$A$1:$A$5';
Ch_Data_1.Values='=Sheet1!$B$1:$B$5';

%添加和更改坐标轴名称
Exl_Ch.Axes(1).HasTitle=true;
Exl_Ch.Axes(2).HasTitle=true;
Ch_Tt_X=Exl_Ch.Axes(1).AxisTitle;
Ch_Tt_X.Caption='X轴';
Ch_Tt_Y=Exl_Ch.Axes(2).AxisTitle;
Ch_Tt_Y.Caption='Y轴';

%添加趋势线
Trend_1=Exl_Ch.FullSeriesCollection(1).Trendlines.Add;
Trend_1.DisplayEquation=true;
Trend_1.DisplayRSquared=true;

%更改Chart位置和大小
exlASh_Shape1=exlASh_Shape.Item(1);
exlASh_Shape1.Top=50;
exlASh_Shape1.Left=160;
exlASh_Shape1.Height=300;
exlASh_Shape1.Width=300;

%保存
exlWkbk.SaveAs(file);
%exlFile.Save;%如果对文件进行读取和修改,用这个
%关闭程序
exlWkbk. Close;
exl.Quit;
exl.delete;
Among them, the names of different graphics can be found by recording macros in excel. Here are a few examples:
| name | value |
|---|---|
| column chart | xlColumnClustered |
| histogram | xlHistogram |
| pie chart | xlPie |
| Scatterplot | xlXYScatter |
| Scatter plot connected by smooth curves | xlXYScatterSmooth |
| Scatter plot connected by smooth curve (no points) | xlXYScatterSmoothNoMarkers |