0 Preface
We have explained various applications of canal before, but for a production environment, high service availability must be guaranteed. Therefore, a single canal node cannot meet our needs. You need to build a canal cluster.
1. canal cluster mode
From the perspective of architecture, the means we use to ensure high availability of services are mainly master-slave architecture and cluster architecture. Sometimes we also attribute the master-slave to the cluster architecture, but strictly speaking, the cluster architecture refers to the simultaneous operation of multiple nodes, while the master-slave architecture has only one node running at the same time, and the other node is used as a backup, only when the master node is down. , the standby node will be enabled.
Which is the cluster mode of canal?
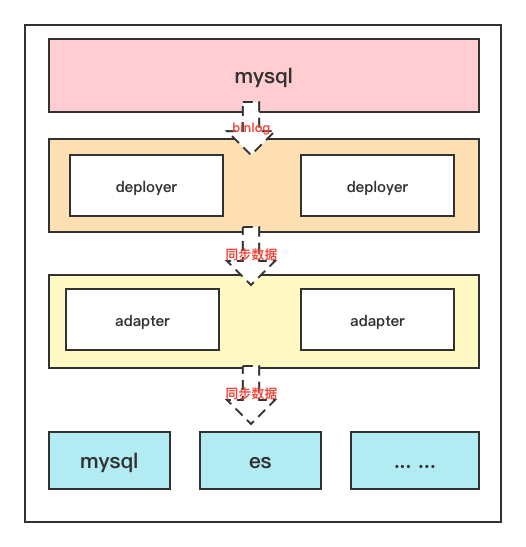
We must first understand that canal's data synchronization depends on binlog and also on the mysql dump command. The characteristics of binlog itself require data atomicity, isolation, and orderliness. At the same time, the mysql dump command occupies more resources on the mysql server, so It should be avoided as little as possible. For this reason, the canal server can only have one node at a time to read the binlog for synchronization.
Therefore, on this basis, canal's cluster mode is actually a master-slave mode. Then what we want to build is the master-slave.
We know that there are server-side deployer and client-side adapter in canal. The server is responsible for reading binlog from mysql, while the client is responsible for reading the synchronized binlog data from the server. After processing, the synchronized data is sent to the target server, such as redis, es or other relational databases, etc.
This point is also explained in the official document, which is hereby quoted to help everyone understand
Canal's ha is divided into two parts, canal server and canal client have corresponding ha implementations respectively
canal server: In order to reduce requests for mysql dump, instances on different servers require only one to be running at the same time, and the others to be in standby state.
canal client: In order to ensure orderliness, only one canal client can perform get/ack/rollback operations on an instance at a time, otherwise the order cannot be guaranteed for the client to receive.
How to coordinate and cooperate between master and slave nodes?
After the cluster architecture is determined, another problem arises: how does the slave node know that the master node is down, and how does it know when to start working? At the same time, how does the slave node know the progress of the master node synchronizing data? It is impossible for the slave node to synchronize data from scratch again?
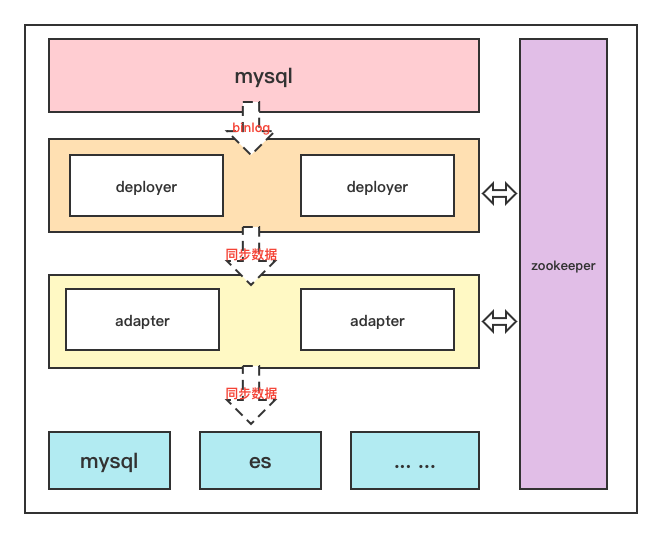
For the first one, you may think of sending heartbeat packets to achieve it, and for the second one, you need a third party to store the progress of synchronization. So combining these two points, let's think about what kind of third-party components have heartbeat Maintenance function (that is, the function of registration service), also has the function of file storage and synchronization
Isn't this the natural property of zookeeper. So we need zk as a third-party component to regulate the master-slave nodes. It is equivalent to the role of registration center and configuration center
So the structure becomes like this
2. Canal cluster construction
After sorting out the principles, let's see how to actually build
2.1 Environment preparation
In order to ensure the integrity of the demonstration, in addition to demonstrating the canal cluster construction, we will also synchronize mysql data to es through the cluster mode
So we need to prepare in advance:
- A mysql database, and open binlog, and create a canal account, grant permissions
- An es+kibana service
- A zookeeper service
- Two servers for deploying canal
Regarding mysql opening binlog, creating users and empowering them, as I have already said before, I will not repeat them again. If necessary, please refer to the following blog posts:
Realize incremental/full synchronization of mysql8.0 data to elasticsearch7.x through canal1.1.5
2.2 Cluster Construction
2.2.1 zookeeper construction
Here, for the convenience of demonstration, docker is used to build zk
docker run -d -e TZ="Asia/Shanghai" -p 2181:2181 --name zookeeper zookeeper
2.2.2 Build server deployer
1. Query the binlog location of the data source mysql service
# 源mysql服务器中登陆mysql执行
show binary logs;
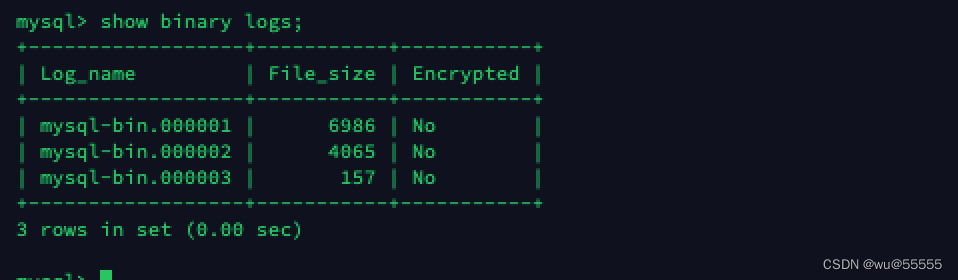
Remember the query result, we will use it in subsequent configuration
2. As of this article, the latest version of canal is 1.1.6, so the text uses this version for demonstration. Canal1.1.6 version requires jdk11+, canal1.1.5 and below use jdk1.8+
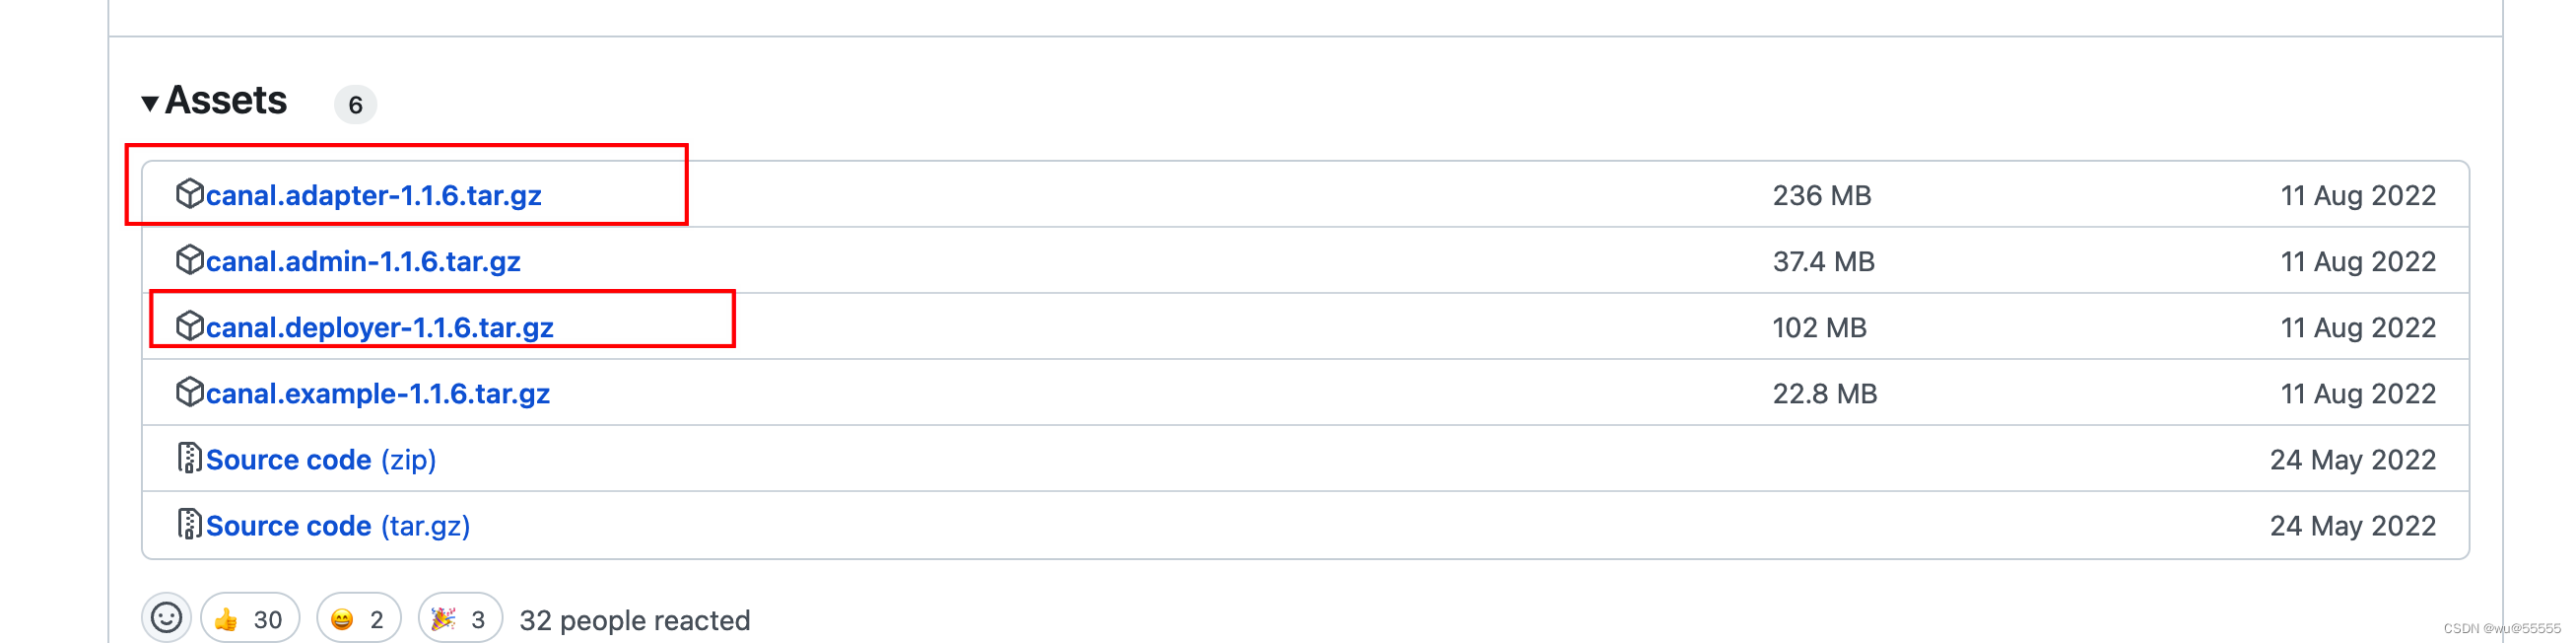
Or download directly on the server through the wget command
wget https://github.com/alibaba/canal/releases/download/canal-1.1.6/canal.deployer-1.1.6.tar.gz
3. Unzip the installation package
tar -zxvf canal.deployer-1.1.6.tar.gz
4. Create a new instance clusterfor this demonstration
cd deployer
cp -R conf/example conf/cluster
5. Modify the configuration file canal.properties
vim conf/canal.properties
Modify content
# 设置canal服务端IP
canal.ip =192.168.244.25
# zk地址,多个地址用逗号隔开
canal.zkServers =192.168.244.1:2181
# 实例名称
canal.destinations = cluster
# 持久化模式采用zk
canal.instance.global.spring.xml = classpath:spring/default-instance.xml
6. Modify the configuration file instance.properties
vim conf/cluster/instance.properties
Modifications:
# 每个canal节点的slaveId保持唯一,在1.0.26版本后已经能够自动生成了, 无需设置
# canal.instance.mysql.slaveId=1
# 设置binlog同步开始位置
canal.instance.master.address=192.168.244.17:3306
canal.instance.master.journal.name=mysql-bin.000001
canal.instance.master.position=0
canal.instance.master.timestamp=1665038153854
# 数据源账号密码
# username/password
canal.instance.dbUsername=canal
canal.instance.dbPassword=canal
Description of the starting point of mysql data synchronization:
- canal.instance.master.journal.name + canal.instance.master.position : precisely specify a binlog position to start
- canal.instance.master.timestamp : specify a timestamp, canal will automatically traverse the mysql binlog, find the binlog location corresponding to the timestamp, and start
- Do not specify any information: by default, start from the location of the current database. (show master status)
7. Refer to the above configuration to adjust the deployer node 2. Note that the deployer service ip is adjusted to the ip of the current node
8. Start two nodes. It should be noted that when starting the second node, it will not start successfully. As we said above, only one canal service will run at the same time. When the other canal service goes down, the backup The node will automatically start
./bin/startup.sh
2.2.3 Client adapter configuration
1. Download the adapter installation package, which can be downloaded on the github page as above, or downloaded through instructions
wget https://github.com/alibaba/canal/releases/download/canal-1.1.6/canal.adapter-1.1.6.tar.gz
2. Unzip the compressed package
tar -zxvf canal.adapter-1.1.6.tar.gz
3. Modify the configuration fileapplication.yml
vim conf/application.yml
Modify the content, the required adjustment item has been 【】marked with
server:
  port: 8081
spring:
  jackson:
    date-format: yyyy-MM-dd HH:mm:ss
    time-zone: GMT+8
    default-property-inclusion: non_null

canal.conf:
  mode: tcp #tcp kafka rocketMQ rabbitMQ
  flatMessage: true
  # zk地址【1】
  zookeeperHosts: 192.168.244.1:2181
  syncBatchSize: 1000
  # 出现报错时的重试次数
  retries: 0
  timeout:
  accessKey:
  secretKey:
  consumerProperties:
    # canal tcp consumer
    # deployer服务端地【2】
   # canal.tcp.server.host: 127.0.0.1:11111
   # zk地址【3】
    canal.tcp.zookeeper.hosts: 192.168.244.1:2181
    canal.tcp.batch.size: 500
    canal.tcp.username:
    canal.tcp.password:
  srcDataSources:
    # 源数据库地址,可配置多个
    canalDs: # 命名自定义【4】
      url: jdbc:mysql://192.168.244.17:3306/canal_test?useUnicode=true
      username: canal
      password: canal
  canalAdapters:
  - instance: cluster # 服务端配置的实例名称【5】
    groups:
    - groupId: g1
      outerAdapters:
      # 开启日志打印
      - name: logger
      # 配置目标数据源【5】
      -
        key: es
        # es7 or es6
        name: es7
        hosts: http://192.168.244.11:9200 # 127.0.0.1:9300 for transport mode
        properties:
          mode: rest # or rest or transport
          # es账号密码
          security.auth: elastic:elastic #  only used for rest mode
          # es集群名称
          cluster.name: blade-cluster
4. Create a synchronization configuration fileuser.yml
vim conf/es7/user.yml
document content
注意事项: There is a pitfall here, that is, do not use the "``" symbol to enclose your table name in the written sql, otherwise it will cause no error but the data will not be synchronized
dataSourceKey: canalDs # 这里的key与上述application.yml中配置的数据源保持一致
outerAdapterKey: es # 与上述application.yml中配置的outerAdapters.key一直
destination: cluster # 默认为example,与application.yml中配置的instance保持一致
groupId:
esMapping:
  _index: user
  _type: _doc
  _id: id
  sql: "SELECT
         id,
         seq_no,
         name,
         age,
         address
       FROM
        user"
#  etlCondition: "where t.update_time>='{0}'"
  commitBatch: 3000
Here you can create the corresponding file according to your own database table. I only synchronized one table here. The index mappings in es are as follows. Please create the index in advance before synchronization.
{
  "user" : {
    "mappings" : {
      "properties" : {
        "address" : {
          "type" : "text",
          "analyzer" : "ik_smart"
        },
        "age" : {
          "type" : "integer"
        },
        "name" : {
          "type" : "keyword"
        },
        "seq_no" : {
          "type" : "keyword"
        }
      }
    }
  }
}
5. The other adapter node is also configured in the same way
6. Start the adapter
./bin/startup.sh

2.2.4 Testing
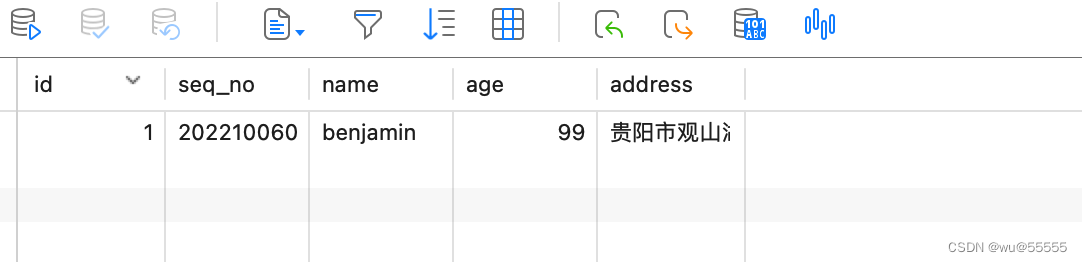
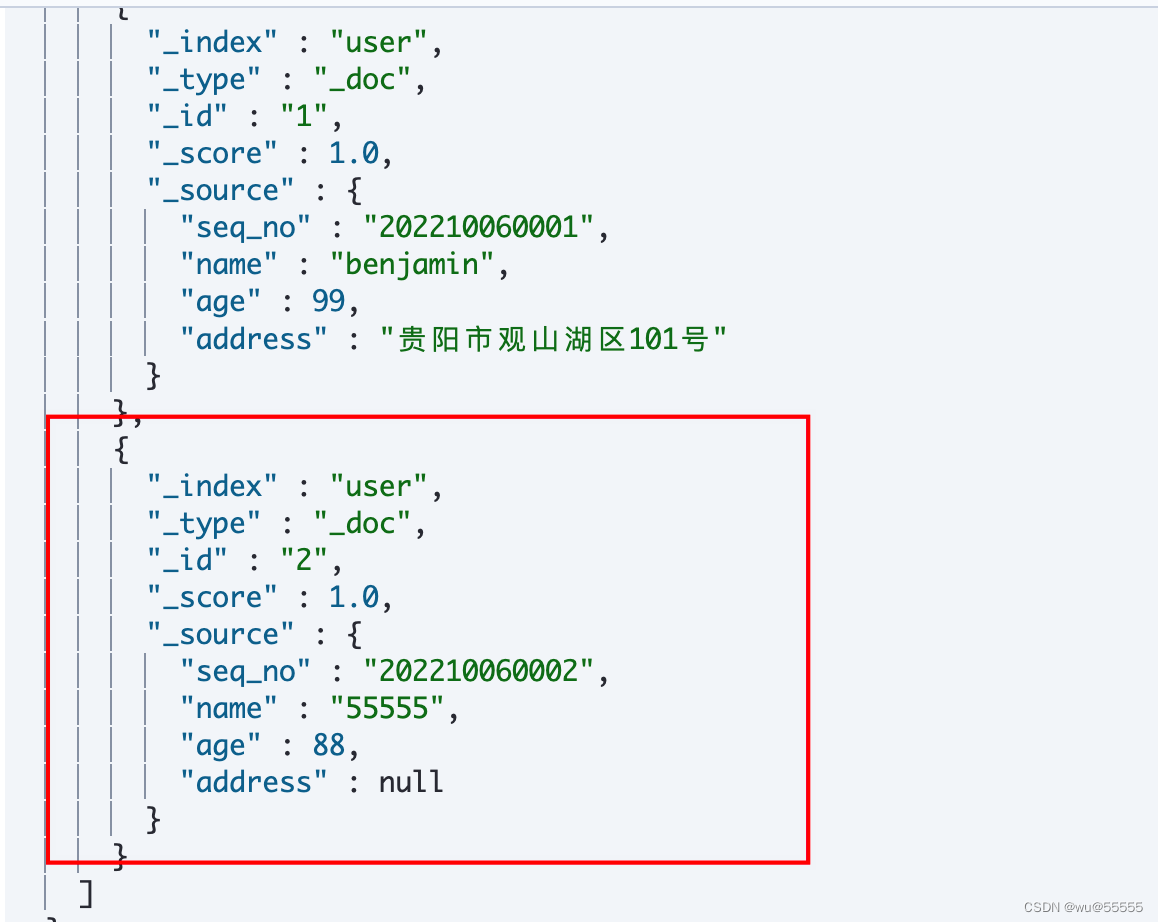
1. We add data to the database
2. Check the adapter node log
tail -f logs/adapter/adapter.log
Node 1:

Node 2:

It can be seen that the data has been distributed to node 1 synchronously. After the synchronization is successful, there will be Affected indexes: xxxthe words after the log
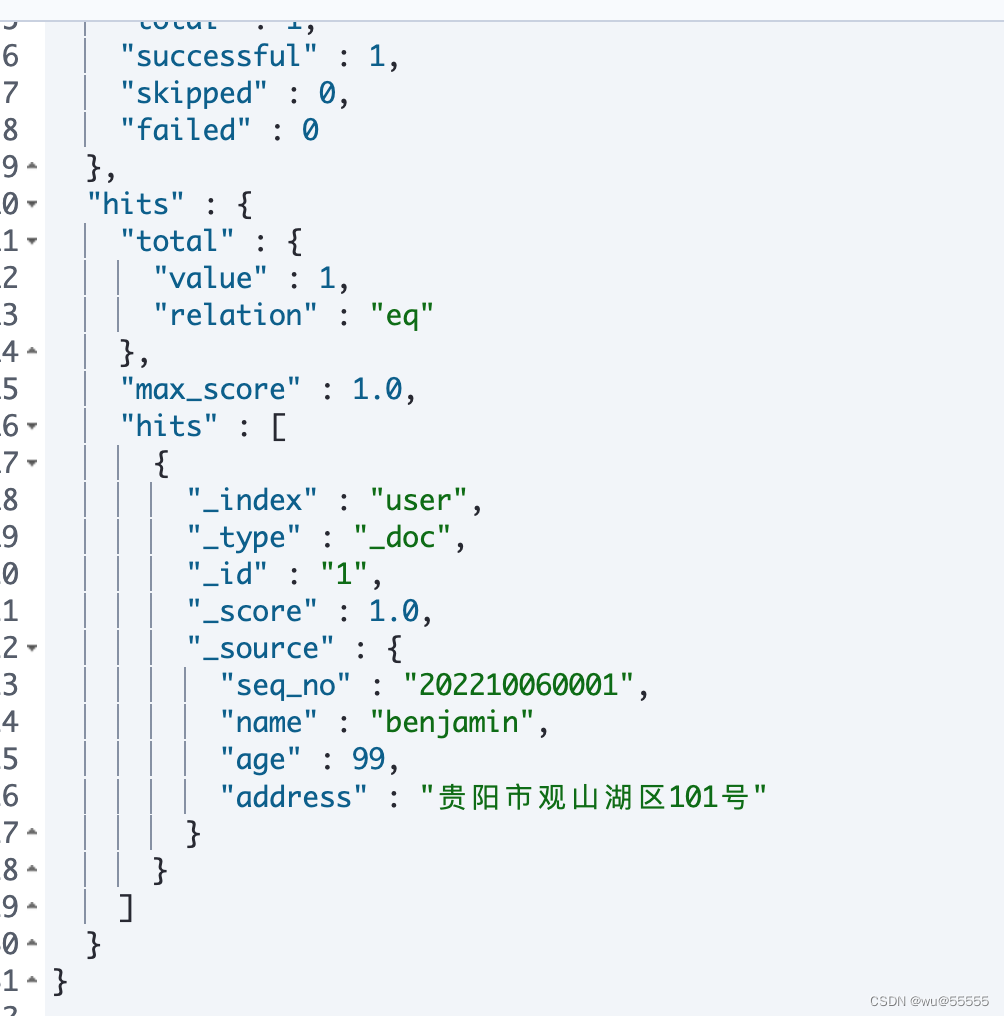
3. We query data in kibana
GET user/_search
The result shows that the synchronization is normal
4. Now we shut down the deployer service that is working to simulate downtime
If you don't know which deployer is working, just check the log, and the one with continuous log output is working
cd ../deployer
./bin/stop.sh
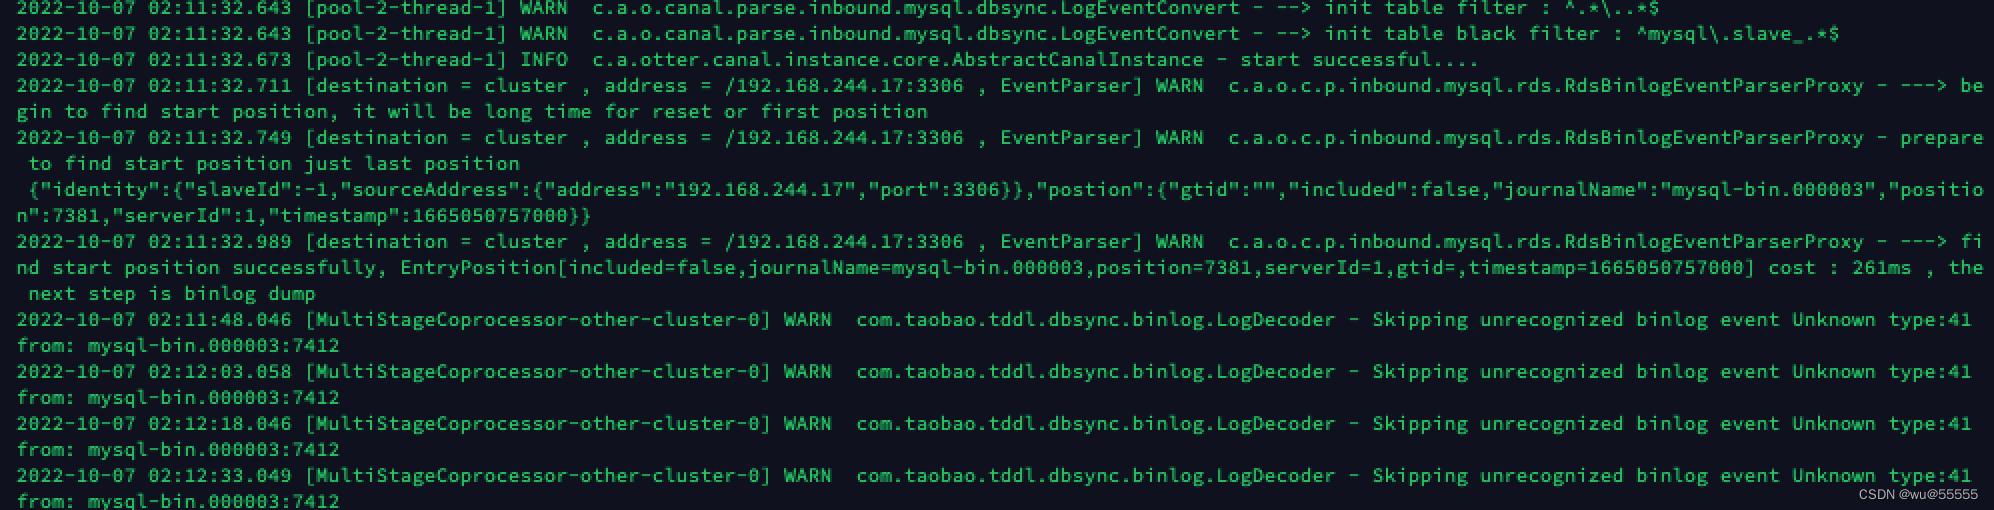
5. View the log of the standby deployer node
cat logs/cluster/cluster.log
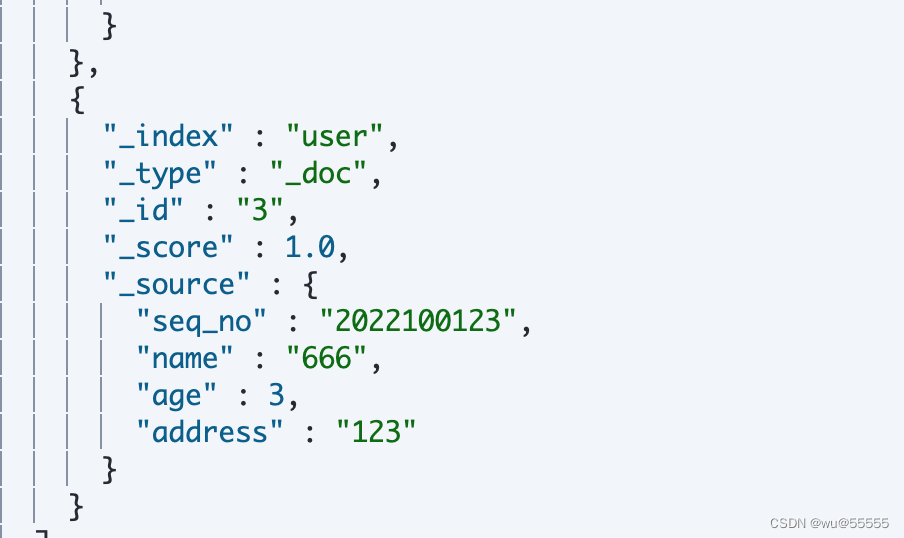
6. Add another piece of data to see if it can be synchronized normally
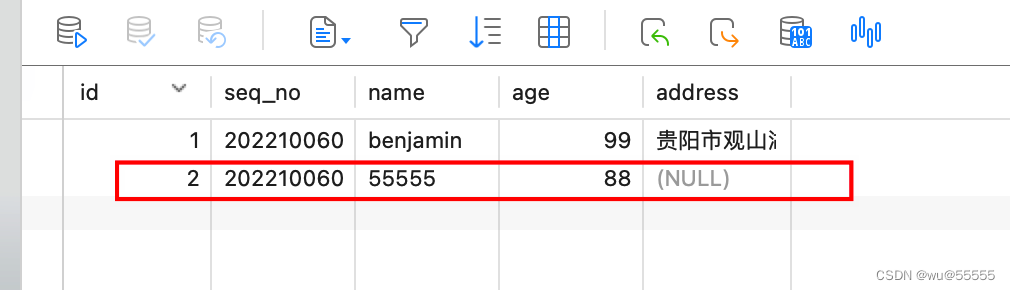
7. Check the data in kibana, and the data synchronization is successful, indicating that the deployer node automatically switches successfully
8. Next, let's simulate the downtime of the adapter node: we will shut down one of the adapter nodes
9. Add a piece of data
10. View kibana, the data is synchronized normally
Summarize
The deployer node will only run one at the same time, while the adapter node adopts the service distribution mechanism, and multiple nodes serve at the same time, and zk distributes requests to specific adapter nodes to perform data synchronization tasks
In the next issue, we will continue to talk about how to manage cluster nodes in combination with canal-admin