Introduction
JUnit is a unit testing framework and regression testing framework for the Java programming language .
Features of JUnit:
- open source framework
- Provide annotations to identify test methods
- Provide assertions to test expected results
- TestRun is provided to run tests.
- Run fast, elegant and simple
- Can run automatically and check its own results and provide immediate feedback
use
Affirmation
Assertion is the main function in JUnit, and all assertions in JUnit are contained in the Assert class.
The main methods in the Assert class are as follows:
| method name | method description |
|---|---|
| assertEquals | Assert that the expected value passed in is equal to the actual value |
| assertNotEquals | Assert that the expected value passed in is not equal to the actual value |
| assertArrayEquals | Assert that the expected array passed in is equal to the actual array |
| assertNull | Assert that the passed in object is null |
| assertNotNull | Assert that the passed in object is not null |
| assertTrue | assert condition is true |
| assertFalse | Assert condition is false |
| assertSame | Assert that two objects refer to the same object, equivalent to "==" |
| assertNotSame | Assert that two objects refer to different objects, equivalent to "!=" |
| assertThat | Asserts whether an actual value satisfies a specified condition |
Note: The above methods are all static methods of Assert, called by Assert.xxx, if you need to call directly, you need to addimport static org.junit.Assert.*;
order of execution
In JUnit, the execution order is determined by @BeforeClass, @Before, @Test, @Afterand @AfterClassannotations.
| annotation | introduce |
|---|---|
@beforeClass() |
Annotated methods are executed first, and only once. |
@afterClass() |
Annotated methods are executed last and only once. |
@before() |
Annotated methods are executed for each test case, but before the test case is executed. |
@after() |
Annotated methods are executed for each test case, but after the test case is executed. |
@Test |
Between the before() method and the after() method, each test case is executed. The order of execution is determined by the code position |
Examples are as follows:
   @BeforeClass
    public static void beforeClass() {


        System.out.println("in before class");
    }

    //execute only once, in the end
    @AfterClass
    public static void  afterClass() {


        System.out.println("in after class");
    }

    //execute for each test, before executing test
    @Before
    public void before() {


        System.out.println("in before");
    }

    //execute for each test, after executing test
    @After
    public void after() {


        System.out.println("in after");
    }

    //test case 1
    @Test
    public void testCase1() {


        System.out.println("in test case 1");
    }

    //test case 2
    @Test
    public void testCase2() {


        System.out.println("in test case 2");
    }
The result is shown in the figure:

write tests
Here is the encryption program we are going to test
public class Encryption {


    /**
     * 加密程序,算法是将字符串反转,如 abc 会转为为 cba
     * @param content
     * @return
     */
    public static String encryption(String content){


       if (content == null)throw new NullPointerException();
       if (content.length() < 2)return content;
       char[] data = content.toCharArray();
       int size = data.length;
       for (int i = 0; i < size/2; i++) {


            char c = data[i];
            data[i] = data[size - i - 1];
            data[size - i - 1] = c;
       }
       return new String(data);
    }
}
The test code is as follows
public class EncryptionTest {
    String content = "abc";
    @Test
    public void encryption() {
        assertEquals(Encryption.encryption(content),"cba");
    }
}
parametric test
In the above test code, it is very troublesome to set the corresponding value every time a method is tested. Junit 4 introduces a new functional parameterized test. Parameterized tests allow developers to run the same test over and over with different values. You will follow 5 steps to create parameterized tests.
- Use
@RunWith(Parameterized.class)to annotateEncryptionTestthe class. - Create a
@Parameterized.Parameterspublic static method annotated that returns a collection (array) of objects to use as the test data collection. - Create a public constructor for EncryptionTest that accepts the equivalent of a row of test data.
- Create an instance variable for each column of test data.
- Create your test cases using instance variables as a source of test data.
code show as below:
@RunWith(Parameterized.class)
public class EncryptionTest {


    String result;

    String content;

    public EncryptionTest(String content, String result) {


        this.content = content;
        this.result = result;
    }

    @Parameterized.Parameters
    public static Collection primeNumbers(){


        return Arrays.asList(new Object[][]{


                {

    "abc","cba"},
                {

    "1234","4321"},
                {

    "",""}
        });
    }

    @Test
    public void encryption() {


        System.out.println("content = "+content+"  result = "+result);
        assertEquals(Encryption.encryption(content),result);
    }
}
The test results are shown in the figure:

exception test
When we enter content = null, an exception will be thrown. So how do we test for abnormal conditions, this requires the use of @Testannotation expectedparameters, the parameter value is the abnormality to be detected. If the corresponding exception is thrown, the test succeeds; otherwise, the test fails.
code show as below:
    @Test(expected = NullPointerException.class)
    public void encryption() {


        System.out.println("content = "+content+"  result = "+result);
        assertEquals(Encryption.encryption(content),result);
    }
time test
Sometimes we need to test the efficiency of a certain module, we need to test the running time. We can timeout determine the maximum running time in milliseconds through the parameters of @Test.
code show as below:
    @Test(timeout = 1000)
    public void encryption() {


        System.out.println("content = "+content+"  result = "+result);
        assertEquals(Encryption.encryption(content),result);
    }
async test
Principle: The principle of asynchronous testing is to block the test thread, and then execute the test thread after the asynchronous thread is executed.
Here use waitand notiftyAllmethod to achieve, the code is as follows
/**
*要测试的类
*/
public class Simple {


    public interface Callback{


        void finish(String result);
    }

    private Callback callback;

    public void setCallback(Callback callback) {


        this.callback = callback;
    }

    public void deal(){


        new Thread(){


            @Override
            public void run() {


                try {


                    //模拟耗时操作
                    Thread.sleep(1000);
                } catch (InterruptedException e) {


                    e.printStackTrace();
                }
                callback.finish("完成");
            }
        }.start();
    }
}


/**
*测试类
*/
public class SimpleTest {


    private Object lock = new Object();
    private int flag = 0;
    String res = null;
    @Test
    public void deal(){


         Simple simple = new Simple();
         simple.setCallback(result -> {


             synchronized (lock){


                 flag = 1;
                 lock.notifyAll();
             }
             res = result;
         });
         simple.deal();
             synchronized (lock){


                 while (flag == 0){


                     try {


                         lock.wait();
                     } catch (InterruptedException e) {


                         e.printStackTrace();
                     }
                 }
             }
        assertEquals(res,"完成");
    }
}
assertThat
Transferred from Android unit testing (1):assertThat the use of the JUnit framework
Some of the basic assertions we used above, if we do not set the output information when the failure occurs, then only an AssertionError will be thrown when the assertion fails, and it is impossible to know which part is wrong. And assertThat helps us solve this. It's more readable.
assertThat(T actual, Matcher<? super T> matcher);

assertThat(String reason, T actual, Matcher<? super T> matcher);
Among them, reason is the output information when the assertion fails, actual is the value of the assertion, and matcher is the matcher of the assertion.
Commonly used matcher collations:
| matcher | illustrate | example |
|---|---|---|
| is | Asserts that the argument is equal to the match expression given later | assertThat(5, is (5)); |
| not | Assert that the argument is not equal to the matching expression given later assertThat(5, not(6)); | |
| equalTo | Assert arguments are equal | assertThat(30, equalTo(30)); |
| equalToIgnoringCase | Assert string equality ignoring case | assertThat(“Ab”, equalToIgnoringCase(“ab”)); |
| containsString | Assert that a string contains a string | assertThat(“abc”, containsString(“bc”)); |
| startsWith | Assert that a string starts with a certain string | assertThat(“abc”, startsWith(“a”)); |
| endsWith | Assert that a string ends with a certain string | assertThat(“abc”, endsWith(“c”)); |
| nullValue | Assert that the value of the parameter is null | assertThat(null, nullValue()); |
| notNullValue | Assert that the value of the parameter is not null | assertThat(“abc”, notNullValue()); |
| greaterThan | Assert that the argument is greater than | assertThat(4, greaterThan(3)); |
| lessThan | Assert that the argument is less than | assertThat(4, lessThan(6)); |
| greaterThanOrEqualTo | Assert that the argument is greater than or equal to | assertThat(4, greaterThanOrEqualTo(3)); |
| lessThanOrEqualTo | Assert that the argument is less than or equal to | assertThat(4, lessThanOrEqualTo(6)); |
| closeTo | Assert that a floating-point number is within a certain range | assertThat(4.0, closeTo(2.6, 4.3)); |
| allOf | Assert that all conditions are met, equivalent to && | assertThat(4,allOf(greaterThan(3), lessThan(6))); |
| anyOf | Assert that a condition is met, equivalent to or | assertThat(4,anyOf(greaterThan(9), lessThan(6))); |
| hasKey | 断言Map集合含有此键 | assertThat(map, hasKey(“key”)); |
| hasValue | 断言Map集合含有此值 | assertThat(map, hasValue(value)); |
| hasItem | 断言迭代对象含有此元素 | assertThat(list, hasItem(element)); |
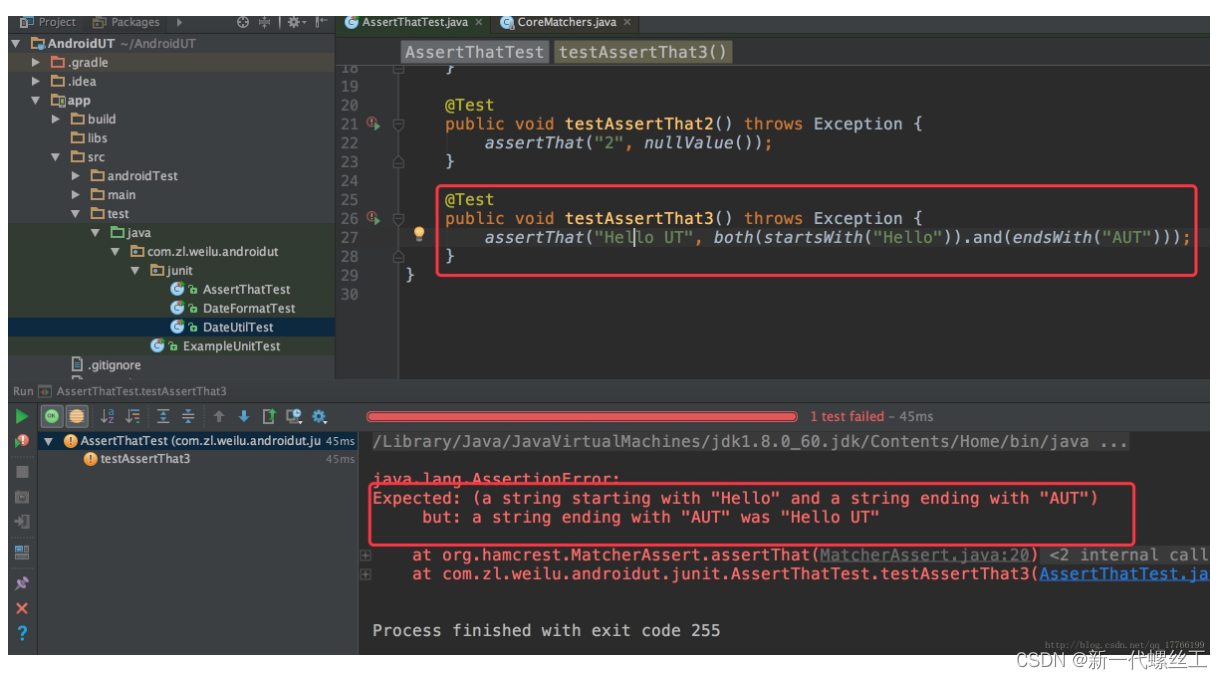
下图为使用assertThat测试失败时所显示的具体错误信息。可以看到错误信息很详细!
当然了匹配器也是可以自定义的。这里我自定义一个字符串是否是手机号码的匹配器来演示一下。
只需要继承BaseMatcher抽象类,实现matches与describeTo方法。代码如下:
public class IsMobilePhoneMatcher extends BaseMatcher<String> {
    /**
     * 进行断言判定,返回true则断言成功,否则断言失败
     */

    @Override
    public boolean matches(Object item) {
        if (item == null) {
            return false;
        }

        Pattern pattern = Pattern.compile("(1|861)(3|5|7|8)\\d{9}$*");
        Matcher matcher = pattern.matcher((String) item);

        return matcher.find();
    }

    /**
     * 给期待断言成功的对象增加描述
     */
    @Override
    public void describeTo(Description description) {
        description.appendText("预计此字符串是手机号码!");
    }

    /**
     * 给断言失败的对象增加描述
     */
    @Override
    public void describeMismatch(Object item, Description description) {
        description.appendText(item.toString() + "不是手机号码!");
    }
}
@Rule用法
转自Android单元测试(一):JUnit框架的使用的@Rule用法
还记得一开始我们在@Before与@After注解的方法中加入”测试开始”的提示信息吗?假如我们一直需要这样的提示,那是不是需要每次在测试类中去实现它。这样就会比较麻烦。这时你就可以使用@Rule来解决这个问题,它甚至比@Before与@After还要强大。
自定义@Rule很简单,就是实现TestRule 接口,实现apply方法。代码如下:
public class MyRule implements TestRule {


    @Override
    public Statement apply(final Statement base, final Description description) {


        return new Statement() {


            @Override
            public void evaluate() throws Throwable {


                // evaluate前执行方法相当于@Before
                String methodName = description.getMethodName(); // 获取测试方法的名字
                System.out.println(methodName + "测试开始!");

                base.evaluate();  // 运行的测试方法

                // evaluate后执行方法相当于@After
                System.out.println(methodName + "测试结束!");
            }
        };
    }

}
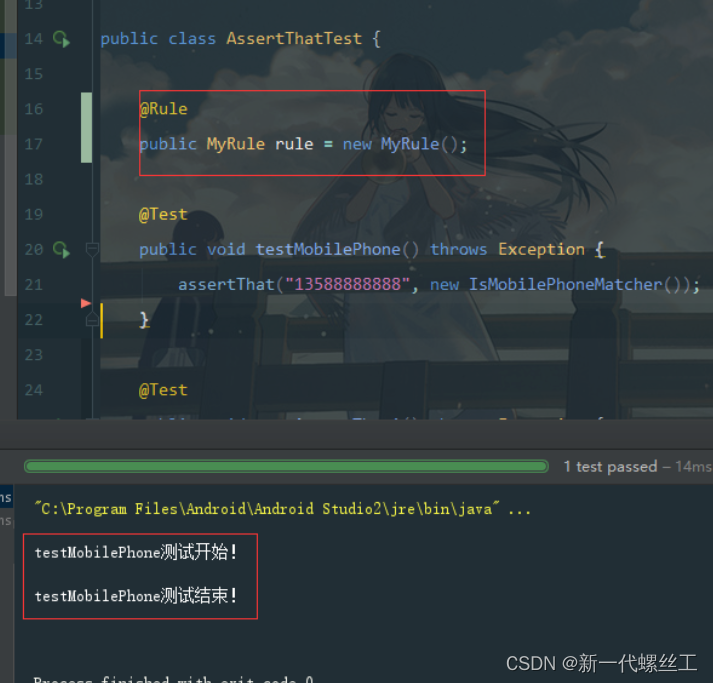
我们使用一下我们自定义的MyRule,效果如图:
JUnit - 框架扩展
Cactus
Cactus 是一个简单框架用来测试服务器端的 Java 代码(Servlets, EJBs, Tag Libs, Filters)。Cactus 的设计意图是用来减小为服务器端代码写测试样例的成本。它使用 JUnit 并且在此基础上进行扩展。Cactus 实现了 in-container 的策略,意味着可以在容器内部执行测试。
JWebUnit
JWebUnit is a Java-based testing framework for web applications. It wraps existing frameworks such as HtmlUnit and Selenium with a unified, simple test interface to allow you to quickly test the correctness of web applications.
JWebUnit provides a high-level Java API for working with web applications that incorporates a series of assertions that verify program correctness. This includes passing links, form filling and submission, validation of form content and other typical business features of web applications.
XMLUnit
XMLUnit provides a single JUnit extension class, XMLTestCase, and some supporting classes that allow assertions:
- Compare two XML files for differences (by using the Diff and DetailedDiff classes)
- Validation of an XML file (by using the Validator class)
- The result of transforming an XML file using XSLT (by using the Transform class)
- Evaluation of XPath expressions for an XML document (by implementing the XPathEngine interface)
- A standalone node after DOM traversal of an XML file (by using the NodeTest class)
MockObject
In a unit test, dummy objects can mimic the behavior of complex, real (non-dummy) objects, so are useful when a real object is impractical or impossible to include in a unit test.