1. Custom layout
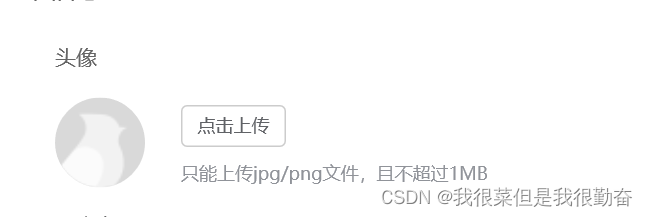
Check the avatar upload function of element ui, and find that the avatar can only be uploaded by clicking on the position of the avatar, so can we click the button outside the avatar to upload the avatar?
element ui effect diagram : target effect :


Before implementing, you need to understand the meaning of the code in element ui:
//el-upload是用来控制图片上传,里面有相关属性。
<el-upload
  class="avatar-uploader"
  action="https://jsonplaceholder.typicode.com/posts/"
  :show-file-list="false"
  :on-success="handleAvatarSuccess"
  :before-upload="beforeAvatarUpload">
  //img的是存放上传图片位置的地方
  <img v-if="imageUrl" :src="imageUrl" class="avatar">
  <i v-else class="el-icon-plus avatar-uploader-icon"></i>
</el-upload>
When we understand the meaning of each tag, we can adjust the position of the img tag to achieve our goal.
The following picture shows the code of the target rendering: html+css layout
<div class="touxiang">
//把存放头像单独拿出来,放到一个div中,通过css布局来调整位置
  <div class="pic">
    <img v-if="imageUrl" :src="imageUrl?''+imageUrl:'@/assets/avatar.gif'" class="avatar" />
    <i v-else class="el-icon-plus avatar-uploader-icon"></i>
  </div>
  <el-upload
    class="avatar-uploader"
    list-type="picture"
    ref="upload"
    accept=".jpg, .png"
    :limit="1"
    :auto-upload="false"
    :show-file-list="false"
    :file-list="fileList"
    :on-change="getFile">

    //点击上传的按钮一定要在el-upload内部才可以实现
     <el-button size="small" type="primary">点击上传</el-button>
     <div slot="tip" class="el-upload__tip">只能上传jpg/png文件,且不超过2MB</div>
  </el-upload>
</div>
.touxiang {
margin: 30px auto 30px 150px;
display: flex;
.avatar-uploader {
::v-deep .el-upload {
margin-top: 5px;
height: 45px;
display: flex;
flex-direction: column;
align-content: space-between;
}
::v-deep .el-button {
width: 90px;
height: 35px;
font-size: 15px;
}
}
.pic {
margin-right: 20px;
border-radius: 50%;
border: 1px dashed gray;
.avatar-uploader-icon {
font-size: 28px;
color: #8c939d;
width: 80px;
height: 80px;
line-height: 80px;
text-align: center;
}
.avatar {
border-radius: 50%;
width: 80px;
height: 80px;
display: block;
}
}
}2. Convert the file to base64 (see the picture above for the html code)
2.1 First define the variables that need to be used
data() {
    return {
      // 上传头像地址
      imageUrl: '',
      //接收上传的文件
      fileList:[],
    };
  },
2.2 Use on-change to monitor the status of the incoming file. When the uploaded file size (beforeAvatarUpload function) and format (accept attribute in the html code) meet our target requirements, the file can be converted and then passed to rear end.
// 头像上传
    getFile(file, fileList) {
      if(this.beforeAvatarUpload(file)){
        this.getBase64(file.raw).then(res => {
          this.imageUrl = res;
          //ruleForm是我接收后端传过来的数据,此处可以忽略
          this.ruleForm.imagePath=res
        })
      }
    },

//这里是文件转base64
    getBase64(file) {
      return new Promise(function (resolve, reject) {
        const reader = new FileReader()
        let imgResult = ''
        reader.readAsDataURL(file)
        reader.onload = function () {
          imgResult = reader.result
        }
        reader.onerror = function (error) {
          reject(error)
        }
        reader.onloadend = function () {
          resolve(imgResult)
        }
      })
    },
    beforeAvatarUpload(file) {
      const isLt2M = file.size / 1024 / 1024 < 2;
      if (!isLt2M) {
        this.$message.error('上传头像图片大小不能超过 2MB!');
      }
      return isLt2M;
    },
This is the end of the article, I hope it can be helpful to you!