Table of contents
1. Deployments - Controller Application
2. Deployment upgrade rollback and elastic contraction
2.1. Create a pod of version 1.14
2.4. Check the historical version
3. StatefulSet - stateful application
1. Deployments - Controller Application
Deployment represents an update operation of the user on the K8S cluster. The Deployment controller can deploy stateless applications, manage Pods and ReplicaSets, deploy, and roll upgrades.
Below is an example Deployment.
Among them, a ReplicaSet is created, which is responsible for starting three nginx Pods:
vim simple-deployment.yam
apiVersion: apps/v1
kind: Deployment
metadata:
  name: nginx-deployment	 # 后续创建 ReplicaSet 和 Pod 的命名基础
  labels:
    app: nginx
spec:
  replicas: 3		# pod的副本数量
  selector:
    matchLabels:
      app: nginx  # 定义所创建的 ReplicaSet 如何查找要管理的 Pod
  template:
    metadata:
      labels:
        app: nginx		# pod模板标签
    spec:
      containers:
      - name: nginx
        image: nginx:1.14.2
        ports:
        - containerPort: 80
Create a Deployment:
$ kubectl create -f simple-deployment.yaml
deployment.apps/nginx-deployment created

# 查看deployment是否创建
$ kubectl get deployments
NAME               READY   UP-TO-DATE   AVAILABLE   AGE
nginx-deployment   3/3     3            3           13s
Notice that the Deployment has created all three replicas, and all replicas are up to date (they contain the latest pod templates) and available. Field description:
- NAME lists the name of the Deployment in the namespace.
- READY shows the number of available "copies" of the application. The displayed pattern is "Ready Count/Expected Count".
- UP-TO-DATE shows how many replicas have been updated to reach the desired state.
- AVAILABLE shows how many copies of the application are available to the user.
- AGE shows how long the application has been running.
We can view deployment-related events through kubectl describe [deployment-name] :
$ kubectl describe deploy nginx-deployment
Name:                   nginx-deployment
Namespace:              default
CreationTimestamp:      Mon, 06 Feb 2023 06:58:59 +0000
Labels:                 app=nginx
Annotations:            deployment.kubernetes.io/revision: 1
Selector:               app=nginx
Replicas:               3 desired | 3 updated | 3 total | 3 available | 0 unavailable
StrategyType:           RollingUpdate
MinReadySeconds:        0
RollingUpdateStrategy:  25% max unavailable, 25% max surge
Pod Template:
  Labels:  app=nginx
  Containers:
   nginx:
    Image:        nginx:1.14.2
    Port:         80/TCP
    Host Port:    0/TCP
    Environment:  <none>
    Mounts:       <none>
  Volumes:        <none>
Conditions:
  Type           Status  Reason
  ----           ------  ------
  Available      True    MinimumReplicasAvailable
  Progressing    True    NewReplicaSetAvailable
OldReplicaSets:  <none>
NewReplicaSet:   nginx-deployment-85996f8dbd (3/3 replicas created)
Events:
  Type    Reason             Age   From                   Message
  ----    ------             ----  ----                   -------
  Normal  ScalingReplicaSet  101s  deployment-controller  Scaled up replica set nginx-deployment-85996f8dbd to 3
We can see that the Scaled up replica set nginx-deployment-85996f8dbd to 3 at the bottom is actually a Pod running three copies. In k8s, the deployment is realized through the ReplicaSet (replica set). When we create a deployment , will automatically create a ReplicaSet to manage the number of copies of the pod.
View the ReplicaSet (rs) created by the Deployment:
$ kubectl get rs
NAME                          DESIRED   CURRENT   READY   AGE
nginx-deployment-85996f8dbd   3         3         3       3m13s
The following fields are included in the ReplicaSet output:
- NAME lists the name of the ReplicaSet in the namespace;
- DESIRED shows the expected number of copies of the application, which is the value defined when creating the Deployment. This is the desired state;
- CURRENT displays the number of replicas in the current running state;
- READY shows how many copies of the application are available to serve the user;
- AGE shows how long the application has been running.
Note that the name of a ReplicaSet is always of the form [Deployment name]-[hash]. This name will be the basis for naming the Pods that are created. The hash string in it is consistent with the pod-template-hash label on the ReplicaSet.
View ReplicaSet related events:
$ kubectl describe rs nginx-deployment-85996f8dbd
Name:           nginx-deployment-85996f8dbd
Namespace:      default
Selector:       app=nginx,pod-template-hash=85996f8dbd
Labels:         app=nginx
                pod-template-hash=85996f8dbd
Annotations:    deployment.kubernetes.io/desired-replicas: 3
                deployment.kubernetes.io/max-replicas: 4
                deployment.kubernetes.io/revision: 1
Controlled By:  Deployment/nginx-deployment
Replicas:       3 current / 3 desired
Pods Status:    3 Running / 0 Waiting / 0 Succeeded / 0 Failed
Pod Template:
  Labels:  app=nginx
           pod-template-hash=85996f8dbd
  Containers:
   nginx:
    Image:        nginx:1.14.2
    Port:         80/TCP
    Host Port:    0/TCP
    Environment:  <none>
    Mounts:       <none>
  Volumes:        <none>
Events:
  Type    Reason            Age    From                   Message
  ----    ------            ----   ----                   -------
  Normal  SuccessfulCreate  3m24s  replicaset-controller  Created pod: nginx-deployment-85996f8dbd-q9plt
  Normal  SuccessfulCreate  3m24s  replicaset-controller  Created pod: nginx-deployment-85996f8dbd-knwkv
  Normal  SuccessfulCreate  3m24s  replicaset-controller  Created pod: nginx-deployment-85996f8dbd-vcs8d
As you can see, the replicaset-controller is responsible for creating three nginx Pods.
2. Deployment upgrade rollback and elastic contraction
- Upgrade: Assuming that the version is upgraded from 1.14 to 1.15, this is called an application upgrade [upgrade can ensure uninterrupted service];
- Rollback: From version 1.15 to 1.14, this is called application rollback;
- Elastic scaling: We change the number of Pods to provide external services according to different business scenarios, which is elastic scaling;
2.1. Create a pod of version 1.14
apiVersion: apps/v1
kind: Deployment
metadata:
  creationTimestamp: null
  labels:
    app: web
  name: web
spec:
  replicas: 1
  selector:
    matchLabels:
      app: web
  strategy: {}
  template:
    metadata:
      creationTimestamp: null
      labels:
        app: web
    spec:
      containers:
      # 修改 nginx 版本 1.14
      - image: nginx:1.14
        name: nginx
        resources: {}
status: {}
Create pods:
$ kubectl apply -f nginx.yaml
As shown in the figure above, you can see that the image version of the currently running nginx container is 1.14.
2.2. Application upgrade
$ kubectl set image deployment web nginx=nginx:1.15Upgrade process:
$ kubectl set image deployment web nginx=nginx:1.15
deployment.apps/web image updated

# 首先是开始的 nginx 1.14 版本的 Pod 在运行,然后 1.15 版本的在创建
$ kubectl get pod
NAME                   READY   STATUS              RESTARTS   AGE
web-66bf4959f5-qhzsd   1/1     Running             0          52s
web-bbcf684cb-bbmqv    0/1     ContainerCreating   0          3s

# 然后在 1.15 版本创建完成后,就会暂停 1.14 版本
$ kubectl get pod
NAME                   READY   STATUS        RESTARTS   AGE
web-66bf4959f5-qhzsd   1/1     Terminating   0          67s
web-bbcf684cb-bbmqv    1/1     Running       0          18s

# 最后把 1.14 版本的 Pod 移除,完成我们的升级
$ kubectl get pod
NAME                  READY   STATUS    RESTARTS   AGE
web-bbcf684cb-bbmqv   1/1     Running   0          33s
We are downloading version 1.15, and the container is in the ContainerCreating state. After the download is complete, version 1.14 is replaced with version 1.15. The advantage of this is that the upgrade can ensure that the service is not interrupted.
2.3. Check the upgrade status
$ kubectl rollout status deployment web
deployment "web" successfully rolled out
2.4. Check the historical version
$ kubectl rollout history deployment web
deployment.apps/web
REVISION  CHANGE-CAUSE
1         <none>
2         <none>
2.5. Application Rollback
# 回滚到上一版本
$ kubectl rollout undo deployment web

# 回滚到指定版本
$ kubectl rollout undo deployment web --to-revision=2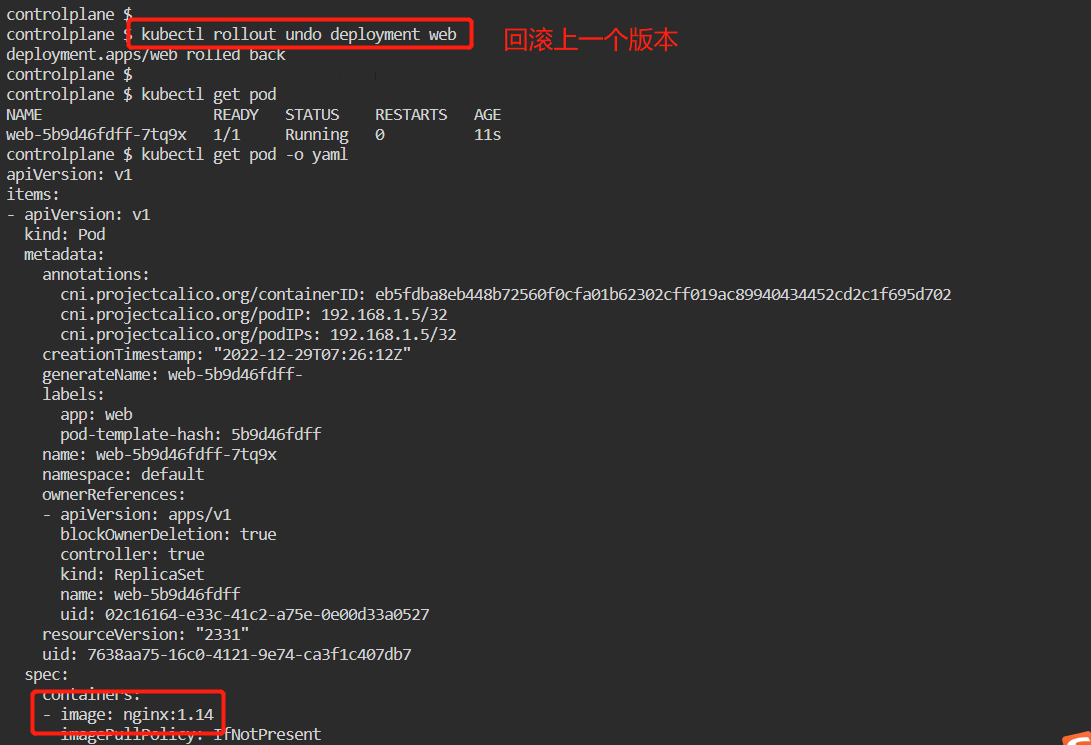
As shown in the figure above, you can see that the image version has changed to 1.14 after successfully rolling back to the previous version through kubectl rollout undo. Of course, you can also specify --to-revision to roll back to the specified version.
2.6. Elastic expansion
# 创建5个pod副本
$ kubectl scale deployment web --replicas=5
deployment.apps/web scaled

# 输出结果,等一会就会全部 Running
$ kubectl get pod
NAME                   READY   STATUS    RESTARTS   AGE
web-5b9d46fdff-2v2rt   1/1     Running   0          24s
web-5b9d46fdff-4lz7w   1/1     Running   0          24s
web-5b9d46fdff-7tq9x   1/1     Running   0          3m42s
web-5b9d46fdff-mfqhb   1/1     Running   0          24s
web-5b9d46fdff-sfx6q   1/1     Running   0          24s
3. StatefulSet - stateful application
Deployment controller design principle: All managed Pods are exactly the same, providing the same service, regardless of which Node is running, and can expand and shrink at will. Such applications are called "stateless", such as Web services.
In actual scenarios, not all applications can be satisfied, especially distributed applications. Multiple instances will be deployed, and there are often dependencies between these instances, such as master-slave relationship and master-slave relationship. This kind of application is called "stateful ", such as MySQL master-slave, Etcd cluster.
At this time, stateful deployment is required. Stateful deployment has the following characteristics:
- 1. Each pod has a different role (not equal)
- 2. There is a connection relationship between pods
- 3. Each pod has independent storage
The StatefulSet controller is used to deploy stateful applications to meet the requirements of some stateful applications:
• Pods are deployed, expanded, deleted and stopped in an orderly manner;
• Pod assigns a stable and unique network identifier;
• Pod allocates an exclusive storage;
Stable Pod network identification: Use Headless Service (compared to ordinary Service, which only defines spec.clusterIP as None).
To maintain the Pod network identity, each Pod is assigned a number and deployed in sequence.
Stability is mainly reflected in the host name and Pod A records:
• Hostname: <statefulset name>-<number>
• Pod DNS A record: <statefulset name-number>.<service-name> .<namespace>.svc.cluster.local
An example of a StatefulSet stateful application is used to illustrate:
Prepare the sta.yaml file:
apiVersion: v1
kind: Service
metadata:
  name: nginx
  namespace: default
  labels:
     app: nginx
spec:
  clusterIP: None
  ports:
  - port: 80
    name: nginx
    protocol: TCP
    targetPort: 80
  selector:
    app: nginx
  type: ClusterIP

---

apiVersion: apps/v1
kind: StatefulSet
metadata:
  name: nginx-statefulset
  namespace: default
spec:
  serviceName: nginx
  selector:
    matchLabels:
      app: nginx
  replicas: 3
  template:
    metadata:
      labels:
        app: nginx
    spec:
      containers:
      - name: nginx
        image: nginx
Create and view pods:
$ kubectl apply -f sta.yaml
service/nginx created
statefulset.apps/nginx-statefulset created

$ kubectl get pods
NAME                  READY   STATUS    RESTARTS   AGE
nginx-statefulset-0   1/1     Running   0          62s
nginx-statefulset-1   1/1     Running   0          43s
nginx-statefulset-2   1/1     Running   0          39s
As you can see, each pod has a unique name.
[root@localhost ~]# kubectl get svc
NAME         TYPE        CLUSTER-IP   EXTERNAL-IP   PORT(S)   AGE
kubernetes   ClusterIP   10.96.0.1    <none>        443/TCP   13m
nginx        ClusterIP   None         <none>        80/TCP    110s
It can be seen that CULSTER-IP is None, indicating that this is a headless service.
4. DaemonSet - daemon process
DaemonSet ensures that a copy of the Pod is running on all nodes. When nodes join the cluster, a Pod will be added for them. These Pods are also recycled when a node is removed from the cluster. Deleting a DaemonSet will delete all Pods it created.
Some typical uses of DaemonSet:
- Run cluster daemons on each node
- Run a log collection daemon on each node
- Run a monitoring daemon on each node
A simple usage is to start a DaemonSet on all nodes for each type of daemon. A slightly more complex usage is to deploy multiple DaemonSets for the same kind of daemon; each with different flags and different memory, CPU requirements for different hardware types.
DaemonSet example:
vim daemonset.yaml
apiVersion: apps/v1
kind: DaemonSet
metadata:
  name: nginx
spec:
  selector:
    matchLabels:
      app: nginx
  template:
    metadata:
      labels:
        app: nginx
    spec:
      containers:
        - name: nginx
          image: nginx
Create and view pods:
# 当前集群中存在两个节点
$ kubectl get nodes
NAME           STATUS   ROLES           AGE     VERSION
controlplane   Ready    control-plane   2d17h   v1.26.0
node01         Ready    <none>          2d16h   v1.26.0

$ kubectl apply -f daemonset.yaml
daemonset.apps/nginx created

# nginx pod在两个节点都处于运行状态
$ kubectl get pod -o wide
NAME          READY   STATUS    RESTARTS   AGE   IP            NODE           NOMINATED NODE   READINESS GATES
nginx-frmjc   1/1     Running   0          6s    192.168.1.4   node01         <none>           <none>
nginx-qdb7s   1/1     Running   0          6s    192.168.0.8   controlplane   <none>           <none>
5. Job - single task
A Job creates one or more Pods and will continue to retry the execution of Pods until the specified number of Pods terminate successfully. As Pods complete successfully, the Job keeps track of how many Pods completed successfully. When the number reaches the specified success threshold, the task (i.e. Job) ends. Deleting a Job will clear all created Pods. The operation of suspending the Job will delete all active Pods of the Job until the Job is resumed again.
Sample Job: Below is a sample Job configuration. It is responsible for calculating π to 2000 decimal places and printing the result. This calculation takes approximately 10 seconds to complete.
vim job.yaml
apiVersion: batch/v1
kind: Job
metadata:
  name: pi-job
spec:
  template:
    spec:
      containers:
      - name: pi
        image: perl:5.34.0
        command: ["perl",  "-Mbignum=bpi", "-wle", "print bpi(2000)"]
      restartPolicy: Never
  backoffLimit: 4
Create and view jobs:
$ kubectl apply -f job.yaml
job.batch/pi-job created

$ kubectl get job
NAME     COMPLETIONS   DURATION   AGE
pi-job   1/1           30s        82s

$ kubectl describe job pi-job
Name:             pi-job
Namespace:        default
Selector:         controller-uid=63b08866-0f04-4326-98ac-08118ec419d7
Labels:           controller-uid=63b08866-0f04-4326-98ac-08118ec419d7
                  job-name=pi-job
Annotations:      batch.kubernetes.io/job-tracking:
Parallelism:      1
Completions:      1
Completion Mode:  NonIndexed
Start Time:       Sun, 29 Jan 2023 07:48:01 +0000
Completed At:     Sun, 29 Jan 2023 07:48:31 +0000
Duration:         30s
Pods Statuses:    0 Active (0 Ready) / 1 Succeeded / 0 Failed
Pod Template:
  Labels:  controller-uid=63b08866-0f04-4326-98ac-08118ec419d7
           job-name=pi-job
  Containers:
   pi:
    Image:      perl:5.34.0
    Port:       <none>
    Host Port:  <none>
    Command:
      perl
      -Mbignum=bpi
      -wle
      print bpi(2000)
    Environment:  <none>
    Mounts:       <none>
  Volumes:        <none>
Events:
  Type    Reason            Age   From            Message
  ----    ------            ----  ----            -------
  Normal  SuccessfulCreate  84s   job-controller  Created pod: pi-job-q7h7c
  Normal  Completed         54s   job-controller  Job completed
To view the completed Pod corresponding to the Job, you can execute kubectl get pod:
$ kubectl get pod
NAME           READY   STATUS      RESTARTS   AGE
pi-job-q7h7c   0/1     Completed   0          117s

# 查看Pod的标准输出
$ kubectl logs pi-job-q7h7c
3.1415926535897932384626433832795028841971693993751058209749445923078164062862089986280348253421170679821480865132823066470938446095505822317253594081284811174502841027019385211055596446229489549303819644288109756659334461284756482337867831652712019091456485669234603486104543266482133936072602491412737245870066063155881748815209209628292540917153643678925903600113305305488204665213841469519415116094330572703657595919530921861173819326117931051185480744623799627495673518857527248912279381830119491298336733624406566430860213949463952247371907021798609437027705392171762931767523846748184676694051320005681271452635608277857713427577896091736371787214684409012249534301465495853710507922796892589235420199561121290219608640344181598136297747713099605187072113499999983729780499510597317328160963185950244594553469083026425223082533446850352619311881710100031378387528865875332083814206171776691473035982534904287554687311595628638823537875937519577818577805321712268066130019278766111959092164201989380952572010654858632788659361533818279682303019520353018529689957736225994138912497217752834791315155748572424541506959508295331168617278558890750983817546374649393192550604009277016711390098488240128583616035637076601047101819429555961989467678374494482553797747268471040475346462080466842590694912933136770289891521047521620569660240580381501935112533824300355876402474964732639141992726042699227967823547816360093417216412199245863150302861829745557067498385054945885869269956909272107975093029553211653449872027559602364806654991198818347977535663698074265425278625518184175746728909777727938000816470600161452491921732172147723501414419735685481613611573525521334757418494684385233239073941433345477624168625189835694855620992192221842725502542568876717904946016534668049886272327917860857843838279679766814541009538837863609506800642251252051173929848960841284886269456042419652850222106611863067442786220391949450471237137869609563643719172874677646575739624138908658326459958133904780275901
6. Cronjob - Timing task
CronJob creates a Job based on a time-lapse recurring schedule.
CronJobs are used to perform scheduled operations such as backups, report generation, etc. A CronJob object is like a line in the crontab (cron table) file on Unix systems. It is written in Cron format and periodically executes the Job at a given scheduled time.
CronJob example: The CronJob example manifest below prints out the current time and a greeting message every minute
vim cronjob.yaml
apiVersion: batch/v1
kind: CronJob
metadata:
  name: hello-cronjob
spec:
  schedule: "* * * * *"
  jobTemplate:
    spec:
      template:
        spec:
          containers:
          - name: busybox
            image: busybox:1.28
            imagePullPolicy: IfNotPresent
            command:
            - /bin/sh
            - -c
            - date; echo Hello from the Kubernetes cluster
          restartPolicy: OnFailure
Create and view cronjobs:
$ kubectl create -f cronjob.yaml
cronjob.batch/hello-cronjob created

$ kubectl get cronjob
NAME            SCHEDULE    SUSPEND   ACTIVE   LAST SCHEDULE   AGE
hello-cronjob   * * * * *   False     0        <none>          6s

$ kubectl describe cronjob hello-cronjob
Name:                          hello-cronjob
Namespace:                     default
Labels:                        <none>
Annotations:                   <none>
Schedule:                      * * * * *
Concurrency Policy:            Allow
Suspend:                       False
Successful Job History Limit:  3
Failed Job History Limit:      1
Starting Deadline Seconds:     <unset>
Selector:                      <unset>
Parallelism:                   <unset>
Completions:                   <unset>
Pod Template:
  Labels:  <none>
  Containers:
   busybox:
    Image:      busybox:1.28
    Port:       <none>
    Host Port:  <none>
    Command:
      /bin/sh
      -c
      date; echo Hello from the Kubernetes cluster
    Environment:     <none>
    Mounts:          <none>
  Volumes:           <none>
Last Schedule Time:  Sun, 29 Jan 2023 07:57:00 +0000
Active Jobs:         hello-cronjob-27916317
Events:
  Type    Reason            Age   From                Message
  ----    ------            ----  ----                -------
  Normal  SuccessfulCreate  1s    cronjob-controller  Created job hello-cronjob-27916317
View the pod generated by cronjob:
$ kubectl get pod
NAME                           READY   STATUS      RESTARTS   AGE
hello-cronjob-27916317-zdc9d   0/1     Completed   0          100s
hello-cronjob-27916318-nx65t   0/1     Completed   0          40s

$ kubectl logs hello-cronjob-27916317-zdc9d
Sun Jan 29 07:57:02 UTC 2023
Hello from the Kubernetes cluster

$ kubectl logs hello-cronjob-27916318-nx65t
Sun Jan 29 07:58:00 UTC 2023
Hello from the Kubernetes cluster
It can be seen that the cronjob will generate a corresponding pod every minute, and then the log will output the current time and the corresponding prompt message.