1. Docker container and image concept
First, clarify the concepts of images and containers. We can use docker to build a mirror, which can be imported and exported for transmission and reuse. Then if you run it, it is called a container. A container is a runtime and includes a runtime context; an image is static and does not include a runtime context.
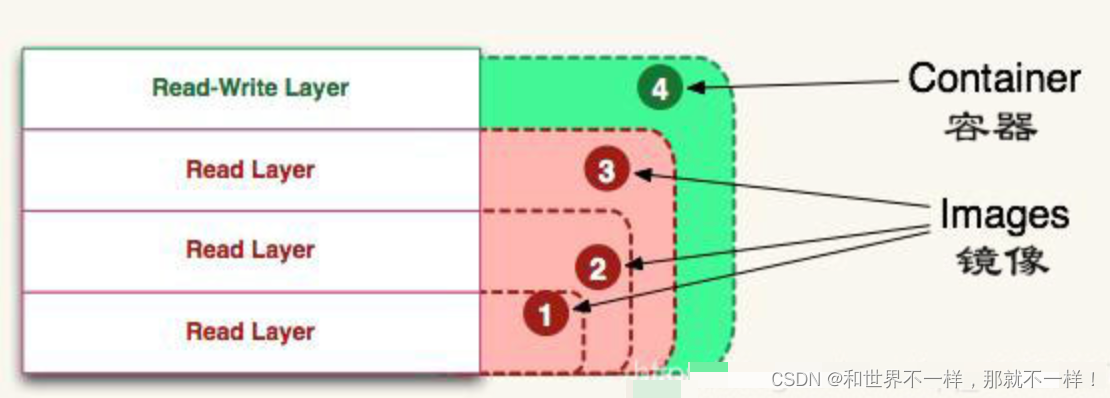
Docker container: container = image + readable layer.
For a detailed introduction, please refer to: Docker container and image
2. Common operating commands of Docker
Image operation:

Container operation:
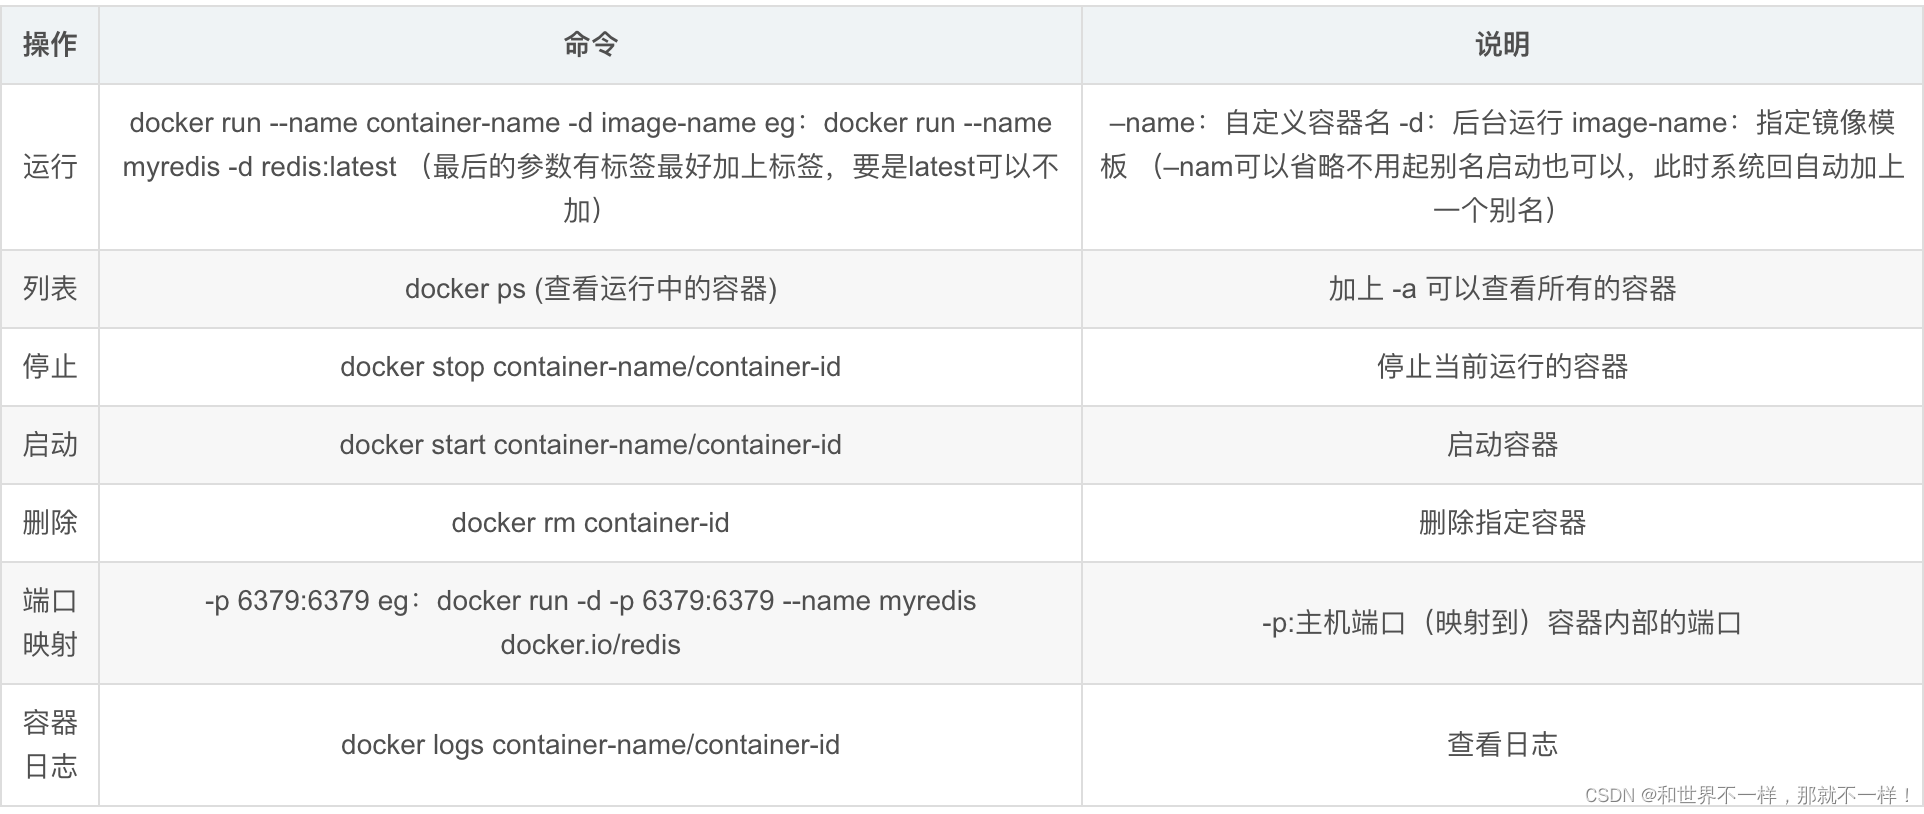
For more commands, please refer to: Docker Docs
3. Actual use
1> Basic operation of Docker
//  制作前端容器
//  Dockerfile 指定 Dockerfile 的名称,也可以是别的名称
//  image-name 指定镜像名,image-tag 指定镜像 tag
//  . 表示上下文为当前目录为上下文制作容器
docker build -f <Dockerfile> -t <image-name>:<image-tag> .

//  查看镜像
//  docker images 会输出所有存在的镜像
docker images

//  run前端容器
//  -d 表示以后台模式运行
//  --name 指定容器的名称,停止或查看日志时可用的 alias
//  --restart always 表示,只要是容器挂了,或者 docker.io 重启了,容器就会自动 run
//  -p 8000:80 表示端口映射,8000访问主机端口,80表示容器内部端口
//  此时访问本机的 8000端口即可访问容器内80端口web应用提供的界面。
//  也可以不使用 -p 命令,改为使用 --network host,表示直接使用宿主机网络
docker run -d --name <frontend> --restart always -p 8000:80 <image-name>:<image-tag>

// 查看所有容器
//  -a 表示停止的容器也展示,如果不加 -a 则只会显示正在运行的容器
docker ps -a

//  stop前端容器
docker stop frontend

// restart前端容器
//  当 nginx 的配置文件被修改时,需要 restart 容器使其生效
//  原理相当于 docker exec -it frontend; nginx -s reload
docker restart frontend

//  以交互方式进入容器
//  --it 表示交互式
//  进入文件后可查看容器内部文件情况
docker exec -it frontend bash

//  拷贝容器内部文件
//  表示把当前目录的 default.conf 拷贝到容器内部的 /etc/nginx/conf.d/default.conf 路径,相当于用当前目录的文件替换掉容器内部的文件
//  也可以反过来写
//  docker cp frontend:/etc/nginx/conf.d/default.conf default.conf
//  表示把容器内部 /ect/nginx/conf.d/default.conf 文件拷贝到当前路径 default.conf,相当于用容器内部文件替换当前目录的文件
docker cp default.conf frontend:/etc/nginx/conf.d/default.conf
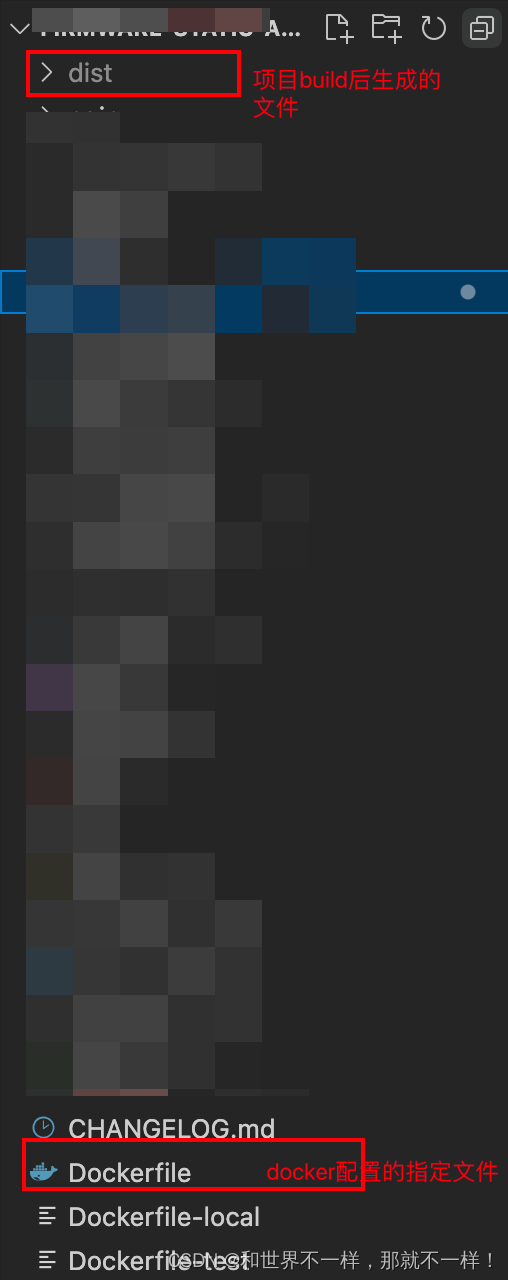
2> DockerFile file
To make a mirror image, you must first have a Dockerfile before you can execute the build operation.
- Example of mirroring based on nginx
// 以 nginx:1.19.3 作为基础镜像构建镜像
FROM nginx:1.19.3

// 拷贝 npm run build 之后的产物文件到对应的 nginx 目录
COPY dist/ /usr/share/nginx/html

// 拷贝配置文件到对应的 nginx 目录
COPY ./nginx/dev/default.conf /etc/nginx/conf.d/default.conf

// 拷贝配置文件
COPY ./nginx/dev/nginx.conf /etc/nginx/nginx.conf

// 指定暴露容器端口 80
EXPOSE 80
3> Make a mirror image
// 准备文件
// 打包好的dist文件,dockerfile,nginx配置文件
// 镜像制作
docker build -f <Dockerfile> -t <project-name>:<project-versions> .
//示例:
// 苹果 M1 芯片需要指定 platform 参数:
docker build --platform linux/amd64 -f Dockerfile-private -t fe-image-yh-local:v3.2.001.20220602 .
// x86 机器不用:
docker build -f Dockerfile-private -t fe-image-yh-local:v3.2.001.20220602 .
// 查看镜像是否创建成功
docker images
4> Run the container
// 为了防止线上项目挂了 建议加上 --restart always
docker run -d --name < project name>  -p 8000:80 <image-name>:<image-tag>
docker ps -a
// 启动容器
docker start <docker id>
4. Use of real projects
Requirements: Build a new mirror (front-end) on a new server
New server: 192.168.5.23 account admin/password 123456
1. Solution A
1) Log in to the 192.168.5.25 server first: ssh @root 192.168.5.25, enter the password, and enter the server
2. Local machine project packaging:
sh build_report.sh  // 报告特殊处理下,一般的项目不需要这个步骤
npm run build:dev  // 项目打包,根据自己项目打包的命令来
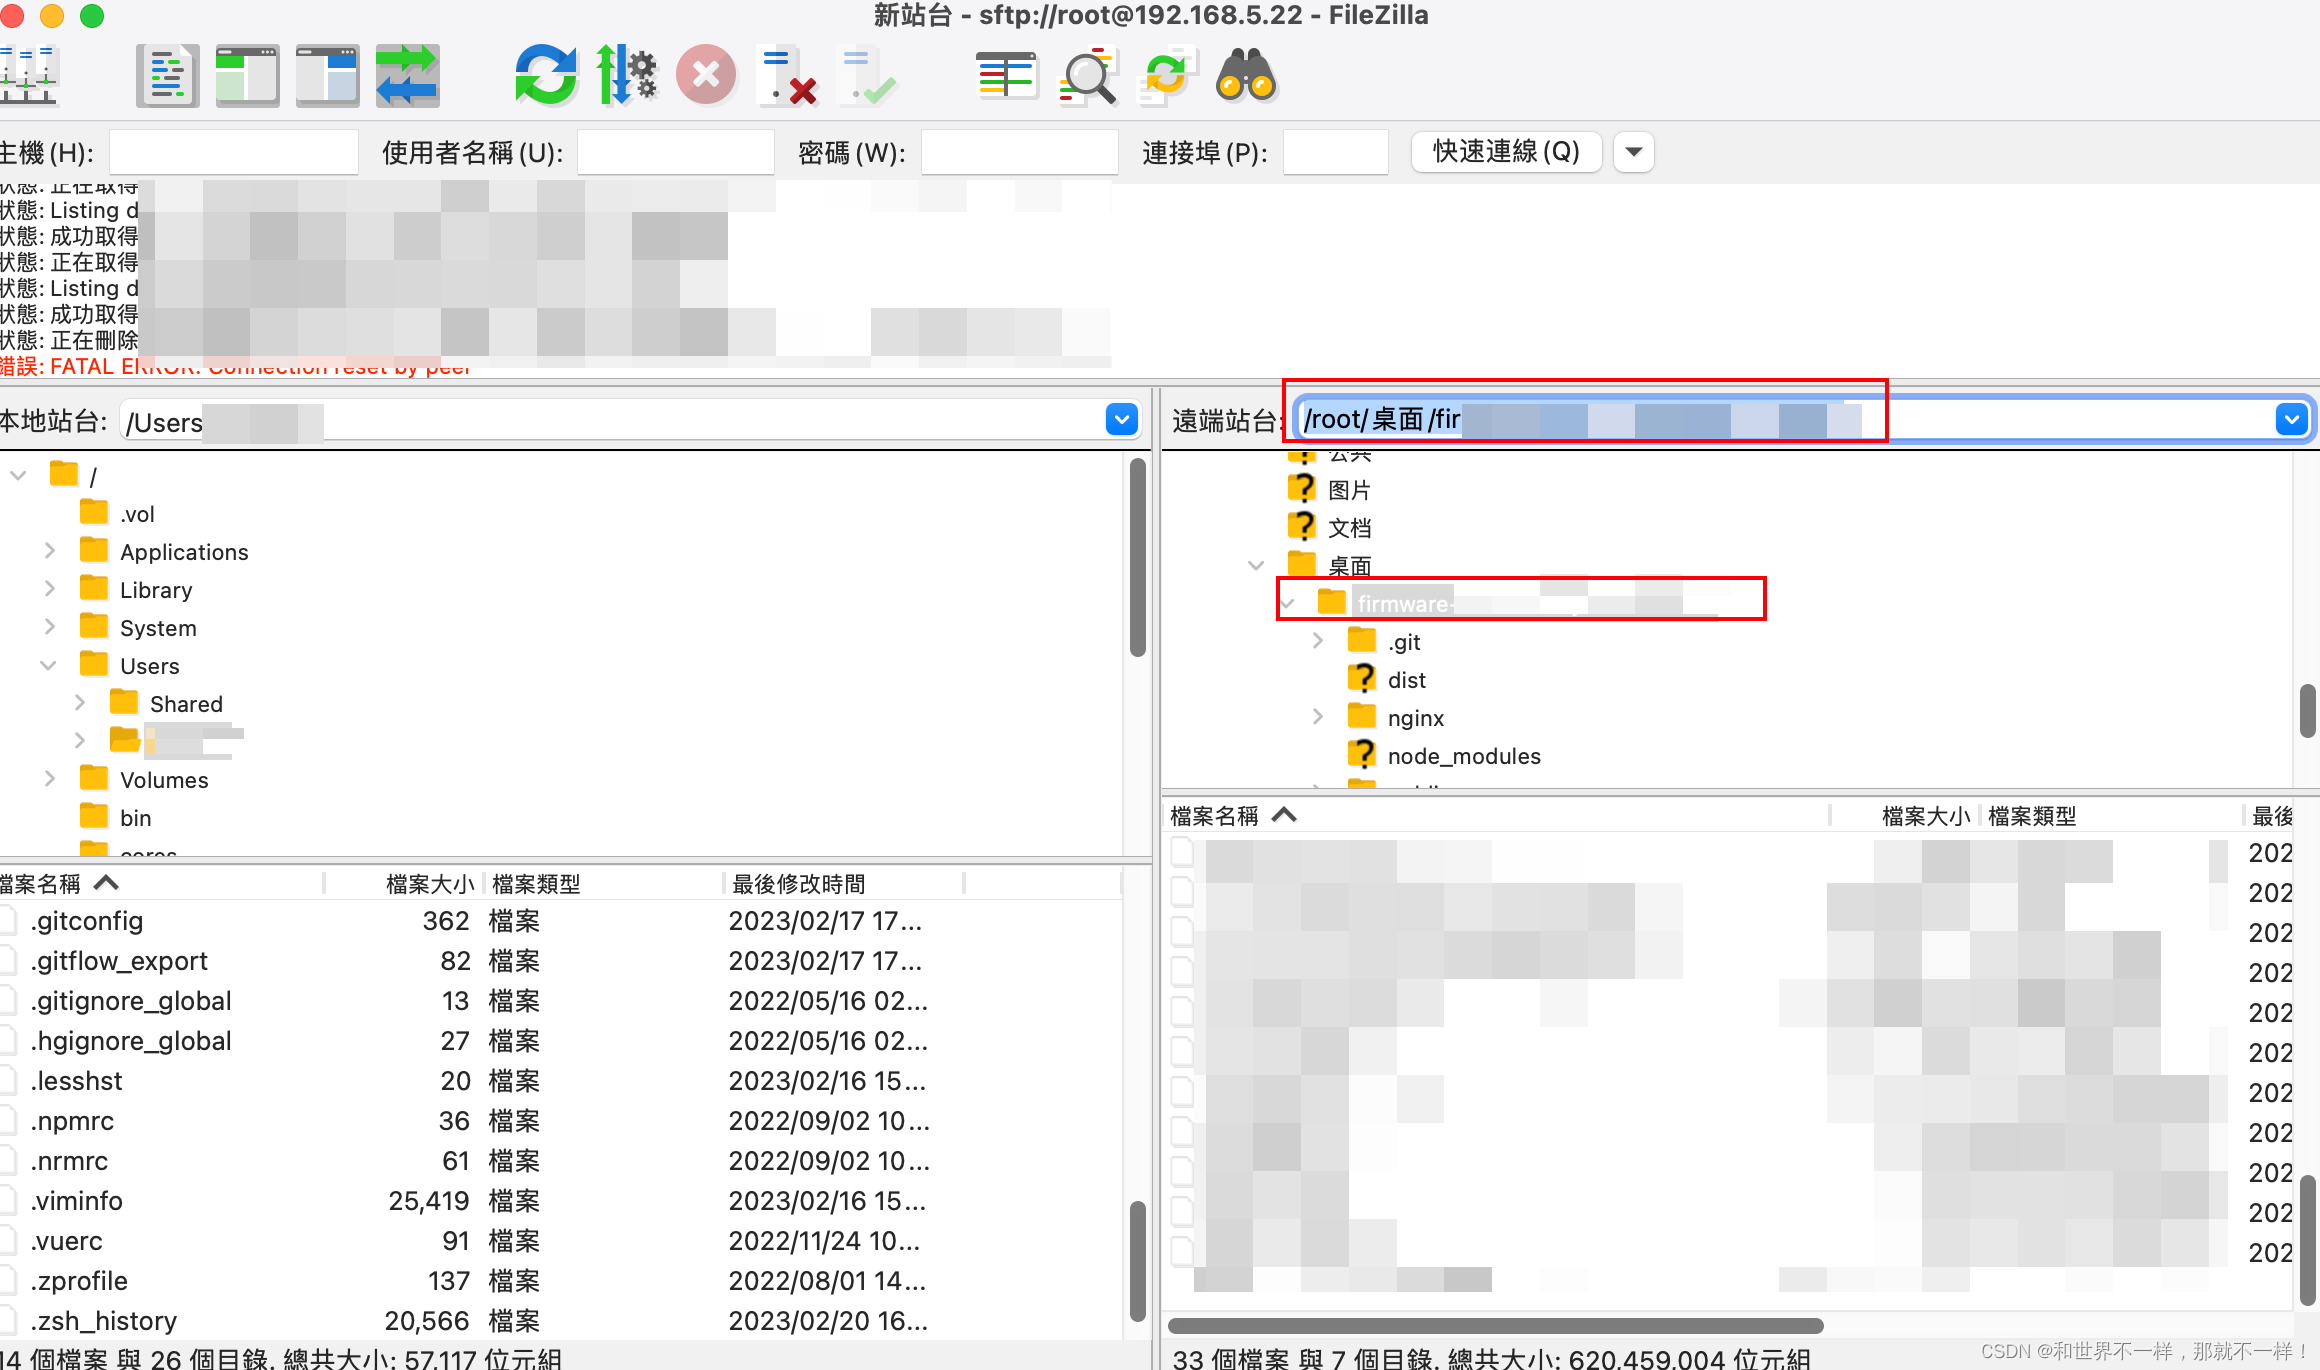
3. FileZilla software is used together, download address: FileZilla client
FZ software: drag in the dist file generated by packaging, and the dockerFile file.
Put it under the specified path, and I put it on the desktop.
FileZilla software page:
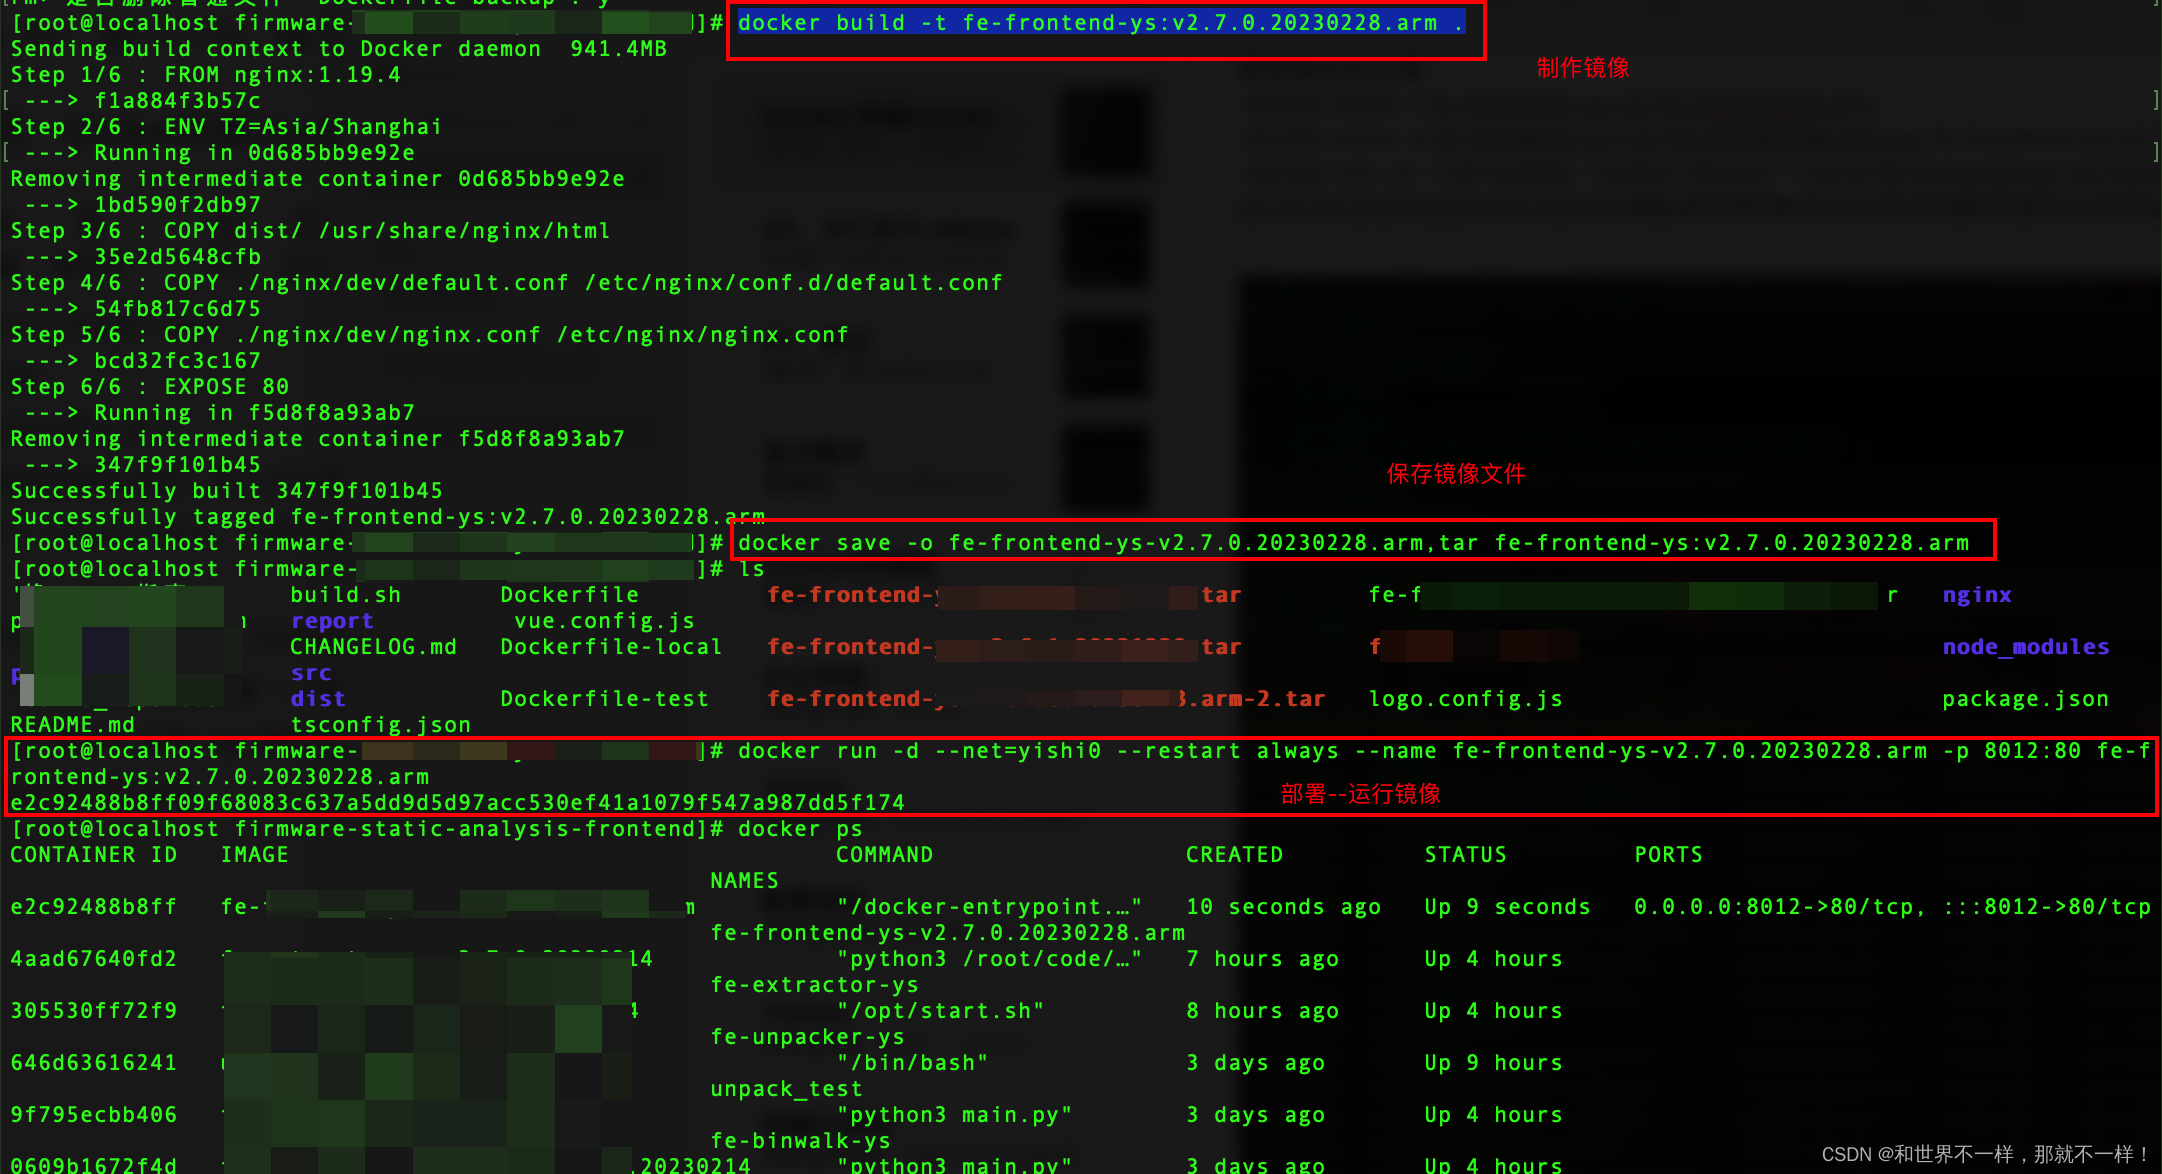
4. Packing:
terminal, cd to the /root/desktop/firmware-xxx path, and perform image construction and save operations
// 构建镜像  docker build -t <镜像名> .
 docker build -t fe-frontend-ys:v2.7.0.20230228.arm .
// 保存  docker save -o <打包名><镜像名>
docker save -o fe-frontend-ys-v2.7.0.20230228.arm.tar fe-frontend-ys:v2.7.0.20230228.arm
5. Deploy the code:
docker load -i fe-frontend-ys-v2.7.0.20230228.arm.tar
docker run -d --network host --restart always --name fe-frontend-ys-v2.7.0.20230228.arm  fe-frontend-ys:v2.7.0.20230228.arm
2. Solution B
Directly drag the entire project code to the server;
1. Open the FZ software, drag the entire project into it (delete node-modules), after dragging it in, the terminal cd to the path: /root/desktop/firmware-xxx, and perform npm i installation node-modules
2. Packing
sh build_report.sh  // 报告特殊处理下,一般的项目不需要这个步骤
npm run build:dev  // 项目打包,根据自己项目打包的命令来
// 构建镜像  docker build -t <镜像名> .
 docker build -t fe-frontend-ys:v2.7.0.20230228.arm .
// 保存  docker save -o <打包名><镜像名>
docker save -o fe-frontend-ys-v2.7.0.20230228.arm.tar fe-frontend-ys:v2.7.0.20230228.arm
3. Deployment
// 运行容器
// docker run -d --name <frontend> --restart always -p 8000:80 <image-name>:<image-tag>
// run前端容器
// -d 表示以后台模式运行
// --name 指定容器的名称,停止或查看日志时可用的 alias
// --restart always 表示,只要是容器挂了,或者 docker.io 重启了,容器就会自动 run
// -p 8000:80 表示端口映射,8000访问主机端口,80表示容器内部端口
docker run -d --net=yishi0 --restart always --name fe-frontend-ys-v2.7.0.20230228.arm -p 8012:80 fe-frontend-ys:v2.7.0.20230228.arm
This article is mainly partial application, combined with the real usage in your own project, to explain; it
is for reference only.
Learning article:
Introduction to Docker command line: These 18 items, you have to know
Docker installation