Table of contents
3.3 List (two-way linked list)
3.4 Set (unordered collection)
1. 9 data types
3.1 Key operation
3.1.1 Related commands
| serial number |
command syntax |
describe |
| 1 |
DEL key |
This command is used to delete the key when the key exists |
| 2 |
DUMP key |
Serialize the given key and return the serialized value |
| 3 |
EXISTS key |
Check if the given key exists, return 1 if it exists, otherwise return 0 |
| 4 |
EXPIRE key seconds |
Set the expiration time for the given key, in seconds |
| 5 |
EXPIREAT key timestamp |
The function of EXPIREAT is similar to that of EXPIRE, both are used to set the expiration time for the key. The difference is that the time parameter accepted by the EXPIREAT command is a UNIX timestamp |
| 6 |
PEXPIRE key milliseconds |
Set the key expiration time in milliseconds |
| 7 |
PEXPIREAT key milliseconds-timestamp |
Set the timestamp of the key expiration time (unix timestamp) in milliseconds |
| 8 |
KEYS pattern |
Find all keys matching the given pattern |
| 9 |
MOVE key db |
Move the key of the current database to the given database db |
| 10 |
PERSIST key |
Remove the expiration time of the key, the key will persist |
| 11 |
PTTL key |
Returns the remaining expiration time for the key in milliseconds |
| 12 |
TTL key |
Returns the remaining time to live (TTL, time to live) of the given key in seconds |
| 13 |
RANDOMKEY |
Randomly returns a key from the current database |
| 14 |
RENAME key newkey |
Modify the name of the key |
| 15 |
RENAMENX key newkey |
Rename key to newkey only if newkey does not exist |
| 16 |
SCAN cursor [MATCH pattern] [COUNT count] |
Iterate over the database keys in the database |
| 17 |
TYPE key |
Returns the type of the value stored by the key |
| 18 |
SELECT db |
Select the database database as 0-15 (a total of 16 databases by default) |
| 19 |
DBSIZE |
View the number of keys in the database |
| 20 |
FLUSHDB |
Clear the current database |
| 21 |
FLUSHALL |
clear all databases |
| 22 |
ECHO |
print command |
Description: KEYS * matches all keys in the database KEYS h?llo matches hello, hallo, hxllo etc. KEYS h*llo matches hllo and heeello etc. KEYS h[ae]llo matches hello and hallo
practise:
First create some data:
127.0.0.1:6379> set key1 k1
127.0.0.1:6379> set key2 k3
127.0.0.1:6379> set key3 k2
127.0.0.1:6379> set key4 k4
127.0.0.1:6379> set key5 k5
Example:
127.0.0.1:6379> del key1 如果key1存在则删除key1
(integer) 1
127.0.0.1:6379> get key1 获取key1的balue
(nil)
127.0.0.1:6379> dump key2 序列化key2,并且返回系列化的值
"\x00\x02k3\n\x00O\xa3<\xcc \x19;\x04"
127.0.0.1:6379> exists key3 判断key3是否存在
(integer) 1
127.0.0.1:6379> expire key6 3 给key设置过期时间3秒
(integer) 0
127.0.0.1:6379> pexpire key7 3000 给key7设置过期时间3000毫秒
(integer) 0
127.0.0.1:6379> expire key8 3000 给key8设置过期时间,单位是时间戳
(integer) 0
127.0.0.1:6379> keys key5 查看指定的key5
1) "key5"
127.0.0.1:6379> select 1 选择数据库1
OK
127.0.0.1:6379[1]> move key5 2 将key5移动到 数据库2
(integer) 0
127.0.0.1:6379[1]> set key6 k6 新建key6
OK
127.0.0.1:6379[1]> rename key6 key66 给key6重命名key66
OK
127.0.0.1:6379[1]> type key66 查看key66的类型
string
127.0.0.1:6379[1]> dbsize  查看当前数据库的大小
(integer) 1
127.0.0.1:6379[1]> flushdb   删除当前数据库中所有数据
OK
127.0.0.1:6379[1]> flushall  删除所有数据库中的所有数据
OK
3.2 String
String is the most basic type of redis, you can understand it as exactly the same type as Memcached, a key corresponds to a value.
The String type is binary safe, which means that the string of redis can contain any data. Such as jpg images or serialized objects.
The String type is the most basic data type of Redis, and the value of the String type can store up to 512MB.
The String type is generally used for caching, current limiting, counters, distributed locks, and distributed sessions.
3.2.1 Structure diagram

3.2.2 Related commands
| serial number |
command syntax |
describe |
| 1 |
SET key value |
Set the value of the specified key |
| 2 |
GET key |
Get the value of the specified key |
| 3 |
GETRANGE key start end |
Returns the subcharacters of the string value in the key, when end=-1 means all |
| 4 |
SETBIT key offset value |
For the string value stored by key, set or clear the bit at the specified offset |
| 5 |
GETBIT key offset |
For the string value stored by key, get the bit at the specified offset (bit) |
| 6 |
MSET key value [key value ...] |
Set one or more key-value pairs at the same time |
| 7 |
MGET key1 [key2..] |
Get all (one or more) values for a given key |
| 8 |
GETSET key value |
Set the value of the given key to value and return the old value of the key (old value) |
| 9 |
SETEX key seconds value |
Associate the value value with the key, and set the expiration time of the key to seconds (in seconds) |
| 10 |
SETNX key value |
Only set the value of the key if the key does not exist |
| 11 |
SETRANGE key offset value |
Overwrites the string value stored at the given key with the value parameter, starting at offset offset |
| 12 |
STRLEN key |
Returns the length of the string value stored by key |
| 13 |
MSETNX key value [key value ...] |
Simultaneously set one or more key-value pairs if and only if none of the given keys exist |
| 14 |
PSETEX key milliseconds value |
Similar to the SETEX command, but it sets the key's lifetime in milliseconds |
| 15 |
INCR key |
Increment the numeric value stored in key by one |
| 16 |
INCRBY key increment |
Add the value stored by the key to the given increment value (increment) |
| 17 |
INCRBYFLOAT key increment |
Add the value stored by the key to the given floating point increment value (increment) |
| 18 |
DECR key |
Decrease the numeric value stored in the key by one |
| 19 |
DECRBY key decrement |
key 所储存的值减去给定的减量值(decrement) |
| 20 |
APPEND key value |
如果 key 已经存在并且是一个字符串,APPEND 命令将指定的 value 追加到该 key 原来值 value 的末尾 |
练习:
127.0.0.1:6379> set mykey1 "hello" 为键mykey1设置值“hello”
OK
127.0.0.1:6379> set mykey2 2 EX 5 为mykey2设置过期时间5秒
OK
127.0.0.1:6379> set mykey2 2 PX 5000 为mykey2设置过期时间5000毫秒
OK
127.0.0.1:6379> set mykey4 4 EXAT 5 为mykey4设置unix时间,以秒为单位
OK
127.0.0.1:6379> set mykey5 5 EXAT 5000 为mykey5设置unix时间,以毫秒为单位
OK
127.0.0.1:6379> set mykey6 6 NX 为mykey6设置value 当mykey6不存在时创建
OK
127.0.0.1:6379> set mykey7 7 XX 为mykey7设置value 当mykey7存在时创建(这里很明显创建失败)
(nil)
127.0.0.1:6379> set mykey6 8 GET 返回旧键即mykey中的字符串,如果不存在则返回nil,相当于get操作
"6"
127.0.0.1:6379> mset mykey200 200 mykey300 300一次性创建多个键值对
OK
get
127.0.0.1:6379> get mykey1 查找一个存在的键
"hello"
127.0.0.1:6379> get mykey100 查找一个不存在的键
(nil)
127.0.0.1:6379> set mykey10 100 新建一个mykey10键并且赋值
OK
127.0.0.1:6379> getdel mykey10 找到并且删除该mykey10
"100"
127.0.0.1:6379> get mykey10 再查看就查不到了
(nil)
127.0.0.1:6379> getrange mykey1 2 8 指定查看的键为mykey1 起始位置为2 结束到8
"llo wor"
127.0.0.1:6379> mget mykey200 mykey300
1) "200"
2) "300"
Append
127.0.0.1:6379> append mykey1 " world" 为mykey1后面追加“ world”
(integer) 11
127.0.0.1:6379> get mykey1 查看
"hello world"
DESC
127.0.0.1:6379> set mykey8 1
OK
127.0.0.1:6379> decr mykey8
(integer) 0
127.0.0.1:6379> decr mykey8
(integer) -1
注意:
(1)desc 能够自减的对象必须是一个数值型数据
(2)desc只能进行自减一的操作
127.0.0.1:6379> decrby mykey8 10自减并且指定偏移量为10
(integer) -11
INCR
127.0.0.1:6379> incr mykey8
(integer) -10
127.0.0.1:6379> incrby mykey8 20
(integer) 10
127.0.0.1:6379> incrbyfloat mykey8 0.1incrbyfloat 可以使用浮点数自增
"10.1"
127.0.0.1:6379> strlen mykey1 获取指定键中的值的长度
(integer) 11
127.0.0.1:6379> substr mykey1 0 7获取指定键子串 起始0 结束到7
"hello wo"
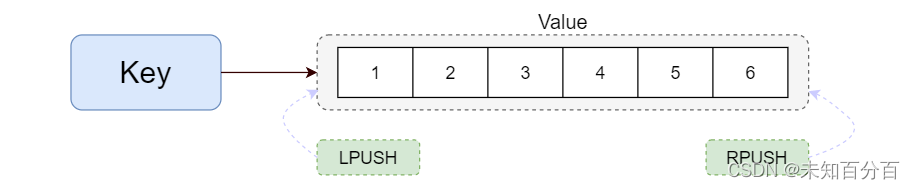
3.3 List(双向的链表)
Redis列表是简单的字符串列表,按照插入顺序排序。你可以添加一个元素到列表的头部(左边)或者尾部(右边)一个列表最多可以包含 2^32^ - 1 个元素 (4294967295, 每个列表超过40亿个元素)。
List类型一般用于关注人、简单队列等。
3.3.1 结构图
3.3.2 相关命令
| 序号 |
命令语法 |
描述 |
| 1 |
LPUSH key value1 [value2] |
将一个或多个值插入到列表头部 |
| 2 |
LPOP key |
移出并获取列表的第一个元素 |
| 3 |
LRANGE key start stop |
获取列表指定范围内的元素 |
| 4 |
LPUSHX key value |
将一个值插入到已存在的列表头部 |
| 5 |
RPUSH key value1 [value2] |
在列表中添加一个或多个值 |
| 6 |
RPOP key |
移除列表的最后一个元素,返回值为移除的元素 |
| 7 |
RPUSHX key value |
为已存在的列表添加值 |
| 8 |
LLEN key |
获取列表长度 |
| 9 |
LINSERT key BEFORE|AFTER pivot value |
在列表的元素前或者后插入元素 |
| 10 |
LINDEX key index |
通过索引获取列表中的元素 |
| 11 |
LSET key index value |
通过索引设置列表元素的值 |
| 12 |
LREM key count value |
移除列表元素 |
| 13 |
LTRIM key start stop |
对一个列表进行修剪,就是让列表只保留指定区间内的元素,不在指定区间之内的元素都将被删除 |
| 14 |
BLPOP key1 [key2 ] timeout |
移出并获取列表的第一个元素,如果列表没有元素会阻塞列表直到等待超时或发现可弹出元素为止 |
| 15 |
BRPOP key1 [key2 ] timeout |
移出并获取列表的最后一个元素,如果列表没有元素会阻塞列表直到等待超时或发现可弹出元素为止 |
| 16 |
BRPOPLPUSH source destination timeout |
从列表中弹出一个值,将弹出的元素插入到另外一个列表中并返回它;如果列表没有元素会阻塞列表直到等待超时或发现可lpu弹出元素为止 |
| 17 |
RPOPLPUSH source destination |
移除列表的最后一个元素,并将该元素添加到另一个列表并返回 |
先创建数据:
127.0.0.1:6379[1]> lpush key1 zhangsan
(integer) 1
127.0.0.1:6379[1]> lpush key2 lisi
(integer) 1
127.0.0.1:6379[1]> lpush key3 wangwu
(integer) 1
127.0.0.1:6379[1]> lpush key4 1 2 3 4 5
(integer) 5
练习:
127.0.0.1:6379[1]> lpop key4  移除并且获得列表的第一个元素
"5"
127.0.0.1:6379[1]> lrange key4 0 -1 获取指定范围的元素
1) "4"
2) "3"
3) "2"
4) "1"
127.0.0.1:6379[1]> rpush key4 3 0 -1 在列表中添加一个值 3
(integer) 7
127.0.0.1:6379[1]> rpush key4 10 20 在列表中添加两个值 10 20
(integer) 9
127.0.0.1:6379[1]> rpop key4 移除列表的最后一个元素,并且返回该值
"20"
127.0.0.1:6379[1]> rpush key 30 40 为列表中添加值
(integer) 2
127.0.0.1:6379[1]> llen key4 获取key4中值的长度
(integer) 8
127.0.0.1:6379[1]> lindex key4 5 获取指定下标的值
"0"
127.0.0.1:6379[1]> lset key4 5 555 为下标为5的设置555
OK
127.0.0.1:6379[1]> lrem key4 5 555 移除下标为5的值
(integer) 1
127.0.0.1:6379[1]> ltrim key4 0 10 只保留0-10的值其他的值全部删除
OK
127.0.0.1:6379[1]> blpop key4  10 移出并获取列表的第一个元素,如果列表没有元素会阻塞列表直到等待超时或发现可弹出元素为止
1) "key4"
2) "4"
127.0.0.1:6379[1]> brpop key4  10移出并获取列表的最后一个元素,如果列表没有元素会阻塞列表直到等待超时或发现可弹出元素为止
1) "key4"
2) "10"
127.0.0.1:6379[1]> rpoplpush key4 key1 移除列表的最后一个元素,并将该元素添加到另一个列表并返回
"-1"
3.4 Set(无序集合)
集合(特点:无序,不重复)
Redis 的 Set 是 String 类型的无序集合。集合中成员是唯一的,这就意味着集合中不能出现重复的数据。Redis 中集合是通过哈希表实现的,所以添加,删除,查找的复杂度都是 O(1)。 集合中最大的成员数为 2^32^ - 1 (4294967295, 每个集合可存储40多亿个成员)。
Set类型一般用于赞、踩、标签、好友关系(互相为好友,直去重一次)等。
3.4.1 结构图

3.4.2 相关命令
| 序号 |
命令语法 |
描述 |
| 1 |
SADD key member1 [member2] |
向集合添加一个或多个成员 |
| 2 |
SMEMBERS key |
返回集合中的所有成员 |
| 3 |
SCARD key |
获取集合的成员数 |
| 4 |
SRANDMEMBER key [count] |
返回集合中一个或多个随机数 |
| 5 |
SISMEMBER key member |
判断 member 元素是否是集合 key 的成员 |
| 6 |
SREM key member1 [member2] |
移除集合中一个或多个成员 |
| 7 |
SDIFF key1 [key2] |
返回给定所有集合的差集 |
| 8 |
SDIFFSTORE destination key1 [key2] |
返回给定所有集合的差集并存储在 destination 中 |
| 9 |
SINTER key1 [key2] |
返回给定所有集合的交集 |
| 10 |
SINTERSTORE destination key1 [key2] |
返回给定所有集合的交集并存储在 destination 中 |
| 11 |
SUNION key1 [key2] |
返回所有给定集合的并集 |
| 12 |
SUNIONSTORE destination key1 [key2] |
所有给定集合的并集存储在 destination 集合中 |
| 13 |
SMOVE source destination member |
将 member 元素从 source 集合移动到 destination 集合 |
| 14 |
SPOP key |
移除并返回集合中的一个随机元素 |
| 15 |
SSCAN key cursor [MATCH pattern] [COUNT count] |
迭代集合中的元素 |
cursor:游标
MATCH pattern:查询 Key 的条件
Count count:返回的条数,默认值为 10
SCAN 是一个基于游标的迭代器,需要基于上一次的游标延续之前的迭代过程。SCAN 以 ==0== 作为游标,开始一次新的迭代,直到命令返回游标 0 完成一次遍历。 此命令并不保证每次执行都返回某个给定数量的元素,甚至会返回 0 个元素,但只要游标不是 0,程序都不会认为 SCAN 命令结束,但是返回的元素数量大概率符合 Count 参数。另外,SCAN 支持模糊查询。
例:SSCAN names 0 MATCH test* COUNT 10 # 每次返回10条以test为前缀的key
练习:
127.0.0.1:6379[1]> sadd myset 1 2 3 4 5 向集合中添加五个元素
(integer) 5
127.0.0.1:6379[1]> smembers myset 返回集合中的所有元素
1) "1"
2) "2"
3) "3"
4) "4"
5) "5"
127.0.0.1:6379[1]> scard myset 获取集合的成员数
(integer) 5
127.0.0.1:6379[1]> srandmember myset 返货集合中的一个或者多个随机数
"2"
127.0.0.1:6379[1]> sismember myset 100 判断100是不是 myset中的元素
(integer) 0
127.0.0.1:6379[1]> srem myset 2 移除 myset中的一个或者多个元素
(integer) 1
127.0.0.1:6379[1]> sadd myset2 1 3 5 7 9 新建一个myset2
(integer) 5
127.0.0.1:6379[1]> sdiff myset myset2 求myset myset2 的差集
1) "4"
127.0.0.1:6379[1]> sinter myset myset2 求myset myset2 的交集
1) "1"
2) "3"
3) "5"
127.0.0.1:6379[1]> sunion myset myset2 求myset myset2 的合集
1) "1"
2) "3"
3) "4"
4) "5"
5) "7"
6) "9"
127.0.0.1:6379[1]> spop myset 移除并且返回集合中的一个随机数
"3"
3.5 Zset(有序集合)
Redis 有序集合和集合一样也是string类型元素的集合且不允许重复的成员。不同的是每个元素都会关联一个==double类型的分数==。redis正是通过分数来为集合中的成员进行从小到大的排序。有序集合的成员是唯一的,但分数(score)却可以重复。
集合是通过哈希表实现的,所以添加,删除,查找的复杂度都是O(1)。 集合中最大的成员数为 2^32^ - 1 (4294967295, 每个集合可存储40多亿个成员)。
Zset类型一般用于排行榜等。
3.5.1 结构图

3.5.2 相关命令
| 序号 |
命令语法 |
描述 |
| 1 |
ZADD key score1 member1 [score2 member2] |
向有序集合添加一个或多个成员,或者更新已存在成员的分数 |
| 2 |
ZCARD key |
获取有序集合的成员数 |
| 3 |
ZCOUNT key min max |
计算在有序集合中指定区间分数的成员数 |
| 4 |
ZINCRBY key increment member |
有序集合中对指定成员的分数加上增量 increment |
| 5 |
ZLEXCOUNT key min max |
在有序集合中计算指定字典区间内成员数量 |
| 6 |
ZRANGE key start stop [WITHSCORES] |
通过索引区间返回有序集合指定区间内的成员 |
| 7 |
ZRANGEBYLEX key min max [LIMIT offset count] |
通过字典区间返回有序集合的成员 |
| 8 |
ZRANGEBYSCORE key min max [WITHSCORES] [LIMIT] |
通过分数返回有序集合指定区间内的成员 |
| 9 |
ZRANK key member |
返回有序集合中指定成员的索引 |
| 10 |
ZREM key member [member ...] |
移除有序集合中的一个或多个成员 |
| 11 |
ZREMRANGEBYLEX key min max |
移除有序集合中给定的字典区间的所有成员 |
| 12 |
ZREMRANGEBYRANK key start stop |
移除有序集合中给定的排名区间的所有成员 |
| 13 |
ZREMRANGEBYSCORE key min max |
移除有序集合中给定的分数区间的所有成员 |
| 14 |
ZREVRANGE key start stop [WITHSCORES] |
返回有序集中指定区间内的成员,通过索引,分数从高到低 |
| 15 |
ZREVRANGEBYSCORE key max min [WITHSCORES] |
返回有序集中指定分数区间内的成员,分数从高到低排序 |
| 16 |
ZREVRANK key member |
返回有序集合中指定成员的排名,有序集成员按分数值递减(从大到小)排序 |
| 17 |
ZSCORE key member |
返回有序集中,成员的分数值 |
| 18 |
ZINTERSTORE destination numkeys key [key ...] |
计算给定的一个或多个有序集的交集并将结果集存储在新的有序集合 key 中 |
| 19 |
ZUNIONSTORE destination numkeys key [key ...] |
计算给定的一个或多个有序集的并集,并存储在新的 key 中 |
| 20 |
ZSCAN key cursor [MATCH pattern] [COUNT count] |
迭代有序集合中的元素(包括元素成员和元素分值) |
创建一些数据:
127.0.0.1:6379[1]> zadd myzset 85 zhangsan
(integer) 1
127.0.0.1:6379[1]> zadd myzset 70 lisi
(integer) 1
127.0.0.1:6379[1]> zadd myzset 90 wangwu
(integer) 1
127.0.0.1:6379[1]> zadd myzset 60 1 2 3 4 5
(integer) 3
练习
127.0.0.1:6379[1]> zcard myzset  获取有序集合的成员数
(integer) 6
127.0.0.1:6379[1]> zcount myset 60 90 计算指定score区间的成员数
(integer) 4
127.0.0.1:6379[1]> zincrby myzset 10 60 给分数为 60的人的score增加10
"10"
127.0.0.1:6379[1]> zrange myzset 0 -1   返回区间的元素
1) "3"
2) "5"
3) "60"
4) "1"
5) "lisi"
6) "zhangsan"
7) "wangwu"
127.0.0.1:6379[1]> zrank myzset zhangsan 返回有序集合中指定成员的索引
(integer) 5
127.0.0.1:6379[1]> zrem myzset zhangsan 移除有序集合中的一个或者多个成员
(integer) 1
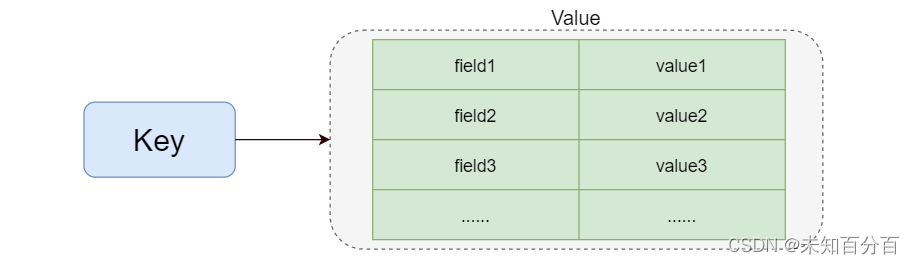
3.6 Hash
Redis hash 是一个 string 类型的 field 和 value 的映射表,hash 特别适合用于存储对象。Redis 中每个 hash 可以存储 2^32^ - 1 键值对(40多亿)。
Hash类型一般用于存储用户信息、用户主页访问量、组合查询等。
3.6.1 结构图
3.6.2 相关命令
| 序号 |
命令语法 |
描述 |
| 1 |
HSET key field value |
将哈希表 key 中的字段 field 的值设为 value |
| 2 |
HGET key field |
获取存储在哈希表中指定字段的值 |
| 3 |
HGETALL key |
获取在哈希表中指定 key 的所有字段和值 |
| 4 |
HEXISTS key field |
查看哈希表 key 中,指定的字段是否存在 |
| 5 |
HSETNX key field value |
只有在字段 field 不存在时,设置哈希表字段的值 |
| 6 |
HKEYS key |
获取所有哈希表中的字段 |
| 7 |
HVALS key |
获取哈希表中所有值 |
| 8 |
HLEN key |
获取哈希表中字段的数量 |
| 9 |
HMGET key field1 [field2] |
获取所有给定字段的值 |
| 10 |
HMSET key field1 value1 [field2 value2] |
同时将多个 field-value (域-值)对设置到哈希表 key 中 |
| 11 |
HINCRBY key field increment |
为哈希表 key 中的指定字段的整数值加上增量 increment |
| 12 |
HINCRBYFLOAT key field increment |
为哈希表 key 中的指定字段的浮点数值加上增量 increment |
| 13 |
HDEL key field1 [field2] |
删除一个或多个哈希表字段 |
| 14 |
HSCAN key cursor [MATCH pattern] [COUNT count] |
迭代哈希表中的键值对 |
练习
127.0.0.1:6379[1]> HSET myhash name zhangsan 创建哈希表 myhash 并且为字段name设置 zhangsan
(integer) 1
127.0.0.1:6379[1]> HGET myhash name  获取指定字段的值
"zhangsan"
127.0.0.1:6379[1]> hgetall myhash 获取哈希表中myhash的所有字段和值
1) "name"
2) "zhangsan"
127.0.0.1:6379[1]> HEXISTS myhash name  查看myhash表中指定字段是否存在
(integer) 1
127.0.0.1:6379[1]> hsetnx myhash age 11 只有age不存在时才会设置字段的值
(integer) 1
127.0.0.1:6379[1]> hvals myhash 获取所有值
1) "zhangsan"
2) "11"
127.0.0.1:6379[1]> hkeys myhash 获取所有字段
1) "name"
2) "age"
127.0.0.1:6379[1]> hlen myhash 获取表中字段的数量
(integer) 2
127.0.0.1:6379[1]> hmget myhash name 获取给定字段的值
1) "zhangsan"
127.0.0.1:6379[1]> hdel myhash age 删除指定字段age
(integer) 1
3.7 Bitmaps
3.7.1 介绍
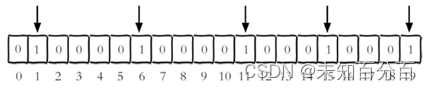
现代计算机用二进制(位) 作为信息的基础单位, 1个字节等于8位, 例如“abc”字符串是由3个字节组成, 但实际在计算机存储时将其用二进制表示, “abc”分别对应的ASCII码分别是97、 98、 99, 对应的二进制分别是01100001、 01100010和01100011,如下图:

合理地使用操作位能够有效地提高内存使用率和开发效率。
Redis 6 中提供了 Bitmaps 这个“数据类型”可以实现对位的操作:
1)Bitmaps本身不是一种数据类型,实际上它就是字符串(key-value),但是它可以对字符串的位进行操作。
2)Bitmaps单独提供了一套命令,所以在Redis中使用Bitmaps和使用字符串的方法不太相同。 可以把Bitmaps想象成一个以位为单位的数组, 数组的每个单元只能存储0和1, 数组的下标在Bitmaps中叫做偏移量。

练习
1、setbit
这个命令用于设置Bitmaps中某个偏移量的值(0或1),offset偏移量从0开始。格式如下:
setbit <key> <offset> <value>
例如,把每个独立用户是否访问过网站存放在Bitmaps中, 将访问的用户记做1,没有访问的用户记做0,用偏移量作为用户的id。
设置键的第offset个位的值(从0算起) , 假设现在有20个用户,userid=1,6,11,15,19的用户对网站进行了访问, 那么当前Bitmaps初始化结果如图:
下面示例是代表 2023-07-21 这天的独立访问用户的Bitmaps:
127.0.0.1:6379[1]> setbit username:dog:20230721 1 1
(integer) 0
127.0.0.1:6379[1]> setbit username:dog:20230721 2 1
(integer) 0
127.0.0.1:6379[1]> setbit username:dog:20230721 3 1
(integer) 0
127.0.0.1:6379[1]> setbit username:dog:20230721 4 0
(integer) 0
127.0.0.1:6379[1]> setbit username:dog:20230721 5 0
(integer) 0
127.0.0.1:6379[1]> setbit username:dog:20230721 6 1
(integer) 0
127.0.0.1:6379[1]> setbit username:dog:20230721 7 1
(integer) 0
注意:
很多应用的用户id以一个指定数字(例如10000) 开头, 直接将用户id和Bitmaps的偏移量对应势必会造成一定的浪费, 通常的做法是每次做setbit操作时将用户id减去这个指定数字。
在第一次初始化Bitmaps时, 假如偏移量非常大, 那么整个初始化过程执行会比较慢, 可能会造成Redis的阻塞。
2、getbit
这个命令用于获取Bitmaps中某个偏移量的值。格式为:
getbit <key> <offset>
获取键的第offset位的值(从0开始算)。例如获取id=dog的用户是否在2022-07-21这天访问过, 返回0说明没有访问过:
127.0.0.1:6379[1]> getbit username:dog:20230721 1
(integer) 1
127.0.0.1:6379[1]> getbit username:dog:20230721 5
(integer) 0
3、bitcount
这个命令用于统计字符串被设置为1的bit数。一般情况下,给定的整个字符串都会被进行计数,通过指定额外的 start 或 end 参数,可以让计数只在特定的位上进行。start 和 end 参数的设置,都可以使用负数值:比如 -1 表示最后一个位,而 -2 表示倒数第二个位,start、end 是指bit组的字节的下标数,二者皆包含。格式如下:
bitcount <key> [start end]
用于统计字符串从start字节到end字节比特值为1的数量。例如,统计dog用户访问的次数
127.0.0.1:6379[1]> bitcount username:dog:20230721 4、bitop
这个命令是一个复合操作, 它可以做多个Bitmaps的and(交集) 、 or(并集) 、 not(非) 、 xor(异或) 操作并将结果保存在destkey中。格式如下:
bitop and(or/not/xor) <destkey> [key…]
例如:
2023-7-20 日访问网站的userid=1,2,5,9。
2023-7-21 日访问网站的userid=0,1,4,9。
127.0.0.1:6379[1]> setbit user:20230720 1 1
(integer) 0
127.0.0.1:6379[1]> setbit user:20230720 2 1
(integer) 0
127.0.0.1:6379[1]> setbit user:20230720 5 1
(integer) 0
127.0.0.1:6379[1]> setbit user:20230720 9 1
(integer) 0
127.0.0.1:6379[1]> setbit user:20230721 0 1
(integer) 0
127.0.0.1:6379[1]> setbit user:20230721 1 1
(integer) 0
127.0.0.1:6379[1]> setbit user:20230721 4 1
(integer) 0
127.0.0.1:6379[1]> setbit user:20230721 9 1
(integer) 0
计算出两天都访问过网站的用户数量
127.0.0.1:6379[1]> bitop and user:and:20_21 user:20230720 user:20230721
(integer) 2
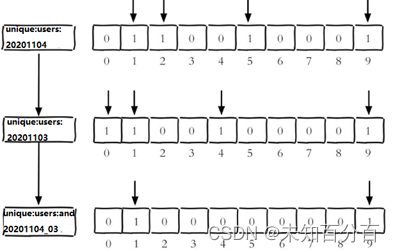
计算出任意一天都访问过网站的用户数量(例如月活跃就是类似这种) , 可以使用or求并集
127.0.0.1:6379[1]> bitop or user:and:20_21 user:20230720 user:20230721
(integer) 2
3.8 HyperLogLog
3.8.1 简介
在工作当中,我们经常会遇到与统计相关的功能需求,比如统计网站PV(PageView页面访问量),可以使用Redis的incr、incrby轻松实现。
但像UV(UniqueVisitor,独立访客)、独立IP数、搜索记录数等需要去重和计数的问题如何解决?这种求集合中不重复元素个数的问题称为基数问题。
解决基数问题有很多种方案:
1)数据存储在MySQL表中,使用distinct count计算不重复个数
2)使用Redis提供的hash、set、bitmaps等数据结构来处理
以上的方案结果精确,但随着数据不断增加,导致占用空间越来越大,对于非常大的数据集是不切实际的。
为了能够降低一定的精度来平衡存储空间,Redis推出了HyperLogLog。
HyperLogLog 是用来做基数统计的算法,HyperLogLog 的优点是:在输入元素的数量或者体积非常非常大时,计算基数所需的空间总是固定的、并且是很小的。
在 Redis 里面,每个 HyperLogLog 键只需要花费 12 KB 内存,就可以计算接近 2^64 个不同元素的基数。这和计算基数时,元素越多耗费内存就越多的集合形成鲜明对比。
但是,因为 HyperLogLog 只会根据输入元素来计算基数,而不会储存输入元素本身,所以 HyperLogLog 不能像集合那样,返回输入的各个元素。
什么是基数?
比如数据集 {1, 3, 5, 7, 5, 7, 8},那么这个数据集的基数集为 {1, 3, 5 ,7, 8},基数(不重复元素)为5。 基数估计就是在误差可接受的范围内,快速计算基数。
3.8.2 相关命令
| 序号 |
命令语法 |
描述 |
| 1 |
PFADD key element [element ...] |
添加指定元素到 HyperLogLog 中 |
| 2 |
PFCOUNT key [key ...] |
返回给定 HyperLogLog 的基数估算值 |
| 3 |
PFMERGE destkey sourcekey [sourcekey ...] |
将多个 HyperLogLog 合并为一个 HyperLogLog |
练习
127.0.0.1:6379[1]> pfadd mypf 1 2 3 7 9 5 3 4 2 2 为mypf中插入数据
(integer) 1
127.0.0.1:6379[1]> pfcount mypf 统计mypf的基数
(integer) 7
127.0.0.1:6379[1]> pfadd mypf2 4 5 13 2 2 4  为mypf2中插入数据
(integer) 1
127.0.0.1:6379[1]> pfmerge mypf mypf2 将mypf和mypf2合并为一个
OK
将所有元素添加到指定HyperLogLog数据结构中。如果执行命令后HLL估计的近似基数发生变化,则返回1,否则返回0。
3.9 Geospatial(地理空间)
3.9.1 简介
Redis 3.2 中增加了对GEO类型的支持。GEO,Geographic,地理信息的缩写。该类型,就是元素的2维坐标,在地图上就是经纬度。redis基于该类型,提供了经纬度设置,查询,范围查询,距离查询,经纬度Hash等常见操作。
3.9.2 相关命令
| 序号 |
命令语法 |
描述 |
| 1 |
geoadd key longitude latitude member [longitude latitude member...] |
添加地理位置(经度,纬度,名称) |
| 2 |
geopos key member [member...] |
获得指定地区的坐标值 |
| 3 |
geodist key member1 member2 [mkmftmi] |
获取两个位置之间的直线距离 |
| 4 |
georadius key longitude latitude radius [mkmft mi] |
以给定的经纬度为中心,找出某一半径内的元素 |
练习
1)添加城市坐标
例如,设置上海、重庆、深圳和北京的坐标
127.0.0.1:6379[1]> geoadd china:city 121.47 31.23 shanghai
(integer) 1
127.0.0.1:6379[1]> geoadd china:city 106.50 29.53 chongqing 114.05 22.52 shenzhen 116.38 39.90 beijing
(integer) 3
有效的经度从 -180 度到 180 度。有效的纬度从 -85.05112878 度到 85.05112878 度。
当坐标位置超出指定范围时,该命令将会返回一个错误。
已经添加的数据,是无法再次往里面添加的。
2)获取城市坐标
例如,获取上海的坐标。
127.0.0.1:6379[1]>  geopos china:city shanghai
1) 1) "121.47000163793563843"
   2) "31.22999903975783553"
3)用于获取两个位置之间的直线距离。
例如,获取北京和深圳的直线距离。
127.0.0.1:6379[1]>  geopos china:city beijing shanghai km
1) 1) "116.38000041246414185"
   2) "39.90000009167092543"
2) 1) "121.47000163793563843"
   2) "31.22999903975783553"
3) (nil)
单位:
m:表示单位为米[默认值]。
km:表示单位为千米。
mi:表示单位为英里。
ft:表示单位为英尺。
4)用于获取指定坐标半径内的元素
例如,获取经度为 110,纬度为 30,半径为 1000KM 的所有城市。
127.0.0.1:6379[1]>  georadius china:city 110 30 1000 km
1) "chongqing"
2) "shenzhen"
二、Redis持久化
触发方式:
(1)手动触发:save
(2)自动触发:bgsave,即
在redis.conf中去进行配置:
save time opeation_count
例如:save 10 30;#表示的是十秒内如果有三十次操作就自动进行一次快照
1、RDB
1.1 什么是RDB
在指定的时间间隔内将内存中的数据集快照写入磁盘, 也就是Snapshot快照,它恢复时是将快照文件直接读到内存里。
1.2 如何备份
Redis会单独创建(fork)一个子进程来进行持久化,(创建子进程的目的:让主进程正常工作)会先将数据写入到 一个临时文件中(防止子进程失败破坏原文件件),待持久化过程都结束后,再用这个临时文件替换上次持久化好的文件。 整个过程中,主进程是不进行任何IO操作的,这就确保了极高的性能。如果需要进行大规模数据的恢复,且对于数据恢复的完整性不是非常敏感,那RDB方式要比AOF方式更加的高效。RDB的缺点是最后一次持久化后的数据可能丢失。
1.3 Fork
Fork 的作用是复制一个与当前进程一样的进程。新进程的所有数据(变量、环境变量、程序计数器等) 数值都和原进程一致,但它是一个全新的进程,并作为原进程的子进程。在 Linux 程序中,fork() 会产生一个和父进程完全相同的子进程,但子进程在此后多会 exec 系统调用,出于效率考虑,Linux 中引入了“写时复制技术”。一般情况下父进程和子进程会共用同一段物理内存,只有进程空间的各段的内容要发生变化时,才会将父进程的内容复制一份给子进程。(只有主进程中的数据发生变化时才会把副本复制给子进程)
1.4 优势
RDB 方式适合大规模的数据恢复,并且对数据完整性和一致性要求不高更适合使用。它有以下几种优势:
-
节省磁盘空间(二进制存储)
-
恢复速度快

1.5 劣势
-
Fork的时候,内存中的数据被克隆了一份,大致2倍的膨胀性需要考虑
-
虽然Redis在fork时使用了写时拷贝技术,但是如果数据庞大时还是比较消耗性能。
-
在备份周期在一定间隔时间做一次备份,所以如果Redis意外down掉的话,就会丢失最后一次快照后的所有修改。
1.6具体实现:
1、进入redis.conf配置文件中:
vim /etc/redis.conf
一些配置可设置的配置:
save 3600 1 300 100 60 10000 # 自动触发机制
stop-writes-on-bgsave-error yes # 是否在遇到错误停止写
rdbcompression yes # 是否压缩
rdbchecksum yes # 是否校验完整性
dbfilename dump.rdb #rdb文件名
dir /usr/local/redis-stable/# 存储rdb文件的位置
2、修改文件路径

3、增加触发机制:

4、 重启redis服务
systemctl restart redis
5、在配置文件中关闭aof

6、 尝试在redis中存放6条数据:
127.0.0.1:6379> lpush k1 1
(integer) 1
127.0.0.1:6379> lpush k1 2
(integer) 2
127.0.0.1:6379> lpush k1 3
(integer) 3
127.0.0.1:6379> lpush k1 4
(integer) 4
127.0.0.1:6379> lpush k1 5
(integer) 5
127.0.0.1:6379> lpush k1 6
(integer) 6
7、查看并且killredis进程
[root@server ~]# ps -e | grep redis
   2476 pts/0    00:00:00 redis-server
   2481 pts/2    00:00:00 redis-cli
[root@server ~]# kill -9 2476
8、查看:
127.0.0.1:6379> lrange k1 0 -1
1) "5"
2) "4"
3) "3"
4) "2"
5) "1"
#这里结果显示的只有前五条数据,符合之前设置的60秒保存5条记录
2、AOF
2.1 什么是AOF
以日志的形式来记录每个写操作(增量保存),将Redis执行过的所有写指令记录下来(读操作不记录), 只追加文件但不可以改写文件,Redis启动之初会读取该文件重新构建数据。简单说,Redis 重启时会根据日志文件的内容将写指令从前到后执行一次以完成数据的恢复工作。
在Redis的默认配置中AOF(Append Only File)持久化机制是没有开启的,要想使用AOF持久化需要先开启此功能。AOF持久化会将被执行的写命令写到AOF文件末尾,以此来记录数据发生的变化,因此只要Redis从头到尾执行一次AOF文件所包含的所有写命令,就可以恢复AOF文件的记录的数据集。
注:AOF的文件是文本文件格式;
2.2 优势
-
备份机制更稳健,丢失数据概率更低。
-
可读的日志文本,通过操作AOF稳健,可以处理误操作。
2.3 劣势
-
比起RDB占用更多的磁盘空间。
-
恢复备份速度要慢。
-
每次读写都同步的话,有一定的性能压力。
-
存在个别Bug,造成恢复不能。
2.4具体实现
1、首先关闭RDB

2、移除之前的文件并且重启redis服务:
 mv dump.rdb dump.rdb.bak
systemctl restart redis
3、开启AOF:

#有关AOF的配置文件
appendonly no # 是否开启AOF
appendfilename "appendonly.aof" # AOF文件名
appenddirname "appendonlydir" # AOF文件的目录
appendfsync everysec # 刷盘时机
no-appendfsync-on-rewrite no # 重写的时候是否刷盘
# 触发重写rewrite的条件
auto-aof-rewrite-percentage 100 # 当文件大小和上一次rewrite的aof文件大小一样的时候开始rewrite
100M-> 100M
auto-aof-rewrite-min-size 64mb  # 64mb 文件大小最小64mb
4、重启服务:
systemctl restart redis.service 5、查看内容
127.0.0.1:6379> keys *
(empty array)
#已经变为空值了
6、写入一些内容
127.0.0.1:6379> set k1 v1
OK
127.0.0.1:6379> set k2 v2
OK
127.0.0.1:6379> set k3 v3
OK
127.0.0.1:6379> set k1 v2
OK
127.0.0.1:6379> set k2 v2
OK
127.0.0.1:6379> set k1 v3
OK
127.0.0.1:6379> set k1 v4
OK
127.0.0.1:6379> set k1 v5
OK
127.0.0.1:6379> lpush mylist 1
(integer) 1
127.0.0.1:6379> lpush mylist 2
(integer) 2
127.0.0.1:6379> lpush mylist 3
(integer) 3
127.0.0.1:6379> lpush mylist 4
(integer) 4
127.0.0.1:6379> lpush mylist 5
(integer) 5
127.0.0.1:6379> lpush mylist 6
(integer) 6
7、手动触发瘦身
BGREWRITEAOF
Background append only file rewriting started
8、瘦身前后对比
瘦身前:
ls -l
总用量 12
-rw-r--r--. 1 root root  89  7月 21 06:29 appendonly.aof.1.base.rdb
-rw-r--r--. 1 root root 459  7月 21 06:32 appendonly.aof.1.incr.aof
-rw-r--r--. 1 root root  88  7月 21 06:29 appendonly.aof.manifest
瘦身后:
ls -l
总用量 8
-rw-r--r--. 1 root root 145  7月 21 06:37 appendonly.aof.2.base.rdb
-rw-r--r--. 1 root root   0  7月 21 06:37 appendonly.aof.2.incr.aof
-rw-r--r--. 1 root root  88  7月 21 06:37 appendonly.aof.manifest
很明显瘦身后的文件比瘦身前小很多