1. What is CMake
You may have heard of several Make tools, such as GNU Make, QT's qmake, Microsoft's MS nmake, BSD Make (pmake), Makepp, and so on. These Make tools follow different norms and standards, and the format of the Makefile they execute varies widely. This brings up a serious problem: if the software wants to be cross-platform, it must be guaranteed to be able to compile on different platforms. And if you use the above Make tool, you have to write a Makefile for each standard, which will be a crazy job.
CMake is a tool designed to address the above problems: it first allows developers to write a platform-independent CMakeList.txt file to customize the entire compilation process, and then further generates the required localized Makefile and project files according to the target user's platform. Such as a Makefile for Unix or a Visual Studio project for Windows. So as to achieve "Write once, run everywhere". Obviously, CMake is a more advanced compilation and configuration tool than the above-mentioned make. Some well-known open source projects that use CMake as the project architecture system include VTK, ITK, KDE, OpenCV, OSG, etc. [1].
CMake is a tool that I really like and use all the time. Not only does it help me cross-platform and cross-compiler, but the coolest thing is that it saves me too much storage space. Especially when used in combination with mercury, its friendly experience is enough to give us hard-working coders a little comfort.
The following content is translated from the official website tutorial: CMake
1.1CMake Tutorial
A Basic Starting Point (Step 1)
The most basic is to compile a source code file into an exe executable program. For a simple project, a two-line CMakeLists.txt file is sufficient. This will be the start of our tutorial. The CMakeLists.txt file will look like this:
cmake_minimum_required (VERSION 2.6)
project (Tutorial)
add_executable(Tutorial tutorial.cxx)
Note that in this example, CMakeLists.txt are all lowercase letters used. In fact, CMake commands are case-insensitive, you can use uppercase, lowercase, or mixed. The tutorial.cxx source code will calculate the square root of a number. Its first version looks very simple, as follows:
// A simple program that computes the square root of a number
#include <stdio.h>
#include <stdlib.h>
#include <math.h>
int main (int argc, char *argv[])
{
  if (argc < 2)
    {
    fprintf(stdout,"Usage: %s number\n",argv[0]);
    return 1;
    }
  double inputValue = atof(argv[1]);
  double outputValue = sqrt(inputValue);
  fprintf(stdout,"The square root of %g is %g\n",
          inputValue, outputValue);
  return 0;
}
Adding a Version Number and Configured Header File
The first feature we will add is to add a version number to the project and executable program. While you can do this directly in the source code, doing it with CMakeLists files provides more flexibility. To increment the version number, we can change the CMakeLists file like this:
cmake_minimum_required (VERSION 2.6)
project (Tutorial)
# The version number.
set (Tutorial_VERSION_MAJOR 1)
set (Tutorial_VERSION_MINOR 0)

# configure a header file to pass some of the CMake settings
# to the source code
configure_file (
  "${PROJECT_SOURCE_DIR}/TutorialConfig.h.in"
  "${PROJECT_BINARY_DIR}/TutorialConfig.h"
  )

# add the binary tree to the search path for include files
# so that we will find TutorialConfig.h
include_directories("${PROJECT_BINARY_DIR}")

# add the executable
add_executable(Tutorial tutorial.cxx)
Since configuration files must be written to the binary tree, we must add this directory to the header file search directory. We then created the http://TutorialConfig.h.in file in the source code directory with the following content:
// the configured options and settings for Tutorial
#define Tutorial_VERSION_MAJOR @Tutorial_VERSION_MAJOR@
#define Tutorial_VERSION_MINOR @Tutorial_VERSION_MINOR@
When CMake configures this header, the values of @Tutorial_VERSION_MAJOR@ and @Tutorial_VERSION_MINOR@ will be changed. Next, we modify tutorial.cxx to include the configuration header and use the version number. The final source code looks like this:
// A simple program that computes the square root of a number
#include <stdio.h>
#include <stdlib.h>
#include <math.h>
#include "TutorialConfig.h"

int main (int argc, char *argv[])
{
  if (argc < 2)
    {
    fprintf(stdout,"%s Version %d.%d\n",
            argv[0],
            Tutorial_VERSION_MAJOR,
            Tutorial_VERSION_MINOR);
    fprintf(stdout,"Usage: %s number\n",argv[0]);
    return 1;
    }
  double inputValue = atof(argv[1]);
  double outputValue = sqrt(inputValue);
  fprintf(stdout,"The square root of %g is %g\n",
          inputValue, outputValue);
  return 0;
}
The most important change is the inclusion of the TutorialConfig.h header file and exporting the version number.
Adding a Library (Step 2)
Now we add a library to the project. This library will contain our own square root implementation. In this way, the application can use this library instead of the library provided by the compiler. In this tutorial, we put the library into a subfolder called MathFunctions.
It uses a one-line CMakeLists file like this:
add_library(MathFunctions mysqrt.cxx)
The original file mysqrt.cxx has a function called mysqrt that provides functionality similar to the compiler's sqrt. In order to use the new library, we need to add a call to add_subdirectory in the top-level CMakeLists file. We'll also add an additional header file search directory so that MathFunctions/mysqrt.h can be searched. The final change is to add the new library to the executable. The top-level CMakeLists file now looks like this:
include_directories ("${PROJECT_SOURCE_DIR}/MathFunctions")
add_subdirectory (MathFunctions)

# add the executable
add_executable (Tutorial tutorial.cxx)
target_link_libraries (Tutorial MathFunctions)
Now let's consider how to make the MathFunctions library optional. While there is no reason to do this in this tutorial, you may wish to do so if using a larger library or when relying on third-party libraries. The first step is to add an option to the top-level CMakeLists file.
# should we use our own math functions?
option (USE_MYMATH
        "Use tutorial provided math implementation" ON)
This option will be displayed in the CMake GUI, and its default value is ON. When the user chooses, this value will be saved in CACHE, so that there is no need to change it every time CMAKE. The next step conditionally builds and links the MathFunctions library. To do this, we can change the top-level CMakeLists file to look like this:
# add the MathFunctions library?
#
if (USE_MYMATH)
  include_directories ("${PROJECT_SOURCE_DIR}/MathFunctions")
  add_subdirectory (MathFunctions)
  set (EXTRA_LIBS ${EXTRA_LIBS} MathFunctions)
endif (USE_MYMATH)

# add the executable
add_executable (Tutorial tutorial.cxx)
target_link_libraries (Tutorial  ${EXTRA_LIBS})
Here USE_MYMATH is used to determine whether MathFunctions will be compiled and used. Note the use of the variable EXTRA_LIBS here. This is a way to keep a large project looking clean. The corresponding changes in the source code are relatively simple:
// A simple program that computes the square root of a number
#include <stdio.h>
#include <stdlib.h>
#include <math.h>
#include "TutorialConfig.h"
#ifdef USE_MYMATH
#include "MathFunctions.h"
#endif

int main (int argc, char *argv[])
{
  if (argc < 2)
    {
    fprintf(stdout,"%s Version %d.%d\n", argv[0],
            Tutorial_VERSION_MAJOR,
            Tutorial_VERSION_MINOR);
    fprintf(stdout,"Usage: %s number\n",argv[0]);
    return 1;
    }

  double inputValue = atof(argv[1]);

#ifdef USE_MYMATH
  double outputValue = mysqrt(inputValue);
#else
  double outputValue = sqrt(inputValue);
#endif

  fprintf(stdout,"The square root of %g is %g\n",
          inputValue, outputValue);
  return 0;
}
We also use the USE_MYMATH macro in the source code. It is provided to the source code by CMAKE through the configuration file http://TutorialConfig.h.in .
#cmakedefine USE_MYMATH
Installing and Testing (Step 3)
Next we will add installation rules and testing support to our project. The installation rules are very very simple. For the MathFunctions library, we only need to add the following statement to install the library and header files:
install (TARGETS MathFunctions DESTINATION bin)
install (FILES MathFunctions.h DESTINATION include)
For the application, we only need to configure it in the top-level CMakeLists file to install the executable program and the configured header file:
# add the install targets
install (TARGETS Tutorial DESTINATION bin)
install (FILES "${PROJECT_BINARY_DIR}/TutorialConfig.h"
         DESTINATION include)
That's all there is to it. Now you can compile this tutorial, and then type make install (or compile the INSTALL target in the IDE), and the header files, libraries, executable programs, etc. will be installed correctly. The CMake variable CMAKE_INSTALL_PREFIX is used to determine in which root directory those files will be installed. Adding tests is also a fairly straightforward process. At the end of the top-level CMakeLists file we can add a series of basic tests to confirm that the program is working correctly.
# does the application run
add_test (TutorialRuns Tutorial 25)

# does it sqrt of 25
add_test (TutorialComp25 Tutorial 25)

set_tests_properties (TutorialComp25
  PROPERTIES PASS_REGULAR_EXPRESSION "25 is 5")

# does it handle negative numbers
add_test (TutorialNegative Tutorial -25)
set_tests_properties (TutorialNegative
  PROPERTIES PASS_REGULAR_EXPRESSION "-25 is 0")

# does it handle small numbers
add_test (TutorialSmall Tutorial 0.0001)
set_tests_properties (TutorialSmall
  PROPERTIES PASS_REGULAR_EXPRESSION "0.0001 is 0.01")

# does the usage message work?
add_test (TutorialUsage Tutorial)
set_tests_properties (TutorialUsage
  PROPERTIES
  PASS_REGULAR_EXPRESSION "Usage:.*number")
The first test simply confirms that the application runs without segfaults or other crashes, and returns 0. This is the most basic form of CTest. The following tests all use the PASS_REGULAR_EXPRESSION test attribute to confirm whether the output contains a certain string. If you need to add a lot of tests for different input values, you may want to consider creating a macro similar to the following:
#define a macro to simplify adding tests, then use it
macro (do_test arg result)
  add_test (TutorialComp${arg} Tutorial ${arg})
  set_tests_properties (TutorialComp${arg}
    PROPERTIES PASS_REGULAR_EXPRESSION ${result})
endmacro (do_test)

# do a bunch of result based tests
do_test (25 "25 is 5")
do_test (-25 "-25 is 0")
For any call to do_test, another test is added to the project.
Adding System Introspection (Step 4)
Next, let's consider adding some code that some target platforms may not support. In this example, we will add our code depending on whether the target platform has log and exp functions. Of course, most platforms have these functions, but this tutorial assumes that these two functions are not so commonly supported. If the platform has a log, then in mysqrt, use it to calculate the square root. We first test for the existence of these functions using CheckFunctionExists.cmake, in the top-level CMakeLists file:
# does this system provide the log and exp functions?
include (CheckFunctionExists.cmake)
check_function_exists (log HAVE_LOG)
check_function_exists (exp HAVE_EXP)
Next we modify http://TutorialConfig.h.in to define whether CMake finds the macros of these functions
// does the platform provide exp and log functions?
#cmakedefine HAVE_LOG
#cmakedefine HAVE_EXP
The important point is that the tests and logs must be completed before the configuration file command. The profile command will use the configuration file in CMake immediately. Finally, in the mysqrt function, we provide two implementation methods:
// if we have both log and exp then use them
#if defined (HAVE_LOG) && defined (HAVE_EXP)
  result = exp(log(x)*0.5);
#else // otherwise use an iterative approach
  . . .
Adding a Generated File and Generator (Step 5)
In this section, we'll show you how to include a generated source file into the application build process. In this example, we will create a table of precomputed square roots and compile this table into the application. To achieve this, we first need a program to generate such a table. A new source file called MakeTable.cxx in the MathFunctions subdirectory does just that.
// A simple program that builds a sqrt table
#include <stdio.h>
#include <stdlib.h>
#include <math.h>

int main (int argc, char *argv[])
{
  int i;
  double result;

  // make sure we have enough arguments
  if (argc < 2)
    {
    return 1;
    }

  // open the output file
  FILE *fout = fopen(argv[1],"w");
  if (!fout)
    {
    return 1;
    }

  // create a source file with a table of square roots
  fprintf(fout,"double sqrtTable[] = {\n");
  for (i = 0; i < 10; ++i)
    {
    result = sqrt(static_cast<double>(i));
    fprintf(fout,"%g,\n",result);
    }

  // close the table with a zero
  fprintf(fout,"0};\n");
  fclose(fout);
  return 0;
}
Note that this table is generated by a valid C++ code, and that the name of the output file is substituted into the parameter. The next step is to add the appropriate commands to the MathFunctions CMakeLists file to build the MakeTable executable as part of the build process. Doing it requires a few commands, as follows:
# first we add the executable that generates the table
add_executable(MakeTable MakeTable.cxx)

# add the command to generate the source code
add_custom_command (
  OUTPUT ${CMAKE_CURRENT_BINARY_DIR}/Table.h
  COMMAND MakeTable ${CMAKE_CURRENT_BINARY_DIR}/Table.h
  DEPENDS MakeTable
  )

# add the binary tree directory to the search path for
# include files
include_directories( ${CMAKE_CURRENT_BINARY_DIR} )

# add the main library
add_library(MathFunctions mysqrt.cxx ${CMAKE_CURRENT_BINARY_DIR}/Table.h  )
First, MakeTable is added as an executable just like any other executable. We then added a custom command to detail how to generate Table.h by running MakeTable. Next, we need to let CMake know that mysqrt.cxx depends on the generated file Table.h. This is achieved by adding the generated Table.h to the MathFunctions library. We also need to add the current build directory to the search path so that Table.h can be found by mysqrt.cxx.
When this project is built, it will first build the executable program MakeTable. Then run MakeTable to generate Table.h. Finally, it compiles mysqrt.cxx to generate the MathFunctions library.
At this moment, we added all the features to the topmost CMakeLists file, which now looks like this:
cmake_minimum_required (VERSION 2.6)
project (Tutorial)

# The version number.
set (Tutorial_VERSION_MAJOR 1)
set (Tutorial_VERSION_MINOR 0)

# does this system provide the log and exp functions?
include (${CMAKE_ROOT}/Modules/CheckFunctionExists.cmake)

check_function_exists (log HAVE_LOG)
check_function_exists (exp HAVE_EXP)

# should we use our own math functions
option(USE_MYMATH
  "Use tutorial provided math implementation" ON)

# configure a header file to pass some of the CMake settings
# to the source code
configure_file (
  "${PROJECT_SOURCE_DIR}/TutorialConfig.h.in"
  "${PROJECT_BINARY_DIR}/TutorialConfig.h"
  )

# add the binary tree to the search path for include files
# so that we will find TutorialConfig.h
include_directories ("${PROJECT_BINARY_DIR}")

# add the MathFunctions library?
if (USE_MYMATH)
  include_directories ("${PROJECT_SOURCE_DIR}/MathFunctions")
  add_subdirectory (MathFunctions)
  set (EXTRA_LIBS ${EXTRA_LIBS} MathFunctions)
endif (USE_MYMATH)

# add the executable
add_executable (Tutorial tutorial.cxx)
target_link_libraries (Tutorial  ${EXTRA_LIBS})

# add the install targets
install (TARGETS Tutorial DESTINATION bin)
install (FILES "${PROJECT_BINARY_DIR}/TutorialConfig.h"
         DESTINATION include)

# does the application run
add_test (TutorialRuns Tutorial 25)

# does the usage message work?
add_test (TutorialUsage Tutorial)
set_tests_properties (TutorialUsage
  PROPERTIES
  PASS_REGULAR_EXPRESSION "Usage:.*number"
  )


#define a macro to simplify adding tests
macro (do_test arg result)
  add_test (TutorialComp${arg} Tutorial ${arg})
  set_tests_properties (TutorialComp${arg}
    PROPERTIES PASS_REGULAR_EXPRESSION ${result}
    )
endmacro (do_test)

# do a bunch of result based tests
do_test (4 "4 is 2")
do_test (9 "9 is 3")
do_test (5 "5 is 2.236")
do_test (7 "7 is 2.645")
do_test (25 "25 is 5")
do_test (-25 "-25 is 0")
do_test (0.0001 "0.0001 is 0.01")
TutorialConfig.h is like this:
// the configured options and settings for Tutorial
#define Tutorial_VERSION_MAJOR @Tutorial_VERSION_MAJOR@
#define Tutorial_VERSION_MINOR @Tutorial_VERSION_MINOR@
#cmakedefine USE_MYMATH

// does the platform provide exp and log functions?
#cmakedefine HAVE_LOG
#cmakedefine HAVE_EXP
The final CMakeLists file for MathFunctions looks like this:
# first we add the executable that generates the table
add_executable(MakeTable MakeTable.cxx)
# add the command to generate the source code
add_custom_command (
  OUTPUT ${CMAKE_CURRENT_BINARY_DIR}/Table.h
  DEPENDS MakeTable
  COMMAND MakeTable ${CMAKE_CURRENT_BINARY_DIR}/Table.h
  )
# add the binary tree directory to the search path
# for include files
include_directories( ${CMAKE_CURRENT_BINARY_DIR} )

# add the main library
add_library(MathFunctions mysqrt.cxx ${CMAKE_CURRENT_BINARY_DIR}/Table.h)

install (TARGETS MathFunctions DESTINATION bin)
install (FILES MathFunctions.h DESTINATION include)
Building an Installer (Step 6)
Finally suppose we want to distribute our project to others so they can use it. We want to give them binaries and source code for different platforms at the same time. This is slightly different from install in step 3, which installs the binaries we built from source. In this example, we will build installation packages to support binary installation and package management features of cygwin, debian, RPMs, etc. For this purpose, we will use CPack to create platform-specific installation packages. Specifically, we need to add a few lines at the bottom of the top-level CMakeLists.txt file.
# build a CPack driven installer package
include (InstallRequiredSystemLibraries)
set (CPACK_RESOURCE_FILE_LICENSE
     "${CMAKE_CURRENT_SOURCE_DIR}/License.txt")
set (CPACK_PACKAGE_VERSION_MAJOR "${Tutorial_VERSION_MAJOR}")
set (CPACK_PACKAGE_VERSION_MINOR "${Tutorial_VERSION_MINOR}")
set (CPACK_PACKAGE_VERSION_PATCH "${Tutorial_VERSION_PATCH}")
include (CPack)
That's all there is to it. We first included InstallRequiredSystemLibraries. This module will contain all runtime libraries required by the current platform. Next, we set some CPack variables to save the license and project version information. The version information makes use of the variables we used in earlier tutorials. Finally we included the CPack module to use these variables and other features of the system you are using to set up the package.
The next step is to build the project in the usual way and run it on CPack. To build a binary package you need to run:
cpack --config CPackConfig.cmake
If you want to create a closed code package you need to enter
cpack --config CPackSourceConfig.cmake
Adding Support for a Dashboard (Step 7)
Uploading test results to the dashboard is very simple. We have defined some tests in an earlier step. We just need to run these routines and submit them to the dashboard. To include support for dashboards, we need to include the CTest module in the top-level CMakeLists file.
# enable dashboard scripting
include (CTest)
We also created a CTestConfig.cmake file to specify the name of the project on dashobard.
set (CTEST_PROJECT_NAME "Tutorial")
CTest will read this file and run it. To create a simple dashboard, you can run CMake on your project, change the directory of the build path, and run ctest -D Experimental. The results of your dashboard will be uploaded to Kitware's public dashboard.
The process of using CMake to generate Makefile and compile it under the Linux platform is as follows:
- Write the CMake configuration file CMakeLists.txt.
- The difference between executing commands
cmake PATHorccmake PATHgenerating Makefile 1 1ccmakeandcmakeis that the former provides an interactive interface. . Among them,PATHis the directory where CMakeLists.txt is located. - Use
makethe command to compile.
This article will start with an example and explain the common usage of CMake step by step. All the example codes in this article can be found here. If you’re still feeling overwhelmed after reading this, you can continue learning the other resources I provide at the end of the article.
1.2 CMake guide tutorial ( official address )
The CMake Tutorials provide step-by-step instructions covering common build system issues that CMake can help with. It's helpful to see how the various themes work together in the sample project. Tutorial documentation and source code for the examples can be found in the CMake source tree'sHelp/guide/tutorial directory . Each step has its own subdirectory containing code that can be used as a starting point. The tutorial examples are incremental, so each step provides a complete solution for the previous step.
(Step 1) Basic starting point
The most basic project builds an executable from source code files. For simple projects, only three lines CMakeLists.txtof files are required. This is the starting point for this tutorial. Create a CMakeLists.txt file in the Step1 directory as follows:
cmake_minimum_required(VERSION 3.10)
# set the project name project(Tutorial)
# add the executable add_executable(Tutorial tutorial.cxx)
Note that this example CMakeLists.txtuses lowercase commands in the file. CMake supports uppercase, lowercase, and mixed-case commands. The source code provided in the Step1 directory tutorial.cxxcan be used to calculate the square root of a number.
Add version number and configure header file
The first feature we'll add is to give our executable and project a version number. While we could just do this in the source code, using CMakeLists.txt.
First, modify CMakeLists.txtthe file to set the version number.
cmake_minimum_required(VERSION 3.10)

# set the project name and version
project(Tutorial VERSION 1.0)

###早期版本的写法
###		project(Tutorial)
###		set (Tutorial_VERSION_MAJOR 1)
###		set (Tutorial_VERSION_MINOR 0)
Then, configure a header file to pass the version number to the source code:
configure_file(TutorialConfig.h.in TutorialConfig.h)

###早期版本的写法
###configure_file ("${PROJECT_SOURCE_DIR}/TutorialConfig.h.in" "${PROJECT_BINARY_DIR}/TutorialConfig.h")
Since the configured files will be written into the binary tree, we must add this directory to the list of paths searched for include files. CMakeLists.txtAdd the following lines at the end of the file:
#必须在add_excutable之后
target_include_directories(Tutorial PUBLIC  "${PROJECT_BINARY_DIR}")
###早期版本的写法:
###可以位于任意位置,一般放在add_excutable之前
###include_directories("${PROJECT_BINARY_DIR}")
Use your favorite editor to create in the source directory TutorialConfig.h.inwith the following content:
// the configured options and settings for Tutorial
#define Tutorial_VERSION_MAJOR @Tutorial_VERSION_MAJOR@
#define Tutorial_VERSION_MINOR @Tutorial_VERSION_MINOR@
When CMake configures this header, the values of @Tutorial_VERSION_MAJOR@ and @Tutorial_VERSION_MINOR@ will be replaced. Next, modify tutorial.cxx to include the configuration header file TutorialConfig.h. Finally, print out the version number by updating tutorial.cxx as follows:
 if (argc < 2) {
    // report version
    std::cout << argv[0] << " Version " << Tutorial_VERSION_MAJOR << "."
              << Tutorial_VERSION_MINOR << std::endl;
    std::cout << "Usage: " << argv[0] << " number" << std::endl;
    return 1;
  }
Complete CMakeLists.txtas follows:
cmake_minimum_required(VERSION 3.10)

#set project name and version
project(Tutorial VERSION 1.0)

configure_file(TutorialConfig.h.in TutorialConfig.h)

#add the executable
add_executable(Tutorial tutorial.cxx)

target_include_directories(Tutorial PUBLIC  "${PROJECT_BINARY_DIR}"  )
Specify the c++ standard
Next, add some C++11 features to our project by tutorial.cxxreplacing atof with . std::stodAlso, delete #include <cstdlib>.
const double inputValue = std::stod(argv[1]);
We need to explicitly state in the CMake code that the correct flag should be used. The easiest way to enable support for a specific C++ standard in CMake is to use CMAKE_CXX_STANDARDvariables. For this tutorial, set the variable CMakeLists.txtin the file CMAKE_CXX_STANDARDto 11 and CMAKE_CXX_STANDARD_REQUIREDset to True:
cmake_minimum_required(VERSION 3.10)
# set the project name and version
project(Tutorial VERSION 1.0)
# specify the C++ standard
set(CMAKE_CXX_STANDARD 11)
set(CMAKE_CXX_STANDARD_REQUIRED True)
build and test
Run cmake or cmake-gui to configure the project, then build with the build tool of choice. For example, from the command line we can navigate to a directory of the CMake source tree Help /guide/tutorialand run the following command:
mkdir Step1_build
cd Step1_build
cmake ../Step1
cmake --build .
Navigate to the directory where you built the tutorial (probably the make directory or the Debug or Release build configuration subdirectory), and run the following command:
Tutorial 4294967296
Tutorial 10
Tutorial
(step 2) add library
Now, we will add a library to our project. This library is our own implementation for computing square roots of numbers. Executables can use this library instead of the standard square root function provided by the compiler.
In this tutorial, we put the library into MathFunctionsa subdirectory named . This directory already contains header MathFunctions.hand source files mysqrt.cxx. A source file has a function called , which provides functionality similar mysqrtto the compiler's function.sqrt
Add the following line CMakeLists.txtto the file MathFunctionsin the directory:
add_library(MathFunctions mysqrt.cxx)
In order to use the new library, we will CMakeLists.txtadd calls to the top level file add_subdirectoryto build the library. We add the new library to the executable and will MathFunctionsadd as include directory so mqsqrt.hthe header files can be found. CMakeLists.txtThe last few lines of the top-level file should now look like this:
# add the MathFunctions library
add_subdirectory(MathFunctions)

# add the executable
add_executable(Tutorial tutorial.cxx)

#必须位于add_excutable之后
target_link_libraries(Tutorial PUBLIC MathFunctions)

###早期版本的写法
###target_link_libraries(Tutorial MathFunctions)

#add the binary tree to the search path for include files so that we will find TutorialConfig.h
target_include_directories(Tutorial PUBLIC "${PROJECT_BINARY_DIR}" "${PROJECT_SOURCE_DIR}/MathFunctions")
Now let's make the MathFunctions library optional. While this isn't really necessary for this tutorial, it's quite common for larger projects. The first step is CMakeLists.txtto add an option to the top-level file.
option(USE_MYMATH "Use tutorial provided math implementation" ON)
# configure a header file to pass some of the CMake settings to the source code
configure_file(TutorialConfig.h.in TutorialConfig.h)
This option will be shown in CMake GUI and ccmake, default value ON, can be changed by user. This setting will be stored in the cache, so users don't have to set the value every time they run CMake on the build directory.
The next change is to make building and linking the MathFunctions library a boolean option. To do this, we CMakeLists.txtchange the end of the top-level file to look like this:
if(USE_MYMATH)
  add_subdirectory(MathFunctions)
  list(APPEND EXTRA_LIBS MathFunctions)
  list(APPEND EXTRA_INCLUDES "${PROJECT_SOURCE_DIR}/MathFunctions")
endif()

# add the executable
add_executable(Tutorial tutorial.cxx)

#必须位于add_executable之后
target_link_libraries(Tutorial PUBLIC ${EXTRA_LIBS})

# add the binary tree to the search path for include files so that we will find TutorialConfig.h
target_include_directories(Tutorial PUBLIC "${PROJECT_BINARY_DIR}" ${EXTRA_INCLUDES})

###早期版本的写法
##if(USE_MYMATH)
###include_directories ("${PROJECT_SOURCE_DIR}/MathFunctions")
###add_subdirectory (MathFunctions)
###set(EXTRA_LIBS ${EXTRA_LIBS} MathFunctions)
###endif(USE_MYMATH)
###include_directories("${PROJECT_BINARY_DIR}")
###add_executable(Tutorial tutorial.cxx)
###target_link_libraries(Tutorial ${EXTRA_LIBS})
Note the use of variables EXTRA_LIBSto collect any optional libraries for later linking into the executable. Variables EXTRA_INCLUDESare used similarly for optional headers. This is a classic approach when dealing with many optional components, and we'll cover the modern approach in the next step.
The corresponding changes to the source code are very simple. First, tutorial.cxxinclude MathFunctions.hthe header files, if needed, in:
#ifdef USE_MYMATH
#  include "MathFunctions.h"
#endif
Then, in the same file, make USE_MYMATH control which square root function is used:
#ifdef USE_MYMATH
  const double outputValue = mysqrt(inputValue);
#else
  const double outputValue = sqrt(inputValue);
#endif
Since the source code now requires it USE_MYMATH, it can be added to it with the following line TutorialConfig.h.in:
#cmakedefine USE_MYMATH
Exercise : Why is USE_MYMATHit so important to configure TutorialConfig.h.in after options? What happens if we invert the two? Run cmake or cmake-gui to configure the project, then build with the build tool of choice. Then run the built Tutorial executable. Values updated using ccmake or the CMake GUI USE_MYMATH. Rebuild and run the tutorial again. Which function, sqrt or mysqrt, gives better results?
The full CMakeLists.txtfile is as follows:
cmake_minimum_required(VERSION 3.5)
# set the project name and version
project(Tutorial VERSION 1.0)

# specify the C++ standard
set(CMAKE_CXX_STANDARD 11)
set(CMAKE_CXX_STANDARD_REQUIRED True)

option(USE_MYMATH "Use tutorial provided math implementation" ON)

# configure a header file to pass some of the CMake settings to the source code
configure_file(TutorialConfig.h.in TutorialConfig.h)

if(USE_MYMATH)
    add_subdirectory(MathFunctions)
    list(APPEND EXTRA_LIBS MathFunctions)
    list(APPEND EXTRA_INCLUDES "${PROJECT_SOURCE_DIR}/MathFunctions")
endif()

# add the executable
add_executable(Tutorial tutorial.cxx)

#必须位于add_executable之后
target_link_libraries(Tutorial PUBLIC ${EXTRA_LIBS})

# add the binary tree to the search path for include files so that we will find TutorialConfig.h
target_include_directories(Tutorial PUBLIC  "${PROJECT_BINARY_DIR}" ${EXTRA_INCLUDES})
(Step 3) Add the usage requirements of the library
Using requirements allows finer control over linking and include lines for libraries or executables, while also giving finer control over the transitive properties of targets inside CMake. The main command to take advantage of using requirements is:
- target compile definition
- target build options
- target_include_directories
- target library
Let's refactor the code from step 2 to take advantage of the modern CMake approach to writing usage requirements. We start by stating that anything linking to MathFunctions needs to include the current source directory, while MathFunctions itself does not. So this can be INTERFACEa usage requirement.
Remember, INTERFACEwhat the consumer wants is what the producer doesn't want. Add the following lines to MathFunctions/CMakeLists.txtthe end of the :
target_include_directories(MathFunctions INTERFACE ${CMAKE_CURRENT_SOURCE_DIR)
Now that we have specified the usage requirements of MathFunction, we can safely CMakeLists.txtremove EXTRA_INCLUDESthe usage of the variable from the top level:
if(USE_MYMATH)
  add_subdirectory(MathFunctions)
  list(APPEND EXTRA_LIBS MathFunctions)
endif()
... ...
... ...

target_include_directories(Tutorial PUBLIC "${PROJECT_BINARY_DIR}")
(Step 4) Installation and Testing
Now we can start adding installation rules and testing support to the project.
The installation rules are quite simple: for MathFunctions we install the library and headers, and for applications we install the executable and the configured headers.
Therefore, MathFunctions/CMakeLists.txtadd at the end of:
install(TARGETS MathFunctions DESTINATION lib)
install(FILES MathFunctions.h DESTINATION include)
Then at the end of the top level cmakelt.txt add
install(TARGETS Tutorial DESTINATION bin)
install(FILES "${PROJECT_BINARY_DIR}/TutorialConfig.h" DESTINATION include)
That's all it takes to create a basic local installation for this tutorial. Run cmake or cmake-gui to configure the project, then build with the build tool of choice. Type to install from the command line cmake --install(introduced since 3.15, earlier versions of CMake must use make install), or build INSTALLthe target from the IDE. This will install the appropriate headers, libraries and executables.
CMake variables CMAKE_INSTALL_PREFIXare used to determine the installation root directory for files. If used cmake --install, --prefixa custom installation directory can be specified via parameter. For multi-configuration tools, use --configparameters to specify configurations.
Verify that the installed Tutorial works.
test support
Next, test our application. At CMakeLists.txtthe end of the top-level file, we can enable testing, and then add some basic tests to verify that the application is working correctly.
enable_testing()

# does the application run
add_test(NAME Runs COMMAND Tutorial 25)

# does it sqrt of 25
add_test (NAME Comp25 COMMAND Tutorial 25)
set_tests_properties (Comp25 PROPERTIES PASS_REGULAR_EXPRESSION "25 is 5")

# does the usage message work?
add_test(NAME Usage COMMAND Tutorial)
set_tests_properties(Usage  PROPERTIES PASS_REGULAR_EXPRESSION "Usage:.*number")

# define a function to simplify adding tests
function(do_test target arg result)
  add_test(NAME Comp${arg} COMMAND ${target} ${arg})
  set_tests_properties(Comp${arg}  PROPERTIES PASS_REGULAR_EXPRESSION ${result} )
endfunction(do_test)

# do a bunch of result based tests
do_test(Tutorial 4 "4 is 2")
do_test(Tutorial 9 "9 is 3")
do_test(Tutorial 5 "5 is 2.236")
do_test(Tutorial 7 "7 is 2.645")
do_test(Tutorial 25 "25 is 5")
do_test(Tutorial -25 "-25 is [-nan|nan|0]")
do_test(Tutorial 0.0001 "0.0001 is 0.01")

###早期版本的写法
###include(CTest)
###add_test (TutorialRuns Tutorial 25)
###
###add_test (TutorialComp25 Tutorial 25)
###set_tests_properties (TutorialComp25 PROPERTIES PASS_REGULAR_EXPRESSION "25 is 5")
###
##add_test (TutorialUsage Tutorial)
###set_tests_properties (TutorialUsage PROPERTIES PASS_REGULAR_EXPRESSION "Usage:.*number")
###
####define a macro to simplify adding tests, then use it
###macro (do_test arg result)
##add_test (TutorialComp${arg} Tutorial ${arg})
###set_tests_properties (TutorialComp${arg} PROPERTIES PASS_REGULAR_EXPRESSION ${result})
###endmacro (do_test)
###
###do_test(4 "4 is 2")
###do_test(9 "9 is 3")
###do_test(5 "5 is 2.236")
###do_test(7 "7 is 2.645")
###do_test(25 "25 is 5")
###do_test(-25 "-25 is [-nan|nan|0]")
###do_test(0.0001 "0.0001 is 0.01")
The first test just verifies that the application runs without segfaults or other crashes, and returns zero. This is the basic form of a CTest test.
The next test uses PASS_REGULAR_EXPRESSIONthe test attribute to verify that the output of the test contains certain strings. In this case, verify that a usage message is printed when the wrong number of arguments are supplied.
Finally, we have a do_testfunction named , which runs the application and verifies that the computed square root is correct for the given input. For do_testeach invocation of , another test is added to the project based on the passed parameters, with a name, inputs, and expected results.
Rebuild the app, then cd to the binary directory and run ctest -Nand ctest -VV. For multi-configuration generators (such as Visual Studio), the configuration type must be specified. For example, to run tests in "debug" mode, use from the build directory (not the "debug" subdirectory!) ctest -C Debug -VV. Alternatively, build RUN_TESTSthe target from the IDE.
(Step 5) Add system self-test
Let's consider adding some code to our project that depends on functionality that the target platform may not have. For this example, we'll add some code depending on whether the target platform has logand expfunctions. Of course, almost every platform has these functions, but for the purposes of this tutorial, they are assumed to be uncommon.
If the platform has logsums expthen we will use them to calculate mysqrtthe square root in the function. We first test the availability of these functions using the modules CMakeLists.txtin the top level. CheckSymbolExistsWe'll be TutorialConfig.h.inusing the new definitions in , so make sure to set that before configuring that file.
include(CheckSymbolExists)
set(CMAKE_REQUIRED_LIBRARIES "m")
check_symbol_exists(log "math.h" HAVE_LOG)
check_symbol_exists(exp "math.h" HAVE_EXP)

###早期版本的写法
###include (CheckFunctionExists)
###check_function_exists (log HAVE_LOG)
###check_function_exists (exp HAVE_EXP)
Now, add these definitions to TutorialConfig.h.inso we can mysqrt.cxx中use them from:
// does the platform provide exp and log functions?
#cmakedefine HAVE_LOG
#cmakedefine HAVE_EXP
Modified mysqrt.cxxto include cmath. Next, in mysqrtthe same file of the function, we can provide an alternative implementation based on logand exp(if available on the system) with the following code (don't forget return result;before #endif!):
#if defined(HAVE_LOG) && defined(HAVE_EXP)
  double result = exp(log(x) * 0.5);
  std::cout << "Computing sqrt of " << x << " to be " << result
            << " using log and exp" << std::endl;
#else
  double result = x;
Run cmake or cmake-gui to configure the project, then build with the build tool of choice and run the Tutorial executable.
You'll notice that we also didn't use logand exp, even though we thought they should be available. We should quickly realize that we forgot mysqrt.cxxto include in TutorialConfig.h.
We also need to update MathFunctions/CMakeLists.txtso mysqrt.cxxwe know where this file is:
target_include_directories(MathFunctions INTERFACE ${CMAKE_CURRENT_SOURCE_DIR} PRIVATE ${CMAKE_BINARY_DIR})
After this update, go ahead and build the project again, then run the built Tutorial executable. If logand are still not used exp, open the generated TutorialConfig.h file from the build directory. Maybe they are not available on the current system?
Which function may give better results now, sqrtor mysqrt?
Specify compile definition
Is there a better place for us than TutorialConfig.hsaving HAVE_LOGsum values in ? HAVE_EXPLet's try to use it target_compile_definitions.
First, remove the definition TutorialConfig.h.infrom it . We no longer need the included mysqrt.cxxor TutorialConfig.hthe MathFunctions/CMakeLists.txtother includes.
Next, we can move the HAVE_LOGsum HAVE_EXP的checks to MathFunctions/CMakeLists.txt, and specify these values as PRIVATEcompile definitions.
include(CheckSymbolExists)
set(CMAKE_REQUIRED_LIBRARIES "m")
check_symbol_exists(log "math.h" HAVE_LOG)
check_symbol_exists(exp "math.h" HAVE_EXP)

if(HAVE_LOG AND HAVE_EXP)
  target_compile_definitions(MathFunctions
                             PRIVATE "HAVE_LOG" "HAVE_EXP")
endif()
After these updates, go ahead and rebuild the project. Run the built-in Tutorial executable and verify that the result is the same as earlier in this step.
(step 6) Add custom commands and generated files
For the purposes of this tutorial, assume we decide to move away from using platforms logand expfunctions, and instead wish to generate a mysqrttable of precomputed values that can be used in functions. In this section, we'll create the table during the build process and then compile that table into our application.
First, let's remove the check for the sum function MathFunctions/CMakeLists.txtin . Then remove the check for the sum from mysqrt.cxx . At the same time, we can delete .logexpHAVE_LOGHAVE_EXP#include <cmath>
In the subdirectory, a new source file named MathFunctionsis provided to generate the table.MakeTable.cxx
After looking at the file, we can see that the table was generated as valid C++ code, with the output filename passed in as a parameter.
The next step is to add the appropriate commands to MathFunctions/CMakeLists.txtthe file to build the MakeTable executable and then run it during the build. A few commands are required to accomplish this.
First, at MathFunctions/CMakeLists.txtthe top of , add MakeTablethe executable just like you would add any other executable.
add_executable(MakeTable MakeTable.cxx)
We then add a custom command that specifies how to generate by running MakeTable Table.h.
add_custom_command(
  OUTPUT ${CMAKE_CURRENT_BINARY_DIR}/Table.h
  COMMAND MakeTable ${CMAKE_CURRENT_BINARY_DIR}/Table.h
  DEPENDS MakeTable
  )
Next, we have to let CMake know mysqrt.cxxto depend on the generated files Table.h. Table.hThis is done by adding the generated to the source list of the library MathFunctions.
add_library(MathFunctions mysqrt.cxx ${CMAKE_CURRENT_BINARY_DIR}/Table.h )
We also have to add the current binary directory to the list of include directories so it mysqrt.cxxcan be found and included Table.h.
target_include_directories(MathFunctions
          INTERFACE ${CMAKE_CURRENT_SOURCE_DIR}
          PRIVATE ${CMAKE_CURRENT_BINARY_DIR}
          )
Now, let's use the generated table. First, modify mysqrt.cxxto include Table.h. Next, we can rewrite mysqrtthe function to use this table:
double mysqrt(double x)
{
  if (x <= 0) {
    return 0;
  }

  // use the table to help find an initial value
  double result = x;
  if (x >= 1 && x < 10) {
    std::cout << "Use the table to help find an initial value " << std::endl;
    result = sqrtTable[static_cast<int>(x)];
  }

  // do ten iterations
  for (int i = 0; i < 10; ++i) {
    if (result <= 0) {
      result = 0.1;
    }
    double delta = x - (result * result);
    result = result + 0.5 * delta / result;
    std::cout << "Computing sqrt of " << x << " to be " << result << std::endl;
  }

  return result;
}
Run cmake or cmake-gui to configure the project, then build with the build tool of choice. When building this project, it will first build MakeTablethe executable. Then it will run MakeTableto build Table.h. Finally, it will compile the included Table.hto mysqrt.cxxgenerate the MathFunctions library. Run the Tutorial executable and verify that it is using the table.
(step 7) build an installer
Next, let's say we want to distribute the project to other people so they can use it. We hope to provide both binary and source code on various platforms. This is a bit different from the installation we did earlier in "Install and Test" (step 4), where we installed binaries built from source. In this example, we will build an installer package that supports binary installation and package management capabilities. To do this, we'll use CPack to create platform-specific installers. Specifically, we need to add a few lines to the bottom of the top-level CMakeLists.txt file.
include(InstallRequiredSystemLibraries)
set(CPACK_RESOURCE_FILE_LICENSE "${CMAKE_CURRENT_SOURCE_DIR}/License.txt")
set(CPACK_PACKAGE_VERSION_MAJOR "${Tutorial_VERSION_MAJOR}")
set(CPACK_PACKAGE_VERSION_MINOR "${Tutorial_VERSION_MINOR}")
include(CPack)
That's all there is to it. We include first InstallRequiredSystemLibraries. This module will include any runtime libraries required for the project's current platform. Next, we set some CPack variables to where we store the license and version information for this project. The version information was set earlier in the tutorial and license.txthas been included in the top-level source directory for this step.
Finally, we include the CPack module that will use these variables and some other properties of the current system to set up the installer.
The next step is to build the project in the normal way, then run CPack on it. To build a binary distribution, from the binary directory run:
cpack
To specify a generator, use the -G option. For multi-config builds, use -C to specify the configuration. For example:
cpack -G ZIP -C Debug
To create a source distribution, you can type:
cpack --config CPackSourceConfig.cmake
Alternatively, run or right-click the target and make packagein the IDE .PackageBuild Project
Run the installer found in the binaries directory. Then run the installed executable and verify that it works.
(Step 8) Add Dashboard support
It is very easy to add support to submit test results to Dashboard. We have defined a number of tests for our project in Test Support. Now we just need to run these tests and submit them to the Dashboard. To include support for Dashboard, we CMakeLists.txtinclude the CTest module at the top level.
use
# enable dashboard scripting
include(CTest)
replace
# enable testing
enable_testing()
The CTest module will be called automatically enable_testing(), so we can remove it from the CMake file.
We also need to create a file in the top-level directory CTestConfig.cmakewhere we can specify the name of the project and where to submit the Dashboard.
set(CTEST_PROJECT_NAME "CMakeTutorial")
set(CTEST_NIGHTLY_START_TIME "00:00:00 EST")

set(CTEST_DROP_METHOD "http")
set(CTEST_DROP_SITE "my.cdash.org")
set(CTEST_DROP_LOCATION "/submit.php?project=CMakeTutorial")
set(CTEST_DROP_SITE_CDASH TRUE)
CTest will read this file at runtime. To create a simple Dashboard, you can run cmake or cmake-gui to configure the project, but not build it. Instead, change directory into the binary tree, then run:
ctest [-VV] -D Experimental
Remember that for multi-configuration generators (such as Visual Studio), the configuration type must be specified:
ctest [-VV] -C Debug -D Experimental
Alternatively, build Experimentalthe target from within the IDE.
ctestThe project will be built and tested, and the results submitted to the Kitware public dashboard Dashboard. Dashboard results will be uploaded to Kitware's public Dashboard.
(step 9) Mixing static and dynamic libraries
In this section we show how to use BUILD_SHARED_LIBSvariables to control add_librarythe default behavior and allow control over how STATIC,SHARED,MODULE或OBJECTlibraries are built without explicit types ( ).
To do this we need to BUILD_SHARED_LIBSadd to the top level CMakeLists.txt. We use optionthe command because it allows the user to choose whether the value is On or Off.
Next, we'll refactor MathFunctions to be a real library wrapped in mysqrt or sqrt instead of requiring the calling code to perform this logic. This also means that USE_MYMATHbuilding MathFuctions will not be controlled, but the behavior of this library.
The first step is to CMakeLists.txtupdate the top-level start section to:
cmake_minimum_required(VERSION 3.10)

# set the project name and version
project(Tutorial VERSION 1.0)

# specify the C++ standard
set(CMAKE_CXX_STANDARD 11)
set(CMAKE_CXX_STANDARD_REQUIRED True)

# control where the static and shared libraries are built so that on windows
# we don't need to tinker with the path to run the executable
set(CMAKE_ARCHIVE_OUTPUT_DIRECTORY "${PROJECT_BINARY_DIR}")
set(CMAKE_LIBRARY_OUTPUT_DIRECTORY "${PROJECT_BINARY_DIR}")
set(CMAKE_RUNTIME_OUTPUT_DIRECTORY "${PROJECT_BINARY_DIR}")

option(BUILD_SHARED_LIBS "Build using shared libraries" ON)

# configure a header file to pass the version number only
configure_file(TutorialConfig.h.in TutorialConfig.h)

# add the MathFunctions library
add_subdirectory(MathFunctions)

# add the executable
add_executable(Tutorial tutorial.cxx)
target_link_libraries(Tutorial PUBLIC MathFunctions)
Now that we have MathFunctions always used, we will need to update the library's logic. So, in MathFunctions/CMakeLists.txt, we need to create one that conditionally builds it SqrtLibrarywhen enabled . USE_MYMATHNow, since this is a tutorial, we will explicitly require that SqrtLibrary be built statically.
The end result MathFunctions/CMakeLists.txtshould look like this:
# add the library that runs
add_library(MathFunctions MathFunctions.cxx)

# state that anybody linking to us needs to include the current source dir
# to find MathFunctions.h, while we don't.
target_include_directories(MathFunctions
                           INTERFACE ${CMAKE_CURRENT_SOURCE_DIR}
                           )

# should we use our own math functions
option(USE_MYMATH "Use tutorial provided math implementation" ON)
if(USE_MYMATH)

  target_compile_definitions(MathFunctions PRIVATE "USE_MYMATH")

  # first we add the executable that generates the table
  add_executable(MakeTable MakeTable.cxx)

  # add the command to generate the source code
  add_custom_command(
    OUTPUT ${CMAKE_CURRENT_BINARY_DIR}/Table.h
    COMMAND MakeTable ${CMAKE_CURRENT_BINARY_DIR}/Table.h
    DEPENDS MakeTable
    )

  # library that just does sqrt
  add_library(SqrtLibrary STATIC
              mysqrt.cxx
              ${CMAKE_CURRENT_BINARY_DIR}/Table.h
              )

  # state that we depend on our binary dir to find Table.h
  target_include_directories(SqrtLibrary PRIVATE
                             ${CMAKE_CURRENT_BINARY_DIR}
                             )

  target_link_libraries(MathFunctions PRIVATE SqrtLibrary)
endif()

# define the symbol stating we are using the declspec(dllexport) when
# building on windows
target_compile_definitions(MathFunctions PRIVATE "EXPORTING_MYMATH")

# install rules
install(TARGETS MathFunctions DESTINATION lib)
install(FILES MathFunctions.h DESTINATION include)
Next, update MathFunctions/mysqrt.cxxto use mathfunctionsand detailnamespace:
#include <iostream>

#include "MathFunctions.h"

// include the generated table
#include "Table.h"

namespace mathfunctions
{
namespace detail
{
// a hack square root calculation using simple operations
double mysqrt(double x)
{
  if (x <= 0)
    return 0;

  // use the table to help find an initial value
  double result = x;
  if (x >= 1 && x < 10)
  {
    std::cout << "Use the table to help find an initial value " << std::endl;
    result = sqrtTable[static_cast<int>(x)];
  }

  // do ten iterations
  for (int i = 0; i < 10; ++i)
  {
    if (result <= 0)
      result = 0.1;
    double delta = x - (result * result);
    result = result + 0.5 * delta / result;
    std::cout << "Computing sqrt of " << x << " to be " << result << std::endl;
  }

  return result;
}
}
}
We also need to tutorial.cxxmake some changes in so that it no longer works USE_MYMATH:
- always include
MathFunctions.h - always use
mathfunctions::sqrt - do not contain
cmath
Finally, update MathFunctions/MathFunctions.hto use the dll export definition:
#if defined(_WIN32)
#  if defined(EXPORTING_MYMATH)
#    define DECLSPEC __declspec(dllexport)
#  else
#    define DECLSPEC __declspec(dllimport)
#  endif
#else // non windows
#  define DECLSPEC
#endif

namespace mathfunctions {
double DECLSPEC sqrt(double x);
}
At this point, if you built everything, you'll notice linking failures because we combined a static library with no position-independent code with a library with position-independent code. POSITION_INDEPENDENT_CODEThe solution is to explicitly set the target property of SqrtLibrary to True regardless of the build type .
# state that SqrtLibrary need PIC when the default is shared libraries
  set_target_properties(SqrtLibrary PROPERTIES
                        POSITION_INDEPENDENT_CODE ${BUILD_SHARED_LIBS}
                        )

  target_link_libraries(MathFunctions PRIVATE SqrtLibrary)
Exercise: We modified MathFunctions.hto use the dll export definition. Using the CMake documentation, can you find a helper module to make this easier?
(step 10) Add a generator expression
Generator expressions are evaluated during build system generation to generate information specific to each build configuration.
LINK_LIBRARIES,INCLUDE_DIRECTORIES,COMPLIE_DEFINITIONSGenerator expressions are allowed in the context of many target properties (such as etc.). They can also be used when populating these properties with commands such as target_link_libraries(),target_include_directories() ,target_compile_definitions()etc.
Generator expressions can be used to enable conditional linking, conditional definitions used at compile time, conditional include directories, etc. Conditions can be based on build configurations, target properties, platform information, or any other queryable information.
There are different types of generator expressions, including logical, informational, and output expressions.
Logical expressions are used to create conditional outputs. Basic expressions are 0 and 1 expressions. $<0:...>results in an empty string, which instead <1:...>results in the content "...". They can also be nested.
A common use of generator expressions is to conditionally add compiler flags, such as those for language levels or warnings. A good pattern is to INTERFACEassociate the information with a target to allow the information to spread. Let's start by constructing a INTERFACEtarget and specifying the desired C++standard level 11instead of using CMAKE_CXX_STANDARD.
So, the following code:
# specify the C++ standard
set(CMAKE_CXX_STANDARD 11)
set(CMAKE_CXX_STANDARD_REQUIRED True)
will be replaced with:
add_library(tutorial_compiler_flags INTERFACE)
target_compile_features(tutorial_compiler_flags INTERFACE cxx_std_11)
Next, we add the required compiler warning flags to the project. Since warning flags vary by compiler, we use COMPILE_LANG_AND_IDgenerator expressions to control which flags should be applied given a language and a set of compiler IDs, like this:
set(gcc_like_cxx "$<COMPILE_LANG_AND_ID:CXX,ARMClang,AppleClang,Clang,GNU>")
set(msvc_cxx "$<COMPILE_LANG_AND_ID:CXX,MSVC>")
target_compile_options(tutorial_compiler_flags INTERFACE
 "$<${gcc_like_cxx}:$<BUILD_INTERFACE:-Wall;-Wextra;-Wshadow;-Wformat=2;-Wunused>>"
 "$<${msvc_cxx}:$<BUILD_INTERFACE:-W3>>"
)
Looking at this, we see that the warning signs are encapsulated inside BUILD_INTERFACEthe condition. This is done so that consumers of our installed projects don't inherit our warning flags.
Exercise: Modify MathFunctions/CMakeLists.txtso that all targets have pair tutorial_compiler_flags target_link_libraries()calls.
(Step 11) Add output configuration
In "(Step 4) Installation and Testing" of this tutorial, we added the ability to CMake to install the project's libraries and header files. During "(Step 7) Building the Installer" we added the ability to package this stuff so it can be distributed to others.
The next step is to add the necessary information so that other CMake projects can use our project, whether from a build directory, a local installation, or a packaged file.
The first step is to update our install(TARGETS)command to not only specify DESTINATION, but to specify EXPORT. EXPORTThe keyword generates and installs a CMake file that contains code for importing all targets listed in the install command from the installation tree. So let's go ahead and explicitly update the MathFunctions library with the command MathFunctions/CMakeLists.txtin the update as follows:installEXPORT
install(TARGETS MathFunctions tutorial_compiler_flags
        DESTINATION lib
        EXPORT MathFunctionsTargets)
install(FILES MathFunctions.h DESTINATION include)
Now that we have exported MathFunctions, we also need to explicitly install the generated MathFunctionsTargets.cmakefiles. CMakeLists.txtThis is done by adding the following to the bottom of the top-level :
install(EXPORT MathFunctionsTargets
  FILE MathFunctionsTargets.cmake
  DESTINATION lib/cmake/MathFunctions
)
At this point, you should try running CMake. If everything is set up correctly, you will see that CMake will generate errors like this:
Target "MathFunctions" INTERFACE_INCLUDE_DIRECTORIES property contains
path:

  "/Users/robert/Documents/CMakeClass/Tutorial/Step11/MathFunctions"

which is prefixed in the source directory.
What CMake is trying to say is that, in the process of generating the export information, it will export paths that are inherently tied to the current machine and have no effect on other machines. The solution is to update MathFunctions target_include_directoriesto know that it needs a different INTERFACElocation when using it from the build directory and the install/package. This means turning the call to MathFunctions target_include_directoriesinto:
target_include_directories(MathFunctions
                           INTERFACE
                            $<BUILD_INTERFACE:${CMAKE_CURRENT_SOURCE_DIR}>
                            $<INSTALL_INTERFACE:include>
                           )
After updating, we can re-run CMake and confirm that it no longer emits warnings.
At this point, we have correctly packaged the target information required by CMake, but we still need to build MathFunctionsConfig.cmakeso that the CMake find_packagecommand can find our project. So we go ahead and Config.cmake.inadd a new file named to the top-level directory of the project's top-level project with the following contents:
@PACKAGE_INIT@
include ( "${CMAKE_CURRENT_LIST_DIR}/MathFunctionsTargets.cmake" )
Then, to properly configure and install the file, add the following to CMakeLists.txtthe bottom of the top-level:
install(EXPORT MathFunctionsTargets
  FILE MathFunctionsTargets.cmake
  DESTINATION lib/cmake/MathFunctions
)

include(CMakePackageConfigHelpers)
# generate the config file that is includes the exports
configure_package_config_file(${CMAKE_CURRENT_SOURCE_DIR}/Config.cmake.in
  "${CMAKE_CURRENT_BINARY_DIR}/MathFunctionsConfig.cmake"
  INSTALL_DESTINATION "lib/cmake/example"
  NO_SET_AND_CHECK_MACRO
  NO_CHECK_REQUIRED_COMPONENTS_MACRO
  )
# generate the version file for the config file
write_basic_package_version_file(
  "${CMAKE_CURRENT_BINARY_DIR}/MathFunctionsConfigVersion.cmake"
  VERSION "${Tutorial_VERSION_MAJOR}.${Tutorial_VERSION_MINOR}"
  COMPATIBILITY AnyNewerVersion
)

# install the configuration file
install(FILES
  ${CMAKE_CURRENT_BINARY_DIR}/MathFunctionsConfig.cmake
  DESTINATION lib/cmake/MathFunctions
  )
At this point, we have generated a relocatable CMake configuration for our project, which can be used after installing or packaging the project. If we also want to use our project from the build directory, we just need to add the following to CMakeLists.txtthe bottom of the top level:
export(EXPORT MathFunctionsTargets
  FILE "${CMAKE_CURRENT_BINARY_DIR}/MathFunctionsTargets.cmake"
)
With this export call, we now generate one Targets.cmakethat allows the one configured in the build directory MathFunctionsConfig.cmaketo be used by other projects without having to install it.
Import a CMake project (consumer)
This example shows how a project can find Config.cmakeother CMake packages for makefiles.
It also shows Config.cmakehow the project's external dependencies are declared at build time.
Package debug and release (multiple packages)
By default, CMake's model is that a build directory contains only one configuration, which can be Debug, Release, MinSizeRel or RelWithDebInfo.
But CPack can be set up to bundle multiple build directories at the same time to build a single package containing multiple configurations of the same project.
First, we need to build a multi_configdirectory called , which will contain all the builds we want to package together.
Second multi_config, create a debugand releasedirectory under . In the end you should have a layout like this:
─ multi_config
    ├── debug
    └── release
Now, we need to set up debug and release builds, which roughly requires the following:
cmake -DCMAKE_BUILD_TYPE=Debug ../../MultiPackage/
cmake --build .
cd ../release
cmake -DCMAKE_BUILD_TYPE=Release ../../MultiPackage/
cmake --build .
cd ..
MultiCPackConfig.cmakeNow that the debug and release builds are complete, we can package the two builds into one release build using custom files.
cpack --config ../../MultiPackage/MultiCPackConfig.cmake
Two, Cmake entry case
2.1 Single source file
The source code corresponding to this section is located in the directory: Demo1. For simple projects, you only need to write a few lines of code. For example, suppose there is only one source file http://main.cc in our project now , and the purpose of this program is to calculate the exponent power of a number.
#include <stdio.h>
#include <stdlib.h>

/**
 * power - Calculate the power of number.
 * @param base: Base value.
 * @param exponent: Exponent value.
 *
 * @return base raised to the power exponent.
 */
double power(double base, int exponent)
{
    int result = base;
    int i;

    for(i = 1; i < exponent; ++i){
        result = result * base;
    }

    return result;
}

int main(int argc, char *argv[])
{
    if (argc < 3){
        printf("Usage: %s base exponent \n", argv[0]);
        return 1;
    }
    double base = atof(argv[1]);
    int exponent = atoi(argv[2]);
    double result = power(base, exponent);
    printf("%g ^ %d is %g\n", base, exponent, result);
    return 0;
}
Write CMakeLists.txt
First write the CMakeLists.txt file and save it in the same directory as the http://main.cc source file:
# CMake 最低版本号要求
cmake_minimum_required (VERSION 2.8)

# 项目信息
project (Demo1)

# 指定生成目标
add_executable(Demo main.cc)
The syntax of CMakeLists.txt is relatively simple, consisting of commands, comments and spaces, where commands are not case-sensitive. #Anything after the symbol is considered a comment. A command consists of a command name, parentheses, and parameters, and the parameters are separated by spaces.
For the above CMakeLists.txt file, several commands appeared in sequence:
cmake_minimum_required: Specifies the minimum version of CMake required to run this configuration file;project: The parameter ismain, the command indicates that the name of the project is main.add_executable: Compile the source file named main.cc into an executable file named Demo.
compile project
Afterwards, execute it in the current directory cmake .to obtain the Makefile and use makethe command to compile the Demo1 executable file.
[ehome@xman Demo1]$ cmake .
-- The C compiler identification is GNU 4.8.2
-- The CXX compiler identification is GNU 4.8.2
-- Check for working C compiler: /usr/sbin/cc
-- Check for working C compiler: /usr/sbin/cc -- works
-- Detecting C compiler ABI info
-- Detecting C compiler ABI info - done
-- Check for working CXX compiler: /usr/sbin/c++
-- Check for working CXX compiler: /usr/sbin/c++ -- works
-- Detecting CXX compiler ABI info
-- Detecting CXX compiler ABI info - done
-- Configuring done
-- Generating done
-- Build files have been written to: /home/ehome/Documents/programming/C/power/Demo1
[ehome@xman Demo1]$ make
Scanning dependencies of target Demo
[100%] Building C object CMakeFiles/Demo.dir/main.cc.o
Linking C executable Demo
[100%] Built target Demo
[ehome@xman Demo1]$ ./Demo 5 4
5 ^ 4 is 625
[ehome@xman Demo1]$ ./Demo 7 3
7 ^ 3 is 343
[ehome@xman Demo1]$ ./Demo 2 10
2 ^ 10 is 1024
2.2 Multiple source files
Multiple source files in the same directory: the directory where the source code corresponding to this section is located: Demo2.
The above example has only a single source file. Now if powerthe function is written separately MathFunctions.cinto a source file named , the project becomes as follows:
/Demo2
    |
    +--- main.cc
    |
    +--- MathFunctions.cc
    |
    +--- MathFunctions.h
At this time, CMakeLists.txt can be changed to the following form:
# CMake 最低版本号要求
cmake_minimum_required (VERSION 2.8)

# 项目信息
project (Demo2)

# 指定生成目标
add_executable(Demo main.cc MathFunctions.cc)
The only change is add_executableto add a MathFunctions.ccsource file to the command. Of course, there is nothing wrong with writing this way, but if there are many source files, it will be an annoying job to add the names of all source files. A more convenient way is to use aux_source_directorythe command, which will search for all source files in the specified directory, and then store the results in the specified variable name. Its syntax is as follows:
aux_source_directory(<dir> <variable>)
Therefore, you can modify CMakeLists.txt as follows:
# CMake 最低版本号要求
cmake_minimum_required (VERSION 2.8)

# 项目信息
project (Demo2)

# 查找当前目录下的所有源文件
# 并将名称保存到 DIR_SRCS 变量
aux_source_directory(. DIR_SRCS)

# 指定生成目标
add_executable(Demo ${DIR_SRCS})
In this way, CMake will assign the file names of all source files in the current directory to the variable DIR_SRCS, and then indicate that DIR_SRCSthe source files in the variable need to be compiled into an executable file named Demo.
2.3 Multiple directories, multiple source files
The directory of the source code corresponding to this section: Demo3.
Now move the MathFunctions.h and http://MathFunctions.cc files further into the math directory.
./Demo3
    |
    +--- main.cc
    |
    +--- math/
          |
          +--- MathFunctions.cc
          |
          +--- MathFunctions.h
For this case, you need to write a CMakeLists.txt file in the project root directory Demo3 and math directory respectively. For convenience, we can first compile the files in the math directory into a static library and then call it from the main function.
CMakeLists.txt in the root directory:
# 项目信息
project (Demo3)

# 查找当前目录下的所有源文件
# 并将名称保存到 DIR_SRCS 变量
aux_source_directory(. DIR_SRCS)

# 添加 math 子目录
add_subdirectory(math)

# 指定生成目标
add_executable(Demo main.cc)

# 添加链接库
target_link_libraries(Demo MathFunctions)
Add the following content to this file: Line 3, use the command add_subdirectoryto indicate that this project contains a subdirectory math, so that the CMakeLists.txt file and source code in the math directory will also be processed. On line 6, use the command target_link_librariesto indicate that the executable file main needs to link a link library named MathFunctions.
CMakeLists.txt in subdirectory:
# 查找当前目录下的所有源文件
# 并将名称保存到 DIR_LIB_SRCS 变量
aux_source_directory(. DIR_LIB_SRCS)

# 生成链接库
add_library (MathFunctions ${DIR_LIB_SRCS})
Use the command in this file add_libraryto compile the source files in the src directory into a static link library.
2.4 Custom compilation options
The source code directory corresponding to this section: Demo4.
CMake allows adding compilation options to the project, so that the most suitable compilation scheme can be selected according to the user's environment and needs.
For example, the MathFunctions library can be set as an optional library, and if the option is ON, the mathematical functions defined in the library are used for calculation. Otherwise, the mathematical function library in the standard library is called.
Modify the CMakeLists file
The first step we have to do is to add this option in the top-level CMakeLists.txt file:
# CMake 最低版本号要求
cmake_minimum_required (VERSION 2.8)

# 项目信息
project (Demo4)

# 加入一个配置头文件,用于处理 CMake 对源码的设置
configure_file (
  "${PROJECT_SOURCE_DIR}/config.h.in"
  "${PROJECT_BINARY_DIR}/config.h"
  )

# 是否使用自己的 MathFunctions 库
option (USE_MYMATH
       "Use provided math implementation" ON)

# 是否加入 MathFunctions 库
if (USE_MYMATH)
  include_directories ("${PROJECT_SOURCE_DIR}/math")
  add_subdirectory (math)
  set (EXTRA_LIBS ${EXTRA_LIBS} MathFunctions)
endif (USE_MYMATH)

# 查找当前目录下的所有源文件
# 并将名称保存到 DIR_SRCS 变量
aux_source_directory(. DIR_SRCS)

# 指定生成目标
add_executable(Demo ${DIR_SRCS})
target_link_libraries (Demo  ${EXTRA_LIBS})
in:
- The command on line 7
configure_fileis used to add a configuration header file config.h, which is generated by CMake from config.h.in. Through this mechanism, some parameters and variables can be predefined to control the generation of code. - The command on line 13
optionadds aUSE_MYMATHoption, and defaults toON. - Line 17
USE_MYMATHdecides whether to use the MathFunctions library written by ourselves according to the value of the variable.
Modify the http://main.cc file
Then modify the http://main.cc file to let it USE_MYMATHdecide whether to call the standard library or the MathFunctions library according to the predefined value:
#include <stdio.h>
#include <stdlib.h>
#include "config.h"

#ifdef USE_MYMATH
  #include "math/MathFunctions.h"
#else
  #include <math.h>
#endif


int main(int argc, char *argv[])
{
    if (argc < 3){
        printf("Usage: %s base exponent \n", argv[0]);
        return 1;
    }
    double base = atof(argv[1]);
    int exponent = atoi(argv[2]);

#ifdef USE_MYMATH
    printf("Now we use our own Math library. \n");
    double result = power(base, exponent);
#else
    printf("Now we use the standard library. \n");
    double result = pow(base, exponent);
#endif
    printf("%g ^ %d is %g\n", base, exponent, result);
    return 0;
}
Write http://config.h.in file
The above program is worth noting that line 2 refers to a config.h file, which predefines USE_MYMATHthe value of . But we don't write this file directly. In order to facilitate importing configuration from CMakeLists.txt, we write a config.h.in file with the following content:
#cmakedefine USE_MYMATH
In this way, CMake will automatically generate the config.h file according to the settings in the CMakeLists configuration file.
compile project
Now compile this project, in order to interactively select the value of this variable, you can use ccmakethe command 2 2 or you can use cmake -ithe command, which will provide a conversational interactive configuration interface.
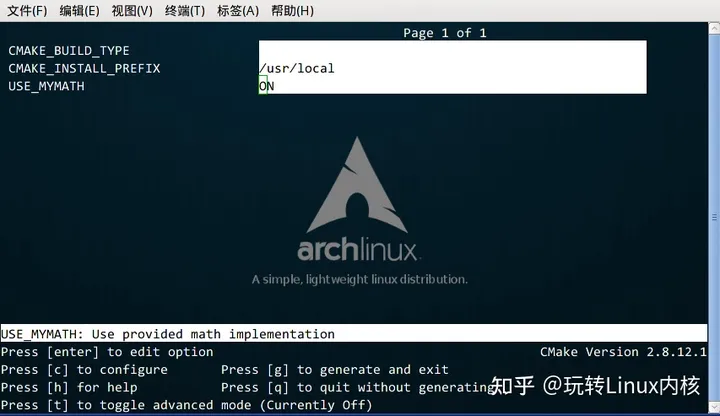
From it, you can find the option just defined USE_MYMATH, press the arrow keys on the keyboard to jump between different option windows, and press enterthe key to modify the option. After the modification, you can press cthe option to complete the configuration, and then press gthe key to confirm to generate the Makefile. For other operations of ccmake, please refer to the instruction prompt given at the bottom of the window.
We can try to USE_MYMATHset ONand OFFget the results respectively:
USE_MYMATH is ON
operation result:
[ehome@xman Demo4]$ ./Demo
Now we use our own MathFunctions library.
 7 ^ 3 = 343.000000
 10 ^ 5 = 100000.000000
 2 ^ 10 = 1024.000000
At this point the content of config.h is:
#define USE_MYMATH
USE_MYMATH is OFF
operation result:
[ehome@xman Demo4]$ ./Demo
Now we use the standard library.
 7 ^ 3 = 343.000000
 10 ^ 5 = 100000.000000
 2 ^ 10 = 1024.000000
At this point the content of config.h is:
/* #undef USE_MYMATH */
2.5 Installation and testing
The source code directory corresponding to this section: Demo5.
CMake can also specify installation rules, and add tests. make installThese two functions can be executed by using and respectively after generating the Makefile make test. In the previous GNU Makefile, you may need to write installand testtwo pseudo-targets and corresponding rules for this, but in CMake, this kind of work also only needs to simply call a few commands.
custom installation rules
First add the following two lines to the math/CMakeLists.txt file:
# 指定 MathFunctions 库的安装路径
install (TARGETS MathFunctions DESTINATION bin)
install (FILES MathFunctions.h DESTINATION include)
Indicates the installation path of the MathFunctions library. Then modify the CMakeLists file in the root directory as well, and add the following lines at the end:
# 指定安装路径
install (TARGETS Demo DESTINATION bin)
install (FILES "${PROJECT_BINARY_DIR}/config.h"
         DESTINATION include)
Through the above customization, the generated Demo file and the MathFunctions function library libMathFunctions.o file will be copied to /usr/local/bin, and MathFunctions.h and the generated config.h file will be copied to /usr/local/include. We can verify that 33 By the way, here /usr/local/is the root directory installed by default, you can CMAKE_INSTALL_PREFIXspecify which root directory these files should be copied to by modifying the value of the variable.
[ehome@xman Demo5]$ sudo make install
[ 50%] Built target MathFunctions
[100%] Built target Demo
Install the project...
-- Install configuration: ""
-- Installing: /usr/local/bin/Demo
-- Installing: /usr/local/include/config.h
-- Installing: /usr/local/bin/libMathFunctions.a
-- Up-to-date: /usr/local/include/MathFunctions.h
[ehome@xman Demo5]$ ls /usr/local/bin
Demo  libMathFunctions.a
[ehome@xman Demo5]$ ls /usr/local/include
config.h  MathFunctions.h
Add tests to the project
Adding tests is also easy. CMake provides a testing tool called CTest. All we have to do is call a series of commands in the CMakeLists file in the project root directory add_test.
# 启用测试
enable_testing()

# 测试程序是否成功运行
add_test (test_run Demo 5 2)

# 测试帮助信息是否可以正常提示
add_test (test_usage Demo)
set_tests_properties (test_usage
  PROPERTIES PASS_REGULAR_EXPRESSION "Usage: .* base exponent")

# 测试 5 的平方
add_test (test_5_2 Demo 5 2)

set_tests_properties (test_5_2
 PROPERTIES PASS_REGULAR_EXPRESSION "is 25")

# 测试 10 的 5 次方
add_test (test_10_5 Demo 10 5)

set_tests_properties (test_10_5
 PROPERTIES PASS_REGULAR_EXPRESSION "is 100000")

# 测试 2 的 10 次方
add_test (test_2_10 Demo 2 10)

set_tests_properties (test_2_10
 PROPERTIES PASS_REGULAR_EXPRESSION "is 1024")
The above code contains four tests. The first test test_runis used to test whether the program runs successfully and returns a value of 0. The remaining three tests are used to test whether the square of 5, the 5th power of 10, and the 10th power of 2 can all get correct results. where PASS_REGULAR_EXPRESSIONis used to test whether the output contains the string that follows.
Let's see the results of the test:
[ehome@xman Demo5]$ make test
Running tests...
Test project /home/ehome/Documents/programming/C/power/Demo5
    Start 1: test_run
1/4 Test #1: test_run .........................   Passed    0.00 sec
    Start 2: test_5_2
2/4 Test #2: test_5_2 .........................   Passed    0.00 sec
    Start 3: test_10_5
3/4 Test #3: test_10_5 ........................   Passed    0.00 sec
    Start 4: test_2_10
4/4 Test #4: test_2_10 ........................   Passed    0.00 sec

100% tests passed, 0 tests failed out of 4

Total Test time (real) =   0.01 sec
If you want to test more input data, it would be too cumbersome to write test cases one by one as above. This can be achieved by writing a macro:
# 定义一个宏,用来简化测试工作
macro (do_test arg1 arg2 result)
  add_test (test_${arg1}_${arg2} Demo ${arg1} ${arg2})
  set_tests_properties (test_${arg1}_${arg2}
    PROPERTIES PASS_REGULAR_EXPRESSION ${result})
endmacro (do_test)

# 使用该宏进行一系列的数据测试
do_test (5 2 "is 25")
do_test (10 5 "is 100000")
do_test (2 10 "is 1024")
For more detailed usage of CTest, please man 1 ctestrefer to the documentation of CTest.
support gdb
It is also very easy to let CMake support gdb settings, just need to specify the option Debugto open in mode -g:
set(CMAKE_BUILD_TYPE "Debug")
set(CMAKE_CXX_FLAGS_DEBUG "$ENV{CXXFLAGS} -O0 -Wall -g -ggdb")
set(CMAKE_CXX_FLAGS_RELEASE "$ENV{CXXFLAGS} -O3 -Wall")
Then you can directly use gdb to debug the generated program.
2.6 Add environment check
The directory of the source code corresponding to this section: Demo6.
Sometimes it may be necessary to check the system environment, for example when using a platform-specific feature. In this example, we check whether the system comes with the pow function. If it has a pow function, use it; otherwise use the power function we defined.
Add CheckFunctionExists macro
First add the CheckFunctionExists.cmake macro in the top-level CMakeLists file, and call check_function_existsthe command to test whether the linker can find powthe function during the linking phase.
# 检查系统是否支持 pow 函数
include (${CMAKE_ROOT}/Modules/CheckFunctionExists.cmake)
check_function_exists (pow HAVE_POW)
Put the code above configure_filebefore the command.
Predefine related macro variables
Next, modify the http://config.h.in file to predefine related macro variables.
// does the platform provide pow function?
#cmakedefine HAVE_POW
Using macros and functions in code
The final step is to modify http://main.cc to use macros and functions in the code:
#ifdef HAVE_POW
    printf("Now we use the standard library. \n");
    double result = pow(base, exponent);
#else
    printf("Now we use our own Math library. \n");
    double result = power(base, exponent);
#endif
2.8 Add version number
The directory of the source code corresponding to this section: Demo7.
It is a good habit to add and maintain the version number to the project, so that users can understand the maintenance status of each version, and keep abreast of whether the currently used version is out of date, or whether there may be incompatibility.
First modify the top-level CMakeLists file, and projectadd the following two lines after the command:
set (Demo_VERSION_MAJOR 1)
set (Demo_VERSION_MINOR 0)
Specify the major and minor version numbers of the current project, respectively.
Later, in order to get the version information in the code, we can modify the http://config.h.in file and add two predefined variables:
// the configured options and settings for Tutorial
#define Demo_VERSION_MAJOR @Demo_VERSION_MAJOR@
#define Demo_VERSION_MINOR @Demo_VERSION_MINOR@
In this way, the version information can be printed directly in the code:
#include <stdio.h>
#include <stdlib.h>
#include <math.h>
#include "config.h"
#include "math/MathFunctions.h"

int main(int argc, char *argv[])
{
    if (argc < 3){
        // print version info
        printf("%s Version %d.%d\n",
            argv[0],
            Demo_VERSION_MAJOR,
            Demo_VERSION_MINOR);
        printf("Usage: %s base exponent \n", argv[0]);
        return 1;
    }
    double base = atof(argv[1]);
    int exponent = atoi(argv[2]);

#if defined (HAVE_POW)
    printf("Now we use the standard library. \n");
    double result = pow(base, exponent);
#else
    printf("Now we use our own Math library. \n");
    double result = power(base, exponent);
#endif

    printf("%g ^ %d is %g\n", base, exponent, result);
    return 0;
}
2.9 Generate installation package
The source code corresponding to this section is located in the directory: Demo8.
This section will learn how to configure and generate installation packages on various platforms, including binary installation packages and source code installation packages. In order to accomplish this task, we need to use CPack, which is also a tool provided by CMake, which is specially used for packaging.
First add the following lines at the end of the top-level CMakeLists.txt file:
# 构建一个 CPack 安装包
include (InstallRequiredSystemLibraries)
set (CPACK_RESOURCE_FILE_LICENSE
  "${CMAKE_CURRENT_SOURCE_DIR}/License.txt")
set (CPACK_PACKAGE_VERSION_MAJOR "${Demo_VERSION_MAJOR}")
set (CPACK_PACKAGE_VERSION_MINOR "${Demo_VERSION_MINOR}")
include (CPack)
The above code does the following things:
- Import the InstallRequiredSystemLibraries module to import the CPack module later;
- Set some CPack related variables, including copyright information and version information, where the version information uses the version number defined in the previous section;
- Import the CPack module.
The next job is to build the project as usual and execute cpackthe command.
Generate a binary installation package:
cpack -C CPackConfig.cmake
Generate source code installation package
cpack -C CPackSourceConfig.cmake
We can try it. After building the project, execute cpack -C CPackConfig.cmakethe command:
[ehome@xman Demo8]$ cpack -C CPackSourceConfig.cmake
CPack: Create package using STGZ
CPack: Install projects
CPack: - Run preinstall target for: Demo8
CPack: - Install project: Demo8
CPack: Create package
CPack: - package: /home/ehome/Documents/programming/C/power/Demo8/Demo8-1.0.1-Linux.sh generated.
CPack: Create package using TGZ
CPack: Install projects
CPack: - Run preinstall target for: Demo8
CPack: - Install project: Demo8
CPack: Create package
CPack: - package: /home/ehome/Documents/programming/C/power/Demo8/Demo8-1.0.1-Linux.tar.gz generated.
CPack: Create package using TZ
CPack: Install projects
CPack: - Run preinstall target for: Demo8
CPack: - Install project: Demo8
CPack: Create package
CPack: - package: /home/ehome/Documents/programming/C/power/Demo8/Demo8-1.0.1-Linux.tar.Z generated.
At this point, 3 binary package files in different formats will be created in this directory:
[ehome@xman Demo8]$ ls Demo8-*
Demo8-1.0.1-Linux.sh  Demo8-1.0.1-Linux.tar.gz  Demo8-1.0.1-Linux.tar.Z
The content contained in these 3 binary package files is exactly the same. We can execute one of them. An interactive installation interface automatically generated by CPack will appear:
[ehome@xman Demo8]$ sh Demo8-1.0.1-Linux.sh
Demo8 Installer Version: 1.0.1, Copyright (c) Humanity
This is a self-extracting archive.
The archive will be extracted to: /home/ehome/Documents/programming/C/power/Demo8

If you want to stop extracting, please press <ctrl-C>.
The MIT License (MIT)

Copyright (c) 2013 Joseph Pan(http://hahack.com)

Permission is hereby granted, free of charge, to any person obtaining a copy of
this software and associated documentation files (the "Software"), to deal in
the Software without restriction, including without limitation the rights to
use, copy, modify, merge, publish, distribute, sublicense, and/or sell copies of
the Software, and to permit persons to whom the Software is furnished to do so,
subject to the following conditions:

The above copyright notice and this permission notice shall be included in all
copies or substantial portions of the Software.

THE SOFTWARE IS PROVIDED "AS IS", WITHOUT WARRANTY OF ANY KIND, EXPRESS OR
IMPLIED, INCLUDING BUT NOT LIMITED TO THE WARRANTIES OF MERCHANTABILITY, FITNESS
FOR A PARTICULAR PURPOSE AND NONINFRINGEMENT. IN NO EVENT SHALL THE AUTHORS OR
COPYRIGHT HOLDERS BE LIABLE FOR ANY CLAIM, DAMAGES OR OTHER LIABILITY, WHETHER
IN AN ACTION OF CONTRACT, TORT OR OTHERWISE, ARISING FROM, OUT OF OR IN
CONNECTION WITH THE SOFTWARE OR THE USE OR OTHER DEALINGS IN THE SOFTWARE.


Do you accept the license? [yN]:
y
By default the Demo8 will be installed in:
  "/home/ehome/Documents/programming/C/power/Demo8/Demo8-1.0.1-Linux"
Do you want to include the subdirectory Demo8-1.0.1-Linux?
Saying no will install in: "/home/ehome/Documents/programming/C/power/Demo8" [Yn]:
y

Using target directory: /home/ehome/Documents/programming/C/power/Demo8/Demo8-1.0.1-Linux
Extracting, please wait...

Unpacking finished successfully
After completion, it prompts that the installation is in the Demo8-1.0.1-Linux subdirectory, we can go in and execute the program:
[ehome@xman Demo8]$ ./Demo8-1.0.1-Linux/bin/Demo 5 2
Now we use our own Math library.
5 ^ 2 is 25
For more detailed usage of CPack, please man 1 cpackrefer to the documentation of CPack.
Migrate projects from other platforms to CMake:
CMake can easily build an engineering environment suitable for execution on various platforms. And if the current engineering environment is not CMake, but based on a specific platform, can it be migrated to CMake? The answer is possible. For several commonly used platforms, their corresponding migration solutions are listed below.
autotools
- am2cmake can convert autotools projects to CMake, a successful case of this tool is KDE.
- Alternative Automake2CMake can convert KDevelop projects using automake.
- Converting autoconf tests
qmake
- qmake converter can convert qmake projects using QT.
Visual Studio
- vcproj2cmake.rb can generate CMakeLists.txt file according to Visual Studio project file (suffix name is
.vcprojor.vcxproj). - vcproj2cmake.ps1 PowerShell version of vcproj2cmake.
- folders4cmake generates corresponding "source_group" information according to Visual Studio project files, which can be easily used in CMake scripts. Support Visual Studio 9/10 project files.
CMakeLists.txt automatically deduced
- gencmake derives a CMakeLists.txt file from existing files.
- CMakeListGenerator applies a set of file and directory analysis to create a complete CMakeLists.txt file. Only Win32 platforms are supported.
Copyright statement: This article is an original article written by Zhihu blogger "Playing with the Linux Kernel". It follows the CC 4.0 BY-SA copyright agreement. For reprinting, please attach the original source link and this statement.
o whom the Software is furnished to do so,
subject to the following conditions:
The above copyright notice and this permission notice shall be included in all
copies or substantial portions of the Software.
THE SOFTWARE IS PROVIDED “AS IS”, WITHOUT WARRANTY OF ANY KIND, EXPRESS OR
IMPLIED, INCLUDING BUT NOT LIMITED TO THE WARRANTIES OF MERCHANTABILITY, FITNESS
FOR A PARTICULAR PURPOSE AND NONINFRINGEMENT. IN NO EVENT SHALL THE AUTHORS OR
COPYRIGHT HOLDERS BE LIABLE FOR ANY CLAIM, DAMAGES OR OTHER LIABILITY, WHETHER
IN AN ACTION OF CONTRACT, TORT OR OTHERWISE, ARISING FROM, OUT OF OR IN
CONNECTION WITH THE SOFTWARE OR THE USE OR OTHER DEALINGS IN THE SOFTWARE.
Do you accept the license? [yN]:
y
By default the Demo8 will be installed in:
“/home/ehome/Documents/programming/C/power/Demo8/Demo8-1.0.1-Linux”
Do you want to include the subdirectory Demo8-1.0.1-Linux?
Saying no will install in: “/home/ehome/Documents/programming/C/power/Demo8” [Yn]:
y
Using target directory: /home/ehome/Documents/programming/C/power/Demo8/Demo8-1.0.1-Linux
Extracting, please wait…
Unpacking finished successfully
完成后提示安装到了 Demo8-1.0.1-Linux 子目录中,我们可以进去执行该程序:

```text
[ehome@xman Demo8]$ ./Demo8-1.0.1-Linux/bin/Demo 5 2
Now we use our own Math library.
5 ^ 2 is 25
For more detailed usage of CPack, please man 1 cpackrefer to the documentation of CPack.
Migrate projects from other platforms to CMake:
CMake can easily build an engineering environment suitable for execution on various platforms. And if the current engineering environment is not CMake, but based on a specific platform, can it be migrated to CMake? The answer is possible. For several commonly used platforms, their corresponding migration solutions are listed below.
autotools
- am2cmake can convert autotools projects to CMake, a successful case of this tool is KDE.
- Alternative Automake2CMake can convert KDevelop projects using automake.
- Converting autoconf tests
qmake
- qmake converter can convert qmake projects using QT.
Visual Studio
- vcproj2cmake.rb can generate CMakeLists.txt file according to Visual Studio project file (suffix name is
.vcprojor.vcxproj). - vcproj2cmake.ps1 PowerShell version of vcproj2cmake.
- folders4cmake generates corresponding "source_group" information according to Visual Studio project files, which can be easily used in CMake scripts. Support Visual Studio 9/10 project files.
CMakeLists.txt automatically deduced
- gencmake derives a CMakeLists.txt file from existing files.
- CMakeListGenerator applies a set of file and directory analysis to create a complete CMakeLists.txt file. Only Win32 platforms are supported.
Copyright statement: This article is an original article written by Zhihu blogger "Playing with the Linux Kernel". It follows the CC 4.0 BY-SA copyright agreement. For reprinting, please attach the original source link and this statement.
Original link: https://zhuanlan.zhihu.com/p/638429917