
Table of contents
1. What is Tencent Cloud Cloud Studio
2. Introduction to the experiment in this paper
3. Develop a simplified version of the ordering system page
1.2. Install less and less-loader
1.3. Expose the webpack configuration file
1.5. Upload the materials required for the project
1.6. Replace the App.js main file
4. Development space management
I. Introduction
1. What is Tencent Cloud Cloud Studio
Cloud Studio is a "browser"-based integrated development environment (IDE) that provides developers with a stable cloud workstation. When using Cloud Studio, there is no need to install it. You can quickly start and develop projects by opening the browser. The underlying resources can be automatically elastically scaled, which greatly saves costs. Low-code development saves time and effort.
The web-based code editor includes basic IDE functions such as code highlighting, auto-completion, Git integration, and terminal, and supports real-time debugging, plug-in extensions, etc., to improve development, compilation, and deployment efficiency;
Supports remote access to cloud servers, providing Tencent Cloud SCF industry users with a complete closed-loop cloud-native development experience of development-test-deployment;
2. Introduction to the experiment in this paper
We often encounter remote office scenarios. Next, we use the cloud IDE Cloud Studio to quickly build, and develop and restore a simplified version of the mobile React H5 ordering system page, from 0 to 1 to experience the advantages brought to us by the cloud IDE. It does not need to install various environments. It is simple and easy to use, and you can get started right out of the box.
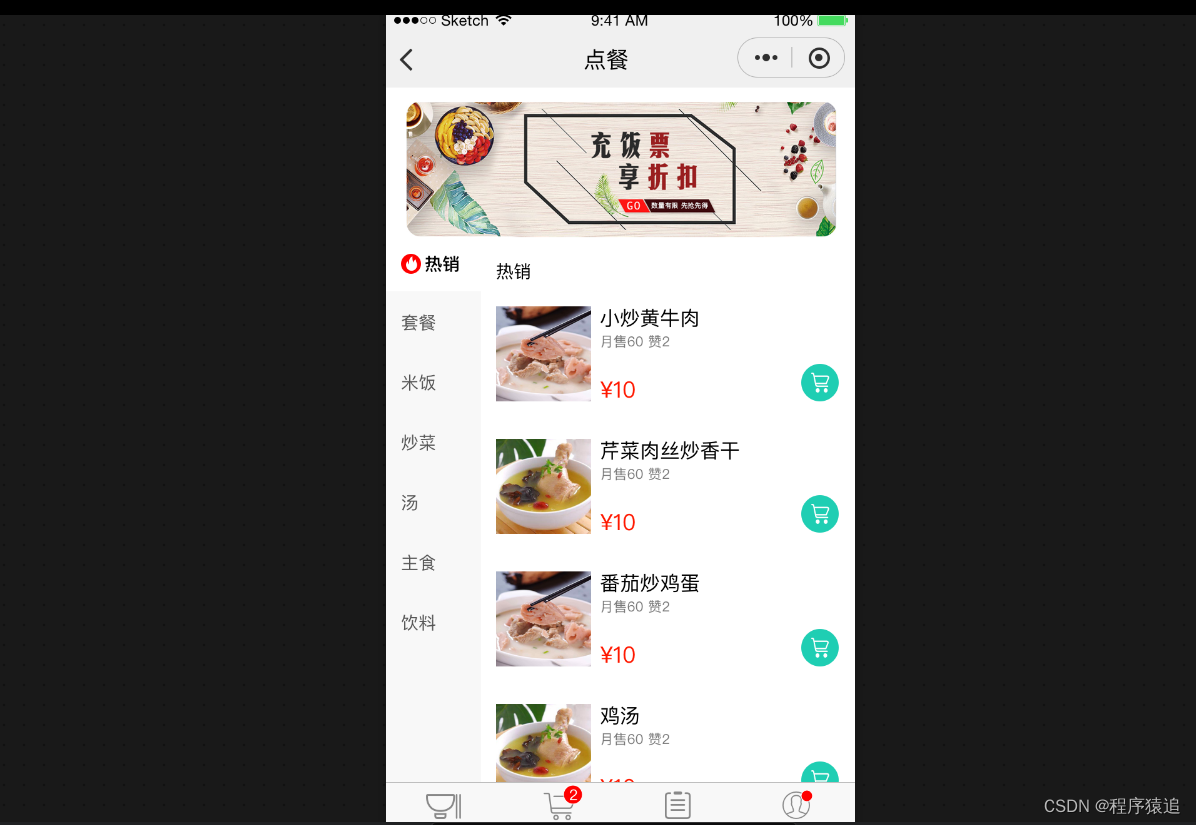
order interface
2. Preparatory work
1. Register Cloud Studio
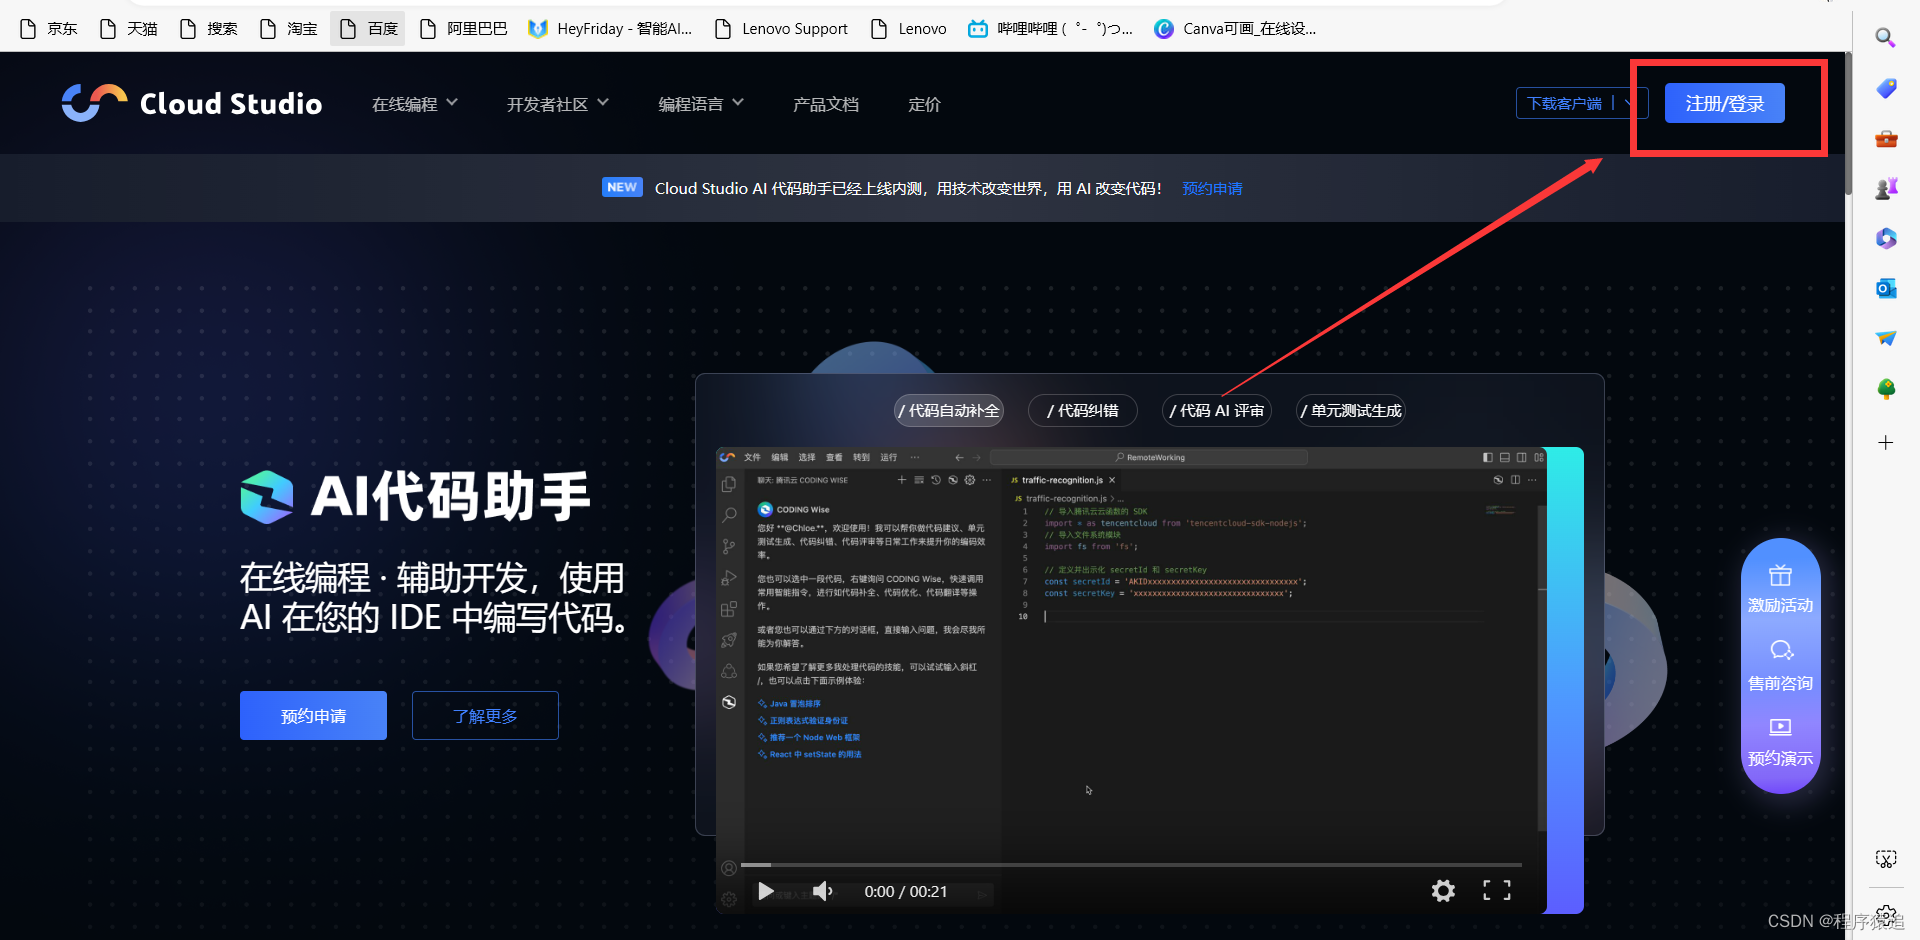
Prepare material images (such as the banner on the home page, food pictures, etc.), then click the link to jump to the official website, and click "Register/Login".
Among them, Cloud Studio is very convenient and provides three registration methods:
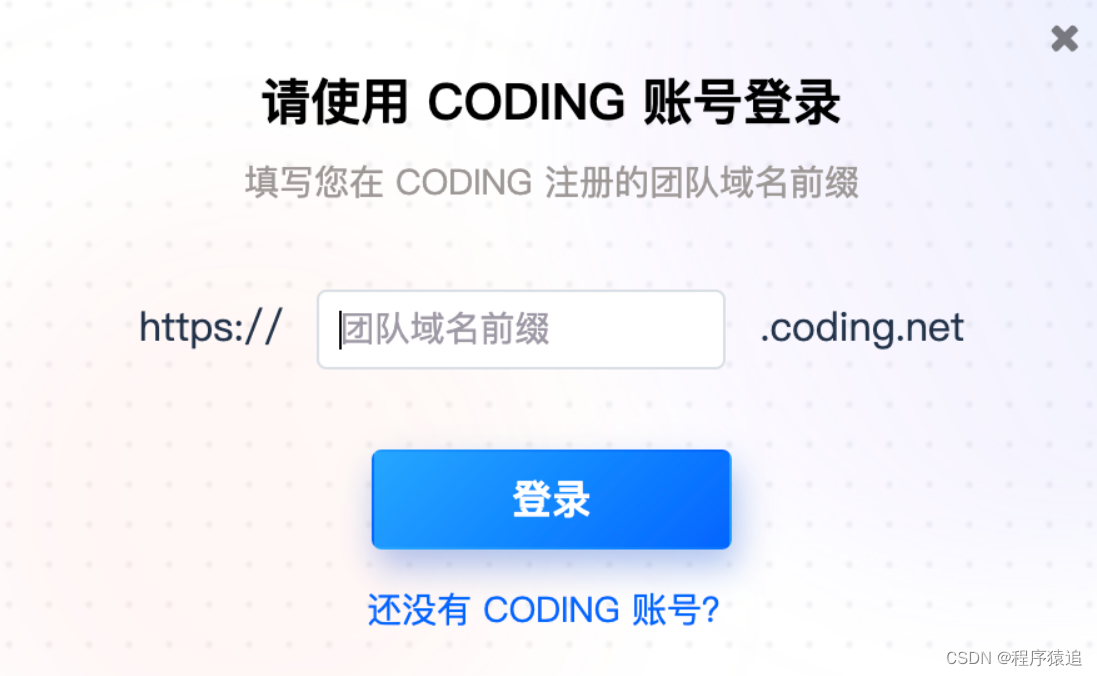
1. Use the CODING account to authorize registration/login
2. Use WeChat to authorize registration/login
3. Use GitHub to authorize registration/login

I chose CODING, and I need to enter the corresponding team domain name prefix
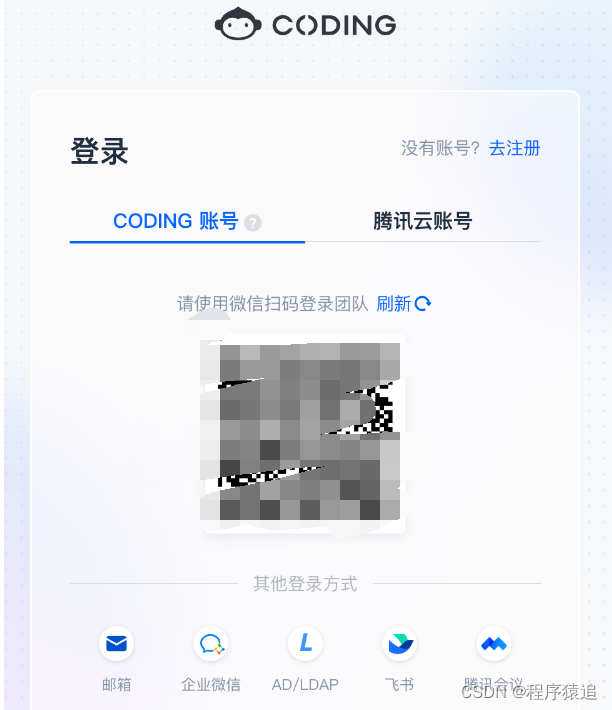
After entering the domain name, the following interface will appear, select your CODING account method, and scan the code to log in.
2. Initialize the workspace
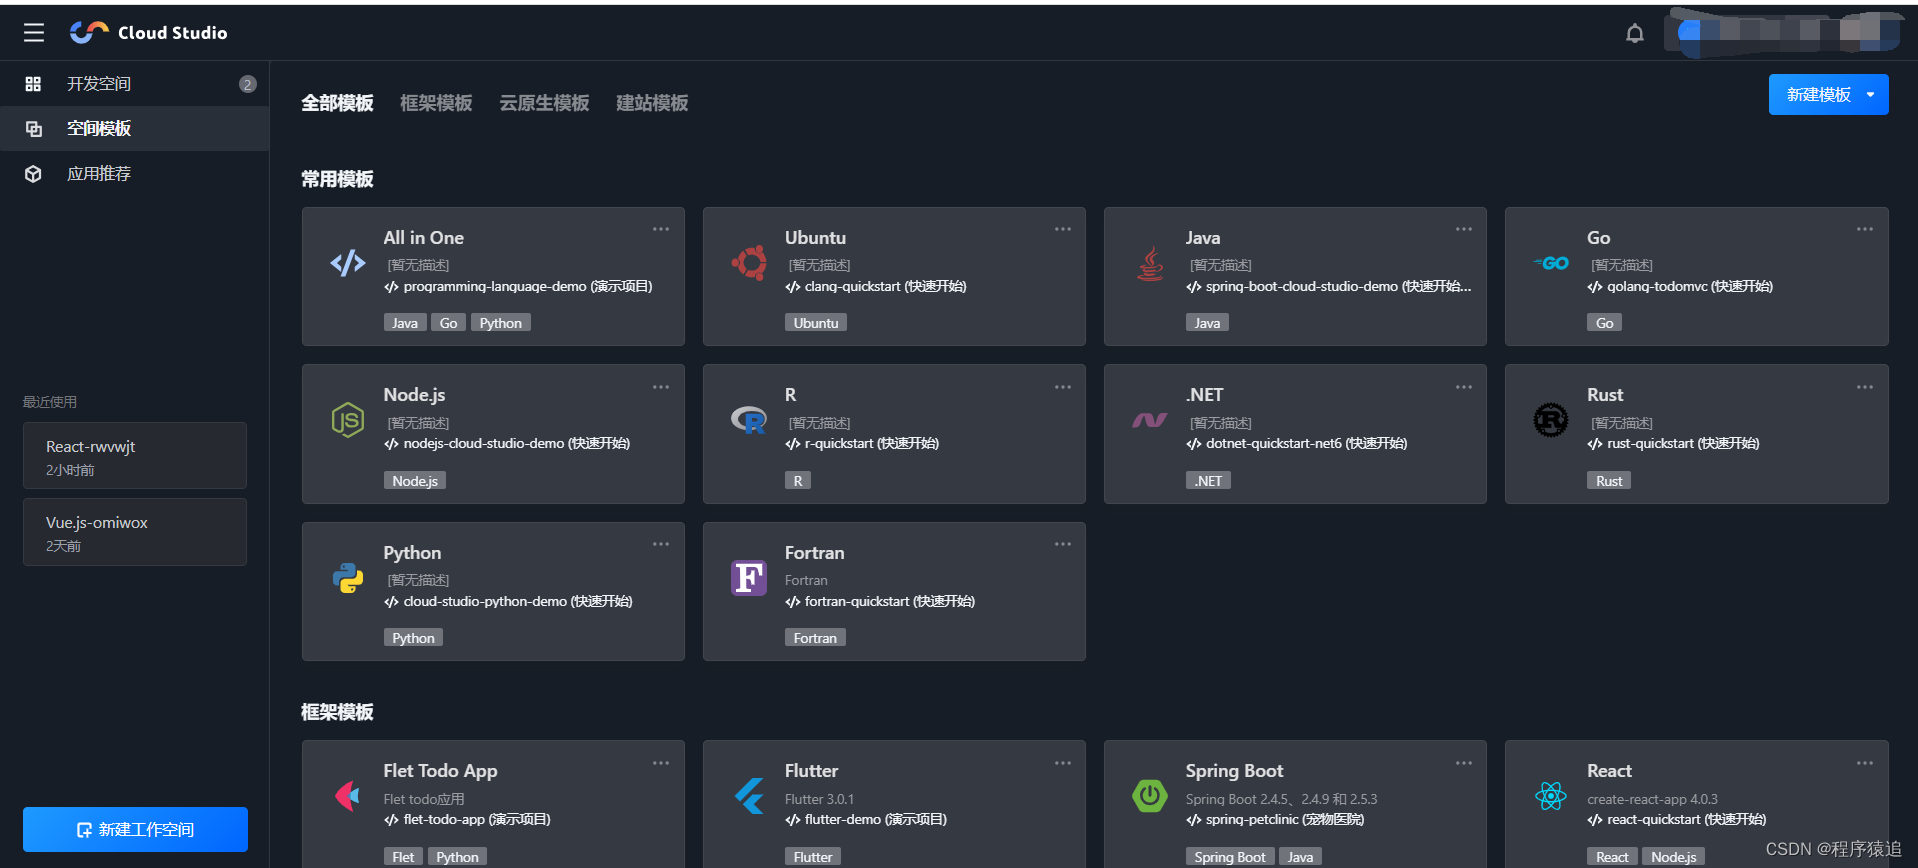
After entering, the following interface will appear. Cloud Studio provides many templates, such as framework templates, cloud-native templates, website building templates, etc. At the same time, Cloud Studio also gives all new and old users 3000 minutes of free working space per month.
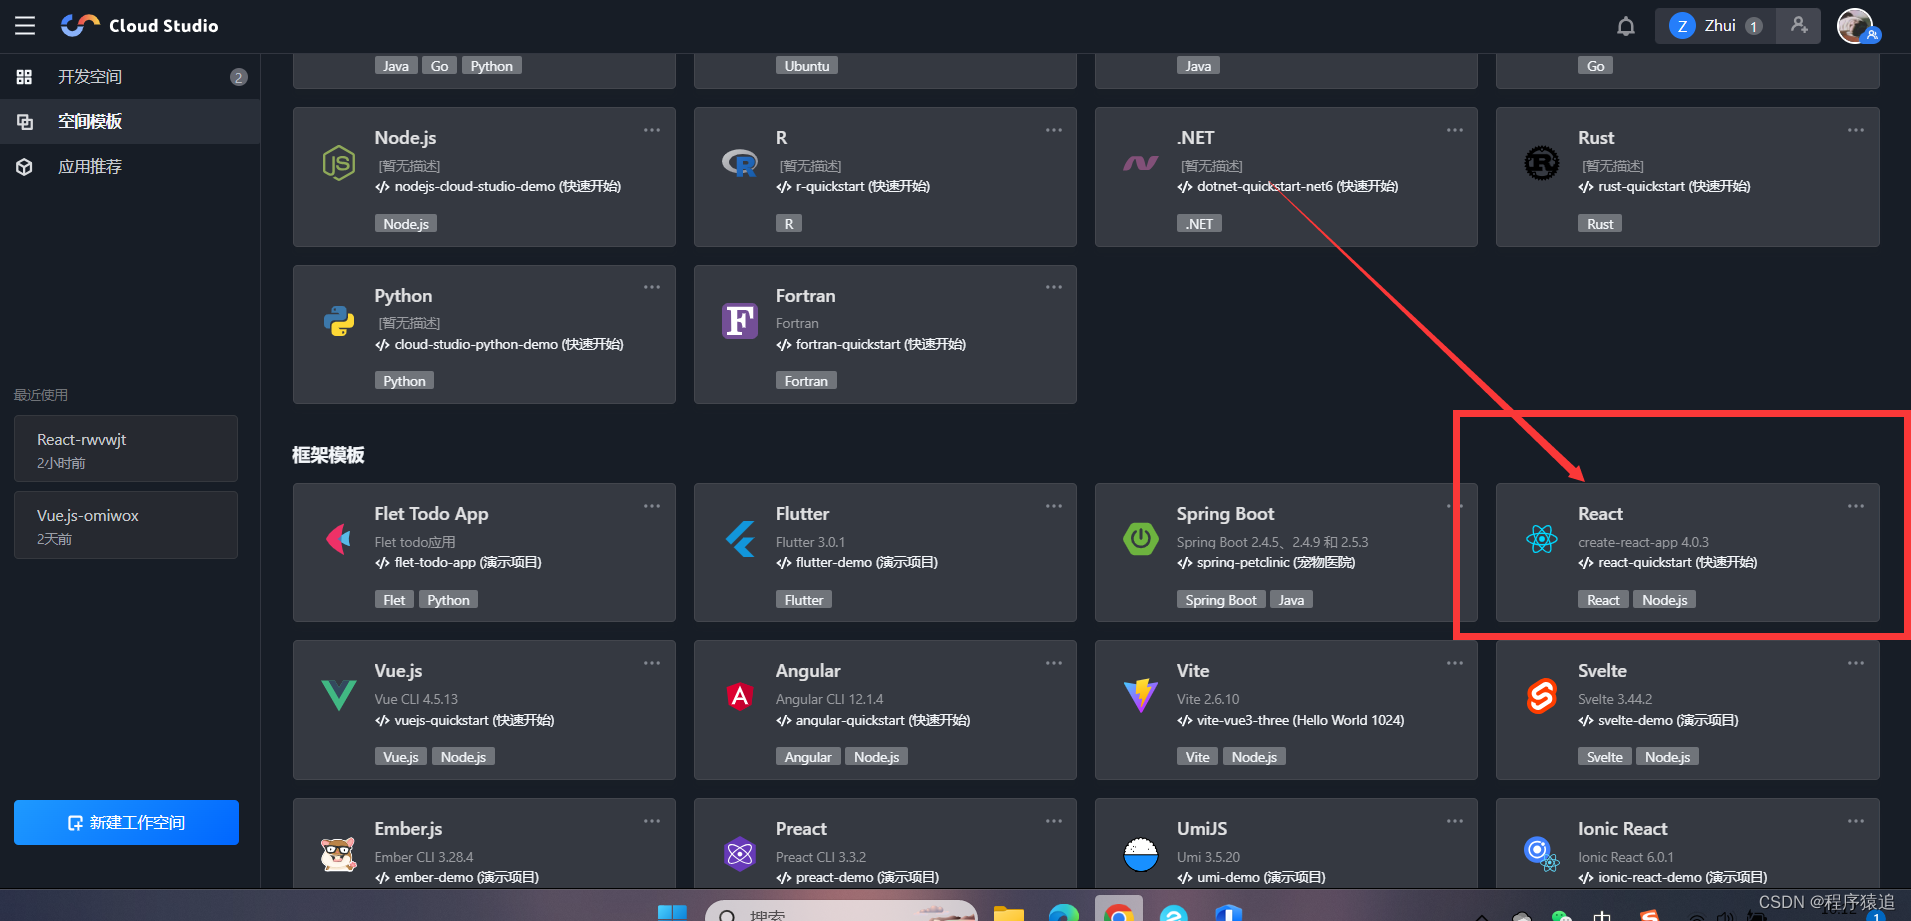
Find the React framework template and click it to start initializing a React workspace, and wait for the initialization of the cloud IDE to complete.
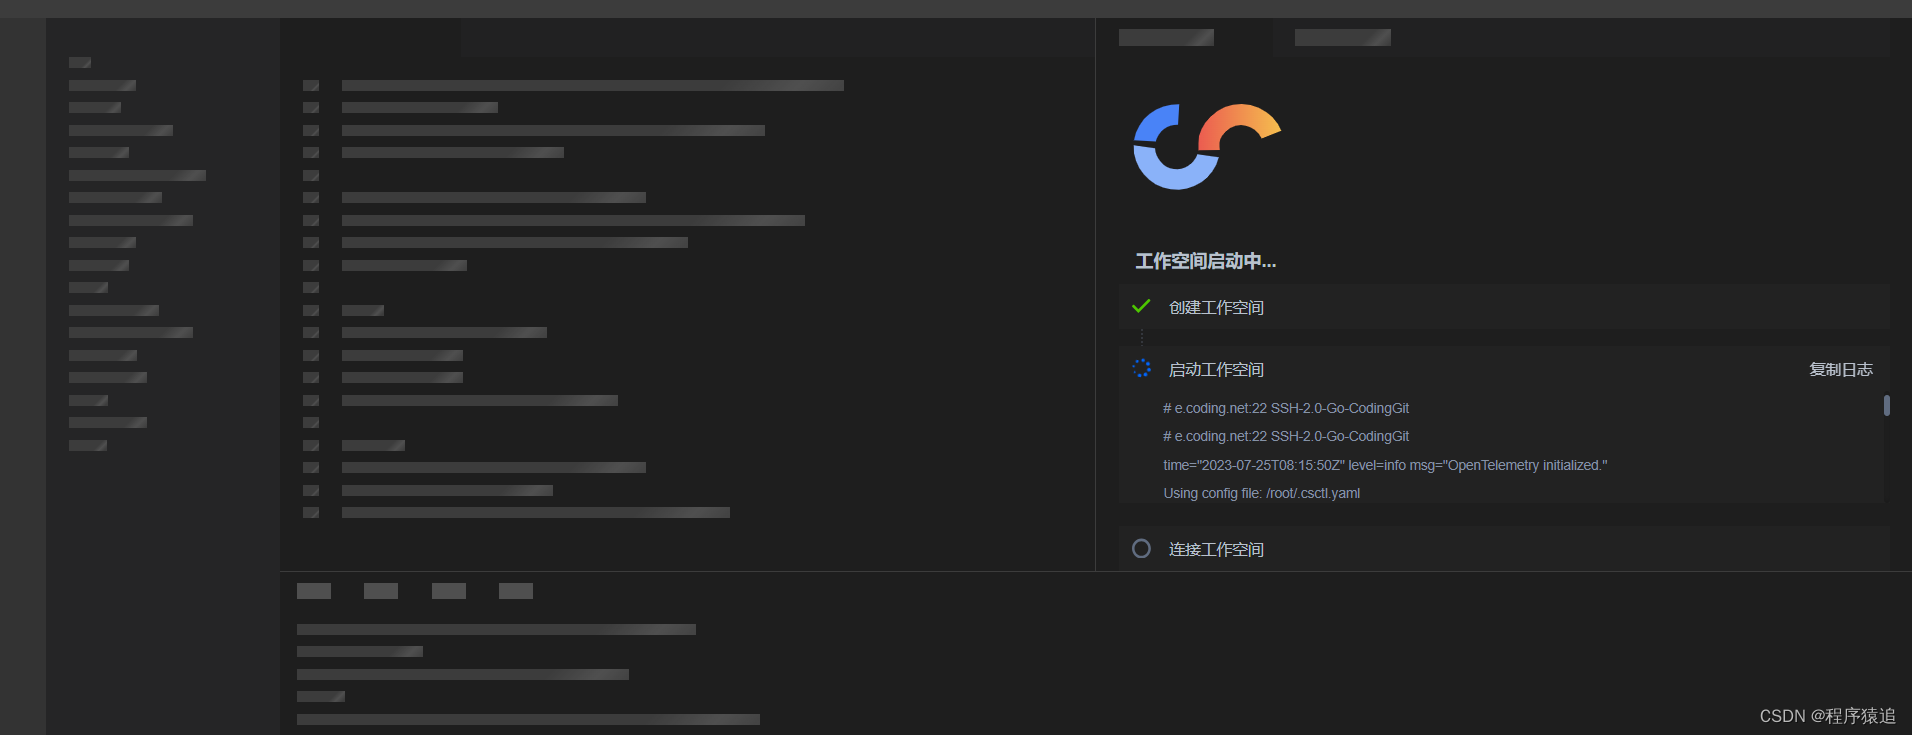
During the initialization process, after you can see the code on the left, the console will install dependencies and start a simple React template project.
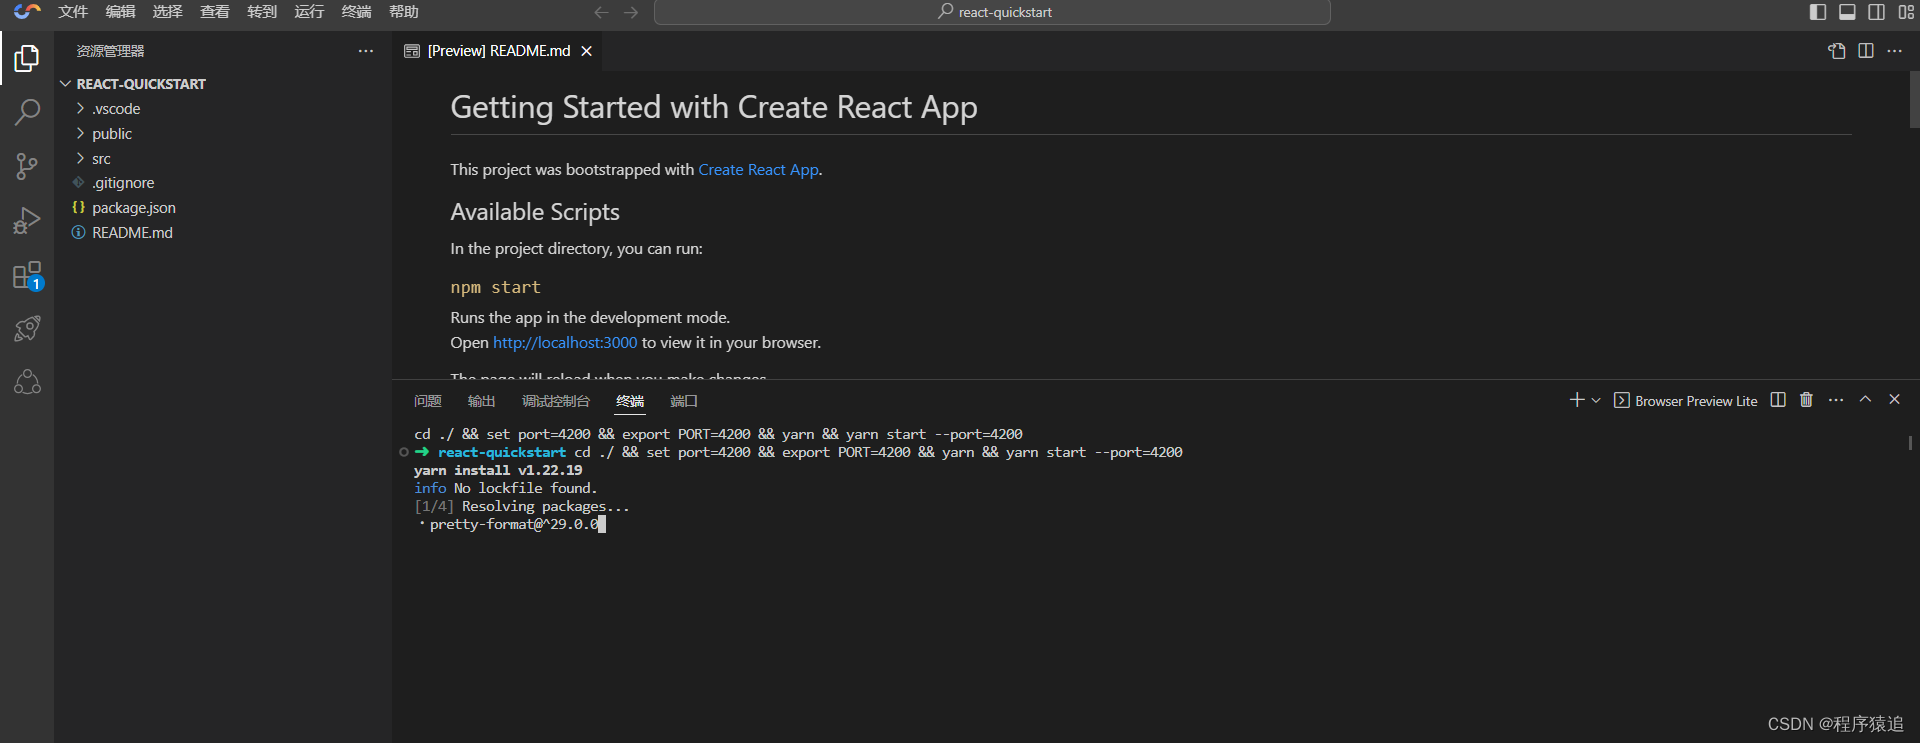
After the initialization is complete, on our right side, we can see a real-time preview preview interface, and then enter the following commands in the console below.
// 进入当前目录
cd ./ &&
// 设置port的环境变量
set port=3000 &&
// 导出port的环境变量
export PORT=3000 &&
// 相当于 yarn install,安装相关依赖
yarn &&
// 启动开发环境
yarn start --port=3000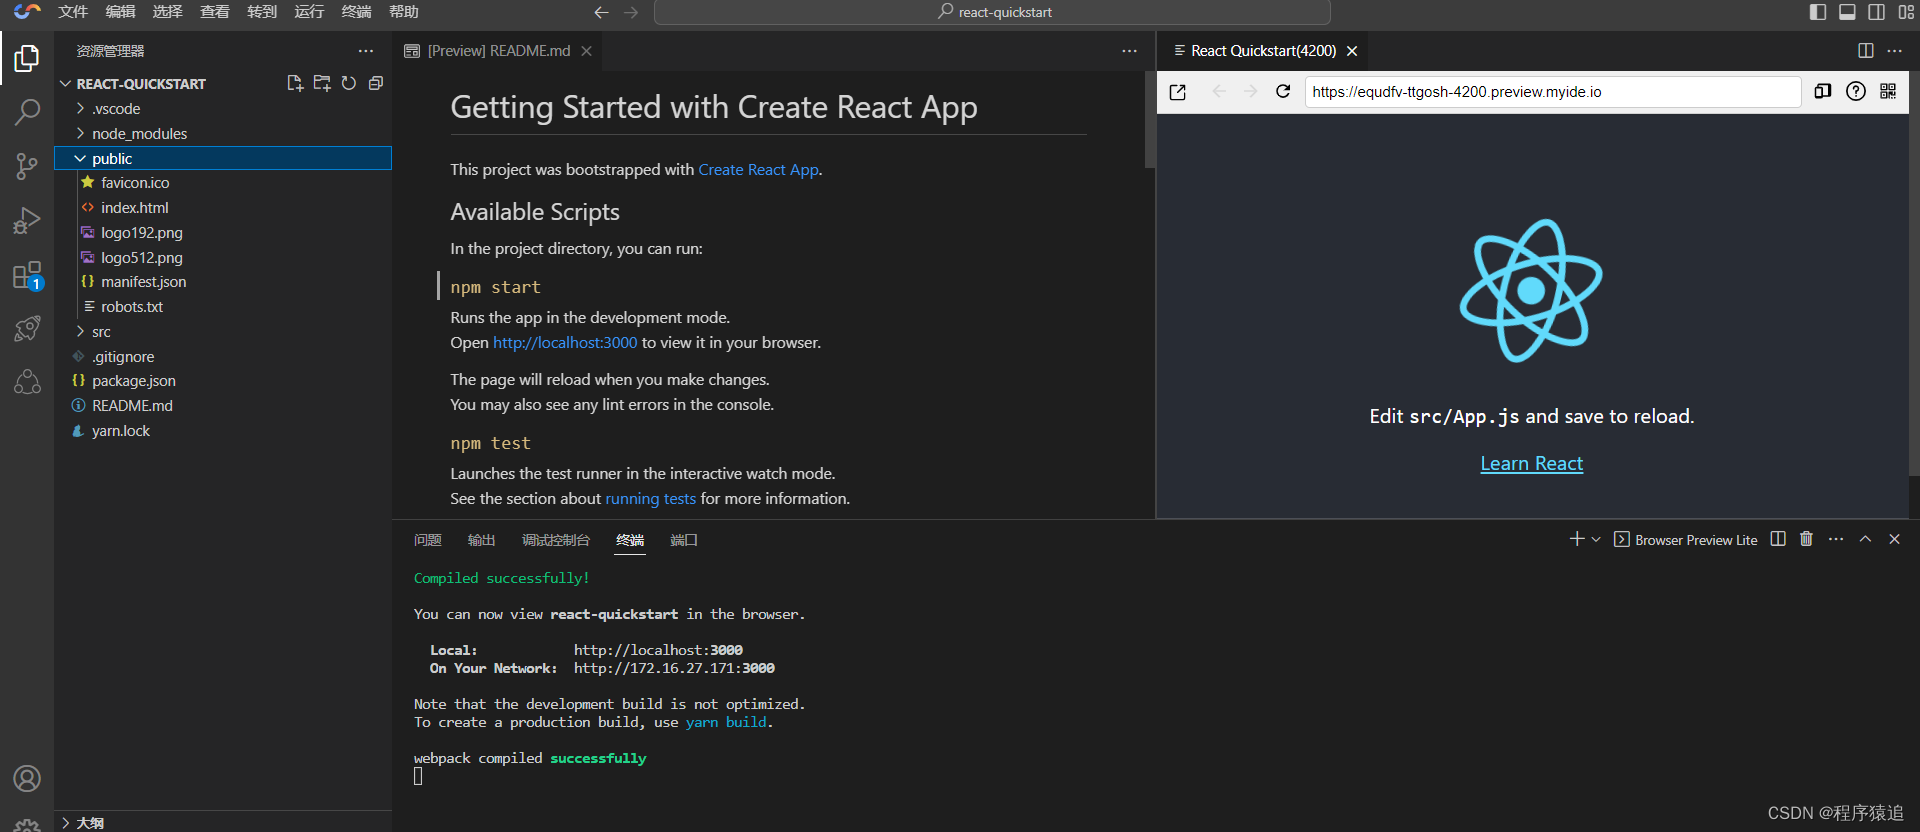
So far, we have found that if we use a new host, as long as we have a browser, we don’t need to prepare any environment, and we don’t need to install any software. We only need to be able to connect to the Internet, and we can initialize a React project within a few minutes. This efficiency is very high.
3. Develop a simplified version of the ordering system page
The title is to develop a React H5 page. For rapid development, a UI component library is usually used. Here we use the antd-mobile UI library (antd-mobile is the React implementation of Ant Design's mobile specification).
1. Installation dependencies
1.1. Install antd-mobile
yarn add antd-mobile@^5.32.0

# 或者

npm install --save antd-mobile@^5.32.0
1.2. Install less and less-loader
yarn add -D less@^3.12.2 less-loader@^7.0.1
Note: Do not install a higher version here, the project will fail to start

1.3. Expose the webpack configuration file
Note: Configure in webpack.config.js, this configuration needs to expose React's config configuration file, warning that this operation is irreversible
npm run eject
After entering 'y', the project will automatically deconstruct.
After completing the command, a config folder will appear in the root directory of the project, find the config/webpack.config.js file, press Ctrl + F to find the keyword "style files"
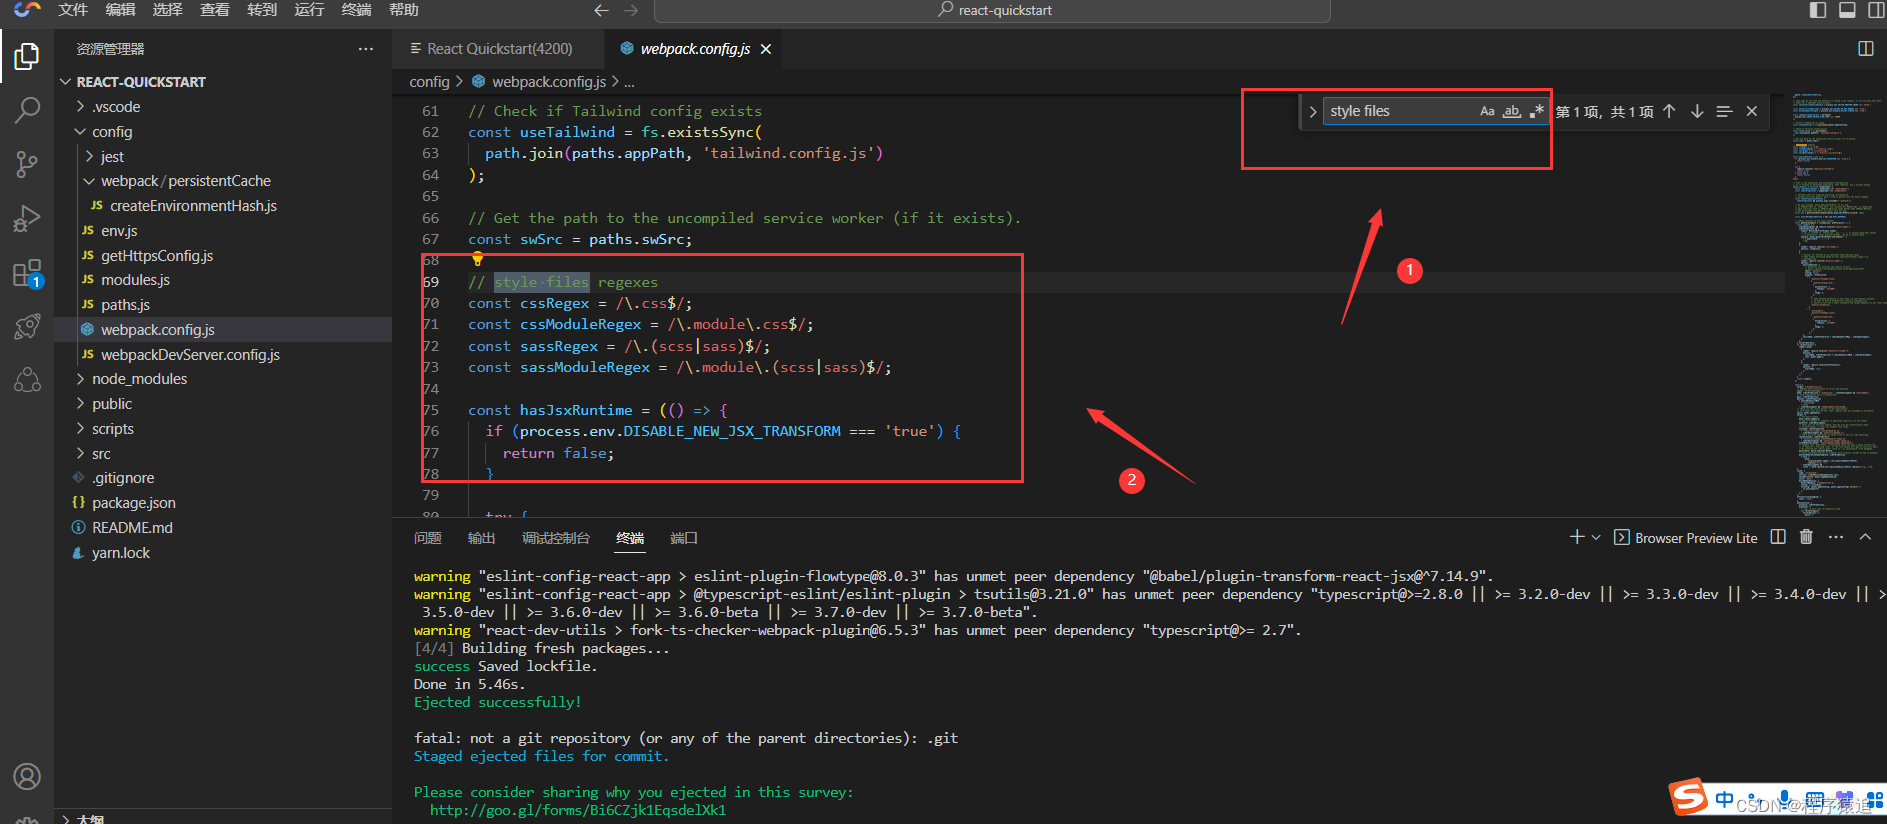
Change the code from lines 70 to 73 in the above figure to less
// style files regexes
const cssRegex = /\.css$/;
const cssModuleRegex = /\.module\.css$/;
const sassRegex = /\.(scss|sass)$/;
const sassModuleRegex = /\.module\.(scss|sass)$/;
// 新增加 Less 代码
const lessRegex = /\.(less)$/;
const lessModuleRegex = /\.module\.(less)$/;
Enter "sassRegex" in the search box to find the following code.
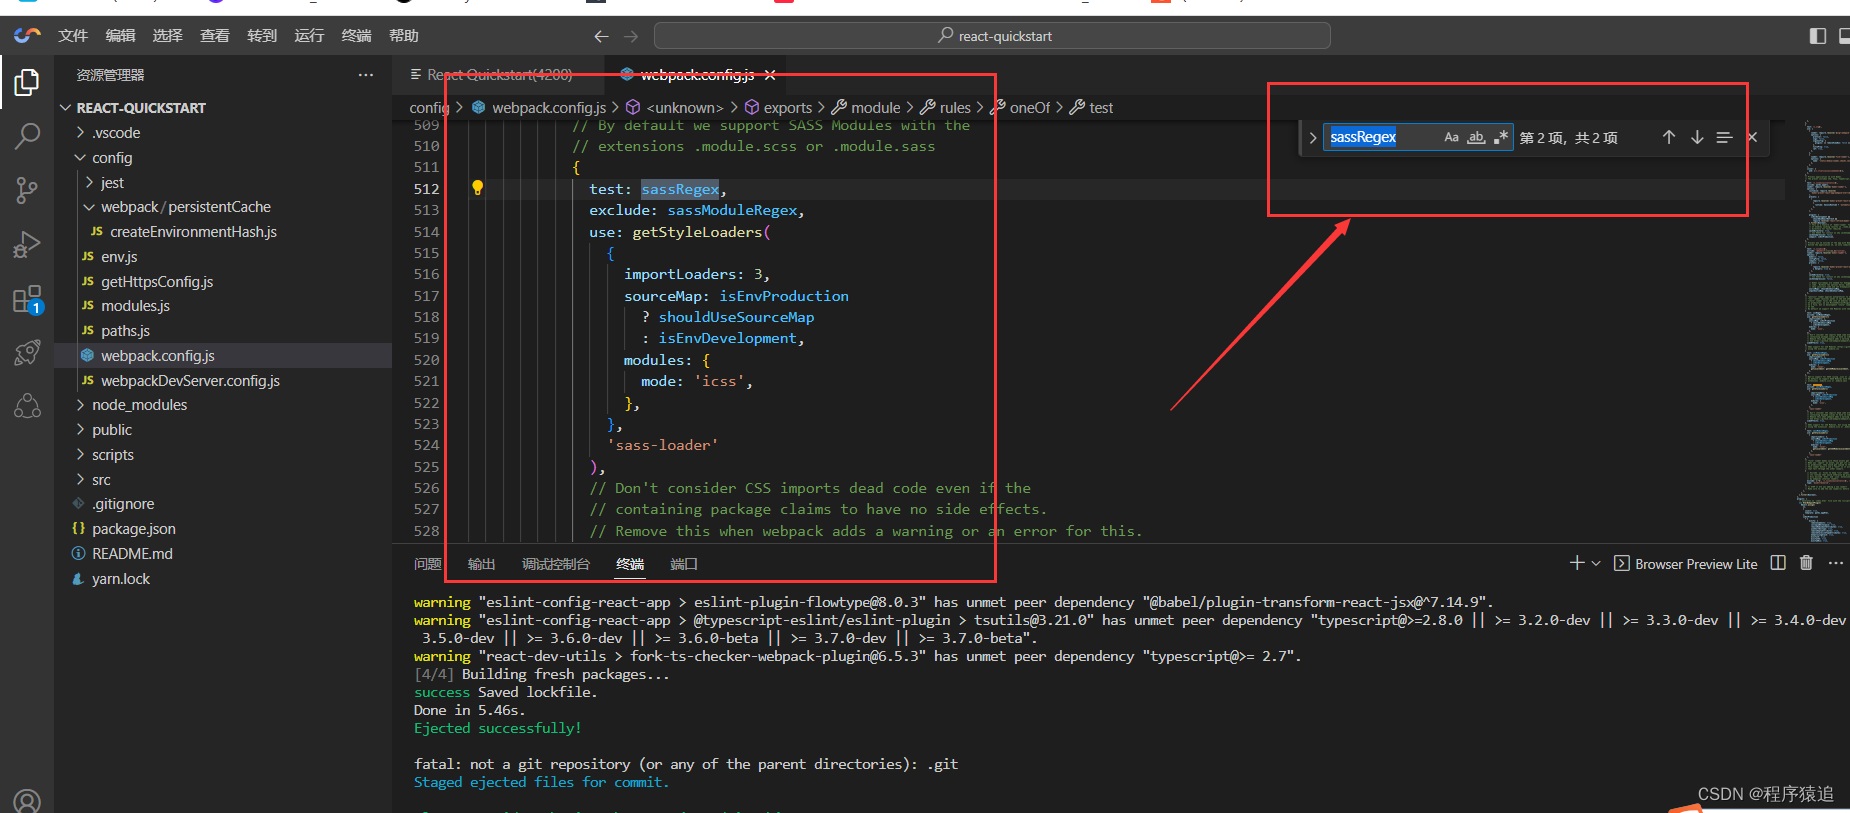
Like the previous configuration, follow the configuration of sass to configure less.
// less
{
  test: lessRegex,  // 有改动
  exclude: lessModuleRegex,  // 有改动
  use: getStyleLoaders(
    {
      importLoaders: 3,
      sourceMap: isEnvProduction
        ? shouldUseSourceMap
        : isEnvDevelopment,
    },
    'less-loader'  // 有改动
  ),
  sideEffects: true,
},
{
  test: lessModuleRegex,  // 有改动
  use: getStyleLoaders(
    {
      importLoaders: 3,
      sourceMap: isEnvProduction
        ? shouldUseSourceMap
        : isEnvDevelopment,
      modules: {
        getLocalIdent: getCSSModuleLocalIdent,
      },
    },
    'less-loader'  // 有改动
  ),
},
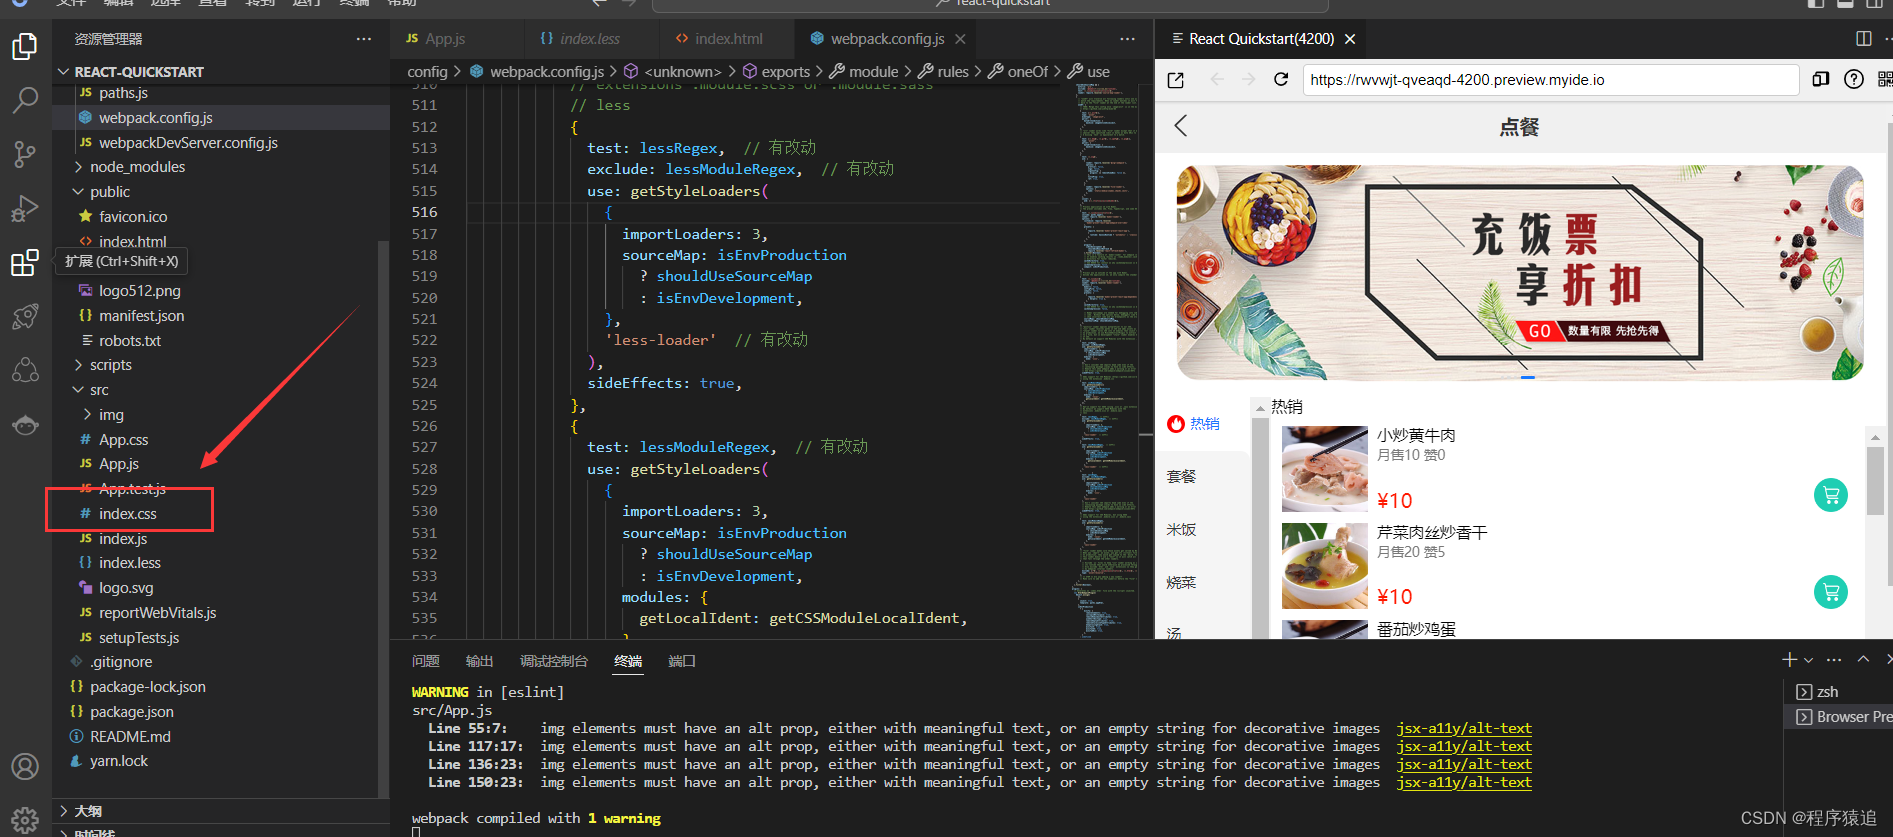
This completes the configuration of less in webpack.config.js, and the less style can be used in the project.
1.4. Install normalize
yarn add -D normalize.css@^8.0.1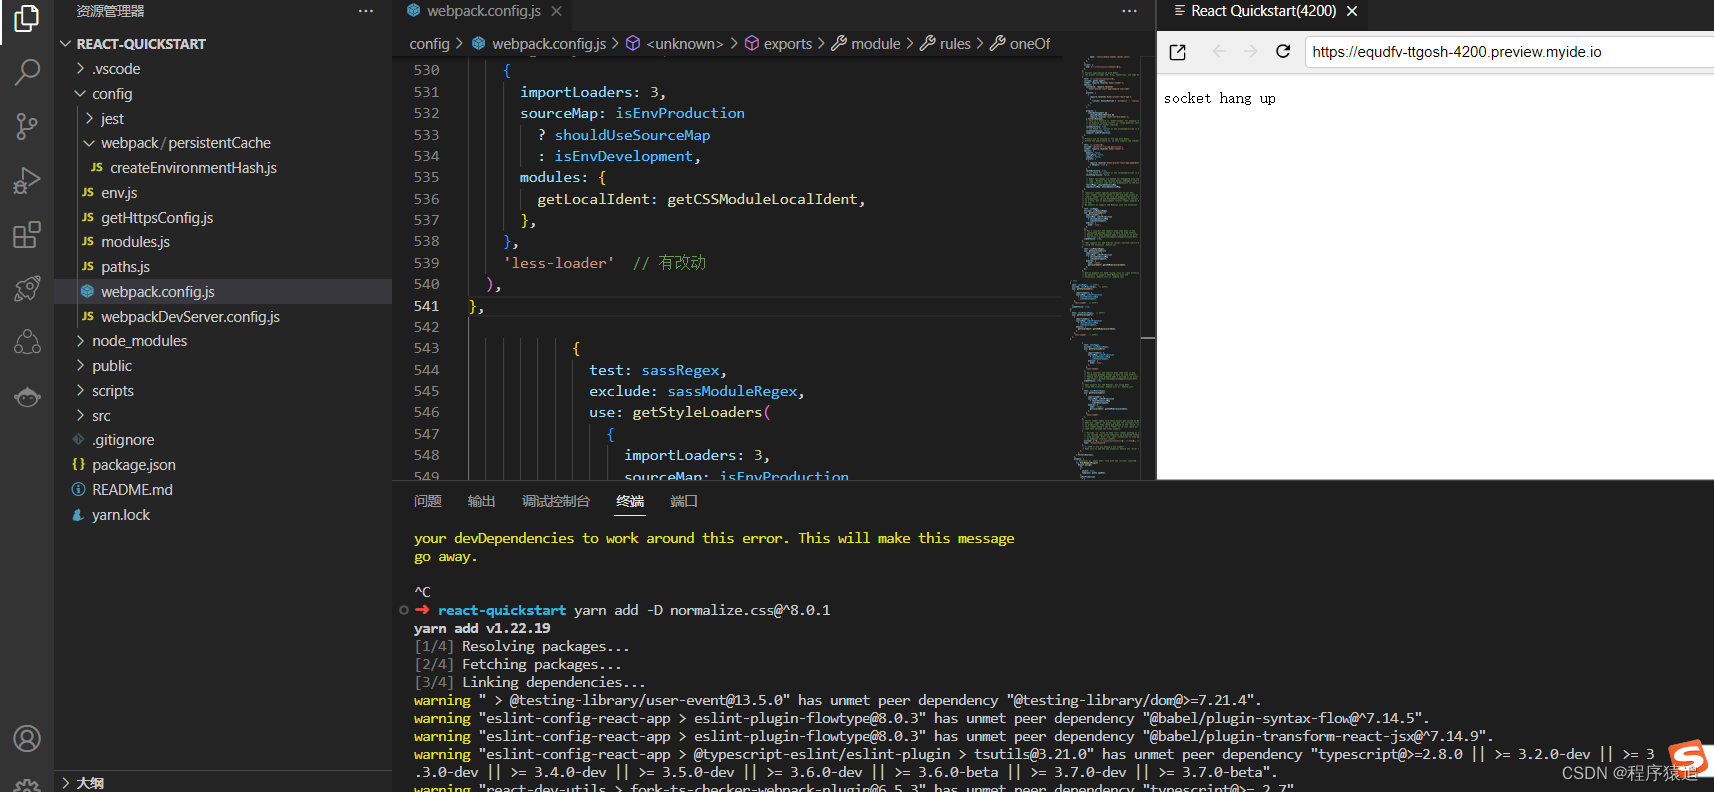
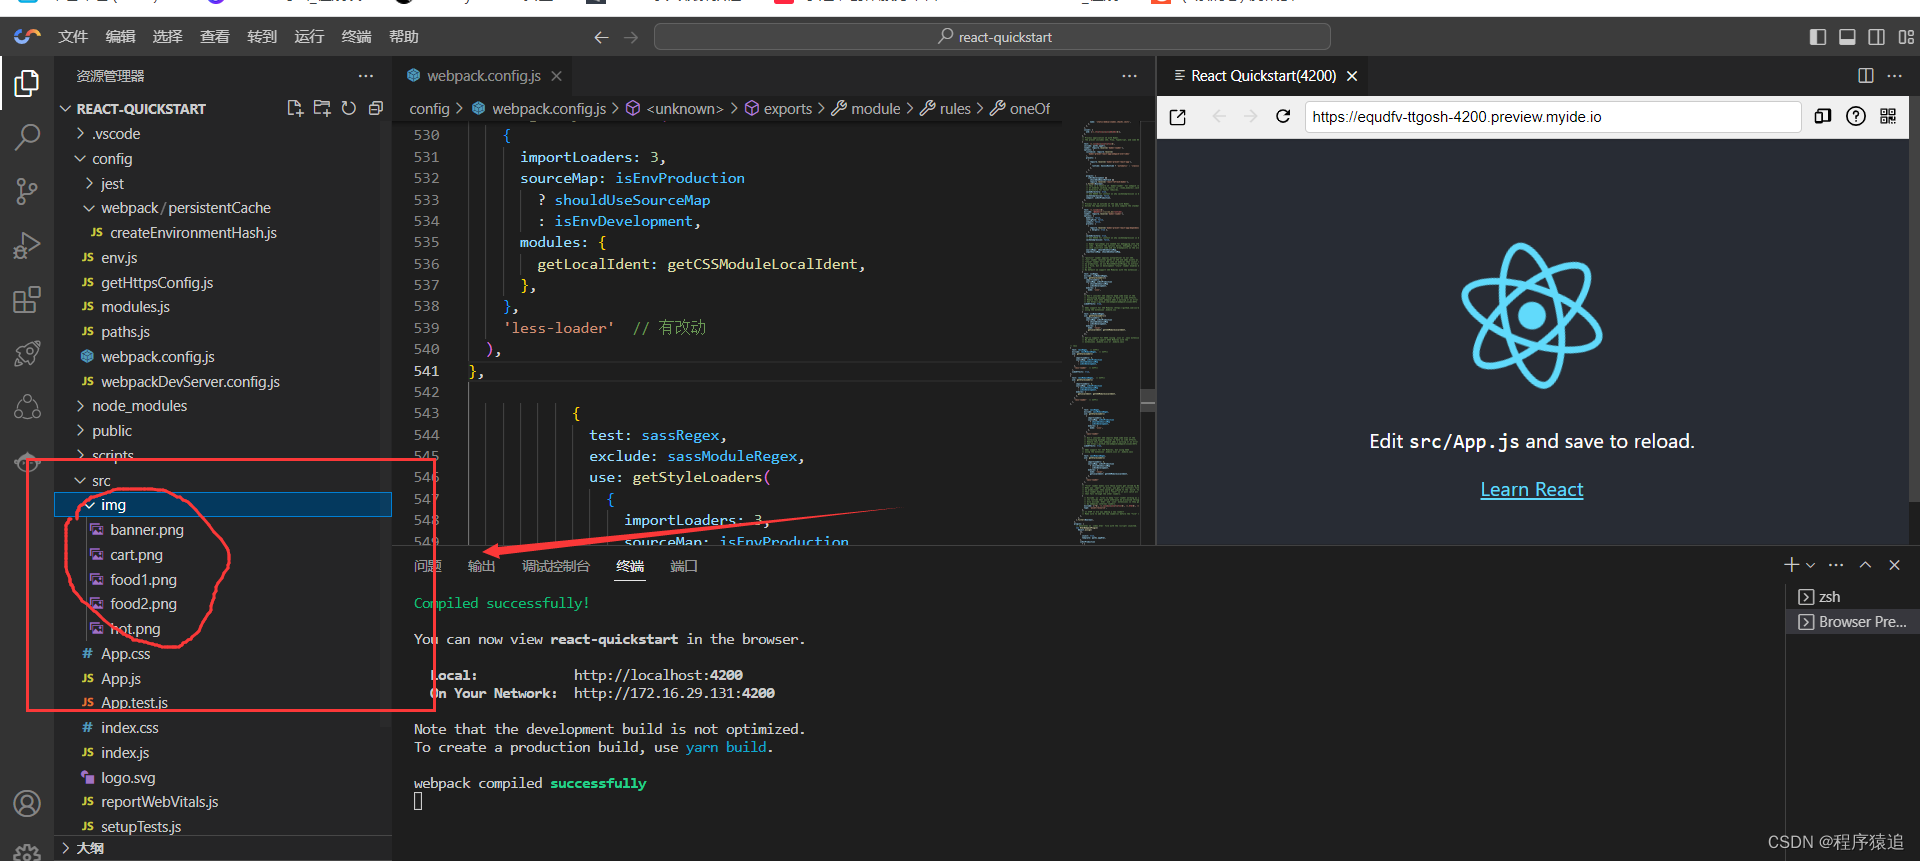
1.5. Upload the materials required for the project
In the past, to upload server code, you needed to use the Scp command or install the Remote SSH plug-in support. Cloud Studio can easily support routine operations such as file upload and download by default, which is consistent with the local IDE experience :
1. You can directly drag files to the IDE editing area
2. Right-click the IDE editing area and "Upload"
Just drag the img folder to the src directory.
1.6. Replace the App.js main file
Open the src/App.js file, the following is the main business code of the ordering system, just replace it with CV.
import './App.css';
import React, { useState } from 'react'
import { NavBar, Toast, Swiper, SideBar, TabBar, Badge } from 'antd-mobile'
import {
  AppOutline,
  ExclamationShieldOutline,
  UnorderedListOutline,
  UserOutline,
} from 'antd-mobile-icons'
import BannerImg from './img/banner.png'
import HotImg from './img/hot.png'
import Food1Img from './img/food1.png'
import Food2Img from './img/food2.png'
import CartImg from './img/cart.png'
import './index.less'
import "normalize.css"

function App() {
  const [activeKey, setActiveKey] = useState('1')

  const tabbars = [
    {
      key: 'home',
      title: '点餐',
      icon: <AppOutline />,
    },
    {
      key: 'todo',
      title: '购物车',
      icon: <UnorderedListOutline />,
      badge: '5',
    },
    {
      key: 'sale',
      title: '餐牌预告',
      icon: <ExclamationShieldOutline />,
    },
    {
      key: '我的',
      title: '我的',
      icon: <UserOutline />,
      badge: Badge.dot,
    },
  ]

  const back = () =>
    Toast.show({
      content: '欢迎进入点餐系统',
      duration: 1000,
    })


  const items = ['', '', '', ''].map((color, index) => (
    <Swiper.Item key={index}>
      <img style={

   {
        width: '100%'
      }} src={ BannerImg }></img>
    </Swiper.Item>
  ))

  const tabs =  [
    { key: '1', title: '热销' },
    { key: '2', title: '套餐' },
    { key: '3', title: '米饭' },
    { key: '4', title: '烧菜' },
    { key: '5', title: '汤' },
    { key: '6', title: '主食' },
    { key: '7', title: '饮料' },
  ]

  const productName = [
    '小炒黄牛肉',
    '芹菜肉丝炒香干',
    '番茄炒鸡蛋',
    '鸡汤',
    '酸菜鱼',
    '水煮肉片',
    '土豆炒肉片',
    '孜然肉片',
    '宫保鸡丁',
    '麻辣豆腐',
    '香椿炒鸡蛋',
    '豆角炒肉'
  ]
  const productList = productName.map((item, key) => {
    return {
      name: item,
      img: key % 2 === 1 ? Food1Img : Food2Img
    }
  })

  return (
    <div className="App">
      <NavBar onBack={back} style={

   {
        background: '#F0F0F0',
        fontWeight: 'bold'
      }}>点餐</NavBar>

      <div className='head-card'>
        <Swiper
          style={

   {
            '--border-radius': '8px',
          }}
          autoplay
          defaultIndex={1}
        >
          {items}
        </Swiper>
      </div>

      <div className='product-box'>
        <SideBar activeKey={activeKey} onChange={setActiveKey}>
          {tabs.map(item => (
            <SideBar.Item key={item.key} title={
              item.key === '1' ? <div>
              <div className='flex-center'>
                <img style={

   {
                  display: 'block',
                  width: '16px',
                  marginRight: '5px'
                }} src={ HotImg }></img>
                <div>{ item.title }</div>
              </div>
            </div> : item.title
            } />
          ))}
        </SideBar>
        <div className='product-right'>
          <div className='product-title'>热销</div>
          <div className='product-list'>
            {
              productList.map((item, key) => {
                return (
                  <div className='product-item'>
                    <div className='product-item-left'>
                      <img style={

   {
                        display: 'block',
                        width: '76px',
                        marginRight: '5px'
                      }} src={ item.img }></img>
                      <div className='product-item-left-info'>
                        <div>
                          <div className='product-item-left-info-name'>{ item.name }</div>
                          <div className='product-item-left-info-number'>月售{key + 1}0 赞{key * 5}</div>
                        </div>
                        <div className='product-item-left-info-price'>¥10</div>
                      </div>
                    </div>
                    <div className="cart">
                      <img style={

   {
                        display: 'block',
                        width: '30px',
                        marginRight: '5px'
                      }} src={ CartImg } onClick = { () =>
                        Toast.show({
                          content: '添加购物车成功'
                        }) }></img>
                    </div>
                  </div>
                )
              })
            }
          </div>
        </div>
      </div>

      <TabBar>
        {tabbars.map(item => (
          <TabBar.Item
            key={item.key}
            icon={item.icon}
            title={item.title}
            badge={item.badge}
          />
        ))}
      </TabBar>
    </div>
  );
}

export default App;
In the src directory, create an index.less file, and copy the following less-related codes into the file.
.head-card {
  padding: 10px 20px;
  box-sizing: border-box;
}

.flex-center {
  display: flex;
  align-items: center;
}

.product-box {
  display: flex;
  align-items: center;
  width: 100%;
  height: calc(100vh - 45px - 130px - 50px);
}

.product-right {
  flex: 1;
  height: 100%;
}

.product-title {
  font-family: PingFangSC-Regular;
  font-size: 14px;
  color: #000000;
  text-align: left;
  padding-bottom: 10px;
}

.product-list {
  height: calc(100% - 24px);
  overflow-y: auto;
}

.product-item {
  position: relative;
  width: 100%;
  display: flex;
  align-items: center;
  justify-content: space-between;
  padding-left: 10px;
  box-sizing: border-box;
  margin-bottom: 10px;
  &-left {
    display: flex;
    &-info {
      padding-left: 3px;
      box-sizing: border-box;
      display: flex;
      flex-direction: column;
      justify-content: space-between;
      &-name {
        font-family: PingFangSC-Regular;
        font-size: 14px;
        color: #000000;
        text-align: left;
      }
      &-number {
        padding-top: 3px;
        font-family: PingFangSC-Regular;
        font-size: 11px;
        color: #787878;
        text-align: left;
      }
      &-price {
        font-family: PingFangSC-Regular;
        font-size: 18px;
        color: #FF1800;
        text-align: left;
      }
    }
  }
}

.cart {
  position: absolute;
  right: 10px;
  bottom: 0;
}
After the copy is complete, enter yarn start in the console to start the project.
2. Publish to the warehouse
Before publishing, we need to fill out the README.md file.
# 项目说明

这是一个用 IDE [Cloud Studio](https://www.cloudstudio.net/?utm=csdn) 快速搭建,并开发还原一个移动端 React H5 的简版点餐系统页面,从 0 到 1 体验云 IDE 给我们带来的优势,不需要装各种环境,简单易用,开箱即可上手。

## 相关技术栈

React + less + webpack

## 项目运行

yarn install
yarn start
Find "Source Code Management" in the function menu area on the left, and use git init to initialize the warehouse.
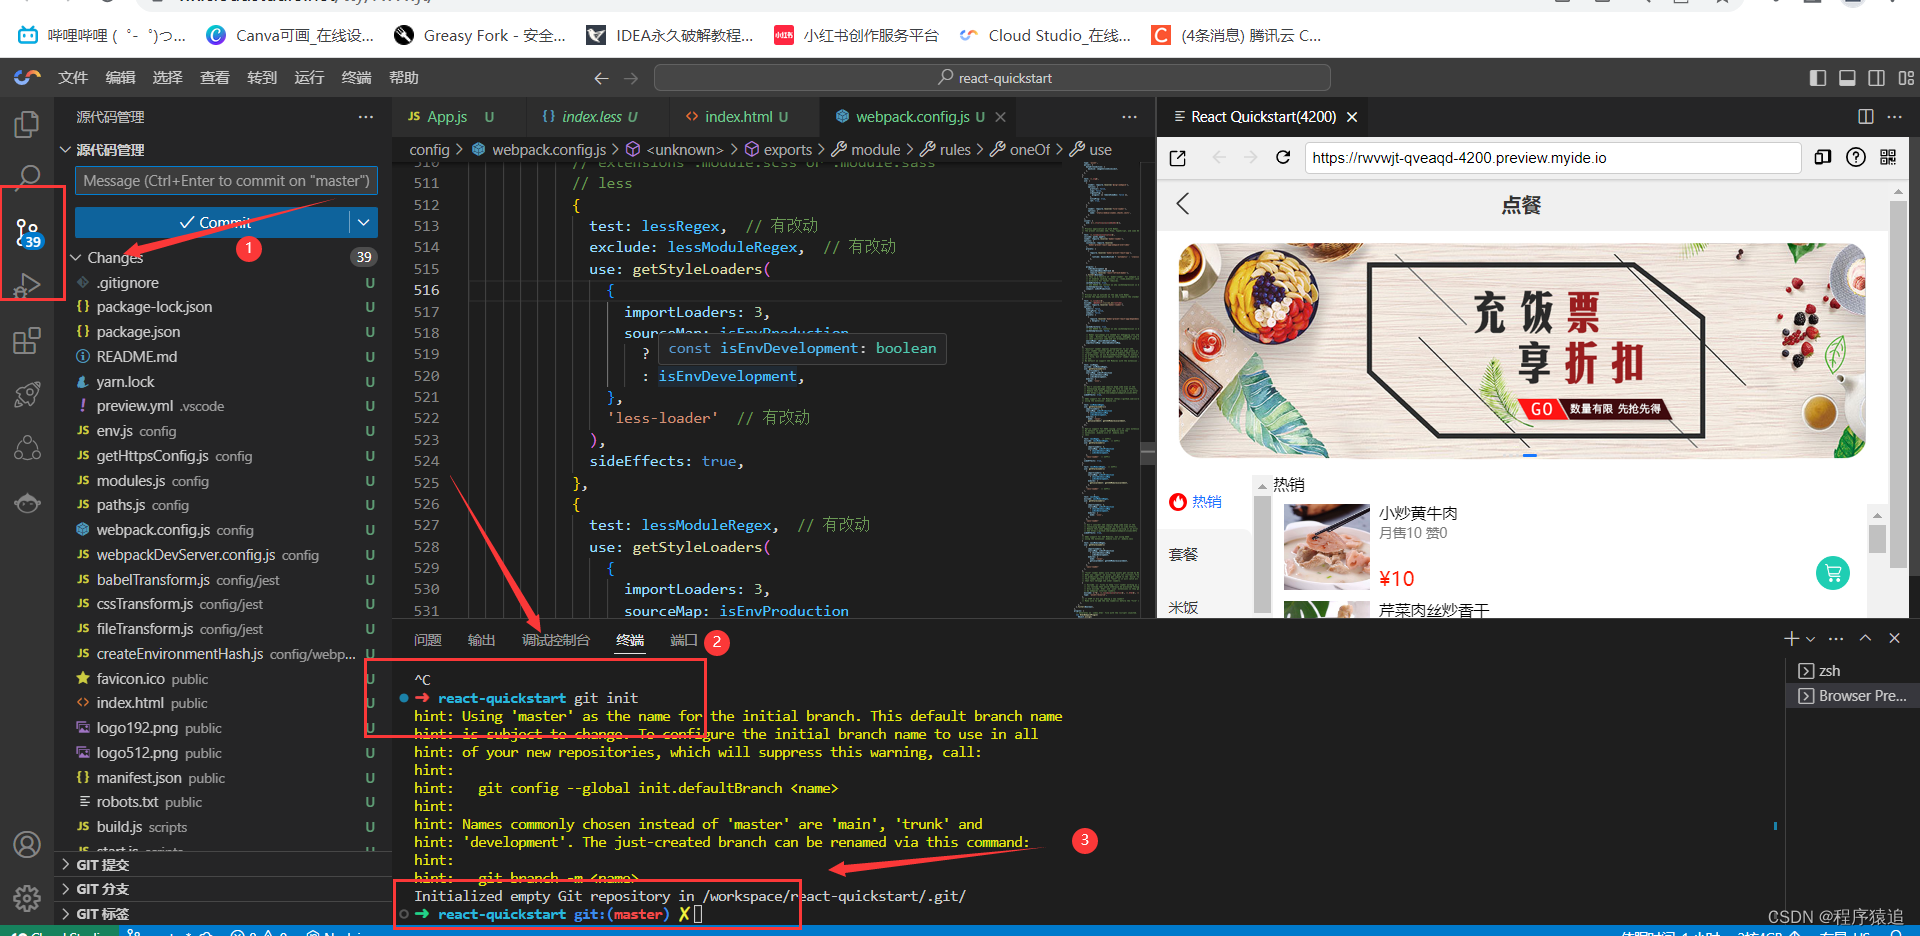
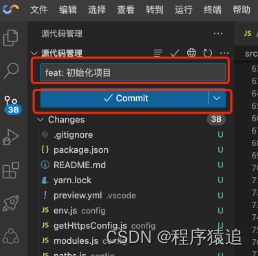
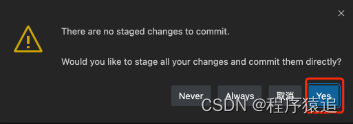
Enter the message information to be submitted, and then click "Commit" to submit the warehouse.
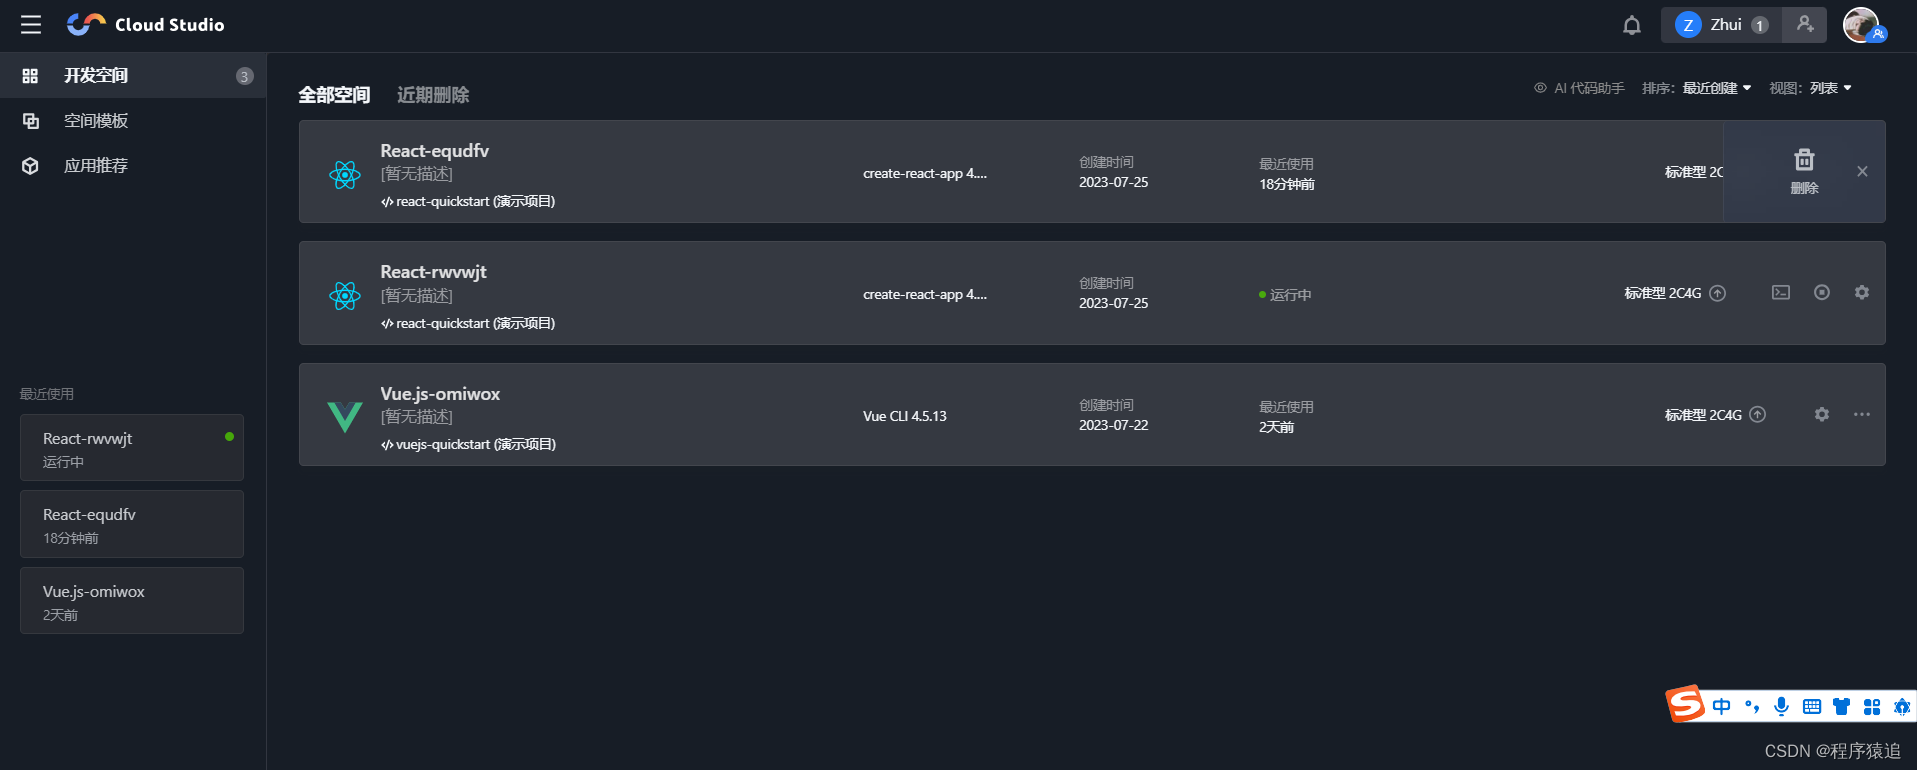
4. Development space management
In our console , we can manage all the workspaces used, and the buttons on the right can perform upgrade configuration, settings, delete, start\stop operations.
V. Summary
Cloud Studio Features
- The web-based code editor includes basic IDE functions such as code highlighting, auto-completion, Git integration, and terminal. It also supports real-time debugging, plug-in extensions, etc., to improve the efficiency of development, compilation, and deployment.
- It supports remote access to cloud servers and provides Tencent Cloud SCF industry users with a complete closed-loop cloud native development experience of development-test-deployment.
- Self-developed a variety of plug-ins to meet development needs, such as collaboration plug-ins, custom template plug-ins, preview plug-ins, deployment plug-ins, etc., to help unleash the potential of programming.
This article is mainly to guide you how to use Cloud Studio for cloud programming, and use the cloud IDE Cloud Studio to quickly build, and develop and restore a simplified version of the mobile React H5 ordering system page. You are also welcome to explore more functions of Cloud Studio and empower your work!