1. Application mechanism
The mechanism of xlsx-style to modify the style is to select which row, which column or which one to modify. For example, the coordinates of a grid in the upper left corner of the table are (0, 0) subscript, which can also be called A1 . After selection, you can modify its style
2. Practical explanation
1. Download dependencies
npm install xlsx-style -SFirst download the dependencies to the project
2. Import into the project
import * as XLSX from 'xlsx'3. Create export form
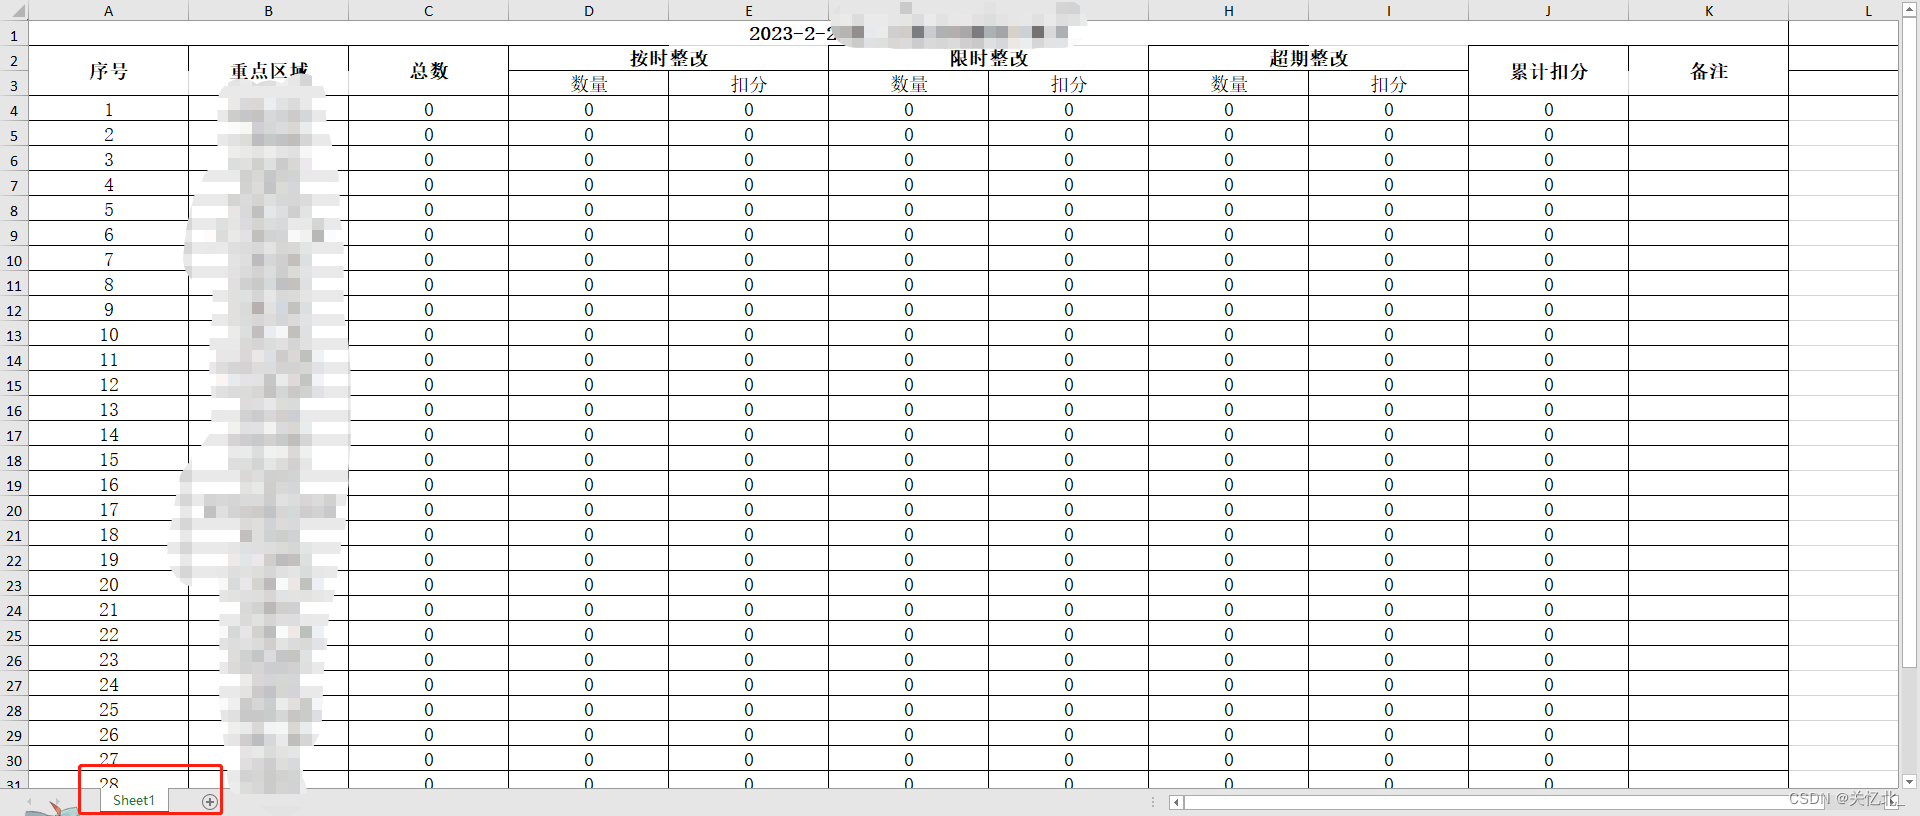
Why create an export table instead of a table, because the export table may be different from the table displayed on the original page . For example, if I export the page table, there is one more line of comments at the bottom of the normal table, etc. If the exported table is the same as the page display, you can use the modified table, otherwise create a new table v-show="false" that is hidden and used for export. The above code
<el-table :data="tableDatas" border style="margin-left: 5%;width: 84%;" id="report-table"
  :header-cell-style="{ 'text-align': 'center' }" height="70vh" @row-dblclick="rowDblclick"
  :cell-style="{ 'text-align': 'center' }" v-show="false">
  <el-table-column :label="time + req.source + '检查问题统计报表'">
    <el-table-column label="序号" align="center" width="100">
      <template slot-scope="scope">
        <span v-if="scope.row.index"> {

   { scope.row.index }} </span>
        <span v-else>{

   { scope.$index + 1 }}</span>
      </template>
    </el-table-column>
    <el-table-column v-if="show('zdlb')" prop="caseTypeDetail" label="问题类别" width="300">
    </el-table-column>
    <el-table-column v-if="show('zdqyS')" prop="syncRoad" label="重点区域" width="300">
      <template slot-scope="scope">
        {

   { scope.row.syncRoad }}
      </template>
    </el-table-column>
    <el-table-column v-if="show('zdqyC')" prop="community" label="重点区域" width="300">
      <template slot-scope="scope">
        <span v-if="scope.row.community == '合并'"> {

   { scope.row.community }} </span>
        <selectTag v-else :type="communityData" :value="scope.row.community"></selectTag>
      </template>
    </el-table-column>
    <el-table-column prop="total" label="总数" width="100">
    </el-table-column>
    <el-table-column label="按时整改" width="200">
      <template slot-scope="{}" slot="header">
        <span>按时整改</span>
        <el-tooltip class="item" effect="dark" placement="top">
          <i class="el-icon-question" style="vertical-align: middle;color:red"></i>
          <div slot="content">
            <p>Tips:在规定时限内完成整改的案件</p>
          </div>
        </el-tooltip>
      </template>
      <el-table-column prop="ontimeNum" label="数量" width="100">
      </el-table-column>
      <el-table-column prop="ontimeScore" label="扣分" width="100">
      </el-table-column>
    </el-table-column>
    <el-table-column label="限时整改" width="200">
      <template slot-scope="{}" slot="header">
        <span>限时整改</span>
        <el-tooltip class="item" effect="dark" placement="top">
          <i class="el-icon-question" style="vertical-align: middle;color:red"></i>
          <div slot="content">
            <p>Tips:未在规定时限内完成整改的案件</p>
          </div>
        </el-tooltip>
      </template>
      <el-table-column prop="timelimitNum" label="数量" width="100">
      </el-table-column>
      <el-table-column prop="timelimitScore" label="扣分" width="100">
      </el-table-column>
    </el-table-column>
    <el-table-column label="超期整改" width="200">
      <template slot-scope="{}" slot="header">
        <span>超期整改</span>
        <el-tooltip class="item" effect="dark" placement="top">
          <i class="el-icon-question" style="vertical-align: middle;color: red"></i>
          <div slot="content">
            <p>Tips:超过规定时限内整改的案件</p>
          </div>
        </el-tooltip>
      </template>
      <el-table-column prop="overdueNum" label="数量" width="100">
      </el-table-column>
      <el-table-column prop="overdueScore" label="扣分" width="100">
      </el-table-column>
    </el-table-column>
    <el-table-column prop="accumulatedScore" label="累计扣分" width="100">
      <template slot-scope="scope">
        {

   { scope.row.accumulatedScore ? parseFloat(scope.row.accumulatedScore).toFixed(2) : "" }}
      </template>
    </el-table-column>
    <el-table-column label="备注" width="100">
    </el-table-column>
  </el-table-column>
</el-table>
The above is the source code may be too complicated, I will give you a simplified version
<el-table :data="tableDatas" border id="report-table" v-show="false">
  <el-table-column :label="time + req.source + '检查问题统计报表'">
    <el-table-column label="序号" align="center" width="100">
      <template slot-scope="scope">
        <span v-if="scope.row.index"> {

   { scope.row.index }} </span>
        <span v-else>{

   { scope.$index + 1 }}</span>
      </template>
    </el-table-column>
    <el-table-column label="备注" width="100">
    </el-table-column>
  </el-table-column>
</el-table>
The important thing is: the id bound in the el-table tag
4. Export events
In the event, let’s talk about it line by line. First, get the data of the current export form. At this time, we need to use the id bound above the previous export form. We declare a wb to receive the binary blob converted from the data in the form.
var wb = XLSX.utils.table_to_book(document.querySelector("#report-table"));We can print the wb to see what's inside

And the form we need to modify is under wb.Sheets , we are printing wb.Sheets

If you export only one sheet, there is only Sheet1 under wb.Sheets ; if there are other sheets, there are: Sheet2, Sheet3 ... and so on
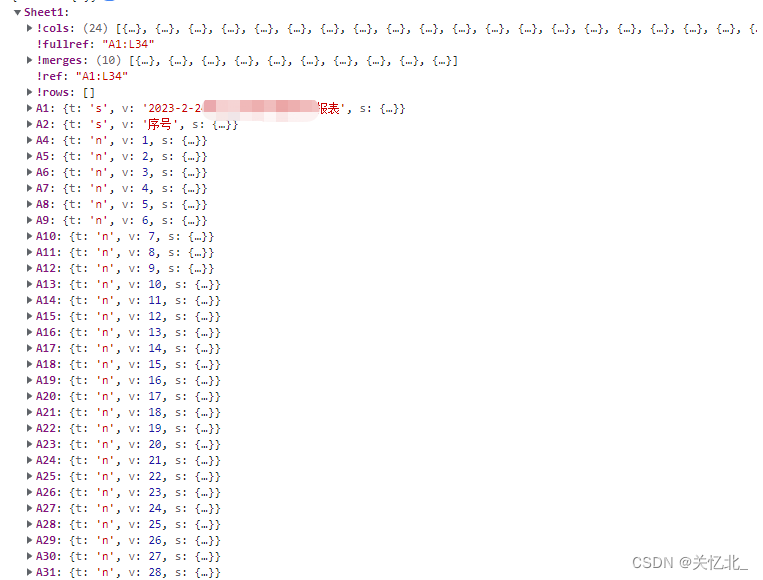
Parameters below Sheet1
| parameter | express meaning |
| !cols | Represents each column, and the data format is an array, such as [{wpx:100}, {wpx: 100}], which means that the width of the first two columns is 100px |
| !merge | Merge cells, the data format is an array [{s:{r:0,c:0},e:{r:0,c:6}}], s (start) is the start cell coordinates, e (end) is the end cell coordinates, r (row) row, c (col) column, the example here represents merging the sixth cell from row 0 to row 0 |
| A1 | A1 represents the first row of the cell, and the first row to the right is B1, C1... You can refer to the first row of column A in the export table. Each cell has its format {t: "s", s: {}, v: "" }, t (type) is the type, and its parameters are: n (number digital type), s (string string type); the parameter in s (style) is the style, you want to modify the internal style of the cell, v (value) is the cell content |
Know the parameters, then we continue to code
For example: I want to modify the cell width of the first 24 columns
// 表Sheet1
wb.Sheets.Sheet1["!cols"] = [];
// 动态添加前24列  宽为140px
for (let a = 0; a < 24; a++) {
  wb.Sheets.Sheet1["!cols"].push({
    wpx: 140,
  })
}
Add a border to the table and modify the font
let arr = ["A", "B", "C", "D", "E", "F", "G", "H", "I", "J", "K", "L", "M", "N", "O", "P", "Q", "R", "S", "T", "U", "V", "W", "X", "Y", "Z"]
// 循环渲染表格样式
arr.forEach((item) => {
for (let i = 1; i < 7 + this.tableData.length; i++) {
let str = (item + i).toString();
if (wb.Sheets.Sheet1[str]) {
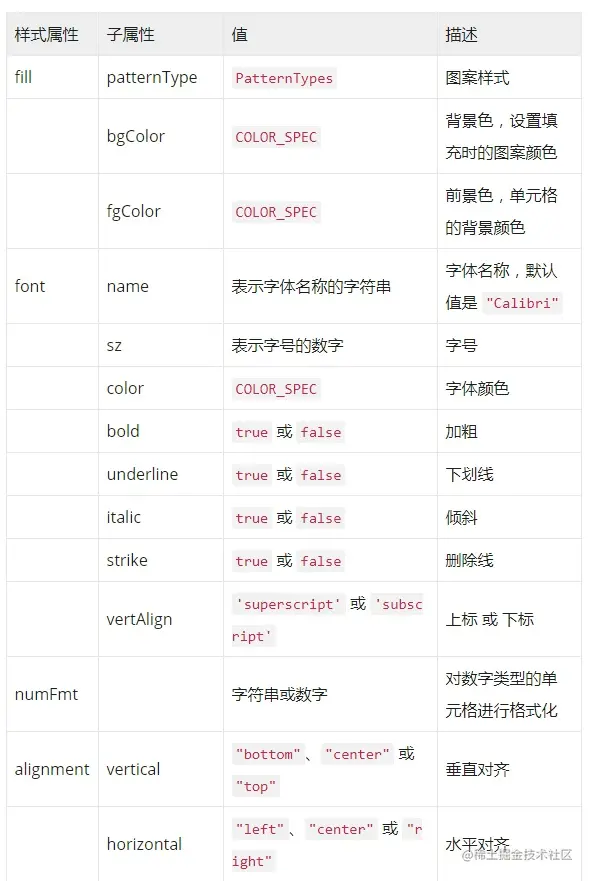
wb.Sheets.Sheet1[str].s = {
font: {
name: "宋体",
sz: 14,
// bold: true,
// color: { rgb: "FC5531" }
},
border: {
top: {
style: 'thin',
color: {
auto: 1
}
},
left: {
style: 'thin',
color: {
auto: 1
}
},
right: {
style: 'thin',
color: {
auto: 1
}
},
bottom: {
style: 'thin',
color: {
auto: 1
}
}
},
alignment: {
// 居中
horizontal: "center",
vertical: "center",
indent: 0,
},
}
}
})
})First loop arr and then loop this.tableData.length because the loops are added together to form A1 A2 B1 B2 ... This type of wb.Sheets.Sheet1[str].s is to modify its style
Merge cells manually (manual merging may cause problems with the form)
// 手动合并  最后三行注释
wb.Sheets.Sheet1["!merges"].push({
  e: {
    r: parseInt(_tableData.length + 2), c: 0
  },
  s: {
    r: parseInt(_tableData.length + 4), c: 5
  }
})
This point is enough, we have to study how to solve it
Finish the handwork