Article Directory
- 1. Overview of keepalived
- 2. Deploy LVS+keepalived high availability cluster
- total
1. Overview of keepalived
1. Important functions of keepalived service
1.1 Manage LvS load balancer software
Keepalived can directly manage LVS configuration and start and stop services through a lower-level interface by reading its own configuration file, which will make LVS applications easier.
1.2 Support automatic failover (failover)
(1) Both hosts have keepalived installed and start the service at the same time. When starting up, the master host obtains all resources and provides request services to users. When the role backup host is used as the master hot standby, when the master host hangs up and fails, the backup host will automatically take over all the work of the master host, including taking over VIP resources and corresponding resource services.
(2) After the failure of the master host is repaired, it will automatically take over its original processing work, and the backup host will simultaneously release the work that the masgter host took over when it failed. At this moment, the two hosts will return to their respective original roles and working states at the initial startup.
(3) Preemption mode: After the master recovers from a failure, it will preempt the VIP from the backup node.
(4) Non-preemption: The master does not preempt the backup after recovering from a fault, and the backup is upgraded to the VIP after the master.
1.3 Realize the health check of LVS centralized nodes (health checking)
Configure LVS nodes (IP) and related parameters in keepalived.conf to realize direct management of LVS. If several node servers fail at the same time and cannot provide services, the keepalived service will automatically remove the failed node server from the LVS normal forwarding list and dispatch requests to other normal node servers, so as to ensure that the end user’s access is not affected.
1.4 Realize high availability (HA) of LVS load scheduler node server
Enterprise clusters need to meet four characteristics: load balancing, health checks, failover, LVS+ keepalived, which can be purchased on demand
2. Keepalived high availability failover transfer principle and VRRP communication principle
The failover transfer between keepalived high-availability service clusters is realized through VRRP (virtual router redundancy protocol).
When the keepalived service is working normally, the master node will continuously send (multicast) heartbeat messages to the backup node to tell the backup node that it is still alive. When the master node fails, it cannot send heartbeat messages. Therefore, the backup node cannot detect the heartbeat from the master node, so it calls its own takeover program to take over the IP resources and services of the master node. When the primary node recovers, the standby host will release the IP resources and services it took over when the primary node failed, and restore to the original standby role.
3. Main modules and functions of the keepalived system
The three modules are core, check, vrrp
(1) core module: the core of keepalived, responsible for starting the main process, maintaining global configuration files, loading and parsing
(2) VRRP module: to implement the VRRP protocol
(3) check module: responsible for common inspection methods of health checks, such as: port URL
4. How the keepalived service works
Keepalived is a high-availability solution for LVS services based on the VRRP protocol, which can solve the problem of single point of failure in static routing.
In an LVS service cluster, there are usually servers with two roles, the master server (MASTER) and the backup server (BACKUP), but they appear as a virtual IP to the outside world. The master server will send VRRP notification information to the backup server. When the backup server fails to receive the VRRP message, that is, when the master server is abnormal, the backup server will take over the virtual IP and continue to provide services, thus ensuring high availability.
2. Deploy LVS+keepalived high availability cluster
1. Deployment icon
![[External link image transfer failed, the source site may have an anti-leeching mechanism, it is recommended to save the image and upload it directly (img-jf8ORNBW-1688650765122) (C:\Users\zhao\AppData\Roaming\Typora\typora-user-images\image-20230706142031207.png)]](https://img-blog.csdnimg.cn/35155a1fbe51439bad7690fb6173ed59.png)
2. Deploy LVS+keepalived steps
Primary DR server: ens33 (192.168.198.11) ipvsadm, keepalived (hot standby)
Virtual IP: 192.168.198.180 NIC ens33:0
Standby DR server: ens33(192.168.198.12) ipvsadm, keepalived
Virtual IP: 192.168.198.180 NIC ens33:0
Web server 1: ens33 192.168.13
lo:0(VIP)192. 168.198.180
Web server 2: ens33 192.168.198.14
lo:0(VIP) 192.168.198.180
NFS shared server: 192.168.198.15
2.1 Configure NFS share (192.168.198.15)
systemctl stop firewalld.service
setenforce 0

yum -y install nfs-utils rpcbind
mkdir /opt/blue /opt/summer
chmod 777 /opt/blue /opt/summer

vim /etc/exports
/usr/share *(ro,sync)
/opt/blue 192.168.198.0/24(rw,sync)
/opt/summer 192.168.198.0/24(rw,sync)
systemctl start nfs.service
systemctl start rpcbind.service
2.2 Configure the primary DR server (192.168.198.11)
systemctl stop firewalld.service
setenforce 0
modprobe ip_vs
cat /proc/net/ip_vs
yum -y install ipvsadm
2.2.1 Configure virtual IP address (VIP: 192.168.198.180)
cd /etc/sysconfig/network-scripts/
cp ifcfg-ens33 ifcfg-ens33:0
#若隧道模式,复制为ifcfg-tunl0
vim ifcfg-ens33:0
DEVICE=ens33:0
ONBOOT=yes
IPADDR=192.168.198.180
NETMASK=255.255.255.255
ifup ens33:0
ifconfig ens33:0
Note: If the configuration is not successful here, ifup ens33:0 fails, you can directly restart the network card systemctl restart network,
![[External link image transfer failed, the source site may have an anti-leeching mechanism, it is recommended to save the image and upload it directly (img-bnN2dfLh-1688650765123) (C:\Users\zhao\AppData\Roaming\Typora\typora-user-images\image-20230706144814676.png)]](https://img-blog.csdnimg.cn/36d745335d0f4c5aa7fe116750999cd2.png)
2.2.2 Install keepalived
#安装keepalived
yum -y install ipvsadm keepalived
#加载 Linux 内核的 IPVS 模块
modprobe ip_vs
#查看当前 IPVS 的状态和信息
cat /proc/net/ip_vs
2.2.3 Configure keeplived
cd /etc/keepalived/
cp keepalived.conf keepalived.conf.bak
vim keepalived.conf
#定义全局参数
global_defs {
   notification_email {
     [email protected]
     [email protected]
     [email protected]
   }
   notification_email_from [email protected]
#10行修改,邮件服务指向本地
   smtp_server 127.0.0.1
   smtp_connect_timeout 30
#12行--修改,指定服务器(路由器)的名称,主备服务器名称须不同,主为LVS_01
   router_id LVS_01
   vrrp_skip_check_adv_addr
#14行--注释掉,取消严格遵守VRRP协议功能,否则VIP无法被连接
  #vrrp_strict
   vrrp_garp_interval 0
   vrrp_gna_interval 0
}
#定义VRRP热备实例参数
vrrp_instance VI_1 {
#20行--修改,指定热备状态,主为MASTER,备为BACKUP
    state MASTER
#21行--修改,指定承载vip地址的物理接口
    interface ens33
#22行--修改,指定虚拟路由器的ID号,每个热备组保持一致
#nopreempt		#如果设置非抢占模式,两个节点state必须为bakcup,并加上配置 nopreempt
    virtual_router_id 51
#23行--修改,指定优先级,数值越大优先级越高,这里设置主为100
    priority 100
#通告间隔秒数(心跳频率)
    advert_int 1
#定义认证信息,每个热备组保持一致
    authentication {
#认证类型
  auth_type PASS
#27行--修改,指定验证密码,主备服务器保持一致
        auth_pass 000000
    }
    virtual_ipaddress {
##指定群集vip地址
        192.168.198.180
    }
}
#修改,指定虚拟服务器地址(VIP)、端口,定义虚拟服务器和Web服务器池参数
virtual_server 192.168.198.180 80 {
#健康检查的间隔时间(秒)
    delay_loop 6
#指定调度算法,轮询(rr)
    lb_algo rr
#修改,指定群集工作模式,直接路由(DR)
    lb_kind DR
##连接保持时间(秒)
    persistence_timeout 50
#应用服务采用的是 TCP协议
    protocol TCP
#修改,指定第一个Web节点的地址、端口
    real_server 192.168.198.13 80 {
#节点的权重
             weight 1
#删除,添加以下健康检查方式
     TCP_CHECK {
#添加检查的目标端口
                        connect_port 80
#添加连接超时(秒)
                        connect_timeout 3
#添加重试次数
                        nb_get_retry 3
#添加重试间隔
                        delay_before_retry 3
                }
        }
#添加第二个 Web节点的地址、端口
real_server 192.168.198.14 80 {
        weight 1
      TCP_CHECK {
                        connect_port 80
                        connect_timeout 3
                        nb_get_retry 3
                        delay_before_retry 3
                }
        }
##删除后面多余的配置##
}
systemctl start keepalived
ip addr
2.2.4 Start ipvsadm service
ipvsadm-save > /etc/sysconfig/ipvsadm
systemctl start ipvsadm
#清空规则
ipvsadm -C
ipvsadm -A -t 192.168.198.180:80 -s rr
ipvsadm -a -t 192.168.198.180:80 -r 192.168.198.13:80 -g
ipvsadm -a -t 192.168.198.180:80 -r 192.168.198.14:80 -g
ipvsadm -ln
#如没有VIP 的分发策略,则重启 keepalived 服务,systemctl restart keepalived
2.2.5 Adjust the proc response parameters, turn off the redirection parameter response of the Linux kernel
vim /etc/sysctl.conf
net.ipv4.conf.all.send_redirects = 0
net.ipv4.conf.default.send_redirects = 0
net.ipv4.conf.ens33.send_redirects = 0
sysctl -p

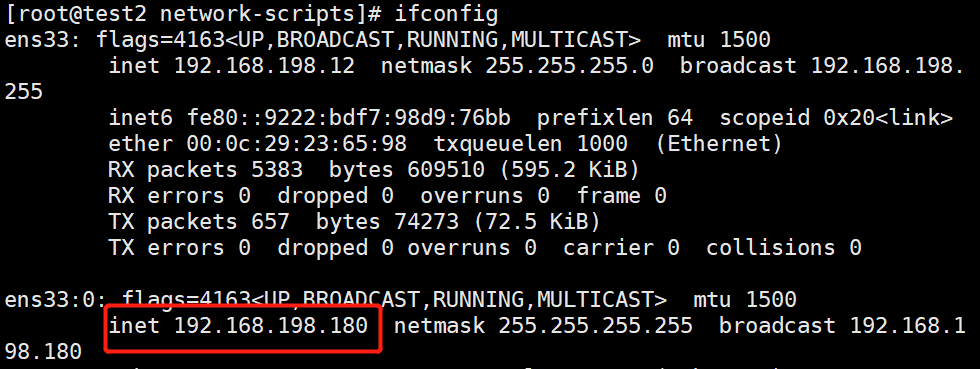
2.3 Configure the standby DR server (192.168.198.12)
systemctl stop firewalld.service
setenforce 0
modprobe ip_vs
cat /proc/net/ip_vs
yum -y install ipvsadm
2.3.1 Configure virtual IP address (VIP: 192.168.198.180)
cd /etc/sysconfig/network-scripts/
cp ifcfg-ens33 ifcfg-ens33:0
#若隧道模式,复制为ifcfg-tunl0
vim ifcfg-ens33:0
DEVICE=ens33:0
ONBOOT=yes
IPADDR=192.168.198.180
NETMASK=255.255.255.255
重启网卡 systemctl restart network
ifup  ens33:0
ifconfig
2.3.2 Install keepalived
#安装keepalived
yum -y install ipvsadm keepalived
#加载 Linux 内核的 IPVS 模块
modprobe ip_vs
#查看当前 IPVS 的状态和信息
cat /proc/net/ip_vs
2.3.3 Configure keeplived
cd /etc/keepalived/
cp keepalived.conf keepalived.conf.bak
vim keepalived.conf
global_defs {
   notification_email {
     [email protected]
     [email protected]
     [email protected]
   }
   notification_email_from [email protected]
   smtp_server 127.0.0.1
   smtp_connect_timeout 30
   router_id LVS_02
   vrrp_skip_check_adv_addr
  #vrrp_strict
   vrrp_garp_interval 0
   vrrp_gna_interval 0
}

vrrp_instance VI_1 {
    state BACKUP
    interface ens33
    virtual_router_id 51
    priority 99
    advert_int 1
    authentication {
   auth_type PASS
        auth_pass 000000
    }
    virtual_ipaddress {
        192.168.198.180
    }
}

virtual_server 192.168.198.180 80 {
    delay_loop 6
    lb_algo rr
    lb_kind DR
    persistence_timeout 50
    protocol TCP

    real_server 192.168.198.13 80 {
             weight 1
     TCP_CHECK {
                        connect_port 80
                        connect_timeout 3
                        nb_get_retry 3
                        delay_before_retry 3
                }
        }
  real_server 192.168.198.14 80 {
        weight 1
      TCP_CHECK {
                        connect_port 80
                        connect_timeout 3
                        nb_get_retry 3
                        delay_before_retry 3
                }
        }
}
systemctl start keepalived
ip addr
2.3.4 Start ipvsadm service
ipvsadm-save > /etc/sysconfig/ipvsadm
systemctl start ipvsadm
ipvsadm -C
ipvsadm -A -t 192.168.198.180:80 -s rr
ipvsadm -a -t 192.168.198.180:80 -r 192.168.198.13:80 -g
ipvsadm -a -t 192.168.198.180:80 -r 192.168.198.14:80 -g
2.3.5 Adjust the proc response parameters, turn off the redirection parameter response of the Linux kernel
vim /etc/sysctl.conf
net.ipv4.conf.all.send_redirects = 0
net.ipv4.conf.default.send_redirects = 0
net.ipv4.conf.ens33.send_redirects = 0
sysctl -p
3. Configure the node server
Web server 1: ens33 192.168.13
lo:0(VIP)192.168.198.180
Web server 2: ens33 192.168.198.14
lo:0(VIP)192.168.198.180
systemctl stop firewalld
setenforce 0

yum -y install httpd
systemctl start httpd

--192.168.198.13---
echo 'this is blue web!' > /var/www/html/index.html

--192.168.198.14---
echo 'this is summer web!' > /var/www/html/index.html

vim /etc/sysconfig/network-scripts/ifcfg-lo:0
DEVICE=lo:0
ONBOOT=yes
IPADDR=192.168.198.180
NETMASK=255.255.255.255

service network restart 或 systemctl restart network
ifup lo:0
ifconfig lo:0
route add -host 192.168.198.180 dev lo:0

vim /etc/sysctl.conf

net.ipv4.conf.lo.arp_ignore = 1
net.ipv4.conf.lo.arp_announce = 2
net.ipv4.conf.all.arp_ignore = 1
net.ipv4.conf.all.arp_announce = 2

sysctl -p
4. Test verification
Access http://192.168.198.180/ on the client side
![[External link image transfer failed, the source site may have an anti-leeching mechanism, it is recommended to save the image and upload it directly (img-tG4446eB-1688650765125) (C:\Users\zhao\AppData\Roaming\Typora\typora-user-images\image-20230706194710785.png)]](https://img-blog.csdnimg.cn/559305c6fc3847c7ab57809dfd27cca7.png)
![[External link image transfer failed, the source site may have an anti-leeching mechanism, it is recommended to save the image and upload it directly (img-4xCkVLSd-1688650765126) (C:\Users\zhao\AppData\Roaming\Typora\typora-user-images\image-20230706194721466.png)]](https://img-blog.csdnimg.cn/90dcbe62603e4bcdb7791585b61d1002.png)
Then test after the main server closes the keepalived service, systemctl stop keepalived
![[External link image transfer failed, the source site may have an anti-leeching mechanism, it is recommended to save the image and upload it directly (img-BbRHxuNH-1688650765126) (C:\Users\zhao\AppData\Roaming\Typora\typora-user-images\image-20230706194749281.png)]](https://img-blog.csdnimg.cn/a5e3bf3fdd6943578d43aa25d9933414.png)
![[External link image transfer failed, the source site may have an anti-theft link mechanism, it is recommended to save the image and upload it directly (img-vi4t0TIv-1688650765127) (C:\Users\zhao\AppData\Roaming\Typora\typora-user-images\image-20230706194815889.png)]](https://img-blog.csdnimg.cn/e6080cbc496f4dc6bbf52da14d604a6d.png)
![[External link image transfer failed, the source site may have an anti-leeching mechanism, it is recommended to save the image and upload it directly (img-hlNGmY7F-1688650765127) (C:\Users\zhao\AppData\Roaming\Typora\typora-user-images\image-20230706194855162.png)]](https://img-blog.csdnimg.cn/039718701e084c5c9d91f5a882342e78.png)
![[External link image transfer failed, the source site may have an anti-leeching mechanism, it is recommended to save the image and upload it directly (img-uPPdhwQd-1688650765128) (C:\Users\zhao\AppData\Roaming\Typora\typora-user-images\image-20230706194910123.png)]](https://img-blog.csdnimg.cn/e5d6b74964f9488bb85dc8c02a553629.png)
total
The role of keepalived is to solve the single point of failure. Configuring keepalived on the scheduler can be equivalent to the primary backup of ARRP. If the primary node fails, the data flow will be transferred to the secondary host. Keepalived can be used in components: mysql, nginx, Tomcat), high availability, and failover.
There are three main modules:
(1) core module: the core of keepalived, responsible for starting the main process, maintaining global configuration files, loading and parsing
(2) VRRP module: to implement the VRRP protocol
(3) check module: responsible for common inspection methods of health checks, such as: port URL