Background of this migration:
The computer room needs to be relocated, and a new oracle database has been built. It is planned to migrate without downtime, and migrate the data from the old database at the source to the new database at the target.
I originally wanted to use RMAN to migrate, but because the old database is an AIX system and the new database is a Linux system, there will be problems with RMAN migration, so I consider using data pump + ogg to achieve non-stop migration.
Here it is planned to export by user, configure a single ogg process for large users, and make a batch of ogg processes for multiple small users. Here is an example of synchronizing one of the user AMIs.
/*
Sometimes it may be necessary to configure and synchronize some tables of a library to other libraries, and ogg is often used.
*/
A database configuration
1.1 Open archive (source side)
Archiving at the source must be enabled. If the target is not enabled, it will not affect ogg synchronization. However, if the data file is damaged and the database cannot be restored to a certain point in time, it is recommended to enable the archive log.
#Check if the archive log is enabled
archive log list;
If Automatic archival is Enabled, it means it is enabled. If it is Disabled, it needs to be enabled:
shutdown immediate;
startup mount;
alter database archivelog;
archive log list;
alter database open;
1.2 Turn on additional logging at the database level (source side)
Check the opening status of the database additional log through the following sql statement:
SQL> select SUPPLEMENTAL_LOG_DATA_MIN,supplemental_log_data_pk,supplemental_log_data_ui,
force_logging from v$database;
The return value yes means open, both pk and ui need to be opened. Note that force logging does not need to be turned on, it does not matter if it is already turned on.
If it is not enabled, please execute the following command to enable it
alter database add supplemental log data;
alter database add supplemental log data (primary key, unique,foreign key) columns;
alter system switch logfile;
# check again
select SUPPLEMENTAL_LOG_DATA_MIN,supplemental_log_data_pk,supplemental_log_data_ui,
force_logging from v$database;
Notice:
If the database cannot be opened to the force logging mode, the nologging table cannot be synchronized. If nologging is used when the table is created, alter table tablename logging is required;
1.3 Create Goldengate user and table space (source and target)
#给ogg创建单独的表空间

create tablespace OGGTBS datafile '/u01/app/oracle/oradata/orcl/oggtb1.dbf'  size 3g;

#给ogg创建单独的管理用户

CREATE USER GOLDENGATE IDENTIFIED BY "123456" DEFAULT TABLESPACE OGGTBS TEMPORARY TABLESPACE TEMP;

GRANT CONNECT,resource TO goldengate;

GRANT ALTER ANY  TABLE TO goldengate;

GRANT ALTER SESSION TO goldengate;

GRANT CREATE SESSION TO goldengate;

GRANT FLASHBACK ANY TABLE TO goldengate;

GRANT SELECT ANY DICTIONARY TO goldengate;

GRANT SELECT ANY TABLE TO goldengate;

GRANT drop ANY TABLE TO goldengate;

Grant insert any table to goldengate;

Grant update any table to goldengate;

Grant delete any table to goldengate;

Grant create any table to goldengate;

GRANT EXECUTE ON utl_file TO goldengate;

GRANT EXECUTE ON dbms_flashback TO goldengate;

GRANT SELECT ANY TRANSACTION TO goldengate;
1.4 Enable ogg replication (source and target)
alter system set enable_goldengate_replication=true;
1.5 Determine the character set of the database (source)
$ sqlplus / as sysdba
SQL> show parameter nls_language
SQL> show parameter nls_territory
SQL> select name,value$ from sys.props$ where name='NLS_CHARACTERSET';
The character set of the database is NLS_LANGUAGE _ NLS_TERRITORY . NLS_CHARACTERSET
For example:
NLS_LANGUAGE 为AMERICAN
NLS_TERRITORY is AMERICA
NLS_CHARACTERSET is ZHS16GBK
Then the character set of the database is AMERICAN_AMERICA.ZHS16GBK
2. Install Goldengate software (source and target)
Install the ogg software on both the source and target.
Software download address: https://edelivery.oracle.com/osdc/faces/SoftwareDelivery

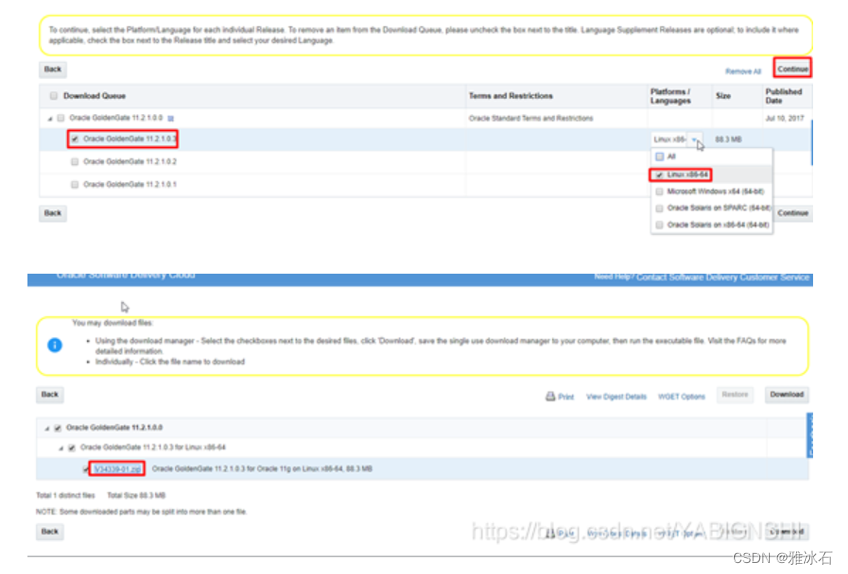 Click on the file name to download.
2.1 Create a directory and configure environment variables
mkdir -p /goldengate
chown -R oracle:oinstall /goldengate
su - oracle
vi .bash_profile
Added:
export OGG_DIR=/goldengate
export PATH=$OGG_DIR:$ORACLE_HOME/bin:$ODI_HOME/oracledi/client:$ODI_JAVA_HOME/bin:$PATH
export LD_LIBRARY_PATH=$OGG_DIR:$ORACLE_HOME/lib:/usr/lib
# make changes take effect
source .bash_profile
2.2 Install the Goldengate software
Upload the installation media package to this directory: /goldengate
cd /goldengate
tar xvf fbo_ggs_Linux_x64_ora11g_64bit.tar
./ggsci
#Create OGG working directory
GGSCI (orasvr) 3> create subdirs
cd /goldengate/dirdat
mkdir database
2.3 Add checkpoint table
Add GLOBALS parameter file, add checklist
GGSCI (fdpdb1) 1>edit params ./GLOBALS
checkpointtable goldengate.checkpoint
GGSCI (fdpdb1) 1>dblogin userid goldengate,password 123456
GGSCI (fdpdb1) 1>add checkpointtable goldengate.checkpoint
Three Goldengate configuration
3.1 Configure the MGR process (source and target)
3.1.1 Configuration parameter file
GGSCI (fdpdb1) 2> edit params mgr
Added:
port 7839
DYNAMICPORTLIST 7850-7959
AUTOSTART ER *
AUTORESTART EXTRACT *,RETRIES 5,WAITMINUTES 7
PURGEOLDEXTRACTS ./dirdat/database/*,usecheckpoints,minkeephours 2
USERID goldengate, PASSWORD 123456
--PURGEDDLHISTORY MINKEEPDAYS 3, MAXKEEPDAYS 4
--PURGEMARKERHISTORY MINKEEPDAYS 7, MAXKEEPDAYS 10
LAGREPORTHOURS 1
LAGINFOMINUTES 30
LAGCRITICALMINUTES 45
3.1.2 start mgr
start mgr
info all #Make sure the process is running
3.2 Configure ogg at the source
3.2.1 Add additional log information for the replicated table
For which tables to copy, add additional log information for which tables
$ cd /goldengate
$ ./ggsci
GGSCI> dblogin userid goldengate ,password 123456
If it is exported by user, then add trandata user.*
If it is exported by table, then add trandata table name
-- Check whether additional log configuration has been added for each table
ggsci> info trandata table name
3.2.2 Configuration extraction process
Here the extraction process starts with ext, followed by AM is a custom letter abbreviation.
edit param EXT_AM
Added:
EXTRACT EXT_AM
SETENV (NLS_LANG = "AMERICAN_AMERICA.ZHS16GBK")
SETENV (ORACLE_SID = "orcl")
USERID goldengate, PASSWORD "123456"
GETTRUNCATES
REPORTCOUNT EVERY 1 MINUTES, RATE
DISCARDFILE ./dirrpt/EXT_AM.dsc,APPEND,MEGABYTES 1024
THREADOPTIONS MAXCOMMITPROPAGATIONDELAY 60000 IOLATENCY 60000
TRANLOGOPTIONS _DISABLESTREAMLINEDDBLOGREADER
DBOPTIONS ALLOWUNUSEDCOLUMN
WARNLONGTRANS 2h,CHECKINTERVAL 3m
EXTTRAIL ./dirdat/database/am
FETCHOPTIONS NOUSESNAPSHOT
TRANLOGOPTIONS DBLOGREADER
GETUPDATEBEFORES
NOCOMPRESSDELETES
CACHEMGR CACHESIZE 1G
TABLE AMI.*;
3.2.3 Create an extraction process
add extract EXT_AM, tranlog, begin now, threads 1
add exttrail ./dirdat/database/am, extract EXT_AM, megabytes 1024
3.2.4 Configure delivery process
Here the extraction process starts with dpe, followed by am is a custom letter abbreviation.
GGSCI> edit params dpe_am
EXTRACT dpe_am
PASSTHRU
RMTHOST 172.22.204.250, MGRPORT 7839, compress
RMTTRAIL ./dirdat/database/am
TABLE AMI.*;
3.2.5 Create delivery process
add extract dpe_am, exttrailsource ./dirdat/database/am
ADD RMTTRAIL ./dirdat/database/am, EXTRACT dpe_am, MEGABYTES 1024
3.2.6 Start the extraction process and transfer process
GGSCI> start extract EXT_AM
GGSCI> start extract dpe_am
info all #Ensure that the processes are all in the RUNNING startup state
Create some test data to see if the posting process captures the changes:
stats dpe_am
Example:

#Check on the target side if it has been delivered, and see if you can see the file
cd /goldengate/dirdat/database
ls -ltr
If you can see the custom queue file above, it is normal:

3.3 Initialize data
DML operations include INSERT, UPDATE, DELETE, and SELECT operations. In these operations, UPDATE and DELETE operations only record the changed data column and row ID (ROWID). After GoldenGate extracts the data, it converts it into its own format and sends it to the target end. Before the synchronization starts, the target does not initialize the data (the target is empty data), then the UPDATE and DELETE DML operations generated by the transaction are sent to the target, and the GoldenGate Replicat process on the target will report an error because the data cannot be found, which will cause the Replicat process to crash and stop (ABENDED). Therefore, we need to initialize the data before synchronization, and then synchronize after initialization, which greatly reduces the error rate. The way to synchronize data can be synchronized through DBLINK, EXP/IMP, SQLLDR or table space migration.
3.3.1 expdp backup source data destination configuration
3.3.1.1 Query the SCN number at the source
SELECT a."CURRENT_SCN" FROM v$database a ; #Record the detected scn , here is 1343313
3.3.1.2 Add SCN number when exporting
vi expdp_ami_alldata_20230621.par
Added:
userid='/ as sysdba'
directory=DMP
dumpfile=expdp_ami_alldata_20230621_%U.dmp
logfile=expdp_ami_alldata_20230621.log
schemas=ami
compression=ALL
CLUSTER=N
parallel=8
exclude=statistics
FLASHBACK_SCN= 1343313 #The scn found above means that the export starts from this position
# start export
nohup expdp parfile=expdp_ami_alldata_20230621.par >nohup_expdp_ami_alldata_20230621.log &
tail -100f nohup_expdp_ami_alldata_20230621.log
Check the logs for errors.
3.3.2 Copy the backup file to the target
3.3.2 Import data on the target side
vi impdp_ami_alldata_20230621.par
Added:
userid='/ as sysdba'
directory=dmp
dumpfile=expdp_ami_alldata_20230621_%u.dmp
logfile=impdp_ami_alldata_20230621.log
table_exists_action=replace
cluster=n
parallel=8
#import
nohup impdp parfile=impdp_ami_alldata_20230621.par >nohup_impdp_ami_alldata_20230621.log &
tail -100f nohup_impdp_ami_alldata_20230621.log
Check the logs for errors.
3.4 Configure the replication process on the target side
3.4.1 Configure the replication process
edit param rep_am
Add the following content:
REPLICATED rep_am
SETENV (NLS_LANG = "AMERICAN_AMERICA.ZHS16GBK")
SETENV (ORACLE_SID = "orcl")
USERID goldengate, PASSWORD 123456
SQLEXEC "ALTER SESSION SET CONSTRAINTS=DEFERRED"
REPORT AT 01:59
REPORTCOUNT EVERY 30 MINUTES, RATE
REPERROR DEFAULT, ABEND
HANDLECOLLISIONS
--DBOPTIONS_NOAUTOMATICSEQUENCEFLUSH
batchsql BATCHESPERQUEUE 100, OPSPERBATCH 8000
--GROUPTRANSOPS 2000
--MAXTRANSOPS 500
assumetargetdefs
DISCARDFILE ./dirrpt/rep_am.dsc, APPEND, MEGABYTES 1024
DISCARDROLLOVER AT 02:30
GETTRUNCATES
ALLOWNOOPUPDATES
---SOURCEDEFS ./dirdef/cj.def
assumetargetdefs
map ami.* ,target ami.*;
/*
If you want to synchronize multiple tables, write like this:
map user. table 1, target user. table 1;
map user. table 2, target user. table 2;
*/
3.4.2 Add replication process
ADD REPLICAT rep_am, EXTTRAIL ./dirdat/database/am , nodbcheckpoint
3.4.3 Start the target replication process
start replicat rep_am, the scn checked above aftercsn
Example:
start replicat rep_am,aftercsn 1343313
info all #Check to make sure the command is running
3.5 Test data synchronization
slightly
Problems encountered during 3.6
snapshot too old
Increase undo_retention:
If it still doesn't work, find out the large table and configure the ogg synchronization of the large table separately.